We have a truck again – and hot water!

Woohoo, what a day!!!

I hadn’t heard from the garage about the status of our truck, but today was my day to do our first stock up shopping trip (which will get its own post later). Once I was in the city, I texted our mechanic and let him know I had a reliable signal, so he could update me whenever he had the chance.

Long story short, it was fixed and getting its oil change, and would be ready soon.

Yay!

Now, to get the truck, I was thinking I would have to do it another day, as I would first be driving to the city to get my SIL, then we’d drive back to the garage, pay and get the keys, then my SIL would take their car to their home and I’d take the truck to ours.

Well, after much messaging between my brother and his wife, and the garage, it was worked out to get it done today! My brother was bringing one last load here to the farm, with my SIL coming along to help me get the truck, but they weren’t going to make it until well after the garage closed.

With a discount for paying in cash, the total was $320. On the way home from the city I still had to stop at the feed store for a 40 pound bag of cat food to tide us over until my husband’s main disability pay comes in. A branch of my bank is in the same town, so I got the cash, then drove to the garage to pay for the work and get the keys before they closed, leaving the truck until I could come back with me SIL.

I was able to briefly talk to the mechanic about the truck. It turned out to be probable the best of all possible scenarios.

The oil pump’s sensor needing replacing.

He said this is so common, he changes out about one of these every week – which is a lot for a town this size.

There is no damage to the engine at all, which is a HUGE relief.

From there, I finally went home to unload the shopping of the day, then had a quick supper. I took advantage of the daylight to work on a garden bed until my brother and his wife arrived. She and I then left pretty much immediately to get the truck.

Their car is a sweet ride, but it sure felt good to be driving our truck again!

After a quick stop to add a bit of gas, I headed home – absolutely paranoid about all the gauges and lights and warnings a long the way!

It was fine. Apparently, this is why the check engine light had been on, too.

Once we got back, we helped my brother unload. When things were mostly done, my SIL headed home ahead of him – it was already full dark by then. While this is the last load for the farm, they still have a few more things to take care of on their property before the new owners officially take possession of it.

I continued helping my brother until it was all done. The only down side was when I popped the tailgate back onto the trailer. It’s made to slide down channels on the sides, but if it doesn’t drop straight, one end tends to catch. That happened and when I got it loose, it dropped straight down.

Right onto the tips of two of my fingers!

One of them is now quite swollen, making typing rather difficult! 😄

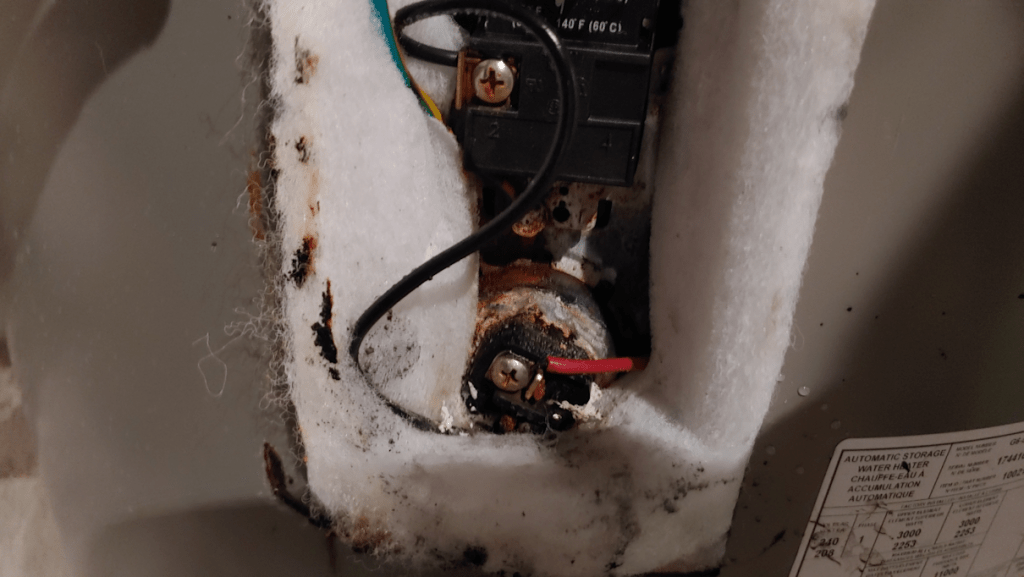
Once everything was closed up and put away, my wonderful, awesome, amazing brother took the time to work on our hot water tank!

The first thing he did was use a different handle for the socket, and was able to get the old anode rod out, while I held the tank in place as best I could. Once those tanks are empty, they are really quite light!

The anode rod was longer than there’s space above the tank, so he had to bend it to get it out. It was quite covered in crud, of course. I honestly expected it to look worse.

Once that was done, it was a relatively simple matter to install the powered rod (not an affiliate link). This is how it looks now.

The rod itself is a lot shorter than what we pulled out, so that made it easier to install. It sticks out a lot further than I expected. There is a ground wire now attached to one of the screws around the top of the tank.

Then it was time to remove the elements.

When he tested it with his meter before, the top one was out. He didn’t have his meter with him this time, but I was sure the bottom one was also burnt out.

After removing the wires, it was quite easy to get the top element out. After making sure the threads were clean and clear, the new element was installed and wired up again.

Then it was time to take out the bottom element.

Wow. That was… something.

It wasn’t difficult to unscrew it, but once my brother starting trying to pull it out, it did NOT want to come out. It was completely covered in crud! He kept having to twist it back and forth to break off the crud and try to pull it out, little by little. It turned out to be longer than expected – and then there was a bend at the end!

Once he got it out completely, we could see that it was supposed to be bent back on itself, but it was so full of crud that, as my brother pulled it out, he actually straightened the element out in the process.

After he pulled it out, he bent it back like it was originally supposed to be – sort of.

Here is the old and new elements.

Yes, they are different elements; this part number for the new one is the number I was given by the company for the bottom element.

Here are all three parts. Instagram cuts off part of the photo, so you can’t see the tip of the anode rod, which has even more crud on it than the rest.

The straight element it from the top. That’s the one that was dead when my brother tested them. How the bottom one was still live at the time, I have no idea! That one was so encased in crud!

The new powered anode rod is supposed to keep that from happening again. Or, at least, not so quickly. This tank was installed only a year ago! The shorted life span of any of the tanks we had – though the previous ones started leaking from their bases somewhere inside, and this one hasn’t.

Once everything was installed, it was time to start filling the tank.

When there was enough water in it, we allowed it to drain out the bottom, to take some of the crud out with it. We didn’t see a lot, though.

As the tank filled, we ran the hot water at the old laundry sink in the basement, while my daughter ran all the hot water taps upstairs, to get the air out of the pipes and clear out more crud. Once the tank was full, we did it again, before finally asking my daughter to turn on the breaker. We also plugged in the powered anode rod.

My brother waited a while longer, checking the elements to make sure nothing was leaking, etc. He couldn’t stay until the entire tank heated up, though, and left soon after.

We do now have hot water, though! In fact, it’s now so hot, we might want to turn the thermostat down on the tank!

No more heating pots and kettles of water, for dishes and sponge bathing!

We’re all so paranoid of things breaking, though, no one has dared to take a shower, yet. 😄

Meanwhile, with this new powered anode rod, we should also no longer have that sulfur smell from the hot water. We’d been treating the tank with hydrogen peroxide to get rid of it, but it never lasted long. Eventually, we just stopped bothering, and put up with the smell.

I am so glad my brother was able to take the time to help us with this. Especially when they have so much going on with their move right now. In retrospect, while we might have been able to do it ourselves to a certain point, when it came to getting that bottom element out, we could not have done it. I’ve lost so much grip strength due to arthritis, I couldn’t have done it. My younger daughter injured her wrist while installing the tub surround, and both my daughters have all the joint issues that comes with PCOS. My husband, of course, is the most broken of all of us, and shouldn’t even be doing the stairs.

My brother is the best!

The Re-Farmer

Well, I didn’t get the progress I intended…

But I did get progress!

My original plan for today was to get a garden bed ready to plant garlic in.

I ended up going into town, instead. My daughter’s transfer from PayPal went through, and she sent me the funds for two new heat elements for the hot water tank. Then, since I was in town anyhow, I make a quick stop at the grocery store to refill our big water jugs.

We still don’t have hot water, though.

Using the large socket set my brother loaned us, we first tried a practice run on removing the anode rod from one of the old tanks.

It would not come loose, no matter what. The socket wrench in this set had an extra long handle, so torque wasn’t the problem. It could also slide so that you can grab it from both sides of the socket.

Nothing.

This was an old tank that died a year ago, so perhaps that was part of the problem?

The current hot water tanks’ breaker is off, but I still double checked before setting it to drain completely. After a while, we tried to take out the original anode rod.

Nope. It was not moving. We also had the extra challenge of the tank trying to spin around, but not being able to hold it in place as easily as with the tank was wasn’t right up against a wall.

So that got set aside. I’m going to have to ask my brother for help with that.

We popped open the panels to access the elements, but ended up not doing anything. I just don’t want to take chances with anything electrical and, since we need my brother’s help anyhow, it would just be easier on my mind to leave it for him.

What I could do, though, was start setting up for the powered anode rod. It came with a 12 foot power cord. That was long enough to reach the outlet the sump pump is plugged into. I set up hooks to hold up the cord along the floor joists for the bathroom floor, while also keeping it away from the various water and drainage pipes, and still have a bit of slack at either end.

At times like this, it’s handy that the old basement’s ceiling is more than a foot lower than the new basement. Short little me can reach without any problem!

Meanwhile, we were kept up to date on how things were going for my brother and SIL. By the time they loaded the two trailers, their truck and their friend’s SUV, it was past 4pm by the time they could leave!

I made sure the gate was open for them. Then, when it was getting close to the time I expected them to arrive, I headed outside. I wasn’t going to be able to start preparing a garden bed to plant garlic in, but I could at least work on the small bed the Crespo squash was planted in. The A frame trellis, with its cross piece broken by the weight of a squash, and its netting was still there. I got the A frame parts and pieces unsecured and set with the stakes from the beds in the main garden area. Once all of the stakes, posts, nets, ties, etc. are gathered up, they’ll be sorted and bundled before being put into the old garden shed for the winter. There are a lot of broken bamboo stakes this year, but I might be able to use some of them for other things.

Once the stakes used to make the A frame trellis were set aside, it was time to clear the net of squash vines and pole beans. That took the longest to get done!

Once the net was bundled up and set with the rest of the stuff for winter storage, I pulled the rest of the squash vines out of the bed. The compost ring is, handily, right beside this bed.

I was just pulling the supports for the peppers in the bed beside it, when vehicles and trailers pulled in. By the time I set the supports aside and joined them, they already had one trailer backed up to the barn, both sets of doors open, and were already unloading.

With the four of us working together, unloading went very quickly, all things considered. Still, with two trailers and both vehicles loaded, we lost light quickly.

We got to enjoy another beautiful sunset, though!

Not as brilliantly orange and red as yesterday, but still very dramatic and gorgeous!

With the possession date on their sold property coming up fast, they just put everything into the barn, even though some of it will need to be moved out to their storage trailer and the old bread truck that will become a workshop. My brother is going to have to sort through and organize things later one. That’s going to be a huge job!

Even with all this going on, they had us in mind. Yesterday, we had the extra lumber that they gave us for our small building projects, as well as a heated water bowl from when they had dogs. Today, it was traps! They have two live animal traps. One is smaller; they used it for squirrels getting into their sheds. It’s big enough for a small cat. The other is a larger, two door trap that’s the next size up. After putting those in the garage, I made sure to message the Cat Lady. She was going to lend us a trap so catch the feral females for spaying, but the last person they lent it to hasn’t returned it. Now, we have two! That will come in very handy over the winter. The goal is to trap and spay as many of the feral females as we can before they go into heat in the spring.

If all goes well, the cat isolation shelter will get good use this winter!

Once everything was unloaded, they had to leave right away. Hopefully, tomorrow will be their last loads out here – at least, the last ones that need trailers to haul out!

Which means my goal of getting a garlic bed prepared and planted has been shifted to tomorrow.

It’s supposed to be warmer tomorrow, anyhow!

Another delay, but considering it meant getting that much closer to having hot water again, plus helping my brother and SIL out, it was worth it!

The Re-Farmer

Testing, testing…

Yes! We have major progress!

But first, the cuteness.

I did my evening rounds after giving the outside cats their evening feeding. As I was coming back to the hose, I saw this adorable face watching me.

We can most definitely consider Kohl well socialized now – and boy, does she ever want to get into the house! It’s a good thing we have the old kitchen as a buffer zone. She and several others often manage to dash inside while I’m struggling with the doors and a bowl full of warm kibble for them.

The Cat Lady was asking me if we could be able to catch any females for spaying this fall. Among the kittens, we should be able to easily catch at least two – Kohl and Magda – and possibly a third. There’s also one adult female we should be able to catch, but the clinic that we’ve been going to has special pricing for spaying cats under 6 months old now. Kohl may be too old for that now, though. She is from the very first litter of the year.

Meanwhile…

I’m happy to say, the parts and pieces of plumbing for the tup that needed to be replaced, have been replaced. We were able to attach the fixtures, turn on the water and test it out.

While my daughter was working on the other side of the wall, I stayed on the tub side to turn things on and off whenever she told me to. I took advantage of the wait in between to scrub and clean as much as I could, then scrape off any remaining old caulk that I could find. In the process I discovered that I could scrape off much of the rust and scale that had accumulated under the hot water tap when it leaked during use. CLR wasn’t getting it all for a reason!

After the first test, we found that the cold water was leaking at the tub, while the hot water was leaking at a Pex to copper join in the basement. My daughter spent the next while tightening and taping everything, while getting me to turn the taps and shower on, as needed.

It looks like we finally have everything tight and leak free!

My daughter is just amazing. She was working in some really tight spaces. Especially in the basement, which had the added issue of cobwebs to deal with, even though she did sweep away most of them, first.

My daughter does not do well with spiders, so her doing that is really, really something.

Once the testing was done, the water was shut off again, and the fixtures removed again.

The next step will be to add mold and mildew resistant sealant around the tub edge, in the corners, and anywhere else that looks like it needs it. I will be bringing some wood lath over from the garage to place in strategic areas where the paneling was cut out, so the tub surround will have something to adhere to in that area. Only if it’s thin enough, though. It might be too thick. We shall see.

If we do add the wood, the cut out area will get another coat of the mold and mildew resistant primer.

Then, once everything has had a chance to dry and cure, we will finally be able to install the tub surround.

Last of all, we put back the arm bars.

In between all that, we need to pick up a couple of heat elements for the hot water tank. Hopefully, that will be enough to get us hot water again. I would hate to have to buy another tank, considering how much the price has increased since we got the last warranty replacement in 2020.

I’m not sure when we’d be able to do this, though. I got a call from my mother tomorrow, telling me “her fridge is empty “my fridge is empty!”

She isn’t actually out of food; that’s just her way of telling me she needs a shopping trip.

Still, she was wanting me to come over today! I told her I was going to be helping with the plumbing today, so it’s arranged for tomorrow. She has her Meals on Wheels coming in tomorrow, so I don’t need to leave as early to pick up a lunch for us. She still needs to get to the bank; she wasn’t up to it last time. I was hoping my sister would have been able to come over with her smaller car to help her, but she and her husband are out of province right now. So my mother will have to clamber into our truck again!

I’m not sure how long I will be gone tomorrow, but I still hope to get at least a little bit more garden clean up done. Tomorrow is supposed to be a bit cooler than today was, but it’s then supposed to warm up for a few days – there’s even a high of 21C/70F in the forecast! – so I hope to get more done on those days and, if all goes to plan, start direct sowing seed for next year’s garden.

We shall see!

Meanwhile, I’m going to start heating up water so I can actually bathe. The tub now is clean enough to use instead of the sink!

Man, we have had to heat water to bathe way to many times since moving out there! 😄😄

The Re-Farmer

Well, that’s not gonna happen, and we are SO lucky!

I’m just pausing to write a quick post, before I go to help my daughter with the bathtub plumbing.

We got the new hot water tank element tool out just a little while ago, and headed into the basement to see what we could find in the two older tanks. The hope was to be able to use one of the elements from the old tanks to replace the burnt out one in the current tank.

Yeeeeaaaahhhh….

That’s not gonna happen.

This is what we pulled out of the first tank, where I’d already opened up the panel for the top element. The bottom one was encrusted in scale on the outside, so that one was clearly not going to be good.

Click through to see the other side of the element.

Wow.

Yeah, that’s toast.

So we opened up the panel for the other old tank.

The first warning that things were not good was that I had to tear the panel free of the insulation.

The outside of the insulation had rust on it, and we could see damage to the wires.

After tearing away most of the insulation, this is what we found.

Yeah. That plastic cover is melted. That thermostat is burned.

Click through to the next image, and you can see more of the damage, and how completely encrusted the outside of the element is!

It is an absolute miracle that there wasn’t a fire started.

As for the current tank, we no longer even have warm water, so we’ve shut the breaker off. It looks like both elements are burned out now. Seeing what we pulled out of the old tank, I’m not at all surprised!

When the first tank died, it was after less than 2 years of use, which is why we were able to replace it on warranty. About a year later, when we saw the replacement tank starting to leak on the bottom, we were able to replace that on warranty, too, even though we should not have been able to. We kept the new tank in the box until the second tank finally died. It lasted far longer than we expected.

I just looked up my old posts. This current tank was installed just over a year ago – Oct. 10, 2023, to be exact. We were able to pick it up as a warranty replacement in April of 2021. Before that, we got a new tank in January of 2020, though it took a bit longer before we could get it installed. The tank that was originally here was replaced in December of 2017, just in time for Christmas. All four of us had been here for little more than a month at the time!

Not counting the original tank – I found the original warranty papers for that, dated 1963, if I remember correctly – we have gone through 3 modern tanks in less than 7 years of living here.

The most recent one lasting just over a year after installation.

That. Is. Insane.

It all really comes down to our water. I remember talking to the plumber during one of the installations, and he told me that this is pretty typical for hot water tanks in our area.

When all this started, these tanks cost a little over $400. Looking at them now, I see they cost about $700 for the exact same tank.

The elements cost about $40 each.

With the powered anode rod that should arrive next week, that will hopefully keep the tank going longer, though we still need to get the right tool to remove the old anode rod. I thought the tool we got for the element might also work for the rod, but it’s way too big. We need to buy the right size socket to be able to remove the anode rod.

For right now, though, I need to go help my daughter. She was able to get the piece out that needed to be cut out. With the adapters, we might not even need to replace the copper pipes to the basement, though the hot water one has the 90° elbows in it, so that one should probably be replaced with Pex, at the very least.

But I digress!

Time to go assist my daughter.

The Re-Farmer

Well, that isn’t going to work!

First, Happy Thanksgiving to my Canadian friends, and Happy Columbus Day to my friends in the US.

Before I get into our newest find in the bathroom plumbing saga, I will share some cuteness.

This is what the view out our bathroom window typically is, not that the platform has been set up for the winter.

The cats are just smashed together up there!

I think that’s Shop Towel with his head handing over the edge of the cat bed, being used as a bed by several kittens. He may be aggressive with the adults at times, but he’s good with the babies!

Nosy, I see, is cuddled up with him. Now that Nosy has been neutered, it does seem like he’s no longer involved in any aggressiveness that we still see at times.

Anyhow.

Today’s main job was to see if we could get a panel cut into the wall in my husband’s room, to access the plumbing for the tub and shower. After gathering what tools we thought we might need, my daughter flashed a light into the holes for the bathtub taps, to try and see where the wall joints were.

Turns out, they were pretty much right at the pipes.

Then she went to the other side of the wall, while I used the drill with an auger bit and made a couple of holes above the taps, trying to be close to the joists, but not too close, through to the other side of the wall. The first pair of holes was made using one of the narrowest auger bits. Once those were through and I got the go ahead from my daughter on the other side, I did them again, using a larger bit.

Then my daughter cut an opening in the paneling.

We hoped to be able to use the jig saw, but that would have hit the pipes. She ended up doing the first cut across the top, using the saw on her multi tool. It was the only saw small enough. After that, aside from having to start the first inch or so with the multi tool, she was able to use the pull saw.

My brother thought there might be aspenite behind the paneling, but there was no. It was just open joists. At one point, as my daughter was saying away, the panel was flexing so much, it made things almost impossible. I ended up reaching under her with a broom handle to hold it against the paneling to hold it, so she could finally finish the cut.

She wasn’t able to cut all of one side, though. She was a couple of inches short when she hit something. She pulled back the cut piece as much as she could to see, and thought there was a nail or something, in the joist. In the end, she cut everywhere else, then just snapped the panel off.

Finally, we could access the plumbing!

In the end, there was nothing we could do.

My daughter tried to take off the piece for the taps, but it just would not happen. It turned out it was soldered. I ended up taking pictures and sending them to my brother.

We took out the faucet set we have and discovered another problem.

It threads completely differently.

Here, you can see both old and new.

On the right, for the hot water, you can see that wood was gouged out of the joist to make room for the plumbing. There is also a strange pair of right angle beds in the hot water pipe below.

We don’t know why the cold water side is black.

In the middle, however, you can see the problem.

The old fixture is threaded internally.

The new fixture is threaded externally.

In the end, we put everything away, then taped the section of panel that was cut off back over the hole for now.

After a while, my brother was able to look at the photos I sent him, and we ended up talking on the phone.

It turns out that, 40 years ago, it was standard practice to solder plumbing together with lead. The only way we’re going to get that out is to cut it.

After talking about it some more, and getting a look at that bend in the hot water pipe, my brother suggested that we replace the copper pipe with Pex, including the pipe to the shower. We can then get Shark Bite parts and adapters to install the new fixture. The set we have includes a shower head, but we won’t be using that, since we currently have the accessible hand held shower (it has an extra long hose, and a shut off valve under the handle of the shower head).

I don’t know that I want to mess with the pipe for the shower, if I can avoid that. I have no idea how it’s attached at the top, and I don’t want to cut another hole in the paneling to see!

So that was it for today.

Tomorrow, I’ll be going to the hardware store. There’s a guy there that has been most helpful. I can show him the photos and talk to him about what we need. My older daughter says she can cover the cost, though at this point, we have no idea what those would be.

We did get a few other things done today, though it was nowhere near as productive as I would have liked. I have so much I need to do outside, and I’m just not getting to it!

My daughter and I got the last of the winter squash moved from the garage to the root cellar; we’re supposed to reach -3C/27F tonight, and I figured it was time. We did leave the big Crespo squash upstairs, though. It has the most damage to the shell, so we will see about using that as soon as we can. I definitely want to save seeds from this one, so we can grow them again next year.

The tomato paste I was making in the slow cooker out of just San Marzano tomatoes was finally done last night and left to cool until today. I like using the slow cooker for this, but it does take longer. I probably should have cooked it down more, but we were going to need the slow cooker. There was enough somewhat saucy paste to fill two 750ml jars. We’ll just keep those in the fridge to use as needed. We like to just add a spoonful of paste into various things, almost as a seasoning.

I did taste test it and, to be honest, I don’t find the flavour any better or worse than any other tomato sauce or paste we’ve made. I’ll have to get my daughters to try it. I’m not a good judge of such things! 😄

Our Thanksgiving turkey got deboned, and there is now a stock being made from the bones in the slow cooker. It’s as plain as plain can be. Just the bones and water. Not even salt, so that we can use it for the cats as well as for ourselves. We can add seasonings for ourselves, later.

The last of the vegetables that were under the turkey went into a pot, along with the leftover squash, some of the leftover turkey and some of the freshly jarred tomato paste to make a large soup. Between the soup and the rest of the turkey, we won’t need to take anything out of the freezer for a while!

We’re still having to heat water to wash ourselves and anything else, including the dishes. I have found that, if we leave the hot water alone long enough, we do actually get some almost hot water. It takes a long time for one element to heat up a 40 gallon tank.

Another job for tomorrow. Take the elements out of the previous tanks to see if any of them can be used to replace the burnt out one in our current tank. I took a quick look at one of the tanks while I was done there earlier today. The bottom panel is already open and I could see scale built up around the element on the outside.

There’s a reason we go through hot water tanks so quickly!

I’ll have to grab some tools and have at the old tanks. Aside from opening the panels and removing the elements to see how they are, I want to take out the anode rods. At the top of the tank is just a flat cap. There’s nothing to grip. I can’t see how it’s supposed to be removed without digging under it and scratching up the surface of the tank. Of course, nothing I find online is the same as what we’ve got. It’s probably a simple thing, but with how absolutely everything seems to be breaking at once right now… well, let’s just say I’m glad we’ve got a couple of old tanks to practice on!

Our new powered rod isn’t supposed to arrive until Oct. 22, so we have time for that. It’s the element that I really hope we can get replaced.

Meanwhile, the girls are going to be taking on scrubbing the area around the tub as much as they can before treating with with an anti-mold and mildew disinfectant again. Then, once that’s dry, all the exposed area will get painted with the mold and mildew resistant primer. Once that’s dry, we can look into getting the new tub surround ready to install. The most important part being, cutting the holes for the plumbing in the right places.

The tub itself is going to need a whole lot of CLR, too.

It’s going to be downright strange when all this is done, having a tub and surround that isn’t water stained with rust.

I just want to be able to have a real shower again, with water that wasn’t heated in a kettle, first!

Ah, well. Little by little, it’ll get done!

Very little, by very little, with this particular job!

The Re-Farmer

What a great day, with some excellent updates

I am really happy with how things have turned out today!

First, we have the cat isolation shelter.

It took all day, but it is now useable! It has been moved close to the house, and the cats love it. Here is a short video I took to post on Instagram.

I was able to make the sliding doors, but one of them turned out to be a real pain. The wood lath covering the insulation on the other side, were not all the same widths, with some sticking out further than others. There was no way the panel could slide over it. So I made a stopper, instead, and it can only slide the other way. We’ll just have to be careful not to slide it out so far that it’ll fall out.

The other side was downright easy, after that!

Once those were in, I got my daughter to hold the front window in place while I drilled some pilot holes and put screws into the corners. Once that was done, she could let it go, and we added more screws to secure it.

Then, finally, we could put the roof pieces on.

Which turned out to not be as long as the boards they were being attached to. We have excess wood sticking out, front and back The back is the “handle” to lift the roof, anyhow, so I’m not too concerned about that, though at some point we’ll want to replace the strip of wood lath across the back with something sturdier. As for the pieces sticking out the front, I ended up using them to help steer as we moved it. We might cut them flush with the roof later, though.

I had to abandon my daughter part way through moving it, as my brother arrived with another load to drop off. After greeting him and he went to unload, I had a chance to take a short video of the isolation shelter. My daughter had left it in an open spot for me to do that. Eventually, I will put together a video of the entire process, which dragged on for so much longer than expected. After that, I moved the shelter closer to the house.

The door/ramp doesn’t have a latch, though – the ones I had were not large enough – so it kept dropping open, even though we’d taped it shut. The down side of using salvaged materials. One of the boards of the ramp cracked after hitting the ground. I had to add a couple more screws to fix it. Which was fine, but it required closing the door to do it.

The kitten that was inside the shelter was not happy about that! 😄

The last thing that really needs to be done is to find a latch for the door/ramp. We also need to get more paint, but that’s mostly cosmetic.

Once we work out exactly where it will stay for the winter, we’ll hang the clamp lamp with the heat bulb under the roof and get that ready for plugging in for the winter, preferably with a timer. I’d also like to attach handles to make it easier to move. The handles I had that I thought we could use are not strong enough.

After moving the isolation shelter closer to the other cat shelters, I grabbed a couple of winter squash as a gift for my brother, and went to join him while he worked. While we were there, we started hearing a noise.

A noise he identified as splashing water on metal.

From the septic expeller.

I couldn’t believe that’s what we were hearing, so we went to take a look. Sure enough, there was water coming out of the pipe!

It was not coming out as well as it should have been; it was almost dribbling down the outer pipe, and the sheet of metal that’s there to prevent erosion at the base was being partially missed. The pipe itself is leaning a bit back and to one side, instead of being straight up, which I’m sure isn’t helping, either.

I’m amazed that it was working at all. I was just there earlier today, taking photos, and saw no sign that water was being ejected from that pipe.

Oh! I completely forgot to mention!

With the one septic company ghosting us, I called the other and left a message this morning. The owner called me back less than half an hour later. They will be able to do the job for us. They are really busy and he couldn’t tell me when they can come out to fix the leak – it might be 3 or 4 weeks – but he told me that they could do the work even if the ground were frozen.

So that was definitely good news!

He asked me for photos of the expeller. While I was there, I made a point of looking to see if there was any sign that greywater has been flowing over the sheet of metal. That fact that there is some water flowing out the pipe, and not all just seeping into the ground, is actually a bit of a weight off my shoulders, making the timing of getting the repair done is not quite as urgent.

So that was more good news.

My brother had been able to come out sooner than he expected. It was still light out when he was done unloading, so he and I did a walkabout, including out to the car graveyard and the old farm equipment. I now know which things he wants to keep, and what can go to the scrap dealer – and it’s added a lot more to what the salvage company can come out for!

Oh, it’s going to be good to clear out this stuff.

My brother then came in to take a look at the bathroom, and the rot on the walls.

In the end, he said it’s not actually that bad. He said he wouldn’t bother taking it out at all, which would require taking the tub out. He suggested we just fix the taps from the other side, then cover it all with the new tub surround we already have.

Then we went around to the other side of the wall to talk about cutting an access panel. He’s pretty sure there is more aspenite under the paneling. We could take off the entire panel, but that would require removing the molding that’s over it, too. He suggested drilling through from the bathroom side to mark where to cut. Which is what I had been thinking, but only after cutting away the rotted aspenite around the taps. We have to figure out where the joists are; they should be 16″ apart, but the bathroom was installed while he was away in college, so he never saw how things were done.

So that is more good news. We don’t have to remove the tub and cut more of the walls away. He recommended we treat the aspenite with bleach, but we have some anti-mold product specifically for bathrooms we can use.

We can now put together a plan of action to get things fixed so we can use our tub and shower again!

Then my brother got his meter and we went to check the hot water tank – after shutting off the breaker! He tested the elements, and it turns out that it is the top element that is burnt out. The bottom one is working fine.

So we’ll be looking into getting a replacement for the top element.

I told him about the powered anode rod we are getting. Looking at the outlet near the hot water tank, I mentioned my thought of unplugging the extension cord that goes into my husband’s closet, then moving the plug for the well pump up, so we have room to plug in the new rod.

He advised against it.

As he put it, we’re already on borrowed time with that well pump, and he wouldn’t touch anything if it can be avoided.

We looked at the other outlet, where the sump pump is plugged in. He suggested running an extension cord from there, instead.

I will trust his advice and do that.

So we’re still without use of the tub and shower, and have only tepid water, but we now have a better idea of what to do next.

Which will be to get at the plumbing for the faucet set from the bedroom side and get that working, first. Then, even if it takes longer to get to the point we can install the tub surround, we can temporarily put plastic over where it’s cut open, so we can use the tub and not have to keep sponge bathing!

So… I rate that as more good news.

There was only one hiccup in the day that is more strange than anything else.

While my brother was unloading his truck, he got a voice mail notification on his cell phone – but his phone never rang. He joked that it was our vandal, because that’s who it was the last time this happened.

Well, after he left our place, my brother checked the voice mail, and it really was from our vandal!

I’ll get a copy of the message later, but it was much the same as last time. He’s wondering why my brother is “catering” to me – and we have no idea what he’s talking about. He also said that his doctor told him that the reason he got cancer is because of us, and that we are evil, evil, evil! He’s dying of cancer, and it’s our fault.

???

I’d say, he was drinking behind his wife’s back again.

At least he didn’t threaten us with “retribution” so extreme, even the Pope would be reading about it in a magazine, this time.

We are perplexed as to what triggered the call. Particularly since my brother was here when the voice mail was left. My brother thinks our vandal has been watching us, and saw that my brother had arrived, but I don’t see how.

Whatever the reason, my brother has our vandal’s number blocked, so he shouldn’t have been able to leave any voice mail message at all. The phone company is going to be getting a call about it, that’s for sure!

One thing else is for sure. When the scrap metal company comes to clean things up, we will have to watch out for our vandal, because he is going to go ballistic. He believes all this stuff rightfully belongs to him – but then, he thinks the entire property rightfully belongs to him.

Well, we’ll deal with that when the time comes. I’ll just be glad to get all this stuff cleaned out – and I’m sure the renter will be glad to see it gone, too, since his cows graze around almost all of it!

Oh, and I told my brother about the guy that wants to buy a couple of cars for parts, and how he will need to bring in special equipment to be able to get them out. I also told my brother that I’d arranged for him to use part of the money for the cars to pay back the guy that put a down payment on the old Farm Hand tractor, since I could see my brother wasn’t happy with the sale. My brother was happy to hear this.

So good news for him, too!

It’s just been a good day, overall, I’d say!

The Re-Farmer

Progress!

Also, a cutie.

I just wanted to share the adorableness of Syndol, as he accompanied me on my morning rounds. That’s all. 😄😄

Anyhow…

Today turned out to be a rather productive day, all in all.

Our main goals for the day were to get my husband’s bed and computer set up again. He was telling me this morning how my bed is soooo comfortable – but is absolutely killing his back! He needs to be back in his hospital bed.

Which isn’t as simple as it sounds. Since the plastic covered mattress causes him to sweat, he had several layers of bedding on top to at least try and alleviate that. It took 4 loads of laundry to wash everything, pillows included.

What I ended up doing was laying out a king size cotton sheet over the entire bed, folding up and laying out the various layers of bedding as close to the dimensions of the bedding as I could get them without being lumpy, then pulling up the sides and ends of the cotton sheet to encase it all. Then the fitted sheet could cover the whole thing and hold it in place.

With this being the smallest bedroom in the house, and the wardrobe is still in it, getting this done involved a lot of shifting the bed back and forth so I could reach from both sides, layer after layer, until I could finally put it back in its corner….

Only to have to move it again, to set up one of the power bars with a super long cord that had to be removed earlier. This room has only two outlets, and one of them is in the wall the bed is against. Handily, both outlets are higher than usual. More typical of the height for accessibility in modern homes. I’m not sure why these ones were placed so high. Especially since they are both in log walls. I’m not going to complain, though!

After the cord was run under the bed in such a way as to not touch the floor (because, cats…) it was done.

Until my husband asked about some of the bedding and I realized I’d padded his mattress with bedding he preferred to sleep under.

One of them being the cotton sheet I’d used to wrap the whole bundle.

I found a replacement for that one, at least, but the covers I’d left out, thinking those were what he’d want to sleep under, now that winter is coming, were supposed to be part of the bundle.

It didn’t take much to readjust things, but it did involve having to move the entire bed back and forth repeatedly, while I did it!

Eventually, I was finally able to bring back a side table to hold the internet router, other electronics and the CPAP machine.

In between doing this, I also got my own laundry going, then cleared a spot for the girls’ bar fridge to be moved to my room, so that they can then move the wardrobe upstairs. That will open up quite a bit of space in my husband’s room.

Eventually, we had to head out for a dump run; my younger daughter came along to act as spotter again. The pit area looked even worse than last week. At least this time, she wasn’t having to kick away nails the whole way in!

While we were out, we got a message from my other daughter, asking if we were up to a trip into town. Which we were, so she transferred some funds to me, along with a shopping list.

While we were in town, she and my husband moved things off the table he uses as a desk, he set up his computer, and they got his chair in. He also moved his CPAP back, so he’s now set, even though the room is not done.

Once the wardrobe is out, we’ll be able to access the closet again. The bottom of it has storage boxes, some filled with some of my late father’s things, but the closet rod and shelf above are open. There isn’t a lot of space between the footboard of the hospital bed and the closet door, since the bed is quite a bit longer than standard, but it’s enough to be able to open the door completely and access it. There’s still another shelf and his little medication fridge that needs to be set up again, but not until the wardrobe is emptied and taken upstairs.

Most important of all, of course, is that the corner where the tub’s plumbing is, is now clear and accessible.

I don’t want to cut the access panel from this side of the wall, though. At least not at first. Once we are able to cut away the rotted aspenite around the taps, we should be able to see where best to set the access panel. Even if we just make some holes from the bathroom side, to mark the corners, we can use those as guides to finish cutting the panel out from the bedroom side. If we do it neat and tidy enough, we might even be able to use the cut out piece to make a removeable cover for the opening.

It’ll be the girls taking care of getting that wardrobe upstairs, which means that tomorrow…

Oh, my goodness!

Tomorrow I might even be able to…

*gasp*

… get some work done OUTSIDE!

😄😄😄

I noticed today that the sunchokes are starting to die back, so I might start harvesting some of those. I definitely want to get the potatoes harvested. We should be able to use both with our Thanksgiving dinner.

If we have one.

With the hot water tank managing to produce only warmish water, it makes it rather hard to keep up with the dishes. We’re rather not be boiling large amounts of water again, as that makes the entire house ridiculously humid.

We could use disposable dishes, though. I think we still have some. I forgot about that, entirely!

Speaking of hot water tanks.

In going over the manual, it looks like our bottom element might be burned out. The anode rod likely needs to be replaced, too. It might be premature, since we haven’t confirmed this, but we’ve ordered a Corro-Protec rod (not an affiliate link), which we had to do on a payment plan, unfortunately.

The main hesitation we had for ordering one earlier was being able to plug it in. There is an outlet near the tank, tucked next to a floor joist above, but it already has two things plugged into it. One, we can remove; I traced the line and it’s an extension cord that goes up into the closet in my husband’s bedroom, along with a TV cable. When my late father used this room, there was a TV set up for him to be able to watch from bed, but we don’t watch TV, and that power cord isn’t being used.

The other thing plugged into there is the well pump. The problem is, the plug for the powered anode rod is fairly large. We might still be able to fit it in with the well pump’s plug, if we move the well pump’s plug up to where the extension cord is currently plugged in, but I don’t know that there’s enough space around the outlet to fit the powered anode rod’s plug. We won’t know until we actually get it.

Hopefully, we’ll be able to get the hot water tank repaired affordably, but we have no idea when that’ll happen. It’s not like we can afford to call a plumber for that, any more than we can afford to call a plumber for the taps in the tub.

Until then, we’ll be making do with tepid water, and boiling water if we can’t get away with tepid.

It’s a good thing we only do laundry with cold water!

Still, it’ll make Thanksgiving dinner a bit more challenging to prepare!

This house is going to be the death of us. 😄😄

The Re-Farmer

How much more can go wrong?

Please don’t try to answer that rhetorical question.

Guess what?

Now we don’t have hot water.

There is tepid water, but no hot water.

We’ve already had our tank replaced on warranty twice – normally, it would never be done more than once, and we know we won’t be able to get another warranty tank.

*sigh*

The Re-Farmer

We have hot water again!

Yay!!!

I was so excited when the phone rang, and I saw the plumber’s name on the call display.

Then confused, when there was nothing but dead air.

It took several calls like this, until I finally made sure my cell phone was on Wi-Fi calling (it keeps turning that off of me!) and got through to him that way. He’d tried calling another number in our area, with the same prefix, and had trouble there, so it seems like it’s a regional problem.

The important thing is, he was able to come over shortly after calling, and get the new tank installed.

Here, you can see his handy little pump draining the tank. We had turned off the breaker but never drained it or shut the water off, so that if we happened to turn on the hot water tap out of habit, it would still work. We just wouldn’t have hot water.

Looking inside, he thought that maybe the bottom element had burned out and said it could possibly be fixed, but I saw no point in that. This tank has already lasted two years longer than expected!

The weird thing was this.

This is where the electrical wires are tucked in, after the tank is hooked up. The plumber could not understand how water got in here!

After switching the tanks and starting to fill the new one, we talked about our well pump. It turned on while the tank was being filled, of course, but was having a hard time filling the pressure tank fast enough, so it started to make that grinding noise that worries me so much. I told him, we have a new pump ready and waiting, but with the possibility of the foot valve breaking, no plumber has been willing to change switching it out, because we’d end up with no water. He agreed with that assessment! I asked if he happened to know of any companies that serviced hand pumps, but he couldn’t say for sure. It’s entirely possible, we can change out the well pump and not have any problem at all, but when I said I didn’t want to risk it until we got the hand pump checked out and working again (if all it needs it new leathers), he thought that was a good idea. If we find ourselves with a worse case scenario, we at least can haul water to the house! Part of the problem is that the pipes in our well are a size that isn’t used anymore, so if the foot valve goes, we’d have to either find the old size somewhere or, if there are none to be had, get a new well drilled.

While the tank was filling, he was careful about using the valve to slow down the flow of water, giving the well pump a chance to catch up.

It takes quite a while to fill a 40 gallon tank!

Once it was full, he got me to turn on a hot water tap – which we have right in the basement, where the laundry used to be – to get the air out of the pipes and the water flowing. Once that was done, we could turn the breaker back on.

It takes a while for 40 gallons of water to heat up!

But heat up it did, and we now have hot water again! He recommended to check it a few times to make sure nothing is leaking, which I’ve done. Hopefully, this tank will last longer but, just in case, I’m hoping that we can pick up a “spare” tank, because we won’t be able to replace a warranty tank with a warranty tank again!

The whole thing ended up costing just under $235, after taxes. Thankfully, my daughter had already provided funds for most of that. Otherwise, I would have had to go into funds set aside for a down payment towards a new vehicle! We’re good, though, and I am very grateful!

It turned out to be a gorgeous day today – we reached 12C/54F this afternoon, which was several degrees warmer than forecast. I took advantage of it – and of having the cardboard from the box the new hot water tank was in – and started filling the trellis bed.

The cardboard almost completely covered the bottom of the bed, leaving gaps small enough that I’m not too concerned about it. After laying out, stamping down and hosing down the cardboard, I added the bark shavings from the poplar poles that will make up the trellis supports, followed by a wheel barrow load of wood chips. That got tromped down and soaked before the next layer was added – tomato, bean and melon plans pulled up from the garden. Finally, I added straw that had been laid out on this area when it was a Ruth Stout style garden bed. Another tromping and a soak, and I stopped for a while. These layers are just enough to cover the bottom logs, but they will settle down once the soil is added. I started adding scraps of wood into gaps as chinking, from the inside, so the straw could be used to hold it in place. There are more gaps that need to be chinked before more layers are added. It will get kitchen compost added, as well as leaves and grass clippings, before soil is finally added to the top. I’ll be using the soil from the melon bed and the grow bags, but those still need to be cleared.

With that in mind, I harvested the last of the onions in this area. There were just a few yellow onions left in the high raised bed, plus the Red of Florence onions sharing grow bags with the peppers. Last night’s frost was too much for the peppers, but some of the larger unripe ones were salvageable. I harvested the last of the peppers in the wattle weave bed, too, along with the two little eggplant that could be picked. We’re at 8C/46F right now, and supposed to drop to 6C/43F overnight, but there’s really nothing left to cover and try to protect anymore.

I’m happy with the progress on the trellis bed. Hopefully, I’ll be able to get that bed filled and set for the winter, and still be able to harvest more logs for the second bed. I’ll worry about the trellis supports later. That part can wait until next year, if need be.

It’s been a good and productive day today!

The Re-Farmer

Here we go again!

We knew it was coming. It was just a matter of time. In fact, it took a lot longer to happen than I thought it would! There were hints, though, that the limit had been reached, and today, it finally happened.

Our hot water tank died.

While my daughter was showering, of course.

The original tank (I found the original 1963 warranty while cleaning up in the basement and my parents got it second hand in the 1970’s!) died shortly after we moved here. My brother tried valiantly to keep it going, but a few months later, in 2018, we got it replaced with a new tank.

The replacement tank only lasted a year? Two? before it started leaking out the bottom.

It’s a good thing I take pictures of all this stuff, and document it here on the blog!

The first replacement tank started having problems in August of 2019, so about a year and a half before problems started. Water was leaking somewhere and filling the bottom of the tank.

The plumber tried different things, but in the end, it got replaced under warranty in January of 2020.

This is what started happening just over a year later.

Once again, water was leaking and filling the bottom of the tank.

I called the company and got it replaced under warranty again – but this was the last time I could do that. There’s only so many times you can replace a tank under warranty before they start assuming there’s something dishonest going on. Which is understandable.

So in January of 2021, I got a second warranty replacement tank. However, once we got it into the basement, I noticed the leaving the panel off had provided enough air circulation that the bottom of the tank was dry again.

So, we left it. We still had hot water, and we knew by now that our hard well water would likely just kill the new tank in a year. We decided to see how long we could last on what we had.

Amazingly, it lasted until now!

My first hint that something was wrong came when I was checking the old basement and found the concrete under the hot water tank was wet. I took the blower fan that we use to help dry out the basement when it gets wet in the spring, set it to blow directly at the hot water tank, then left it. A couple of days later, it was completely dry.

Then, last night, while doing dishes before bed, I found the hot water was getting way too hot. Warning sign number two!

This morning, I switched out the blower fan for a pedestal fan that uses less power. The concrete under the tank was starting to look damp again. Warning sign number three!. This fan could be set up closer, and I thought it might be enough.

I don’t know if it was. I haven’t gone down to check since then (the stairs are difficult for me to navigate). Later today, though, we simply lost hot water.

We called a plumber and left a message. Since we have the warranty replacement tank, still in the box, it just needs to be swapped out. That shouldn’t cost very much at all. Which is good, because every spare penny we have is being set aside to try and build up a larger down payment for a replacement vehicle.

Meanwhile, I’m bringing my mother’s car back to the garage tomorrow morning to get the spark plugs replaced. Then I will be going into the city for our second Costco shop.

Oh, and the septic guy was able to come by today – the ground was solid enough, even after yesterday’s downpours.

*sigh*

It’s like everything is popping up to make it impossible for us to set funds aside for a vehicle!

Oh, I also got word from the ranch we’re buying a quarter beef from. We’ve been paying $100 a month towards that since March, with the expectation that it would be ready in December. Well, it turns out it’ll be ready in 2 weeks, and what cuts did we want this time? !!!

Also, the weight for a quarter beef is higher this year, too. All together, we were going to be over $400 short!

I explained our situation, and they are going to hold our order off until January, which will make it even easier on the budget. So awesome of them! Once that’s paid for, that’s $100 a month that will be diverted to car payments.

The plumber hasn’t called back yet, but hopefully we will hear back tomorrow. If he hasn’t called by the time I’m back from the city, I’ll try again.

Aside from all that, it was a nice enough day that, once the septic guy was gone and I was no longer on kitten watch, to make sure none went anywhere near the open tank, I was able to get some work done outside. We don’t have high winds today, so my daughter was able to get a burn going, doing our paper garbage and some of the branches that we were starting to accumulate again that can’t fit into our wood chipper.

She’s still out there as I write this!

As for me, I need to try and get to bed early, because I’ve got a long day of running around tomorrow.

Good night, my friends!

The Re-Farmer