Well, there was definitely no chance the door would get replaced today! It started raining last night and is expected to continue to rain until about 6am tomorrow morning.
The door isn’t going to be done tomorrow, either. The installers aren’t available until Wednesday.
Which is the day I’m going to my mother’s for her grocery shopping and appointment with the home care assessor. I’ll be coming home to a new door.
Rain or no rain, the outside cats needed to be fed. When I went out to do the evening feeding, though, this one was not hungry and stayed in bed.
This fluffy kitten is getting so big – and so gorgeous!
Must. Socialize. The wild kitty.
Feeding the cats was about it for going outside today. Even they were avoiding it as much as possible!
Which means I more relaxed day indoors. I even got to do some crafting! I haven’t doing any in a very long time. Partly because I usually do crochet, and with my hands to rough and dry from working in the garden, the yarn gets hung up on my skin and will even pull the loops of my hook!
Today, however, I tried doing a small weaving project. I’ve got a loom knitting and weaving kit, and used the pieces to put together the smallest square peg loom possible. Big enough to make coaster sized squares.
I’d gotten the idea from some Pinterest images that showed up in my feed, but it was this video that gave me the full instructions.
I tried using single strand yarn, but found it too open and floppy. I ended up making four squares, experimenting with different thicknesses, doubling up the yarn, and different ways of finishing the edges. Eventually, I’ll make up larger peg looms and see how that goes. If nothing else, practicing on the small loom for coaster sized squares is a good way to use up leftover balls of yarn that are too small for anything else!
So it’s a been a quiet day, overall. Which is good. Normally I try to keep Sunday as my day of rest, but took advantage of the good weather to get much needed work done, so today is my day of rest, instead. I’m going to need it, as I’m going to be doing a lot of running around over the next couple of days!
One that started way too early, but still an awesome day!
I had my alarm set for 6am. Unfortunately, the furry alarm clocks had other plans. It was light out, anyhow, so I got up and did my morning rounds.
It turned 6am as I was getting back into the house!
My daughters didn’t fair much better, and one of them was up working all night.
My younger daughter and I made sure to grab breakfast before we left, but did make a stop at a gas station convenience store along the way to make sure she had a couple of large water bottles to keep with her during her workshop. I’m glad we left nice and early, because we drove right past the place and had to turn around. 😁
When we got there, others had arrived even earlier than we did. My daughter had a standard waiver to sign as we made our introductions with one of the instructors/owners, then my daughter headed over to their “classroom” to pick an individual forge for the workshop, while I headed out.
The road the forge was on turned out to go almost directly to where the small Walmart we tend to go to is. Very convenient! My new shoes, while fitting where they need to, are still size 11 men’s, so they are too long, and my heels were popping out. So I went searching and found some insoles and heel thingies – I can’t remember what they are called – to reduce the problem. Once I got those into my shoes, I set a timer for myself, settled into the truck and went for a nap in the Walmart parking lot! It was much needed.
They had a 1 hour lunch break scheduled to start at noon, so after a lovely little snooze, I went to a downtown grocery store to hunt down a lunch for us. I asked during the drive in, and my daughter requested something cold for lunch, since she was going to be working with fire all morning. I knew this grocery store would have some good options. I ended up getting some fresh made sushi, a lovely little charcuterie board, cut vegetables and hummus for us to share.
When I got back, it was too early for lunch break yet, but my daughter showed me some of the hooks she had made, using various techniques. She finished one last hook before break was called.
This place has a really good set up – one with extra care taken, since they’re under a fire ban, too. All the forges had new hoods put on them, and everything was set up under a roof. The walls were open, but several sections were covered with a particular sort of cloth/netting. I’d thought it was to prevent sparks from blowing out, but it turns out it was to keep flammable cottonwood puffs from blowing into the fire zone!
The entire grounds were fascinating, with all sorts of equipment – some modern, some antique – around. Even the house was amazing, built out of huge logs. It may have had a modern metal roof but, from the aging of the logs, I wouldn’t be surprised if the house itself is probably close to 100 years old.
The grounds were also very open and spread out, and they had a picnic table available in the shade of some trees for those who wanted to have lunch on site. The instructor/owner that has met us when we came in soon joined us, along with her husband, and some of the other students had brought their own camp chairs and settled in the shade nearby, too. We all had some grand conversation; the other attendees were very interesting people!
Then my daughter’s cell phone rang, which is always a surprise. She uses her phone as a phone even less than I do with mine! 😄
It was from her doctor’s office.
She quickly got up and went aside to take the call until she needed to come back and clear some dates for me.
Her surgery to remove her ganglion is going to happen in July – about 3 weeks from now – and she’s got a consultation appointment to go over the details, tomorrow, late afternoon.
The hospital is in the same small city we frequent in between stock up trips, and it basically across the street from the vet clinic that’s been doing our spays and neuters, so it’s all familiar territory for us.
Of course, other people heard us as we put the appointments into my calendar. Afterwards, we learned that one of the guys that joined us at the picnic table had had a massive ganglion removed some 25 years ago – large enough that he still has a scar! So he and my daughter commiserated about how painful those things can be, for a while. 😁
When the scheduled lunch was done and everyone went back to the workshop, I went back to the city and spent some time actually looking for stuff this time. We need at least one more garden hose, but the only ones that were affordable were the ones that keep breaking on us. In the end, I ended up picking up some replacement couplings, instead. Hopefully, higher quality ones. They also have a built in shut off valve, so you can switch attachments and not have to turned the water off at the tap or, like I usually do, kink the hose to stop the flow – which is part of why they end up breaking so quickly. Oddly, the one that’s leaking on me right now developed a pin hole in the metal of the female coupling. How that happened, I have no idea, but it’s enough to send a tiny, barely visible stream of water shooting out at least a foot!
I also picked up some water soluble fertilizer for the vegetable garden, and some potting soil. Our massive jade trees need repotting. We need to find a new home for them. We have to keep them in the cat free zone/living room, and there just isn’t enough light for them in there. Maybe rehoming plants will be easier than rehoming cats!
That done, I took my time checking out a couple more stores, just to pass the time until I headed back to the forge.
This time, I hung out in a seating area they had in the “classroom”, where my daughter was conveniently set up. They were working on long implements at the time, with a twist in the handle.
My daughter was in absolute heaven.
It was an interesting group to watch. There was about 10 people there, each at their own forge (there were a couple of “spares” that weren’t being used). Most were men that looked to be about my age, give or take a decade. There was one other woman there, who looked to be in her 60s. My daughter was clearly the youngest person there. Everyone seemed to be really enjoying the workshop, too.
Talking about it later, my daughter said she was 99% sure she would love blacksmithing, but there was still that 1% she wasn’t sure of. After today, she is 100% she is in love with blacksmithing! She’s really looking forward to building her own forge and smithy here at the farm. It will take time to acquire the materials, and set up a safe area to work in. Particularly since the area that makes the most sense to build it in is where the fire pit currently is, and there are several dead or partially dead trees with branches overhanging the area that we need to clear out! I plan to make our outdoor kitchen in a different area, so the fire pit area will be available to her. Thanks to this workshop, she also knows which things she prefers to have, such as a hand operated blower instead of an electric one. We do already have some of the tools, since my late father had done some blacksmithing here, though his forge got scavenged at some point. One pair of tongs I found were broken, but another is fine. My daughter says she has seen other tools that are suitable, laying around, including ball peen hammers of the appropriate size and weight. There is a tiny anvil, made from a piece of railroad tie. When I was growing up here, I remember we had a full size blacksmithing anvil in the pump shack, but that is another of the things that grew legs and walked away over the years before we moved in. So it really wouldn’t take much for my daughter to be able to set up her own smithy!
Here are the things my daughter made, by the end of the workshop.
The first image is a series of hooks including one that is meant to be hammered in like a nail. The others have different shaped flat parts, including one leaf shape, with screw holes in them. The screw holes were added towards the very end, using a special hole punch. Then there is the handle; getting the swoop shape it was supposed to be was not easy!
The second image has a fire poke, with a twisted handle. The other thing is a steak flipper. Not something either of us is familiar with!
The owners/instructors welcomed people to stay as long as they needed to put on any finishing touches on their projects before leaving, and most of them did stay longer. My daughter just needed to use the hole punch before she was done, so we had a chance to chat with the other owner/instructor.
My daughter still wants to clean up the stuff she made with a wire brush to give them a more finished look. She plans to give some to my brother and his wife, as a thank you for their birthday gift of this workshop. The steak flipper and fire poker are both going to get use when we do outdoor cooking again – which might be a while. With the current fire bans, some fires are allowed, but with our own fire pit area we aren’t going to chance it for some time.
With staying longer to finish things off and chat for a bit, it was getting pretty late, so we went into the city again, and I made sure my daughter got fed! She ended up choosing to go to a Subway, but she was so tired – especially her hands, from all that hammering! – she could barely hold her sandwich! My husband messaged me to see of I could find something at Walmart for him, and she stayed in the truck while I popped in. She was so tired this morning, was absolutely fine during the workshop, but once it was over, she was basically crashing!
It was absolutely worth it for her, though!
By the time we got home, it was well past time to feed the outside cats, so I took care of that while the girls took care of bringing stuff inside. I ended up bring out a bowl of warm water to wash leaky eyes, assembly line style. Kale and Zipper are still the worst for it, and I’m afraid that Kale might lose an eye. She has missed some eye washing, simply because we couldn’t reach her, or she wasn’t around at the time. Most of the other kittens look like they are recovering quite well.
When I go out to take care of the cats, I’m always on the lookout for more kittens. So far, nothing. I am seeing Sprout more often and, this evening, I could just make out as she ran passed me, that she has at least two active teats, but we can’t get close enough to really see. With others, I just can’t tell. Not even with Slick, who will jump up onto the roof of the cat house to eat. She doesn’t give us a chance to see her belly!
Today turned out to be a really lovely day in the weather sense, too. The high of the day was supposed to be 18C/64F, but we did end up reaching 20C/68F, but with a lovely breeze to keep things from feeing too hot. We’re supposed to get warmer over the next few days, but nothing excessive.
I am very glad I got the garden in when I did, that’s for sure. If I hadn’t, I probably be dealing with dead transplants right now!
Mostly, though, I’m just so happy my daughter enjoyed the workshop, and is now sure that blacksmithing is something she really wants to continue with.
While winding down for the night, I’ve been watching some videos, including this new one from MI Gardener; a resource I have recommended before.
This is an interesting video, since I fairly regularly see these concrete blocks being recommended to make raised beds. He lists the reasons he believes they should not be used.
I found it really interesting, and wanted to talk about some of them.
One of the first things he brought up was the weight. The ones he uses in the video are 8″x8″x16″ This is the size of most of the blocks we’ve been finding all over the place, though I think I’ve found some that are 10″x8″x16″
He also adds that they are cheap, and says they cost about $2 each.
So, of course, I had to look it up!
It turns out, one of these concrete blocks weighs about 30-35 pounds. The ones he’s using has flat ends. Some have shaped ends, and from what I found on the Canadian Home Depot page, they weight 42 pounds (19kg). The 10″ ones weigh 45 pounds (20.4kg).
I’d never really thought about how much they weighed. I found them heavy to carry around, but not that bad, really.
As for being cheap, interestingly, the 8″ ones are listed as just under $5 each – and are more expensive than the 10″ ones, which are just over $4 each. The last time I looked at their prices, at an actual store, not online, was a few years ago, and one 8″ block was priced at over $8 each, which shocked me. This was before inflation went nuts, too. Very odd.
This got me wondering, since we are using concrete chimney blocks as planters. So I had to look those up, too. I found plenty of links, but not one of them included a price. The closest I could find was an old image with a price on it, but the link was no longer active. Other than that, I found some on FB Marketplace were someone lists a whole bunch of things, not just chimney blocks, with a $4 each price listed. I don’t think that price was the same for all the wide variety of items listed, so I still don’t know how much they sell for here.
The chimney blocks we have are the standard square size of 16.75″x16.75″x7.62″
That measurement is so odd, I thought it would make more sense in metric, but not really. That works out to 42.5cmx42.5cmx19.35cm
What caught my attention was the weight.
Each one of those chimney blocks weighs 68 pounds (30.8kg)
So… I was lugging almost 70 pound blocks around the yard when I built the retaining wall and the chain link fence planters.
Okay, so weight was one of his reasons not to use them, but the other was height. They’re only 8″ high (slightly higher than our chimney blocks), making only 8″ of growing space.
I found that curious. His sample concrete block raised bed is on top of soil. Granted, it looks like the area was just leveled and has been driven over, so it might be compacted, but it’s still open soil, not a concrete pad or something. Any plants could send it’s roots lower. We have maybe 8″ of top soil – 10″ in a really good spot – before we hit gravel, clay and rocks. An 8″ high bed gives us about 16″ of growing space. We have been using modified hügelkultur, so the first couple of years would have sticks and branches at the bottom, so we don’t plant root vegetables in them right away.
I would find 8″ too low for accessibility reasons, and when I see people doing raised beds with concrete blocks, they are often two, three or even four blocks high. He talks about adding a second level, and demonstrates how easily the block spins around, since the base row is not perfectly level. He mentioned that people have suggested rebar to hold them in place.
I agree with him on the rebar. It seems almost counterproductive.
I’d just use concrete glue. AKA construction adhesive. It’s really cheap, one tube goes a long way, and can be applied using a caulking gun. Granted, that makes it permanent, but most raised beds don’t get moved around once they’re built, anyhow.
He makes a point about breakage being a problem, but not in the way he talks about. Where we are, we have temperature extremes. Pretty much all the concrete blocks we’ve been finding have been outdoors. Most of the chimney blocks we’ve used were stored outdoors since my parents bought this farm in 1964. Yeah, they have dings and chips, but they are still sound. The only blocks we’ve had actually crack and split where the two we put into the fire pit to hold old oven racks over the coals to cook on. It was exposure to high heat that lead to them cracking, not outdoor temperature fluctuations.
He mentioned that concrete is very porous, and that the edges of beds would need extra watering. True enough, though with our chimney blocks, there isn’t any centre space that would hold water longer than the edges. We still watered them as often as the other beds. We just have them more water. It’s been a few winters now for the retaining wall blocks long the old kitchen garden, and not one of them has cracked due to water absorption and the fresh thaw cycle. I’m not saying it can’t or won’t happen. Just that is hasn’t happened to us.
He then mentions that concrete absorbs a lot of heat. More so than even metal raised beds.
That may indeed be a problem in a lot of places.
Where we are, that’s a selling point! Even in the heat of our summers, it just makes them better for heat loving plants that might normally not grow well here.
There is another element to using concrete blocks he doesn’t mention, and that is the effect on soil pH. I’d read before that concrete can help lower the pH, which would be great for our alkaline soil.
As I was looking it up just now, though, I found one article that said concrete can lower the pH, but that was it. Other articles, however, said that concrete will increase the pH.
Which is the last thing we need!
Given the smallish growing space inside our chimney block planters, it wouldn’t take much to affect the pH in the soil there. Granted, I did amend the soil with sulphur this past year, as well as with peat, but with our pH already at 8 or higher, it’s going to take a long time to adjust the pH even slightly lower. Getting it to be slightly acidic, which most of the things we want to grow do better in, will take years. Looking up what vegetables grow well in alkaline soil, the list is pretty long, but most of them have an upper limit of 7.5. If we can get our soil at least down to that, it would be good, but it is harder to lower the pH than it is to increase it.
Well, the mint I transplanted into some of the retaining wall blocks seems to be handling the high pH quite well, as are the chives. Our biggest issue, however, is roots growing in from below. With the blocks at the chain link fence, it’s the nearby elms that took over the soil in the blocks. In the retaining wall, it’s some sort of invasive flower we haven’t been able to get rid of. It’s almost killing off the mint, in some blocks!
So when it comes down to it, whether using concrete blocks for raised beds is a good idea or not really depends on a lot of things. Stuff he saw as negatives, are positives for us, or non-issues.
Would I use concrete blocks for a raised bed?
Probably not.
We’ve got all those dead spruce trees that need to be cut down that can be used. For other raised beds, I’m liking the wattle weave idea and want to build more, though it’s surprisingly hard to gather enough suitable branches to use for the weaving. If we did happen to have enough concrete blocks to make raised beds, there are other things I’d much prefer to use them for.
When it comes to gardening, it is such an individual thing. We all just have to figure out what will work for our own gardens in our own regional area and microclimate, and use what materials we have access to.
Hearing what works or doesn’t work for others and why can still be a huge help. Which is why I like videos like this one. Not only did I find what he had to say very interesting, it got me checking things out and looking things up to learn more.
And now I know how much those chimney blocks weigh, too!
Welcome to my second “Recommended” series. Here, you’ll find various sites and channels that I’ve been enjoying and wanted to share with you. With so many people currently looking to find ways to be more self sufficient or prepared for emergencies, that will be the focus for most of these, but I’ll also be adding a few that are just plain fun. Please feel free to leave a comment or make your own recommendation. I hope you enjoy these!
With spring finally arriving, the days getting longer, I find myself wanting to spend as much time outdoors as I can get away with – which made me think of an outdoorsy YouTube channel I follow!
This channel is still relatively new at the time I’m writing this, but I’ve included its creator in my previous series of Recommended sites, Maritime Gardening. Outdoors on the Cheap is all about enjoying the great outdoors without breaking the bank! In fact, I’ll just let Greg explain it himself.
The range of topics covered is quite broad, including everything from why he wears a neck knife, to how to make a fire if you’ve fallen into the water while in the woods, to using an ax and a knife to carve a tree into a paddle, to…
… making a comfortable chair in the woods.
You’ll find videos on the best and cheapest boats you can get to enjoy some fishing, how to repair it if necessary, and videos on how to load them into your vehicle.
He even talks about how to deal with some of the more psychological aspects of overnighting in the woods.
Along with videos about fishing, hunting, rifles and snares, you’ll find survival information, such as what to include in a fire kit, and plenty about getting good use out of cheap, basic axes and knives, then how to take care of them.
I’ve been watching a lot of videos exploring different ways to make survival shelters, which all have their own benefits, but it’s rare indeed to find any quite as basic as someone building a shelter and fire after a Canadian ice storm.
The channel is just chock full of practical, basic information.
I just really like how down to earth these are. You really get the sense that pretty much anyone can follow along and do the same, and not have to be… oh… ex-military, or some survivalist guru.
So I definitely recommend checking out the Outdoors on the Cheap YouTube channel, and if you go to the About page, you’ll find URLs to follow on Twitter and Facebook, too.
I now have this sudden urge to go out in the bush with some basic tools, and just… doing stuff. :-D
Welcome to my “Recommended” series of posts. These will be weekly – for now – posts about resources and sites I have found over the past while that I found so excellent, I want to share them with you, my dear readers. 🙂 Whether or not I continue to post these, and how often they are posted, will depend on feedback. Please feel free to comment below, and if you have a favorite resource of your own, do share, and I will review them for possible future posts.
I hope you find these recommendations as useful and enjoyable as I have!
You would think that, having grown up on the farm, I wouldn’t need to be looking up all these resources on how to live on a farm! :-D Our situation is very different from how I grew up here, though, since most of the land is rented out, and our focus is on a relatively small portion of 1 quarter, around the house. We aren’t to be the sort of farmers my parents were, so homesteading resources have been more in line with what we are looking to be doing over the next few years.
Unfortunately, I’m not finding a lot of Canadian ones, so there’s quite a lot that just doesn’t apply to us. We don’t have the climate for soil conditions. Which is fine. There is still lots to learn! And a lot of “homesteader” skills can be applied anywhere you live.
Like cooking from scratch. That’s a big one, for me, and these skills kept food on the table during some pretty lean years! It was just what we did, when I was growing up, but I definitely learned to appreciate those skills over the years!
The Prairie Homestead is one of those resources that are quite useful, even for those who live in urban areas. The channel started quite a few years ago, with the first videos going back 8 years, and there were a few time gaps before things got into the groove, to where videos are being posted weekly. The focus now is largely on from scratch cooking, and the site owner has a cook book out as well.
Here, you will find videos on how to make things like butter, broth, pasta and sourdough starter, and even how to render lard.
You’ll find videos on how to start seeds indoors, planting, and preserving food, as well as starting a new garden.
Some of the earliest videos include how to milk goats and cows, and others about livestock care. More recent videos include one on their home schooling routine.
I like the really wide range of topics included in their videos.
They also have Facebook, Instagram and podcasts, as well as web pages.
The Prairie Homestead has sections for from-scratch cooking, starting a home stead, growing food and DIY.
I just couldn’t wait to try out the new carving knives! I ended up using only two of them, though.
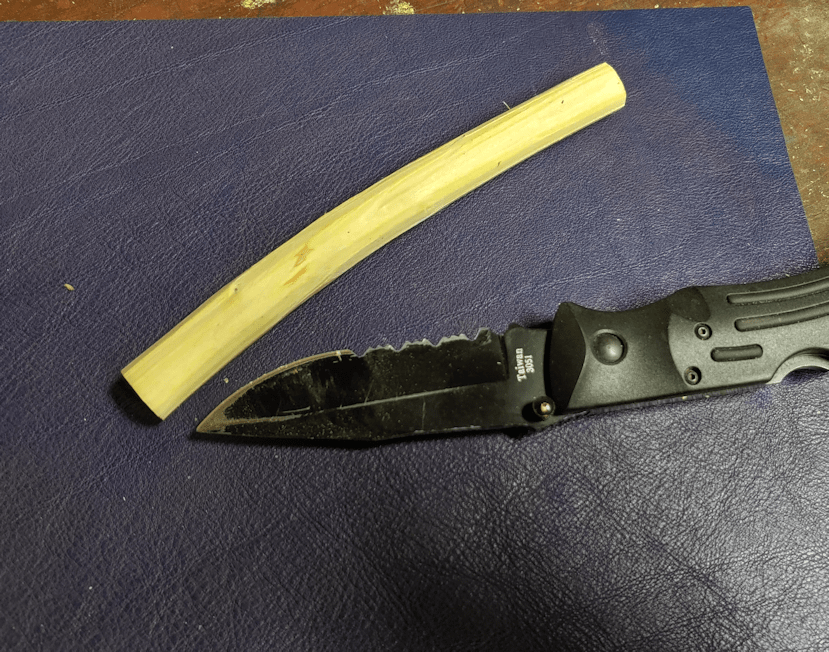
After looking at the bits and pieces in the basement, I chose a small piece of lilac to practice on.
It is resting on the leather breastplate my husband made for me.
I was not about to use the carving blades on that bark, though…
I used my K-Bar instead. The wood was surprisingly green, for something that was cleaned up from storm damage some 8 months ago!
I didn’t think to get a picture of the safety glove. There is a pair of them, and they can be worn on either hand. It fit remarkably well, considering I have big, wide man-hands.
Hhhmmm… that may be why it fit well… :-D
It was also very comfortable to wear. I thought it might be really coarse and scratchy, but not at all. It felt like a normal glove.
These are the two carving knives I used. I can’t remember what either of them are called right now.
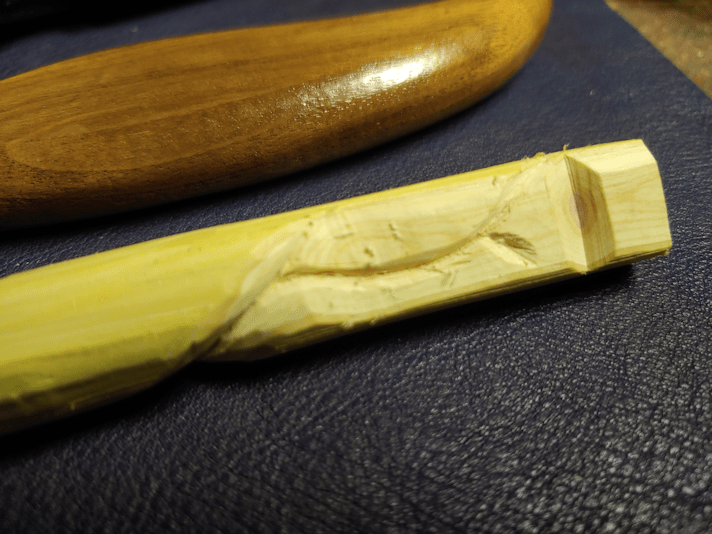
I started by practicing push and pull cuts to flatten a piece at each end…
…though only one end showed the colours inside; the stick was slightly thicker at the other end.
Then I practiced different methods of making V cuts.
Detail work is going to need a lot more practice. ;-)
After that, I worked on the spiral around the piece, using that to practice different ways of cutting and switching up between the two blades.
I’m rather happy with how it turned out, considering I’ve never carved before. The lilac would was nice to carve with. The blades themselves…
I can see myself wanting to pick up higher quality ones in the future, if I find myself carving more often. While not the cheapest set I saw, it was hardly the highest end, either. I found myself sharpening them almost from the start. The edge held fairly well after I did, so it seems they didn’t arrive as sharp as they could have. Still, they did the job quite well for the learning process it is.
Next time, I’ll find something different to use that curved blade on. :-D
Welcome to my “Recommended” series of posts. These will be weekly – for now – posts about resources I have found over the past while that I found so excellent, I want to share them with you, my dear readers. 🙂 Whether or not I continue to post these, and how often they are posted, will depend on feedback. Please feel free to comment below, and if you have a favorite resource of your own, do share, and I will review them for possible future posts.
I hope you find these recommendations as useful and enjoyable as I have!
You’d think that, having grown up on this farm and with my family being subsistence farmers, I would already know how to garden here. And I guess I do, really. The thing is, I want to do things differently than my parents did. Some simple things, like trellising, which my parents never did. One of my jobs as a kid was to flip the rows of pea plants, so the sun could get at the other side. We also want to grow new things I have no experience in, use no-till methods my parents never used, and eventually have raised beds.
So basically, I’m learning how to garden, all over again.
Part of this learning curve is figuring out how to grow what we want in our climate zone, which is a zone 3. It takes extra measures to produce food in our short growing season. We can’t even take advantage of any urban heat island effects.
With that in mind, I have been looking up resources for cold climate gardening. In my searches, I have found many sites and YouTube channels dedicated to cold climate gardening. How wonderful, I would think, as I eagerly began to explore them.
Right up until I discovered that these “cold climate” gardeners were in…
Zone 5.
Really?
Just about everything I look at that I’m interested in growing is rated to zone 5. How is zone 5 considered a cold climate?
Okay, okay. I realize that these sites are almost all based in the US, and northern states are rightfully considered cold climates compared to the southern states. But I’m in frikkin’ central Canada. To us, zone 5 is almost tropical. :-D
All joking aside, it did make my searches frustrating. It turns out there just aren’t a lot of active Canadian gardening resources out there.
Maritime Gardening is run by Greg Auton, in Nova Scotia. It’s basically one person and 2,500 square feet of back yard garden! He’s been making these videos since 2016.
The only down side?
It’s still a zone 5 climate region… but it’s far closer to our situation than anything else I’ve found! There are lots of videos on how to lengthen the outdoor growing season, like getting the soil to thaw out faster, or dealing with high winds.
There are also a lot of videos on specific crops, such as garlic, onions, potatoes, and strawberries, and techniques, such as no-till gardening, using cold frames, different types of mulches, and so on.
There are videos on planning out your garden spaces, dealing with weeds and insect problems, saving seeds, harvesting and preserving.
There are even cooking videos, fermentation videos, videos on how to make tool handles, and so much more.
There is just SO much to learn from here! I highly recommend this channel as a resource.
Welcome to my “Recommended” series of posts. These will be weekly – for now – posts about resources I have found over the past while that I found so excellent, I want to share them with you, my dear readers. 🙂 Whether or not I continue to post these, and how often they are posted, will depend on feedback. Please feel free to comment below, and if you have a favorite resource of your own, do share, and I will review them for possible future posts.
I hope you find these recommendations as useful and enjoyable as I have!
When I was a kid, I was pretty indifferent to cheese. For commercial cheese, we got your basic cheddar, processed cheese slices, and I even remember the odd block of Velveeta (yeah, I know…). I honestly don’t think there was much else available. Some Mozzarella, cream cheese, marble cheese and grated Parmesan in a shaker. The odd triangle of expensive blue cheese. Our choices were limited.
Even as an adult, there really wasn’t a lot of variety available. I liked cheese, certainly, but it wasn’t really a thing for me. The one major discovery for me was commercial cottage cheese. My mother made cottage cheese, and I really didn’t like it. I recently asked her how she made it, since I only remembered bits and pieces, and it was far more convoluted than I expected. It took two days, and included the addition of baking soda, but no cream.
The end product was very, very dry.
It was, of course, used as a filling in pierogi. I loved my mother’s potato pierogi, but never liked the ones with cottage cheese or sauerkraut stuffings. So very un-Polish of me. :-D
Then one day, I tried commercial cottage cheese and realized that yeah, that stuff is actually good!
Over the years, I regularly bought cheddar, but every now and then I’d get adventurous and try some Havarty or Montery Jack. Discovering Brie was an eye opening experience for me. I’d never had anything like it before, and it’s still one of my favourite cheeses.
Then, a few years back, one of our local grocery stores added a new cheese section.
You know you’re getting old when something like that is exciting. :-D
Suddenly, there was the wild and crazy selection of cheeses available, at pretty much every major grocery store. Then we found a local chain that specialized in European imports, baked their own bread in wood fired ovens, and had a deli consistently rated as the best in the city, year after year. It was thanks to this store that I discovered charcuterie platters, which became a much enjoyed treat, any time we could. We began to try new cheeses every time we could squeeze it into the budget.
I’ve long been interested in making as many things myself as I could, including making yogurt and yogurtcheese.
I definitely was interested in making other cheeses, and never really thought I could do more than make something like mozzarella or ricotta – cheeses that don’t require any aging. Then we moved provinces, and I discovered that apparently, cheeses just aren’t as popular out here. The specialty cheese sections in grocery stores don’t have anywhere near the variety, even in the city, that we’d become used to. But, what are we to do? It’s not like we could make any of these, ourselves, right? I mean, it’s not like we had access to raw milk in the first place, never mind the equipment, space, access to cultures and so on. I knew people who did make cheeses like Gouda at home, but they were farmers with cows or goats they were milking.
Then I stumbled upon The Curd Nerd, Gavin Webber, and his YouTube channel.
Talk about inspiring!!
Gavin Webber is an Australian who has been doing cheese making tutorials and “Ask the Cheesemaker” live streams and podcasts since late 2009. You’ll find videos on the making of MANY different types of cheese, followed up later with taste tests. He talks about what equipment is needed (much less than I expected), how to sanitize them, how to age cheese in a fridge, how to wax cheeses, and more. All done in his own home.
He even talks about the failures.
There are even videos on how to clean your cheese cloth, and other topics, like making mead, and the construction of his cob oven.
It was these next two videos – especially the taste testing one – that won me over.
We need to start making our own cheese.
I just love how enthusiastic and excited he gets about cheese!!! Oh, how I want to be tasting those cheeses with him!
Inspiring indeed!
I now feel we actually can start making a wide variety of cheeses at home. We are looking to convert the old root cellar into a cheese cave, but even if it turns out to not have the conditions needed, I now know we can work around that and still be able to make our own ages cheeses – in varieties that are not available locally, or well beyond our budget to indulge in.
First, you may have noticed a change in the menu at the top. I now have a separate tab for sourdough. If you’re looking for information on making a sourdough starter, or trying some of the recipes we’ve been using, that’s where you’ll find quick links to all the relevant posts.
There’s a reason I’ve done this. :-D
We have long been the sort of family to keep a pantry stocked of basics and do a lot of “from scratch” cooking. Part of it was because that’s what we wanted to do, but there was many a time when finances left us with little choice.
Since we’ve been living on my husband’s long term disability income, which comes in once a month, we’ve also been in the practice of stocking up once a month, long before we found ourselves living out in the boonies.
Which means that many of the things people are being called to do, with the Wuhan virus lockdowns, are things we were already doing. Now, however, there are more people doing it, which means we’re suddenly having a harder time finding things that have never been an issue before.
Like yeast.
Now, to be honest, I did have troubles finding the type of yeast I wanted. It was far easier to find super quick acting or bread machine yeast, than the slower acting yeasts I preferred. But that’s just me being picky. :-D Right now, there just isn’t any type of yeast to be found, even as supplies of flour and sugar have been restocked in many places; at least in the cities.
I have given up Facebook for Lent, which is probably an extra blessing this year, as I’m missing out on all the social media crazy that I’m sure is going around right now. I still use their messenger, as I can use it on my phone without logging into Facebook, so I sometimes get people sending me information that way, but beyond that, I’m pretty much out of the social media loop.
With so many people suddenly stuck at home and having to learn how to cook and bake, plenty have turned to social media to discuss and share. Since I’ve mentioned to a few friends and family members about my inability to find yeast, I had someone message me with something they found.
It was instructions on how to “make your own yeast.”
Now, right off the bat, I knew things were off. That’s not how yeast works. You don’t “make” yeast. Yeast is a living thing, and wild yeast floats in the air around us all the time. Now, it could have meant instructions on how to make something like commercial yeast, but that’s not what was in the photo.
What it really was, was instructions on how to make a sourdough starter.
Which was great. As a recipe, it could have made a very nice sourdough.
The reason I say “could” instead of “would” is because how it turns out depends on the wild yeast that finds a home in the mixture and starts colonizing it. It’s entirely possible for a nasty strain to take hold, and instead of getting a nice, bubbly mixture that smells wonderful, you get something that’s black or red or otherwise nasty, and it needs to be thrown out. That’s why even some sourdough starter recipes include adding a bit of commercial yeast. This is to ensure that a strain of yeast that is known to be safe is established.
There are lots of reasons people so readily adopted commercial yeast.
Even if it was colonized by a lovely strain of yeast, sourdough starter is not something you can substitute 2:1 with commercial yeast. It doesn’t work that way. Starter is a living thing that needs to be tended and fed and stored properly if it’s not going to be used very often. It also behaves differently than commercial yeast, typically taking much longer to rise (unless your recipe calls for something like baking soda which triggers a chemical reaction… do feel free to visit the sourdough tab to learn more). That slow rise is one of the attractions of sourdough baking, as it allows all sorts of lovely flavours to develop.
Oh, and the Pinterest worthy photo of a mason jar full to the top with lovely, bubbly sourdough starter?
Don’t do it. It may not be as aesthetically pleasing, but this is what it should look like.
A starter needs lots of room to bubble and expand. Put it in a little mason jar, and you’re going to have a mess to clean up before long! Also, if you’re going to be doing any serious level of baking with sourdough, you’re going to need more than a tiny jar will give you. We keep ours in a giant plastic bowl (no metal!). Some of our recipes call for 4 cups of starter, so we keep a fairly large amount of starter bubbling away.
Having yeast is really handy. That’s why, even though we have a sourdough starter we’ve managed to keep alive for a year and a half now, I still like to have commercial yeast.
I recently spoke to my mother about not being able to find yeast. She told me how, in her younger years, no one used yeast. She’s shared memories of her childhood before, so I already knew that part. When bread baking, her mother would set aside a piece of the dough for the next baking day. I knew that part, too, as it was a common technique at the time, and my dad has also shared memories of his family doing the same. Her mother would bury the set aside piece of dough into the flour.
Wait… I didn’t know that part!
In fact, this was a method I’d never heard of before. My grandmother would bury the piece of dough in the flour. A dry crust would form on the outside, and it would need to be soaked before it could be used in the next batch of bread.
I think I might have to try that!
So what’s my point about all this?
Well, for those who are new to baking and wondering what to do about not having commercial yeast, you’ll be fine. You can make a sourdough starter. Just know that this is something that takes time to get established. Or you can make flatbread, with no leavening at all. There are options. The trick will be to sift through the misinformation that’s out there. It’s not as hard as some make it out to be, but it’s not as “easy” as others make it out to be, either.
I supposed it comes down to, if it sounds too good to be true, it probably isn’t!