Babcia’s Bread Experiment, part 3c: all done, and where I screwed up

Our first batch of bread using old dough, in the manner my Babcia used to do, is now done. I did mess up a bit, which I will talk about below.

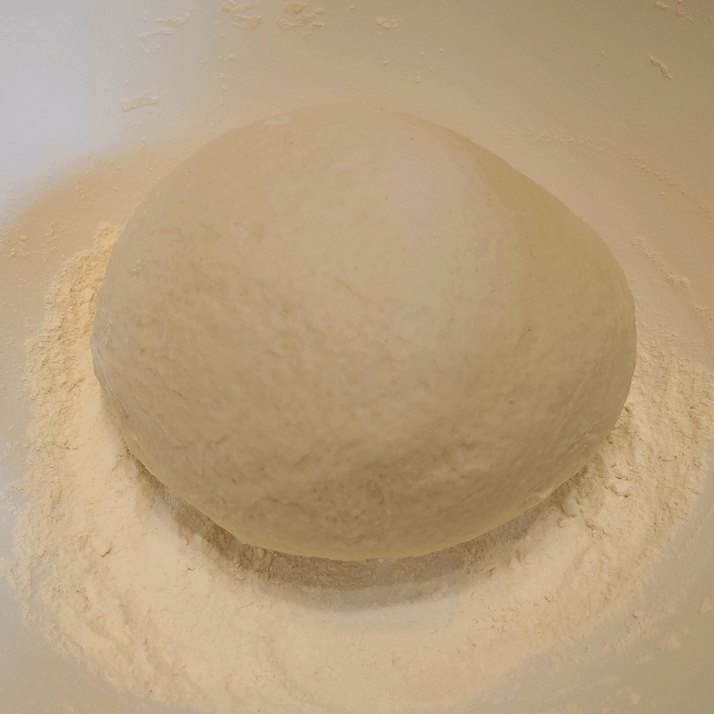
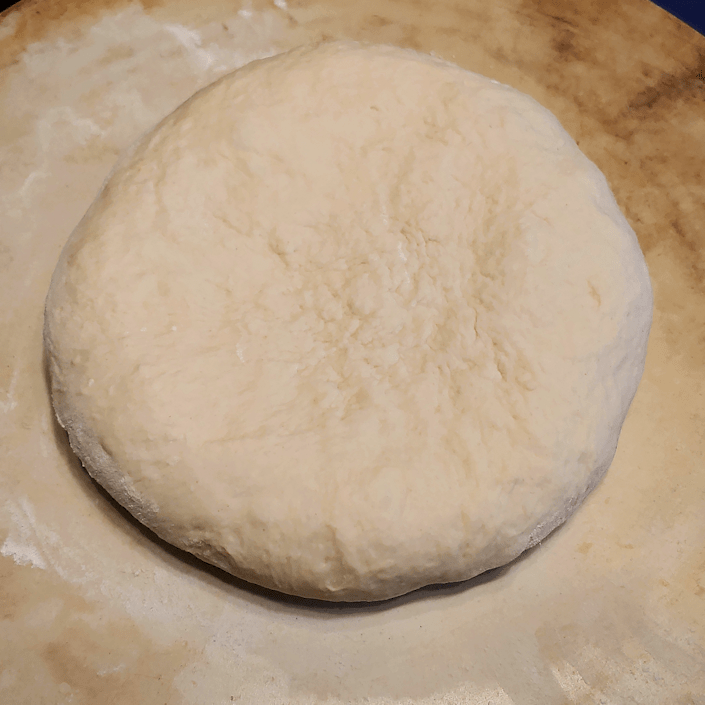
Here is how the dough looked after the first rise. I had left it for about 1 1/2 – 2 hours, give or take.

That is just beautiful.

My mother described my Babcia as “punching down” the dough. I know exactly what she was talking about, since this is what she did with her bread baking. My mother used a huge, enameled bowl with a lid, which we still have, for one big batch of bread. She would get it ready for its first rise before going out to milk the cows in the morning. By the time those chores were done, the dough was overflowing the giant bowl, knocking the lid askew. She would put the dough back in, scraping dough off the lid and adding it in, too, then literally punch it down with her fist. She would then put the lid back and leave it for a second rising, which would also overflow. She would gather it up again and punch it down before continuing on to form loaves and buns.

For such a small batch, I just took it out and gave it a light kneading.

The dough felt beautiful! Soft, light, fluffy and elastic. I probably could have skipped a rising, but I really want to recreate what my Babcia did as much as possible, so back into the bowl it went.

Both times, I set the bowl into a warm oven with the heat off and the light on.

This is possibly where I made my first mistake. The dough did not rise as much the second time. Usually, dough rises faster during a second rising, but after an hour, it really hadn’t risen as much as I would have expected. I probably should have left it for another half hour, at least.

I didn’t do that.

With this batch being rather small, I formed just one loaf out of it (after removing a portion for the next batch), then giving it another light knead.

In my starter batch, the two round loaves I shaped had puffed upwards quite a lot, so this time I pressed the loaf flat, then set it aside, covered with a tea towel, to rise while the oven preheated to 425F.

Which may have been my second mistake. I probably should have let it rise for a while, before preheating the oven. Not only am I too used to how quickly yeast bread rises, but our new oven preheats faster than the old one!

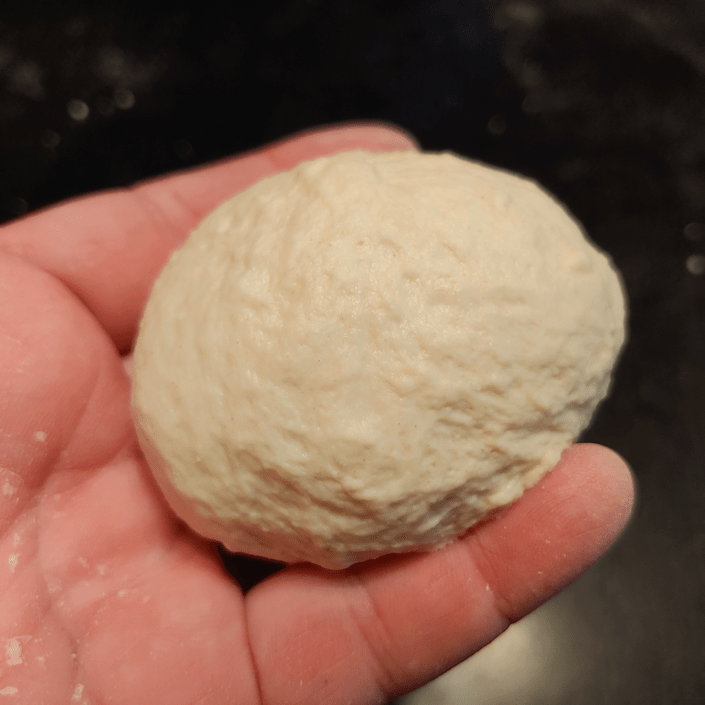
Meanwhile, I used the piece of dough I’d set aside to pick up the bits of dough stuck to the bowl and table top, as my mother described my grandmother doing, kneaded it enough to incorporate it all, then buried it in our canister of flour. I took out slightly more dough this time, as in the next batch, I intend to increase the quantities of flour and water.

When the oven was ready, I scored the loaf and put it in, checking it after half an hour, then adding more time.

I’m certainly glad I flattened the loaf as much as I did! It still became very much a ball!

This was taken out at about 40 minutes.

Which was most definitely a mistake.

Though I made sure to do the “thump” test to check if it was done, when I finally cut it open, the centre seemed slightly underdone. I probably should have left it in the oven for at least 5 or 10 more minutes. I am really bad for taking bread out too early, as I am constantly thinking they are going to burn! :-(

What to do?

Toast it!

Sort of.

I cut it into pieces, laid it back on the baking stone, and put it back in a 350F oven. After about 15 minutes, I flipped them and put them back for another 10 minutes.

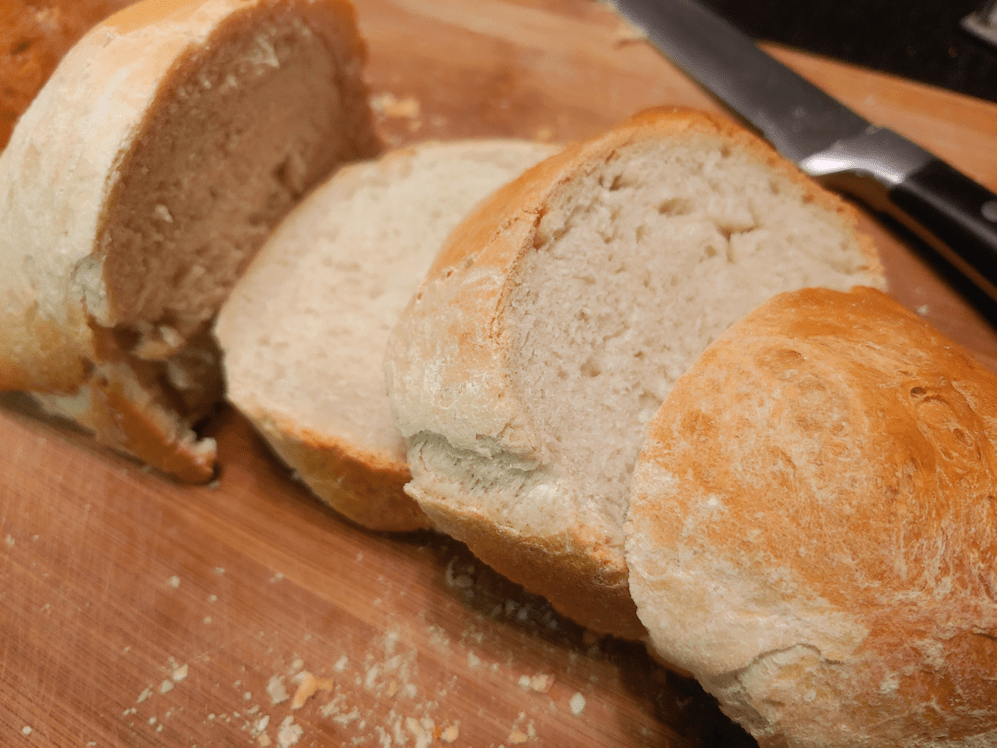
Here is the end result!

It looks really great, at least! It still felt a bit heavy and dense, though.

The first taste test was with a plain piece.

The flavour is a bit milder than the starter batch. This makes sense, since that one used a commercial sourdough yeast. The sourdough yeast included rye, which I could taste in that starter batch, but I am not getting any rye flavour with this batch. There is, however, a very slight sourdough flavour. I expect this flavour to develop with every batch we bake. Overall, though, the flavour was very neutral.

The texture was slightly dense and chewy, but not under-cooked and doughy, as I feared it would be.

The one thing I had an issue with, was the crust. It had a thick, crunchy crust that crossed over to that “watch you don’t cut your mouth up” level. This may have been exacerbated by “toasting” the bread pieces again, but from what I saw when I was cutting it, I could see it was already going to be an issue.

The second taste test was with butter and, of course, that one tasted better. Fat is flavour, after all!

I found myself thinking this would be a very good bread to dip in an herb infused olive oil! The neutral base flavour would make a great carrier for other, more strongly flavored things. That neutrality will likely disappear over time, as each batch should develop a more distinct “sourdough” flavour.

So this first batch of bread using old dough was both a success and a not-quite-success.

The use of the old dough in place of yeast or sourdough started worked very well. There was plenty of yeast activity in there. Even without the use of sugar in the bread, the yeast did its job – when I gave it the time to do so!

The other success was reducing the amount of flour. It did mean making one loaf instead of two, but the dough itself turned out much better for it.

The not-quite-success part of it had more to do with my not giving it the time it needed, I think. I’ve made sourdough bread were I’ve left the dough to proof for an entire day, so it’s not like I don’t have the patience for that sort of thing. But I did see the signs and simply chose to go ahead, anyway. The end result was probably not as could as it could have been, because of it.

Plus, of course, I need to be concerned less about over-baked bread, and more about underdone bread, and leave it in the oven for longer! I should probably increase the oven temperature to 450F. That’s the temperature my daughter bakes her French bread in, and her much larger loaves bake up wonderfully.

I will leave the “bread egg” in the flour for a couple of days, then make another batch, tweaking things with what I’ve learned with this attempt.

The Re-Farmer

Babcia’s Bread Experiment, part 3b: first rising

When setting the old dough to reconstitute and ferment overnight, I had some concerns about temperature. The crock was sitting on our dining table, and that room gets pretty chilly. I did warm up the rice bag we have been using to warm our fermenting hard apple cider (which is probably ready to be bottled, but we haven’t gotten around to it yet) and set it under the crock, to help keep it at least a little bit warm.

While investigating some cat noises in the wee hours of the morning, I checked it and found it was looking pretty much the same as when I’d left it. So I warmed the oven up a bit, then put the crock in, shut the oven off and left the light on.

This is how it looked about 3 hours later.

Warming it up, did the trick! I’ll have to keep that in mind, as we continue experimenting.

I warmed the oven up a bit again, then put the crock back for another 3 hours or so, before I was able to start making the dough.

That’s looking nice and puffy!

I find it interesting that the pieces are still distinctly separate. When I stirred it, before adding it to some flour and salt in a bowl, I found the pieces separated and stretched, before starting to mix together. The water under the old dough pieces was pretty much clear until I mixed it, too.

I added this to a bowl with 3 cups of flour and 2 tsp of Kosher salt and mixed it together. I kneaded another 4 – 4 1/2 cups of flour in before turning it onto my table and kneading it for another 5 – 10 minutes.

Normally, I would oil the bowl the dough will be rising in, but my grandmother would not have done that, so I used flour, instead.

With this batch, I’ve got the same amount of water as the first batch the old dough came from, but I’m using less flour. That first batch was too dense. With only a little more than 4 cups of flour in here, after I remove some dough for the next batch, I think I’ll just make one large round loaf this time, instead of two.

Next time, I think I’ll up the water and flour quantities a little bit, and make a bigger batch. I don’t think I’ll adjust the amount of salt, though. Not unless I end up doubling the recipe or something.

The dough is now covered and set aside for its first rising. I’ll give it at least an hour, probably two, before punching it down and leaving it for a second rising.

I will post again, later today, with the final results! :-)

The Re-Farmer

Babcia’s Bread Experiment, part 3: reconstituted, and more of the story

Tonight, the plan was to continue with my attempt to recreate bread, as much as possible, in the way my mother remembers my grandmother baking.

I spent some time doing research on the method, but there is nothing out there that quite matches what my mother describes. I gave her a call today with more questions, and got more of the story. :-)

This video was the closest I could find to what my mother described, but it left me with a lot more questions.

Obviously, my babcia didn’t put the piece of dough into a jar and stick it in the refrigerator. They didn’t have refrigeration. The dough in the video is almost a batter. Also, did my babcia use rye flour? Since she baked only once a week, she had to have been making a LOT of bread. How much did she bake, and how much of the dough did she set aside for that much baking?

My mother had difficulty understanding some of my questions – and she’s at a loss as to why I am even bothering with all this! Using commercial yeast is just so much easier. :-D

So it took a while, but this is what I was able to find out.

My babcia’s weekly baking was for about a dozen round loaves. This was all one big batch. Her dough bowl must have been huge! She worked up the dough, using the old dough that was reconstituted overnight for leavening, then left it to rise. She then punched the dough down and left it to rise again. After the second rising, she would punch it down again, then knead and shape her loaves, laying them out on a flour covered surface. The shaped loaves would be left to rise one more time before baking in their masonry oven.

It would have been when she was forming the loaves that dough was taken out for the next batch, and all the scrapings from the wooden dough bowl and leftover bits of flour, would be incorporated into the ball. My mother says the ball of dough was about the size of a loaf of pumpernickel bread that she sometimes buys at the local grocery. That would make it about 3 – 4 cups of dough, before proofing, though I do take into account that, given her age at the time, her memory of the size might be distorted by her own small size.

Still, it’s enough information to assure me that my egg sized lump of dough is probably about the right size for a 2 loaf recipe.

I also learned that my babcia did use rye flour, as well as the wheat flour and corn flour my mother had already mentioned. Basically, whatever they had on hand. Or whatever was left, after either the Russians or the Nazi’s came through and took everything again.

It was a rather precarious existence for them!

I also confirmed that my grandmother’s dough was NOT a wet, almost batter like dough, like the one in the video above. My mother described it as being more like the sort of bread she used to bake all the time, when I was a kid. Considering that I helped her with bread baking for many years, that gives me a very good idea of what I will be looking for.

Armed with more information from my mother, I started on reconstituting our bread dough “egg” in preparation for baking with it, tomorrow.

Here is how it looked, when I dug it out of the flour.

It was most definitely larger than when it first went in! Not extremely so, but enough to really notice.

It also felt a lot lighter than when it was first put in. I was very interested in seeing how it looked on the inside!

Ooooo!!! That looks amazing!

The outer shell was almost flaky in texture, and was clearly doing a great job of allowing the yeasts to continue to ferment without contamination.

It actually rather reminded me of the sourdough in this video, minus the fire.

It’s interesting to note that, historically, people did conserve their sourdough starters while traveling by putting it into their bag of flour and allowing it to dry out. What I am making now will certainly result in a sour dough, eventually, though it is not at all the same as maintaining a sourdough starter.

Since I will be making another 2 loaf recipe, I decided to reconstitute the dough ball in the full 2 cups of water that will go into the recipe. I could probably have used half that amount, without any issues, but I figured, why not sue the full amount? I wouldn’t use the full amount of water if I were, say, making a dozen loaves, like my grandmother did, but for a small batch of bread, it should be fine.

I used water that had been boiled, first, as a precaution with using our well water. Once the water had cooled down enough, I put it in a small crock style canister that I have, then added the broken up pieces of old dough.

After that, it just got a quick stir, to make sure all the pieces were thoroughly immersed.

I don’t expect this to overflow as the yeast develops but, just in case, I placed the covered container on the lid of a large mixing bowl.

Now, it just sits for the night. :-)

I am very interested in seeing what this looks like in the morning!

The Re-Farmer

Babcia’s Bread experiment, part 2; the beginning

Photo heavy post ahead. :-)

Okay, here it is! My very first attempt at slowly recreating my grandmother’s bread, with her use of “old dough” yeast that she kept stored in flour in between baking day. (Part 1: the story)

The first goal is to create the bread dough yeast starter, and for that, I need to make a yeast bread.

Here are the ingredients.

Water, yeast, salt and flour.

That’s it!

I used Kosher salt, as I figured that was more like what my grandmother had available to her.

For a 2 loaf recipe, I used 2 cups water, 2 tsp salt, about 2 tsp yeast, and between 5 and 6 cups of flour.

The yeast is my “cheat”. Back in the spring, when everyone started panic buying, yeast was among those things that became hard to find. One of our local grocery stores now not only stocks lots of the usual big name brand or two, but a wide variety of brands and types of yeast. When I spotted a “sourdough” yeast, I grabbed a packet, just to try it.

Since some of the dough from this batch will become the “mother” of future batched, I thought it was appropriate to use it.

The ingredients list is interesting. Both wheat and rye is used.

If you’re wondering about the sorbitan monpstearate, this is what I found:

“Sorbitan monostearate (abbreviation SMS), or Span 60, is an emulsifier esterified from sorbitol and stearic acid with the European food additive number E491. This ingredient is mostly used in baking yeast by improving the activity of instant dry yeast when the yeast is rehydrated before use. “

Speaking of rehydrating…

For the 2 cups of water, I boiled it first, because I have doubts about our well water. We really need to get the water tested, but a full test is really expensive, so… boiling it is.

I measured out half a cup of water into another measuring cup to rehydrate the yeast. I could have done it in the full 2 cups, but the half cup cooled down to a safer temperature for the yeast faster.

The inclusion of rye in this really changes the colour!

I let it proof for 5 minutes. I don’t know if I should have proofed it longer – I have recipes that call for anything from 5 to 15 minutes. It’s bubbled up, though, so I decided to go ahead.

While it was proofing, I mixed the salt into about 2-3 cups of flour. Without a wood bread bowl, I decided not to use a plastic one, and tried “dump your liquids into a well in the flour” method.

That looks…

Unpleasant.

The next while was spent with very messy, sticky hands, incorporating the rest of the flour and water in.

Thankfully, my daughter came down to give me a hand, adding the flour and water as I kneaded it in.

Once it was all mixed in, I kneaded the dough for about 15 minutes.

I may have used too much flour. I’ll have to keep that in mind for next time.

I did notice a difference in texture from my usual bread. Although I kneaded the dough until it felt smooth and satiny, it never looked smooth.

In fact, the longer I kneaded, the rougher it began to appear!

So I went by feel rather than appearances when it came time to set it aside for a first rising.

It went into an oiled plastic bowl, turning to coat all sides with oil. After covering the bowl with a tea towel, it went into a warm oven to rise.

Earlier in the day, I had prepped a baking stone and was curing it with oil in the oven. The oven was off but still warm; prefect for proofing the dough.

Once it was in the oven and rising, I set a timer to check it in an hour while my daughter started a batch of French bread. Checking it at an hour, I decided it needed more time, by my daughter’s bread was rising by the, too. So I took the bowl out and put my daughter’s dough in the warm warm oven, and set my timer for another hour.

This is the dough, after 2 hours.

After turning the dough out to prepare the loaves, I had to make sure to do that most important part.

Collect a dough egg! :-D

This humble little lump of dough is what it’s all about.

Into our flour canister it went!

I almost forget to get a picture before burying it!

My other daughter labeled the container for me.

She is a hoot! :-D

The ball of dough will now dry out until the next time we bake this bread.

After dividing the dough, I decided to form it into round loaves.

By this time, my daughter’s loaves were in the oven.

Where she forgot to take out my curing baking stone.

So they got to have their second rise on a normal baking pa, instead.

In kneading and shaping the dough, once again, the dough got rougher rather than smoother! You can really tell in the one of the left.

I then left them to rise, checking them after about half an hour.

My daughter’s French bread was done well before my second rising was done!

The ended up needing another hour of rising time.

The baking stone had cooled down quite a bit by then, but was warm enough that I transferred the loaves over, and I think that residual warmth helped them rise even more. The above photo was taken just before they went into a 400F oven.

All done!

I am not sure how long they took to back. I set my timer for half and hour, then kept peaking and resetting the time for another 5 minutes, over and over. I think it took about an hour to bake.

I was quite impressed with how much the loaves rose in the process!

The next part was the hardest.

Waiting for the loaves to cool down!

For all that the loaves rose so much in the oven, they still felt surprisingly dense. I was also a bit surprised by how fine a crumb there was.

I taste tested one piece plain, one with ordinary butter, and one with a garlic herb butter.

I’m having a hard time describing the flavour. It was certainly tastey, but I think I was picking up the rye flavour in the “sourdough” yeast. It did have a “sourdough” tang, but one that is quite different from any sourdough we’ve made ourselves.

The sponge was soft, yet toothsome. The crust was crusty enough to be a good chew, but not so crusty as to cut up the mouth (something I have issues with, when it comes to most “crusty” breads).

The plain slice was tasty, but the buttered slices definitely were better. With no fat in the bread itself, the butter really brought out the flavours that were more muted in the unbuttered slice.

All in all, this very plain, very basic bread was a success.

It is, however, just the first step in the process. It’s purpose was to provide us with some dough to reserve for the next batch. Every batch of bread we make using the bread egg now sitting in the flour canister will be another step closer to recreating my Babcia’s bread.

While my grandmother did her bread baking once a week, we will probably make our first batch using the bread egg in 3 or 4 days.

I am really curious to see how it will look when we fish it out of the flour, and how the overnight soak will turn out! For a first time use, I don’t expect the flavour will be much different, but who knows? I’ve never done this before! :-D

The Re-Farmer

Babcia’s Bread Experiment, part 1: the story

I may have mentioned in past posts, about my mother’s memories of bread baking in pre-WWII Poland. I was fascinated by what she could tell me. With no commercial yeast available, I had thought my Babcia (grandmother) had used a sort of sourdough. I know my father remembers this; a portion of the bread dough would be set aside to continue to ferment, and be used in the next batch of bread.

My grandmother did something different. She allowed her old dough to dry.

We lost our own sourdough starter, the Sourceror this past summer. It almost made it to 2 years, but we had a real problem with fruit flies this year. Somehow, they managed to get into the container and contaminated it.

Having a big bubbling bowl on the counter has been a bit of a problem for other reasons, so the more I heard about how my Babcia saved her dough, the more I wanted to try it.

My mother’s memories go back to the late 1930’s, early 1940’s. Then WWII happened and they eventually ended up in Canada, where commercial yeast was available. After questioning her about it, this is what I’ve been able to piece together.

Babcia would bake bread once a week. She would set aside some of the dough, adding in the scrapings from the wooden dough bowl, form it into a ball, then burying the ball in the flour. The night before she would be baking bread again, she would take out the dried ball of dough, break it up into pieces, and soak it in water overnight. In would get all bubbly, and that would be her yeast for her bread baking, with the cycle continuing each time.

My basic bread recipe includes things like oil, sugar, eggs, milk… all things that I just couldn’t see handling sitting in a bag of flour for a week without going off. On questioning my mother, I learned Babcia used none of these things. It simply wasn’t available. Her bread was flour, water, a bit of salt, and the reconstituted old dough. That’s it.

The flour would have been flour they milled themselves (at least they did until the Nazi’s caught them using an illicit hand mill and destroyed it), using grain they grew themselves. My mother says corn flour was also sometimes used, which they also would have grown themselves. The ingredients may have been few, but my mother remembers it as being the best bread; especially when corn flour was added. She remembers it was light and fluffy, too.

My mother was too young at the time to remember a lot of details, though, so I did some research. I know that bread can be as basic as flour and water, but if salt is used, would that be a problem? I know that sugar feeds yeast, while salt retards it. How would having salt in the dough affect the old dough yeast cake? Also, how much dough was set aside? My mother remembers a “ball”, but as young as she was, her sense of how large that was would be distorted.

In my research, I found quite a bit about “old dough” bread baking. This gave me a lot of the information I was looking for. For some types of old dough baking, dough is set aside before the salt was added, while others were taken out after. Both work. As for how much was taken out, I eventually found a general “about the size of an egg” description.

What I didn’t find was anyone who used old dough that was stored in flour. Nor did I find any that stored the dough for weekly baking. Most described setting the old dough aside in the fridge for 2 or 3 days, at most. In some forums I found, people described using it in their daily baking. Not a single person described using their old dough the way my mother remembers her mother did it. They all used wet dough. None used reconstituted dry dough.

I have decided, instead of getting a sourdough going again (for now), I will try and recreate my Babcia’s bread.

Of course, some things I will simply not be able to recreate; at least not now. We’ll be using plain old AP flour. I won’t be adding corn flour right away. I don’t have a big wooden dough bowl like my Babcia would have had (with a wooden dough bowl, yeast would have gotten into the wood itself, adding its own layer of flavours). I also don’t have a wood burning masonry stove (something similar to this, with a sleeping area on top) like my grandmother would have been baking in.

I found some proportions for ingredients for 2 loaves that I will start with, and I will probably experiment with making some a couple of times a week before I start adjusting quantities for larger batches.

One of the main differences in this experimental process is that I don’t have a yeast “mother.” My mother has no memory of where her mother got hers from. It was always just there. She may well have gotten her first old dough from the family members she was living with (my great grandparents having already gone to Canada to start a homestead, only to not be able to send for their children as they had planned, because of WWI). However, as they saw the warning signs leading to WWII, they abandoned their farm in Eastern Poland, taking nothing but the clothes on their backs and a goat they could milk for food, to settle in Western Poland. At that point, my grandmother likely got another old dough ball from one of their new neighbours.

It’s amazing how much history is intertwined in something so ordinary as how my grandmother leavened her bread!

So this is what I will be doing in my experiment that will possibly span years.

Today, I have started a first batch of plain bread; it’s rising as I write this, and I will post about it separately when it’s done.

I will be using a commercial “sourdough” yeast I happened to find, in this first batch.

After the dough is risen and before I shape it into loaves, I will break off some of the dough and store it in a container of flour, then bake the rest of the dough as usual.

In a few days, I’ll reconstitute what should be a mostly dried ball of dough overnight, make another 2 loaf batch, then continue repeating the process.

What should happen: the flavour of the bread should change and develop over time, just as with a sourdough.

What might happen: I’ll have sucky bread that doesn’t rise properly? The dough ball will start molding? The yeast will die off and I’ll have to start over? I have no idea.

For the first few months, at least, I will stick to the same basic mix of flour, water, salt and the old dough for yeast. Eventually, I will try adding corn flour. If I do decide to modify the recipe in other ways, it will be by doing things like kneading in herbs or shredded cheese or whatever, after the dough ball has been removed. I won’t be adding things to the base recipe, like sugar, milk, oil or eggs.

After I’ve done a few batches, and assuming this works, I plan to give some to my mother to taste. Hopefully, she will remember enough to be able to tell me if I’ve succeeded or not! :-D

The Re-Farmer