Things turned out to be rather pleasant yesterday afternoon, so I took advantage of it to get some stuff off my to-do list.
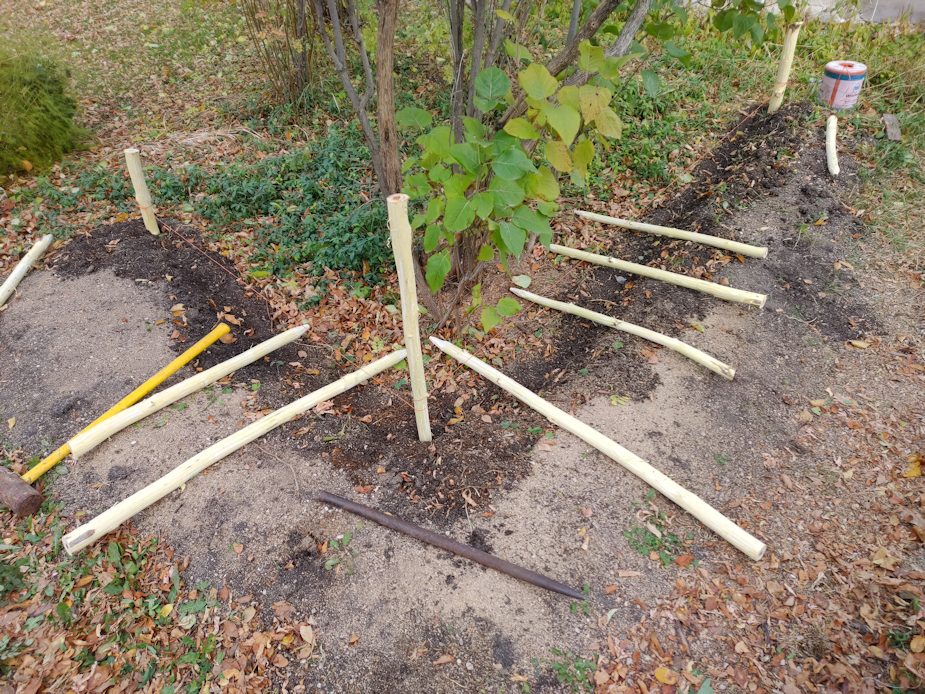
First, the trellises.
The netting and bamboo stakes are all put away. I even unwound the blue twine from the pea trellis. We won’t be planting vegetables here again. We’ll be planting food trees and bushes in the area, instead (except for the area over the phone line, wide enough to drive a vehicle through, that we’ll be keeping clear). So, the trellises are coming down!
The five uprights from the pea trellis all broke at ground level. I was able to pull the others straight out of the ground, with only a little big of wiggling. You can tell by the dirty on the ends, which pile has those!
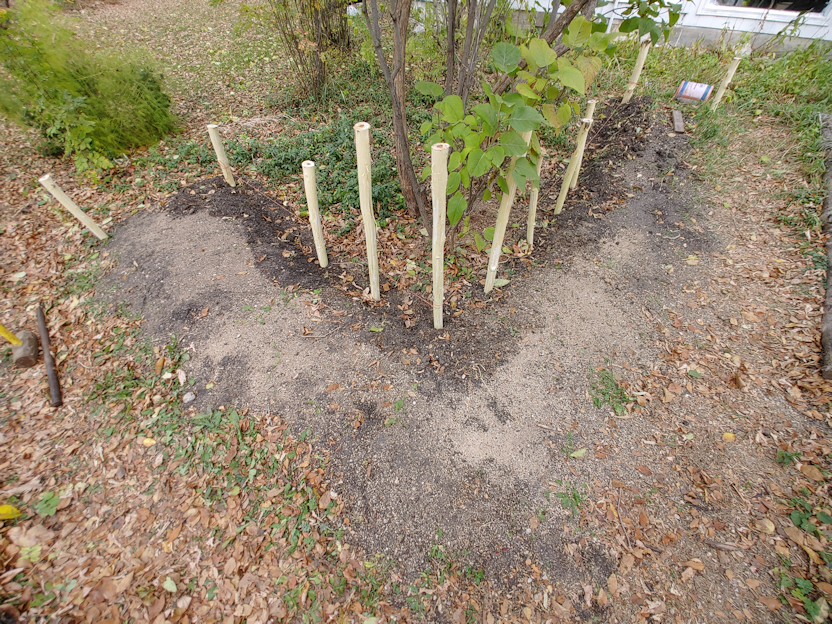
Since I had the materials, I used some of the pieces to make a buck and pole “fence” over the sea buckthorn. Only two have survived, so I only wanted it long enough to go over those. Hopefully, that will dissuade deer from nibbling on them. The gap in the hedge is right near here. One end is far enough out that it should make a deer not want to jump the fence there at all. On the trail cams, I’ve been seeing quite a few deer walking around this corner of the property, so it seems they are already not jumping the fence here much. There is another spot they prefer to jump the fence at.
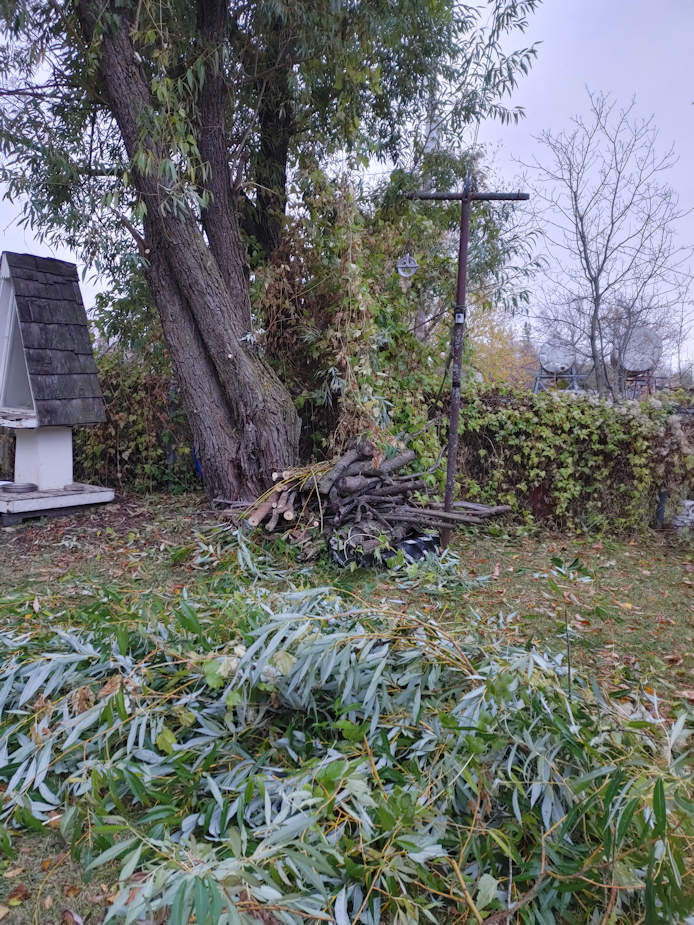
Later on, I decided it was worth working on the willow. I’m after branches to weave into the wattle wall I’m building in the old kitchen garden, so this is getting two things done at once.
The trunks were barely visible from all the branches that had grown along them. Thankfully, we have an extended pole pruner that I can use for the higher branches, instead of trying to get at them with loppers from a ladder. You can see the vine has climbed it quite a bit, too!
The power line to the house is still not clear of branches. This job will be continued later, and includes the trees on the other side of the chain link fence.
The longest and straightest branches were kept, stripped of side branches and leaves, and a daughter started debarking the biggest ones for me while I pruned more, until it started raining. Then I grabbed a knife and helped debark. Wattle fencing isn’t normally debarked, but I want to debark the branches that are going to have contact with soil – because the last thing I want is for willow to start growing right next to the house! I love willow, but that is not a tree you want close to infrastructure!
There were some really straight, thin branches I kept, too, putting them on the pile of maple and cherry wood that’s already there. Who knows. We might find some use for them.
This is all the branches we got out of there, so far. Not even close to how many will be needed to weave a wall. Only the bottom few inches needs to be tightly woven, as it will be holding soil in, but eventually that will be on all sides, not just the “back” that is the focus to get finished first. The high parts of the back wall are to keep things out, rather than in. It’s going to be a challenge to find enough suitable branches for this!
Today is supposed to be a semi-warm day – with both rain and snow expected – then we’ll have several days with highs just barely above freezing, before it warms up again and stays warm for about a week. Hopefully. At least the rain will keep those willow branches from drying out. I’m hoping to at least get these ones woven in, some time today!
Today’s high was supposed to be 19C/66F. I don’t know if we reached it, but with the blustery winds, it never felt that warm. I’ve been keeping a close eye on the weather, and my app on my desktop includes historical data for each day, including 30 year record highs and lows for various data. I noticed that today had a record high for snow of 14cm/5.5in in 2019. In fact, we set record highs for snow on the 10th, 11th and 12th, all in 2019. We were just coming to the end of our second year here, so I went looking at my blog posts for those dates.
Ah, yes. I remember that blizzard!
The amazing thing is that, just days later, all that snow was gone, and while we were still cleaning up storm damage, everything was back to green and sunny!
Depending on which app I look at, however, we might be getting a mix of snow and rain starting tomorrow night, and by Friday afternoon, we’re expected to get between 3-6cm (roughly 1-2 inches) of snow.
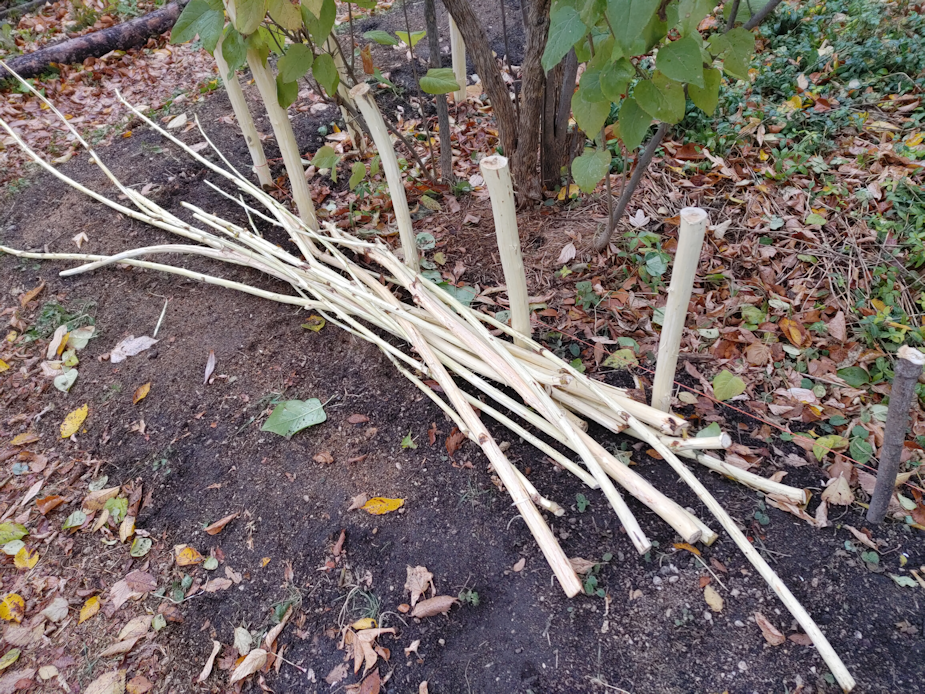
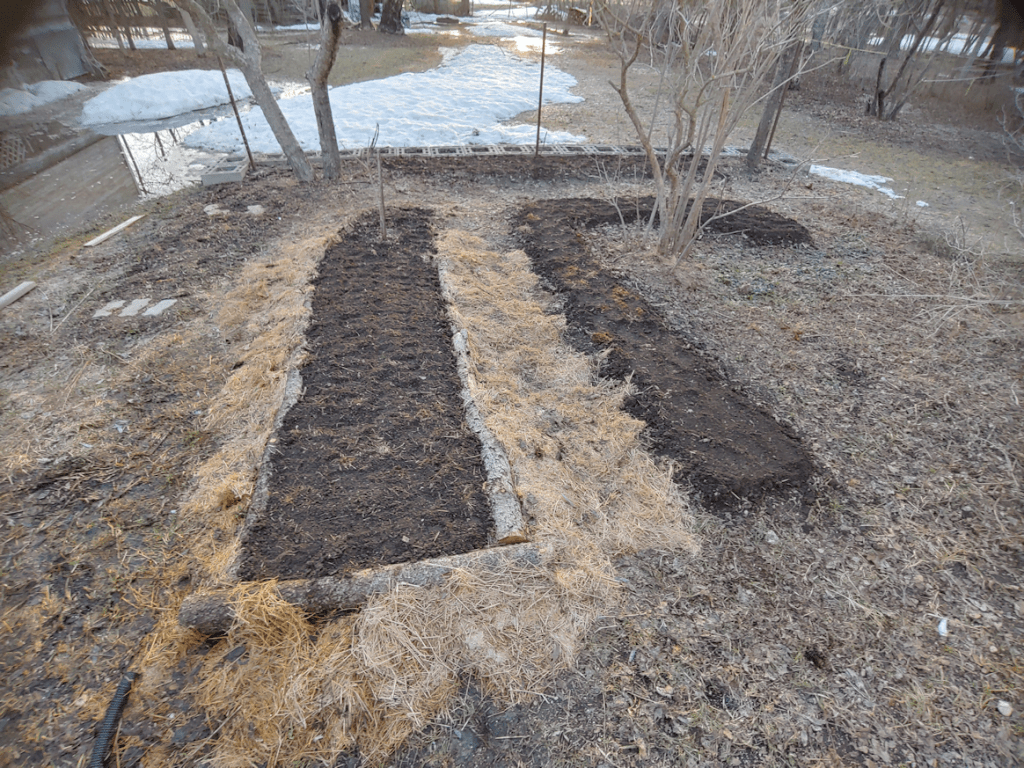
That meant my focus was preparing to build up walls around the L shaped bed in the old kitchen garden.
I went through the maple pieces I’d cut yesterday and started cutting them to size, cutting points on them, and debarking some of them.
I had lots of furry help. So much help, one of the kitties got plumb tuckered out!
From the longest, straightest pieces of maple, I cut three into 4 foot lengths. Then I went through some of the strongest pieces to cut four 3 foot lengths, then four 2 1/2 foot lengths. After that, I just cut as many 2 1/2 foot lengths from the thinner straight pieces as I could get out of them.
I used a hatchet to cut the points on all of them. That was probably the most unpleasant part of the job. Not so much for the thinner pieces, but for all the thicker ones. I’m ambidextrous for most things, left handed when it comes to fine motor control, but for some things, I am completely right handed.
Using a hatchet is one of those things, and my right hand has been in terrible shape lately. I had difficulty gripping the hatchet, and had to stop frequently to give my hand a break.
The draw knife was awesome for debarking the wood. It’s still quite green and came off easily. I don’t have a way to secure the pieces I’m working on well, so there were quite a few times when I was pushing instead of drawing the blade – and it works just as well that was, too. For some of the thinner pieces, though, it was easier to just use a knife to debark them.
Also, no, that is not rust on the blade of the draw knife. It’s stained with tree sap.
The stack of the thinnest pieces did not get debarked. It would have taken forever and, at their sizes, it would have been awkward. The pieces that will be taking the most stress, however, have been debarked.
That all took a few hours.
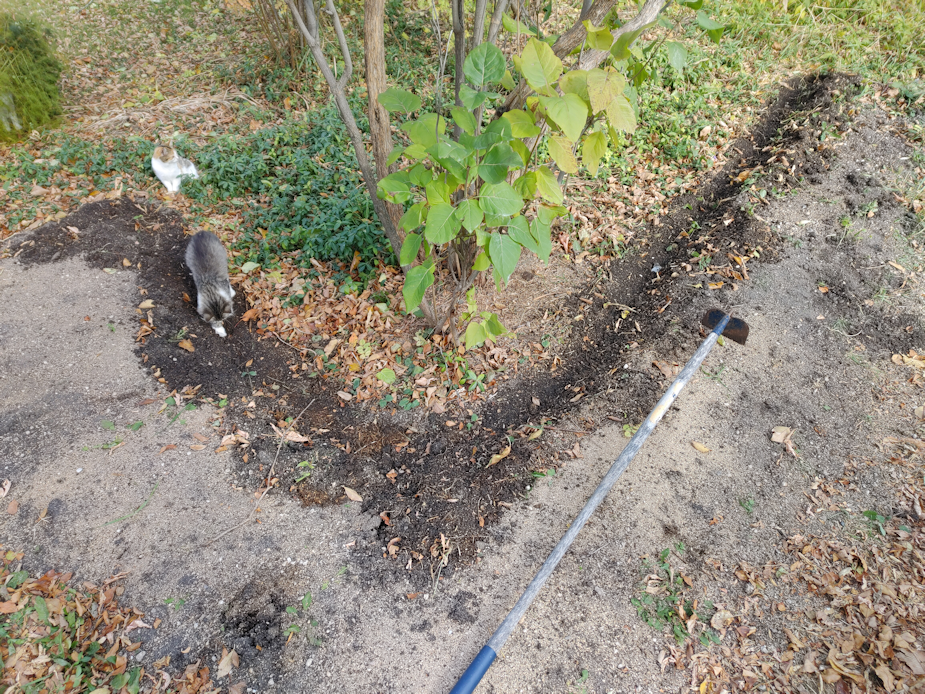
Then it was time to get to the garden bed. I pulled the lettuce I’d left to go to seed (it looks like we’ll get seed from just one of them) and got ready to prep the bed. Without walls, soil was falling into the path and the inside of the L shape, and I don’t like wasting good soil!
I used a hoe to draw some of that soil back into the bed, and level off the edge, where the uprights will be going.
The three longest pieces will form a triangle at the inside of the bend. When we start weaving branches through the posts, these will be taking the most stress. Working out from there, one 3 ft piece will go along the short end, and three down the long end. If I have enough materials to do it, I plan to build up the wall higher at these posts, as much to wall around the lilac as to create a wall for the bed.
The four 2 1/2 ft pieces are for the corners at the ends of the bed.
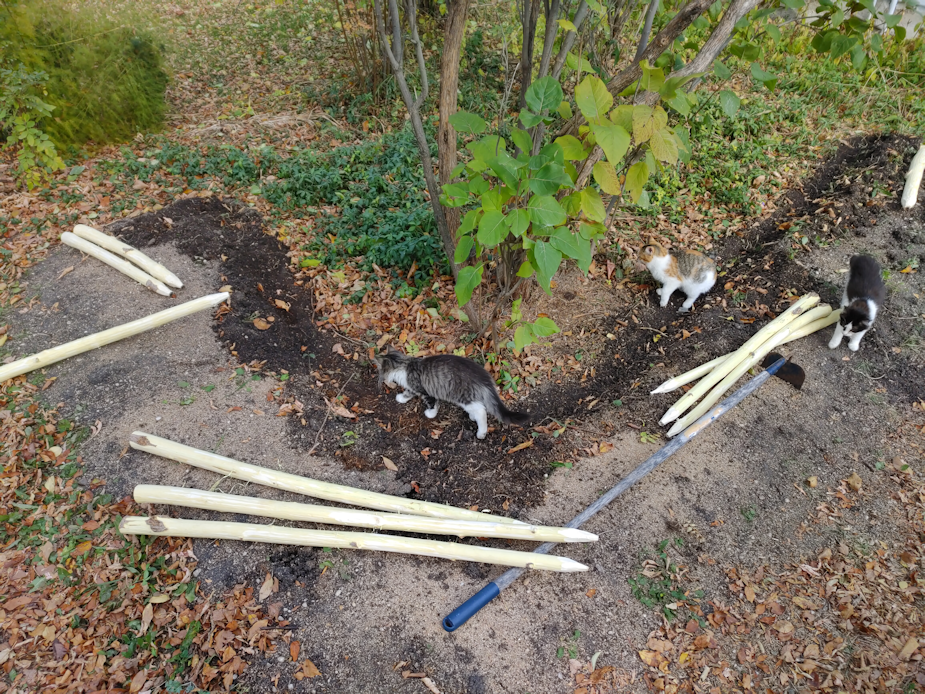
To install the posts, I used the pencil point bar and hammered it into the ground.
Unfortunately, that old hammer doesn’t have the right handle on it, and the head fell off again. I had to switch to a sledge hammer.
I really didn’t want to switch to the sledge hammer.
Ah, well. It worked better. I’m just going to be in a world of hurt, tonight!
I started by placing three posts in, then tied twine between them as guides for the rest of the posts. Then I laid out the spacing for the remaining two 4 ft posts, and the four 3 ft posts.
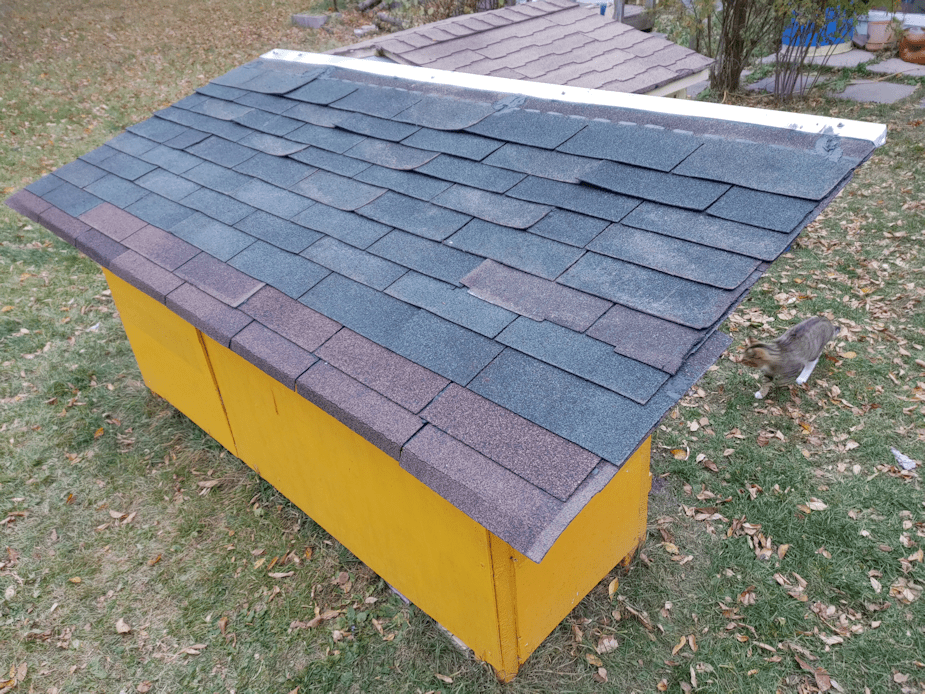
At this point my daughter, who had been working on putting salvaged shingles on the kibble house, ran out of roofing tar. I’d only picked up a small can for patch jobs, never expecting to need more.
So I left my daughter to continue pounding in the posts while I went into town to pick up more tar, and a few other things while I was there. When I came back, I found my daughter lying on a tarp on the ground surrounded by kittens. She is having much more success at socializing than I am!
She had even pounded the other two corner posts at the ends of the L shape.
The weather was starting to get worse, so I quickly filled in the gaps with the smaller 2 1/2 ft posts.
The long end of the L shape will be only 2 feet wide, so the end posts needed just one more added in between them, plus three more along the north side. The short end of the L shape needed only 2 more to fill the gap. Since this end can be accessed from three sides, we’re okay with it being wider than 2 feet, so the end posts there got two more in between. The rest of the posts will be for the outside of the L shape.
From the looks of it, I’m going to need to find more pieces to be able to finish the outside of the bed, but I’m not concerned about that right now. It’s the inside of the L shape that I need to get done first.
By this time, however, dark clouds were rolling in and it was starting to look like rain, so I left the job at this point and focused on cleaning up and putting away anything that might blow away. My daughter, meanwhile, finished the roof of the kibble house.
The green shingles are almost 50 years old and are in pretty rough shape. The brown ones are better, but they’re almost 30 years old.
The water bowl house roof is thinner plywood, so we’ll be using pieces of metal roofing that we’ve been scavenging for various things since we’ve moved here. If we used shingles, the nails we have would go right through by nearly half an inch, and that would be a problem! I dragged a piece of metal roofing out from the barn that we can cut in half and lay side by side to cover the roof of the water bowl house, but I also spotted a stack of corner pieces. I brought one over, and helped my daughter put it on the edge of the shingles on the kibble house. I found a bin of metal roofing screws in the warehouse, so I grabbed a bunch for when the water bowl house is done, and my daughter used a few of those to install the metal cap on the edge of the roof, using the screw holes that were already in the metal – after making sure to put some tar under each hole, first.
Almost everything about the kibble and water bowl houses has been done using scavenged bits and pieces we’ve found around the property, and a lot of it is pretty old and starting to rot. We don’t expect these to last long, but using paint and even decades old shingles will help them last longer. At some point, it’ll be nice to be able to build versions using new materials, all well measured and cut and leveled, etc. But this will do for now.
Once this was done, I set up a longer extension cord I found that was in good shape, and was able to plug in the cat’s house. We lifted the roof and put in the high density rubber mats I’d dragged out of the barn, which will help insulate the floor. There’s a thick scrap yarn crocheted blanket that is laid out on top of the mats, too. We will not be using straw this year. As much care as we have taken with the terrarium heater bulb, I would much rather not have straw in there! The heat bulb is working fine, with the heat shield still in place, and the timer is set to light sensor, so it will turn on when it gets dark, then off again when it gets light. The smoke detector was tested, too, and it’s working fine.
Once the water bowl house is done and set up where it will go, we’ll be able to plug in the heated water bowl through the cat’s house entry, too.
Tonight, the cats will have a warm and cozy place to stay if they start feeling too chilly. I especially hope the tiniest kittens will start using it!
As for me, I’ve pain killered up and hope I’ll be able to continue in the old kitchen garden tomorrow. For the weaving, I plan to cut the willow branches and use them right away, while they are still very green and flexible.
I really hope this works out. Otherwise, that’s a lot of work for nothing! Well. Not for nothing. Now that those posts are in, even if wattle weaving doesn’t work, I could still use them to hold whatever we find to use instead. It’s all fly-by-the-seat-of-our-pants work, anyhow!
We are having a nice day today, before temperatures drop quite a bit tomorrow, so I wanted to get some more done on the old kitchen garden. We’ll expected to have only one cold day before it warms up again, so we should still be okay for getting things done.
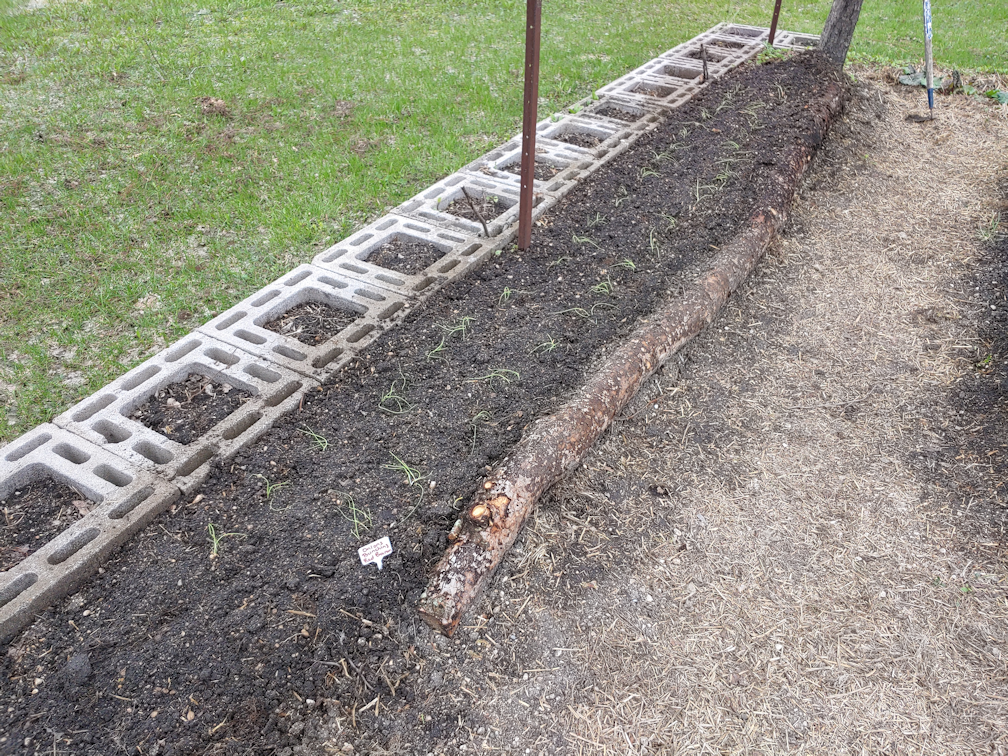
With the new raised bed done, it was time to work on the south edge of the old kitchen garden.
This is where my daughter has planted her irises, and at the far right is where her daffodils are. The bulbs were planted deeply, so that they would better survive our winters, but it meant I could only dig around the top few inches. Which is where most of the roots and rhizomes are, so that worked out.
We had a couple of boards on the ground to mark where the outer edge was, though they were mostly covered by grass and weeds. After moving those out, I used where they were as my guide for were to work while clearing things. Once I’d weeded as much as I could, I wanted to see what I could do about the stepping stones and the paths we’d be leaving open in the wall it will be edges with. I found one more paving stone, like we’ve got as stepping stones under the kitty’s butt. I also tried to find matching, unbroken bricks for the gap in the wall.
The other stepping stones are actual stones. After digging around the rock pile near my late father’s car, I found a couple that had split and were nice and flat.
If you look just above the handle of my digging tool, you’ll see a bit of green. That is one of the irises that, for some reason, it still green. I wanted to make sure it was protected when we use the stepping stones.
The stones and bricks were laid down, then I dug a shallow trench along the outer edge. I was able to fit the shortest log left over from before between the concrete block retaining wall and the bricks, without having to shift the bricks much at all. The longest log from the pile just happened to be the perfect length to fit between the two pairs of bricks, with no adjustments! The last log I added didn’t need to reach all the way to the laundry platform, since that area is sheltered by the mock orange tree you can see the leaves and branches of in the bottom corner. I just hope I didn’t cover that single Egyptian Walking Onion that’s somewhere in there. That thing has managed to survive for many years. I’d hate to be the one that finally killed it!
The logs are just there as temporary place holders. My daughter wants to use rocks to create more of a wall along the edge. Once the logs and stepping stones were in place, I spread the rest of the sifted soil on the tarp all along the edge, and the logs will help keep the soil in place.
This is the first year we were able to protect that onion enough for it to grow bulbils. You can see they’re sprouting, but no roots had started to form, so I moved it out. Then I found another onions while I was weeding.
I figured, what the heck. I may as well plant them!
I planted them along the raised bed, covered them with a grass clipping mulch (and put some around that one iris by the stepping stones), then added sticks at either end to mark it. I knew for sure that there wasn’t anything else planted there. I figure they will be sheltered by the log wall, and still get full sunlight, too. If they survive the winter, we might have more walking onions next year!
That done, I gave everything a thorough watering, including washing the soil off the bricks, stepping stones and the log edge.
After that, it was just a matter of clean up. The pile of roots and weeds went to the burn barrel.
The area is now done. The next area I need to work on is the L shaped bed around the double lilac. I’ve got lettuce I left to go to seed in there and that’s it. With the weather we’ve been having, though, I’m not sure we’ll be getting any seed out of them this year. We shall see.
There are some things I wanted to try with the old kitchen garden, but kept getting distracted. So today I gave the girls a to-do list for the main garden beds, and got started.
This is the main area that I wanted to make changes to.
The areas surrounded by red lines are where we currently have stepping stones. The long red line on the bottom is the border outside of where my daughter planted her irises. You can see the one walking onion, now laying flat on the ground, that has been coming up every year since we moved here. This year, it actually produced a head that, hopefully, has planted itself now. To the right of the onion is where my daughter’s daffodils are planted. We currently have a couple of boards on the outside of this area, but we’ve had issues with people completely ignoring them and stepping on the onion. So one of the things we want to do is build some kind of low wall along that red line, with openings to the stepping stones, just to keep wayward feet out of there.
Where I wanted to work on today, though, is the area marked in orange. That is where we planted our bread seed poppies, using seed collected from last year. They never got to their full size, and the area was way too full of weeds. There was just no way to pull the weeds without damaging the poppies.
So I decided to make a low raised bed in that spot. The first thing that needed to be done, though, was to get rid of those weeds and their root systems, as best as possible.
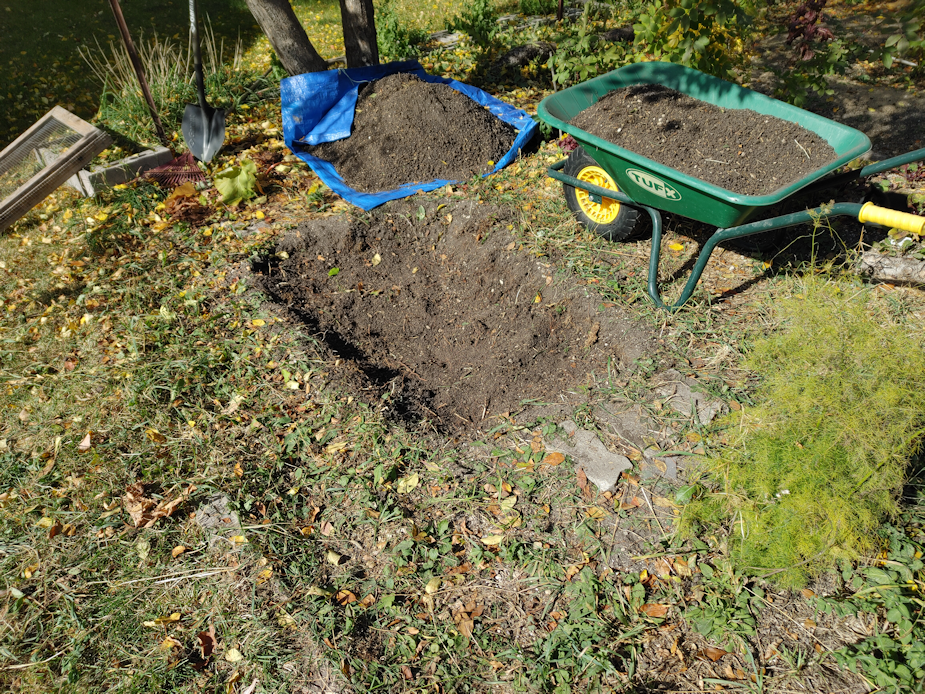
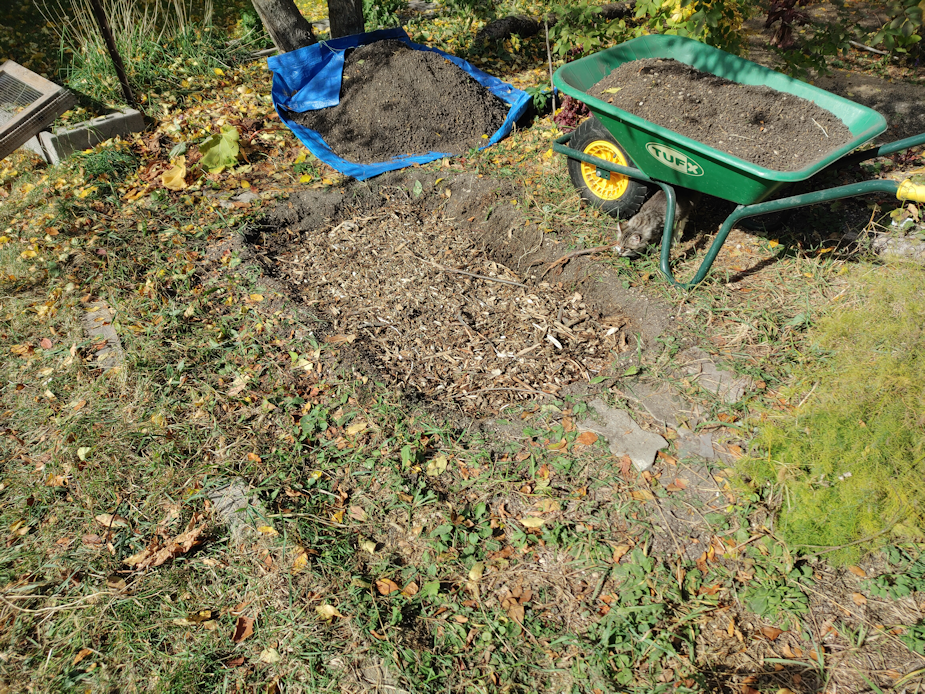
That meant breaking out the wheel barrow and soil sifter.
For such a small area, it took a long time to remove the soil and sift out the roots and weeds.
Some of the roots, from the nearby ornamental apple trees, needed loppers to clear them out. I ended up digging out a lot more of the soil than expected.
The tarp has two wheel barrow loads of sifted soil on it. I didn’t want to go too deep, so I loosened the soil on the bottom to try and pull up more roots, but there’s no way to get them all out. At least I got the bulk of them out.
I hope.
While sifting the soil, I pulled most of the roots out and tossed them onto the grass for later clean up, then whatever was left on the screen after sifting got dumped near some trees behind the storage house, where it will be used to fill in and level some low spots.
We’ve been building up the soil in this garden since our first summer here, and it really showed. Unlike other areas, I never hit the sand and gravel that is so close to the surface in our area.
The soil was really, really dry, though, so my first amendment was a layer of wood chips, to act as moisture absorbing sponges as they break down. I’ll be adding other layers of organic material before putting the soil back, but first I wanted to build walls.
My initial thought was to drive strong stakes into the soil, then weave a wattle wall. I need to clear the suckers out from around the maples. Especially where the branch piles used to be. With those piles gone now, I can finally reach them. As I took a closer look at the suckers, though, I realized they were not straight enough, or long enough, to be suitable for weaving around the uprights, even for such a small bed.
There were, however, those lengths of wood that couldn’t be chipped, neatly stacked nearby.
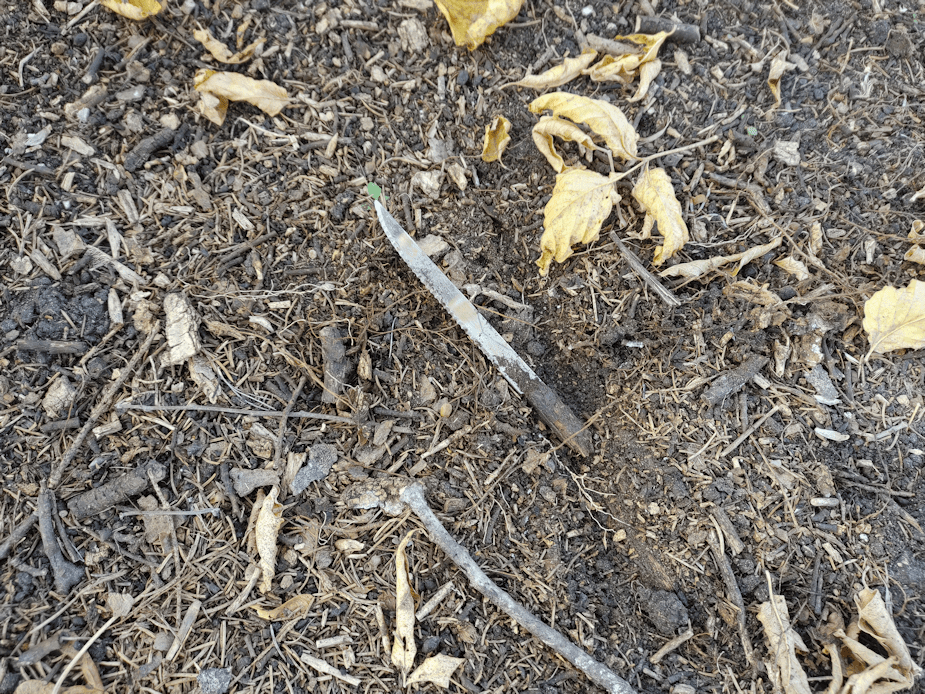
So I went through the pile and chose a whole bunch of the straightest ones and loaded them on the wagon. As I was taking them to the old kitchen garden, I went through where one of the branch piles used to be. It’s just bare ground, which is why I was able to see something reflecting in the sunlight.
Something pointy looking, and very bright.
Oh, the things we find around here!
Why on earth would there be an old steak knife buried in the soil here? It’s been here long enough that most of the wooden handle rotted away and broke off.
I’m glad I spotted that, because just the point was sticking out, and it would have been a pretty nasty thing to step on!
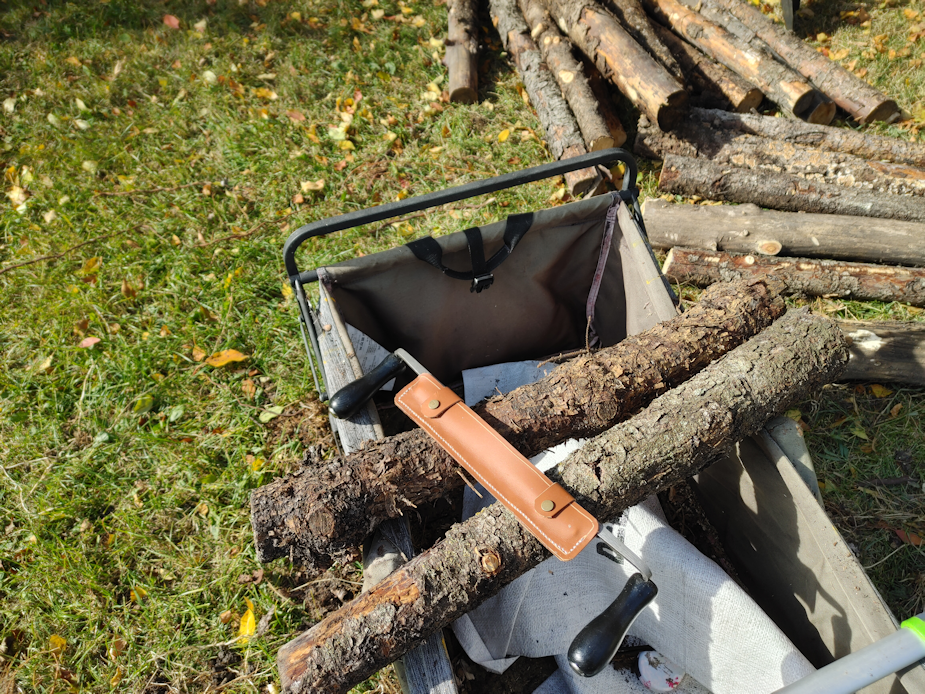
I brought more logs than I thought I would need, including shorter ones for the ends of the bed. When I made our high raised bed, the wood was not debarked, but I have a draw knife now, so I wanted to do that with these.
Isn’t the leather cover my husband made for it awesome? It fits perfectly, and he made sure the stitching is super strong.
I measured the space I’d dug out, and it was almost exactly 2′ x 4′. Conveniently, the tree guys cut these log pieces to a maximum about 4′ in length. I used my baby chainsaw (pruner) to cut pieces to length. I’m glad I got that extra battery, because I went through both of them to get it done! I also used it to remove the nubs of branches on some of them. I’ll let the batteries recharge before I finish that part of the job.
I cut enough to make the bed three logs high. As the soil slopes and is quite a bit lower on the outside, I plan to use the thicker logs on the outside and try and level it off a bit. Or I might have three logs on the outside, and only two on the inside. We’ll see.
It took me almost 3 hours to get to this point, and I was done for the day. Once all that was prepared, I cleaned up the log ends, bark pieces and the roots and weeds. Those went into the burn pile, where we also burn the sawdust from the used stove pellets in the litter boxes (sure beats hauling it all to the dump, like we did with the clay litter!), and our burnable garbage. The garden bed will have to wait until tomorrow to finish. There wasn’t much wind today, so I did a much needed burn.
While I was tending that, the girls headed out to the trellises to start salvaging the netting and bamboo stakes. It took them forever to free up the netting the pole beans were on! Those beans were well wrapped around it. They salvaged the netting and the bamboo stakes that joined the A frame supports across the bottoms. The A frame supports were left for now, as they are currently holding up the trellis frame! Those are going to all come down, eventually, but after it took so long to free up the netting, that got left for another day. Those trellises weren’t built to last more than a year, and we got two years out of them, so I’m impressed that they lasted as long as they did! The next ones we build will be much more permanent.
While they worked on that, and I was tending the fire, I started getting messages from the cat lady. She will be able to book three more spays and neuters for us soon. We pick which ones need to be done first. It’ll be in a town further out, so she will pick up the cats, keep them for their recovery period, then bring them back. There are still problems with too many surrendered cats in the adoption system, and she’s had virtually no progress with adopting any cats out at all, but she is still able to get donated spays and neuters at various vets around the area. Adoption will be easier with cats that are fixed.
We still have Big Rig and Tissue that need to be done, since they got into food while they should have been fasting and their previous appointments had to be cancelled. I was thinking we might want to start doing outside cats, though, as population control, but the kittens we’ve socialized enough may still be too young.
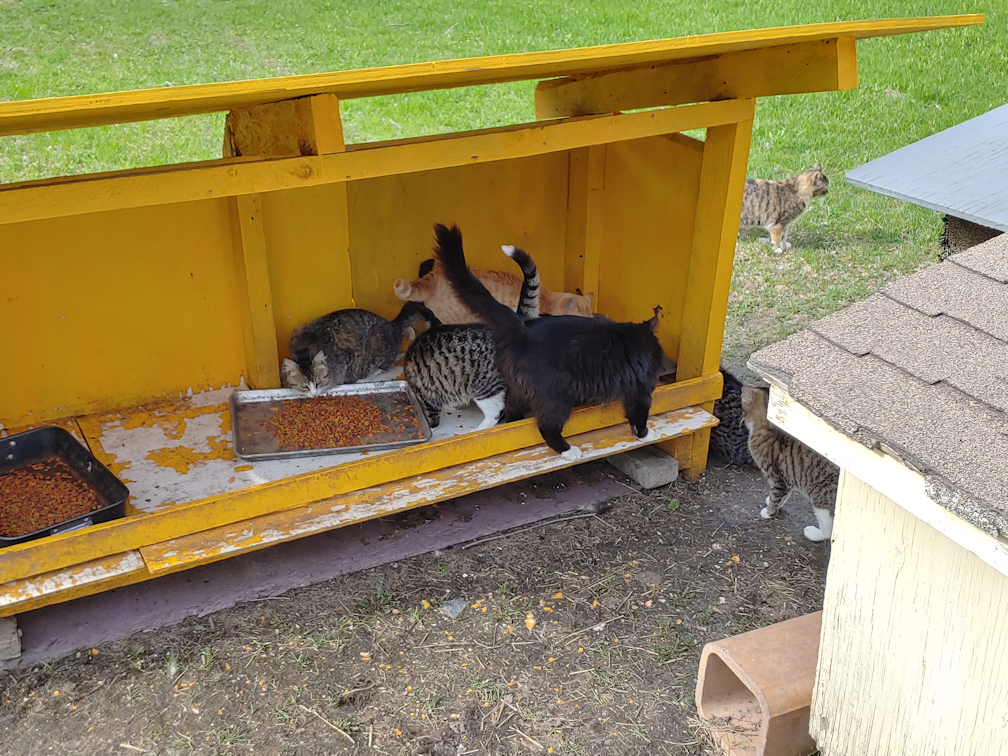
We have made socialization progress, though! Not with the black and white one in the back, looking at the camera. We still can’t touch that one. The three at the peak of the cat shelter roof are the most socialized – they LOVE attention! Those four are siblings from the same litter. The fuzzy grey tabby is a female.
The muted calico on the far left has been allowing us to pet it regularly now, though it’s not quite as socialized as the littler litter. It’s sibling, the brown tabby starting at the camera, is male. The girls have been able to pet him but today, for the first time, I was able to not only pet him, but even pick him up! He wasn’t too comfortable with the picking up thing, but loved the ear skritches, so after I put him down again, he came back for more!
If we are going to get the two indoor females fixed, we can also choose one male from among the outside cats. The girls were thinking one of the smaller ones. The thing is, once we’ve got an outside cat fixed, then being kept indoors with the cat lady during recovery before coming back to us, it’s not going to go back outside. Especially not with the weather changes right now. Plus, once fixed, chances of adoption are higher, and we’d have to made sure we can actually get at it, if a permanent home is found.
If all goes well, though, the cat lady will be able to find homes for several cats over the winter!
The tree guys came today! They’ve been here all morning, and have just headed into town for a lunch break. They have finished the big pile in the outer yard. When they come back, they’ll do the small pile by the garage, then work on the piles in the maple grove.
Now, when the owner of the company came here for an estimate, we talked about getting as much done as possible for 3 hours, because that’s what my budget is.
When the guys came this morning and I was walking around with one of them, showing him where the piles were, and where they could dump the chips, he told me I’ve got them all day. He knew I had cash for them, and whatever else it cost, we can pay them as we are able.
!!!!
Which is good, because that big pile took about 4 hours to do.
Meanwhile…
Check out the sunflowers we have opening now! We did not plant any sunflowers this year, though it had been in the plans. There are a few things we didn’t plant, with how crazy this spring was. And yet, we have several sunflowers growing, all planted by the birds. And it looks like the extra bit of fertilizer they were in helped, too! 😉
The Little Finger eggplant in the black grow bag are blooming! It would be awesome if we actually got some eggplant before the first frost hits.
I finally got to working on the cleaning up the lettuce bed.
I kept at least two of each variety of lettuce to go to seed.
After working on pulling out as many weed roots as I could, I decided it was not worth trying to plant anything at the end closest to the house. There’s just too many things spreading into there.
On the left is the Bloomsdale spinach I already planted.
Between the kittens and the grasshoppers, I decided these needed to be covered. I had some longer plastic coated metal stakes I got last year. The metal was hollow tubes, and they bent and broke easily in our soil. I ended up breaking some of them in half, to have me a bunch of shorter rods. I finally got to use the PEX tubing I picked up for this purpose. They fit over the metal stakes perfectly.
The small space near the Bloomsdale spinach got more Bloomsdale in it, while the longer space got Hybrid Olympia spinach planted in it.
After lashing the last of my 6′ bamboo stakes to the middle of the hoops, I grabbed the shorter pieces of mosquito netting from the main garden and set them up here. They are not pegged to the ground. I’m hoping to not need to do that. As they are now, it would be a simple matter to slide the slips up the hoops to be able to reach under. The excess on the ends are rolled around boards, which can also be easily moved, if needed.
The netting does have holes in it, so insects could still get in, but not as much.
When cleaning up this bed in the fall, I’m hoping to start adding walls to build it up higher. I’m just not sure what I’ll have available to use for that. I don’t expect to make high raised beds here, but I do want to have something in between a high and a low raised bed. Partly to make it easier on the back, but also partly to get it up and away from all those invasive plants! That and working around the lilac is a pain. This bed will be a maximum of 2′ wide, so we’ll be able to each all of it from just one side.
Oh! I see the tree guys coming back on the garage cam. Yay!
I am just so excited by the fabulous job they are doing!
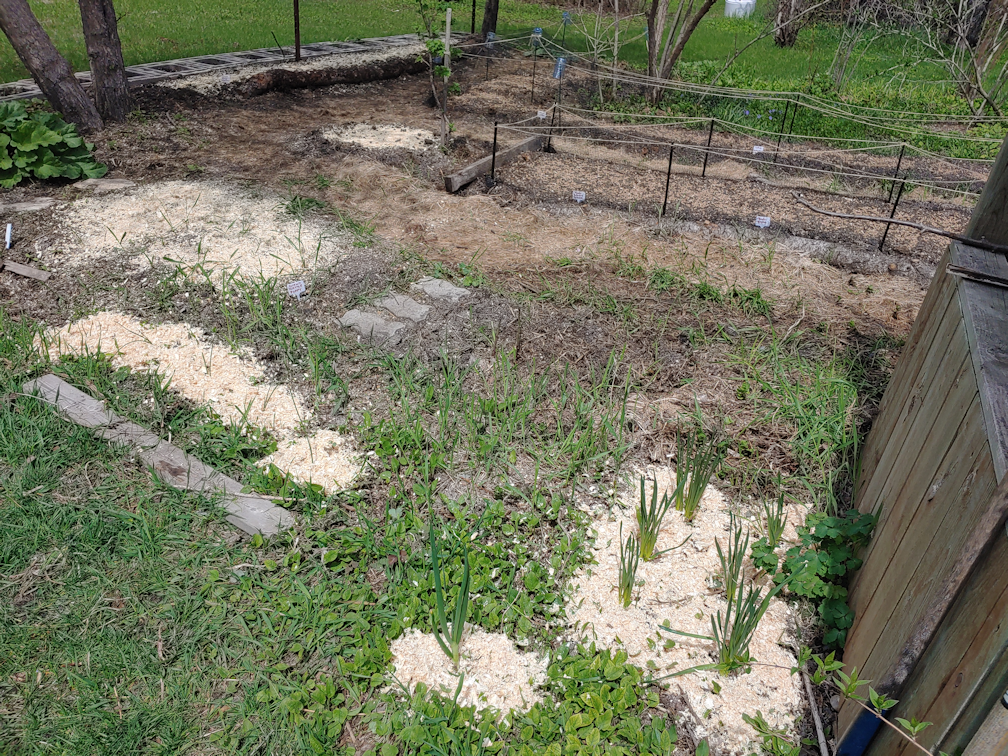
After finishing my morning rounds, I remembered to check the tracking information and saw that our potatoes were ready for pick up. After picking up the nice big, heavy bag, I made a spur of the moment purchase and got some more wood shavings. We still had a small amount left over from last year, but since we can’t quite use our wood chipper yet, I decided it was worth picking up another bag. I’m glad I did!
One of the issues we have with our soil is that, when it’s watered, it develops a hard crust at the time, which seedlings have difficulty breaking through. One way to reduce that is with mulching – and that’s something we don’t have in the old kitchen garden right now. A straw mulch would be too much for what we’ve got in there right now. We do have lots of the hardwood pellets we use for cat litter, but I decided to use the shavings, too.
For some things, I could use the shavings for a slightly thicker mulch, such as around the irises and daffodils, and that one onion that predates us and keeps coming back, no matter how many times something managed to crunch it. The onions along the retaining wall are super tiny still, so they just got a very light mulch, as did the area we planted poppy seeds in, and the tiny patch with lettuce seeds next to the rose bush. More can be added later, as things grow, if necessary.
I even mulched one of the retaining wall blocks. Last year, we found a mystery bulb lying on the grass. We weren’t sure which of the bulbs we’d planted had lost one, so I just stuck it into this cube to see what came up. Nothing did, so it was quite a surprise to see what looks like a tulip emerging this year!
For the beds that are covered with netting, I still used the hardwood pellets, since they can fit through the net. It was a bit difficult to get it to spread evenly, since they wanted to roll into the furrows seeds were planted in, but those are what we want to protect from crusting, anyhow.
All the mulch got watered, so they can help keep the soil moist, and for the hardwood pellets to break up into sawdust. The seedlings should be able to push through the sawdust just fine.
Over time, the crusting problem will lessen as more organic matter like this mulch, breaks down into the soil. Definitely a long term process, but that’s par for the course! This garden has already been 4 years in the works, since we started cleaning it up and prepping it, our first summer here!
Ah, but what about those potatoes we finally picked up?
That will be in my next post! :-) I am really happy with them!
Today has turned out to be a warmer day than predicted, and beautifully sunny. When heading out to do my morning rounds, I had a whole crowd of hungry kitties, waiting by the sun room door for me!
They were running around so much, I didn’t even try to count them. While putting food in the kibble house, TDG not only let me pet him, but let me pull the big ole wood tick in the tip of his ear! In fact, he didn’t even seem to notice I did it.
Which reminds me; while topping up the cat food last night, I got to touch Rosencrantz a bit and finally got a closer look at one of her ears. I thought she might have lost the tip to frost bite over the winter, but the tip is still there! It’s just badly torn. Not a new injury. Not much we can do about it, unfortunately.
The transplants got set outside for hardening off. They were supposed to be out for 5 hours, but we ended up bringing them in a bit early. The winds really picked up, and some of the pots were being blown around.
Wind or no wind, I was determined to get the old kitchen garden finally planted!
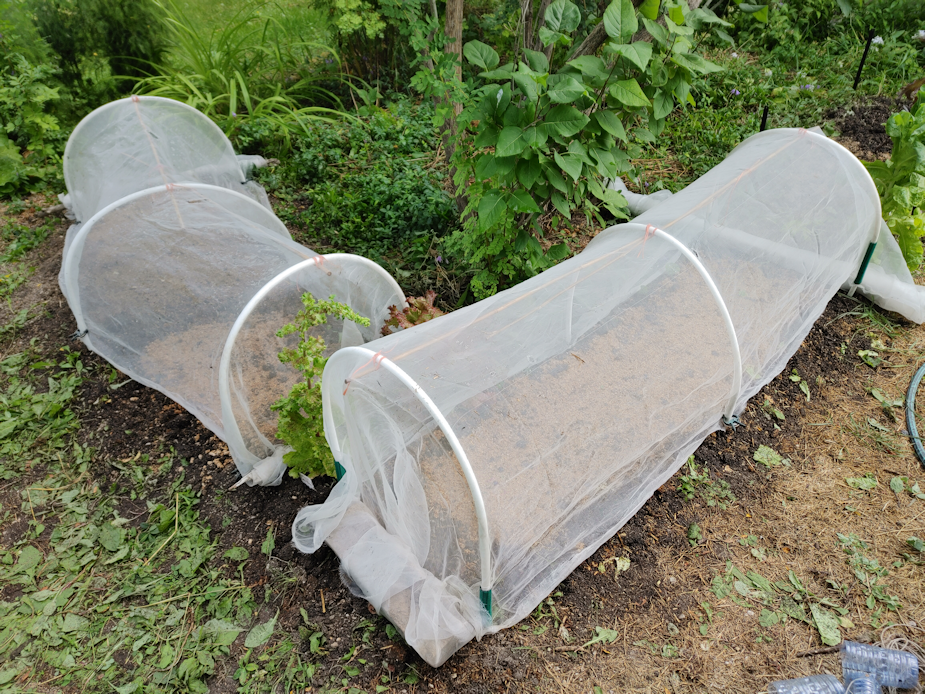
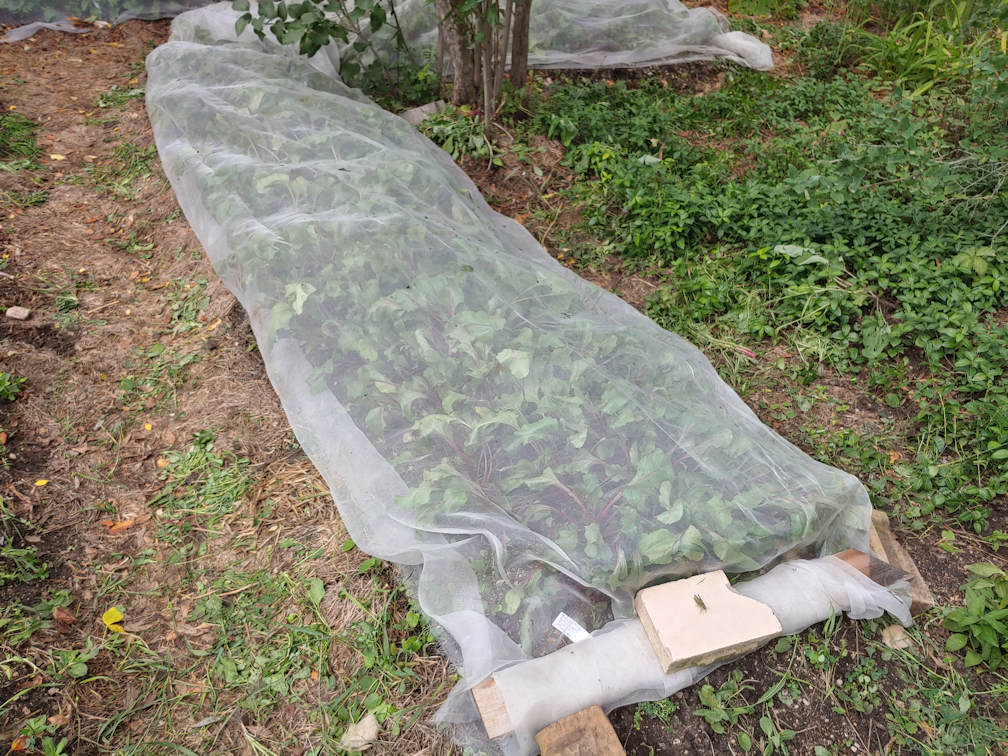
This is now our beet bed. We bought two types of beets this year, Cylindra and Bresko, plus we had some Merlin left over from last year. The support posts handily divided the bed into three sections, so that makes it easy to keep track of where one type starts and another one ends.
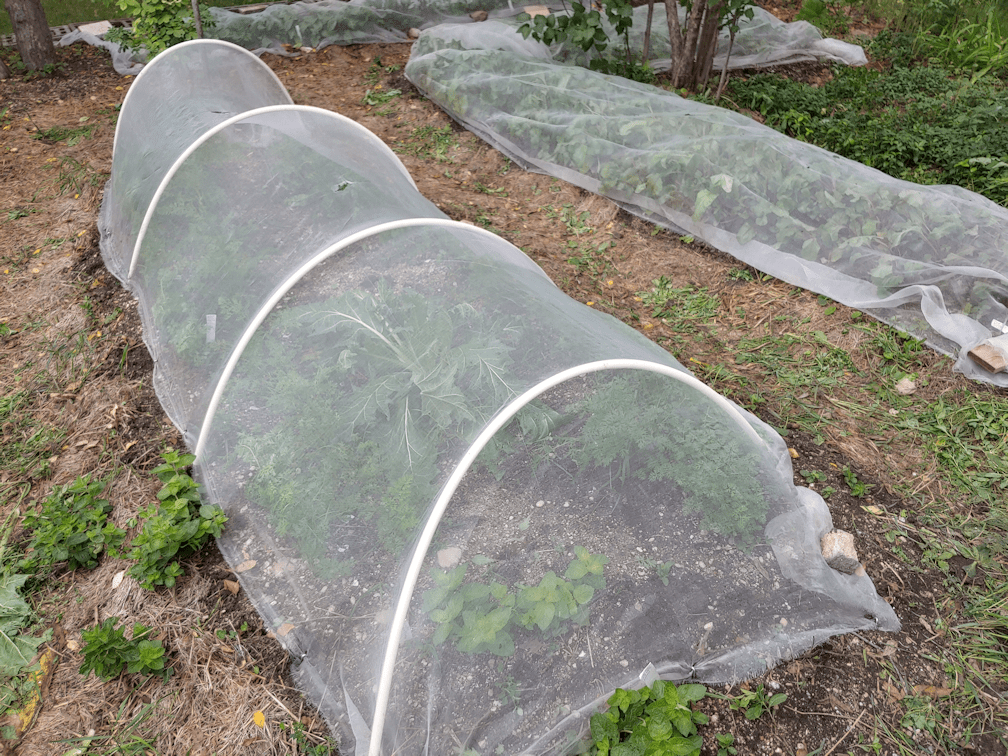
After the bed was seeded and watered, I broke open the roll of netting. This is the stuff my daughter picked out that I thought could be used for deer fencing. It’s a much finer net than I expected! The black just disappears, too, but in the photo, you can see where the excess is bunched up along the sides. I’m really glad I found that big bag of cheap tent pegs in the garage. We used quite a few of them to pin down the edges of the netting. The short ends are held in place at one end by a stick rolled up in the excess, while at the other end, the excess went under a board I was using to mark the end of the bed.
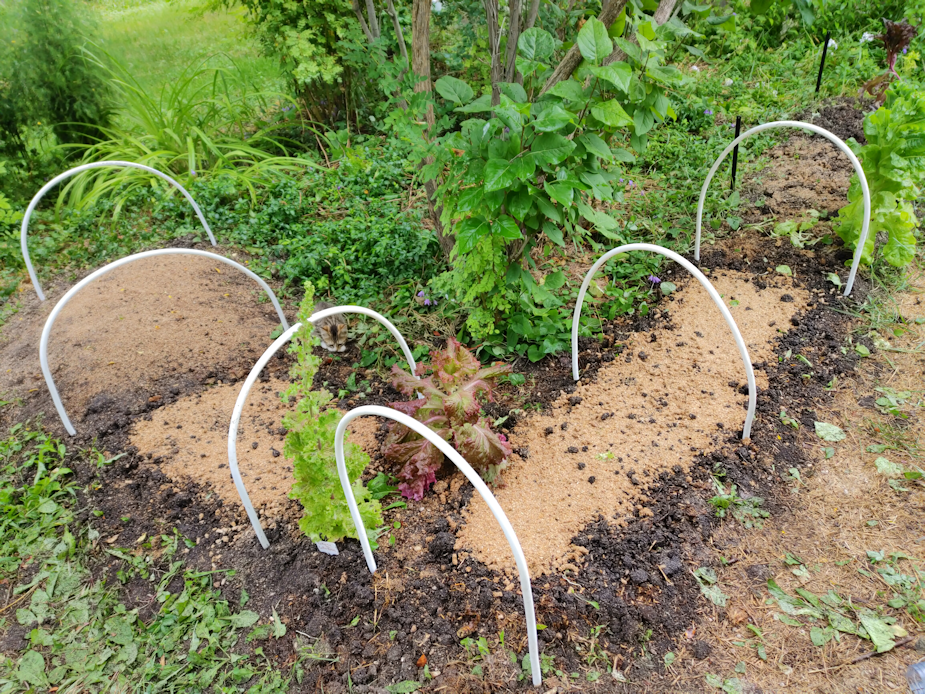
Next was the L shaped bed. Lettuce went into there. I thought I had 4 types of lettuce left over from last year, but it turned out one of the envelopes was empty. That actually worked out, for the amount of seeds in the remaining packets.
The hard part was covering the odd shaped bed. One of my daughters came out and we sized up a piece of netting for the longer part of the L shape and cut it. The netting is 14′ wide, so we stretched it out on the grass and cut it in half.
The short side of the L, up to the label you can see near the bottom of the photo, is one type of lettuce, which is about as much as the other two together! There were still a few seeds left over, including some that had spilled in the baggie the seed packets were in, so those got scattered in the odd little bit of space next to the rose bush. They didn’t get covered with netting; the space is too small to bother.
The long side of the L shape was pretty easy to cover, but the short side curves around the lilac and gets wider at the end. While I used pieces from the canopy tent frame as supports at one end, there weren’t enough of that length for the whole bed, so I dug out some metal support rods I got last year. They’re not very strong and some had pieces broken off, making them shorter. Those matched the tent frame pieces more easily, but other were full length. I could push most if them deep enough to match heights, but with a couple, I kept hitting rocks that were big enough, I couldn’t seem to get around it. That one stake that has a spider web of cords from it is the highest of them all, and there was no way I could adjust it to avoid the rock I was hitting, and still have it where I needed it. (The bottoms of water bottles are there to keep the netting from falling down the stakes) That extra height in particular made pegging the netting down more of a challenge. In the end, we just had to push some of the stakes inwards to create some slack. We managed it, though.
That left one more bed to plant in.
For this bed, I transplanted the Red Baron bunching onions, in little groups of 3 or 4 seedlings. These are not going to get covered, since nothing eats the onions. Hopefully, the cats will leave the bed alone!
While working on this, I checked out the small bed we planted the poppy seeds saved from last year. I think they are starting to come up, but there are so many things coming up with them, it’s hard to tell! For all the roots I dug out of these beds, we’re still going to have a lot of weeds to fight off.
Now, the only thing left in the old kitchen garden are the retaining wall blocks. I’d transplanted mint into alternating blocks, but they’re not showing yet. I don’t know if they’re going to show up later, or if they got killed by the winter cold. It takes a lot to kill mint, but they did just get transplanted. I’ll leave those for now, but still plan to plant things in the remaining blocks. I just haven’t decided what, yet, since we will likely not be covering those. Plus, this area gets shaded by the ornamental apple trees a lot. With the T posts there, we could put up trellis netting and plant climbers, but anything like that would be deer or groundhog buffet, so we would have to find a way to cover them. It was very difficult to cover the retaining wall blocks last year. We’d planted lettuce in it last year, which we were able to protect from the deer, but didn’t count on the groundhogs getting at them.
We’ll figure it out. We can tuck something into the blocks, later one. For now, I’m just glad to finally get this garden basically done!
Oh, before I forget, just a quite update on my mother. I called her up this morning, and she’s still in a lot of pain. She’s quite surprised by it, it seems. She’s also disappointed. She thought that the doctor would be able to fix her. I tried to explain, they can’t fix everything, but she started taking about how, with all the modern technology we have, there must be something. I had to go back to using my husband as an example, since he’s been dealing with debilitating back pain for a very long time now. Even if they technically could do surgery for one thing, the risk was too high for little benefit, and it would have to be done again in 2 years anyhow – and that wasn’t even for the main source of his pain, for which there is nothing that can be done other than painkillers and, for some of it, physio. He hasn’t been able to do physio since we moved here. Some things just can’t be fixed. I don’t think my mother realised just how fortunate she is to have reached 90 and not had to deal with something like this before.
Ah, well. It is what it is. We just deal with the hand we’re dealt with!
I am really loving the longer days. I was able to get all sorts done this evening, while it was still light out!
The first job was to make some changes in the sun room.
A few things needed to be reorganized, which I worked on while the girls got the new metal sawhorses out of their packaging and set them up. There was no place to move the table saw, so one of them sticks out further than is convenient, but we can still get around it.
I suppose we could have laid out the closet door with the hinges down, but that happened to be the way my daughter and I grabbed it and laid it out. I don’t expect it to be a problem.
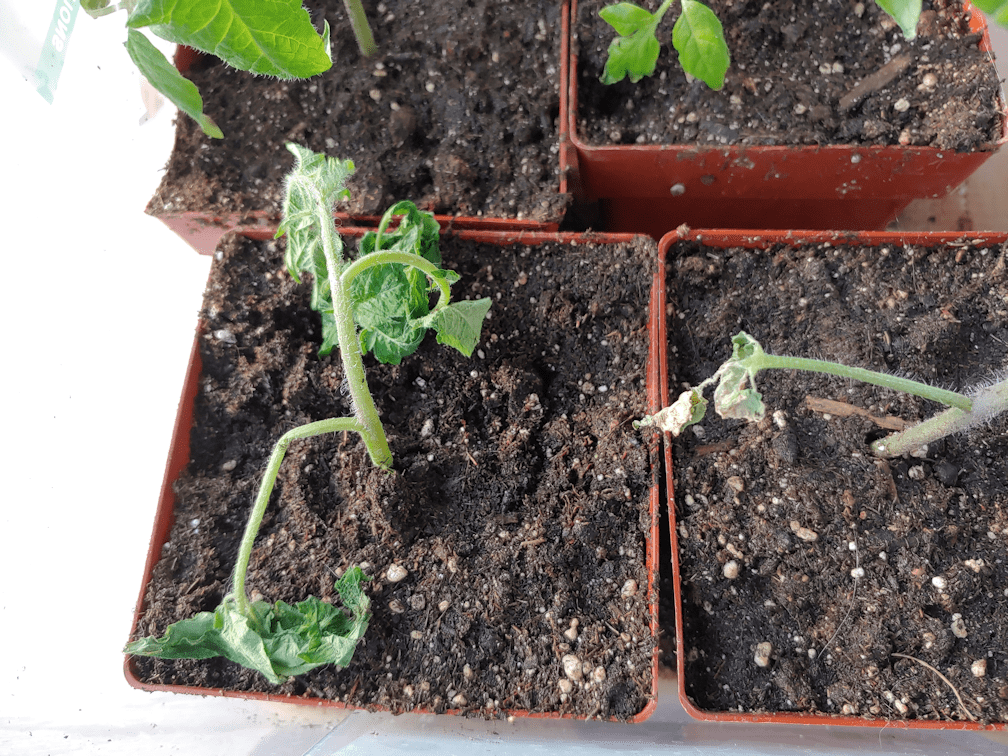
That done, I wanted to get those tall tomato plants out of the shelf, where they just barely fit.
Oh, oh.
Looks like Potato Beetle tried to jump into the bin that was in his favourite spot!
I do wish I’d caught this earlier. It’s pretty wilted. Still, tomatoes being how they are, I tried to salvage it.
I just buried the stem on the soil. Hopefully, those hair roots on the stem will do their job, and it will recover. If it doesn’t, we still have quite a lot of Cup of Moldova tomatoes.
That done, I brought the onions out of the shelf to give them a “haircut”, then switched them around when putting them back on the shelf.
The new set up is the perfect height to work at!
Next, I brought out the tallest plants that were in the mini-greenhouse.
I moved the two Canteen gourds out of the bin in the shelf and in with the larger tomatoes, then added laughably large poles for them to climb on. The poles look too big now, only in relation to the size of the plants, but those plants are going to get much, much larger!
More tomatoes went into the bin the gourds were removed from, another gourd that had still been in the mini-greenhouse joined the other two in the larger bin. The small bin of kulli corn got moved over. Hopefully, this will be a better spot for them. I also brought over a couple of pepper pots. They each had a pair of peppers in them, so I thinned out the smaller ones and repotted them. We’ll see if they will survive. Two more tomato plants joined them, as there wasn’t room for them in any of the bins in the window shelf. With the changes, though, there is now more room on the shelf for a couple more bins of seedlings, once we’re ready to move them over.
That done, I took advantage of the daylight, grabbed a hoe and went into the old kitchen garden.
I was able to prep three beds, including the one alongside the retaining wall blocks. There’s another bed on the left, in between where you can see stone and brick stepping stones. I won’t be touching that, as it was fall seeded with the bread seed poppies that grew there last year. We still have some of the seed pods, and I’ll be adding more seeds to that bed later on, just to make sure we get at least something. We did get another variety of bread seed poppies, but those will be planted in a completely different area, to avoid cross pollination.
The soil in these beds is not at all frozen – what a difference location makes! We’ll look through the seeds for direct sowing and make some decisions on what to plant here. We already sort of mapped things out, but things are flexible. This is a good location for root crops, be we already grew carrots and beets here last year.
Whatever we do, we’ll have to be prepared to cover the beds, so we don’t get a repeat of last year’s critter damage!
There are still the retaining wall blocks at the end. I transplanted mint that was growing where the log framed bed is, into alternating blocks. We’ll soon find out of they survived the winter. They’re mint, though, so it’s highly likely they did. We haven’t decided what to plant in the empty blocks. Perhaps some of the herb seeds we have.
There is another bed that should be quite workable now; the bed along the chain link fence where we planted tomatoes last year. We’re actually intending to put tomatoes there again this year, as they did so well in that location. The soil was very thoroughly reworked when a border of bricks was placed around it, so using it for the same type of plant again shouldn’t be a problem. Since it’s going to have things transplanted into it, and got well mulched in the fall with leaves, it’ll be left alone until planting time.
Gosh, it felt so good to be working in the dirt again! Though it was funny when I got my hands muddy, pulling out roots and weeds as I found them, and was able to go “wash” them off in snow.
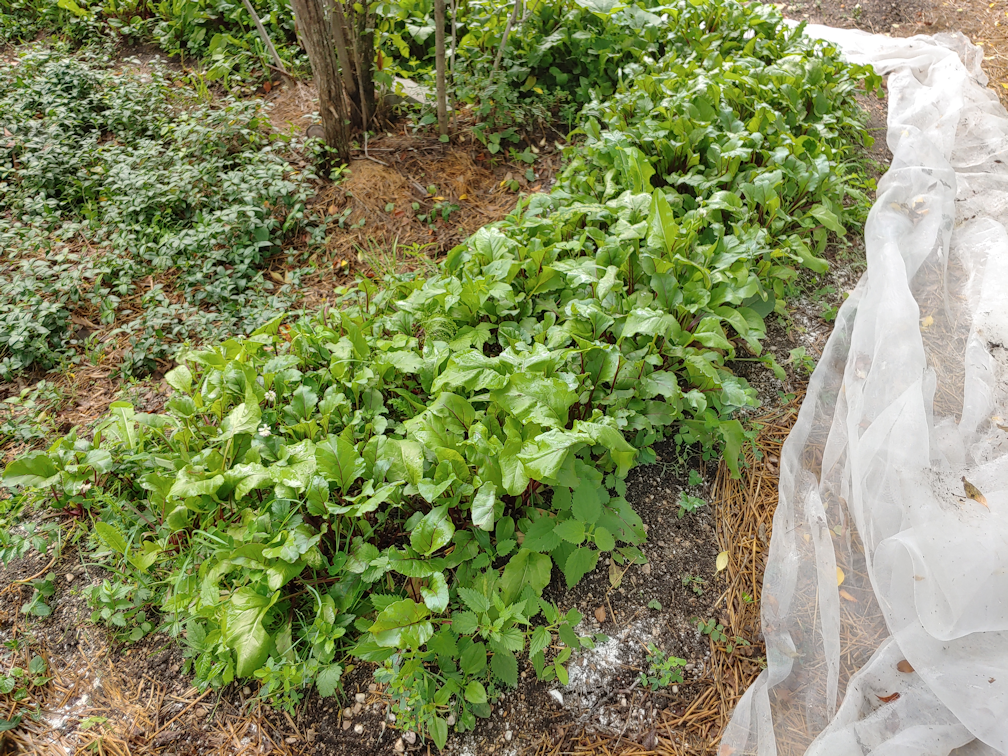
As much as I love all the rain we’ve been having, I was happy to have a mild, sunny day to get some work done outside. I finally got around to tending the big L shaped beet bed in the old kitchen garden.
This bed has had almost no tending, since we put the floating row cover on it to keep the critters out. This is how the two sides looked before I started.
Here is how it looked after a good, solid weeding!
There actually wasn’t a lot of weeds in there. After fighting my way through all the beet greens, following strands of weeds to their bottoms so I could pull them out by the roots, I found that there wasn’t much to pull out. The beets were actually choking out the weeds! Most of them were long and leggy and spread out, trying to reach the light, so when I pulled something out by the roots, I found I was removing quite a lot more plant than expected. The exception were all the sprouting Chinese Elms. It’s remarkable how deep and solid the roots are for a sapling that’s just a couple of inches high.
The beets themselves did not need any thinning, though I did accidentally pull a few out with the weeds. I wasn’t seeing a lot of beet roots developing, though. Hopefully, all the rain we’ve been having will result in a growth spurt!
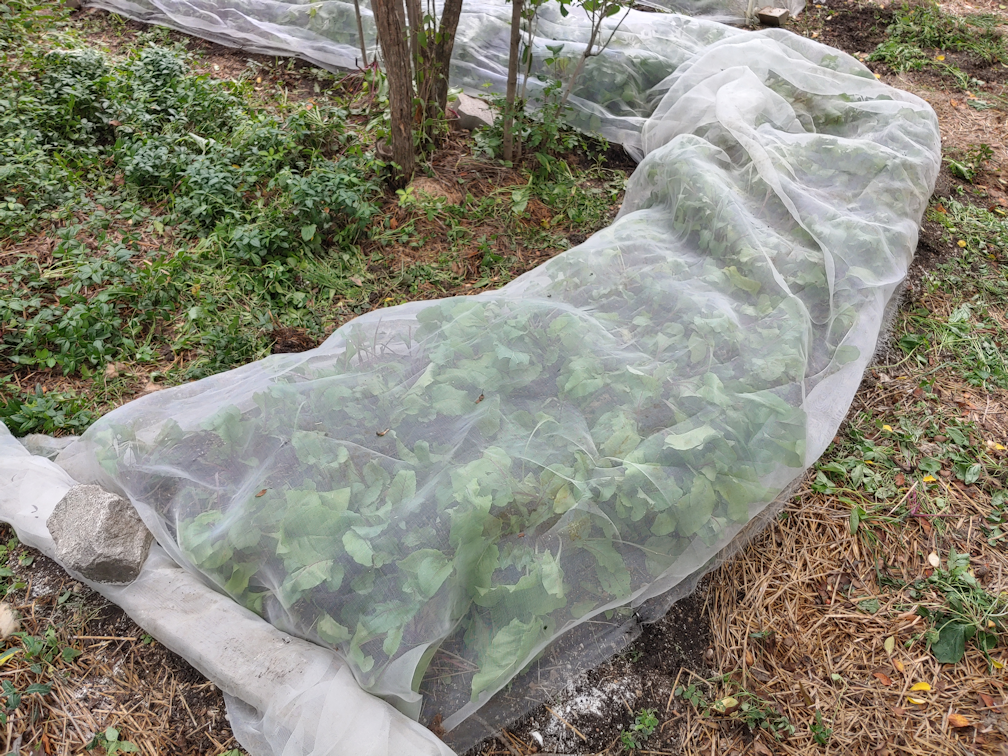
When it came time ot put the netting back on, I took advantage of the big package of tent pegs I found in the garage. The sides of the netting was pulled tight and snug to the ground, so nothing can casually push its way under the netting. No more rocks and bricks to try and keep it down. For the ends, I wrapped the netting around boards, then weighted those down. There is lots of slack in the netting for the leaves to grow, though I don’t expect them to get much taller than they are now.
That done, I worked on the carrot bed next. One of the inner hoops had come down, the doweling holding it in place breaking off completely. Another was well on its way down, too.
Which made for a good time to tend the carrots, too.
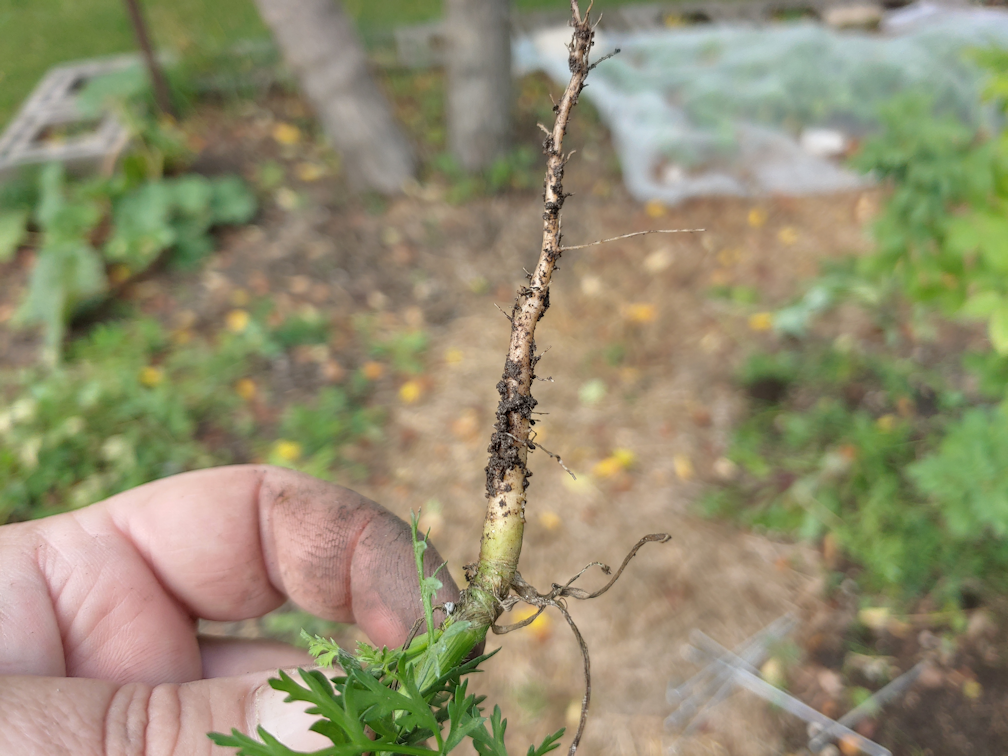
There are two types of carrots in this bed, and these ones have been going to seed. Carrots do to see in their second year, so it seems the grounhogs eating their greens has fooled the carrots into thinking they are in their second year.
Carrots gone to see do not produce much of a root!
These carrots got weeded, but did not need any thinning. The other variety did need thinning.
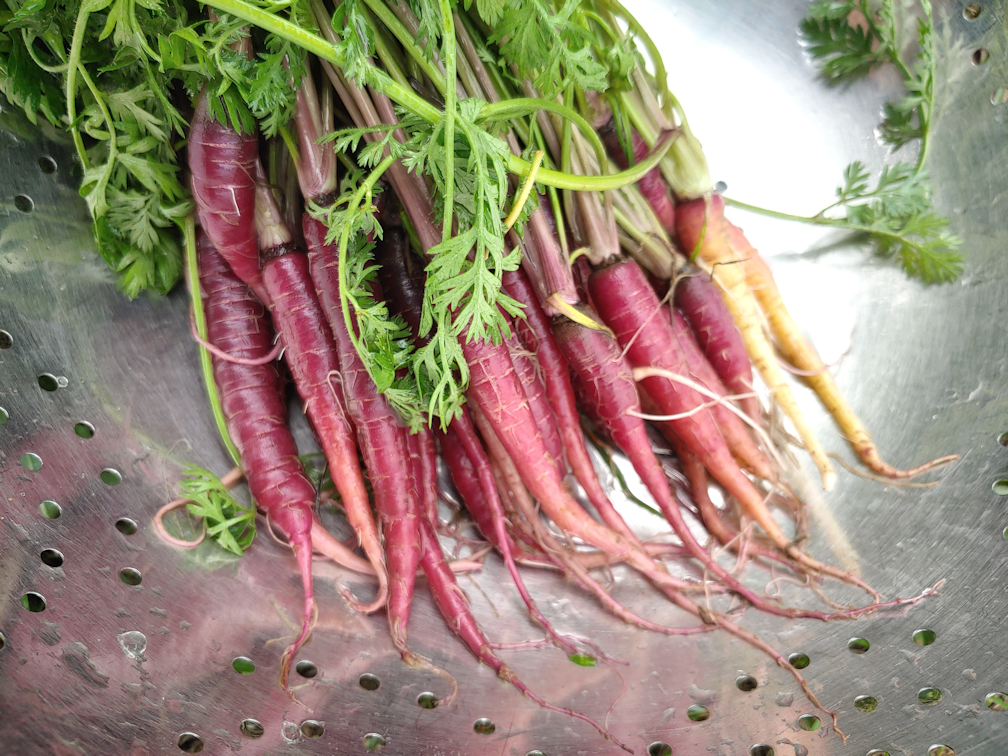
Check these out!!! This is a variety from Baker Creek called Lounge Rouge Sang.
The two orange ones at the top of from the other carrots that had gone to seed, but had enough root that I wanted to keep them.
I checked my records, and those are supposed to be the Deep Purple carrots, from Veseys!
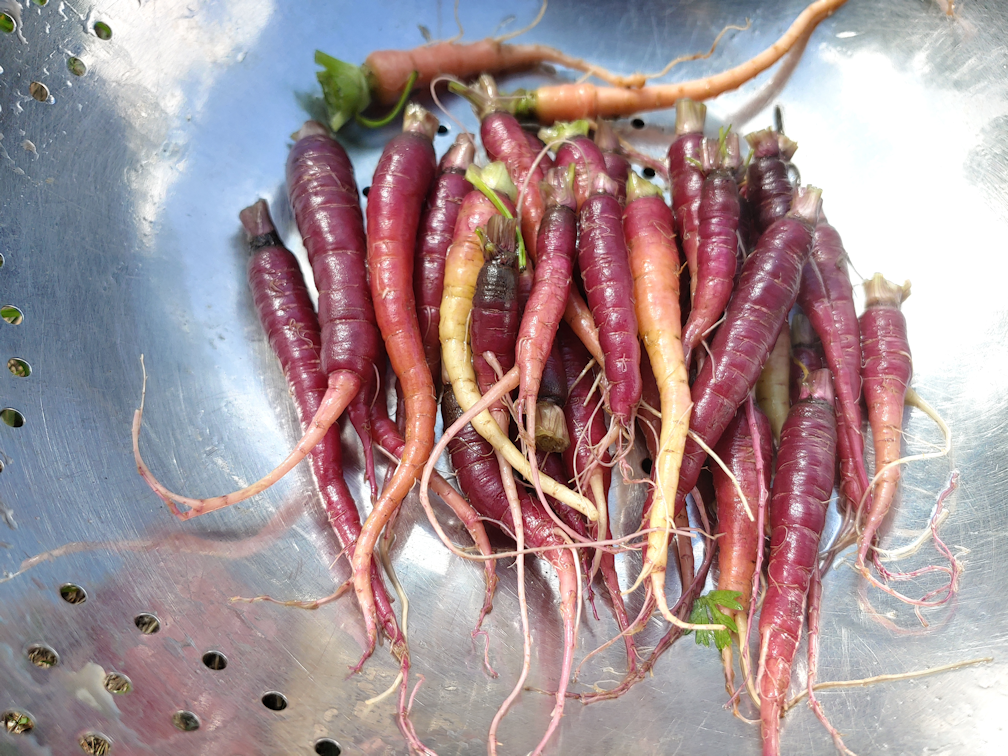
Here you can see what the Longue Rouge Sang carrots should look like, when fully mature. I just love the colours in them, and am happy to see that even the little carrots that got thinned out are showing them.
I’m so excited to see carrots! After the groundhog devastation, I really didn’t know if they would recover enough for us to have any at all. It’s a shame we couldn’t cover the larger carrot bed in the main garden area, too!
Once the bed was cleaned up, and I found new sticks to use to hold the PVC pipe hoops in place, the sides were pegged down tighter to the ground. The only places I used rocks to weigh the netting down was at a couple of corners, where there was excess netting to gather.
I still don’t know what the big green thing in the middle of the bed is. I had hoped it was the White Vienna kohlrabi that was planted there, but I not longer think that’s what they are. I’ve seen them pop up in a few other places, too. They don’t look like a weed, is about all I can say! I’m leaving them, just to hopefully see what they are. I’ve also left quite a bit of the mint that has been making it’s way through. In time, I hope to transplant them somewhere contained. For now, I just try to keep it under control so it won’t take over the garden – and we will still have at least a bit of mint to harvest if we want! :-)
There is still one more bed of beets by the retaining wall, covered in netting, that needs to be cleaned up, but that will have to wait for another day.
One of the things we’ve done to deter deer from nibbling things in the old kitchen garden was drape mosquito netting over one end, using existing T-posts at the retaining wall, ropes, and pegs. Basically, it’s a tent.
We’ve had two problems with this set up. The first is… well… it’s mosquito netting. As expected, bugs can’t get through it. They get caught at the peak of the “tent”. We would find all sorts of flies, but also moths, bumblebees and clearwing moths, and the only way to let them out would be to flip one side of the netting over the top, to the other side, then later flip it back.
The other problem was also expected. Wind! Today, it got windy enough that, even though parts of the netting is attached to trees, it came loose from the posts and even started coming loose from the trees.
Today, we worked on fixing that a bit. I think this will work out better.
The netting had been affixed to the rope with clothespins. Those, of course, would come loose, but then they’d disappear. I expect we will be finding bits and pieces of them in the lawn and garden beds! We’re still using the clothespins in some areas, but now the netting is mostly on the outside, and weighed down with bricks wrapped in the excess fabric. If we need to access the things planted in the retaining wall blocks, we can just unwrap the nearest bricks and reach under the netting, then put the bricks back again. It works rather well, as I did it to get at the newly opened chive blossoms to add to our vinegar (which is now at the sit-for-2-weeks stage).
The rest of the netting is allowed to flap loosely. The movement is one more thing to startle deer away, plus it gives the insects a better chance of getting out on their own, except for at each end, where it’s fastened more tightly. We will still need to check it often, to remove any critters that might get caught. Otherwise, this should work out just fine.
Those bricks we’re finding all over the place are really handy. We need more of them! :-D
While I was working on a new bed, which I will write about in a separate post, my daughter went to check on the asparagus and strawberry spinach beds, and do a bit of weeding. She made a very exciting find!
The days have rain have made a huge impact! The purple asparagus has sprouted! They were not there when I checked the beds this morning. At least not in any size I could see. All 6 asparagus crowns now have asparagus sprouted; the ones in the photos above are the largest.
We are so totally stoked! I had no idea what to expect in their first year. That one spear is SO purple, too! :-D
Two more years, and we’ll be eating asparagus from this bed. :-)