I’m back from doing the Costco shopping today, but before I post about that painful trip, here’s some good news!
While doing my rounds, I found new growth in various places!
There are more purple crocuses up and blooming, plus more white crocus buds are up.
There is no sign of the muscari/grape hyacinth yet, but I did have a wonderful surprise nearby.
Okay, I know they’re hard to see, but there are at least 14 tulips coming up here! Before resizing the photo to post here, I looked at it at full size to try and find them all. Some of the green is blades of grass, but I spotted the leaves of a few tulip plants piercing through the dried leaves above them. I’ll have to keep an eye on those. I remember last year, seeing some of them getting taller, but not able to break through the leaves they’d grown through, so they were all squished together. Once they get taller, and I know where not to step, I’ll go in and pull the dead leaves off, so they can spread out and grow properly.
I had another pleasant surprise in the old kitchen garden, too.
We have one Egyptian walking onion that’s been trying to grow every year since we moved here. Last year, it actually survived long enough to form bulbils. After building a new, little raised bed, I took those bulbils and planted them in front. Here, you can see two of them have sprouted! There were several more, too. I can’t remember how many were planted, but I’m pretty stoked that they survived the winter and are now emerging through the mulch. I didn’t see if the “parent” onion has started to emerge, but think I might have seen, maybe, possibly, leaves from one of the flower bulbs my daughter planted along the edge of this garden. Last year, some leaves came up, but none bloomed. There’s another spot, at one end, where she planted daffodils which did bloom last year but, so far, no sign of them.
I did also check the carrots, and there are no sprouts that I could see, but I was just peaking under the edges of the plastic and couldn’t see very far in. I need to put a priority on building covers for those beds, as the current set up is very temporary, and not as functional.
We’ve got highs of 9C/48F predicted for today and tomorrow, with a bit of rain now and then. After that, we’re supposed to warm up a bit more and have sun for at least 5 days. Great weather to get work done out there!
But maybe not today. City trips three days in a row has sucked all the energy out of me! Right now, I just want to crawl into bed and sleep for a week.
For a while outside, the wind picked up and I could see the snow coming down horizontally out the window! From what I’m hearing the roads are in terrible condition, and quite a few people posted online that they started to go somewhere, only to turn around immediately. Everyone is being told to stay home. A number of roads have been closed, particularly in the South. For our area, it looks like the worst of it has passed by, and things should be getting better from now on, though there is a second system on the radar that might make it as far as us later. Maybe.
A good day to be inside and doing garden stuff!
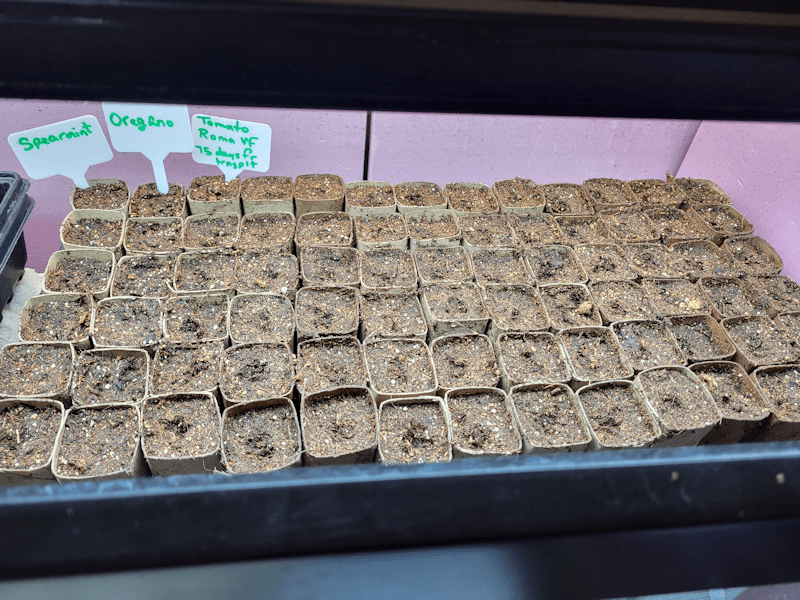
The first thing I needed to do was start some new seeds.
There were only three things that need to be started in the 6-8 week range; spearmint, oregano and the Roma tomatoes.
The oregano and spearmint seeds are so miniscule! We don’t need a lot of either, so there was more than enough for our needs. There weren’t a lot of seed in the tomato packet, so I actually counted them to work out how to use the tray. There turned out to be 67 seeds in the packet. Usually, for “pots” the size of these toilet paper rolls, I would plant two seeds per pot, but with so few seeds, only one got two seeds and the other 65 got a single seed each. Romas are a tomato I want to have a lot of, so we can do tomato paste and sauces again at the end of the year.
The herbs each gone one row in the tray. Here, the tray is on the heat mat, and it now has a dome over it, too.
This is the tray that had been on the heat mat. There are some cayenne, Dragonfly and Early Sensation peppers sprouting. And look at all those spoon tomatoes!
The strawberries and Classic eggplant got moved out entirely, and are now in the small aquarium greenhouse, still on the little bin to lift them closer to the light. The hardware cloth cover for the tank is no longer needed to keep the cats out, but it is still needed to hold the light fixture. We couple put the light back under the tank’s lid and use that, but this way, there is still plenty of air flow.
This done, I decided to do some potting up. First, I thinned by dividing the Crespo squash…
They are on the aluminum sheet in the photo. Of the two pots, one had all three seeds in it germinate, and they all have their own pot now. The second pot, I left for now. You can see a second seed did start to germinate, but it seems to have just stopped growing.
In the baking tray, you can see the Zucca melon, at the bottom right of the picture, are doing well! Those tendrils are reaching out to climb, and I’ve already had to unwrap the biggest one from the mini greenhouse frame. The drum gourds in the back are doing okay, but I think it’s just too cold for them to grow much right now.
I’d reseeded more Zuccz melon and drum gourd, but none have germinated yet. There was a drum gourd seedling that died after I’d put more seed in the empty pots, and I was considering adding more drum gourd seeds to it. Not anymore! That pot has now been “potted up” into the stronger, lighter coloured pot, and contains an experiment.
Last year, we had purchased seeds for Tulip trees and pawpaws. We had a single Tulip tree germinate, only to die soon after. Nothing else germinated. Their containers had been moved between the sun room and the shelf just outside the sun room. No surprise that cats would eventually knock them around, and that was it for any chance of germination. They were planted in a seed starting mix, which I ended up adding in to the big bowl I use to moisten the starting mix before putting it into pots to start new seeds. I ended up finding one of the pawpaw seeds that actually looked robust, so I stuck it into the available pot. Who knows? Maybe it’ll sprout!
Today, I had dumped our last bag of seed starting mix into the big bowl with what was left from before and was mixing water in with my hands when I found another pawpaw seed that looked like it was fresh out of the package we got them in. So I stuck that into the pot I’d put the first one in. The pot is damp, though, so it broke. I grabbed one of the new biodegradable pots I bought and the whole thing fit perfectly inside it. Cool! Now we have two pawpaw seeds to potentially sprout!
As I went back to mixing water into the seed starter mix, I found three more pawpaw seeds! None of them showed even the slighted bit of rot or damage!
They all went into the experiment pot.
I have no idea if they will germinate, but it would be awesome if they did!
Once the herbs and tomato seeds were planted and things were shifted around, I decided it was time to pot up the Black Beauty tomato seedlings. The germination rate for those was really high, and they were starting to get too big for the square potting cells they were in. I had a bag of potting soil ready for potting up, and went with Red Solo cups to transplant them up into.
I filled them about half way with soil, and buried the stems of the seedlings about half way when transplanting. As they get bigger, we can keep filling the cups with soil, allowing for more roots to develop along the stems. The baking tray holds 12 cups, while the bin can only hold 9, which left 5 more to go back into the tray they had been in before. The smaller Indigo Blue tomatoes don’t need potting up yet. Sadly, there are still only three Little Finger eggplants; the pots I reseeded show no signs of germination yet. Again, I think it might just be too cold by the window, even though the whole thing is over a heat vent.
Lower down, you can see the tray that has the first peppers we planted, in the red cups they were potted up into, next to the German thyme and lemon grass. The yellow plant pot below has one of the pots of German thyme transplanted into it, which we will be keeping indoors. In the blue mushroom tray is the luffa. We still have just one plant. The other 3 pots were reseeded, but still nothing.
And finally, here are the onions and shallots! It’s been a while since I showed how they were doing. I suppose we could give them hair cuts, but that may not be beneficial. Gardening in Canada did a video about it, and I trust what she says.
My daughter’s orchids got moved to the shelf beside the onions. I hope they do okay, there. They’re pretty far from the heat vent.
That is it for now! The next seeds we will need to start are the 4-6 week seeds, and I think I have only 1 or 2 things that needs to be started in that range. After that, it’s all stuff that needs 3-4 weeks before last frost date. There are a few seeds in that range that I plan to experiment with, starting some indoors and direct seeding others, to compare how they do.
Being able to work on gardening stuff while it’s snowing outside feels really good!
After a bit of adjusting, our new set up for the seedlings rotated out of the aquarium greenhouses is figured out.
The seedlings that need more warmth are inside the mini greenhouse, which is set up over a heat vent. The plastic cover is there to help trap a bit more heat, and protect them from the cold window.
It looks like we’ve lost one luffa, likely due to the chill, and one drum gourd, but there are still 2 luffa left, and 3 drum gourds. There are also several pots that had nothing germinate in them, but I’m leaving them for now, because who knows? Now that it’s over here, maybe something will happen.
The rolled up door in the cover is hiding them, but the thyme is looking like it could be potted up already!
The onions and shallots get to be on one of the shelves, as they can handle the cooler temperatures better. They look ready for a hair cut!
We were able to use some paracord to bring the lights down lower, and their heights can easily be adjusted. With just the two areas with seedlings, only one light is needed for the space right now. The shelves are closer to the window than the lights, so the seedlings are getting lit up from both sides. That was a major problem with our seedlings last year, and I was using aluminum foil to try and reflect light back to the shadowed side of the trays.
Also, you can see the trays of gourds from last year, in the mini greenhouse. They’re one shelf level above the heat vent; the bottom level won’t be used at all, since it’s right over the heat vent and very dark. If, for some reason, we need the space, we’d have to elevate the entire greenhouse frame somehow. The Tennessee dancing gourds are drying up nicely, but it looks like the Ozark nest egg gourds may still have been a bit too green when harvested. There wasn’t much choice about harvesting when we did, since we were starting to get frost, and that would have wrecked them completely. I still have seeds, though, and we will likely be starting them with the batches we’ll be planting before the end of this month.
With the cat barriers in place, and the living room rearranged for the seedlings, it’s actually made the room more useable. The girls have taken to actually having their meals in there, and even watching shows on Tubi. At the moment, they are enjoying some birthday cake in there! I’ve actually allowed myself one exception to my Lenten fast from sugar/starchy foods, to have a piece of birthday cake. It’s been long enough since I’ve eaten any sugar or starch, it’s actually making me fill a bit dizzy!
Anyhow. That’s our garden progress for the day! 🍃🌿🌱
I’ve been waiting for days before finally getting a picture with the newest drum gourds, then went again and got progress pictures of the rest.
I found a new baby this morning!
The red arrows are pointing to the barely visible first zucca melon!
The new drum gourds were taking a lot longer than the first ones to break free of the soil. When the first one did, the reason became obvious. It was still completely encased in the seed shell! After a while, I very carefully removed it and just dropped the pieces on the soil surface, but the seed leaves have still not started to separate. I can now see that the other one is also still encased in the seed shell. Once it manages to break free of the soil, I will carefully remove it, too. The risk in doing that is tearing the encased parts of the seed leaves right off, as they are so very fragile in there.
The earlier drum gourds are just barely starting to show their true leaves. The luffa’s true leaves are coming out nicely. Even the lemongrass is showing some true leaves. I think. They don’t look very different, other than there being more blades. I honestly can’t tell with the thyme.
That last cell of sweet chocolate peppers finally has a single seedling germinating, so we now have a total of four. Still just the seed leaves in even the oldest ones, though.
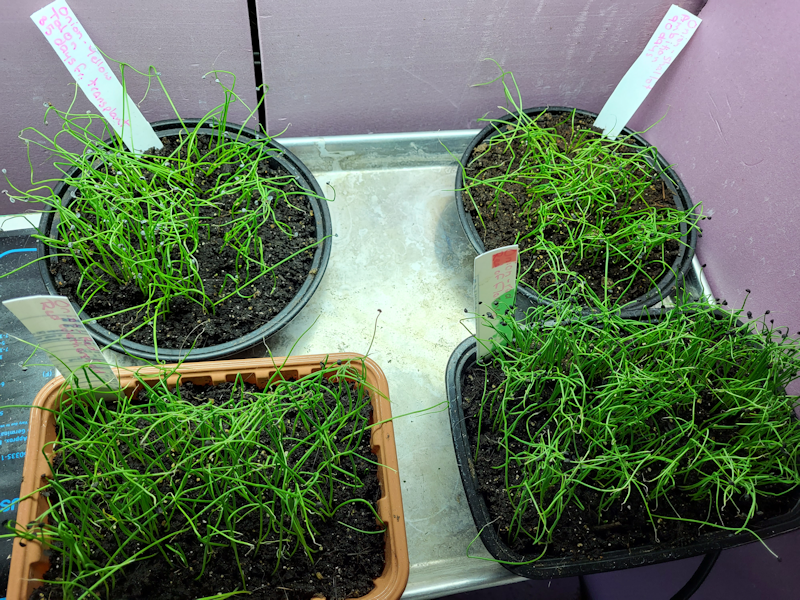
The onions and shallots are growing very slowly at this stage. No new haircuts needed! So far, they’re all surviving, too. Hopefully, we’ll be able to keep them alive! Last year, we had some issues with the yellow onions and shallots not doing well, but we have different varieties of both this year, and they seem to be doing better so far.
We’ve got two varieties of red onions, one of yellow onions, and one of shallots.
What a beautiful day it is today! As I write this, we are at -1C/30F, and have yet to reach our predicted high of 0C/32F.
It’s a good thing it’s getting nice and warm. Yesterday evening, I went to set up the one of the new ceramic heat bulbs in the sun room. Before I did, I screwed it into the fixture and plugged it in, in the old kitchen, to test it.
It didn’t work.
So I took the heat bulb and removed one of the bathroom light bulbs to test it there.
It works.
Looks like the old light fixture is toast. This was something my brother had attached to a board so that he could use the heat of a light bulb to keep pipes from freezing in the kitchen, when this place was empty. We might have some other portable light somewhere that I could safely set up in the sun room, but if we do, it would be in one of the sheds or the barn, where we won’t have access until spring.
The sun room is above freezing, however, so the kitties will be fine. This morning, I counted 25!
Today I went through the packets of seeds to start indoors and selected these as needing to be started very early.
I was finding contradictory information about the Sweet Chocolate bell peppers. The package says to start the seeds indoors 8-12 weeks before last frost – but the days to maturity I found maxed out at 86 days! We could potentially start though by direct seeding by that, if the soil were warm enough right after our last frost date. I am considering planting more of them, when I do the other peppers, but we have so many varieties to try, I don’t want to take up the space, if we don’t have to.
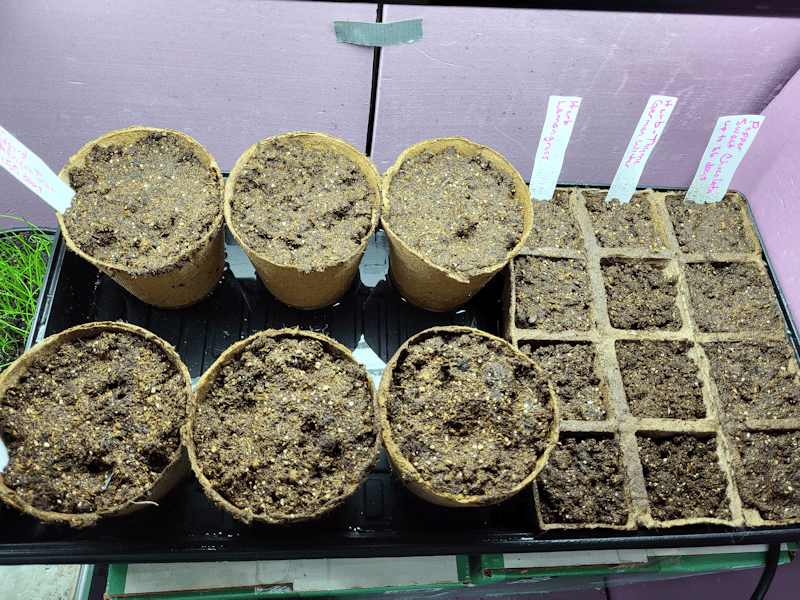
The lemongrass will eventually end up in a large pot, while the thyme will be going into a raised bed in the old kitchen garden. They, and the peppers, will eventually need to be potted up at least once before going outside, so I decided to put them in the degradable square pots, so that can be done without disturbing the roots.
Because of the size the Zucca melon and drum gourds will get before transplanting, those went straight into the largest degradable pots I have for now.
But first, I needed to make space in the aquarium greenhouses.
I could fit only two trays of the onions in the small aquarium. The problem is, there’s nothing we have that fits in there that can be used as a drain tray for bottom watering.
We have a large jade tree that we had to cage with hardware cloth because the cats wouldn’t stop digging in it. I had to remove the top of it because the jade tree was starting to grow through the openings, so I used that to rig a cover for the tank. Last year, we used salvaged screen windows, but they were larger than the top of the tank and, even with weights, the cats kept knocking it about. I’m hoping this works. On the one hand, the openings are large enough that the cats could reach through and dig at the trays – the first year we used this tank as a greenhouse, the cats destroyed our onion starts by reaching through the filter opening in the tank’s lid. They were incredibly determined to get at those trays! However, the larger size mesh also means it’ll be harder for the cats to walk on it, so maybe they’ll just stay off?
We’ll see!
The luffa seedlings have joined the remaining tow trays of onions. I wanted to keep them in this aquarium greenhouse, since it’s warmer than the little one, thanks to the two lights above. One of the seedlings seems to have stalled and isn’t getting any bigger. The second seed in the pot hasn’t germinated at all, and probably won’t by now. I thinned out the extra seedlings that were in two of the pots. So we are probably down to three luffa. Hopefully, they will survive long enough for transplanting!
We now have four cells each of lemongrass, thyme and Sweet Chocolate peppers – those thyme seeds are so incredibly tiny! While I was sowing the seeds for those, I had six each of scarified zucca and drum gourd seeds soaking in water, and now each round pot has two seeds. The seed starting mix was premoistened and the surface got spritzed with water after the seeds were planted, but I also made sure to add a lot of water to the tray, once it was on the warming mat. I want those pots to absorb water from the tray, not the soil.
It should be interesting to see how these do, with being started this early! We won’t need to start more seeds until probably March, though I’ll have to double check on some of them. I think things like the Crespo squash and Boston Marrow could use an earlier start. We’ll have time to move things around in the living room to make space for trays as they get rotated out of the aquarium greenhouses while need seed trays go in.
Since the fixture used for the heat bulb in the sun room is broken, I won’t need the frame of the mini greenhouse to support it anymore. The mini greenhouse can be brought in and gotten ready, too. Plus, we should be able to use some of the plant hooks in the ceiling to hang the shop lights we’re using for grow lights, and generally have a much better set up than last year.
Which means we’ll have to make building a cat barrier a priority over the next few weeks!
A little bit of garden therapy on this cold, cold day. According to one of my phone weather apps, we’ve reach -25C/-13F, with a wind chill of -33C/-27F. Hopefully, things will keep warming up for another hour or two because it takes the predicted deep dive overnight!
Our onion seedlings are getting tall enough that it was time to move them away from the light. Which, for our aquarium greenhouse, means rearranging things inside the tank.
The onions are going to need a hair cut soon!
The tray holding the onions is on the heat mat, which was unplugged when the seedlings started showing. Onions prefer cooler soil, anyhow. The luffa, however, have not germinated yet, and need warmer soil. They were raised up higher on a box, to get some of the warmth from the lights, but the heat mat would be beneficial for them – assuming these 3 yr old seeds are still viable at all. Shifting the two, and removing the box the luffa were on, would give the onions the space from the lights they needed, and the heat mat should make up for the slightly reduced height for the luffa pots.
Since they are in a plastic drain tray, I added the aluminum oven liner sheet to protect the plastic from getting over heated and diffuse the heat a bit, even though the warming mat doesn’t get very hot.
As I was doing this, I noticed what appeared to be disturbed soil, where that arrow is pointing.
So I took a peak.
Yes!!!!
There is a baby luffa sprout, starting to push its way up through the soil! One of the other pots seems to have a new soil hill, too, but I didn’t peak under that one, and just gently covered the first one up again.
Hopefully, the extra warmth will encourage more germination!
When it comes time to transplant these, I want to find a way to have them in the very sheltered microclimate on the south side of the house that we will be growing the lemongrass in. They can be grown in pots, if the pots are large enough. A 5 gallon bucket would be the right size for one plant. Not that I’d waste a bucket by drilling drainage holes in it. I think we have other containers we can use that are large enough. The challenge will be in how to also include a trellis for them to climb.
But I’m getting ahead of myself. Let’s see how many germinate and survive, first!
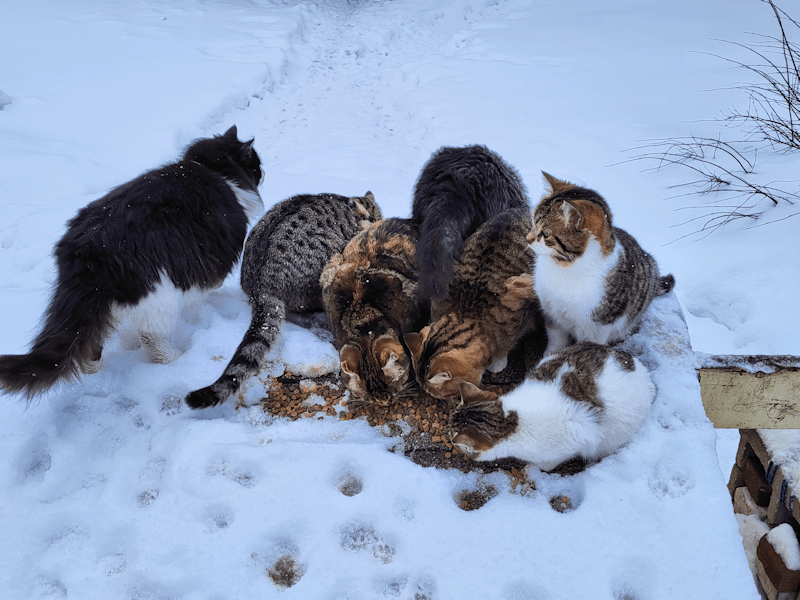
We had a light snowfall last night, making everything all white and fluffy this morning.
The outside cats didn’t mind it at all!
I counted 21 this morning.
Meanwhile, indoors, we have our first signs of spring.
When I checked the trays this morning, three out of four of them had onions sprouting. When I came back about an hour later, there were sprouts in the fourth tray!
I’m absolutely amazed by two things. One is, how quickly they started to germinate.
The other is, how much cat hair there is, all over the soil surface. These trays had lids on them. Where did all that cat hair come from? I mean, Beep Beep practically lives on top of the lights. She naps on them, rolls around on them, and even hugs them, so yeah… I can see some of her fur drifting down… but getting under the lids?
Yesterday, I marked on our communal calendar, two sets of dates. One was the number of weeks counted back from our last average frost date, June 2. This way, we can see at a glance that something that needs to be started 10 weeks before last frost, needs to be started around March 24, while something that needs only 4 weeks can wait until May 5th.
The other dates I marked was number of days counted back from our average first frost date, which is Sept. 10. We have exactly 100 days between our average last spring and first fall frosts. That’s the growing season we can mostly count on for frost sensitive plants.
For things that have really long days to maturity, it’s that “days before first frost” that we need to consider. If, for example, I have a gourd that requires 110 days to maturity, that’s May 23. If it needs 7-10 days to germinate, I would start them at least a week before that.
If I have something than need 90 days to maturity, that falls on June 12 and, by then, I could get away with direct sowing, instead.
One of the really useful tools I’ve found is the Farmer’s Almanac planting calendar. Most planting calendars just give number of weeks before first frost, because they’re meant to be generic. I can get that information from the seed packet. Farmer’s Almanac, however, lets you input your area code (or zip code, if you’re in the US). You can even put in your city (ha!) and province/state. It will find the climate station nearest you, then give you the calendar dates for starting indoors and transplanting, or seeding outdoors. It even gives you the choice of dates based on frost date, or on moon dates. Oh, and I discovered something very handy when I hit the print button on the web page. It allows you to remove things from the list that you aren’t growing, which greatly reduced the number of pages that got printed out!
It’s still a bit generic, of course, but the date range is pretty wide. For example, it tells me bell peppers should be started between March 24 and April 7. We have five varieties of bell peppers, and four of them are early varieties, so we could use the information on the seed packet to figure out which ones need to be started in March, and which can wait until April.
Of course, they can’t cover everything, so we still need to make adjustments. For example, their calendar says to start winter squash outdoors between June 16 and July 14. With some varieties, we could do that, but we’ve got some large varieties of winter squash that need more time to fully mature, so we would be better off starting them indoors. If we use the biodegradable pots that can be buried, that would reduce transplant shock.
We have always started summer squash indoors. I think, this year, we might direct seed them. The calendar says zucchini can be planted anywhere between June 16 and July 14, which is when we can expect the soil to finally be warm enough.
As for the things we’ll need to start the earliest, the herbs (except dill, which is direct sown) will need to be started at the same time as bell peppers; in March. The eggplants and tomatoes can be started in early April, melons can be started in early May, while pumpkins and watermelon can be started in mid May.
The direct sowing dates are pretty interesting for some things. If we decide to try growing radishes again, they can be direct seeded in early April – at the same time we’d be starting eggplant and tomatoes indoors. Carrots can be planted in late April, early May, which would be about the same time we’d be starting melons indoors.
All of which needs to be taken with a grain of salt. For example, the calendar says to start onion seeds outdoors in early May. Sets, sure, but seeds? Nope. There’s a reason people out here start their onion seeds indoors in January! Also, it has dates to start lettuce and chard indoors, but none for direct seeding. Who starts lettuce and chard indoors? I mean, sure, you can grow them indoors, but for transplant?
As it stands now, though, we won’t need to start anything else indoors until March 24, at the earliest.
That gives us February and most of March to get the materials we need and build a removeable door and frame, to keep the cats out of the living room, and out of the seedlings!
We’ll also need to build a barrier to block an opening in the shelf to the left of the door in the image.
Yesterday, after many delays, I finally sorted through all our seeds, old and new. I was happy to find I still had luffa seeds left, so I got those started, along with our onions.
Since I’m running out of media storage space on my WordPress account (the down side of having such a photo heavy blog!), I took my photos and made them into a video, instead. I hope you enjoy it!
Please feel free to let me know what you think of it, either here or in the comments under the video at YouTube. If you watch the video on YouTube, you can subscribe to my channel there. I’ll be uploading it to my Rumble account, too.
I will probably be doing a lot more of these, since I’m not about to spend over $300 a year to upgrade my account, when all I want is more storage space! It takes a lot more time, and I borrow my daughter’s microphone for the voice overs, but it does allow me to use higher quality images, and more of them, than I would here. I’d call it an experiment, but it’s not like I have much choice!
On another note, I’m quite enjoying the Movavi Video Suite to make these videos. I’m just barely skimming the surface of what the software allows me to do, since my needs are really basic, but if I wanted to, I could create some pretty professional looking videos. The only complaint I have is how it keeps wanting me to buy into subscriptions to get more choices in media and effects, etc. But that’s pretty typical of most media software these days, I think.
The sun room is starting to get too cold and night to leave our harvests in it anymore. This morning, I went through them and binned them up.
All of the carrots, both types, filled one bin enough that the lid can’t quite close. Those will need to be taken care of quickly. The Black Nebula carrots are already getting wimpy!
All the gourds will go someplace warm and dry to finish curing.
The Tropeana Lunga onions are growing rather than curing, so they will go to the kitchen for fresh eating and dehydrating.
The hulless seed pumpkins that have ripened the most will be moved inside to ripen some more, while the remaining ones were shifted around on their shelf to get more sunlight. We should be able to get away with leaving those there for a while longer.
The tomatoes that are ripening were laid out in a single layer on the bottom of a bin to go inside for further ripening. The green ones that have shown no signs of turning colour by now are not going to, so they all went into one small bin. I picked through them in the process of sorting through, and the more wizened ones went into compost. The rest will go to the kitchen as we decide what to do with them. The problem is, I’m not the tomato person in this household, so I’m not exactly inspired over them!
Now that these are clear of the sun room, we’ll be able to continue cleaning out and partially reorganizing the sun room for the winter.