Preparing for Easter, and an easier way to peel eggs!

One of the bonuses of our move to the farm I grew up on is that we could take part in a childhood tradition; the blessing of our Easter baskets. It was many moves and many years before we were able to find a Polish church that did basket blessings, and be able to take ours in.

That didn’t stop us from doing our traditional baskets. It was one of my favorite traditions, growing up, and even when we stopped going to church for many years (for a variety of reasons), we still did our baskets and simply blessed them ourselves.

Which is what we’ll have to do this year, since none of the churches are holding any sort of services during the lockdown, other than online.

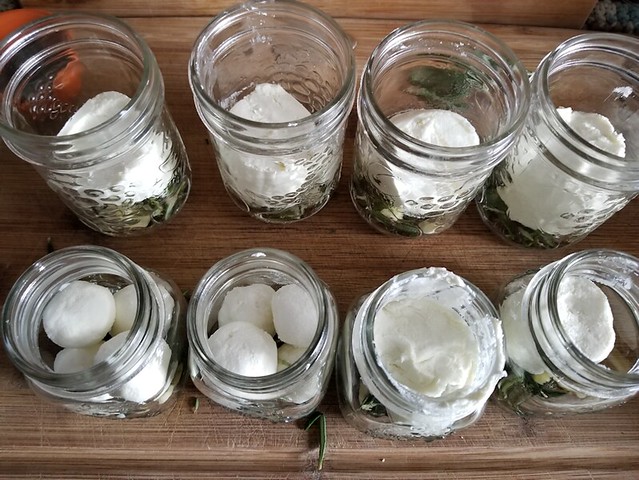
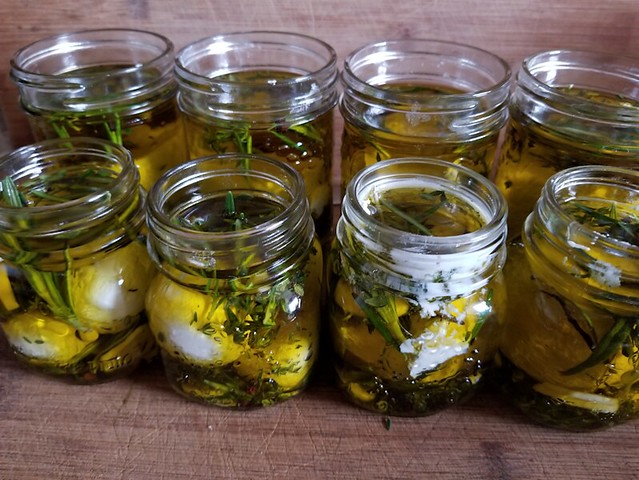
We did start some of our preparations already. For the cheese portion of our basket, we decided to do marinated goat cheese again. I made up two 250ml canning jars for our basket (I’m hoping to get one of them to my mother, along with some fresh horseradish), plus two 500ml ones, just for regular eating.

Tomorrow, I hope to make some fancy bread for the basket. Probably a Braided Egg Bread again, though I haven’t completely decided yet.

Today, I started pink pickled eggs; one of three ways we like to do eggs for our basket. The recipe for pink pickled eggs that I followed before is here. This year we, strangely, had a hard time finding anything other than shredded beets at the grocery store, so I modified the recipe a bit. I found 1 small jar of tiny pickled beets and used the juice from that to colour the liquid, plus sliced some of the beets and included them in with the eggs. With so little beet juice, I figured the addition of the beets themselves would help add colour. The other change I made was to include the fresh herbs I had left over from making the marinated goat cheese; thyme and rosemary.

When preparing eggs for the basket, we always cook way more than we need, so that we can use only the most perfect eggs for the basket.

Which is difficult, when the eggs need to be peeled first. There have been times when we’ve boiled a dozen eggs, and not a single one could be peeled without tearing apart!

So today, I tried a combination of “hacks” to get the job done.

The first is to add baking soda to the cooking water. Yes, it does make a difference.

The next is to cool the cooked eggs down as quickly as possible. Putting the eggs into an ice bath is one way to do it, but our well water gets so cold, we can get away with using tap water.

The final one is something I tried for the first time today, and it worked beautifully!

Shaking them in a jar.

Okay, so it wasn’t quite that simple. :-D

I grabbed a small canning jar, though any jar (with a lid) just a bit bigger than an egg would work. Theoretically, you can use a small glass and cover the top with your fingers, but that would get pretty messy. The first jar I tried was a 500ml (pint) size, and I found it a bit too big and ended up using a 250ml jar instead.

Leaving the eggs in their cold water soak, take one egg and put it in the jar, along with enough water to fill the jar about half full or a bit more. It can be helpful to crack the shell a bit before putting it in the jar.

Then, put on the lid and start shaking. Vigorously, but not too violently!

The shaking does a few things. The most obvious is, it cracks the shell quite thoroughly. This is where you have to find a balance on how much water is in the jar when you shake it. Too much, and the water protects the egg from cracking as much. Too little, and the egg can get bashed apart.

The shaking also separates the membrane from the white of the eggs – which would have already been spurred along by the addition of baking soda to the cooking water, and the quick cool down. And finally, it lets water work its way between the membrane and the egg white, making it much easier to remove the shell.

After a thorough shaking, dump the contents back into the water with the rest of the eggs. While holding the cracked egg under water, start peeling away the shell. If it still sticks, do the shake again. :-)

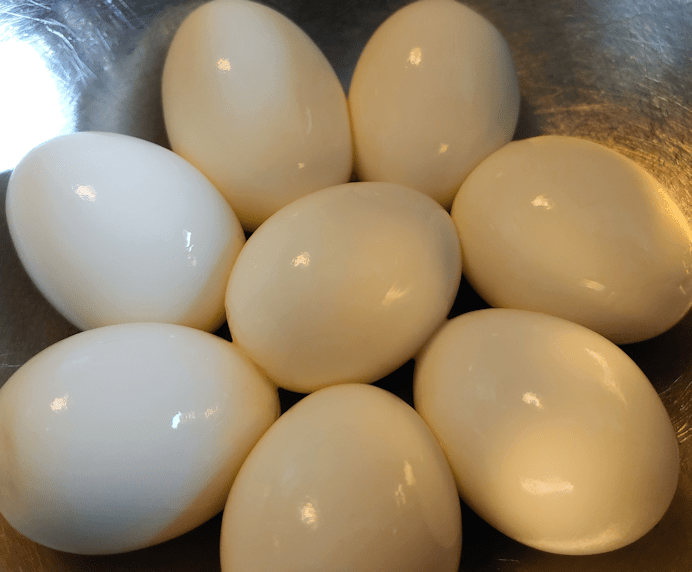
Out of the package of 18 eggs I cooked, I got 8 that were perfect enough for the basket; two for each of us.

This is what happens when an egg is shaken up too vigorously.

Here are the best eggs, ready for the fridge.

They should have at least 3 days to marinade in the pickling liquid, which is just in time for Easter.

Of the remaining eggs, there was one that broke during cooking, which left another 8 eggs suitable for pickling. I did up another container the same way, minus the beet juice. It still has beet slices with the eggs, so it will have just a hint of pink. That one will be for regular eating.

It is going to be a delicious Easter celebration this Sunday! :-)

The Re-Farmer

All bent out of shape

We are a bit behind on our Christmas decorating this year.

Usually, we start at least by Nov. 27 (the Feast of St. Catherine). However, this Christmas is a first for 3 felines.

So we set up the tree, but left it alone. We didn’t even fluff out the branches. The idea being, the cats can get used to the tree being there, and we can start training them to stay out of it, using a spray bottle.

The problem with that, however, is someone has to be in the room to catch them in the act, and we don’t exactly hang out in the dining room.

It’s going to take pliers to straighten some of these branches out. :-D

We can, however, start decorating the rest of the house. Tomorrow is the first day of Advent, so I at least want to get our Advent wreath and its candles set up.

I just have to figure out which of the bins it got put into. :-)

The Re-Farmer

Prepping the old dog houses

Yesterday, after picking the crab apples, I had time to start working on the old dog houses, as part of our winterization plans for them. We were getting severe thunderstorm alerts and, looking at the weather radar, it looked like these ones were not going to miss us, so we rushed to get a bunch of things done outside. The girls put the sheets of metal roofing back on the old garden shed that had blown off from the last storm, but there was no way to nail them in place, so they strapped them down, instead. Then they helped me move aside the dog houses, so I could work on the space under them.

The main issue was that the ground is not level, resulting in one of the dog houses tending to rock back and forth.

This was part of why that was happening.

Nothing like a big ol’ tree root to mess things up!

To try and level it, I first used a garden fork to dig things up and loosen the soil. After that, I used a garden rake to try and level the area as much as I could.

Which the kittens absolutely loved.

I then put the sheets of Styrofoam insulation back, but lay them out differently this time, after noting some issues from how we had it before.

I happened to have a sheet of dollar store tarp in the garage, so I used it to basically hold the 4 sheets of insulation together – and I hope it will serve to protect it a bit from the cats, who like to use the foam to sharpen their claws! LOL

Then I snagged a daughter to help me move the dog houses back again.

The kittens love it!

I have a couple more sheets of insulation that I plan to slide under the dog houses, so the kittens aren’t going to be able to play under there for much longer. :-D Later, when we get a straw bale to cover our septic tank, I plan to add start around the dog houses. We are also looking at ways to use the sheets of black tarp that I cleared from the old wood pile to further shelter and winterize these for the cats.

Not long after this was done, we did get hit with a pretty wild thunderstorm. We promptly lost our internet, and even the power flickered off and on several times, though we never lost it completely. I later saw photos taken in town, where there was some flooding in the streets.

Looking at the long range forecasts, we might get storms throughout tomorrow and into early the next morning, before things clear up. We’ve had enough rain that I might actually have to mow the lawn one more time before putting the mower away for the winter!

The Re-Farmer

Clean up: front gate prep (updated)

This morning, my older daughter and I moved the gates and got started on prepping them for painting.

Those things are fekking heavy!

After considering our options, we ended up digging out a roll of plastic I found in the garage to use as a drop cloth and set one half of the gates up on bricks.

It’s hard to see in this picture, but even though I’d already hosed the gates down before we put it over the plastic, after hosing it down second time, the water puddled under it is really dirty!

We went over the gate on one side with a wire brush to scrub any areas that looked like the paint was peeling of, or were particularly rusted. Then we washed it.

We found an eco-friendly detergent for the job.

After doing the one side, we rinsed off the suds, flipped it over, then did it again.

We also took the sliding bar off the other half and that got scrubbed, cleaned and rinsed, too.

As of this writing, it’s still sitting in the sun, drying. We forgot to get paint thinner to clean our brush, so I will get some when I go to pick up my other daughter from work. By then, it should be dry enough to start painting. :-)

Once that one is done, we’ll do the same to the other half of the gate.

We’ll also need to do the gate posts, though for that, we’ll have to get those bottom broken hinges off, before we can clean it. We’ve been applying penetrating lubricant to them, every now and then, in hopes that that will finally get them loose.

While scrubbing and cleaning the gate, I could see that there was red paint under the black – and in some places, a bright blue! The gate construction is not very usual; gates tend to be made wither either a lighter material, or in a triangular shape, so they aren’t so heavy in the middle, which would stress the hinges and cause the posts to lean inwards. I’m thinking my late brother built the whole thing from scratch! As for the gate posts, which he designed so that they could easily be leveled as needed, they are actually starting to lean outward, due to the shifting of the ground. Heavy as the gate is, it’s not enough to overpower the forces of freeze and thaw!

I’m looking forward to how it looks when everything is all painted and fixed up.

I’m also looking forward to having a working gate again.

The Re-Farmer

Update: first coat of paint on the first side of the first gate is done.

That’s a lot of firsts. LOL

I am loving that blue!

The piece by itself on the brick is the slider bar. When the gates are hung back up, the bar will be placed on one side, with two bolts holding it place. One of them also acts as a stopper, when the gate is closed and the bar is slid across to hold the other side in place. At the other end is a hole for a pin to keep the bar from sliding back again. There had also been some electrical wire, used like a twist tie, to further secure the gate. We replaced the wire with a length of chain and a carabiner, before we had to start locking it.

For as long as I can remember, the pin was just a long screw tied to the opposite gate with some bale twine. When the gate was vandalized, the screw was bent into a semi-circle. Our vandal didn’t move the slider bar before he jacked the first side of the gate off its hinges. So we will have to think of what to use as a pin. Hopefully, we’ll find something nicer than a screw and bale twine. Not that that was anything to sneeze at. It worked for many years, after all!

The paint needs to cure for at least 6 hours, so tomorrow we will be able to flip the gate and do the other side. Then we will have to wait for all the paint to cure for 24 hours before we can put on a second coat. If all goes well, we’ll be able to move this one aside to cure while we prep and paint the other one.

I will have to find something soft to put over the bricks so as not to scratch the new paint after we flip it. :-)

Getting Ready

While we are ready and waiting for my husband to come home from the hospital, we are also getting ready for Easter.

This evening, I went hunting for horseradish.

20190417.horseradish.found

After scraping away some fallen leaves, I found some new grow peaking through the ground. I used a potato fork (the only fork that didn’t grow legs and walk away over the years) to dig up a few pieces.

This bunch is growing under the power pole in the garden. I knew the area was very rocky, but wow. I had a really hard time getting that fork deep enough to get some roots out. No matter where I moved it, I was hitting rocks, just a couple of inches below the surface.

20190417.horseradish.roots

I didn’t take out much. A larger piece for our own basket, and a couple of small pieces for my mother. If she wants, she can use one and plant the other, since she has garden space where she lives.

20190417.horseradish.roots.cleaned

For now, I’ve scrubbed the dirt off, and they are wrapped in damp paper towels. For our basket, I will peel some of the outer skin off the lower part, and save the top. The tradition is to use horseradish paste, mixed with beetroot, in the basket; the bitter taste of the horseradish symbolizes the pain of crucifixion Christ endured for us, while the sweetness of the beetroot symbolizes the joy of the resurrection. Growing up, though, we always used fresh horseradish root. My mother would sometimes give away pieces with sprouting tops, after the baskets were blessed, to friends to plant if they wanted.

My mother planted the horseradish in strange places. One batch is under a spruce tree, which would be just as difficult to harvest as the ones growing among rocks. I found more growing among some of her flowers outside the living room window, which has better soil conditions, but harvesting it would mean damaging the bulbs of the flowers it’s growing with.

I’m thinking of maybe using some of the raised planters that are still in decent shape, so the horseradish itself will also be contained better, and not spread too much.

Something to figure out over the next few days!

Meanwhile, I will now go and boil some eggs to make pink pickled eggs. :-)

The Re-Farmer

Marinated Goat Cheese

Though it is still weeks away, we are already planning our semi-traditional Polish Easter basket.

I say “semi” traditional, because we’ve modified some of the contents over the years.

If you’re unfamiliar with a Polish Easter basket, these are filled with symbolic foods to be blessed on Holy Saturday, and eaten on Easter Sunday. The foods include ham, sausage, bacon, bread, cheese, salt, butter, horseradish and eggs. We also include things like olives, vinegar, and olive oil. It may also contain a bottle of wine and a candle. Oh, and sometimes chocolate or candy. The baskets are decorated and covered with lace or embroidered clothes. As a child, Easter was my favourite holiday, and our traditional basket was a big reason for that!

Some of the contents require more advance preparation, and I was able to start on one of those, yesterday. This is a non-traditional way to include the traditional cheese in the basket.

This year, I found some absolutely delightful mini-jars, and decided to make several small jars of marinated goat cheese, but we’ve also done it by layering medallions of goat cheese in a larger jar. Both ways work fine.

It had been my intention to make two baskets this year, with a large family basket for ourselves, and a smaller one for my mother. She declined my offer, and will be making her own basket.

We’re going to have lots extra out of this batch!

To start with, I scalded the tiny jars I bought special for the basket, plus extra pint size jars. Then I prepared the ingredients. The mini-jars have smaller openings, though, so that changed things a bit.

marinated.goat.cheese.1

Here we have fresh rosemary leaves and fresh thyme leaves – they came in 28gram packages, and I stripped the leaves from the stems. There are peppercorns and about 8 cloves of garlic, sliced. Not pictured is Extra Virgin Olive Oil.

I completely forgot about the bay leaves. There should have been a bay leaf per jar.

As you can see, this is a forgiving recipe.

The goat cheese came in 300 gram logs; I had 2 of them and cut them each into 4 equal pieces. For the ones to go into the mini-jars, I cut pieces off to try and make them into smaller columns, then gently rolled them between my hands to make them smooth and round.

The first one I tried, promptly crumbed apart. Which is why I have rolled balls of cheese. I broke up each trimmed quarter piece into 4 and formed the smaller pieces into smooth balls.

For the pint sized jars, I didn’t have to be pretty, since they’re not intended for the basket

Each jar got some peppercorns, thyme leaves, garlic and rosemary leaves placed on the bottom. If I’d remembered the bay leaves, they would have gone into the bottom, too. Then the goat cheese gets put into the jars.

This is why I make extras…

marinated.goat.cheese.2

I didn’t make one of the small columns of cheese small enough. It got messy. :-D

No worries. It’ll still taste good!

Once the cheese is in, more peppercorns were added, as well as the rest of the thyme, rosemary and garlic slices. Then the olive oil was added.

marinated.goat.cheese.3

After the oil was added, the rims were cleaned, the jars sealed, and into the fridge they went.

Next is the hard part; waiting a week before using them!

From the looks of them, I think the balled cheese will be kept for the basket. I do have one non-messy mini-jar with a bigger piece, so I might use one of each. We shall see. The pint jars don’t have to wait for then, though, and I will post pictures, when they are ready. :-)

After marinating for a week, the oil can be drained through a sieve and reserved (the herbs are discarded). It makes for incredibly flavourful oil to use when cooking. The cheese can be served as a spread on bread or crackers, or used any other way you would use goat cheese.

Alternatively, little jars like this can be served as individual appetizers. The jars can be warmed by placing them in a flat bottomed pan with hot water, and placed in a hot oven until heated through. They can then be used as individual servings, eaten straight from the jar.

I intend to put these in our basket, just as they are, without straining them first since the jars are so small. When we made them before, with layers of cheese in a larger jar, we removed the cheese, then put a few pieces into a smaller container with a liquid tight seal. I then covered the cheese with strained oil and closed it up. It made for a nice presentation in the basket. :-)

The Re-Farmer

Prepping the fire pit

I was able to head out and work on the fire pit area, including getting a fire going to clear the pit out for a future cook out.

I ended up being out there for about 2 hours!

After getting as much snow out of it as I could with it full of wood, I made use of the fire starter cubes I picked up while in town earlier. I figured it was the most efficient way to get a fire going, with all that snow.

I was right. :-D

Continue reading

Off the to-do list

So this has been a productive day!  Most of my to-do list for outside is now complete.  The last thing is to do a dump run, which will be taken care of soon.

Beep Beep made things a little more difficult. :-D  As I was getting my supplies out of the sun room, I paused to respond to a message on my phone.

Beep Beep climbed me like a tree!

20181101.beepbeep

She did it again, while I was working in the garage, too.

What a girl! LOL

The first thing on my list was to use some metal rods I found while cleaning up at the garage recently, to set up markers at our driveway.

20181101.driveway.markers

I don’t know how well they will hold out over the winter.  We shall see.  The main thing is, once the ditches are filled with snow, we’ll be able to see the outer extremes of the driveway.  One of them has some reflective tape on it.  I’ll have to remember to pick up more.  There are a few places where we want to add reflective tape.

Once that was done, I reclaimed our wheelbarrow from the junk pile; an old, cracked rain barrel is now being used to hold things like broke glass and other small things that we didn’t want to just throw on the pile.  Then I took the plastic I’d used to put water in an old bathtub for the cows to cover the whole thing (and added the bathtub to the pile, too).  I tossed some stuff to weigh down the plastic, but I rather doubt it will stay.  We shall see.

The next thing I wanted to do was cover the post pounder.  First, however, I wanted to try pumping up the tires, to see if I could move it.  In order to access the compressor, however, I had to finish cleaning up and putting away stuff we had to clear so we could rescue Doom Guy.

Beep Beep “helped” by jumping up onto the counter, then onto me!

I found a little hand broom and swept off the counter, then had to figure out how to put the shelves, back, without a second person.  In the end, I took the drawers out of the top one, to lighten it.

This is why it was so heavy.

20181101.self1

The one drawer with the long bolts probably weighed about 15 pounds, all on its own… and it got stuck.  I managed to get it out, though, which made moving that shelf easy enough.

Then I went to clean off the second shelf before trying to remove the drawers.

I don’t know how I failed to notice this, when we first took it off.  Probably because we were too distracted by the need to free Doom Guy from behind the counter.

20181101.self2

Yeah.  That’s shedded snake skin.

With this shelf, I wasn’t able to take any of the drawers out, but it was light enough I could just pick it up and put it on top of the other one.

Then I set up the compressor which, thankfully, has a hose long enough to reach both tires on the post pounder.

The first one, much to my surprise, pumped up rather well, and seems to be holding air.

20181101.tire1

Cool!  Now, if the other one would hold air, it might be possible to move the post pounder into a shed or something.

What a hoot.

It pumped up, all right, but as soon as I turned the air off, it quickly deflated.  I could even feel a breeze on my hand!

From this.

20181101.tire2

A big ole crack in the tire!

Ah, well.  It was worth a shot.

I had noticed a tarp in the side of the garage my mother’s car is stored in and was happy to confirm it was big enough to cover the whole thing.

20181101.wrapped1

I don’t know what was used to fasten the old tarp – if anything – but I’m hoping that this one will stay.  Between the bale twin at the top (which is what had been tied around the folded up tarp, and the zip ties, it’s pretty secure.  I just wish I didn’t have to poke little holes into the tarp to thread the zip ties through.

20181101.wrapped3

It should hold for a while, though.  It would take some pretty major winds to tear it off, at this point.

That done, I moved the toilet “art”.  I decided to leave it near the outhouse for now.  I think I really will put dirt in it and plant flowers next year.  Just for a joke!

Then I took the oil drum that was along the garage and set it up as a temporary burn barrel.

20181101,temporary.burnbarrel

Here it is, next to the remains of the old one.  It’s not in very good shape, but until we can chisel off the top of the other barrel we found by a collapsing log building, it will do.  I didn’t have to make drainage holes in the bottom.  It already had holes.

And now it’s time to move on to the other things on the to-do list. :-)

The Re-Farmer

Winter Prep, and future plans

Well, I’m certainly glad that yesterday was a good day, weather wise, because today certainly wasn’t!

Yesterday had warmed up quite a bit, which meant the ice and snow was melting and coming off the trees with a constant rattle of ice pellets hitting the ground.  When I had the chance, I checked around the yard to see if we had lost any other trees or large branches, and am happy to say that we did not.  Just a few little branches.

Heading over towards the apples, I could see that, while we only saw one deer over by the bird feeder, there were certainly others we didn’t see! Continue reading

Prep for winter: dog house for cats

Today has turned out to be beautifully sunny and warm; the last warm day we’re supposed to get for at least a week.  Time to take advantage of it!

One of my goals for the day was to get the old dog house by the sun room cleaned out, re-oriented and winterized for the cats to use.

Here is how it looked, starting out.

20180925.doghouse1

Here, I have already removed the sheets of aluminum and metal roofing from the top, and the board that covered the top of the opening.

The first thing to do was to clean out the old straw.

It smelled like pee. :-(

In the process, I discovered it was really easy to move, so I was able to tip it over to get the last of the old straw and dirt out.

Which is when I discovered this.

20180925.doghouse2

A board, the head of a metal snow shovel, a toilet tank lid, and a rock.

This was all placed under it to level the doghouse.  As you can see, though, the back end had started to sink into the ground.  The wood was beginning to rot where it touched the ground.

I wanted to change the direction the opening face, as the south facing opening meant the wind was blowing right in.  I considered having it face north, towards the sun room, for maximum shelter from the wind, but after seeing how the ground was uneven, I decided to just turn it 90 degrees.  Not quite as sheltered, but still better.  Plus, we have some ideas on how to provide even more insulation and shelter, later.  We shall see.

I also didn’t want to lay it directly on the ground.  There has been a large piece of thick plastic leaning against the house since before we moved here.  No one has said anything about why it’s there or if it’s for anything in particular.  I think it used to be the cover for the basement window in the past, but the one that’s there now is larger.

So, I claimed it.

20180925.doghouse3

The cut outs are a bit of a problem, as it is just shy of the width of the dog house.  Which means the corner “legs” slide off, one way or the other, easily.  To help with that, I used the two glazed bricks that had been in front of the opening before, and put one on either side, to prevent slippage.  Then, for extra measure, I found a rod that I could insert into the ground against one corner.  The doghouse can still be easily moved, but not on its own.

20180925.doghouse4

Next, fresh straw was put inside for bedding and insulation, and more was added around the sides and back, for insulation.

Coming back with another load of straw to add inside, I found Doom Guy in it, checking it out! :-D

20180925.doghouse5

Finally, the metal sheets were put back on the roof, and the board back over the opening.

It’ll do for another winter – probably several winters – but I certainly hope we can replace this with something better, next year.

Who knows how many cats we’ll have by then!

Speaking of cats, they were all over the place, but that will be for another post!

The Re-Farmer