Home made butter

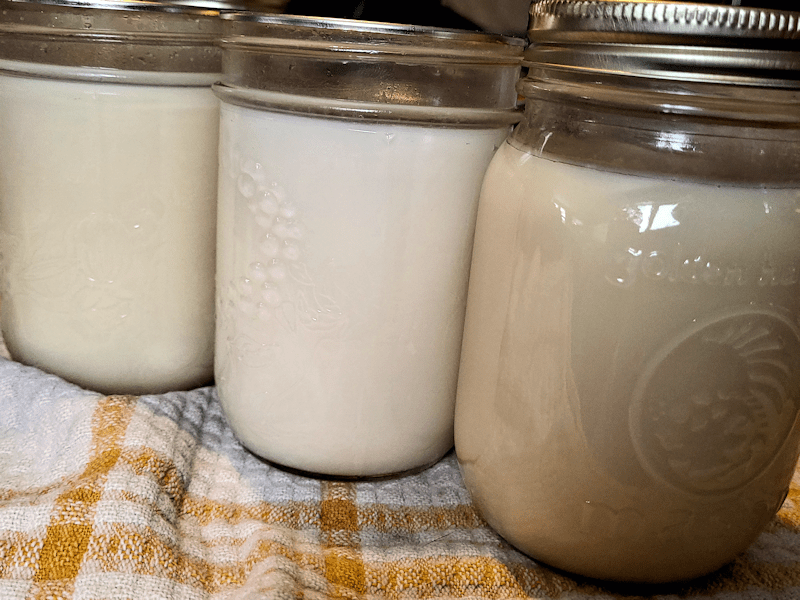
Last night, I finally got around to making some butter, using whipping cream. It’s been ages since I’ve made butter! I decided to try it again when I was picking up butter at the local grocery store, and the cheap, house brand butter had gone up in price so much, it was actually more expensive than whipping cream.

Making butter is easy and relatively fast when using an electric mixer. It can also be made by putting the cream in a well sealed jar and shaking it. Hopefully, with someone that can take turns shaking it with you!

To make butter with an electric mixer, a fairly large bowl is needed, since it will be in the fluffy, whipped cream stage for quite a while. It feels like it’s taking so long, whipping and scraping the sides and whipping and scraping and whipping and scraping some more, when then suddenly it “breaks” and you’ve got butter!

Also, even with a deep bowl, you’ll get cream splattering all over! You are forewarned! 😄

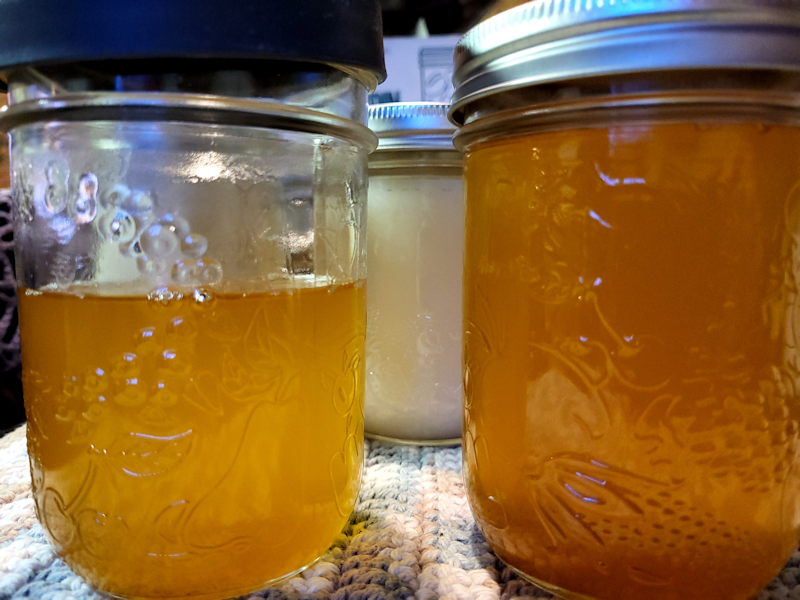
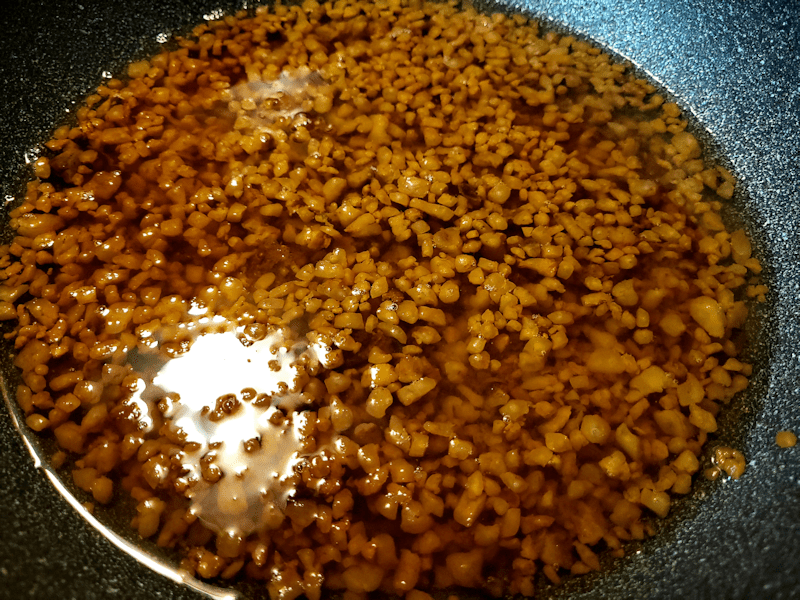
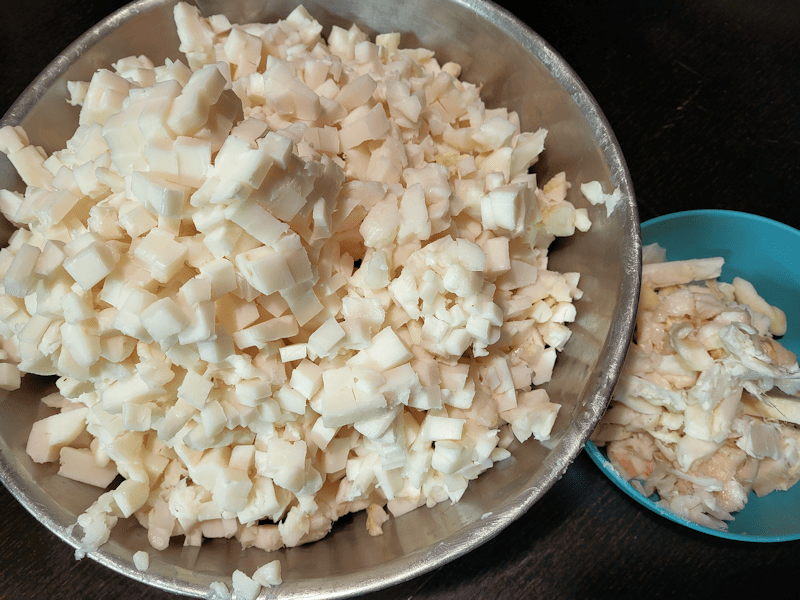
One thing about using a mixer is that the churned butter’s initial texture is very different. You don’t get a lump of butter. Instead, you get this.

The beaters keep the butter from forming larger pieces, so you get lots of very little pieces, instead. This photo was taken after the butter had been drained of buttermilk, then rinsed with cold running water. The smaller pieces made it easier to gently turn it while it drained, being very careful not to push the butter through the sieve.

Once drained through the sieve, there’s still water in the butter than needs to be removed as much as possible. That’s actually the part I find most difficult. It might be easier if we had one of those old style butter presses, but I just had my flat wooden spatula to squeeze and mash the butter in a bowl. I’d press it, drain the liquid, press it again, drain the liquid, and when I thought I was done, I’d press it a bit more and get even more liquid out! Finally, I got to the point where I could mix in a bit of salt to taste. Then, I pressed the butter into a small bowl with a lid, and put it in the fridge to sit until we use it today.

In the end, I estimate I got about 1 3/4 cups of butter, and about the same volume of buttermilk. A pound of butter is 2 cups, so there’s less butter from 1L of whipping cream, but we also got two products out of it. That buttermilk will be very nice in baking!

Whether or not it’s worth making butter with whipping cream is debateable. At least if price is your measurement. Whether it’s the cream or the butter that’s more expensive seems to change rather quickly. About a year ago, I remember whipping cream selling for over $8 for 1L, while butter was still under $4 a pound. The next time I went shopping, the price of whipping cream had gone down again, though still higher than butter was at the time. If you consider being able to control the amount of salt, the flavour, and getting buttermilk as well, the benefits do add up.

If the price of butter keeps going up, while the price of whipping cream remains more stable, it may well become the most cost effective way to get butter!

The Re-Farmer

Our 2023 garden: That was fast!!! and planning ahead

We had a light snowfall last night, making everything all white and fluffy this morning.

The outside cats didn’t mind it at all!

I counted 21 this morning.

Meanwhile, indoors, we have our first signs of spring.

When I checked the trays this morning, three out of four of them had onions sprouting. When I came back about an hour later, there were sprouts in the fourth tray!

I’m absolutely amazed by two things. One is, how quickly they started to germinate.

The other is, how much cat hair there is, all over the soil surface. These trays had lids on them. Where did all that cat hair come from? I mean, Beep Beep practically lives on top of the lights. She naps on them, rolls around on them, and even hugs them, so yeah… I can see some of her fur drifting down… but getting under the lids?

Yesterday, I marked on our communal calendar, two sets of dates. One was the number of weeks counted back from our last average frost date, June 2. This way, we can see at a glance that something that needs to be started 10 weeks before last frost, needs to be started around March 24, while something that needs only 4 weeks can wait until May 5th.

The other dates I marked was number of days counted back from our average first frost date, which is Sept. 10. We have exactly 100 days between our average last spring and first fall frosts. That’s the growing season we can mostly count on for frost sensitive plants.

For things that have really long days to maturity, it’s that “days before first frost” that we need to consider. If, for example, I have a gourd that requires 110 days to maturity, that’s May 23. If it needs 7-10 days to germinate, I would start them at least a week before that.

If I have something than need 90 days to maturity, that falls on June 12 and, by then, I could get away with direct sowing, instead.

One of the really useful tools I’ve found is the Farmer’s Almanac planting calendar. Most planting calendars just give number of weeks before first frost, because they’re meant to be generic. I can get that information from the seed packet. Farmer’s Almanac, however, lets you input your area code (or zip code, if you’re in the US). You can even put in your city (ha!) and province/state. It will find the climate station nearest you, then give you the calendar dates for starting indoors and transplanting, or seeding outdoors. It even gives you the choice of dates based on frost date, or on moon dates. Oh, and I discovered something very handy when I hit the print button on the web page. It allows you to remove things from the list that you aren’t growing, which greatly reduced the number of pages that got printed out!

It’s still a bit generic, of course, but the date range is pretty wide. For example, it tells me bell peppers should be started between March 24 and April 7. We have five varieties of bell peppers, and four of them are early varieties, so we could use the information on the seed packet to figure out which ones need to be started in March, and which can wait until April.

Of course, they can’t cover everything, so we still need to make adjustments. For example, their calendar says to start winter squash outdoors between June 16 and July 14. With some varieties, we could do that, but we’ve got some large varieties of winter squash that need more time to fully mature, so we would be better off starting them indoors. If we use the biodegradable pots that can be buried, that would reduce transplant shock.

We have always started summer squash indoors. I think, this year, we might direct seed them. The calendar says zucchini can be planted anywhere between June 16 and July 14, which is when we can expect the soil to finally be warm enough.

As for the things we’ll need to start the earliest, the herbs (except dill, which is direct sown) will need to be started at the same time as bell peppers; in March. The eggplants and tomatoes can be started in early April, melons can be started in early May, while pumpkins and watermelon can be started in mid May.

The direct sowing dates are pretty interesting for some things. If we decide to try growing radishes again, they can be direct seeded in early April – at the same time we’d be starting eggplant and tomatoes indoors. Carrots can be planted in late April, early May, which would be about the same time we’d be starting melons indoors.

All of which needs to be taken with a grain of salt. For example, the calendar says to start onion seeds outdoors in early May. Sets, sure, but seeds? Nope. There’s a reason people out here start their onion seeds indoors in January! Also, it has dates to start lettuce and chard indoors, but none for direct seeding. Who starts lettuce and chard indoors? I mean, sure, you can grow them indoors, but for transplant?

As it stands now, though, we won’t need to start anything else indoors until March 24, at the earliest.

That gives us February and most of March to get the materials we need and build a removeable door and frame, to keep the cats out of the living room, and out of the seedlings!

We’ll also need to build a barrier to block an opening in the shelf to the left of the door in the image.

Frosty garden plans

We had fog roll in yesterday, so by morning, we were back to looking like a winter wonderland!

Nothing like seeing frost to get me thinking about the garden! 😄😄😄

One of my goals for today is to mark out on our calendar, when we need to start different seeds indoors. We will also need to figure out how to build a barrier to keep the cats out of the living room, as we need to migrate trays out of the aquarium greenhouses and over to the rest of the room. Last year’s set up had serious issues when it came to protection from cats determined to get at the pots. The problem there comes down to funds. The “unallocated funds” of our budget we would use for projects like this are now allocated to make “car payments” into savings, so that we’ll have a down payment for a replacement vehicle before next winter. That’s not going to leave much wiggle room for other things.

Still, it will need to be done! We’ll figure it out.

With the ground still frozen and covered with snow, I’m thinking about where things will be planted, and when. The old kitchen garden is getting to the point where we can start making it into an actual “kitchen garden” – the place to plant those things that we would be wanting to harvest casually and continually, as needed for our cooking. It is also a good place to plant things that will need more protection and warmth.

The waffle weave bed is done and ready. The contents will, of course, sink as time goes by, but I deliberately filled it higher than I wanted it, so that won’t be too much of a problem. With the woven walls, I do want the top of the soil to be lower than the top of the bed by a fair bit, so it’s less likely to fall through the gaps. That bed gets full sun on the long, narrow side, while the short side that gets wider at the end gets quite a bit more shade.

The rectangular bed will be built up a bit higher on the sides, plus an even higher “wall” to hold back the pink rose bush, so that won’t take much to finish. The hard part on that one will be trying to pull up all those mint roots again!

The small raised bed along the south side of the garden is ready, and the strip in front of it has bulbs planted. The area right against the bed, covered with grass clippings in the photo, has bulbils from the single walking onion that keeps coming back, planted. Last year was the first time since we’ve been here that it didn’t get broken by something before the bulbils formed! We’ll see if they survived the winter. It would be nice to have perennial onions in here. This garden would be a good place to grow bunching onions, too, though those failed completely, last year.

There’s a section by the laundry platform that is overgrown with mint that needs to be cleaned up. That could be another bed for some flowers, perhaps – my younger daughter really wants to have a flower garden in here. There’s a bed along the retaining wall blocks that needs some work – it got very compacted last year, and I finally gave up trying to keep it weeded. That bed is where the bunching onions died. 😄

This garden would be a good place to start our herb garden. We transplanted mint into alternating blocks of the retaining wall, and they did survive and grow last summer. I don’t know what variety they are, but we now have spearmint seeds. We could plant the spearmint in the remaining blocks, so we can keep it under control.

I like having a retaining wall that doubles as planters!

Other herbs seeds we have now that can go in here are the thyme (two types), chamomile and oregano. I do not want to plant the dill here, as I want to plant that somewhere it can grow freely and self seed, without taking over a bed from everything else. The lemon grass, of course, will be going into a pot and set into a microclimate against the house.

I’m thinking this garden would be a good place for the Little Finger Eggplant, as well as at least some of the peppers. The free seeds for Jebousek lettuce we got would probably do well in the shadier beds, and I’d love to try the Hedou Tiny bok choy in here.

It sounds like a lot, but I think we’ll have enough space for all of this. For things like the peppers, we’re looking to have just a few plants of each variety, as we see how well they grow here, and which ones are enjoyed the most, so they shouldn’t take up excessive amounts of space. As for the herbs, we’ll only need a couple of plants each to meet our needs, so they won’t take up a lot of space, either.

Hopefully, with raising the beds higher, we’ll have less of a battle with all those invasive flowers my mother had in here, taking things over! The raised beds should also make it easier to have protective covers we can more easily move aside, to access underneath. That was one of the biggest problems I had with tending this garden last year. We had netting to protect the plants from critters, but it had to be fixed so thoroughly, it kept us out, too!

The corner around the honeysuckle and white roses really turned into a jungle of periwinkle and purple bellflower last year. I’d like to keep fighting those off as much as we can, so my daughter can start planting new – non invasive! – flowers to eventually out grow the invaders. The purple bellflower even buried other flowers – lilies, if I remember correctly – to the point that they never bloomed. That patch needs to be divided, so we could take advantage of that and perhaps use them to create a border. I am considering transplanting the rhubarb out of there completely. They are not doing as well as they could, right under the ornamental apple trees as they are. Though, to be honest, I’d like to get rid of those apple trees, They’re creating too much shade and preventing other things from thriving. They’re so beautiful, though, and they do provide food for the birds, so I’ve no plans to do that until we have something to replace them with – somewhere else!

It will be good to have more effective use of this garden. Having a small garden so close to the house should be very convenient, if we plan things right.

The Re-Farmer

Our 2023 garden: Veseys order placed – potatoes and more

Yes, I have gardening on my mind!

Among the things we were talking about ordering that will be delivered in the spring were potatoes and, potentially, raspberries.

It seems we weren’t the only ones that had a bad growing year in 2022, because the potatoes I was looking for were simply not available. However, Veseys has potatoes again, and so I placed another order with them.

Among the items we have ordered before, we are getting the Purple Peruvian Fingerlings again. We were really happy with them, in their grow bags, two years ago. They come in 2 lb packages, so we ordered two of them.

I am also ordering a couple of seed mixes from them that we ordered before (and using the coupon code from Maritime Gardening saved me the shipping costs!). I ordered two each of the Alternative Lawn Mix, and the Western Mix Wildflowers. The areas we had planted them, in the fall of 2021, got flooded in the spring, and nothing came of them. With so many wood piles chipped, we now have areas of bare ground that I would like to seed before they get taken over the invasive weeds again! Two of those areas will get the alternative lawn mix. The third does get accumulated snowmelt nearby in the spring, but should be fine to plant in. That area is next to our budding food forest, and will be good for attracting pollinators.

The seed packs will be sent right away, but the rest will be sent in time for planting in our zone 3.

Here are the new varieties we are going to be getting. All images belong to Veseys.

These are Red Thumb fingerling potatoes. They are noted for their delicious flavour. Unfortunately, there isn’t any information about how well they store over winter. These come in 2 lb packages, so we ordered two of them.

These are Irish Cobbler potatoes, an early variety also noted for their exceptional flavour. They come in a 3 lb pack, and we ordered just one of them.

These last ones are for our food forest. Royalty Raspberries. They come in packages of three, and we ordered just one package to try them. They are a late maturing variety, hardy to zone 2. So far, everything we’ve tried that’s purple has done really well for us, even in poor growing conditions, so I’m hoping the trend continues! These will produce fruit in their second year, so as long as we can keep them alive this year, we should have purple berries to try, next year.

There are still other things we will want to order for spring delivery, such as replacement sea buckthorn. We’ll just have to be careful to set aside the budget for them as we place the spring delivery orders, because we’ll be charged for them all at once, when they’re shipped!

This year, I’m happy to have several items, with different maturing rates, added to our food forest. The raspberries for production next year, apples that should start producing in 4 or 5 years, and the zone 3 mulberry trees that should take a few more years before they begin producing berries, as we will be getting 2 smaller, younger seedlings, instead of the 1 larger, older seedling they normally would have shipped, but are not available.

Little by little, we’re getting to where we want to be!

The Re-Farmer

Our 2023 garden: getting started (video)

Yesterday, after many delays, I finally sorted through all our seeds, old and new. I was happy to find I still had luffa seeds left, so I got those started, along with our onions.

Since I’m running out of media storage space on my WordPress account (the down side of having such a photo heavy blog!), I took my photos and made them into a video, instead. I hope you enjoy it!

Please feel free to let me know what you think of it, either here or in the comments under the video at YouTube. If you watch the video on YouTube, you can subscribe to my channel there. I’ll be uploading it to my Rumble account, too.

I will probably be doing a lot more of these, since I’m not about to spend over $300 a year to upgrade my account, when all I want is more storage space! It takes a lot more time, and I borrow my daughter’s microphone for the voice overs, but it does allow me to use higher quality images, and more of them, than I would here. I’d call it an experiment, but it’s not like I have much choice!

On another note, I’m quite enjoying the Movavi Video Suite to make these videos. I’m just barely skimming the surface of what the software allows me to do, since my needs are really basic, but if I wanted to, I could create some pretty professional looking videos. The only complaint I have is how it keeps wanting me to buy into subscriptions to get more choices in media and effects, etc. But that’s pretty typical of most media software these days, I think.

Anyhow, I hope you enjoy the video!

The Re-Farmer

Rendering lard: comparing 3 batches

While putting the jars of rendered lard into boxes, I remembered to take a picture of jars from each batch, together.

The batches are in order, with the first batch on the left, and the third batch on the right. My younger daughter ended up doing most of the work for the third batch, as I was not feeling well enough. I just got to jar it up the next day.

The third batch turned out smaller than I expected, with only 5 full jars – and I filled them only to the top of the “shoulders” of the regular mouth jars – and a 6th that was not quite fill. The fat was so thoroughly rendered that when I did the cracklings, there was only an extra couple of tablespoons out of them, so that didn’t even make it into a jar.

Also, I much, much prefer the wide mouth jars.

You can see the second batch is noticeably lighter than the other two. The second batch had less time in the slow cooker, and also got the most fat rendered off the cracklings.

Altogether, we got 22 500ml jars of lard, including the crackling lard and partial jars, out of 3 batches.

That should last us a good, long while!

The Re-Farmer

Rendering lard: second batch, first use

I was going to start the third and (hopefully!) last batch tonight, but it’s coming up on 5pm, and I just finished jarring up the second batch a little while ago. It can wait until tomorrow!

At times like this, I really appreciate the uninsulated old kitchen. This time of year, it’s basically a walk in freezer or refrigerator, depending on how cold things are outside. The remaining leaf lard is the thickest chunk we got and was still really frozen when I worked on the rest, yesterday, but as it sits in the old kitchen, it will soften more, yet still be frozen. That makes is a lot easier to chop, but also gives me a bit of flexibility in time for getting it processed. Yesterday evening, I had to get the girls to take over some stuff because my hips suddenly decided to go crunchy on me (they were fine by morning!), while my shoulders have started to really hurt from all the chopping. I’m doing it while sitting at the dining table, since there’s no way I can stand at a counter long enough to do it all, but the height while sitting isn’t very good, resulting in a lot of pain and stiffness right in the muscles where the neck and shoulder join. Which still hurts now, so I’m going to take an evening off from chopping.

I didn’t render the second batch in the slow cooker quite as long as the first batch; I’m curious to see if there is a noticeable difference in the colour of the lard. I might have had a touch less chopped fat in the second batch, but since I only have the depth in the slow cooker to go by, I can’t say for sure. Taking the solids out earlier did mean less liquid fat to jar up, and more volume to turn into cracklings later.

After removing the cracklings, I was able to fill six 500ml jars, with such a small amount left in the slow cooker, I just dumped the rest into the pan with the solids. After taking a break so the girls could use the kitchen, I started rendering the last of the fat out of the cracklings. While that was slowly heating up, I decided to take some leftover mashed potatoes and make them into potato patties. I just kneaded flour to the mashed potatoes until I got an dough somewhat thicker than bread dough, but not as dense as pasta dough. After breaking of sections and making them into rolls, I cut them into rounds, then pan fried them in some of the first batch cracklings lard. Enough to cover the bottom of the pan by about half an inch.

Lard has a high smoke point, so I could do these at almost deep fryer temperature. The higher the temperature, the less fat gets absorbed by the food. After cooking, they got laid out on a paper towel lined dish. They came out nice and crispy on the outside, with a smooth texture on the inside, and not at all greasy.

The lines that you see are because I set the cut rounds on a cooling rack until the pan was ready. If I’d laid them out on a plate, I would have had to flour the outsides to keep them from sticking, and I didn’t want to have burnt flour in the hot oil.

Here is the second batch of lard.

The first 6 jars were almost solid by the time the cracklings lard was done! I got another 1 1/2 pint size (500ml) jars out of the cracklings, making for a total of about 7 1/2 jars. The first batch was just under 8 jars total, so it came out very close.

The cracklings are once again laid out between paper towels, sandwiched between 9×13 baking trays and weighted down, so that cats can’t get at it!

One thing about handling all this fat for the past several days; even with constantly having to wash my hands with lots of soap, they haven’t been this soft in years!

The Re-Farmer

Looking rough, Baby kisses, and the sweet fat of the hog

Before I headed out to do my rounds this morning, I checked on the sun room kitties though the bathroom window.

I saw this, looking back at me.

That’s Sad Face, aka Shop Towel, on the bottom.

His face is looking rough and even more beat up than usual!

I want to feel sympathy for him, but yesterday I had to chase him off from attacking Junk Pile, repeatedly. Even when I managed to come in between them enough that Junk Pile ran off towards the house, he actually ran past me to try and get at her, and attacked her again, near the kibble house!

He doesn’t seem to have a problem with the kittens. Does he recognise that many of them (there are more, outside the photo) are clearly his progeny?

I really want to love on this cat, but he can be so aggressive towards some of the other cats! He’s one of the reasons I was worried about Potato Beetle being outside after he got fixed. He’d be more of a target and less prone to defend himself.

I can’t say how Potato Beetle is doing inside right now. Once we let him out of the carrier, he explored the house… and then disappeared. He found some hidey hole to sleep in, and I’ve yet to see him. I’ll have to ask the girls if he came out when they did the evening feeding in the basement.

While I was doing my rounds and coming back from switching out the memory card in the driveway trail cam, Pointy Baby came running up the driveway towards me, as if he hasn’t seen me in ages and was excited by my return from beyond. 😂

Then he gave me nose kisses when I picked him up!

Such a sweet little baby he is!

Once back inside, I started putting the solidified lard into the jar box for storage, remembering to get a picture, first.

I find it interesting that the darker coloured cracklings lard became so much lighter as it solidified, while the pale yellow fat became darker. I think if I’d taken the fat off earlier, it would have been more white than yellow. The solidified fat on the spoon rest I used when stirring the crock pot was certainly much lighter in colour. It should still be pretty neutral in flavour, though, compared to the cracklings’ lard.

Or, as my daughters call it, the pure, sweet fat of the hog.

Which is apparently something that became quite the viral meme on reddit and Tumblr. You can even get T-shirts with it.

I don’t recommend looking it up, though. Some of the people who ran with it went a bit… creepy on the theme. One of the t-shirt designs is funny, though.

Anyhow…

While putting the jars with canning lids on them away, I took the rings off and tested the lids. All of them are sealed tightly. I’m still keeping the one with the plastic lid, and the not-quite-full one aside to use right away.

I made a cast iron skillet corn bread with breakfast this morning. I added some of the cracklings to the dry ingredients. They want to clump together, of course, but I broke up the clumps while stirring them into the dry ingredients. They tasted really good in the corn bread!

Later today, I’ll start cutting up more of the leaf lard so I can run the slow cooker overnight. It should be interesting to see what the final tally is, when all the fat has been rendered.

The Re-Farmer

Rendering lard: first batch finished

Well, this is certainly a long process!

Here is what the slow cooker looked like this morning.

I stirred it, breaking up the clumps of fat, several times, adding a bit of time to make up for the heat lost while the lid was off, each time. In total, this picture was taken after about 10 or 11 hours.

I added more time.

By the time I was ready for the next step, it was at about 13 hours on low, plus whatever length of time it ended up being on warm, because I couldn’t get back to it right away, and needed time to sanitize the canning supplies.

It’s hard to tell in the photos, but those extra hours did render out and clarify the liquid fat more.

The next step was to scoop out the solids.

Those went straight into a wok-style frying pan.

Not all of the solid bits can be scooped out, with some being small enough to go through the holes. Various sites I’d looked up suggested straining the fat through a coffee filter while pouring it into the jars.

Tip: if you use a coffee filter over your canning funnel, make sure there is a small sieve under it, or the weight of the fat will pull it right into the jar.

Ask me how I know that? Go ahead! 😂

Seriously, though, don’t use a coffee filter. It takes forever for the fat to drain through. Things would start cooling down too much, and the fat needs to still be hot or it’ll all clog up.

Use a small sieve with a very fine mesh. That will work much better!

I had sanitized a full dozen 500ml/pint jars, just in case. Once all the solids were filtered out, though, I filled almost 7 jars.

While these will not be processed in a canner, I still did all the things I normally would if I were going to process them, including wiping the edges with vinegar, and finger tightening the rings.

Once those were done and set aside to cool, it was time to work on the cracklings. These were cooked at medium low heat for several hours.

As more fat was rendered out, it would start to foam up like this.

This picture was taken about about half way through the cooking process. I set up a chair in the kitchen while doing this, since it needed to be watched over and stirred so often.

I cooked it down until it looked like this. Deciding when to stop was pretty much based on scent. Once things started to smell like things were starting to char a bit (the tiniest pieces could potentially start burning), I figured it was good enough!

The cracklings were then scooped out, as much as possible, onto a baking tray lined with paper towels. Then the last of it was strained into another 500ml jar.

Look at that difference in colour!

The last jar was filled more than I normally would, but I didn’t want to leave such a small amount in the pan. It didn’t need as much of a head space, as it got a twist lid, instead of a canning lid and ring. While it’s cooling down, the lid is simply resting on top, to keep the dust (and cat hair!) out. As the other jars cooled, I even heard some of them pinging, but I didn’t want that with the plastic twist off lid.

The jar from the cracklings will be used first, and then the one that has the least in it – which you can see in the photo is cooling down quite a bit faster than the others! Lard is a neutral flavoured fat, but that last jar will likely have more of a flavour to it. It should be interesting to try it out and compare.

Here are the cracklings – after being flipped. It was too messy to try and take photos of the process. I have several of these 9×13 baking trays, so to flip it, I covered the top of the cracklings with more paper towel, put another baking tray on top, upside down, then carefully flipped the whole thing. Once flipped, the grease soaked paper towel was removed, scraping off as much of the stuck cracklings as I could, and thrown away.

More paper towel was added over the top.

Then, because we have cats, I added another layer of paper towel, set a clean baking tray on top, then weighted that down with the slow cooker (cleaned and washed, of course, ready for the next batch!).

Tomorrow, I’ll salt the cracklings and put it in a jar, to be added to as the other batches are finished.

I will stick to doing just one slow cooker batch at a time. It’ll just be easier that way, even though it’ll take longer. Each batch is a 2 day process! I’m pretty sure I can do the rest of the fat in two more batches. We might start running out of pint jars that aren’t still sealed in their packages. I want to save those for when we’re actually processing things in a canner. We can move up to the 750ml jars if we have to, though.

This one batch, which started with enough cubed fat to fill the slow cooker, gave us 7 pint jars of white lard, plus one pint of golden crackling lard. If the other two batches end up similar in size, we could have the equivalent of 21 pints of white lard, and 3 of the crackling lard.

We don’t normally buy lard. It really came down to the budget. Now that we’ve got it, it should be interesting to see how much we actually use it. That will help us decide if it’s worth doing this again, in the future!

The Re-Farmer

Rendering lard, first batch

I started working on the pork fat well before it was thawed out, as it’s much easier to cut it while it’s partially frozen. I have two large slow cookers, and I was planning to use both of them to render the fat out. It should be done over low heat for a long time, and I wasn’t about to monitor a pot on the stove all night.

Thinking back, my mother never rendered lard on low heat. She didn’t have the time for that. I remember it being quite hot by the time she scooped the crispy cracklings out. I’m pretty sure I’m remembering burned bits, too! 😄

Having a large slow cooker or two would have made the job much easier for her!

Part way through cutting the fat up, I changed my mind.

I wasn’t going to do two slow cooker’s worth!

To fill this bowl, I finished off all the smaller pieces I could find. All three of them. 😄 I started cutting into the larger pieces, but they were still too frozen. Plus, I didn’t want to push my hands too far. They’ve been relatively pain free of late, and I would rather they stayed that way!

The small bowl on the side is the janky bits, with blood vessels or meat and the sliver skin. That was saved as a treat for the outside cats, which they were very happy to get!

There was enough pork fat left in the giant bowl that the lid still didn’t quite fit all the way closed, and I had to use the foil to cover it completely again. It’s now sitting on top of the freezer in the old kitchen. It’s going to be a very slow thaw in there! Which is okay. While I was cutting, the outside of the fat would be getting too soft to cut easily, while the inside of the bigger pieces were still too hard. A slow thaw won’t have the two extremes, and it should be easier to continue cutting up tomorrow.

They kinda look like cheese curds in there! 😄🧀

For a moment, while filling the slow cooker, I thought I’d have to dig out the second one, after all! I squished it just flat enough to make sure nothing would touch the underside of the lid. As it renders, it’ll get lower.

The slow cooker is now set on low for 8 hours, and then it’ll automatically switch to warm. It might need more time, so I’ll be checking it off an on throughout the night. I did add a small amount of water to get it going, and make sure it the bits don’t start burning before the fat starts rendering out.

Once it’s getting close to done, we’ll sterilize some jars – probably in 500ml sizes (pints) – to store the lard in. If we do decide to go with a larger size, I’d go with the 750ml jars, rather than the 1L/quart jars. I don’t see us using it fast enough to warrant that large of a jar.

Based on how much is left that needs to be cut up, we might actually be doing two more batches! It’s a shame the meat grinder I found while cleaning out the old kitchen has parts missing. A grinder would make the job much easier, and more fat would render out of the smaller pieces, too.

No matter! The job is getting done, and we’ll have a good supply of shelf stable, high smoke point, flavour neutral fat for our pantry.

The Re-Farmer