Thanks to my wonderful daughter taking over for me, yesterday, we had a couple of fresh loaves of bread to try this morning.
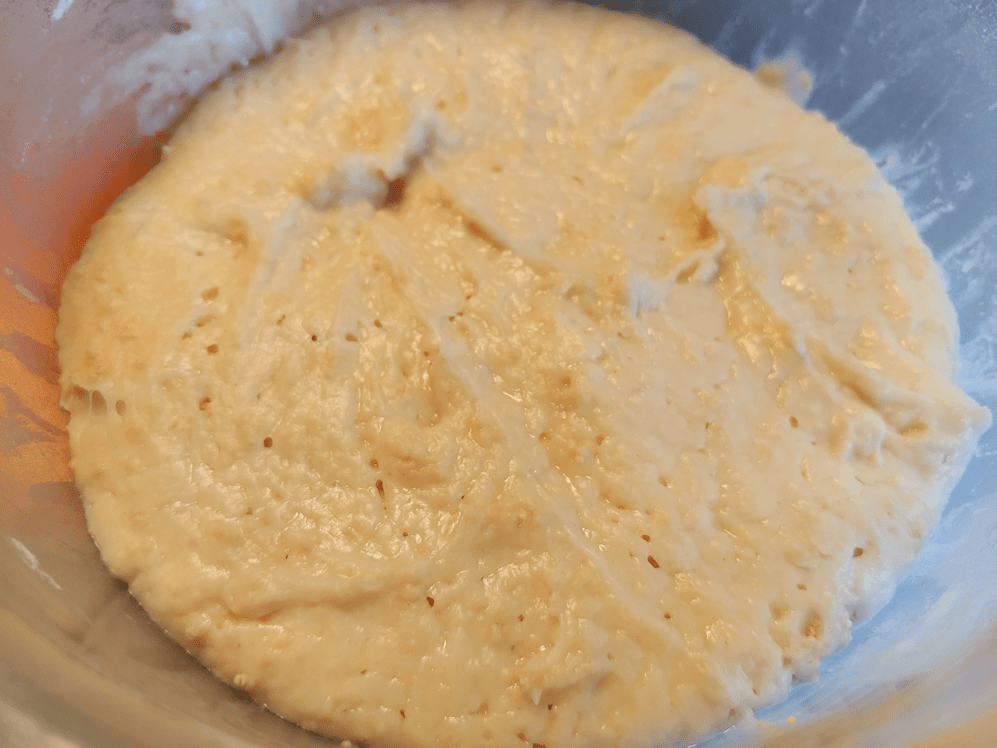
I’d started by having the dough baby soak overnight, then added flour to make a sponge. After several hours, this is what the sponge looked like.
My daughter set aside half of this, then used the remaining sponge to make our basic bread. Instead of using loaf pans, she made two big, flat loaves on a baking tray. Here is what I used for breakfast, this morning! :-)
The bread had a very mild sourdough flavour. For all the months the dough baby sat in the flour, it did not get any stronger in flavour. It was mild enough that I could put them with slices of brie under the broiler, and the flavour of the bread did not overpower the flavour of the cheese. The bread had a very nice texture to it, too.
As for the sponge that had been set aside; my daughter had used the flour from the dough baby’s canister in the bread, but there was still some left. I kneaded some into the sponge to make a stiffer dough, then refilled the canister half way with fresh flour, added the bough baby, then topped it with more flour. The canister is semi-transparent, so when I checked on it an hour or so later, I could see the dough baby had risen enough to work its way through the flour, so I gave the canister enough of a shake to cover it up again. With our temperatures slowly cooling (though I saw a 30C day in the forecast!!), we’ll be using this more often, which should further develop the flavour.
As someone who has never managed to keep a sourdough going for more than a couple of years, I really appreciate how low maintenance the old dough method is. If we can’t going to bake as often, it’ll just stay in its flour bed and dry up. It doesn’t need to be constantly used, fed, stirred, or kept warm. I think this will work out really well for us!
For the next while, as I remove part of the dough from one batch to use in the next batch, I will be taking out slightly larger pieces of dough, to make larger batches of bread with it, next time.
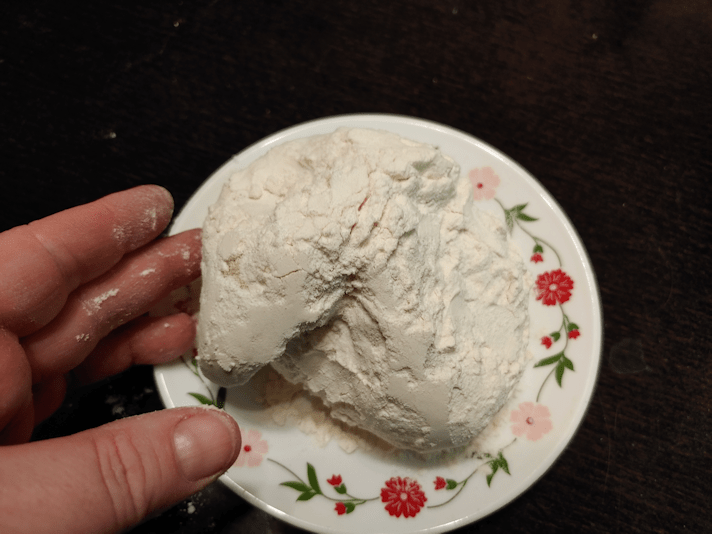
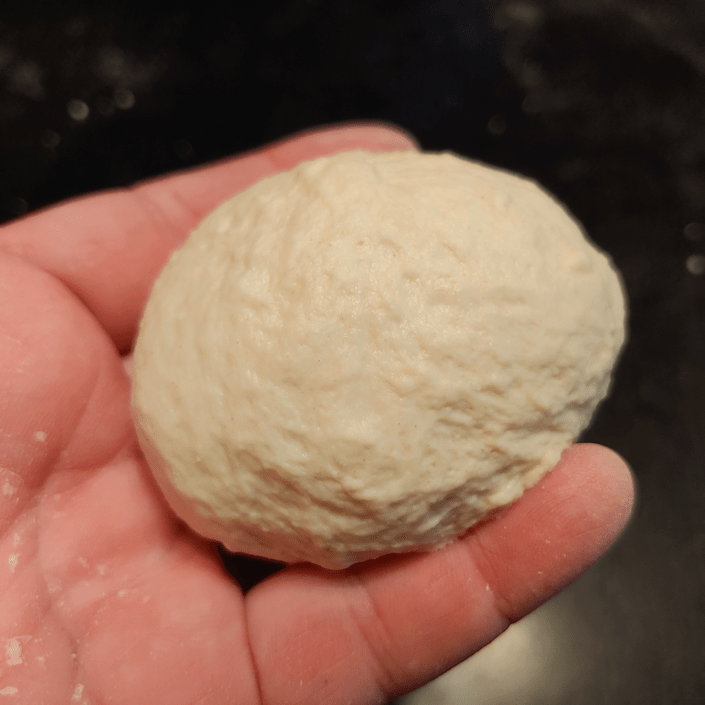
Our flour canister is tall and narrow, so I’ve made a point of flattening the dough baby a bit before burying it in the flour. When I opened the canister last night, I found the dough baby had grown enough to emerge from the flour like a mushroom!
I think today’s dough baby will the the last one I can fit into the canister! I’ll have to start burying them directly in the flour bag. They get so big! Which is encouraging, since that shows how lively the yeast is, so it’s a good problem to have. :-D
The dough baby was light, with a slightly crunchy dry shell, and a thick bubbly interior. The larger size made it a bit harder to tear apart to put in the little crock to soak overnight, so the pieces were a bit on the large size. That did not seem to make a difference to how it looked in the morning.
I soaked it in 2 cups of warm water overnight then, because I wanted to increase the amount of dough I was making, I cheated a bit and let maybe a tablespoon of commercial yeast proof in another cup of warm water. Right now, I’m getting enough to make the equivalent of 4 small loaves, and I eventually want to be making the equivalent of 4 large loaves. I don’t plan to get to my Babcia’s level of a dozen loaves at a time! :-D Making enough for 6 or 8 loaves, maybe, but not a dozen!
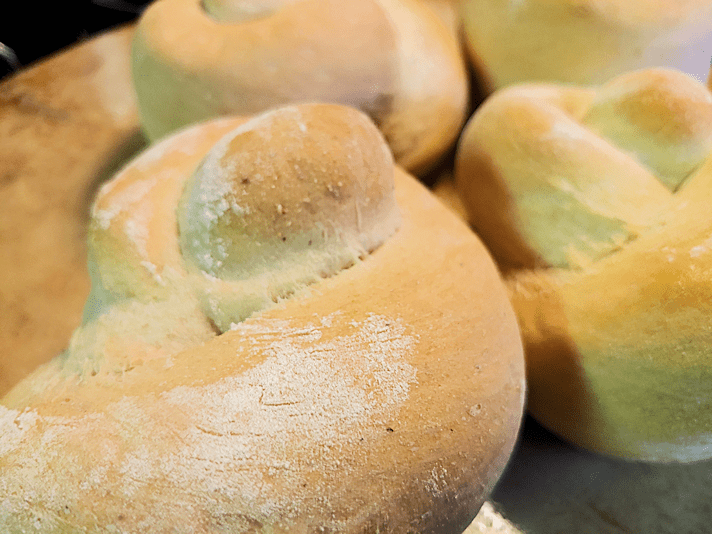
Once again, I used a mix of all purpose and Durum wheat flour, and let it rise only once before shaping. When I am no longer using commercial yeast, I’ll add an extra rising again. I also split it to do one half plain, and one half fancy. For the first half, I made it into 4 knotted buns and used a cast iron pan to bake them in again, which is working out very well.
The second half got divided again, to make a pair of rolled loaves.
Each piece was rolled out, then small pieces of leftover ham were scattered evenly, followed by generous amounts of shredded sharp cheddar, mozzarella and Monterey Jack cheese.
Before rolling them up, I did dampen the edges with water, but I did not try to seal the dough.
Once rolled up, the ends were tucked under, and they were left to rise.
The knotted buns were baked first, and turned out quite adorable.
The ham and cheese rolls, as expected, did leak out the bottom seam!
That’s okay. It just got crispy on the bottom of the pan, for some extra deliciousness. :-)
I would not recommend doing this without using parchment paper. :-D
A huge bubble formed under the top, as the cheese melted and the layers collapsed below. That did make it a bit hard to cut through! :-D
The ends that were tucked under were a lot more substantial. I the slices where the large bubble formed, the top crust was almost like a fancy chip! :-D
We had them for supper with tomato soup. It was a very nice combination! :-D The crispy cheese bits made for a lovely little treat, too.
After yesterday morning’s cat disaster, the girls were kind enough to drop their own projects and take over cleaning up.
While I was doing my rounds outside, the furry little monsters created another mess. One of the jade plant posts I’d managed to shield from their digging got knocked to the floor. *sigh* I was able to repot the plant. Not sure if it will survive. Once again, the girls took over the clean up so I could take care of other things. At least I wasn’t bread baking today!
The one down side of using my grandmother’s method to bake bread is, once I take the dough ball out of the flour and start it soaking overnight, it must be used the next day. There’s no way to postpone it if other things happen!
By the time we were doing cleaning up and putting things away, I started the bread baking much later than planned.
I did, however, cheat a bit. I wanted to mix up more dough, so I could take off more to set aside, for larger batches in the future. As it was, the overnight soak was not looking as active as I would have liked, so I did end up adding some yeast and a touch of sugar, and let that bubble up some more.
Then, since I have it, I used half all purpose flour, half durum wheat flour.
This is after it had about an hour to rise.
I notice a definite difference in the dough, when using the durum wheat flour. The dough feels smoother and more elastic. It was very noticeable when making the pasta, but even at half-and-half, for the bread, it is much nicer to knead.
My grandmother would have used whatever flour they had, so mixing it up like this is probably not all that different from how she did it.
After removing a portion to set aside for the next batch, I split the dough in half. The first half was left plain, though I did have some fun with it, anyhow.
I split the dough into 4 pieces (because there’s 4 of us), and made knots.
The resulting bread was a bit denser and chewier with the durum wheat flour in it. We all like our bread on the toothsome side, so we quite enjoyed it.
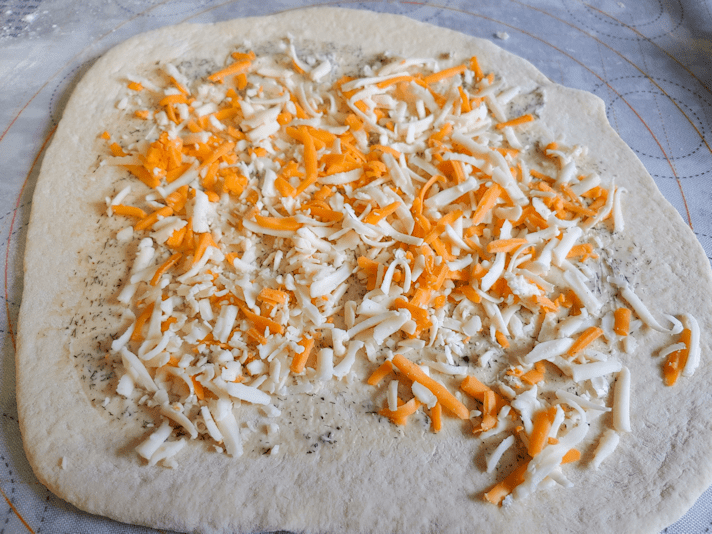
For the other half, I was going to do a cheese roll, but my daughter suggested rolling and folding it. With the extra gluten in the durum wheat flour, it could actually handle that, so I have it a try! This time, I made two loaves.
After rolling the dough out flat and as thin as I could, I used some of the herb butter my husband had made. I don’t know what all he included in there, other than a LOT of dill (the container slipped…), some caraway seeds, and a touch of lemon juice.
Then I added some shredded cheese. It’s a mix of sharp cheddar, mozzarella and Havarti.
Then I folded it in on itself.
It then got rolled out slightly and folded again, before final shaping. I had to use a touch of water to get the edges to stick closed.
Once in the pan, I flattened them out a bit more with my hands, before leaving them to rise.
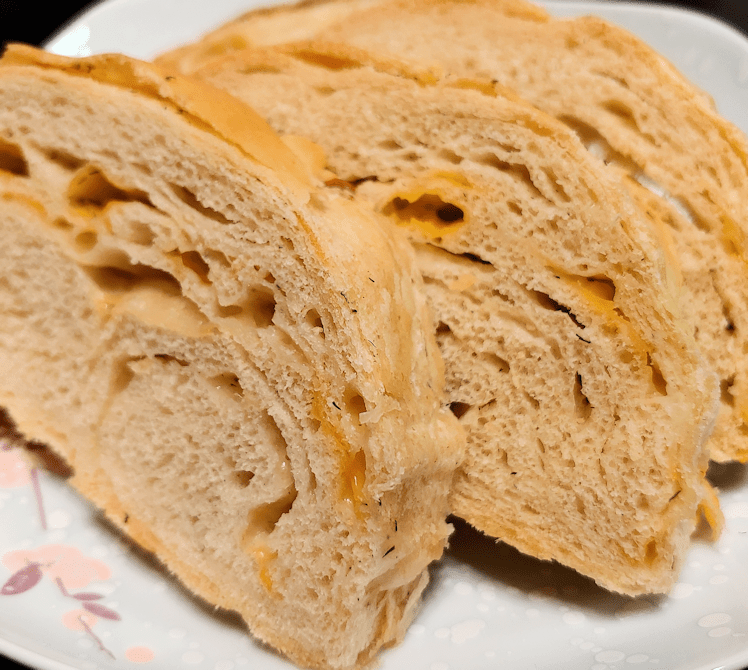
Of course, some of the cheese did make its way through the dough as it baked, but my goodness, it looked and smelled wonderful!
It was quite flaky on the outside. On the inside, the dough absorbed much of the butter, leaving cheesy little pockets all over!
It was quite enjoyable! I don’t know that I would go so far as to do the folding method again (though it would be awesome to do that again with some sliced green onions, to make a version of green onion cakes!), but I definitely do it as a cheese roll in the future.
Until then, I am not going to have some with my lunch!
Okay, so after accidentally killing off our ball of old dough “yeast”, I had to start over. Since I have no idea how my grandmother got her first ball of old dough, this is all a guessing game, anyhow!
This time, I went with another old technique: the sponge.
It’s just 2 cups warm water, 2 cups flour and 2 Tbsp of yeast, mixed together. This is the sort of thing one might put into the fridge overnight, to bake in the morning. Instead, I put it in the oven that was warmed up to its lowest setting, then turned off.
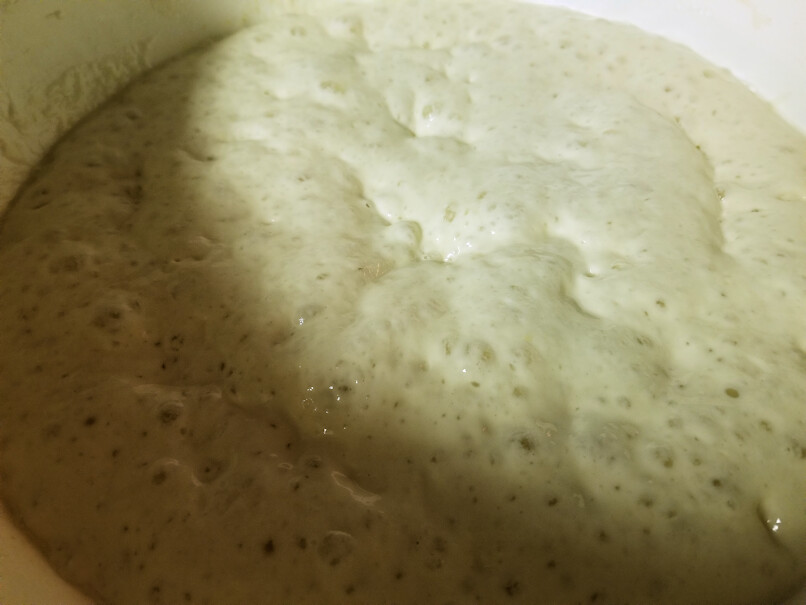
After about an hour or more, the resulting sponge was all soft and fluffy!
I added another half cup of warm water, which also made it easier to transfer it to my big mixing bowl, then added the salt and flour, as usual.
Once I’d kneaded in as much flour as I wanted (I have to catch myself and not add too much!), the dough was set aside to rise in a floured bowl. Once again, it went into a warm oven to rise.
But not before I took out a dough baby! My mother described my grandmother as taking dough out for the next batch after the second rising, when she was shaping the loaves. Since I’m using actual yeast in this, I did only one rising before shaping the loaves. I flattened the ball out this time, to see how that changes things as it sits buried in the flour.
As for the rising dough, it ended up taking about 2 hours, even with using commercial yeast!
This would have been a 2 loaf recipe, but I decided to play around a bit.
I made 4 plain mini loaves, first.
Yes, there are only 3 in the picture. My husband already ate one. :-D
After taking the picture, I ate one, too!
The other half was used to make surprise buns. During our city shop, I’d found a gouda-like cheese (I can’t remember what it was actually called) with truffle in it. There was still some left, so I cut it into small slices and wrapped them inside the dough.
I did try and seal the dough well, but as you can see in the photo, the cheese still made its way out, and started bubbling in the middle!
I can hardly wait to try it out!
With our new dough baby, I will have to make a point of using it every few days again. Since I didn’t start out with an “instant sourdough” yeast, it will take longer to develop that sour flavour. At least, that’s my assumption.
I will also keep taking the dough baby out for the next batch at the start, as the dough it being setting aside to rise. That way, I can do things later on, like knead baking soda in again, or knead in things like herbs or shredded cheese or anything else that catches my fancy.
Our first batch of bread using old dough, in the manner my Babcia used to do, is now done. I did mess up a bit, which I will talk about below.
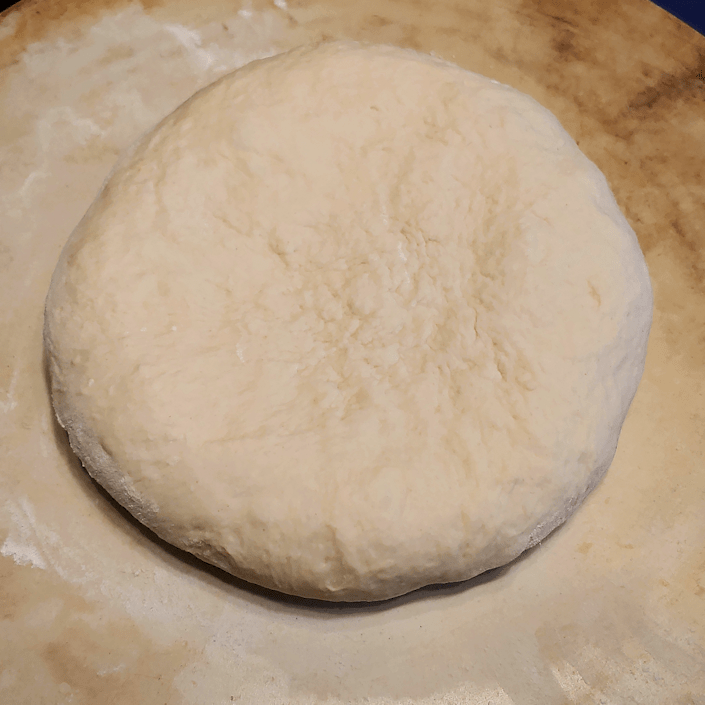
Here is how the dough looked after the first rise. I had left it for about 1 1/2 – 2 hours, give or take.
That is just beautiful.
My mother described my Babcia as “punching down” the dough. I know exactly what she was talking about, since this is what she did with her bread baking. My mother used a huge, enameled bowl with a lid, which we still have, for one big batch of bread. She would get it ready for its first rise before going out to milk the cows in the morning. By the time those chores were done, the dough was overflowing the giant bowl, knocking the lid askew. She would put the dough back in, scraping dough off the lid and adding it in, too, then literally punch it down with her fist. She would then put the lid back and leave it for a second rising, which would also overflow. She would gather it up again and punch it down before continuing on to form loaves and buns.
For such a small batch, I just took it out and gave it a light kneading.
The dough felt beautiful! Soft, light, fluffy and elastic. I probably could have skipped a rising, but I really want to recreate what my Babcia did as much as possible, so back into the bowl it went.
Both times, I set the bowl into a warm oven with the heat off and the light on.
This is possibly where I made my first mistake. The dough did not rise as much the second time. Usually, dough rises faster during a second rising, but after an hour, it really hadn’t risen as much as I would have expected. I probably should have left it for another half hour, at least.
I didn’t do that.
With this batch being rather small, I formed just one loaf out of it (after removing a portion for the next batch), then giving it another light knead.
In my starter batch, the two round loaves I shaped had puffed upwards quite a lot, so this time I pressed the loaf flat, then set it aside, covered with a tea towel, to rise while the oven preheated to 425F.
Which may have been my second mistake. I probably should have let it rise for a while, before preheating the oven. Not only am I too used to how quickly yeast bread rises, but our new oven preheats faster than the old one!
Meanwhile, I used the piece of dough I’d set aside to pick up the bits of dough stuck to the bowl and table top, as my mother described my grandmother doing, kneaded it enough to incorporate it all, then buried it in our canister of flour. I took out slightly more dough this time, as in the next batch, I intend to increase the quantities of flour and water.
When the oven was ready, I scored the loaf and put it in, checking it after half an hour, then adding more time.
I’m certainly glad I flattened the loaf as much as I did! It still became very much a ball!
This was taken out at about 40 minutes.
Which was most definitely a mistake.
Though I made sure to do the “thump” test to check if it was done, when I finally cut it open, the centre seemed slightly underdone. I probably should have left it in the oven for at least 5 or 10 more minutes. I am really bad for taking bread out too early, as I am constantly thinking they are going to burn! :-(
What to do?
Toast it!
Sort of.
I cut it into pieces, laid it back on the baking stone, and put it back in a 350F oven. After about 15 minutes, I flipped them and put them back for another 10 minutes.
Here is the end result!
It looks really great, at least! It still felt a bit heavy and dense, though.
The first taste test was with a plain piece.
The flavour is a bit milder than the starter batch. This makes sense, since that one used a commercial sourdough yeast. The sourdough yeast included rye, which I could taste in that starter batch, but I am not getting any rye flavour with this batch. There is, however, a very slight sourdough flavour. I expect this flavour to develop with every batch we bake. Overall, though, the flavour was very neutral.
The texture was slightly dense and chewy, but not under-cooked and doughy, as I feared it would be.
The one thing I had an issue with, was the crust. It had a thick, crunchy crust that crossed over to that “watch you don’t cut your mouth up” level. This may have been exacerbated by “toasting” the bread pieces again, but from what I saw when I was cutting it, I could see it was already going to be an issue.
The second taste test was with butter and, of course, that one tasted better. Fat is flavour, after all!
I found myself thinking this would be a very good bread to dip in an herb infused olive oil! The neutral base flavour would make a great carrier for other, more strongly flavored things. That neutrality will likely disappear over time, as each batch should develop a more distinct “sourdough” flavour.
So this first batch of bread using old dough was both a success and a not-quite-success.
The use of the old dough in place of yeast or sourdough started worked very well. There was plenty of yeast activity in there. Even without the use of sugar in the bread, the yeast did its job – when I gave it the time to do so!
The other success was reducing the amount of flour. It did mean making one loaf instead of two, but the dough itself turned out much better for it.
The not-quite-success part of it had more to do with my not giving it the time it needed, I think. I’ve made sourdough bread were I’ve left the dough to proof for an entire day, so it’s not like I don’t have the patience for that sort of thing. But I did see the signs and simply chose to go ahead, anyway. The end result was probably not as could as it could have been, because of it.
Plus, of course, I need to be concerned less about over-baked bread, and more about underdone bread, and leave it in the oven for longer! I should probably increase the oven temperature to 450F. That’s the temperature my daughter bakes her French bread in, and her much larger loaves bake up wonderfully.
I will leave the “bread egg” in the flour for a couple of days, then make another batch, tweaking things with what I’ve learned with this attempt.
First, you may have noticed a change in the menu at the top. I now have a separate tab for sourdough. If you’re looking for information on making a sourdough starter, or trying some of the recipes we’ve been using, that’s where you’ll find quick links to all the relevant posts.
There’s a reason I’ve done this. :-D
We have long been the sort of family to keep a pantry stocked of basics and do a lot of “from scratch” cooking. Part of it was because that’s what we wanted to do, but there was many a time when finances left us with little choice.
Since we’ve been living on my husband’s long term disability income, which comes in once a month, we’ve also been in the practice of stocking up once a month, long before we found ourselves living out in the boonies.
Which means that many of the things people are being called to do, with the Wuhan virus lockdowns, are things we were already doing. Now, however, there are more people doing it, which means we’re suddenly having a harder time finding things that have never been an issue before.
Like yeast.
Now, to be honest, I did have troubles finding the type of yeast I wanted. It was far easier to find super quick acting or bread machine yeast, than the slower acting yeasts I preferred. But that’s just me being picky. :-D Right now, there just isn’t any type of yeast to be found, even as supplies of flour and sugar have been restocked in many places; at least in the cities.
I have given up Facebook for Lent, which is probably an extra blessing this year, as I’m missing out on all the social media crazy that I’m sure is going around right now. I still use their messenger, as I can use it on my phone without logging into Facebook, so I sometimes get people sending me information that way, but beyond that, I’m pretty much out of the social media loop.
With so many people suddenly stuck at home and having to learn how to cook and bake, plenty have turned to social media to discuss and share. Since I’ve mentioned to a few friends and family members about my inability to find yeast, I had someone message me with something they found.
It was instructions on how to “make your own yeast.”
Now, right off the bat, I knew things were off. That’s not how yeast works. You don’t “make” yeast. Yeast is a living thing, and wild yeast floats in the air around us all the time. Now, it could have meant instructions on how to make something like commercial yeast, but that’s not what was in the photo.
What it really was, was instructions on how to make a sourdough starter.
Which was great. As a recipe, it could have made a very nice sourdough.
The reason I say “could” instead of “would” is because how it turns out depends on the wild yeast that finds a home in the mixture and starts colonizing it. It’s entirely possible for a nasty strain to take hold, and instead of getting a nice, bubbly mixture that smells wonderful, you get something that’s black or red or otherwise nasty, and it needs to be thrown out. That’s why even some sourdough starter recipes include adding a bit of commercial yeast. This is to ensure that a strain of yeast that is known to be safe is established.
There are lots of reasons people so readily adopted commercial yeast.
Even if it was colonized by a lovely strain of yeast, sourdough starter is not something you can substitute 2:1 with commercial yeast. It doesn’t work that way. Starter is a living thing that needs to be tended and fed and stored properly if it’s not going to be used very often. It also behaves differently than commercial yeast, typically taking much longer to rise (unless your recipe calls for something like baking soda which triggers a chemical reaction… do feel free to visit the sourdough tab to learn more). That slow rise is one of the attractions of sourdough baking, as it allows all sorts of lovely flavours to develop.
Oh, and the Pinterest worthy photo of a mason jar full to the top with lovely, bubbly sourdough starter?
Don’t do it. It may not be as aesthetically pleasing, but this is what it should look like.
A starter needs lots of room to bubble and expand. Put it in a little mason jar, and you’re going to have a mess to clean up before long! Also, if you’re going to be doing any serious level of baking with sourdough, you’re going to need more than a tiny jar will give you. We keep ours in a giant plastic bowl (no metal!). Some of our recipes call for 4 cups of starter, so we keep a fairly large amount of starter bubbling away.
Having yeast is really handy. That’s why, even though we have a sourdough starter we’ve managed to keep alive for a year and a half now, I still like to have commercial yeast.
I recently spoke to my mother about not being able to find yeast. She told me how, in her younger years, no one used yeast. She’s shared memories of her childhood before, so I already knew that part. When bread baking, her mother would set aside a piece of the dough for the next baking day. I knew that part, too, as it was a common technique at the time, and my dad has also shared memories of his family doing the same. Her mother would bury the set aside piece of dough into the flour.
Wait… I didn’t know that part!
In fact, this was a method I’d never heard of before. My grandmother would bury the piece of dough in the flour. A dry crust would form on the outside, and it would need to be soaked before it could be used in the next batch of bread.
I think I might have to try that!
So what’s my point about all this?
Well, for those who are new to baking and wondering what to do about not having commercial yeast, you’ll be fine. You can make a sourdough starter. Just know that this is something that takes time to get established. Or you can make flatbread, with no leavening at all. There are options. The trick will be to sift through the misinformation that’s out there. It’s not as hard as some make it out to be, but it’s not as “easy” as others make it out to be, either.
I supposed it comes down to, if it sounds too good to be true, it probably isn’t!
Today my daughters did the baking, starting with a sourdough “batter” bread.
There’s a reason the word batter is in quotations…
The girls have been finding recipes they like and, after trying them out, adding them to a notebook with any modifications or adjustments they’ve come up with.
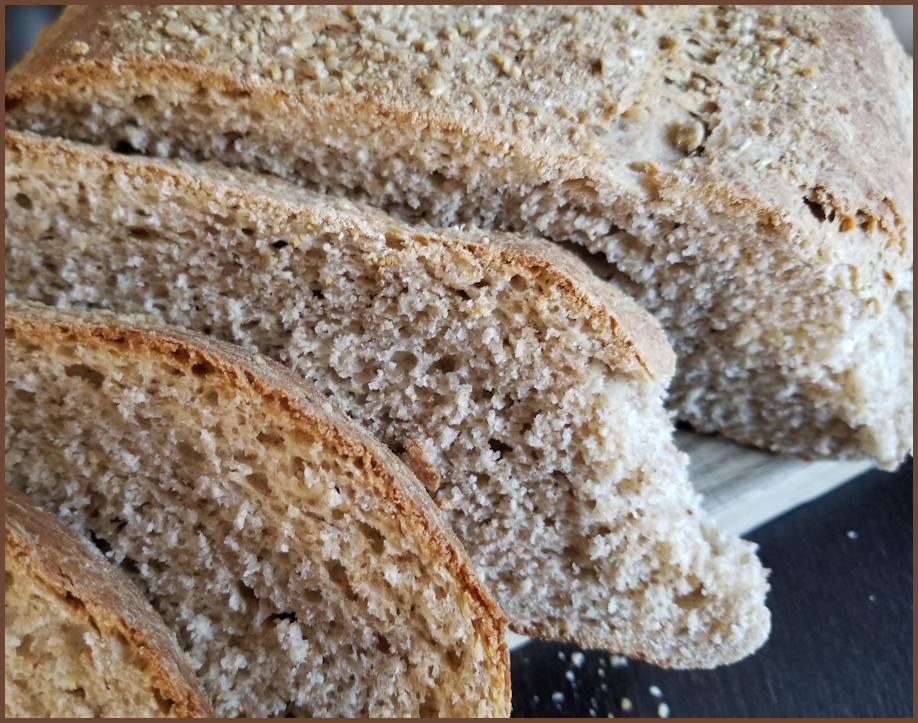
This is a bread that needs a LOT of time! The finished result, with its tangy sourdough flavour, is well worth it.
Begin by preparing the starter the evening before. We used our rye starter, The Rye of SourOn, but a regular starter can be used as well.
Overnight Sourdough Rye Bread
Overnight starter:
1 cup sourdough starter
2 cups warm water
2 1/2 cups rye flour
Mix the ingredients in a large bowl. Cover and let stand overnight in a warm place, such as the oven with the light on.
Ingredients:
Overnight starter
1 cup milk
3 Tbsp butter
3 Tbsp sugar
2 tsp salt
1 Tbsp active dry yeast
1/4 cup warm water
3 cups rye flour, or 2 1/2 cups rye flour, 1/2 cup flax meal
3 – 5 cups all purpose flour
1/8 cup crushed sunflower seeds, to coat top of loaves (optional)
(place roasted, salted sunflower seeds into a slide lock freezer bag and crush with a rolling pin)
The night before: prepare overnight starter
The next morning:
Pour the milk into a saucepan and scald. Add the butter to melt, then stir in salt and sugar. Set aside to cool for about 10 minutes.
Sprinkle yeast over warm water and let stand for about 5 minutes.
Stir yeast and cooled milk mixture into the overnight starter. Stir well.
Mix in optional flax meal and rye flour. Beat thoroughly until batter is smooth.
Cover lightly and set in a warm, draft free place to rise until almost doubled in size; about 30-40 minutes.
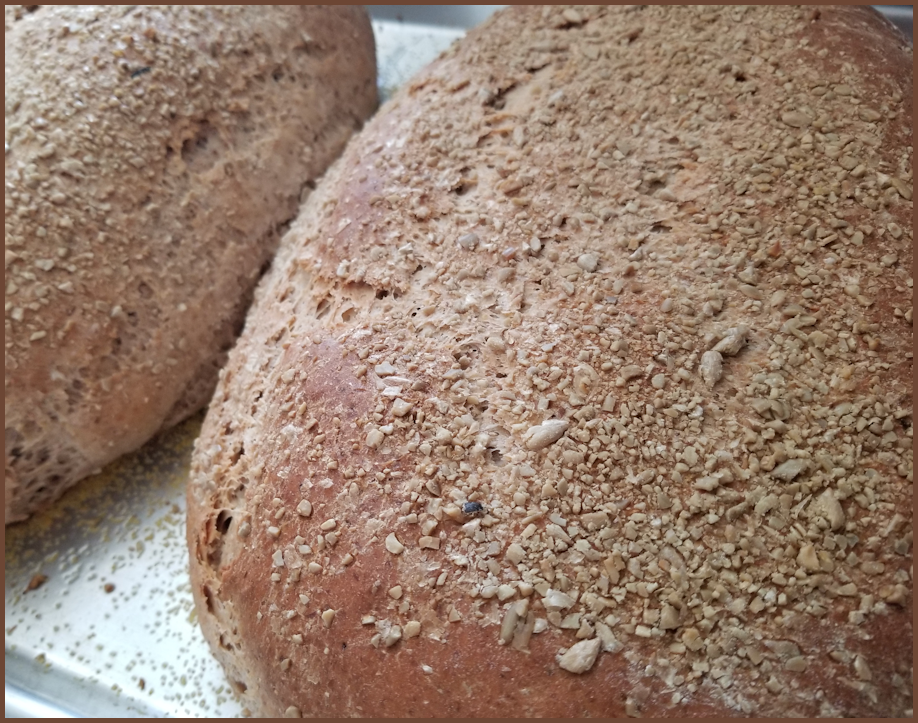
Shaped loaves after rising.
Stir down dough. Add all purpose flour, a little at a time, until a medium stiff dough begins to form. Turn onto a floured surface and knead in more flour, as needed. Continue kneading for another 8-10 minutes, or until soft and elastic.
Divide dough in half, cover lightly and let rest for 10 minutes.
Prepare baking sheet or loaf pans.
Shape the dough into loaves. Place crushed sunflower seeds onto kneading surface and press tops of the loaves into the seeds before placing on the baking sheet/into loaf pans.
Cover lightly and let rise for about 1 hour in a warm, draft free place.
Preheat oven to 375F. Bake for about 45 minutes. Note: if the bread is a golden brown at 30 minutes, tend with foil to prevent further browning.
The following is the Rogers Basic Rye Bread recipe, modified into a sourdough version.
We have never used lemon juice in bread baking before, but the packaging for our rye flour recommends it as a conditioner for no-additive flour. In fact, the packaging is very enthusiastic about the use of lemon juice in bread baking! :-D
We did not use the optional caraway seeds.
This time around, I decided to use our pizza stone. It’s been ages since I used it, and I wanted to see how it worked for bread baking. The stone cannot be oiled, so the surface is dusted with only corn meal to prevent sticking.
Basic Sourdough Rye Bread
1/2 cup warm water
1 tsp molasses
1 Tbsp Yeast
Dissolve yeast and honey in warm water and let stand for 10 minutes.
2 Tbsp molasses
1/4 cup vegetable oil
1 Tbsp salt
1 cup water
1 cup rye sourdough starter
1 Tbsp lemon juice
3 cups rye flour
2 1/2 – 3 1/2 cups all purpose flour
Optional: 1 Tbsp caraway seeds
Optional: egg wash (1 egg beaten in about 1 Tbsp water)
Note: honey can be used in place of molasses
In a large bowl, mix molasses, oil, salt, optional seeds, warm water, lemon juice and starter. Add the yeast mixture and mix well.
Add the rye flour and beat with an electric mixer on low for 2 minutes, or by hand for about 200 strokes.
Add all purpose flour by the half cup full until a stiff dough is formed.
Turn the dough onto a floured surface and knead thoroughly, adding more flour as needed. Knead for about 5 minutes, or until dough is smooth and elastic.
Form the dough into a ball and place into a greased bowl, turning the dough to coat all sides with oil. Cover and place in a warm spot to rise until doubled; about 1 – 2 hours.
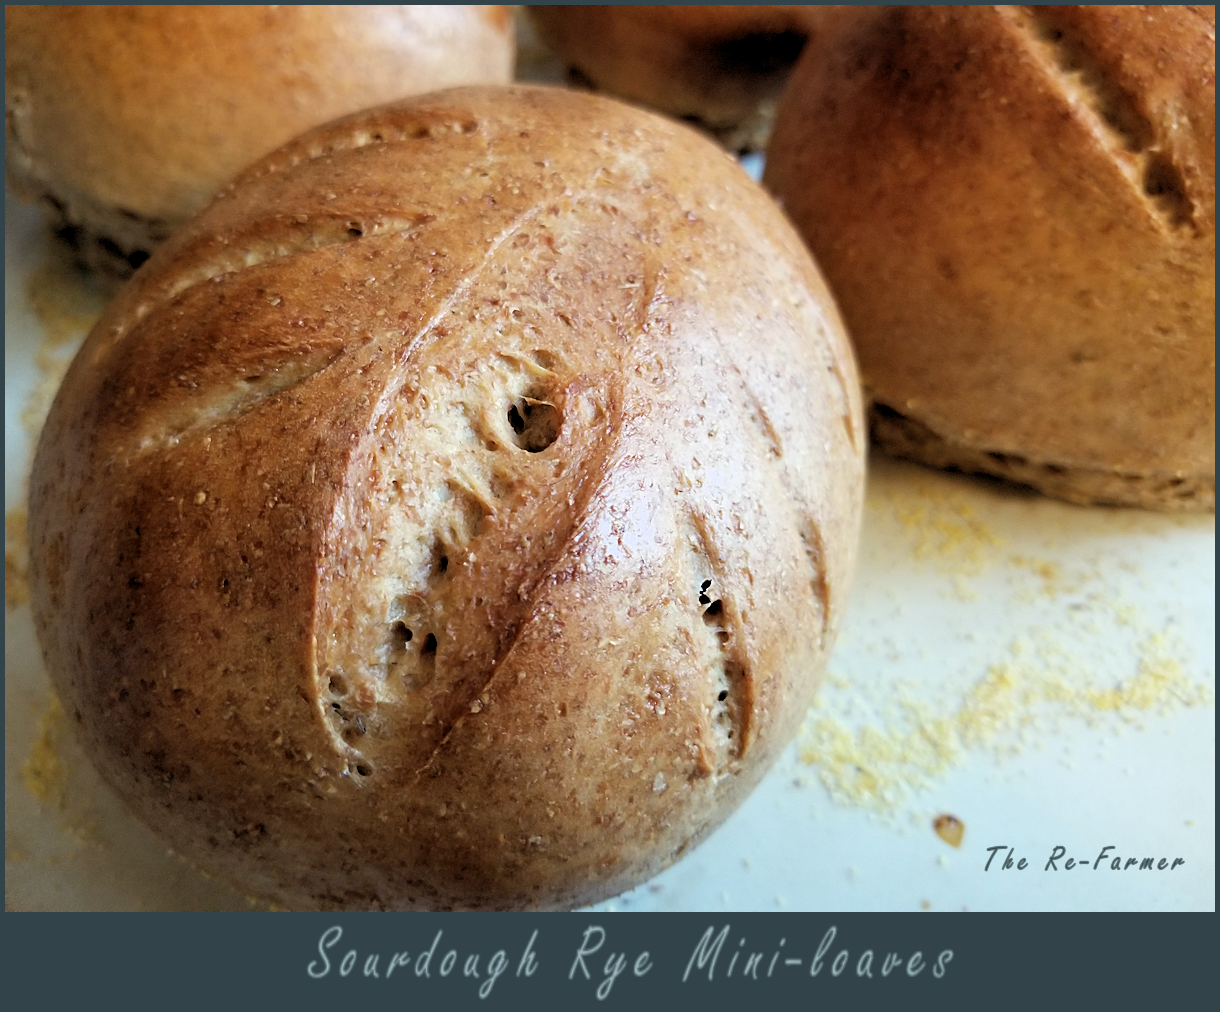
Punch down the dough and divide into two pieces for regular sized loves, or four pieces for mini loaves.
Lightly knead and shape the pieces into loaves and place onto prepared baking pans. Cover and let rise for about 20 minutes. Score the loaves with a sharp knife. Add optional egg wash.
Place in centre rack of oven preheated to 350F. Bake for about 40 – 45 minutes for regular sized loaves or about 25-30 minutes for mini-loaves.