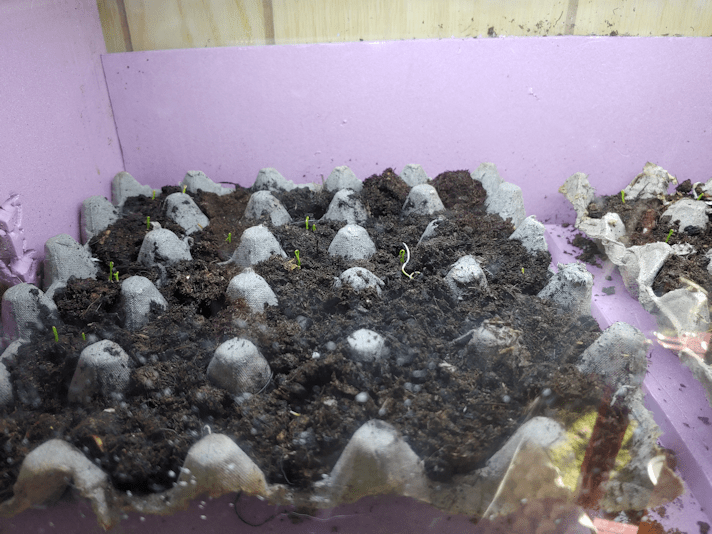
It was very exciting last night! We spotted our very first luffa seedling!
I am not surprised that it is closest to the light we’ve got in there for its heat!
There was just one this morning, but when I turned the tray so the others would get a bit more direct warmth, just before starting this post, I found a second one, in a different pot, had broken ground!
Tomorrow, I will start planting other gourd seeds.
Today, a daughter and I headed into the city for our monthly shop (except some things we needed were out of stock, so we’re going to have to make another trip). I made sure to pick up a shelf for the sun room. It’s time to transfer the tray of bulb onions to the sun room, to make room for more seed starts in the aquarium greenhouses. The tomatoes and the new batch of bunching onions to replace the ones that failed will stay in the aquarium a bit longer.
When we got home, we quickly unloaded the van, then I headed out again to the post office, where I could also pick up more deer feed and bird seed. My new monitor arrived in the mail, and I’m using it now. What a difference! Unfortunately, there are still some pages that do the weird colour thing that is why the monitor was replaced. It’s better, but not gone. Which means the monitor was only part of the problem.
I must say, though, I’m glad to have it. It’s quite a bit bigger than my old one! Meanwhile, my husband tested my old monitor, and it worked just fine while hooked up to his computer. My younger daughter has been wanting to have a second monitor for a while, so she’ll be able to use it.
Which all means it was a while before I could set up a corner of the sun room in preparation for our seedlings.
While Ginger was in isolation in here, we used the frame of the mini-greenhouse to hold the terrarium heater bulb above the bed we set up for him, since it still got pretty chilly in the sun room overnight. I didn’t realize until I put the plastic cover back on that the cats had torn it at the back. It will still work, though.
Some seed trays will be moved here after being started under the lights of the aquarium greenhouses, but later in the season, less delicate things can be started in the sun room. This room gets long hours of sunlight, so while I will probably have to rotate trays, I shouldn’t need to add supplementary light. The lights we have are designed to fit over fish tanks. I might be able to rig them up, if necessary, but it would hardly be ideal.
As for temperatures, the thermometer in the sun room has been reaching as high as 30C/86F during the day. Granted, the thermometer is hanging at the top of a pair of windows, so it would be hotter there than head height, but it’s still quite roasty toasty in there. If for some reason we feel the overnight temperatures would be a bit too low for the seedlings, we do have the ability to warm things up at least a little bit.
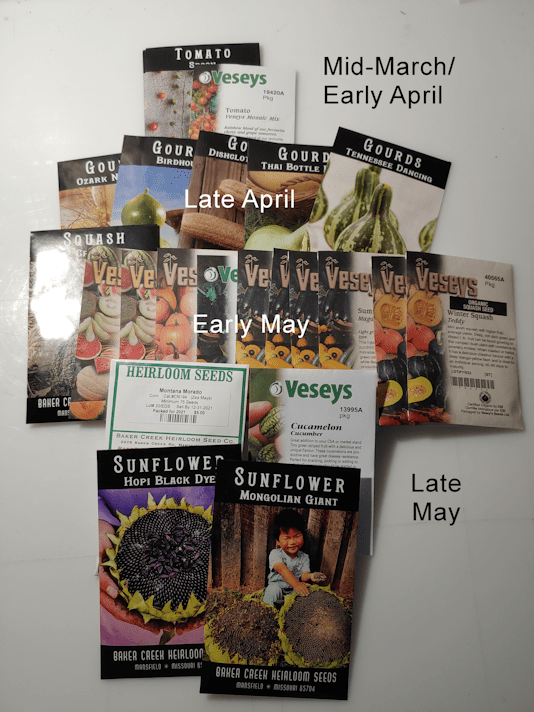
So the luffas are started already, which I now know should have been started back in January (we’ll see how those turn out!), which leaves the remaining gourds to start. I know they’re supposed to be started “late April”, but gourds have such long growing seasons, and our frost dates can be so early, I’m going to take the chance and start them a bit early.
Starting the summer and winter squash should be interesting. With the gourds, we’ll be planting just a few seeds of each, but with the squash, we intend to plant most, if not all, the seeds in their packages. We have two packages of the patty pan squash, which we enjoyed so much last year, and intend to plant all the seeds! :-D
If all goes well, we’re going to have squash coming out of our ears. ;-)
By late May, if all goes well, we’ll have our garden soil in and will be able to direct sow those things that can be planted before our last frost date.
I’m really looking forward to seeing how the gardening goes this year! Right now, as we start things indoors, we’re also praying for some rain! Fire bans are already in effect (and likely were in effect before the grass fire that started near our place last week), and not a lot of farms were able to do controlled burns.
It’s cold with blowing snow outside. What better time to prepare for this year’s garden!
I had been doing some research on how to grow luffa for some time, but it was just a few days ago that I found someone who had managed to grow luffa in zone 3.
After reading this post, written by someone in Saskatchewan, I certainly wished I’d found it earlier.
MUCH earlier!
Realistically, the chances of my being able to successfully grow luffa here are very, very low. They have a 150-200 day maturity range. All the resources I’d been looking at suggested starting the seeds indoors 4-6 weeks before last frost date, but from this person’s experience, I should have started them in January! Ah, well. I’m going to try them, anyhow!
These required some advance preparations.
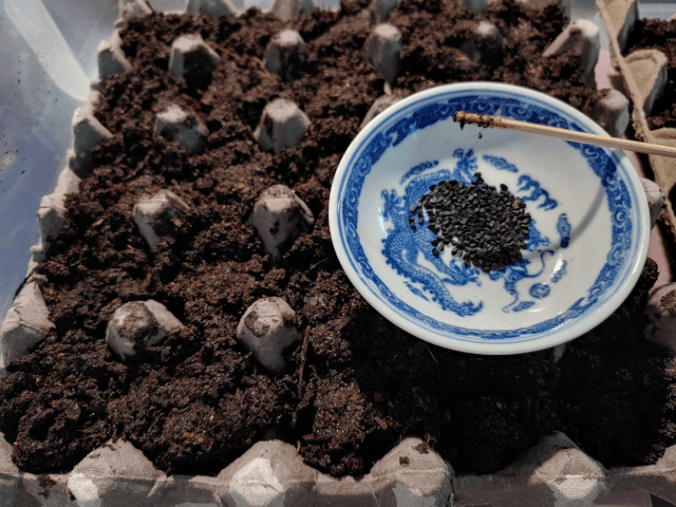
First, I set a few seeds to soak for 24 hours. Then tucked the bowl into a container I could seal, to protect them from cats. Like Susan, whom you can see at the bottom of the photo!
I was going to use the Jiffy pots in the red solo cups to collect drainage, but I found that three pots fit into a take-out container I’d saved. This will make watering from the bottom easier. I had some pre-soaked peat and filled the pots well in advance, so that the pots themselves would absorb some of the moisture.
I also prepared the small fish tank-greenhouse. I raised the level closer to the light, and added the light with the incandescent bulb to warm it up, since I don’t have a heat mat. The light has a full spectrum bulb in it, so it will be useful for the seedlings later, on, too, but for now, it’s the warmth that’s needed.
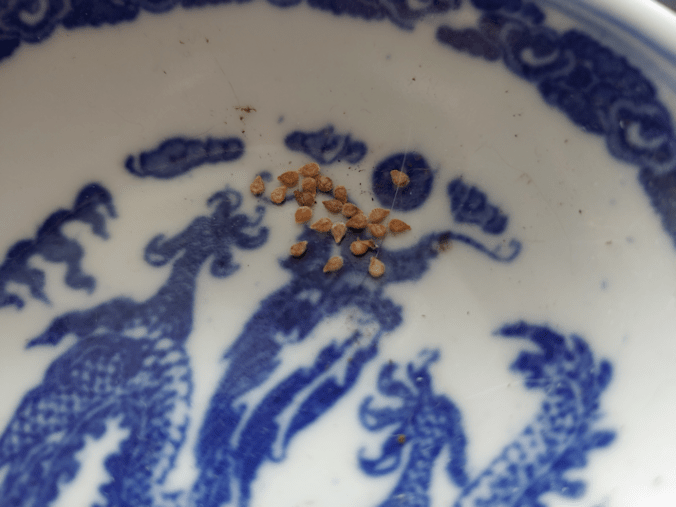
These are the seeds after soaking for 24 hours.
I was really surprised when I saw them, as every resources I’ve looked up showed black seeds!
I know there are different varieties, though, so if anyone knows anything about luffa aegyptiaca, please do leave a comment!!
I planted three seeds into each pot, pushing them into the peat to the required depth with a drinking straw. I am hoping to have 3 good transplants, but honestly, I’d be happy if I get just one!
Then, it was into their little greenhouse.
I think they need to be raised closer to the lights above!
The little light is staying in the tank for the warmth.
Yet another item repurposed from when we had fish; I’m keeping the aquarium thermometer in the tank, too. It’s reading about 24C/75F, which is impressive, considering the top is now just covered with a screen. The rigid insulation and aluminum foil definitely helps. We shall see how things go!
The other gourd seeds will be started after Easter, though I’m tempted to just go ahead and start them now. Which I might still do! ;-)
On a completely different note, I have come to the realization that a problem I thought was with our crappy internet connection is actually my monitor giving up the ghost. Images not loading is a common problem, but I was having them only partially load, and the parts that didn’t finish loading tended to be bright, neon green. Or entire backgrounds of web pages would have blocks of this eye-blinding green. Then text started not loading completely, though I could still read it if I highlighted it, or it would sometimes work if I reloaded the page. When I started having this happen, or letters of text randomly showing as magenta or that green instead of the default colour, even when I wasn’t online, I figured I couldn’t blame shoddy internet anymore! My husband has already ordered me a new ergonomic keyboard (it’s a good thing I can touch type, because the letters are worn off most of the keyboard) that should have arrived weeks ago. Now he’s gone and bought me a monitor already! Now those are some sweet anniversary gifts. :-D
Hopefully, this monitor will last long enough for the new one to come in! :-D
Well, it was time to throw in the towel on some of our seed starts.
The bunching onions in the small fish tank never recovered from the cats being able to get at them, there were mold issues, and watering problems. At least with those, we still had seeds left and could start more.
The shallots (in the background, out of focus) are another loss.
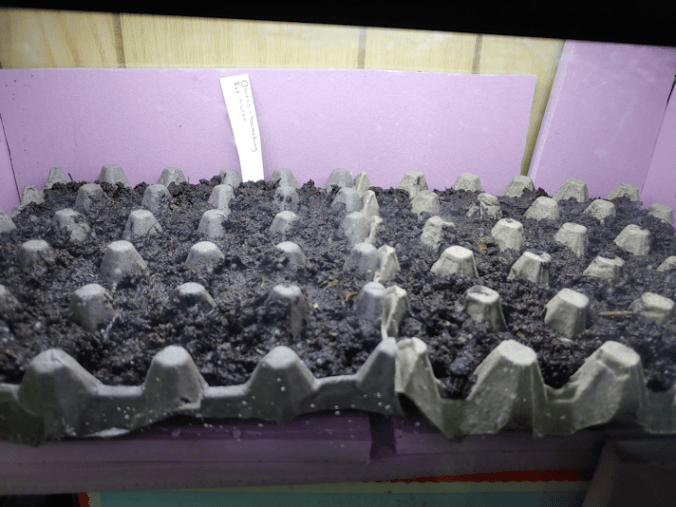
This is one of the potential problems of using whatever was on hand. We started them in the cardboard egg cartons, but had no way to put a tray of any kind under them, where we could water them from below. Even though we did take them out and give them a thorough watering from below, it wasn’t enough. I regularly sprayed them with water, trying to get the cartons themselves wetter, but again, it wasn’t enough. The shallots are a complete loss, and I have no more seeds to try again. So we’ll be down from four types of onions to three. :-( Unless I find and buy sets later on.
In the future, I would not use the cardboard egg cartons to start seeds in again, unless I were able to keep them in a tray of some kind, and keep the cardboard wet all the time. In spite or watering them every evening, when I pulled them out of their makeshift greenhouses this morning, they were pretty much bone dry. So, they went into the compost heap this morning. :-(
The little tank is now empty, and the tomatoes and bunching onions have been shifted around in the big tank. We are seeing more and more seedlings pop up, though there are still a couple of cups that have no seedlings at all. We’re not after a lot of tomato plants, but I am hoping for more of the Red Baron onion seeds to germinate. At least the bulb onions seem to be doing all right. From what I’ve read, I should be trimming them a few inches, about now.
Yesterday, I picked up some Jiffy pots. I’ve been looking things up about growing luffas, which have a very long growing season to reach that sponge stage I’m after. I’ve decided I will start a few seeds of those in the next few days, and set them up in the little tank. With the screen I found in one of the sheds as a “lid”, we’ve solved the cat problem, so I can raise the level closer to the light, too. From what I’ve been reading/watching, luffa doesn’t like to be transplanted (more so than other gourd types), so using pots which can be buried should help reduce transplant stress. With the size the pots are, I should be able to still double cup them with the red solo cups, which would allow me to water them from below.
So that’s a goal for the next few days, and I will also be preparing to start the other seeds that need to be starting in April.
Meanwhile, as I do my morning rounds, I’ve been studying the different areas we intend to garden in this year.
This strip has never had a garden in it. You can see where the ground starts to get rough on the left, where the old garden started. That rough part is from the crappy plow job that was done before we moved here.
This stretch will have alternating blocks of three varieties of Peaches ‘n Cream corn and two varieties of sunflowers.
In years where we had more snow, where I’m standing to take this picture had a large puddle of water from melted snow. This year, there is only that whitish patch you can see on the left foreground. That’s ice from the small amount of water accumulated this spring. This is something to keep in mind when we are planting food trees here, as we don’t want saplings being drowned out in the spring. So part of our goal when growing here is leveling things out a bit more.
The further out we go, however, the drier it gets. By the time we reach the corner, past the low hanging spruce branches I will have to prune away, it’s very dry. Weeds and grass barely grow there. Which means that, when we have corn growing there, we are going to have to find ways to keep them well watered. This entire area is going to be a challenge to water, simply because it’s so far from the house.
This time of the morning is the only time this area is in shade. It gets full sun for most of the day, and also gets incredibly hot. To the left of where the corn and sunflowers will be planted is where we will be having beds of melons and gourds. They’ll get the heat they need (especially if we have summer like last year!). We just have to make sure they get the water they’ll need. The winter squash will also be more on this side, while the summer squash will be planted closer to the house, where they will be closer for continual harvesting over the summer.
We’re also going to have to work on keeping the deer out. There are a number of options we can try. If we make use of several of them together, it should work out.
The fence line the trees on the right are hiding is pretty much toast. New posts had been put in along the spruce grove, which I’m guessing my late brother did, but he never got to finish the job. The remaining stretch of fence has rotting fence posts, some of which are held up by nothing but the barbed wire. My late brother had a soil auger attachment for the Bobcat, and we still have the post pounder he built, but the Bobcat and its accessories are with our vandal now, and the post pounder had been sitting, exposed to the elements and covered in junk, for so many years, there’s lichen growing on the belts. So if we’re going to be putting in new fence posts, we’re going to have to do it the old fashioned way. I’ve found a couple of post hole diggers that we can try out. One of them is a very different design, and I’m curious as to how it would be used.
Meanwhile, that entire strip along the West fence line needs to be cleaned up. I might have to take the remains of the fence out entirely. The North fence line, which runs behind the lilac hedge, is in even worse shape, but at least the lilacs are there to provide some privacy and a bit of security. Once the strip along the West fence line is cleared out, it’ll be pretty open.
It would be nice to not need a fence there at all.
Since these fences mark the property lines at the roads, these are areas where we can consider putting in something very permanent for fencing. Something along the lines of a hedgerow, perhaps, or a “palisade” type of wall that would give both privacy, and keep the deer out! The corner at the far end is one of the places they regularly jump the fence (well… what’s left of the fence…). The road on the North side is very busy (as such things are in this area), and in the summer, a LOT of dust gets kicked up. On a windless day, it just hangs in the air like a fog, slowly drifting across the property, for a surprisingly long time. The lilac hedge helps keep that out of the garden area quite a bit, so that’s another thing to keep in mind as we work on the area. Dust control!
When it comes to gardening in this area, it’s all temporary. If things go well, it’ll just be for one year, and then next year, we’ll be able to start planting food trees here, while permanent garden beds get placed to the south of the house. The area we intend for permanent beds is very rough, though. It might be easiest to clear it as much as we can, then get someone in to plow and smooth it out as much as possible. We’ll be building accessible raised beds there, so it’s the leveling that’s more important to our needs. It would be good if we could get the old farm equipment moved, and the collapsing building dismantled and cleared away, but that might be just too much for this year!
We’ve got a lot of work to get done! Last year, with first the heavy rains, then the excessive heat, we didn’t get anywhere near as much done as I wanted. Hopefully, this summer will be not be as extreme.
So much of what we want to do depends on the weather!
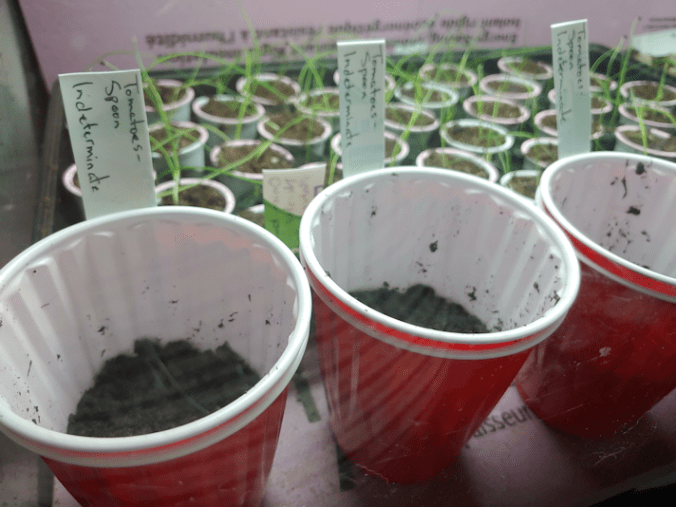
Yes! We managed to resist temptation, and not start the tomatoes too early. :-D
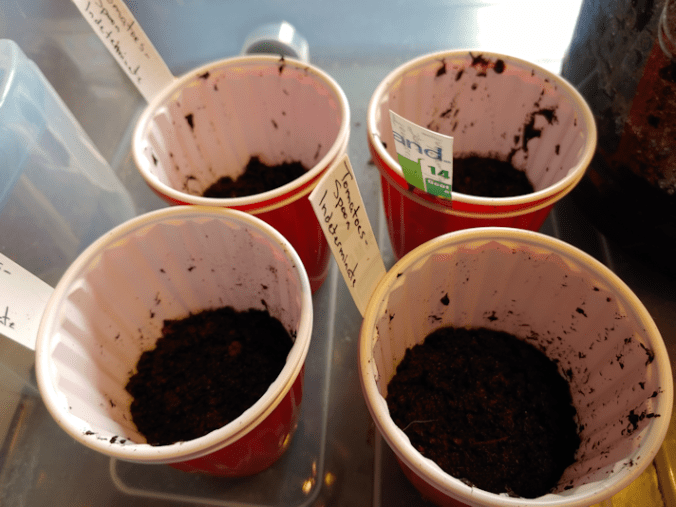
After a fair bit of research, plus an evaluation of our cat-safe spaces, I chose to start our tomatoes using the “double cup” method.
I’d already picked up a large package of the red beer cups, and those were the types recommended. The first thing to do was to make drainage holes in half the cups we’d be using.
These will later be used to start our squash and gourds, so I didn’t mind putting drainage holes in extra cups. I’ve got a bag of 250, so we’ll be putting holes in at least 125! :-D
These are the seeds from one packet of Spoon tomatoes from Baker Creek. They are so tiny!!! And we didn’t even end up using them all!
Now, we’ve considered quite a few options for starting our seeds, including peat or similar pots, Jiffy pellets, starting trays of various types, and even looking at the pots of various sizes we found while cleaning out the basements. I settled on these cups for a few reasons. They are the size I want, you can get a LOT of them for a very low price, and I expect to be able to reuse them for many years. In some of the gardening videos I’ve watched, there are people who have been reusing these cups for as long as 10 years.
If I had the budget, I would prefer to use coir pots. I like the idea of those, or peat pots, as they can be put right into the soil with the transplants to break down, resulting in far less root disruption. The problem is, for the sheer volume of these that we would need, they’re just completely out of budget. Peat pots are fairly easy to find, but coir or any other biodegradable pots are things we’d have to seek out, and are far more expensive. :-/
The double cup method has added benefits. I can water them from below, using the outer cup, and not have to have them sitting in trays. That makes them more flexible for our spaces. Particularly since we’re using fish tanks as makeshift greenhouses. Using double cups means we can fit them inside the big tank, along with the trays of bulb unions and shallots.
Another benefit to using these cups for starting tomatoes is that we won’t need to “pot up” the tomatoes.
We filled the cups only half way with peat. The loose peat we’re using takes a long time to moisten, so I made sure to set some up in a container with water to saturate overnight, first.
As a bonus, the double cups hold the labels in place very well!
Once the seedlings reach a size large enough that we would be potting them up, we can just add more of the peat around the stems. No disruption of the main root, and the “hairs” on the stems will become new roots, making them hardier for when they finally get transplanted outside.
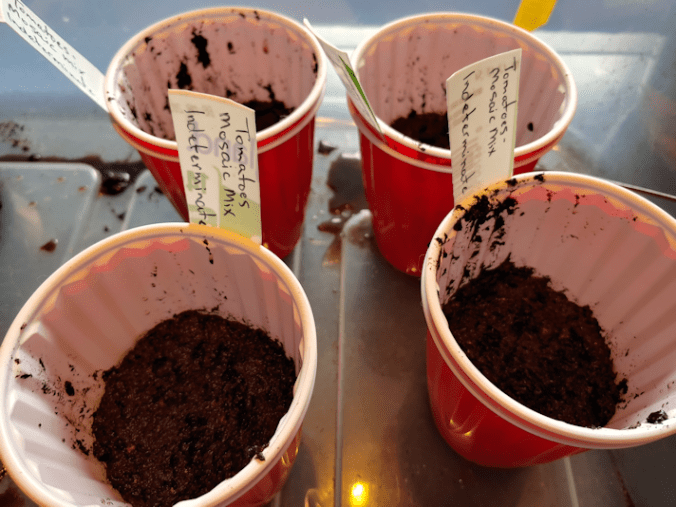
We planted 4 seeds in each cup. We shall see how many germinate, and how many make it to the transplant stage! The goal is for a total of 8 plants, but if we have extra… well, we’ll figure it out when the time comes. With the Mosaic Medley, it is a mix of cherry and grape tomatoes, so we will hopefully have several different varieties from the seeds that were planted, but I really don’t know how we’ll be able to tell until they start fruiting, really. There are plenty of seeds left in that packet, too.
Here they are, all in a row along the front of the big tank. Once they start sprouting, if it seems they aren’t getting enough light, we can place the extra aquarium light over the tank above them.
At which point, I call your attention to the onions, behind them.
The bulb onions (Norstar) in the self-watering tray are doing all right. The K-cups are actually doing better than the ones in the Jiffy pellets, which was a surprise for me. In fact, so many seeded pellets didn’t germinate, I reseeded many of them (plus a few K-cups), and they seem to be doing better now. The K-cups dry out much faster, and don’t water from below as well as the pellets. Unfortunately, watering the taller K-cups without also over watering the pellets has been a challenge. In the future, I would not want to mix the two again.
As for the shallots in the egg trays… Hmm.
I had thought that the wet cardboard of the egg trays might help the plugs stay moister, longer, but they seem to have done the opposite. They seem to be drying them out faster, and with this set up, I don’t have the space to put trays under them, to be able to water them from below. I’ve been using a spray bottle to water them from above, but … well, they really seem to be struggling. And I can’t even plant more, because all of the shallot seeds were used up in these trays.
Then there are the bunching onions, in the small tank.
*sigh*
The cat damage didn’t just wreck a lot of plugs, but it looks like the peat was contaminated, too. On one tray, a white mold has started to grow, while on the other tray, there is what looks like a more yellowish mold. Lack of air circulation in the tank certainly wasn’t helping matters.
That will not be as much of a problem now, at least. The window screen I found in the shed to replace the lid seems to be working, even though it is bigger than the tank. The frame along one side juuuuussssttt fits in the narrow gap between the tank and the wall, which means the tank itself helps hold the screen in place. A couple of 5 pound hand weights on the back, and it seems to actually be working. Yes, we did have a cat knock it off by going on the overhang, but since the weights have been added, that seems to have solved it.
On removing the light fixture from the lid, I had a slightly different issue. There is no “back” to the light bars, and while the waterproof tubes the lights are in have a dark strip along where it would have been against the lid, there was still a lot of light in every other direction. For now, I’ve simply placed the fixture on top of the metal mesh of the screen, then placed a somewhat-cut-to-size piece of rigid insulation, wrapped in aluminum foil, on top. All that “wasted” light is now being reflected downwards. It seemed darker in the tank, possibly because of the mesh itself, so I put aluminum foil around the sides of the tank, too. The foil wrapped “backing” for the light seems to be working well, so I plan to attach the light fixture to it, rather than just have it sitting loosely on top. I had intended to mount the light to the underside of the screen, but it actually seems to be working okay, sitting on top. As long as the cats leave it alone. They don’t seem to like the overhang of the screen, though, and only a couple of the kittens have been willing to make the effort to get past it.
We have a very small, light fan that can sit right on the screen and provide air circulation in the tank. For now, we’ve been switching the little fan back and forth between the tanks, until we feel it’s time to start using the oscillating room fan that’s on a stand.
I’m pretty sure those bunching onions are a lost cause, though.
So we had two things to deal with; the too dry shallots, and the dying bunching onions.
The girls took care of the shallots for me, while I made a run to the post office. They had to get creative, because… cats.
They put the seedlings into baking pans with water in them, to water the seedlings from below. That needed time, but they found that the under-bed storage container that we’ve been using to contain our potting mess was large enough to cover and protect both trays.
They successfully foiled the cats!
There was room for three more cups in the big tank, though, and we still had seeds for the bunching onions. So when I got back from my errands, I decided to plant more of them.
The shallots were well dampened by then, so I slid them back onto the pieces of insulation we’re using tho carry them, and put them back in the tank. Then I filled three double cups with peat and put about a dozen seeds, at least, in each cup. The seeds are all about half an inch apart, so I’ll be able to easily thin them, if necessary, or separate them for transplanting, later on.
And I still have seeds for the bunching onions left over!
So that is done. Tomato seeds have been planted, shallots have been, hopefully, rescued, and new bunching onion seeds have been planted.
The next batch of seeds that we will need to start are the gourds.
But not for another month or so.
Hopefully, by then, it will be warm enough even overnight, that the onions and tomatoes can be safely transferred to the sun room, so we can use the fish tank aquariums for the next batch of seed starts.
Last night, while checking on the onion seedlings, I decided it was time to lower the shallot and bulb union seedlings in the big tank. The seedling tips were looking a little dried out, likely because they were getting too close to the warmth of the light fixture.
Doing that required removing the trays and the “floor” they were resting on, then shifting the boxes holding them all from standing on end, their tallest position, to standing on their narrow sides, which is their second tallest position. Later on, if it seems necessary, we can turn the boxes onto their broad sides to lower the plants even more.
So that worked out rather well. For the trays, anyhow. Unfortunately, being the suck that I am, I tried to do it without removing a kitten that was staying warm on the light fixture. Saffron is a tiny thing that gets cold easily, and she’s taken to using the light fixture to stay warm. So I just slid the whole thing to the back of the tank. It wasn’t enough to get the “floor” out, so I pushed one end a bit further. And a bit further…
The next thing I knew, the whole thing fell behind the tank as a Saffron launched herself across the living room in a panic.
And the lights went out.
At first, I feared I had broken a bulb, but no. The light in the small tank had gone out, too. As the fixture fell, it swiped the power bar’s plug into the wall.
This house does not have many power outlets. In the living room, there is an outlet behind the big tank, though only one plug in it works. We can access the outlet through the cabinet tank’s cabinet, as it is completely open in the back.
Which requires getting down on my knees and crawling half into the cabinet to reach.
My knees did not appreciate this at all.
After straightening out the prong on the plug that got bent when the fixture landed on it, I managed to get it back in and everything was working fine. Nothing broken.
Phew!
Then I put everything back in place.
Almost.
I had been keeping a small plant pot in the tank with the trays. We’ve had to put various types of barriers on, over or around all our house plants that can’t be hung from the ceiling, to keep cats from digging in the dirt. One small succulent was completely covered with a clear plastic dome, like a mini greenhouse, but the cats kept managing to knock the cover off. The last time that happened, I found the poor little succulent on the carpet, along with a pile of soil that had been dug out of the pot. I replanted it and stuck the pot in the aquarium, so it could get the light and the protection the seedlings were getting and, hopefully, recover.
When I lowered the trays, I forgot to put the plant pot back.
This morning, I discovered my error.
I also discovered a half empty pot, and a pile of soil on the shelf and scattered all over the carpet.
What I didn’t find was the plant. There is no sign of it. It’s likely under another shelf, but it could just as easily have been dragged down to the basement.
I had to do my outside rounds, though, so I rescued as much of the soil as I could – it’s a soil mix specifically for succulents – then moved the pot to the dining table. The table is covered in stuff. Partly because all flat surfaces just seem to invite things to be piled onto them, partly on purpose, to keep the cats off when we’re not around. I tucked the pot against some other stuff, then dashed outside to do my rounds.
I came back to another pile of soil on the dining table, and on the floor.
*sigh*
So, that’s another plant lost to the cats. I am pretty sure the culprit is Cabbages, as she’ has been caught many times, trying to get into other plants, but others have been caught, too, so I can’t say for sure.
I really hope the temperatures warm up overnight and stay warm, soon. When we start having to get larger numbers of seeds started, they’re not all going to fit in the two tanks. We’re going to have to use the sun room as a green house. Right now, I’ve seen it reaching as warm as 20C/68F during the day, but it does go below freezing overnight. We’ll be able to fit some things in the big tank with the onion trays (like the tomatoes we will be starting very soon), but when it comes time to start the corn and squash seeds, those onion trays are going to need to be moved to the sun room. This won’t happen for probably another month, at the earliest, so we should hopefully be okay by then.
Well. Maybe Big Rig, in this case. I am sure David and Keith are not responsible for the latest damage.
I had issues with the small tank being used as a greenhouse for the bunching onions. With cats trying to get at the seed trays through the back, we’ve been diligent about catching them coming even close to that tank and chasing them off.
Unfortunately, with this tank having its hard lid with just a couple of openings I’ve had to block off, it’s been too moist in there. Yesterday, I spotted mold starting to grow on the egg carton trays and onto the peat; one patch on each tray, closest to the front, where there is the least air circulation.
So I took the mini fan out of the big tank and set it over the opening in the back of the small tank. The seedlings are getting big enough to need a fan on them, anyhow.
Several hours later, I came back to find the fan on the floor, the lid askew, and one of the trays half on top of the other.
*sigh*
This is what I’ve done.
I took out the box that raised the trays closer to the light. They’re now just a few inches from the bottom, on top of 18 count egg cartons. That puts them lower from the light than I would want them to be, but they are now also out of reach. I also turned the trays, so the areas with the mold were to the back instead of the front.
I had already replanted some of the plugs with more bunching onions, from the last time a cat messed them up. I still have some seeds left, so I could replant more, but some of the cells in the trays are so badly damaged, they’ll no longer hold the peat. I’ll see how it looks over the next few days, then decide if it’s worth replanting more. These poor seedlings have taken quite a beating!
Apparently, we only managed to train the cats to stay off the tank while we are not around to see them. :-/ I’m pretty sure it’s just one cat. I’m just not sure which one!
After doing as much damage control as I could, I was happy to find everything still intact by morning. One of my daughters accompanied me to the city to do the second half of our monthly shopping (though we only went to one place, so I’ll still need to get more cat litter and kibble, but I will go to the smaller city for that). When we got back, everything was still intact. Also, putting the fan on seems to be solving the mold problem. It’s barely visible now.
Oh, you might notice a single tall blade of green growing out of one of the trays. We have one growing in one of the trays in the big tank, too. They are oats! The peat bale was stored near the deer feed in the sun room, so a few seeds managed to fill into the packaging. When I used the peat, I did take out the ones I could find, but clearly missed a couple!
As an aside, the van’s check engine light is still on, but it’s behaving beautifully. While I thought the mileage was getting worse, based on watching the fuel gauge wile I was driving. Yesterday, it seemed to be dropping way faster, but during today’s drive, we burned about as much gas as I would have expected. When I checked the onboard computer, the average mileage has actually improved since before the EGR valve was replaced. Which I would expect, but it was still a bit of a surprise. If the valve were stuck, fuel efficiency would be expected to drop. So far, so good. I’ll have to talk to the garage about giving it a quick check, and manually resetting the codes.
But that will wait. We got back from the city early enough that I’ll have time to hit the post office while picking up more deer feed and bird seed.
Oh, that reminds me. Potato Beetle came over while I was doing the cat stuff this morning. When I first saw him, I was rather alarmed by how dirty the wound area was; just plastered with plant matter and …
… then I realized it wasn’t the wound area. Just near it. Potato got himself into a patch of burrs! He wouldn’t let me pull them out, but I did get to check the wound, which is looking noticeably better. And so is he!
I’m about ready to start throwing cats outside! :-(
This is what I discovered, this morning.
The long piece of insulation across the top is what had been blocking the opening on the back of the tank lid. You can even see the claw marks in it!
Some nasty little beast managed to pull one of the trays up!
The peat stayed in most of the cells, though a few at the very back were empty when I straightened it out. I found the plugs and put them back as best I could, and gently took loose peat off the cells it had fallen on and put it in the emptier cells. I will give it a day or two, then plant new seeds in the cells that didn’t survive.
Eventually, the seedlings will reach a height were I can take out the box that is keeping them closer to the light, and the cats won’t be able to reach the trays anymore, but for now they trays need to be this high. They should probably be a bit higher, but that would just make it easier for a cat to reach. The opening in the back is where I’m going to set up the tiny fan we have, to blow over the seedlings and help them get stronger, but for now, I’ve basically put a sheet of foam core over the tank’s lid and weighed it down. It should still have a bit of air circulation, but we’ll have to keep a close eye on it.
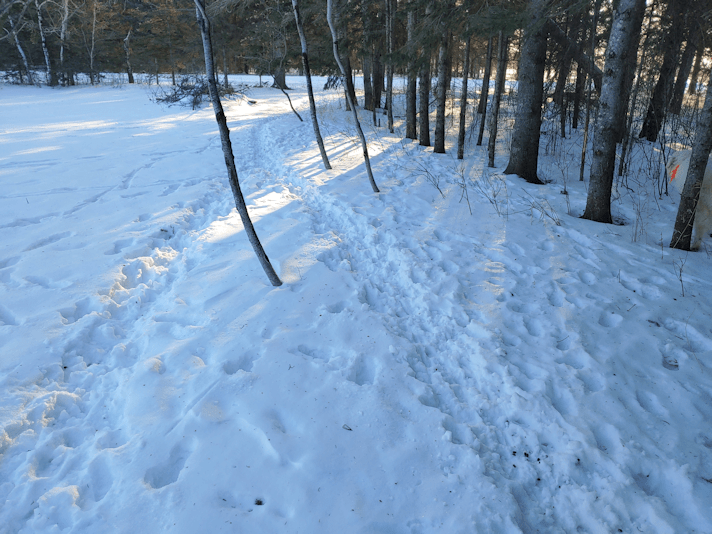
With how bitterly cold it has been for the past while, I have been doing my morning rounds much later in the morning. It may only have been a couple of degrees warmer, but I was taking anything I could get! Usually, by the time I came out, the outside cats were hovering around the door, looking for me to come out with warm water.
This morning, I headed out at a more usual time, even though it was -31C/-24F with a wind chill of -33C/-27F
Absolutely none of the cats came out to greet me! LOL
The only cat I saw was Nosy and, other than lifting his head to look at me, he did not move! Considering that he is curled up right under where the terrarium bulb is, I’m guessing it’s still working.
My brother’s dog was visiting again. He’s loving this cold so much! :-D I didn’t have any cats joining me for my rounds, but I did have him to keep me company! You can even see him in the photo below.
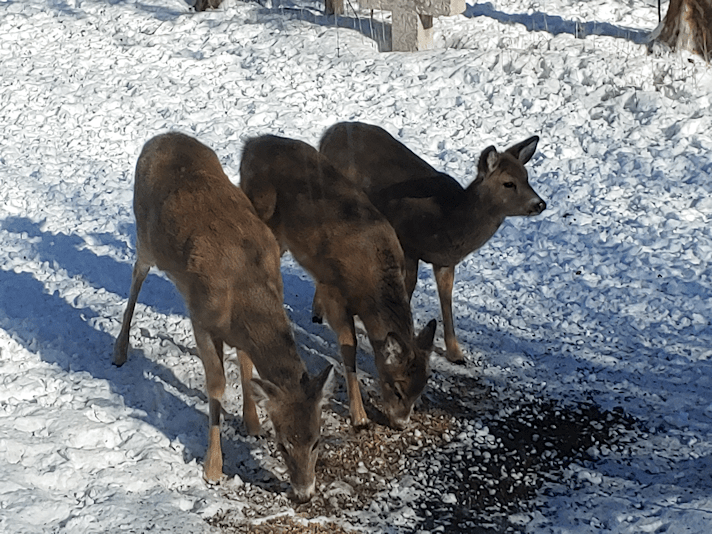
We have deer paths all through the garden area and the East yard, but none are as well worn as these, here. We used to have a trail cam facing where they would cross the road from my brother’s place and jump our fence. One of these days, I’d like to set one up again. I miss seeing how many deer used to cross here!
What I found this morning, however, is that the top barbed wire is loose from one post, and it was twisted around the middle wire. It had been torn loose when a deer didn’t quite clear the fence! I’m going to have to find some U nails and head out with a hammer to fix it.
Long term, we’re going to have to find a way to stop the deer from entering our yard around here at all. As much as I like them, I don’t want them eating the garden! Privacy is also a goal, and not just from our vandal creeping about. Even with the lilac hedge and other trees along the fence like, people driving by like to slow down and peer into the property. Particularly if there are deer at the house. The fence posts around the garden area all need to be replaced, and I want to get away from barbed wire completely, so building a privacy fence around the garden area that the deer can’t jump over is right in line with our goals. When we can do that is another question entirely! :-D
Speaking of gardens…
This morning, I noticed that the label for the bunching onions in the small tank had been knocked over. Though I had blocked the opening in the lid, a cat had still managed to reach in and bat at things. When I lifted the lid to fix it, though, I could feel it was noticeably colder than the room!
Clearly, lining the inside of the tank with insulation was not enough. The above picture is from when the trays were first put into the tank. Not only did a cat knock over the label, but I found one of the peaks of cardboard in a corner had been torn off!
The light on this tank is LED. It provides no warmth. The light on the big tank is fluorescent (I had thought it was LED, too, but was remembering incorrectly), so it does help keep the seedlings warm. The little tank was way too cold for the seeds!
After thinking about how we could warm up the inside of the tank, I remembered something. Years ago, I’d bought a small, recessed bulb, light fixture to provide spot lighting while I was working on crafts, etc. I stopped using it because it had a tendency to get very hot, even with an LED bulb. The bulb would be cool, but the fixture would get hot. I kept it and we even brought it along when we moved here. So this morning, I dug it out, then went through a bag of bulbs we have. We replaced almost all of the light bulbs here with LED bulbs, plus we still had some that the movers accidentally included when packing our stuff. Lo and behold, I found a full spectrum incandescent light bulb in the mix.
Perfect!
So I set the light fixture up on the edge of the tank, with the lid propped on it to hold it in place. I also dug around our aquarium supplies and found the little tank thermometer. The suction cup doesn’t work anymore, but I could still set it up inside the tank so that we could monitor the temperature.
It worked. In only a few minutes, I could feel a significant difference! (The thermometer will need more time to read accurately, since it was in the old kitchen, where it’s below freezing temperatures.)
We can only have this light going while someone is there to supervise, since it could literally melt the plastic of the lid. Since the tank is lined with insulation, once it warms up inside, it will stay warm for quite a while, so a few minutes here and there will be adequate.
On the down side, the cats still try to jump on the lid, even when it’s propped up over the light fixture.
I did not expect the small tank to be less cat proof than the big one!
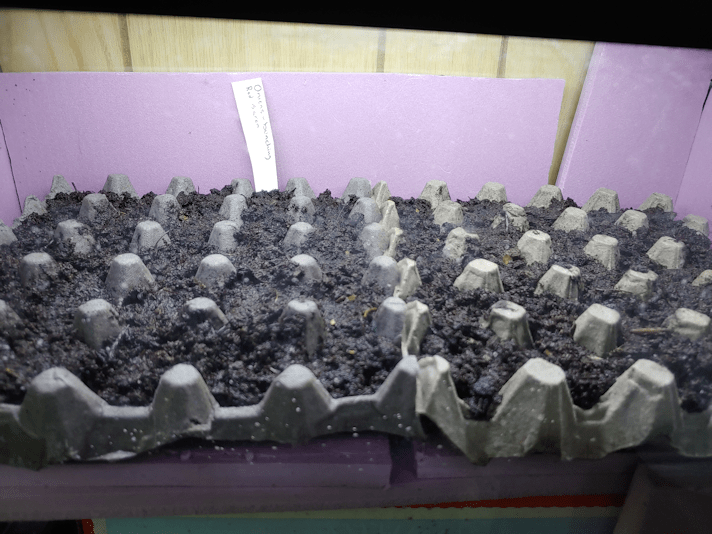
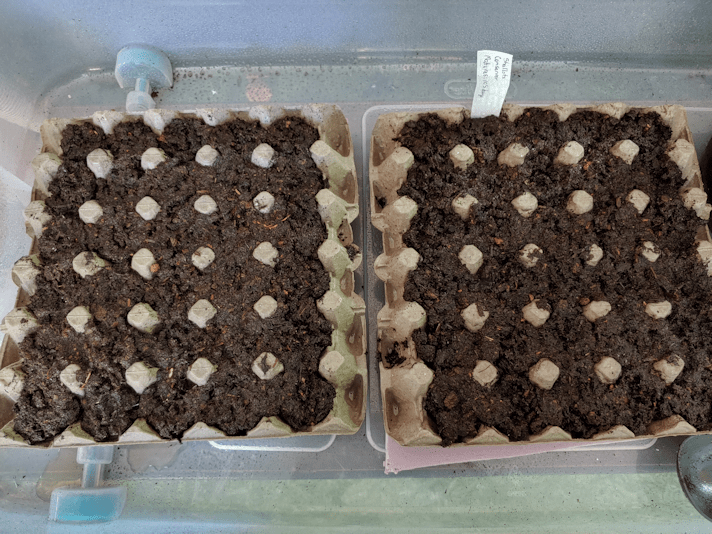
Finally! The last of our onion seeds have been planted!
These were the bunching onions; a variety called Red Baron, from Veseys. They have red root ends instead of the usual white.
Using the dampened blunt end of a bamboo skewer made planting the seeds really easy. I could pick up a single seed at a time (two, if I really wanted to), press it into the growing medium, then cover the seed, all with the skewer. I put two seeds in each cell (though I think I might have lost track and double planted a couple! LOL), which left me with about half a package left over.
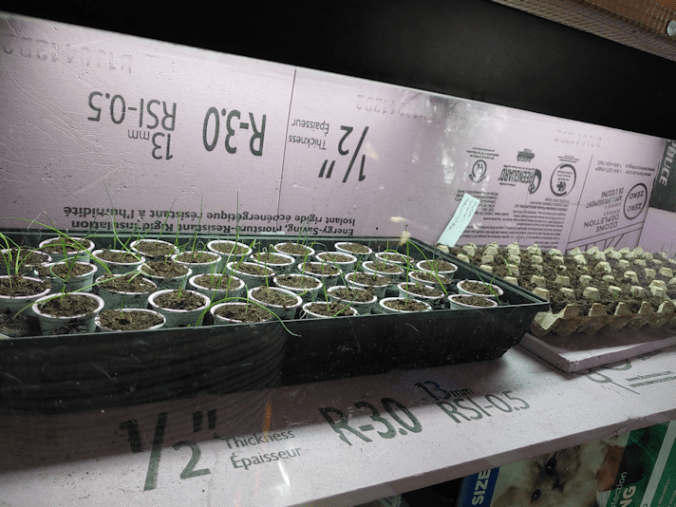
Then the trays went into the 20 gallon fish tank. It’s a bit snug, and I’ll likely have to fight a bit to get them out again later, but there is enough room at each end to move them, to get a grip under the tray supports.
This tank has a lid with the light fixture attached under it. I had thought that would be enough, but my daughter has already caught a cat on the lid, reaching through the opening in the back for the filter and hoses. I’m going to have to find a way to block that off, while still allowing air circulation!
Meanwhile…
The first onions we planted, the Norstar bulb onion, now has sprouts large enough to see in a photo. :-D
You can also see how some of the K-cups are drier on the top. I’d already sprayed them this morning, and we’ll likely have to spray them again this evening. The peat pellets, at least, are holding their moisture quite well.
Special note: when using loose peat to start seeds, soak it with water before putting it in pots or cells!
As an aside, I am happy to say that my husband’s prescriptions got delivered today. I had asked for them to call first, so I could unlock the gate, only to get a phone call saying they were already here! So I quickly threw on some boots and a coat and dashed out to meet them.
Of course “dashing out” doesn’t mean the same thing on the farm than it did when we lived in the city! LOL
When I mentioned I had been expecting to be called in advance, so the gate could be unlocked for them, I was told they’d actually tried to call from the driveway, but couldn’t get a signal. They had to drive up the road about a quarter mile before they could get enough signal to call me.
The driver then commented that he recognized me, and he even remembered my name, as well as my parents! Unfortunately, even though we were outside and on opposite sides of the gate, he was wearing a mask, so I had no clue who he was. It turned out he was the principle when I was in school! He even remembered my husband from high school. Small world! :-) I have no idea why he and his wife were delivering prescriptions for the pharmacy, but I was happy to see them. :-)
My husband has gone over the new meds, and it turns out that the changed prescription isn’t for something he’s on right now. Another medication he used to be on years ago has been added back on, which is why I remembered the name when talking to the doctor about it. I’m losing track of them all! There are some very serious possible contraindications, mostly respiratory. With the setting on his CPAP as high as it already is, that, at least, is not as much of a concern while he’s asleep. It explains why the doctor was so hesitant to change my husband’s medications. He’s already maxed out on the doses of most of his other medications. Hopefully these changes, which will continue to be slowly adjusted over the next few months, will finally get the pain levels under control, and his quality of life will finally start to improve!
Among our goals with our permanent garden beds is for them to be accessible. High beds with wide spaces between them. It would be good for him to be able to get out with his walker, among growing things. :-)
There is more benefit to gardening than being able to grow food!
After adding more water and letting it soak overnight, we were left with a sort of peat slurry! :-D No fear of the seeds not getting enough moisture, this time!
To contain any potential mess, I set up inside the under-bed storage container that will eventually be used to hold the beer cups that I will be using as larger pots, when it’s time to start the squash seeds. It won’t be needed for some weeks, yet, and it was the perfect size and depth for this job.
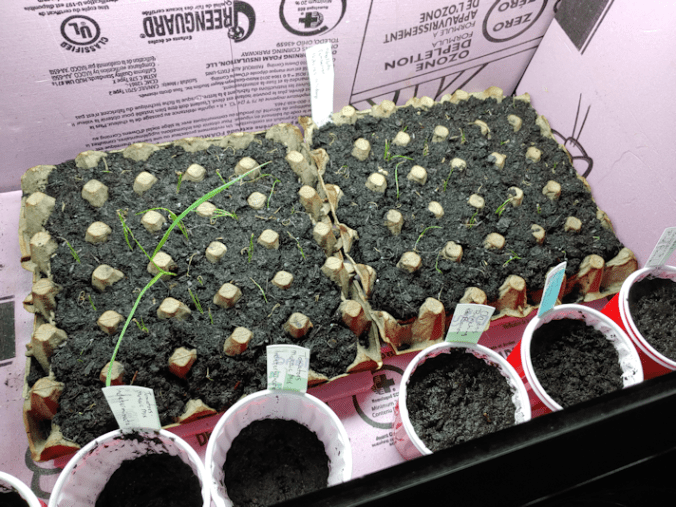
It’s a bit hard to see in the photo, but you can tell why having something under the trays to support them was so essential. The first tray I filled is the slightly darker one on the left. It’s darker, because the cardboard is completely wet! Which means it’s also very floppy. There is no way these trays could be handled, without something solid under them.
When I planted the bulb onions, I was left with about half a package of unused seeds.
Not the shallots! I had just enough seed to put two in every cell, minus 1 seed. :-D
Though the peat was well saturated, I still sprayed the tops, more to settle the surface than for actual watering. When it came time to move the trays, I tipped them side to side a bit, to allow excess water that had soaked through the cardboard to spill off.
To get the trays into the tank, I had to take the light fixture off completely. All the trays fit perfectly, from end to end. If I wanted to, I’d be able to fit pots or egg cartons (dozen size, not 18’s) in the space at the front. That isn’t needed now, but when it’s time to start other seeds, we might find ourselves crowding the space as much as possible.
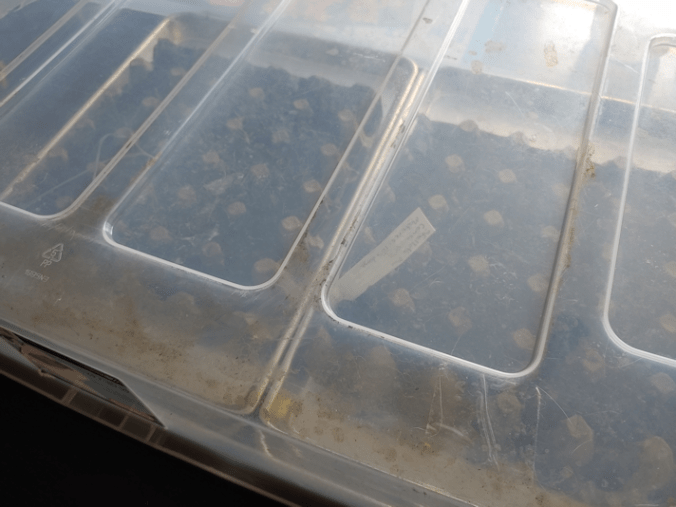
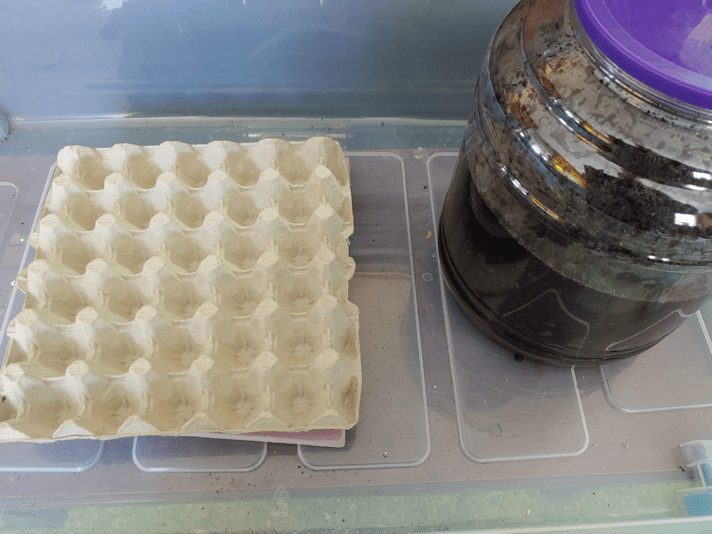
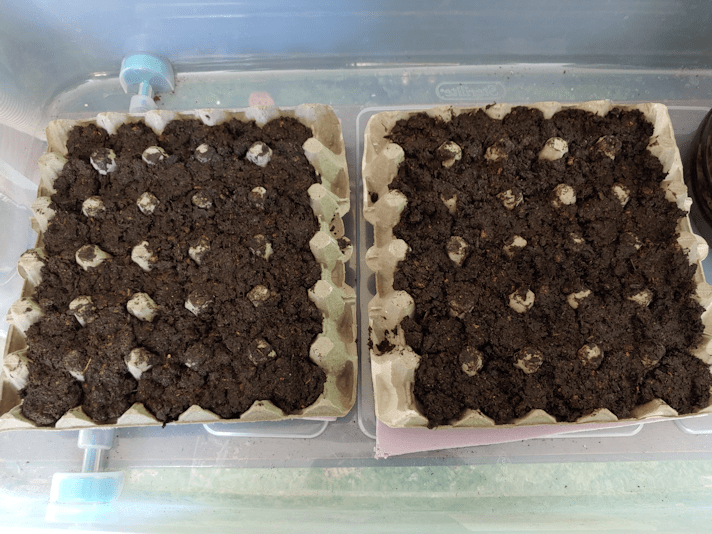
We freed up an 18 count egg carton this morning, so I checked out the fit in the smaller tank. One carton fits, of course, but only in one direction, and it’s long enough that we would not be able to fit in a second one. So I went back to my stack of flats and picked out two. The trays are 5 x 6 cells, and I cut them down to 5 x 5. That will allow two trays to fit in the smaller tank.
I will be adding a bit more peat to the container to absorb some of the excess water and leave it overnight. Tomorrow, I’ll be able to use the cut down trays and start the bunching onions in the small tank. :-)
Between these and the onion sets we’ll be getting in the spring, we should have enough onions in total, for fresh eating and for winter storage, to last us a year, if all goes well. With the bunching onions, I plan to dehydrate a lot of them, but will probably freeze some, too. We do use a lot of onions. I stopped to figure it out, and estimate we use about 200 yellow cooking onions a year, alone. Those are the ones we buy regularly. On top of that are the red onions, bunching onions and leeks we get more irregularly. We don’t usually buy shallots at all, because they are a fair bit more expensive. So it’s well worth the time end effort for us to grow a lot of onions! We won’t be trying this year, but I am hoping that by next year, we’ll be able to try growing leeks, too.
By the end if this year’s gardening, we’ll have a better handle on whether it’s worth it to keep growing from seed, or to go with buying sets. Growing from seed, for the amounts we’re after, takes up a lot of space, but there are more varieties available in seed than in sets. Either way, it’s going to be a trade off.
As a side note, we had company while I was working on the seeds.
I love that they’re coming around during the day now, when we can actually see them! :-D They are so beautiful!