Our 2021 garden: unplanned garden bed

My daughters and I have spent quite a bit of time, working out where to plant what, so we know where to build beds to plant in. Then I realized we completely forgot about the purple asparagus crowns that will be shipped later, to arrive at time of planting in our zone 3 region.

We’d talked about them before, but hadn’t made any decisions. Where my mother had asparagus was ruled out. She’d planted trees and bushes in that garden, so that area no longer gets enough hours of sun in a day. Asparagus will produce for up to 20 years, so we couldn’t include them in most of the areas we will be planting in this year.

After talking about it, we settled on a spot where we had not originally planned to have any garden beds at all this year.

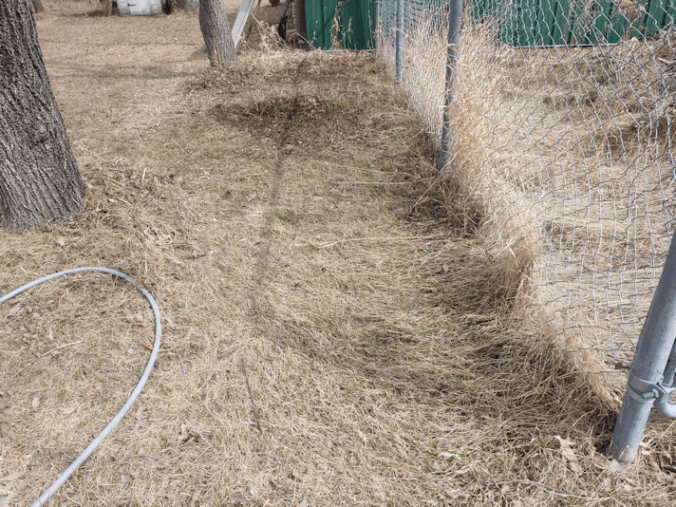
This is the spot we settled on, after I’d raked it out.

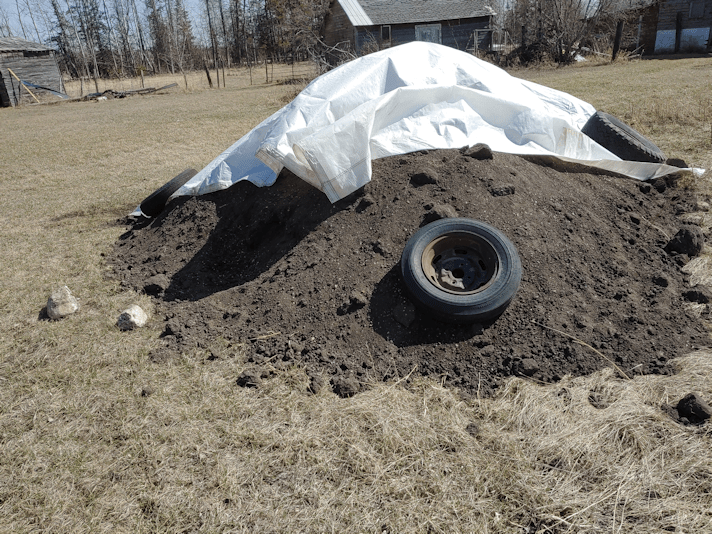
Part way down is where there used to be one of my mother’s tire planters that I’d taken out. I’d dumped the soil out to remove it, and found it was on top of the remains of an old maple.

I know it was an old maple, because it immediately began sending up suckers.

I had covered it with the soil inside the planter as much as I could. The flowers that were in that planter have been showing up, which was nice to see at least. :-) Much of this area is difficult to maintain, though. So now we will be planting two things here. At the far end, on the other side of the remains of maple, is where we will be planting the Strawberry Spinach. In reviews on the Baker Creek website, where I bought the seeds, it was mentioned that these self seed easily, and it was recommended to plant them in a permanent location because of this. That was kept in mind when we chose this location.

In the foreground is where the asparagus will go. For that, we will need to dig a trench long enough for the 6 crowns we will be getting.

Digging a trench here is going to be a challenge.

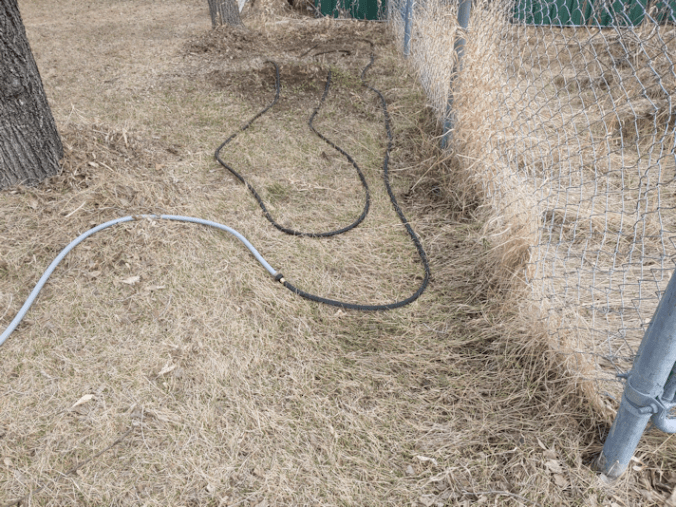
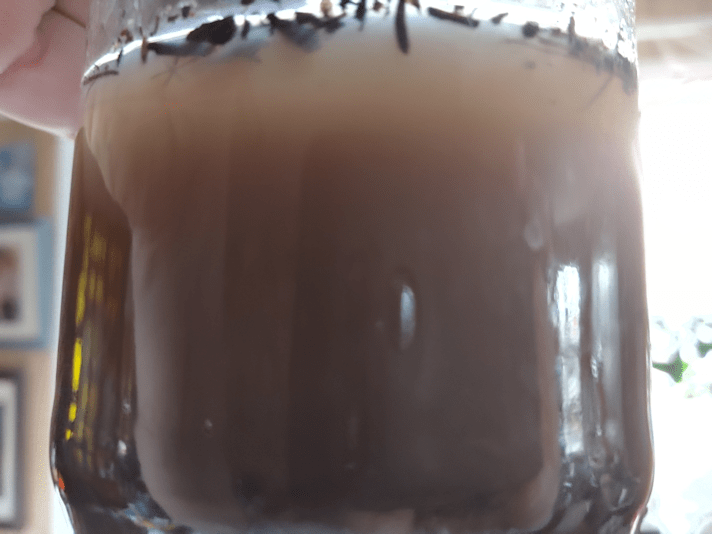
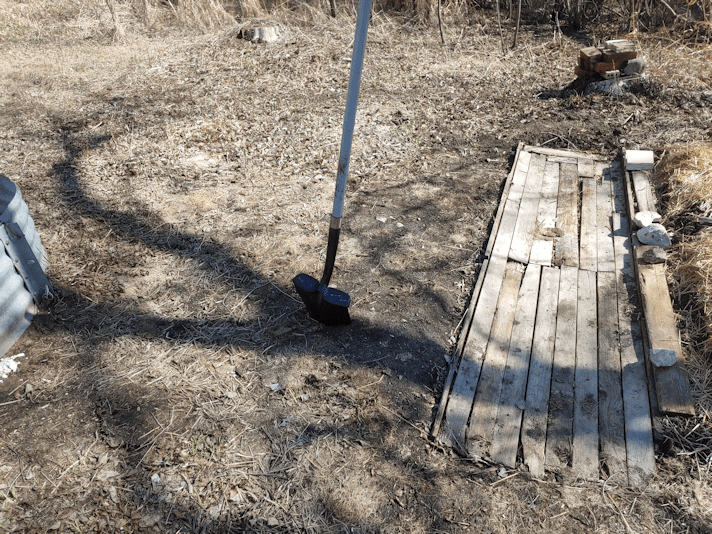
So today, I set up the soaker hose directly on the ground to start. Saturating the soil will make it easier to dig the trench.

While that was soaking, I prepped as many cardboard boxes as I could find, removing any tape or stickers on them.

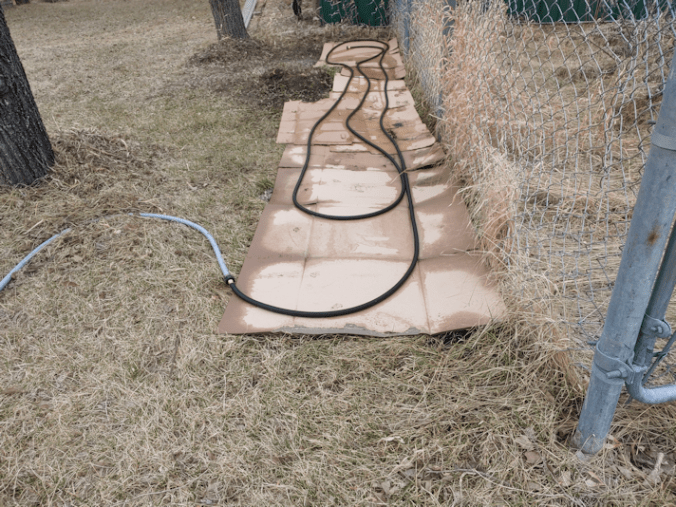
My daughters helped me to lay the cardboard under the soaker hose, and we left it running for a while as we checked other areas. The rain barrel was full, so we used it to fill our watering cans and wet down the cardboard more, and finally just left the soaker hose going for about an hour. The above photo is what it looked like when I turned off the water.

(We are now out of cardboard. :-/ We do still have some moving boxes left, but they’re in really good shape, so we’re saving them for something else.)

We were planning to put straw over the cardboard, too, but it was way too windy today. We have several weeks before the asparagus crowns will arrive, so covering the area now will help kill off the grass, as well as make it easier to dig a trench, later. We’ll just have to keep soaking it. Where the Strawberry Spinach will be planted can have mulch and soil added to it at any time.

I’ve been looking at instructions for planting asparagus, and some places say to dig a trench 15 inches/38cm.

That’s not going to happen!

Those articles, however, also say to fill the bottom third of the trench with compost. We don’t have compost left.

Other articles say to soak the crowns in compost tea for 30 minutes before planting.

Since we don’t have compost to make compost tea with, that’s not happening, either. Our new garden soil, however, has plenty of compost in it.

I’m reading that the crowns should be planted 1 1/2 – 2 ft/46-61cm apart. We will be getting 6 crowns. That space isn’t long enough to plant them in one long row, but it’s wide enough to plant them in 2 rows, so we’ll need to made a double wide trench – about 24-30 in/61-76cm wide. A depth of 8 inches/20cm should be good, but we will be building the area up, so we won’t need to go quite that deep. I don’t know if we even could go any deeper, with the trees being so close. I expect to find a lot of roots under there. By the time we’re done, this area should be about 4-6 inches/10-15cm higher than it is now, so all we really need to do is get rid of the top layer of grass roots.

Hopefully, we will be able to remove more of that tree stump and cover the remains over, in the process.

Once it’s done, we should be able to leave things here and just keep them maintained, for the next couple of decades.

The Re-Farmer

Window kitties!

It’s been warm enough (out of the wind) to open the kitchen window at times.

Cheddar and David, bird watching!

This is the one counter in the kitchen that the cats are allowed to be on. It’s a favorite spot at the best of times, but when the window is open, we’ve been seeing as many as 4 cats crowded onto here! :-D

The Re-Farmer

Filthy felines and seedling surprise

It was a gorgeous day to do our morning rounds, and the yard cats were taking full advantage of it. :-D

It’s a good thing we’re not trying to keep the grass alive around the cat’s shelter. :-D This spot is where a smaller old dog house was, when we first moved here, and the cats roll around in the spot so much, no grass or weeds are growing into it. :-D

As you can see, the based of this linden tree is another favorite spot they like to roll in!

They get so, so filthy! Enough to turn and orange cat black! :-D

In other things, I found a nice little surprise this morning.

The third dancing gourd seed has sprouted!

I honestly forgot how many seeds I planted in there.

The main reason we used peat pots to start the gourds is so that we can just bury the pot into the garden and reduce transplant shock. Which means thinning out the seedlings. The problem is, most of the seedlings we’ve got so far are looking really strong and healthy! Among the luffa, there’s really just one sprout that is smaller and would be thinned out, but the rest are doing so very well! I want to plant them all! :-D

We’ve got over a month before we can transplant any gourds at all, so we’ll see how they are and make decisions then.

The Re-Farmer

Our 2021 garden: Soil test on purchased soil and tending tomatoes

I finished testing samples of the new garden soil this afternoon.

I was interrupted by scrabbling sounds behind me.

Saffron looks so adorable!

She is also a vicious beast. ;-) Her favourite thing it to suddenly launch herself across the room, onto whichever human is passing by. She typically lands about half way up, and then starts sliding down.

Which can be very painful! She is very sharp, and rather clumsy. :-D

Anyhow.

Here are the test results from the purchased garden soil.

The nutrients are nice and high, all round – and so is the pH! Most of what we are growing recommends a pH of 6 – 6.5, so we’ll want to look into increasing the acidity a little, if we can.

Today, I decided to “pot up” the tomatoes. It feels strange to do that, since they are so tiny, but they are also tiny varieties of tomatoes! ;-)

We planted 4 double cups of each variety, but I worked with only three each. Of the Spoon tomatoes, there’s one cup where nothing at all has germinated. Of the Mosaic Medley, one cup as a single seedling in it, and it’s quite small, so I left it.

I’ve never grown tomatoes before, so I looked at a lot of gardening resources before deciding to plant them in a small amount of growing medium in the larger cups, rather than Jiffy Pellets or tiny pots, so as to add more soil as they grew bigger, rather than transplanting them from small to larger pots.

After the soil was added, they got a careful, but large watering. I left them to drain for a while, emptied the lower cups and left them to drain some more. I wanted to ensure the added soil was completely dampened, through and through. I’m hoping this will give them a nice growth spurt. :-)

The overnight temperatures in the sun room are getting much nicer, so we will be able to move things out of the aquarium soon. Over the next while, we will be starting all the summer and winter squash. We’re going to need the space! :-D

Something else on the to-do list:

Having worked out where we will be planting things (which is always subject to change until the seeds are in the ground!) and, more or less, what dimensions we’ll need, my daughters and I need to start measuring out, marking out and preparing garden beds. Some things, like our two varieties of peas, need to be direct sown well before the last frost date. They are going to be near the corn, which isn’t supposed to be planted until well after the last frost date. So we’ll need to mark out the plots and start prepping them. We’ve decided to make most beds at 3′ x 8′ (roughly 1m x 2 1/2m) for ease of access and denser planting. Ultimately, we have no idea how many of these we will need, until we actually start planting. Some varieties had packets with a LOT more seeds than others of the same vegetable type, and some were packed by weight, so we won’t know how many seeds there are until we open them.

We’re finally getting close to when we can plant things outside! Yay!!!

The Re-Farmer

Soil test; finishing first sample, starting the second

I left our first sample’s water and soil mixture to sit overnight again, and this is what it looked like this morning.

This is with the morning light behind it. Still very opaque, after having more than two days to settle!

Also, very orange with the light behind it! The soil in this area does have a reddish cast to it, overall, likely due to so much decomposed wood in it.

Here, you can see the layers pretty clearly. The colours look wildly different from this angle!

I went ahead and started the tests for nitrogen, phosphorus and potash, then got a sample of the new garden soil started in the water for later.

Emptying those capsules into the test tubes is quite the pain. You’re supposed to be able to just open the gel caps, but they don’t come apart. I ended up having to snip them, but that sends powder flying, no matter how tiny the snip!

This is after just a minute or two after mixing. They needed to sit for at least 10 minutes.

And here they are!

Keeping in mind that this soil sample is from an area that has been buried under wood for decades. The only things growing in it were things that could force their way through the pallets, like the cherry trees, some poplars, crab grass and other weeds. This specific spot included the pallet fence on top on top of it, which has a number of little trees growing through it.

Last year was the only time any amendments were added, and that was in the from of a mulch of grass clippings. I did use some Miracle Gro fertilizer on the garden beds we had last year, applied with a garden hose, but the area this sample was taken from was where we had tried to plant kohlrabi, which did not succeed, so any fertilizer this area got was from whatever mist that happened to blow over.

I’m actually pleasantly surprised. It’s a bit on the low side for nitrogen, more of a medium for the phosphorus, and medium – almost high – for the potash. (Note: the colours show up slightly different in the photos than in real life.) It’s a lot better than I expected for soil that has been in the conditions this soil has.

Here is the second sample, after settling for maybe half an hour. What a difference between the purchased garden soil, with its 5 part blend of compost, manures and sand, and the first sample!

I’m actually going to hand on to these after the next batch of tests is done, to compare with the next sample. I should probably do at least two more tests; one from the beds we used last year, and one from an area that has never had any garden in it, that we will be planting in this year. Those should be very interesting!

I need to find more jars I don’t use for food! :-D

The Re-Farmer

Morning spice

Ginger says “good morning!”

And then he attacks my phone. :-D

Ginger continues to settle in. With so many cats in the house there are, of course, moments of aggression. He has no problem standing his ground when one of the other cats decides to take out their bad mood on whichever other cat happens to be nearby. I’ve even seen him running around and tussling playfully with the spice girls.

He does have a habit of squirming around too close to the edge of the bed and sliding right off. :-D

His fur is growing back in the shaved area, but not evenly! He’s got patches of longer hair that’s surprisingly dark. Being right next to the corner where the incisions meet, it looked like he somehow got the area very dirty. :-D

Best of all, he’s now starting to actively seek out people for attention. :-)

He is such a sweetie!

The Re-Farmer

New baby sprrrooots, and soil testing status

We have gourd sprooots!!

Yesterday afternoon, I spotted these.

These are the Tennessee Dancing Gourds, and they are the first of the gourds to sprout!

This is how they looked this morning! So awesome, to see how much they grew in less than 24 hours!

I’m hoping this means we’ll start seeing some of the other gourds sprouting soon, too. :-)

I also checked on the soil sample that was left overnight to settle.

Hmm.

It looks completely unchanged!

The instructions said that soil heavy with clay could take 24 hours to settle, but… I don’t think that’s clay. I think it may actually be organic material.

With how long this is taking, I think I’ll find another jar and test the next soil sample while this one continues to sit.

But not right away.

My older daughter got a call back from the tax preparer. They can’t log into her file at Canada Revenue. Like with her sister, it’s telling them there’s something wrong with her name. We have no idea what that could be. We’re going to have to call up Canada Revenue again. I’ve found a directory, and the numbers all have wait times listed. The number we need to call has a wait time of just over 2 hours.

So we’ll be taking turns monitoring the phone while on hold.

Again.

The Re-Farmer

Morning kitties!

I managed to get a picture of Ginger this morning.

This was just a moment before he leapt up and tackled my phone! :-D

He was very fierce-some this morning!

I got this picture of David the Magnificent, yesterday, and just had to share.

He is such a pretzel!

Meanwhile, I had a whole crowd, outside!

The Ghost Baby was peeking between the shelters to see if it was safe to go eat!

She finally dared!

My daughter told me that she sometimes shows up at their second floor window, describing her as a ghost baby. I figure that’ll do just fine as a name. Better than “that sort-of calico cat…”.

My daughters have also been telling me about another grey and white tabby. I honestly can’t remember (I’m losing track!), but they say it’s Junk Pile’s baby from last summer, and it looks like here, except thicker. So they call it Thickilous.

:-D

I may well have seen it and thought it was Junk Pile, but until I see them both at the same time, I have no way of knowing.

So we have these 7, possibly Thickilous, and Nicky the Nose, hanging around. We have more cats inside than outside right now!

Well. At least until the kittens are born. Only Butterscotch looks pregnant, but that doesn’t mean the others aren’t!

The Re-Farmer

Soil tests, first area (with technical distraction)

Before I get into this post, I just wanted to add that this is my first post written using the SeaMonkey browser. It’s also the first time I’m actually using the browser, yet I’m already seeing a HUGE difference while working in the WordPress editor. Everything is loading SO much faster. The image uploads, the block editor, everything. I’ve just opened a whole bunch of blogs I follow in new tabs, and not a single one is showing the weird colours, not a single image has failed to load, and when I scroll the bottom of posts, everything is loaded. Including the “like” button which, frustratingly, was often the one thing that would fail to load, even as the rest of the page would load. I have yet to try and leave a comment anywhere, but I’ve uploaded media, including directly into this post, without a single problem. I had been using Mozilla Firefox for this blog (to keep is separate from my personal stuff), and it’s been really awful. SeaMonkey is like Mozilla Netscape, and it works a dream, so far! Many thanks to The Hinoeuma for telling me about it!

And now, back to our regularly scheduled post…

I broke out our soil tester and began with a sample from the newest garden bed. This is soil that was under the old wood pile. You can read about that massive clean up job, here. Under it was the only soft soil we had!

The soil test kit I have is from HoldAll Decorative Plant Accessories, and this is our first use. It has the supplies to do 40 tests; 10 each for pH, nitrogen, phosphorous and potash.

The test of pH is the quickest; soil gets put directly into the test tube with the contents of a capsule (all are colour coded), shaken, then allowed to sit for a minute. The other tests required a soil sample to be mixed with water at a ratio of 1 part soil to 5 parts water, so I started that first. Though only the pH test could be done right away, I readied the capsuled for all the tests, so I wouldn’t have to go into the mylar bag again.

I had just finished setting the pH sample in the test tube holder when something large and white caught my eye through the window.

It was the tarp over the load of garden soil in the outer yard, blowing around!

A daughter and I dashed off to get it before it blew away.

The wind has only been picking up! I don’t think I’ll be moving soil onto the new garden bed today. :-(

We fixed the tarp, adding more rocks and even a tire rim onto it, to keep it from blowing away.

Then we came inside, and I found three cats on the table, going after the remaining three test capsules!

They were licking them, and the gel capsules were starting to dissolve. :-( I don’t think any of the powder was ingested, though. They are now sealed in a container.

The pH test had more than enough time to be ready, but the water and soil mixture will need a lot more time! The instructions said it could take anywhere from 30 minutes to 24 hours, depending on how much clay is in the soil.

The soil in the new garden bed came up as neutral. We have a soil meter that is simply stuck into the ground that reads sunlight, moisture and pH. It had been used in the area that now has garlic, and read at about 7.5, so this was pretty much what I was expecting. Most of the things we are planting do better in a slightly acid soil – about 6 – 6.5 – but what we planted in this area last year did pretty good anyhow.

As I write this, the soil and water mixture has been sitting for more than an hour, and is still totally opaque! From the looks of it, it may need to stay overnight.

Meanwhile, I’ve already gathered a sample of the next test I want to do: the new garden soil! I suppose I could do a pH test right away, but I’ll wait until the other three tests on this first sample is done, first.

Testing the soil in the old garden is going to be a challenge. The samples are supposed to be as free of rocks and organic matter as possible.

Ha!

We’ll see how close to that we can manage!

Meanwhile…

As I was working on this post, I got a phone call from my mother. After a while, she asked what we’ve been doing, so I told her about the new garden beds. I tried to describe to her where we put the new bed for the tomatoes, and made the mistake of starting with, “you know where your yellow flowers are?” She immediately launched into “you mean you destroyed my flowers!!” I had to stop her and tell her, “wait, no… you know that space between those flowers and the chain link fence?”

I honestly think my mother forgets that the chain link fence even exists at times! It took her a while before she realized I was talking about the grassy area. Which confused her even more, because nothing was ever grown there, and how can I plant without plowing the soil first? Or at least tilling it? So I described to her what we did with the layers of cardboard, straw and soil. Once she knew our garden soil was delivered, that helped, but she still accused me of killing off her flowers again! Then she brought up the shade of trees, and I told her we only had to take down the one tree that was killing her lilac, anyhow, and that we picked that spot because it will get full sunlight now.

She still had a hard time understanding that we’re planting anything on that side of the house, in the yard, and was all, “so you’re letting the garden go to weeds again”, meaning the area she used to garden in. I told her no, we’re going to be planting all sorts of things there. Without plowing? Yes. Without plowing.

That lead to a whole lot more explaining of things, even though we’ve had this conversation several times, now. She has the hardest time with the concept of no-till gardening. It’s just too wrong! :-D

At least this time, she ended by saying, when everything is in and growing, we need to bring her over so she can see it! :-D So that’s progress, at least! She certainly wasn’t impressed by what she saw last year, but we’ll see how it goes this year. I’m sure she’ll find lots to be angry about! :-D

I didn’t even try to explain to her about the soil testing, though. Maybe another time. Us planting in an area she never planted in was already pressing her limits! :-D Which is funny, because she would stick little gardens in, or plant trees, all over the place. Some of them in places that are now very difficult to work around! :-D So it’s not like I’m doing something she hadn’t already done herself.

One thing that was funny was when we talked about starting things indoors, and I mentioned needing to start squash. She asked if we were growing zucchini, and I told her yes, in green, yellow and a different green, plus the bright yellow round squash (the pattypans) that I’d given her last year. Oh, those are just toys! she tells me. :-D I reminded her that we find them quite delicious!

Hmm. Now I’m suddenly wondering. Did she eat the fresh pattypan squash I’d given her? Or did she get rid of them, because they were too new for her?

I don’t think I want to know the answer to that. :-D

As we talked more about starting things indoors, she had the hardest time understanding that yes, we already have tomatoes started from seed. I think she was disappointed that she couldn’t chastise me for not having them started already. :-D

Talking to my mother about this place can be very challenging! I don’t think she forgets that she doesn’t own it anymore, but she still wants to control everything that is done here, including things she doesn’t understand (if only because my dad and brothers took care of them for her, over the years). I try to respect her wishes as much as possible, but our job is to take care of the place, not keep it in stasis. It’s slowly working out, though. It just takes a lot of explaining, sometimes! Or, in some cases, not even bringing them up.

Like testing soil. I’ll bring that up only if we have a lot of time for me to explain things in ways that make sense to her. It’s not so much that she isn’t aware of some things; it’s more likely she’s never encountered the terms to describe them before.

It’ll work out. It’ll just take time and patience!

The Re-Farmer

Our 2021 garden: new, layered bed

The forecast for today has changed, and we are expected to be even warmer than originally predicted. Before trying to get my husband to the lab in town for his blood work (he never even got to the counter to get his requisition; the line up was out the door, and was moving so slowly, he ended up leaving, due to his pain levels), I saw we’d already reached 13C/55F, which was originally our predicted high. The new high for the day was listed as 18C/64F. As soon as I could after we got back, I headed out to get the new bed done, before things got too hot.

Yeah. I know. It’s not really “hot”, but we’re not acclimatized yet!

This is what it looked like before I started.

I would like to point out how deep into the soil the spade is. This is actually really, really impressive. Pretty much anywhere else in the yard, I would not be able to get the spade that deep, even while standing on it – and I’m no lightweight! Typically, I’d shove the spade into the ground, turn around to do something else, only to have it fall over, moments later. What a difference with soil that has been buried for decades under where the wood pile for the furnace used to be.

The first thing to do was remove that lovely soft soil.

And more roots.

We’ve de-rooted this area three times, and I was still finding old cherry roots!!

Also, worms. Lots of worms!

I dug down until I hit gravel. Which was not as deep as the other two beds that our garlic is planted in.

You can see a root sticking out that I couldn’t remove. I decided it wasn’t worth going back to the sun room to get something to cut it with. Some of the other roots I pulled out went under the boardwalk on the side! I’d dug those areas down to the gravel, too.

Being near the compost ring, this bed is narrower than the others, as well as shallower.

Being right next to the compost ring came in handy, though.

I pretty much emptied the compost ring, then walked back and forth on it to stomp it down.

Using the contents of our compost pile like this, we aren’t getting a chance to get any finished compost! Which is fine. It’s still organic material for our garden beds.

Speaking of which…

Next came a layer of straw.

Unfortunately, the wind was really picking up, and things were blowing away, so I made sure to tromp all over the straw, too.

When it came time to return the soil, I did much of it by hand. This allowed me to break up lumps, remove rocks, old tree roots, weed roots, and gently cover the worms.

This is where a soil sifter would make things a lot easier.

Well. Except for the “gently cover the worms” part. That would be more of a “bash the worms to bits” thing. So I don’t mind doing it by hand!

With the previous beds, I returned the soil that was dug up, plus added the soil from where the paths are. I’m not making a path on the other side, so it’s just the soil I removed. I’d used that side area to pile grass clippings last year. Most was used elsewhere, but there still was some left, and that got added to the bed as well.

We will be adding some of the lovely new garden soil to this, but not yet. By this point, it was just too windy to keep working on it. Hopefully, it will calm down a bit, later. After today’s high of 18C/64F (it’s already 17C/62F), we’re supposed to drop to -3C/26F, with “isolated flurries”. Tomorrow’s high is only 2C/35F, so if I can get this finished today, that would be great.

I do want to break out the soil testing kit first, though. I want to compare soil samples from this area, with the big garden area, and with the new garden soil. That should be quite interesting!

So there is the new, layered, garden bed, almost complete. This will be a good bed for root vegetables. I think we’re planning to put a variety of beets in here, though maybe it would be better for carrots. We have several varieties of both beets and carrots, so we might even do one of each. We shall see!

A lot of our seeds packets say to direct sow “as soon as the ground can be worked.” Which, obviously, can be done now. With the predicted overnight temperatures, though, I don’t think I’d be willing to chance it for another week even if we cover them with plastic. Even cool weather crops have their limits! That will just give us more time to prepare the beds. We’ll have to go over the seed packets and figure out just how big some of them will need to be and start marking them out. That will help us make some decisions on exactly where different things will be planted. Especially those that will need trellises and other supports.

We have lots of work to do, and I’m so thankful to finally be able to get at it!!

The Re-Farmer