Sourdough Cornmeal Pancakes

It’s been ages since I’ve made these, and they are absolutely my favourite pancake recipe, ever.  They’re just a bit of a PITA to make. :-D

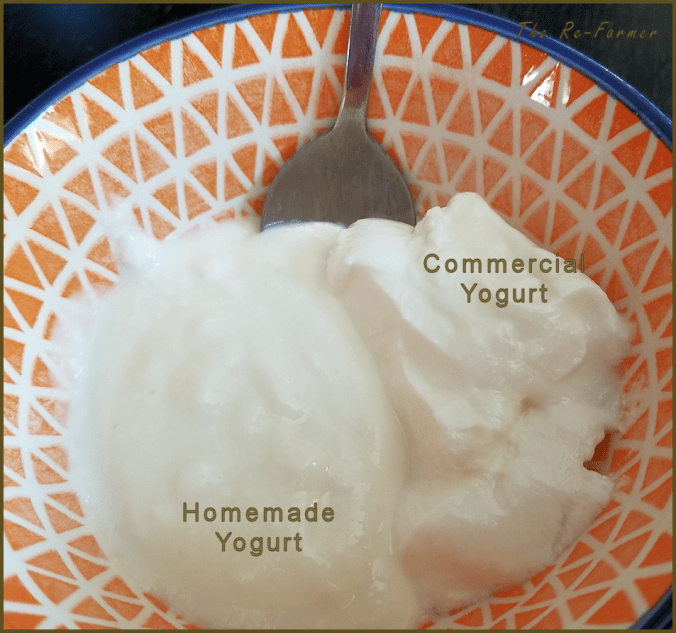
The original recipe called for sour cream.  I substituted yogurt “cheese”, which my daughter described as “sour cream 2.0 – like sour cream, but MORE”. :-D  I was out of yogurt cheese, but I still had some of our homemade yogurt, so I quickly made some.  It took two batches to get the amount I needed for a double recipe, and I also have some whey for our next bread baking.

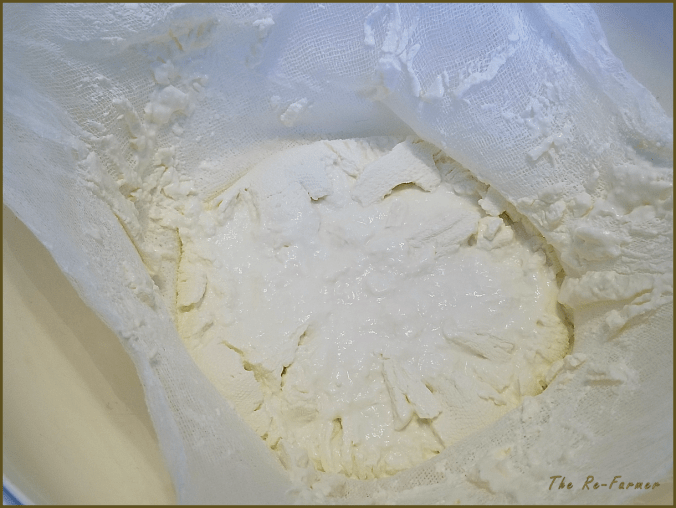
So I’ll start with instructions on how to make small batch yogurt “cheese” for a sour cream substitute.

Needed:
About 1/2 cup yogurt
2 coffee filters
fine sieve/strainer that will fit over a measuring cup
2 cup measuring cup

  1. Place the strainer over the measuring cup.  (If yours has a heavier handle like mine does, you might need to have something next to it to prop it up.)
  2. Line the strainer with 1 coffee filter
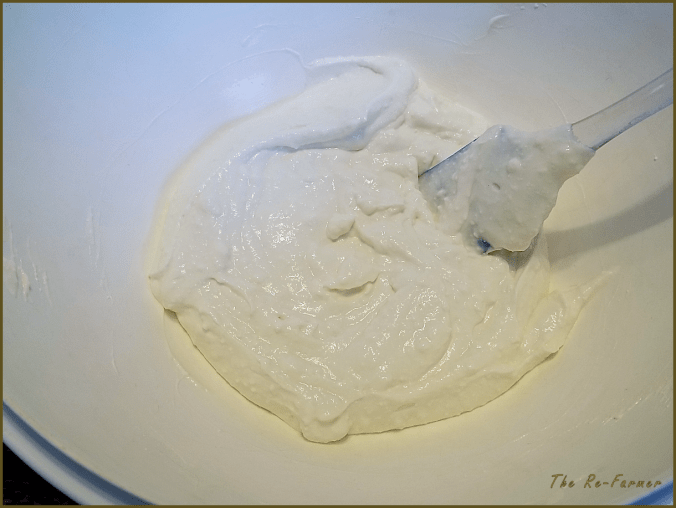
  3. Pour in the yogurt.  Let sit to drain long enough that, when you pull the coffee filter inwards, then let it fall back again, the yogurt stays behind cleanly.  About an hour or so.  You will find the outer edges are thicker and the middle is still soft.
  4. Draw edges of coffee filter in and lift out the yogurt.  Place the second filter into the strainer.  Gently roll the yogurt into the new filter, so that the softer middle is mostly on the bottom of the filter.  Leave to drain until desired thickness.
  5. At this point, if you want it to drain faster, or want a thicker “cheese”, fold the filter sides over the yogurt to completely cover it.  Place a small, flat object (I used one of the many tiny dishes in my collection) over the filter, than add a weight, such as a can of beans, on top.
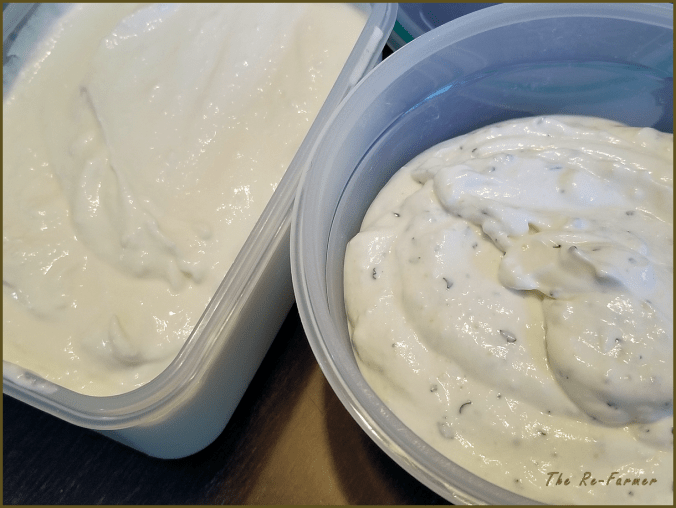
  6. When at desired consistency, remove from coffee filter, place in a sealed container and refrigerate.
  7. Reserve the liquid for bread baking.

The 1/2 cup of yogurt will yield about 1/3 cup yogurt “cheese”, depending on how long you let it sit to drain.

And now… on to the pancakes!

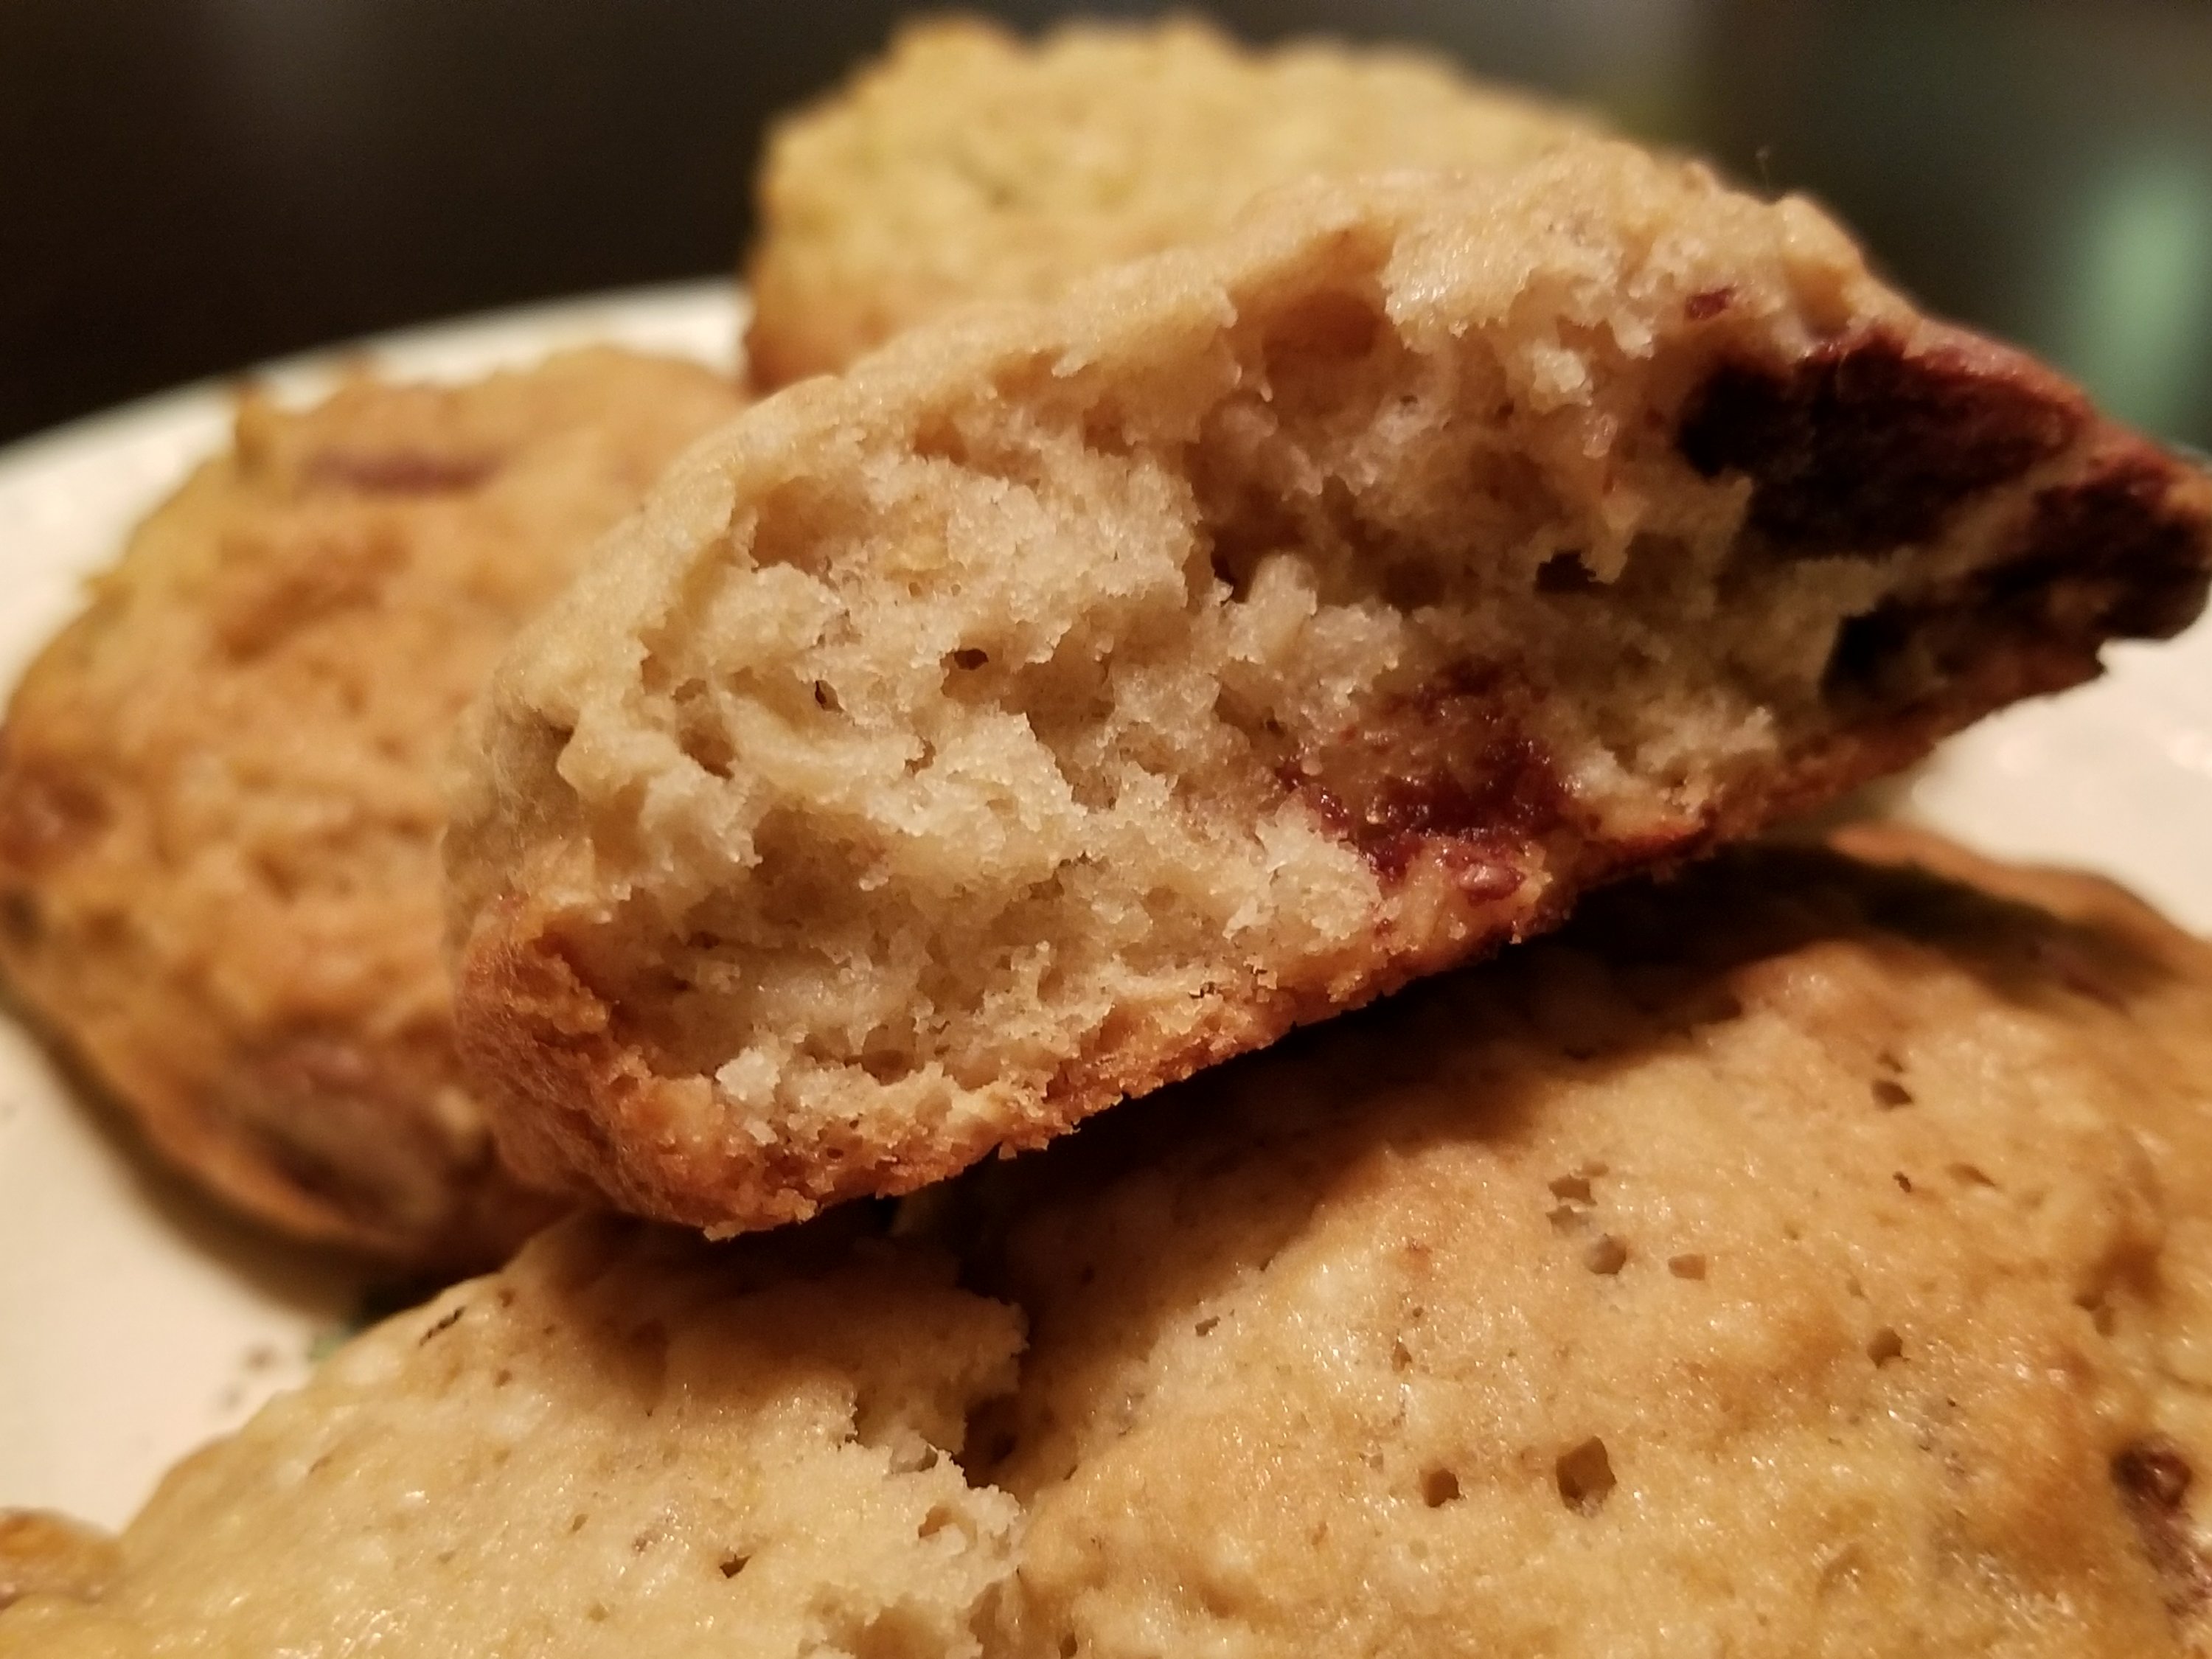
This recipe is modified from “Cornmeal Pancakes” in The Sourdough Cookbook by Rita Davenport.

ingredients

The amounts pictured here is for a DOUBLE recipe of Sourdough Cornmeal Pancakes.

Here is the ingredients list for a SINGLE recipe.

1/2 cup cornmeal
1/2 cup all-purpose flour
1 tsp baking powder
1/2 tsp baking soda
1/2 tsp salt
2 tsp sugar
1 egg
1/2 cup sourdough starter
1/2 cup milk
1/2 cup sour cream (or thick yogurt or yogurt “cheese”)
1 1/2 Tbsp vegetable oil

20180220sourdough.cornmeal.pancakes

Sourdough Cornmeal Pancakes

  1. In a medium bowl, combine all dry ingredients, then set aside.
  2. In a small bowl, beat the egg, then mix in milk and starter.
  3. Add egg mixture to the dry ingredients and stir until just moistened.
  4. Fold in oil and sour cream or sour cream substitute.
  5. Preheat and oil frying pan.  Cook 1/4-1/2 cup of batter per pancake for a minute or two, each side.

Note: kitchen chemistry!  When the wet and dry ingredients combine, the acidic sourdough starter and sour cream/yogurt cheese will react to the baking powder and baking soda, causing it to bubble up.  The batter will still be very thick, but light and fluffy at the same time.  Be gentle with it, to keep those bubbles for light and fluffy pancakes!

I like these with nothing but a bit of melted butter on them, but of course you can top them with whatever you want.

I hope you enjoy these as much as we do!

The Re-Farmer

My Non-traditional Slow Cooker Chili

I do love my slow cookers!  I’ve got two 8 quart sized cookers, and have found they are the perfect size for us.  Especially for making something like chili; it’s enough to feed us for a couple of days, making life much simpler!

The chili I make is not at all traditional.  In fact, I’m sure it would horrify true chili aficionados!  :-D  I’ve looked through various recipes and they either use ingredients I never tend to have – or ones I can’t use.  My chili has no heat to it.  At all.  You see, for some reason, I have these massive crevasses in my tongue.  It seems to be a hereditary thing, as my father had them, as does one of my daughters.  The oils that cause that spicy heat gets into them, and once there, there’s nothing I can do to alleviate the pain of it.  So as much as I love the taste of spicy food, I can’t actually eat it.

Which makes me sad.  Because I love Indian food.

Ah, well.

So here is my non-traditional, totally mild (though you can make it spicy, if you want), slow cooker chili.

Remember; this is for a big slow cooker, so feel free to cut the recipe in half.  I’m pretty loosey-goosey with the quantities, too.

chili-groundbeef

First up, start browning the ground meat.

I like to use lean or extra lean ground beef, but I’ve also made it with combination of beef and pork, or beef and turkey, since those three ground meats are all pretty inexpensive at Costco.  I used a family size pack of lean ground beef, which was about 5 pounds, and browned it in batches and transferred it to the slow cooker liner using a slotted spoon, so what little fat there was in the pan, stayed in the pan.

chili-onion

While the beef was browning, I chopped up a large yellow onion.  I like leaving the chunks a bit on the large side.  Just because.

I added the onion to the last batch of browning beef.

chili-carrots

Next on the chopping block; 4 or 5 small carrots.

I usually use about 5, but used only 4 this time.  I finished off one bag and didn’t feel like starting another.  I like to chop carrots smaller, too.  This made just under a cup of chopped carrots.

chili-sweetpotato

Then I chopped up 2 small sweet potatoes.

Yes, sweet potatoes.

I don’t think I’ve ever seen a chili recipe with them in there, but it was something I decided to try some years ago, and it’s been a permanent addition, since.  I like to chop these even smaller than the carrot.  The idea is for them to be so soft that they disintegrate into the chili when you mix it at the end.  There’s something about the creamy smoothness of it that really appeals to me.

chili-crockpot.prep

After the meat and onions were browned, I added the chopped carrots and sweet potato, then 1 can of mixed beans and 1 can of white kidney beans (both 19 oz cans, drained and rinsed).

I like to change up the can with one type of beans, but I always include 1 can of mixed beans.

chili-crockpot.ingredients

Next up is a large tin of crushed tomatoes, a small tin of tomato paste, seasonings and water.

The seasonings are typically whatever I have handy; usually a steak spice mix and garlic. Slow cookers are where dried foods are in their element, so I used dehydrated garlic pieces that I’ve been able to find.  Strangely, I hardly ever saw them before our move, but our local grocery store carries it!  In refill packages, too, so it’s really cheap. :-)

The 4 of us have very different preferences when it comes to seasoning, so I tend to use a light hand with it, then everyone can add their own later on.

chili-crockpot.readytocook

Then mix it all together!  Not an easy task, with the crock so full!

Add more water, if needed.

The water is another one of those loosey-goosey measurements.  Food in slow cookers release their own moisture, so they need less added to begin with.  How much to add is a judgement call.  I find it’s safer to add less at the start, then check after it’s been cooking a while.  If it seems to need more, I’ll add boiling water, so it won’t cool the slow cooker down too much.

I then set the slow cooker on low for 5 hours.  I did end up adding more water part way through.  In the time it took to finish adding the water and stirring everything, I increased the time a bit to compensate for lost heat.

chili-crockpot.withoutcream

This is what it looked like when we got back from town.  There was a bit over half an hour on the timer at this point.

This would be the time to give it a taste and adjust the seasonings, then give it a good stir.

I then stirred in my final ingredient.

chili-crockpot.withcream

Whipping cream.  About 3/4 cup.

That was another one of those “Hmm… I should try this” experiments I’d made some years ago that stuck around.

At this point, I like to stir it very thoroughly to break up the sweet potato pieces.  I then returned the cover and left it for the last few minutes to make sure the cream was warmed through.

Between the sweet potatoes and the cream, we have ourselves a wonderfully rich and saucy chili.

chili-bowl

Top your bowl with some shredded cheese, sour cream or some yogurt cheese (which, sadly, we are now out of), and enjoy!

Here’s the recipe:

Non-traditional Slow Cooker Chili
for: 8 quart slow cooker
cook on low for 5 hours

Lean or extra lean ground beef (family pack; about 5 pounds)
1 large onion, chopped
4-5 small carrots, chopped
2 small sweet potatoes, chopped small
1 tin mixed beans (19oz), drained and rinsed
1 tin white kidney beans (19oz), drained and rinsed
1 tin crushed tomatoes (796ml – 26oz)
1 tin tomato paste (170gm – 6oz)
4 cups water (to start)
Seasonings to taste (steak spice mix, dehydrated garlic or garlic granules, salt, pepper, etc.)
hot water, as needed during cooking
3/4 cup whipping cream, or to taste
shredded cheese for topping (or sour cream, or yogurt cheese)

  1. Brown beef and onions.  Drain and transfer to slow cooker liner.
  2. Add chopped vegetables, beans, crushed tomato, tomato paste, 3 or 4 cups of water and seasonings.  Mix. Cover.
  3. Set slow cooker to low for 5 hours.
  4. Check after a couple hours to see if hot water is needed.  Add if necessary and stir.
  5. Shortly before done, taste and adjust seasonings as desired.
  6. Stir in whipping cream.  Cover and let warm through for final cooking time.
  7. Serve topped with shredded cheese, sour cream or other toppings of choice.


Slowww….

A slow day for me today.  So… first, the fun stuff!

I wasn’t around to see if any deer came today, though from the looks of the feeding station, they were certainly here.

So instead, I have a cat picture for you!

20180208DaBoy

DaBoy sure loves the top of the piano!  His mom doesn’t go up there.  She’s not as good of a jumper, and there’s nothing close that she can use to take it in stages.  He was just so adorable, with his face hanging over the edge, I had to get a picture!

Yesterday, I spent a long time stirring a pot to make this…

20180208fudge

It is a delicious failure.  I’d doubled the recipe for a type of cream fudge I’d made recently, and I just didn’t cook it down long enough, I think, even though I’d cooked it for at least 45 minutes, stirring constantly.  It’s an attempt to recreate a type of Polish cream fudge that is so addictive.  It has a unique texture that is hard to match, and this doesn’t match it at all.  Leaving it overnight to cool and set didn’t change the texture as much as I’d expected. It still tastes great, though!

Once I’ve got it worked out, I will share the recipe.

Oh, dear!  One of my daughters just came by to share with me something that had happened upstairs.  They were talking and when she laughed, her sister could actually see her breath!

It’s just a touch chilling up there!!!

They moved the heater into the room they were in.

That upstairs needs a lot of work.

Meanwhile…

Today, I focused on doing something I have been letting stew in my brain for a while; figuring out what to do about the Co-op withholding our shares.  That resulted in my spending what ended up being about 4 hours, working on a letter.  Doing it meant having to revisit a pretty traumatic time, and has left me feeling drained.  Then after a break to help with the bread baking, I went back to it to add in something I’d forgotten, then go over it for typos.  It was difficult, and I am recognizing the damage living there has done to me, and that even though we don’t live there anymore, it is still affecting my mental health.

Now that I’ve written it, though, I have to do something with it.

I am not looking forward to it.

Moving away from there was supposed to end this toxic garbage.  Ah, well.  I’ve never been one to avoid doing the right thing, just because it’s difficult.

The Re-Farmer


Home Made Yogurt and Yogurt “cheese” – Day Two; finished

Here are the final results of the yogurt and yogurt cheese making process.

You can visit the first part here, with the recipe, and the second part here, with the step-by-step to make the yogurt cheese.

First up, let’s compare the finished yogurts.

20180129-yogurt6

This was after the home made yogurt was in the fridge for several hours.  It did thicken somewhat from when I first put it in the containers, but as you can see, it’s still quite a bit thinner than the commercial yogurt I’d used as a starter.  That yogurt, by the way, was just a house brand of plain “Balkan” style yogurt.  I normally buy Greek yogurt, but it was more than twice the price!

As far as texture went, the only difference was that one was thinner than the other.

I couldn’t really taste any difference in flavour.

After taking the photo, I mixed both together with a bit of brown sugar and cinnamon.  It was quite nice!

One of my daughters promptly claimed the container that wasn’t quite full for herself, and ate it straight. :-D

Now, on to the yogurt cheese…

After hanging for about 3 hours, there was quite a lot of liquid in the container.  Enough that I poured it off into the container I’d already started in the fridge, almost filling it, so that the bag wouldn’t be sitting in so much liquid.

When very little more drained out of it after another hour or two, I decided to take it out and finish the process.

20180129.yogurt.cheese9

Look how much liquid there is!  I can hardly wait until our next bread baking day. :-D

Once the bag was on the plate, I could really feel how the middle was thinner than the outside.  If I had a cheese press, I would have been able to get more liquid out, more evenly.  Maybe some day.  For now, I’m happy with doing it this way.

20180129.yogurt.cheese.10

And here is my yogurt cheese baby.  With the outside being drier, it allowed me to gently roll the cheese out of the cloth.  If that part had broken up more, the softer middle would have got on the cloth and made it much more difficult to get out of the bag.

Guess how I know that? :-D

20180129.yogurt.cheese.11

Once out of the cloth, I mixed it thoroughly to make it an even texture.  This is a bit on the thin side to be a “cream cheese.”  More like a really thick sour cream.

I had a couple of smaller containers waiting for it…

20180129.yogurt.cheese.12

I filled one with the plain yogurt cheese, then added some garlic powder, onion salt and parsley to what was left in the bowl.

I admit, I licked the spatula after doing this, and the onion and garlic one was sooo good!

Like the plain yogurt, it thickens a bit in the fridge, but not by much more.

If I had wanted to, I could have left the bag to hang longer to drain more liquid out and have more of a cream cheese texture, rather than a sour cream texture.

We are looking forward to trying some of this on pierogi soon!

If you try making this yourself, please to pop by and let me know in the comments, how yours turned out, and what you think of it!

The Re-Farmer

Home Made Yogurt – Day One

I hadn’t intended to make this again so soon, but my daughter and I were able to make a quick trip into town and she made a passing comment about how we should make yogurt again.  I’ve been thinking of it since I posted about using the liquid from making yogurt cheese in bread baking, so that was all it took to convince me to get what we needed to make some now.

Making yogurt is really pretty easy.  The main thing is to have a warm place for the bacteria to do its thing for the hours it needs.  I’ve found leaving it in a warm oven with the light left on overnight to be adequate, but there are other methods.

Since that is my preferred method, it’s a two day process.  I use a full gallon of milk, and plan to use half of it to make yogurt cheese tomorrow.

Along with the ingredients, a candy thermometer is needed, and containers you can sterilize to store the yogurt in, later.  Any container that can handle being scalded, with an air tight lid, of the appropriate size for your amounts will do.

The recipe I use is from Whole Foods for the Whole Family, from La Leche League International.  I have a 1991 printing of it.  It’s a very handy cookbook, if you like to make things from scratch.  I modified the recipe for larger quantities, so I’ll include both the original quantities, and my own variation (in brackets).

This recipe uses plain commercial yogurt as a starter.  Make sure you check the label to see that it says something like “active bacterial culture” or “live bacteria” on it.

Do not use the optional gelatin if you’re planning to make yogurt cheese.  The gelatin serves only to make a firmer yogurt.

20180128-yogurt1

4L milk, scalded

Yogurt

4 cups milk (4 litres/1 gallon)
1 cup powdered milk (4 cups)
2-4 Tbsp plain yogurt (1/2 – 1 cup)
2 tsp (8 tsp) unflavored gelatin, softened in 1/4 cup (1 cup) cold water – optional

  1. Scald milk.
  2. Cool to 95 – 155 degrees. (The recipe does not specify, but looking at my candy thermometer, it must refer to Celsius, not Fahrenheit)  Check with candy thermometer to be sure.

    20180128-yogurt2

    Yogurt starter and powdered milk stirred in.

  3. Stir in powdered milk and yogurt.  Add optional softened gelatin.
  4. Pour into sterilized jars, a baking dish with a cover, or a thermos rinsed with very hot water.  (Because I use an entire gallon of milk, I leave it in the same container I heated it in and cover it with a lid.)
  5. Place into or on a yogurt maker or use other heat source.  A thermos just needs to be wrapped in a towel.
  6. Put in a warm place and allow to incubate at 95-155 degrees until yogurt sets.  It can take from 3-9 hours, depending on your heat source.  Check after 3 hours to see if it is set by tilting the container or tapping it with the heel of your hand.  When set, refrigerate immediately.

Maintaining the temperature is vital; too cold, and the milk can go sour.  Too hot, and it will kill the bacteria.  The recipe lists several options for maintaining the right temperature, but a few of them a fire hazards, so I won’t bother including them. :-D

Yogurt cheese isn’t really cheese at all, but is has a texture similar to cream cheese and makes a wonderful spread.  To make it, you’ll need cheese cloth, and somewhere to hang it.

Which I don’t have.  So I have to figure something out for tomorrow.

Anyhow… to make yogurt “cream cheese”

  1. Line a colander with 2-4 layers of cheesecloth.  Place the colander over a bowl, then dump home made yogurt onto the cheesecloth.  Pull up the corners of the cheese cloth and tie them together so it can be hung.  Suspend the resulting bag of yogurt over the bowl and leave overnight. (Or just a few hours, depending on how thick you want it)
  2. Reserve liquid in bowl for bread baking.
  3. Remove yogurt cheese from bag and refrigerate.

Fair warning: getting the yogurt cheese off the cheese cloth can be a messy job!  Also, the outside will often be drier than the middle, so you’ll probably want to mix it together.  If you wish, you can mix in some dried herbs or garlic or otherwise experiment with it.

More, tomorrow!

The Re-Farmer


Alaska Sourdough Hotcakes: comparison

These are the hotcakes I made yesterday.

This is what I did with Sir Sour Alot last night.

Today, I made more hotcakes, using the transformed Sir Sour Alot.  These are the results. Continue reading

Almost Alaska Sourdough Hotcakes

I say almost, because I don’t have an Alaska sourdough starter.

Yet.

I will be working on that later today, and when it is ready, I will make another batch to compare.

Basic Sourdough Hotcakes
(adapted from Alaska Sourdough)
Note: make sure the mixing bowl you use has enough room for the batter to expand.

2 cups sourdough starter
2 Tbsp sugar
4 Tbsp oil
1 egg
1/2 tsp salt
1 scant tsp baking soda; full teaspoon if starter is very sour.

Mix together all ingredients except soda.

Heat pan or griddle.

Dissolve soda in a tablespoon of warm water. Fold soda gently into batter.  Batter should immediately begin to expand and become light and fluffy.

Cook on prepared pan or griddle.  Place cooked hotcakes on hot place and serve immediately.

I like to put some butter onto the hotcakes as soon as possible after transferring them from pan to plate, while waiting for the next one to cook.  That way, the butter is melted into the hotcake before it gets to the person eating it.

These hotcakes have a very strong and robust sourdough flavour.  Which makes sense, since it’s got no additional flour, and only egg and oil for additional liquid.

For this recipe, I use an 8 cup measuring cup as a mixing bowl; that way I can measure the 2 cups of starter first, then add everything else, and still have room for the batter to expand.

Sourdough Dinner Rolls

Today was our first yeast bread using Sir Sour Alot.  The recipe is very basic.

Typically, with yeast breads, I like to do things like use oatmeal, seeds or grains, or knead in herbs or shredded cheese.

For this one, I didn’t play around.  When my pantry is better stocked, I will get more creative. I didn’t even double the recipe, like I usually do.  So these buns were much tinier than what I typically make! :-D

It was quite a success.

The sourdough flavour is still quite mild with this baby starter, but it is identifiable.  A bit of butter melting on the still warm buns is heavenly!

20180107_1509582064642697.jpgSourdough Dinner Rolls
(adapted from The Sourdough Cookbook)

1 Tbsp active dry yeast
1/2 cup warm water
1 egg
1 cup sourdough starter
2 Tbsp sugar
1 tsp salt
3 Tbsp oil
3 – 4 cups all-purpose flour

Sprinkle the yeast over the warm water and set aside for 5 minutes, or until bubbly.

In a large bowl, beat egg.  Stir in sourdough, sugar, salt and oil, then stir in the softened yeast mixture.

Add 2 cups of flour and beat until smooth. *

Continue beating in small amounts of flour to make a soft dough. **

Turn dough out onto floured surface, then wash and grease the bowl and set aside.

Knead dough, adding flour as needed, until smooth and elastic. **

Place into prepared bowl, turning to oil all sides.  Cover loosely and set aside in a warm place to rise for about 2 hours, or until dough is doubled.

Oil large baking sheets and set aside.

Punch down the dough, then divide into 24 pieces.  Shape the pieces into rolls and arrange on prepared baking sheets.  Cover with a towel and set aside to rise for about 45 minutes or until doubled in size.

Preheat oven to 400F.

Bake for 20 minutes or until golden brown. ***

* How much flour needed can change based on things like humidity.  When I made these today, the first 2 cups was almost all that was needed.  I mixed in maybe half a cup more with this batch.  Likewise, rising times can change dramatically.  I placed the bowl in the oven with the light on for warmth, and it took only about an hour to double in size.

** Sourdough breads will have a slightly stickier dough than those made without sourdough starter.  This is normal.

*** Ovens can be quite variable.  Check after 10 minutes.  Of our two pans of buns, the first one was ready in 10 minutes.  The other in about 15.


Sourdough Oatmeal Chocolate Chip Cookies

We broke out the sourdough starter again today; this time for something sweet!

The following recipe is modified from The Sourdough Cookbook; Soft Oatmeal Cookies.  There are some really awesome recipes in this book!


1 cup butter
1 cup granulated sugar
1/2 cup packed brown sugar
1 egg
1 tsp vanilla extract
1/4 cup water
1 cup sourdough starter
1 1/2 cups all purpose flour
1/2 tsp baking soda
1 tsp salt
2 1/2 cups rolled oats
1 cup chocolate chips

Grease a baking sheet (or two), set aside, and preheat oven to 400F.

In a large bowl, cream the butter and sugars together.

Beat in egg and vanilla until fluffy.

Stir in water and sourdough starter.

In a medium bowl, mix flour, baking soda and salt.  Stir into the sourdough mix.

Stir in rolled oats.

Stir in chocolate chips.

Drop by spoonfuls until prepared baking sheet(s).  Bake for 10-12 minutes, or until golden brown.

Remove from baking sheet and cool on rack.  Clean and grease baking sheet between batches.


It is interesting to make sourdough sweets.  I find you can’t really identify that distinctive sour taste that you would find in making a bread or pancake.  Yet, there is a definite “something” that accents the flavour.

These cookies turned out nice and fluffy on the inside, with a light crispiness to the outside.  Great with peppermint tea!

The Re-farmer