Our 2021 garden: winter squash follow up

Yesterday, I posted about a concern I was finding with our Red Kuri/Little Gem winter squash. I also shared photos in some gardening groups I’m on, and of course, did some searches.

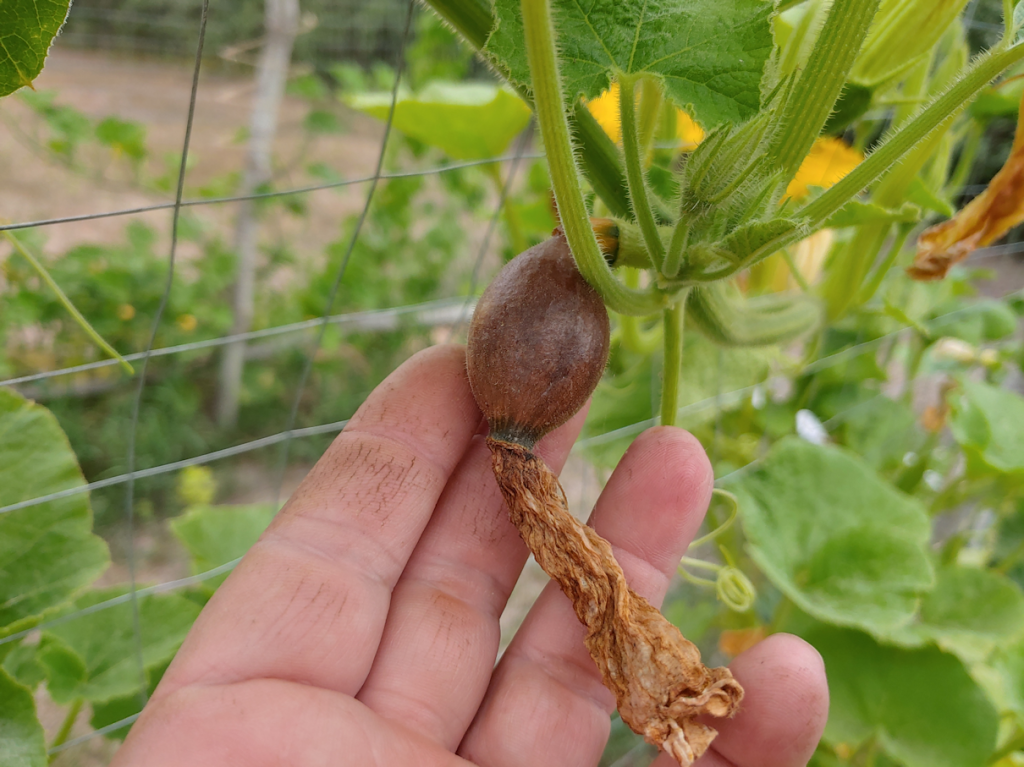
I greatly appreciated the feedback that I got from all over. Some had suggested it was a pollination problem, but that seemed to be from people seeing the pictures of the dying fruit, and not seeing my question about the yellowing leaves. Thankfully, we have not had any shortage of pollinators, unlike some other gardeners I’ve been hearing from. Others suggested blossom end rot. That would be due to watering problems, particularly over watering. In this location, and with our soil (or lack of it), over watering would be very difficult to do. Under watering could be an issue, but these plants are watered the same as everything else at the squash tunnel.

Other possibilities included squash borers, which there are no signs of, and the pattern of yellowing would have been reversed from what is happening. Fungal disease was another possibility, as was root rot. Both of which I could rule out pretty confidently. Insect damage in general could also be ruled out.

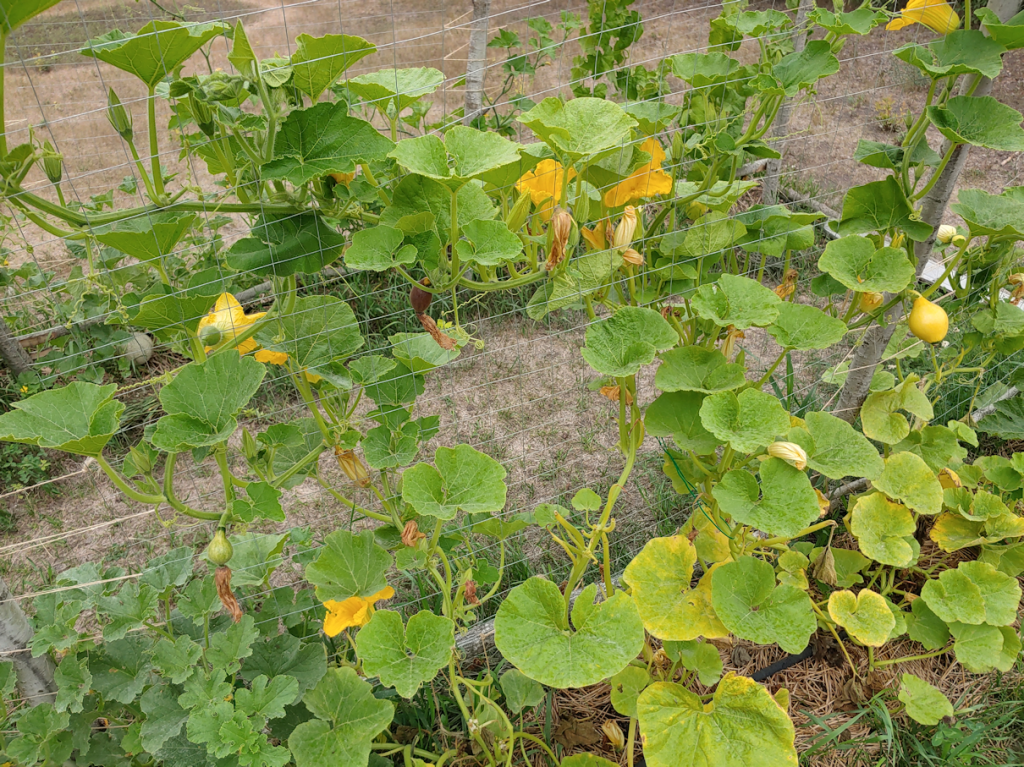
Nutritional deficiency seems to be the most likely cause. Everything at the squash tunnel has been fertilized a couple of times with high nitrogen fertilizer, and lack of nitrogen is one of the possible nutrient deficiencies, but I ‘also had suggestions that lack of calcium, iron and even magnesium might be contributing factors. None of those are included in the soil tests I did! It could simply be that this type of squash has higher nutritional needs than the melons and squash on either side of it. There are five of this type of squash, and all five are affected, while nothing around them are having the same issues, which suggests to me that it this variety is simply a heavier feeder than the others.

This morning, I pruned away all the dead and dying leaves at the bottom of the plants, as well as trimmed away the stems from leaves that had been nibbled on, previously. There were very few of those; it’s the winter squash next to them that is getting the worst of the nibbles!

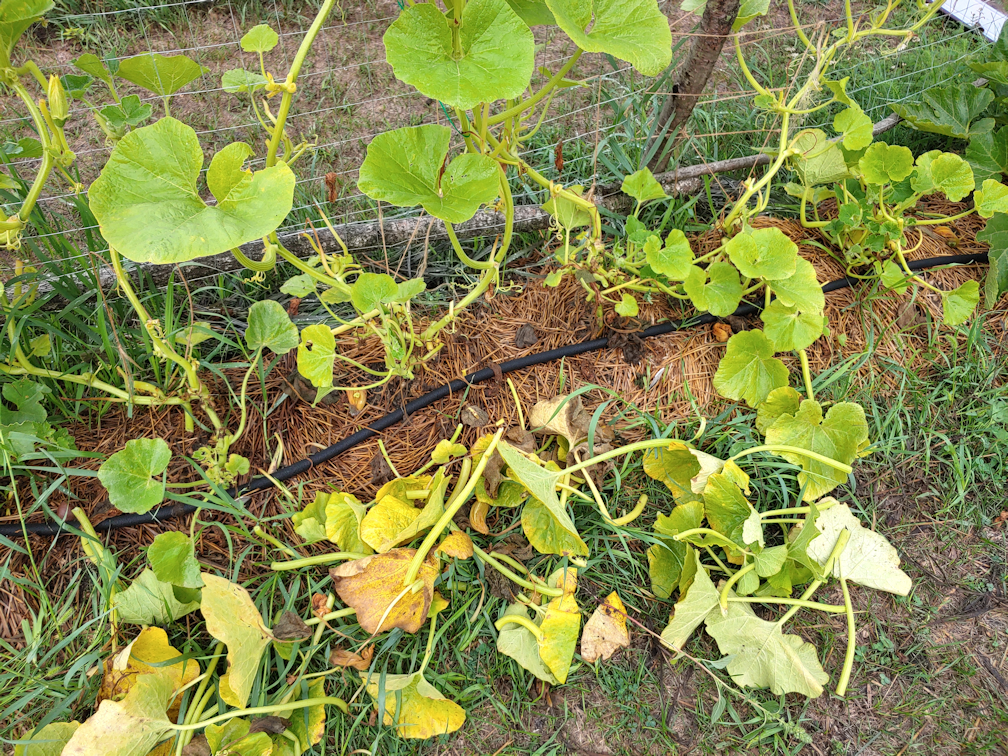
There was quite a bit to trim away! What I found interesting was what was revealed, once these leaves and stems were removed.

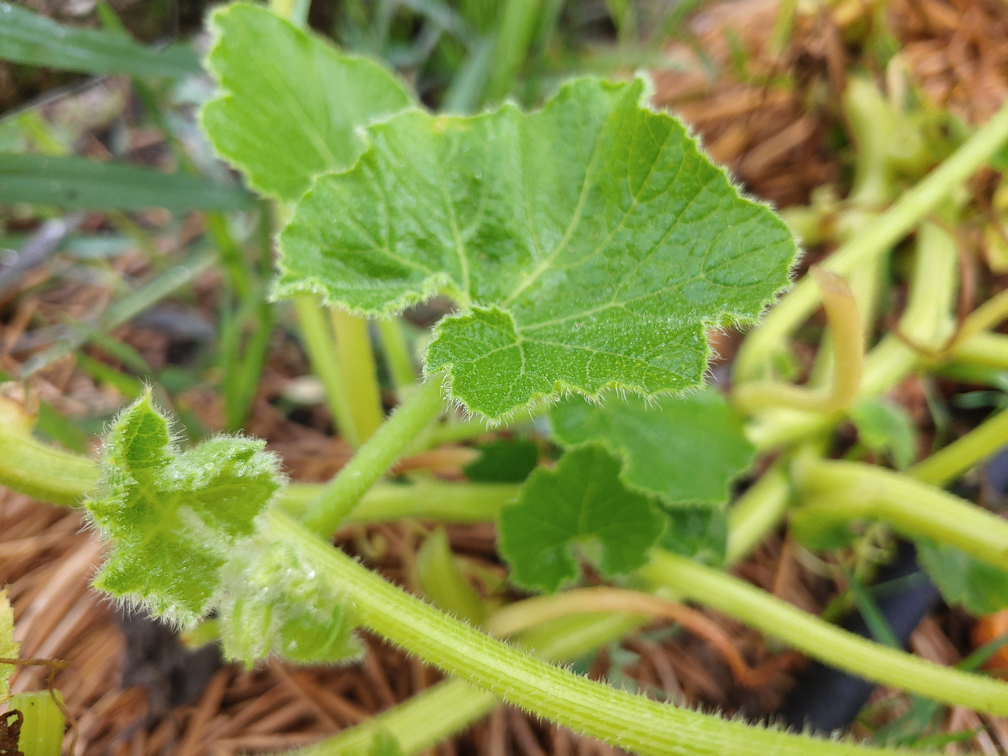
There are fresh new leaves growing! Many are growing out of the stems right next to the dying leaves, as if the plants are trying to replace them as fast as it can.

This also opened things up so I could better check for things like fungal disease, insect damage, etc., just in case I’d missed something before.

In the end, lack of micro nutrients seems to be the most likely cause. That new leaves are coming up at the bottoms (no leaves higher up on the trellis needed to be trimmed), is encouraging.

The big, beautiful flowers, and the still healthy developing squash is also very encouraging!

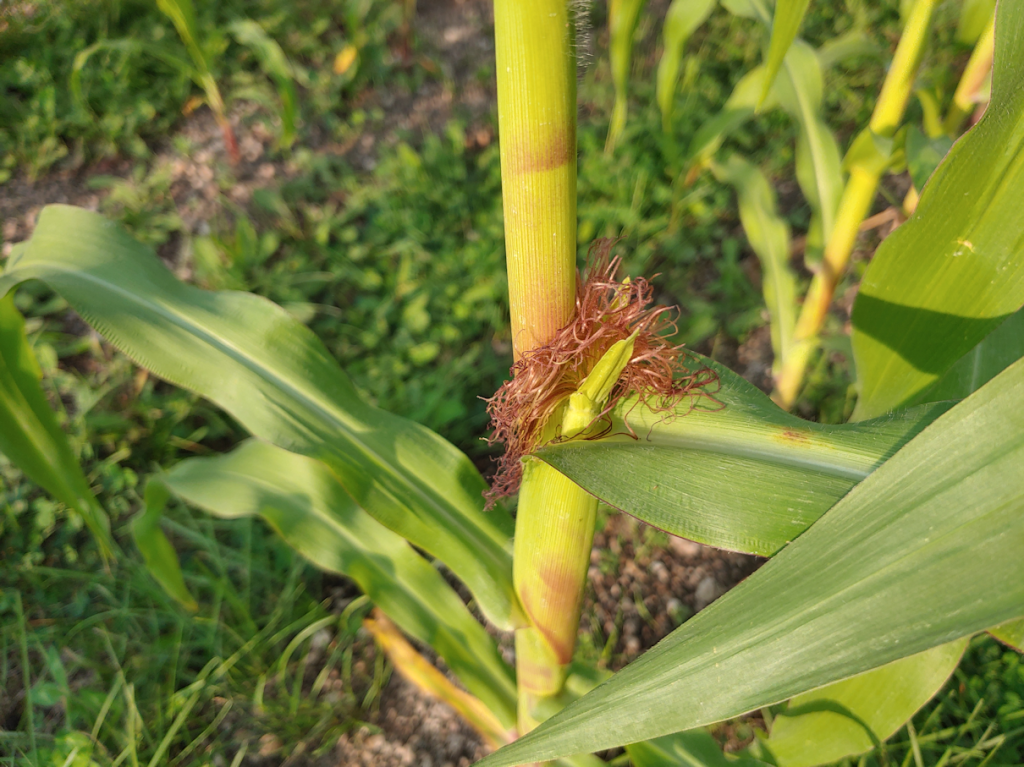
On a completely different garden topic, I was checking out the corn and sunflower blocks, and taking a closer took at some of the developing seed heads.

This Mongolian Giant is typical; one large seed head developing at the top.

Then there was this one, two stalks over.

This one has a whole bunch of little seed heads starting to develop, all down the stem! Pretty much every leaf on this plant is showing a baby seed head growing in their elbows.

I remember we had a sunflower last year do this, too! Sadly, none had a chance to mature before that first frost hit. Hopefully, these have more time to develop, and we’ll have seed heads to harvest as something other than bird feed this year!

The Re-Farmer

Our 2021 garden: winter squash help needed!

Just yesterday, I posted about how big our Little Gem winter squash seemed to be doing.

But only parts of it are doing well.

Does anyone experienced with winter squash know what’s going on here?

The newest growth is looking healthy and vigorous, but near the ground, the leaves and stems are looking yellow, and some of the leaves are dying.

Worse, some of the developing squash are dying.

This one fell off while I was taking its picture. :-(

This is the very first baby squash we found. It has not gotten any bigger, and is now starting to rot, too.

There are SO many baby squash developing under their flowers, but too many don’t get very far.

I don’t know why this is happening.

There is no sign of disease on the leaves. I’m not seeing anything like squash borers or insect damage. It is only affecting this variety – all the plants of this variety – but none of the others.

These are near the middle of the row. They are getting the same amount of water as everything else here. They have been fertilized the same, too. It isn’t even getting any critter nibbles, like the nearby Teddy squash is/was.

I need to consult the local gardening groups to see if anyone else has had this issue.

Any thoughts?

The Re-Farmer

Our 2021 garden: yesterday and today

Yesterday ended up being even hotter than was forecast.

We also didn’t get the thunderstorms that were predicted. :-(

I still ended up outside to take care of a few things. One of them was to check on our curing onions, shallots and garlic.

They are not cured yet, but they’ve dried enough that I took the time to brush off the soil from the shallots, then kept right on going, doing all the onions and hanging garlic, too.

Quite the difference!!

They will probably need at least a few more days, probably a week, to cure, but I might be able to trim and re-string them and hang them in the root cellar to finish curing. We shall see what the conditions are like. They really shouldn’t be hanging outside in the heat like this, though they are at least dry. I found out from my SIL that my mother would braid her garlic and hang them in trees, so I guess this should work out fine, too.

Though we did not get the predicted thunderstorms, we did have high winds from the south all day.

High enough to break a heavily laden tomato branch that didn’t have enough support. :-( I spent some time adding supports to the tomatoes, and found others that were bent, but not broken like this one. This one was still attached, so I tied it upright, but by this morning it was wilting. It’s likely a lost cause, but I went ahead and took it off completely, then stuck the end into the ground.

After adding support to the tomatoes, I picked the ripe ones – there are three different types of tomatoes in this photo – and picked the largest cucamelons, too. We’re still getting just enough for snacking on. :-)

Speaking of cucamelons, check this out.

This morning, their vines were reaching even higher past the top of the fence. How these are not falling over, I don’t know! The vines are clearly much stronger than they appear!

For the past while, I’ve been watching the sweet corn grow, wondering that there were so may tassels forming, but no cobs. When I went to water them yesterday evening, it was a relief to finally see silks emerging on several stalks. We might have corn to eat, after all!

This morning, I was able to pick some more beans, too.

The yellow beans seem to be getting into the height of their production, and I even found green beans large enough to harvest, but only one purple bean large enough to pick!

With how many we planted, I had hope to have more, but with our drought conditions, I’m happy that we have enough to eat fresh with our meals.

Also, do you see the drops of moisture on the colander in the photo?

That’s not from rinsing the beans.

Those are rain drops.

Yes! We have rain! It started to rain lightly just as I was finishing up with my rounds, and has been raining off and on ever since.

So exciting!

Even my older brother is getting rain at their place. They’ve had even less rain than we have. They get the same weird weather phenomenon that we do. As the systems move over us, something seems to just push them to go around, or even cause them to dissipate. Our theory was that it has something to do with being between such large lakes, but my brother’s place is well past the southernmost tip of the lake. So it can’t be that

We are just so happy for the rain we are getting right now. I can’t wait to check on the gravel pit this evening, to see if there’s any water at the bottom of the new dig!

The Re-Farmer

Caught in the act!

Oh, the adorable little beast.

I moved the garden cam again, this time onto the summer squash. I’d had to tie some of their stems back onto their supports, and wasn’t sure if they’d come loose under their own weight, or if something caused them to fall.

Our sunburst squash is looking prolific, but we’ve had very little to pick. Lots of them have been withering on the vine, but there have also been bite marks on them.

It is confirmed who is the cause of this!

I had the camera low on its pole, and at some point during the night it slid down and spun a bit to the left. Which is why it caught a raccoon going by. There was a possibility that the raccoons were doing damage, but it completely ignored the squash, other than to go around them.

I was about 99.9% sure it was the woodchuck doing the damage. Now it is 100% confirmed.

*sigh*

The Re-Farmer

What I found this morning

I tried to head out earlier to do my rounds this morning, as I wanted to make sure all the garden beds got a deep watering, and that the fall plantings got their shade covers. Last night, we never got cooler than 19C/66F, and it was already above 20C/68F by the time I got outside. We’re supposed to hit 31C/88F, with a humidex of 37C/99F by this afternoon.

They’re also saying we’re supposed to get thunderstorms this afternoon. I’ll believe THAT when I see it!

I had a few amusing surprises this morning. One of them was the filthy, filthy water bowls.

We often see where the skunks have been digging for grubs, but this was an unusually enthusiastic dig, for the dirt to be scattered into the water bowls like that!

There must be a lot of grubs right now, because I was finding little divots all over the place this morning.

Well, now.

It looks like the raccoons are not only still able to get to the bird feeder from below, but have figured out how to open the top!

Note the condition of the formerly white post.

The new hanging bird feeder was empty again. No real surprise there, as it is smaller than the old one. I didn’t find the canister on the ground this morning, but it was slid around to the “unlock” position.

It’s the support post that really caught my attention. You can’t really see it in the photo, but all up the post are little scratches in the wood. Then there’s the greasy layer of dirt stuck to it, like on the metal post supporting the big feeder. That would be from the raccoons greasy fur!

Ew.

I notice there’s a fair bit of exposed wood now, too. We’re going to have to pick up more of this paint. I don’t think we have enough left to do many touch ups.

This made me smile! The Little Gem squash is developing quite a few fruit, and this one is looking noticeably bigger, even from yesterday. When ripe, these will turn a deep, reddish orange – their other name is Red Kuri – with a round body and a little neck, and should reach 4-5 pounds.

Hopefully, enough of these will survive and ripen to make up for what looks like a complete loss on the Teddy squash. The plants are looking vigorous, and they are blooming, but it seems their developing fruit are irresistible to some short critter that isn’t triggering the motion sensor on the garden cam. From what I could see this morning, there are no female flowers, and any developing fruit there had been before are gone.

More information to file away for our garden next year!

The Re-Farmer

Our 2021 garden: first taste, and getting big!

This evening, our first real harvest of beans was prepared to accompany our supper, and did a taste test. Though we’d picked a few beans before, they were so few, they just got chopped up and added to a hash.

For these, they were first steamed until almost done, then pan fried in butter with fresh garlic (our own, of course!), then seasoned with salt an pepper.

The purple beans turn green when cooked, and I made a point of tasting them individually, to compare the flavour.

Honestly, I couldn’t tell the difference. As far as I could tell, they tasted the same! :-D Which was very good, I might add. :-)

I forgot to follow up on how the Dorinny corn tasted. We had those last night, wrapped in foil with butter, salt and pepper, then roasted in the oven, next to a ham.

I really liked the Dorinny corn. If you’re a fan of really sweet corn, it probably wouldn’t be your thing, but it had a good, solid corn flavour. It was also wonderfully toothsome. As much a pleasure to eat as to taste. I don’t think we’ll be able to save seeds from these, there are so few of them, but I will definitely want to pick up more for next year’s garden. In fact, I think I will get two packets this time.

While heading out to check on the gravel pit, I paused to look at the cucamelons and had a lovely surprise.

Hiding behind some leaves are some really big ones! Not quite big enough to harvest, but very close.

Yes, this is “big” for cucamelons. :-D

So awesome!

The Re-Farmer

Our 2021 garden: soil protection

We are quite pleased with the new garden beds at the chain link fence. They are working out very much as we intended, and the chain link is providing support for the plants, just as planned.

There is just one real problem.

Erosion.

While scavenging for wood I could use to make raised bed boxes for where the garlic was harvested, I noticed some other old wood in the barn. Today, I decided to grab a few boards and use them to help keep the soil where it belongs.

This is where the cucamelons and some gourds are planted. The ground slopes a bit here, so the bottom of the chain link fence has more of a gap under it. When we lay cardboard down first, we put flaps up against the chain link, but once the soil was added and things were being watered, the cardboard slid under the fence and the soil started to erode away.

It had been intended to place more of the chimney blocks along this section, to use them as planters like the ones we’re using as a retaining wall in the old kitchen garden. We still haven’t taken the last of those blocks out of the old basement (hauling those up the stairs and through the house is going to be difficult enough on its own, never mind no top of having to keep the cats out of that basement). We still intend to do it, though, and once they are in place, this will no longer be a problem. All that’s needed right now is to keep the soil from washing away under the fence, and taking the plants with it.

So for here, I just used a hoe to move enough soil to level things, then pushed boards under the bottom of the chain link from the outside. After that, I just tried to return some of the soil through the bottom of the fence, to hold the boards against the chain link. Otherwise, they would just lean inwards.

The boards were placed as far as the chicken wire critter barrier at the far end, making for a bit of overlap. It only needs to last until the end of the growing season, so as long as the boards keep the soil where it belongs, it’s doing its job.

More boards where then slid between the tomato plants and the chain link fence, though I did need to go back to the barn for another board. Erosion was not as much of a problem, here. There is much less of a gap between the bottom of the fence and the ground, so the cardboard flaps are still holding the soil in place. However, I wanted to add more soil under the tomatoes, and I didn’t want to be losing that.

Once the boards were in place, I was able to add quite a bit of soil, without having to worry about it sliding through the fence.

In time, this bed will get some sort of frame as well. What it will be made of will depend on what materials we end up acquiring. I’m leaning towards brick, partly because we are looking to use paving stones or something similar on the paths along both new beds.

The boards are just a stop gap measure for this season. Like most of the other wood I’m finding in the sheds and barn, it was reclaimed from somewhere, and has various levels of damage. They’re solid enough to do the job for the rest of the season, though, and I’m glad to have it!

The Re-Farmer

Corny curiosity

While doing my rounds this morning and checking for deer damage in the garden beds, I noticed something odd about our sweet corn.

The middle corn block is the one that’s growing the tallest and developing the most tassels.

But there is only one corn cob developing.

Once it sunk in what I was seeing – and not seeing – I walked around through the corn block, looking for developing cobs, and there just aren’t any. Not a sign. Usually, I can at least tell where cobs are going to start growing, but there is nothing.

How very curious.

The Re-Farmer

Our 2021 garden: harvest firsts

This evening, I went over our beans and made our first real harvest!

We’ve picked a couple of beans, here and there, before, but this is the first substantial amount we have been able to gather. The yellow beans, for all that they are the smallest plants, are maturing the fastest.

A few purple beans, at the very end of the row, look to be newly nibbled on, but of the entire row, I could only find these few that looked mature enough to pick. As for the green beans, there are lots of them, but I don’t think they’re quite ready for picking. With the yellow beans, it’s at least easy to tell when they are ready. They turn from green to yellow. The green beans just stay the same green! :-D

After picking these, I stopped to look over other parts of the garden, including the Dorinny corn. These are the ones that were planted before last frost, and are the most mature. With the weather, they have had a hard time, but some of the cobs did seem to be ready to pick.

A whole four of them, including one that had its tip nibbled on by a deer a while back!

Generally speaking, they seem to have had good pollination; just the one cob that got its silks nibbled away has fewer kernels, which makes sense.

I had moved the garden cam to face the Dorinny corn and one side of the squash tunnel, in hopes of seeing what is eating the winter squash. One of the things I’ve done, after the last time a deer got into the Dorinny corn, and the one row of transplanted sunflowers, was move some of the distractions by the tulips, over to these garden beds. Two of those distractions were long strings of twine with jingle bells on them. I took our last couple of bamboo stakes and set them up along the side of the Dorinny corn block, with the bells strung between them.

I didn’t catch anything on the garden cam going after the winter squash, but I did catch a deer on several video files. It was nibbling at the ground in front of the string of bells, but never tried to go past it.

That was encouraging, at least.

Meanwhile, I currently have the corn in the over, wrapped in foil with some butter, salt and pepper, and am looking forward to tasting one! The beans will be enjoyed tomorrow. :-)

The Re-Farmer

Our 2022 garden: first raised bed box

With the garlic all harvested, we’ve got two empty beds that need to be readied for next year’s garden.

With these beds, we had dug into the soft soil we found under the wood pile, mounding soil into beds and making paths in between. This worked out quite well, but there were a couple of issues. One was, for such low raised beds, I found them too wide. They were about 4 feet wide, which would be fine for a high raised bed, but awkward to reach the middles on a low bed. That was partly solved by putting a board across the middle, which served to both mark where the different varieties of garlic were, and to give something to step on while trying to reach into the middle.

What can I say. I’m short.

The other issue was that the soil along the edges would end up in the paths, either from watering or from when the birds were digging around the garlic, early in the season.

The solution to both issues was to build a narrower box frame.

After scavenging in one of the sheds, I found some boards that would serve the purpose.

I dragged them all over to the beds. Here you can see one of them laid at the first bed I want to frame.

In total, I had 17 boards like the one in the foreground, plus 4 more that were the same length and thickness, about about an inch wider.

I decided to keep things simple.

I left four boards as is, then cut another four in half. The boards were all 6′ 1/2″ long and 5 1/4″ wide. Some of the half pieces would be used to increase the length, while the rest would be for the ends of the bed. I cut support pieces for the corners and to join the lengths together from some wood leftover from another project. Those were cut to match the width of two boards together.

The long sides were made by screwing the boards to the support pieces. The boards all have damage to them, ranging from old water damage and some rot, to splitting and cracking from being so very dry. Which is fine. They will do the job, and will last a few years, at least.

What wasn’t fine was flipping a board and almost catching my hand on these!!! They look like the screws were broken off on the other side, so there is no way to unscrew them from the wood. I have to think about the best way to get rid of these, using what tools we have, but for now, we’ll just have to watch out for them!

Once the side pieces were screwed together, making sure they matched in length, I brought over a couple of the wider boards to give a flatter, more even, surface to work on while putting on the end pieces.

Then I quickly tacked it together with just a single screw at each corner, to hold everything together while I worked.

Oddly, one piece was almost an inch longer than the others! Which is okay; the excess can be sawed off, later.

Here we have it! The finished box, next to the bed it will be placed at.

Here, you can see the difference in the dimensions quite clearly.

The box is about 9 feet long by 3 feet wide, and about 11 inches high.

In preparing these beds before planting the garlic, we dug out the soil and buried layers of straw and compost material at the bottom. Since the dimensions are being changed so much, I plan to dig out the beds again, then once the box frame is in position, will start filling it, hugelkulture style, by burying some of the branches we’ve been pruning for the past few years at the bottom, then layering the contents of our compost pile on top of that. Straw decomposes slowly, so I expect to find it when digging the bed out. If I do, I’ll be keeping it separate from the soil, so it can be layered back on again. As for the top layer of soil, I’ll take advantage of the situation to get rid of the weeds by their roots, then mix in some of the garden soil we purchased this year, before returning it to the bed. This soil tested healthier than anywhere else we took samples from, but it was still low in nitrogen, so adding the fresh soil will be a benefit. Once we have the materials again, the top will get layers of mulch to protect the soil.

I have enough wood to make a second box frame just like this one. I plan to build the second box before I start digging out soil. With the wider boards, there is enough to make a third frame for the bed that still has the beets in it, though it will be only one board high.

When this area is done, there will be three longer, narrower, framed beds with wider paths in between. This will make them much more accessible, even at their relatively low height.

Hopefully, I will be able to continue working on this tomorrow, but we’ll see how the day goes. I’ve got our rescheduled court date for the restraining order against our vandal in the morning. Hopefully, it’ll actually happen this time – and if the security guards try to tell me to leave and come back later, I will stay close this time.

The Re-Farmer