I went and borrowed my husband’s phone to take a picture. It’s my old phone, but of course he’s set it up to how he wants it – which turns out to include fingerprint scan to unlock it. I really hate that function. I find they don’t scan fingerprints well, and the last thing I’d want is to get locked out of my own phone because the thing can’t recognize my fingerprint. It could well be because my hands are so rough, it messes up my fingerprints. Either way, it looks like I won’t be borrowing his phone when I got into the city after all. It’s changed so much, I had to get him to tell me where the camera icon was! He does love his funky themes and designs. 😁
Anyhow…
Here it is!
I had enough long poles that I could do the back without having to overlap any. The only problem came when it was time to do just the taller posts. It wasn’t too bad when I was weaving around seven of them, but when it came to just the three at the turn, it was more difficult. I had the shorter pieces for it, but three poles just isn’t really enough to hold the wattles in place, though for some of them, I could push the more flexible tips into the previous wattles to lock them down.
There was lots left over when the inside of the L shape was done, and I wanted to use them while they were still green and flexible, so I went ahead and did the outside. The first thing that needed to be done was to hoe the soil out of the path and back into the bed, while also clearing and leveling where I estimated the uprights would go. Once that was done, I measured two feet from that long pole right in the corner, marking three places; the left and right are lined up with the back walls, while the center one is in the middle.
Knowing I would be working with much thicker poles, I spaced the uprights further apart along the sides, compared to the previous ones. That left me with four extra prepared posts. After using the pencil point bar and a sledge hammer to make holes for the posts, then sledge hammering the posts in place, I could see I wouldn’t be able to use the uprights at the ends, so I added another post at each end, just inside the posts supporting the end wattles.
When it came time to weave the wattles in, I used the longest poles first, with the thickest parts at the ends, so that the more flexible tops would go around the curve. Some of the posts were long enough to actually bend all the way around the curve! When I put in the second side, I was able to wrap the ends around the wattle in the first side. I was able to do this for the first several layers before I found myself having to weave a shorter third pole around the curve. Unfortunately, a few of the poles just couldn’t go around the curve without breaking.
With the more flexible ends going around the curve, this meant the ends built up higher, faster. Which I’m okay with. For the last few pieces, they weren’t long enough to go around the curve at all.
I will need more material to build up the curve, but I also want to build that corner higher, too. So what I need to look for now is a lot of thinner and flexible, pieces. If I can find enough of them, I might be able to not only build up the corner and the curve, but wrap a nice edging along the top, all the way around.
Finding appropriate materials to do this was surprisingly difficult, but I’m really happy with how it’s turning out. By the time this is finished, though, we probably won’t be able to accumulate enough materials to do it again anytime soon, except perhaps for some very small beds.
Once the walls are done, we can add amendments and more soil to this bed to build it up, and it will be MUCH easier on the back to work in it.
While the Western parts of the prairies got walloped with snow yesterday, by the time the system reached us last night, it was rain. Some places even got thunderstorms, apparently.
When I headed out this morning, it was still raining pretty heavily, so not a lot of kitties were coming out for kibble! Quite a few of them were inside the cat house, though, so that was good to see. As I went to switch the memory card for the driveway trail cam, I had to walk on the grass to the side of the driveway because it was covered in water.
We seriously need more gravel on that driveway.
While we have not finished winterizing the sun room, we did get the broken glass cleaned up, so I’ve been allowing the kittens to go in. When I topped up their kibble last night, some of them were still in the sun room, so I rigged the doors so that they were mostly shut, but the kittens could still get in and out. Then, because racoons remain a problem, even if we don’t see them, I used my husband’s walker to brace the kibble bin in its shelf, then took the two big bags of kibble my BIL and his family so generously gave us, and tucked them into the old kitchen.
Well, I forgot to put the breaks on, on the walker! This morning, I found the walker had been pushed aside, and the kibble bin open and almost knocked onto the floor. Thankfully, the bin was only half full, so while it was on its side, hung up on some buckets (with a kitten sitting in the kibble!), the kibble wasn’t spilled onto the floor.
Before moving things around, I’d had a shallow bin, designed to fit under beds, on the top of the shelf we used to hold the kibble bins to catch water from the leaking roof. Well, that shelf isn’t there anymore. I wasn’t expecting it to rain this heavily, so there was just stuff set aside against the wall until we could finish cleaning and winterizing the sun room. I had to move those out – and my husband’s walker that had been pushed that far back – so I could set up a bucket to catch the drips.
I will be so happy when that roof finally gets done, though my brother and I are both on pins and needles, afraid our mother will suddenly decide not to pay for it after all. She tends to do that at the last minute, though, so I expect that once the roofers are actually here and the final bill is being tabulated (the total will likely be higher than the estimate, as I expect them to find rot from leaks that needs to be repaired), she’ll try to refuse to pay it. Much like she tried to do after promising to pay for the movers so we would move out here to take care of the place for her.
There was water on the sun room floor, of course, but it’s a concrete floor and not going to be a problem. Seeing how it all flowed across the room to the opposite corner, though, really shows how much the room has shifted since the concrete was poured, and how much that one corner has been undermined.
Speaking of which…
Something knocked the diverter off the downspout above the rain barrel. It had not been full before, but it sure is now, and was starting to overflow. I got the diverter back in place, so it’s not an issue anymore. Getting that barrel empty and set aside for the winter is going to have to be done soon. The girls are going to have to clean the eavestroughs (aka: rain gutters) out again, too. I did pick up rolls of mesh to cover them, but those won’t be put on until after the roof is done. I also picked up a spray sealant to be used after they’ve been cleaned. There are a couple of places where they are leaking. The roof is supposed to be replaced, but I don’t think that includes the eavestroughs.
Looking at the short range forecast, we’re supposed to get a couple of chilly days, with highs barely above freezing, then it’s supposed to warm right up again for about a week, with several sunny and dry days. That will be a great time to get more progress on things, and to finally be able to finish cleaning out and winterizing the sun room. Cleaning the other half of the sun room will require removing the swing bench, the table saw, and a couple of shelves, along with all the stuff in them, outside. Because overnight temperatures have already been going below freezing in there, all the remaining squash have already been moved to the living room. Some of them are still ripening, so they won’t be going to the root cellar, yet.
In putting the stuff back, we need to keep in mind that we’ll be using the sun room as a greenhouse again in the spring. I want to come up with a way to be able to hang those lights we used last spring, more efficiently. If we do it right, the same set up can then later be used in the fall to hang things like strings of onions and garlic to cure.
Wow. I just realized that, if we’re going to be doing things like starting onions from seed again (which we likely will be), we’ll be needing to get those going in just a couple of months. Onions should really be started indoors in January in our area.
The girls and I will go over how the garden went this year and, taking into account the failures due to flooding and other issues out of our control, what worked, what didn’t, what we want to keep doing, what we will stop doing (if only temporarily), and what we don’t want to ever do again! 😄
We have lots of work to get done before the snow flies, and then lots of planning for next year to get working on.
After finishing up my morning rounds, I did as much as I could with the wattle fence, using what materials we had been able to gather. There wasn’t much I could do with the longer sections. With the shorter part of the L shape, I was able to use a few single lengths, but even there I had to start combining them in pairs.
The girls had gathered some really nice, even pieces of maple suckers, though, and they were the perfect length for the wider end bit.
The red barked lengths are the maple the girls had gathered. When I used those up, I went to the pile of small willow branches I’d set aside and brought over the pieces that were close in size to the maple. Those are the greenish coloured branches. Last of all, I topped it with two thicker pieces of maple that I’d pruned from the nearby maples that are now clear of the branch piles. Those are are lot tighter, and will lock everything in place. I didn’t trim the top one to size yet, as I might need to move it out while the other section of wall is worked on. However, as it is now, that is as high as I intend to go for most of the bed.
It would be great if the whole thing could have been done like this! It looks so much prettier, with smaller gaps and more consistent sizes. The only down side is that such small pieces will also break down faster than the larger ones. It will likely still take a few years, but it’s something to be aware of.
I used more of the maple suckers I had gathered at this end, along with more willow that was left, and locked it down at the top with two thicker pieces of maple.
This corner looks a mess right now! It will be built up, end to end, until they are the same height as the walls at the ends. After that, it will be build up higher to match the heights of the debarked posts. By time I’m working on just the three tallest posts, I’ll be working with much shorter pieces, and should be able to tidy up the whole thing a lot more. Right now, it’s looking quite the mess!
That piece of 2×4 is my mallet.
At this point, I am out of useable materials. I think I will go hunting around the spruce grove for more material, before I start wandering father afield. The Red Osier Dogwood that we have would make excellent, flexible pieces, but that’s something I’m trying to encourage as undergrowth. I might still be able to harvest some, though. There might even be some young poplar I can harvest. Mostly, I just want to find enough material to finish this back wall. The remaining sections can wait until spring, if we have to. Once the back wall is done, the soil that has eroded into the paths can be hoed back into the bed and tidied up. I will likely use grass clippings that we still have all along the bottom of the wattle wall to keep the soil from falling into the gaps. Slowly, this bed will be built up to the height of the lowest sections of wattle, which will make growing in it MUCH easier on the back!
That’s about all I’ll be able to get done today, though. We’ve had another change in plans, with company coming tomorrow. We’re hoping to be able to have a bonfire with the remains of the big branch pile that got chipped, but it will depend on the weather. The forecasts keep changing. Just in case, we need to be prepared to move indoors, so we’re going to have to start moving things like our canning supplies back into storage, and all that other stuff that just sort of takes over every flat surface! We’ll need to be able to expand the dining table, too, which will take up twice the space.
We are terrible house keepers. 😂
But I’m really looking forward to seeing my BIL and his family, and really appreciate that they are willing to make the long drive out here, knowing that my husband can no longer go to their place. It’s going to be awesome!
I was really concerned about the bitty babies last night! We dipped at least as low as -7C/19F during the night. I knew if the bitties were inside the cat house, they would be okay – especially if they had a mama to curl up with – but if any of them got caught outside, and the board ramp was knocked over, they couldn’t get back in on their own.
The board ramp was knocked over this morning. The brick it was braced against was frozen to the ground. I suspect we are still getting skunk visits during the night. We don’t see them around anymore, though I’ve seen the odd one on the security camera live feed at night. They go into the cat house entry to eat any kibble that’s left there.
Thankfully, I spotted all four of the bitties through one of the windows. The board ramp is back, but I didn’t want to hang around too much, or they’d be tempted to go outside.
There was no mama. I didn’t even see an adult cat come out of the cat house when I went outside. The bitties have the cat house to themselves; all the other kittens seem to be leaving it to them, other than when they pop into the entry to nibble on some kibble.
All the shallow water bowls were frozen, and the big bowl had a layer of ice on top, but I had some nice, warm water for them. The board ramp I set up for the water bowl shelter is being well used, with lots of little footprints in the frost.
I tried to do a head count, and I think I counted 21, plus the four bitties. Rolando Moon came around later. If any of the mamas came around, it wasn’t while I was there to see them.
With all those growing kittens and cattens, and the temperatures dropping, they are going through the kibble faster. We’re going to have to pick up more before the end of the month. The cat lady is going to try and get some donated cat food for us, too, though we don’t know when she’ll be able to do that.
Before starting on this post, I sent an email to her through her cat rescue’s email address. We usually text, but that’s always a pain out here. Especially if I want to send photos. My phone is supposed to link up to the wifi for calls or texts, if there is no data signal available, but it’s never been good at actually accomplishing that. So I sent the email, with a few pictures, explaining the situation. Hopefully, she knows of a foster family that can take in kittens that aren’t weaned yet. While the kittens don’t look like they are starving or dehydrated, that may just be a “yet”. At least the clones have figured out kibble is food, but I don’t know about the other two.
Hopefully, I will hear back from her soon.
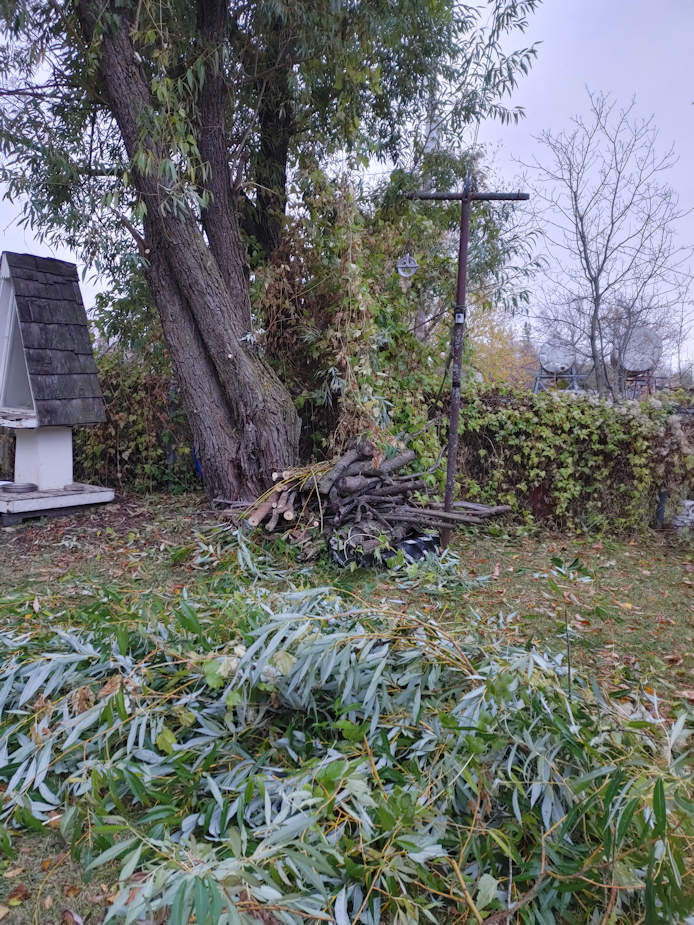
In other things, I got some progress on those willow branches I’d pruned. I dragged them all over to where we’re building up a burn pile where the big branch pile that got chipped used to me, and sorted through them there. Only a few of the branches went straight to the burn pile. With most of them, even if the branches were kind of wonky, most had enough straight sections that I could still use them in sections. It’s still nowhere near enough to finish the wattle weaving, but there will be at least a bit more progress.
Though both today and tomorrow are supposed to have highs just above freezing, with tomorrow slightly warmer than today, we are no longer getting rain and snow. We will be nice and sunny, which makes it a good time to get some things covered. I’m glad I picked up the 3 pack of medium duty tarps at Costco a while back. One of the things that needs to be covered is my late brother’s post pounder that he built. It needs to be refurbished, and that’s not a job we can do right now, but we can at least keep it from getting worse. The trap I’d wrapped around it before was torn to shreds by the wind, and I finally cut the remains away completely, not long ago. The plastic that was covering the motor was also starting to tear, so I made a priority of at least covering that, first. The tarps I have are only 8’x10′, but that should be enough to cover most of it, if I do it right. I’ve learned from how and where the old tarp started shredding, where I need to put some sort of padding, first. Between that and being more strategic on how the tarp is tied down, I hope to be able to reduce the damage from high winds.
The other thing I need cover is the wood pile – formerly junk pile – near the house. The groundhogs absolutely destroyed the old tarp that was over it before, for nesting material – then disappeared. The top boards may be pretty rotten, but the further down we go in the pile, the better shape the wood, and I’d like to keep them from getting worse. This year, however, we had not been able to mow, weed walk or weed a lot of areas as we normally would have, and one side of the pile is among those. It’s completely full of mostly thistles right now. I’ll have to cut away enough of that to be able to reach the pile from all sides, so it can be re-covered with a new tarp. The old tarp was held down by whatever heavy things where handy. This time, I want to actually peg it to the ground.
There is still much to get done before the snow flies – and stays!
Since I wanted to keep an eye on the kitties anyway, I decided to see what I could do with the willow branches. After sorting the longest ones out, I started weaving.
This is all of the branches I have so far.
Minus one that was too bent to use. At least here. When we’re ready to weave the ends, we only need pieces less than 3 feet long, so I could probably salvage it.
As we get more branches to weave in, they’ll get pounded as low as we can, with each layer added keeping everything below in place. Right now, some of them just sort of pop back up a bit after they’ve been pushed down. Until it’s all tighter together, it won’t be holding much soil in place! One more layer along the short wall, and I think we can get away with no longer debarking the branches.
I really hope those maple posts that still have their bark won’t start growing.
I’m just itching to get back out there and cut more willow branches for this, but the weather out there really sucks.
I want to keep an eye on the bitty kitties, though, so maybe…
(glances out the window and tries to convince myself the wind isn’t that bad, and it’s not that cold out…)
Things turned out to be rather pleasant yesterday afternoon, so I took advantage of it to get some stuff off my to-do list.
First, the trellises.
The netting and bamboo stakes are all put away. I even unwound the blue twine from the pea trellis. We won’t be planting vegetables here again. We’ll be planting food trees and bushes in the area, instead (except for the area over the phone line, wide enough to drive a vehicle through, that we’ll be keeping clear). So, the trellises are coming down!
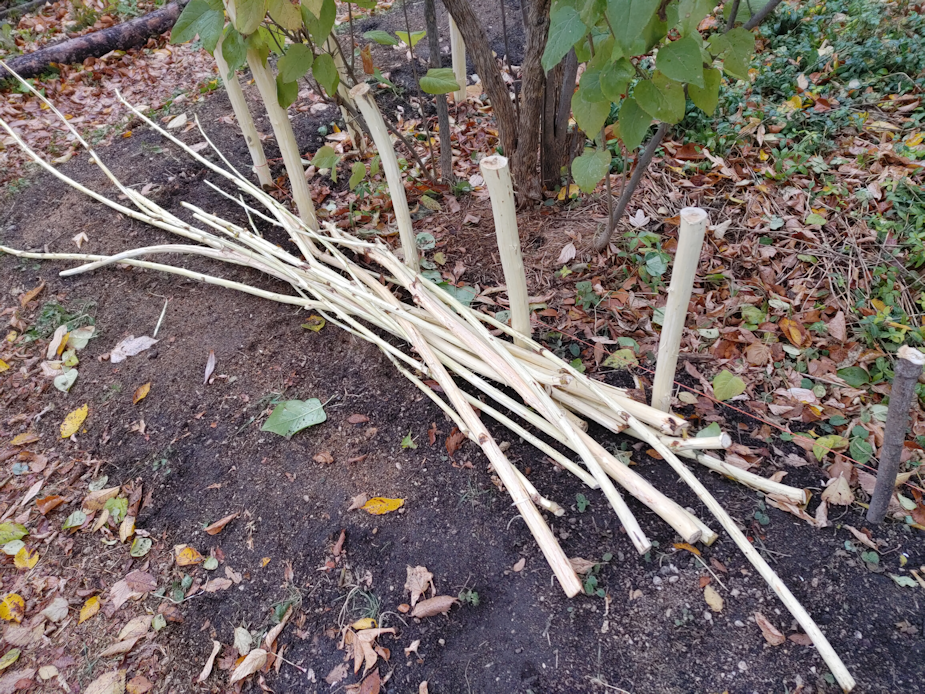
The five uprights from the pea trellis all broke at ground level. I was able to pull the others straight out of the ground, with only a little big of wiggling. You can tell by the dirty on the ends, which pile has those!
Since I had the materials, I used some of the pieces to make a buck and pole “fence” over the sea buckthorn. Only two have survived, so I only wanted it long enough to go over those. Hopefully, that will dissuade deer from nibbling on them. The gap in the hedge is right near here. One end is far enough out that it should make a deer not want to jump the fence there at all. On the trail cams, I’ve been seeing quite a few deer walking around this corner of the property, so it seems they are already not jumping the fence here much. There is another spot they prefer to jump the fence at.
Later on, I decided it was worth working on the willow. I’m after branches to weave into the wattle wall I’m building in the old kitchen garden, so this is getting two things done at once.
The trunks were barely visible from all the branches that had grown along them. Thankfully, we have an extended pole pruner that I can use for the higher branches, instead of trying to get at them with loppers from a ladder. You can see the vine has climbed it quite a bit, too!
The power line to the house is still not clear of branches. This job will be continued later, and includes the trees on the other side of the chain link fence.
The longest and straightest branches were kept, stripped of side branches and leaves, and a daughter started debarking the biggest ones for me while I pruned more, until it started raining. Then I grabbed a knife and helped debark. Wattle fencing isn’t normally debarked, but I want to debark the branches that are going to have contact with soil – because the last thing I want is for willow to start growing right next to the house! I love willow, but that is not a tree you want close to infrastructure!
There were some really straight, thin branches I kept, too, putting them on the pile of maple and cherry wood that’s already there. Who knows. We might find some use for them.
This is all the branches we got out of there, so far. Not even close to how many will be needed to weave a wall. Only the bottom few inches needs to be tightly woven, as it will be holding soil in, but eventually that will be on all sides, not just the “back” that is the focus to get finished first. The high parts of the back wall are to keep things out, rather than in. It’s going to be a challenge to find enough suitable branches for this!
Today is supposed to be a semi-warm day – with both rain and snow expected – then we’ll have several days with highs just barely above freezing, before it warms up again and stays warm for about a week. Hopefully. At least the rain will keep those willow branches from drying out. I’m hoping to at least get these ones woven in, some time today!
Today’s high was supposed to be 19C/66F. I don’t know if we reached it, but with the blustery winds, it never felt that warm. I’ve been keeping a close eye on the weather, and my app on my desktop includes historical data for each day, including 30 year record highs and lows for various data. I noticed that today had a record high for snow of 14cm/5.5in in 2019. In fact, we set record highs for snow on the 10th, 11th and 12th, all in 2019. We were just coming to the end of our second year here, so I went looking at my blog posts for those dates.
Ah, yes. I remember that blizzard!
The amazing thing is that, just days later, all that snow was gone, and while we were still cleaning up storm damage, everything was back to green and sunny!
Depending on which app I look at, however, we might be getting a mix of snow and rain starting tomorrow night, and by Friday afternoon, we’re expected to get between 3-6cm (roughly 1-2 inches) of snow.
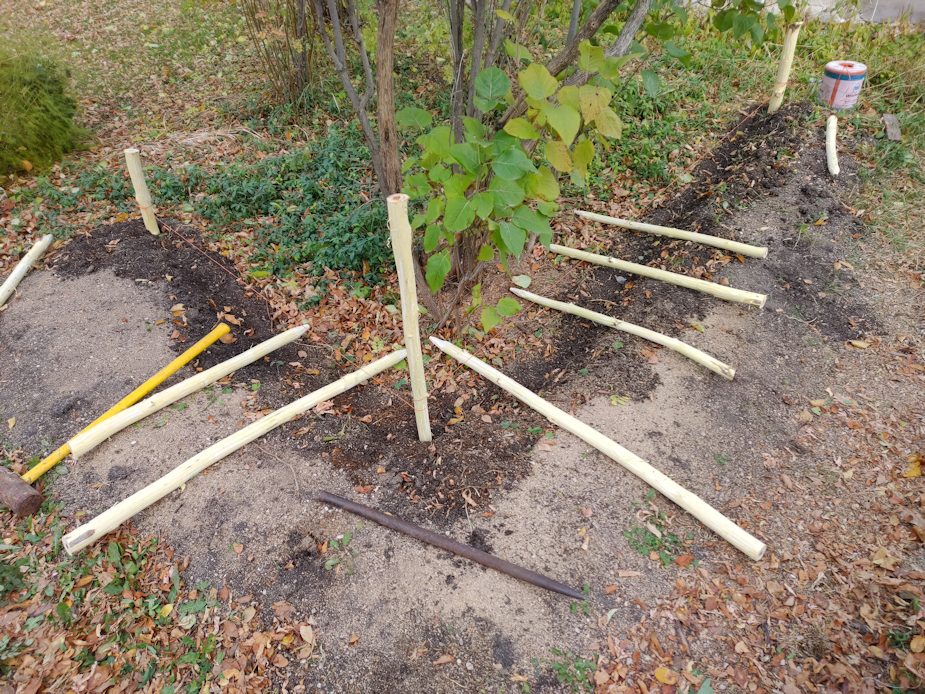
That meant my focus was preparing to build up walls around the L shaped bed in the old kitchen garden.
I went through the maple pieces I’d cut yesterday and started cutting them to size, cutting points on them, and debarking some of them.
I had lots of furry help. So much help, one of the kitties got plumb tuckered out!
From the longest, straightest pieces of maple, I cut three into 4 foot lengths. Then I went through some of the strongest pieces to cut four 3 foot lengths, then four 2 1/2 foot lengths. After that, I just cut as many 2 1/2 foot lengths from the thinner straight pieces as I could get out of them.
I used a hatchet to cut the points on all of them. That was probably the most unpleasant part of the job. Not so much for the thinner pieces, but for all the thicker ones. I’m ambidextrous for most things, left handed when it comes to fine motor control, but for some things, I am completely right handed.
Using a hatchet is one of those things, and my right hand has been in terrible shape lately. I had difficulty gripping the hatchet, and had to stop frequently to give my hand a break.
The draw knife was awesome for debarking the wood. It’s still quite green and came off easily. I don’t have a way to secure the pieces I’m working on well, so there were quite a few times when I was pushing instead of drawing the blade – and it works just as well that was, too. For some of the thinner pieces, though, it was easier to just use a knife to debark them.
Also, no, that is not rust on the blade of the draw knife. It’s stained with tree sap.
The stack of the thinnest pieces did not get debarked. It would have taken forever and, at their sizes, it would have been awkward. The pieces that will be taking the most stress, however, have been debarked.
That all took a few hours.
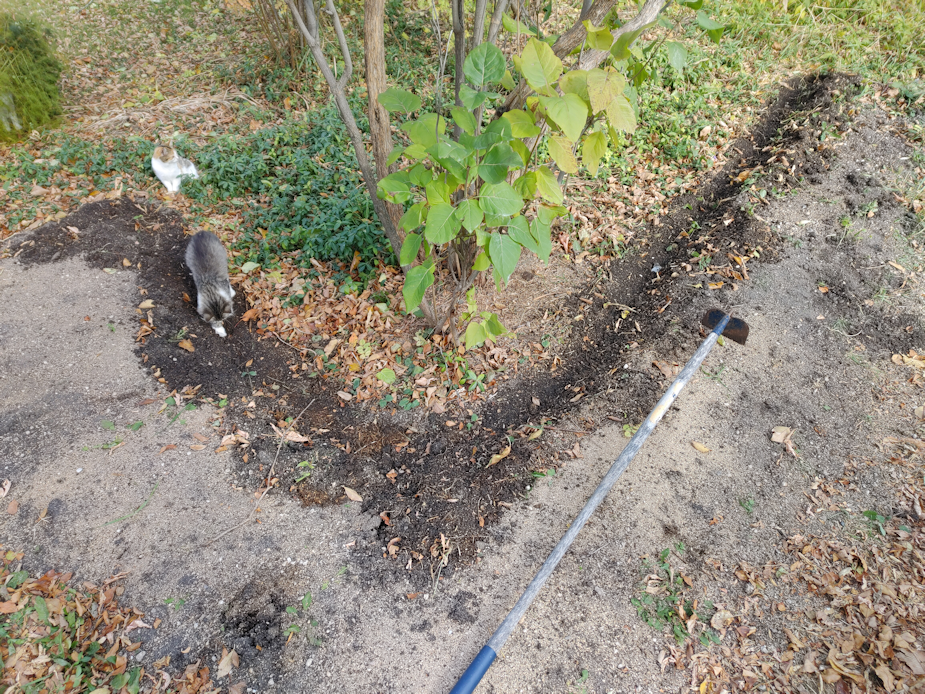
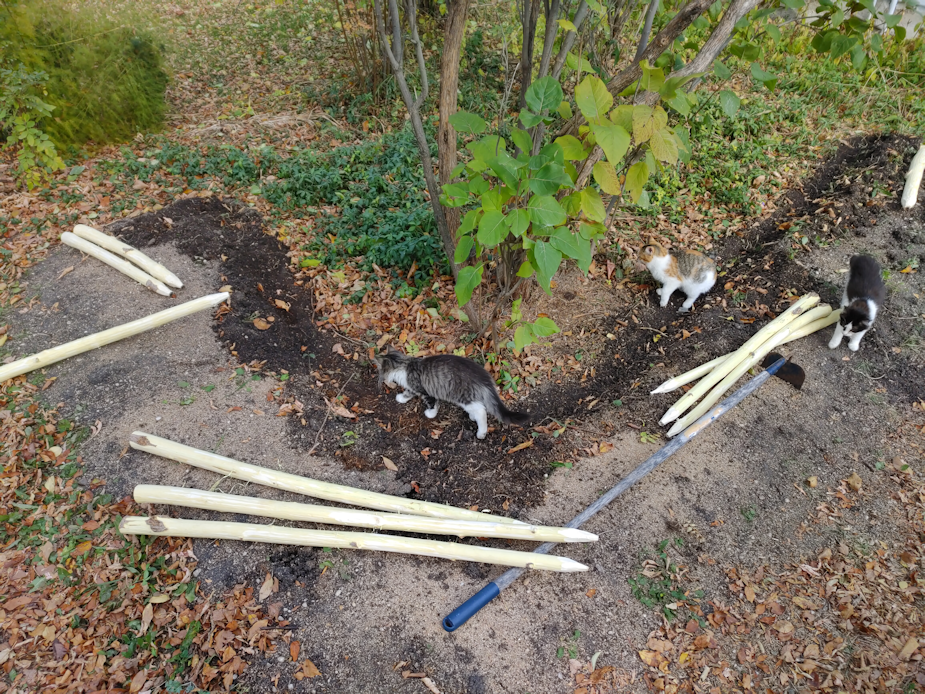
Then it was time to get to the garden bed. I pulled the lettuce I’d left to go to seed (it looks like we’ll get seed from just one of them) and got ready to prep the bed. Without walls, soil was falling into the path and the inside of the L shape, and I don’t like wasting good soil!
I used a hoe to draw some of that soil back into the bed, and level off the edge, where the uprights will be going.
The three longest pieces will form a triangle at the inside of the bend. When we start weaving branches through the posts, these will be taking the most stress. Working out from there, one 3 ft piece will go along the short end, and three down the long end. If I have enough materials to do it, I plan to build up the wall higher at these posts, as much to wall around the lilac as to create a wall for the bed.
The four 2 1/2 ft pieces are for the corners at the ends of the bed.
To install the posts, I used the pencil point bar and hammered it into the ground.
Unfortunately, that old hammer doesn’t have the right handle on it, and the head fell off again. I had to switch to a sledge hammer.
I really didn’t want to switch to the sledge hammer.
Ah, well. It worked better. I’m just going to be in a world of hurt, tonight!
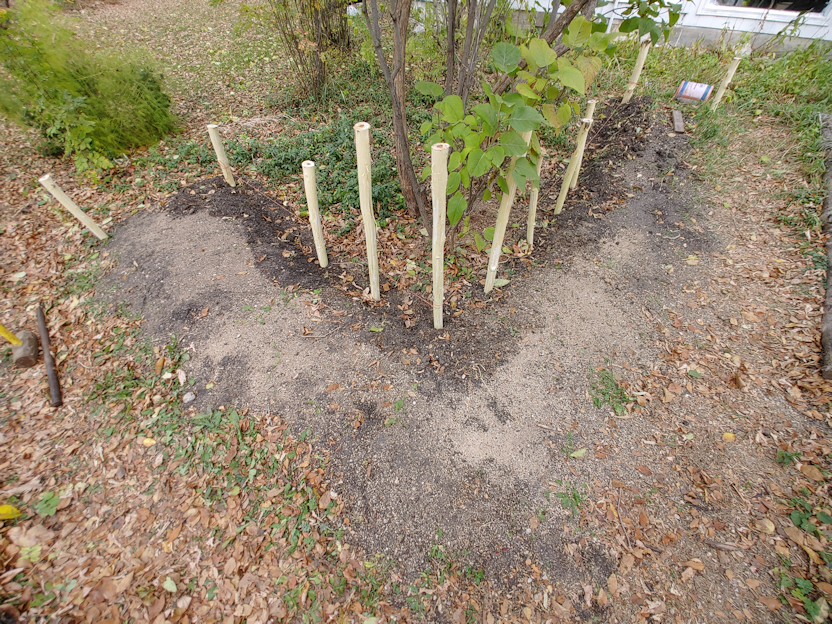
I started by placing three posts in, then tied twine between them as guides for the rest of the posts. Then I laid out the spacing for the remaining two 4 ft posts, and the four 3 ft posts.
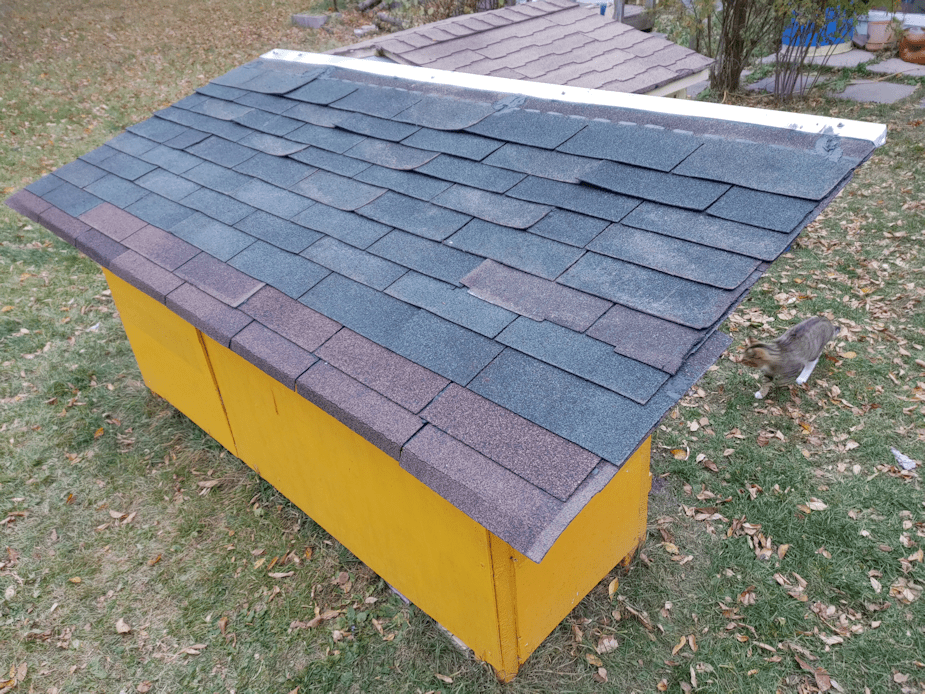
At this point my daughter, who had been working on putting salvaged shingles on the kibble house, ran out of roofing tar. I’d only picked up a small can for patch jobs, never expecting to need more.
So I left my daughter to continue pounding in the posts while I went into town to pick up more tar, and a few other things while I was there. When I came back, I found my daughter lying on a tarp on the ground surrounded by kittens. She is having much more success at socializing than I am!
She had even pounded the other two corner posts at the ends of the L shape.
The weather was starting to get worse, so I quickly filled in the gaps with the smaller 2 1/2 ft posts.
The long end of the L shape will be only 2 feet wide, so the end posts needed just one more added in between them, plus three more along the north side. The short end of the L shape needed only 2 more to fill the gap. Since this end can be accessed from three sides, we’re okay with it being wider than 2 feet, so the end posts there got two more in between. The rest of the posts will be for the outside of the L shape.
From the looks of it, I’m going to need to find more pieces to be able to finish the outside of the bed, but I’m not concerned about that right now. It’s the inside of the L shape that I need to get done first.
By this time, however, dark clouds were rolling in and it was starting to look like rain, so I left the job at this point and focused on cleaning up and putting away anything that might blow away. My daughter, meanwhile, finished the roof of the kibble house.
The green shingles are almost 50 years old and are in pretty rough shape. The brown ones are better, but they’re almost 30 years old.
The water bowl house roof is thinner plywood, so we’ll be using pieces of metal roofing that we’ve been scavenging for various things since we’ve moved here. If we used shingles, the nails we have would go right through by nearly half an inch, and that would be a problem! I dragged a piece of metal roofing out from the barn that we can cut in half and lay side by side to cover the roof of the water bowl house, but I also spotted a stack of corner pieces. I brought one over, and helped my daughter put it on the edge of the shingles on the kibble house. I found a bin of metal roofing screws in the warehouse, so I grabbed a bunch for when the water bowl house is done, and my daughter used a few of those to install the metal cap on the edge of the roof, using the screw holes that were already in the metal – after making sure to put some tar under each hole, first.
Almost everything about the kibble and water bowl houses has been done using scavenged bits and pieces we’ve found around the property, and a lot of it is pretty old and starting to rot. We don’t expect these to last long, but using paint and even decades old shingles will help them last longer. At some point, it’ll be nice to be able to build versions using new materials, all well measured and cut and leveled, etc. But this will do for now.
Once this was done, I set up a longer extension cord I found that was in good shape, and was able to plug in the cat’s house. We lifted the roof and put in the high density rubber mats I’d dragged out of the barn, which will help insulate the floor. There’s a thick scrap yarn crocheted blanket that is laid out on top of the mats, too. We will not be using straw this year. As much care as we have taken with the terrarium heater bulb, I would much rather not have straw in there! The heat bulb is working fine, with the heat shield still in place, and the timer is set to light sensor, so it will turn on when it gets dark, then off again when it gets light. The smoke detector was tested, too, and it’s working fine.
Once the water bowl house is done and set up where it will go, we’ll be able to plug in the heated water bowl through the cat’s house entry, too.
Tonight, the cats will have a warm and cozy place to stay if they start feeling too chilly. I especially hope the tiniest kittens will start using it!
As for me, I’ve pain killered up and hope I’ll be able to continue in the old kitchen garden tomorrow. For the weaving, I plan to cut the willow branches and use them right away, while they are still very green and flexible.
I really hope this works out. Otherwise, that’s a lot of work for nothing! Well. Not for nothing. Now that those posts are in, even if wattle weaving doesn’t work, I could still use them to hold whatever we find to use instead. It’s all fly-by-the-seat-of-our-pants work, anyhow!
Yes, here we are, Oct. 9, and there’s still things to harvest!
Well… half a harvest.
I’d been leaving the sunchokes along, and this is how they look after being hit by frost, then rain, then more frost. This being Thanksgiving weekend here in Canada, I decided to go ahead and harvest some of them to include in our meal. There were ten of them planted, and I decided to only harvest the nearer five.
I was a bit surprised by how they looked. A lot whiter than I expected, but that may be because they never got to reach their full size during this crazy growing year we had. This bed is right next to where some of the longest lasting flooded areas in the yard this spring. The bed was slightly raised, which was probably the only thing that saved them.
There wasn’t a lot to harvest, and I also made sure to rebury at least one of the largest tubers under each plant, for next year.
As for the plants, I did a chop and drop. I’ll add more mulch to this bed before things freeze over, too.
To prepare them, since they were so fresh, I basically just scrubbed them. I’ve never tasted sunchokes before. These are supposed to be edible raw, so I made sure to try a piece. I don’t know how to describe the taste, other than “mild”. There’s nothing else I can compare it to in flavour.
I added them to the other vegetables that I tossed with olive oil and seasonings. I liked them better roasted. They take on other flavours very well. Roasted, they have a very smooth texture. All four of us liked them, which seems to be a rare thing!
If all goes well, we will have a larger harvest of them next year. 😊
The sun room is starting to get too cold and night to leave our harvests in it anymore. This morning, I went through them and binned them up.
All of the carrots, both types, filled one bin enough that the lid can’t quite close. Those will need to be taken care of quickly. The Black Nebula carrots are already getting wimpy!
All the gourds will go someplace warm and dry to finish curing.
The Tropeana Lunga onions are growing rather than curing, so they will go to the kitchen for fresh eating and dehydrating.
The hulless seed pumpkins that have ripened the most will be moved inside to ripen some more, while the remaining ones were shifted around on their shelf to get more sunlight. We should be able to get away with leaving those there for a while longer.
The tomatoes that are ripening were laid out in a single layer on the bottom of a bin to go inside for further ripening. The green ones that have shown no signs of turning colour by now are not going to, so they all went into one small bin. I picked through them in the process of sorting through, and the more wizened ones went into compost. The rest will go to the kitchen as we decide what to do with them. The problem is, I’m not the tomato person in this household, so I’m not exactly inspired over them!
Now that these are clear of the sun room, we’ll be able to continue cleaning out and partially reorganizing the sun room for the winter.
It was a chilly night last night, with temperatures dipping below freezing. As I write this, we’re at 3C/37F – just under our predicted high of the day.
It was actually very pleasant out there!
With a few frosts already past, I decided it was time to harvest the carrots.
This is all of them.
Plus the Purple Prince turnips – the only turnip variety of the three we planted this spring, that survived. Barely. Their greens were constantly munched on by insects. I’m not sure why I even bothered to harvest them. They’re so small, a lot of them got left behind in the bed, then still more went into compost when I trimmed their greens. Not much of a harvest there.
I’m surprised by the Uzbek Golden carrots, which were from a free seed packet. A lot of them were much larger than I expected.
The Black Nebula carrots where more difficult to harvest. Even with several years of amendments, the soil still gets pretty compacted, and these guys get long. It took quite a bit to dig them out!
Well, that didn’t take long… 😅
We are expected to dip to -4C/25F tonight, so these needed to be set up indoors to cure – and the only place we had available in the sun room was covered with tomatoes, still.
Thankfully, they are all laid out on screens.
I was able to stack the screens with the tomatoes and gourds, then lay out the trimmed carrots. After a day or two, we’ll brush the dirt off and go over them. Several of the biggest Uzbek Golden carrots have split, but the Black Nebula look like they were a slug favorite. Quite a few had damage at their tops. The size variety among them is pretty surprising. Quite a few of them are really big around! From the photos, I expected long and narrow.
Once we’ve assessed their condition, we’ll decide how best to store or preserve them. I suspect blanching and freezing will be the best option for most of the Black Nebula carrots, while the Uzbeck golden will be kept in the kitchen for fresh eating first.
I haven’t actually tasted any of these yet! We did harvest a few Uzbeck golden for meals over the summer, but almost no Black Nebula, because even the little ones were hard to pull. I hope they taste as good!