Today, the girls and I headed into the city for our monthly shop.
We took advantage of the trip to accomplish a few things, and ended up going to 5 different places covering half the city. It made for a long day, but we accomplished what we needed, and then some.
I have a whole bunch of things to share with you today, but the first thing I want to share is some good news. Our van didn’t need to get any work done on it today!
A couple of nights ago, it got cold enough overnight for the furnace to turn on, only to hit highs in the 20’s, half a day later!
Yesterday was supposed to be my day to finally get the mower out – which required taking the snow blowers out first, taking out the riding mower, then moving the snow blowers to the back of the shed until winter. I also made room by taking out the two broken push mowers my brother had tested. I stuck them in another shed at the old hay yard. There used to be a tractor in there, but that is one of the things that disappeared before we moved in.
Once the mower was cleared, I topped up the oil, filled the gas tank, checked it over and…
Here is a really easy recipe for a healthy snack to satisfy those cravings for something crunchy!
Roasted, Seasoned Chickpeas
Ingredients:
canned chick peas
olive oil
seasonings to taste
I have found that a 9×13 baking tray fits 2 cans of chickpeas in a single layer very well.
Instructions:
Turn oven to 400F.
Drain the chickpeas into a colander and rinse well. Spread the wet chickpeas onto a baking tray and let the water dry off for a while.
Put the dried chickpeas into a bowl large enough to toss them. Add olive oil and seasonings. (In our last batch, we used Scarborough Fair Garlic Salt and freshly ground pepper. You can use ordinary course salt and pepper, if you wish. It would be great with Rosemary Lemon Salt as well, or if you want to stay away from salt, use your favourite Mrs. Dash mix. )
Toss the chick peas until well coated with olive oil and seasonings.
Return the chick peas to the baking tray and spread into a single layer. Place on centre rack in pre-heated oven.
Roast for about 20 minutes. Take the pan out and give it a shake to turn the chick peas. Return to oven and continue roasting to desired crunchiness, giving the pan another shake every now and then. (We like them extra crisp. With our oven, that takes more than an hour of roasting time. Our oven also has some cold spots, so when we give the chick peas a shake, we also turn the pan, to ensure even roasting. )
When done, remove the pan and allow the chick peas to cool.
Once cool, store in an air tight container.
These make a really excellent and healthy snack, and are downright addictive!
Posting is going to be a bit light over the next few days. Hopefully, I will be able to upgrade my WordPress account by this weekend, giving me more storage for photos. I am hoping to continue doing the before and after posts that I did while cleaning and clearing the yard last year. I will also be restarting the Critter of the Day posts – we’ve been seeing all sorts of new birds I’m excited to share with you!
It’s been a surprisingly chilly spring. It’s warm enough during the day, but even last night, we got another frost warning, and we’ve had our furnace turning on during the night!
Which leaves me feeling very behind on my work outside. I just hope this means we’ll have a longer fall to make up for it.
Meanwhile, here are some of the things I see as I do my usual routine.
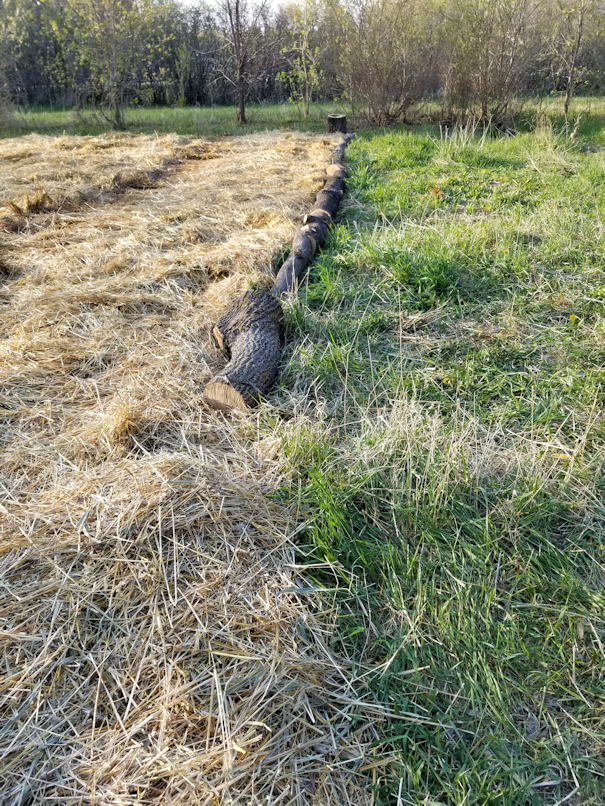
A bit more progress on the garden today; my daughters used some pieces of the trees that were taken down to edge the area we mulched yesterday.
The North end was left alone, since we won’t be going into there much at all, and the South edges were left open a path between the raspberries and the future garden.
The beauty of using these logs is that they are big enough to made an adequate “wall”, but will be easy to move away again, when that time comes.
One of my daughters tried to use a hoe to level some areas, so the logs wouldn’t be more level. The ground is so hard, it just bounced off the dirt!
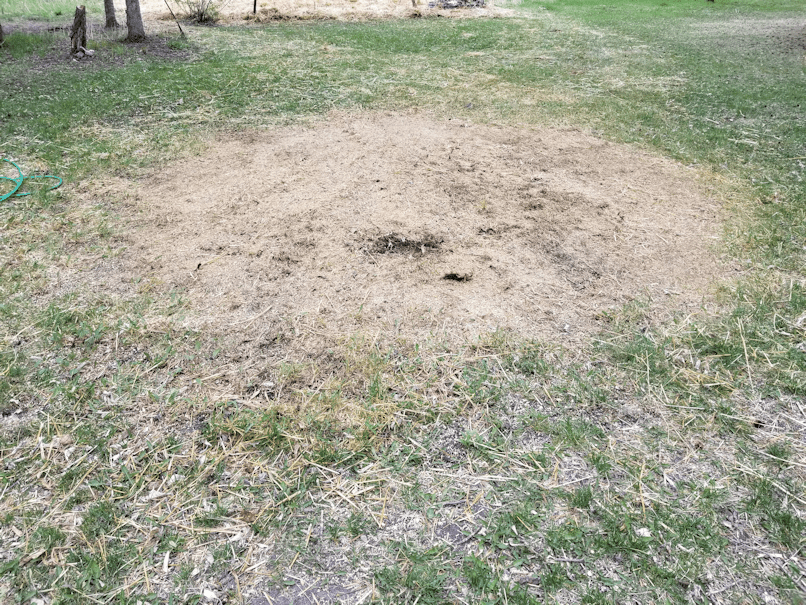
We’ve broken down and removed the straw bale we got for mulch last year.
It’s amazing just how much material is packed into a round bale.
The girls continued taking wheel barrows of straw to the garden until the core was small enough to tip over and roll away.
There was still plenty left behind, of course.
Despite rolling against the grain, it still left a trail, all the way to the garden. :-D
Note in the above photo, how wide the mulched area in the garden is. We’ve already widened it on one side a bit, since we last worked on it.
Once in place, the core could simply be unrolled, leaving behind a thick enough layer that it only needed to be tamped down in places.
You can really see the difference between what was the bottom of the bale and the top; the part that was touching the ground is still tightly wrapped, and already starting to decompose, while the top is much looser, as it had room to spread while we took layers off to cover the septic tank and mulch the old kitchen garden.
This is where the bale sat all winter. When it was first moved, and my daughter was raking up what was left behind to haul away, she noticed lots of worms. When I was transplanting the raspberries, I noticed plenty of worms, too. This is a good sign!
This area behind the house is very spotty as far as how the grass is going, with the area closest to the house having almost no grass at all. So we’re not too worried about the grass that was under the bale; we’ll need to find some shade hardy grass seed for the area, anyhow.
And here we have the mulched garden area for next year. In the foreground, to the left, is a big gooseberry bush that I hope will actually produce some berries this year. Next to it is a chokecherry, then where the raspberries were transplanted, a crab apple tree, and the compost. Which, I discovered as I tried to turn it, was used for garbage at some point, as I found pieces of food tray foam and the remains of a plastic tray that held transplants. Plus, lots of branches, still. This is where a pile of pruned branches and cut back trees were piled, then moved to the middle of the garden, before we moved here. The plan had been to burn them – yes, even when it was right on the compost pile, under that apple tree! – but we broke it down and moved it manually, last spring. We’ll have fire pit fuel for a long time, just from that one pile!
The next steps for the mulched garden area is to “frame” it with some of those logs we have from getting the trees cleared. The idea is to keep the straw from being dragged around with our feet as we work in it. Other material will be added to it, to build up the layers and improve that rock-hard soil. Covering it all with landscape cloth to prevent the grass and weeds from growing through the mulch would be good, if we can get enough to cover the whole area.
We’re getting a pretty decent sized garden out of this! Obviously, nothing close to what it was before, but we can amend and re-claim sections of it, little by little, over the years, while planning out where we want to put more permanent plantings.