Yesterday, after moving Butterscotch’s babies out of her most recent hiding place and putting them with Beep Beep’s babies, I check on them several times throughout the day.
I also got some adorable videos.
The babies were clearly quite content with the set up. Beep Beep was also quite good with all the babies.
Butterscotch, on the other hand, was not happy.
She and Beep Beep don’t get along at times, but I hoped her own kittens would be enough for her to make the effort. There’s lots of room in that cat cave.
At my last visit with them, however, I changed my mind. I was able to pick Butterscotch up briefly, but she was very nervous and jumped down. Not before I could feel that her teats were engorged. The kittens were fine, which means Beep Beep must have been nursing them, too, because Butterscotch sure hadn’t been.
The last thing I want is for her to end up with mastitis, or lose her milk. So I put her babies back into the box nest, so she could nurse them in peace.
Ah, well. The kittens are getting more active as they get bigger, and will be able to cuddle and play together soon enough.
We had a nice day, and my wonderful daughter was able to get up onto the roof to take care of the damaged shingles we’d noticed a few days back.
This is what one section looked like before.
While up there, she noticed quite a few were loose, and took care of them, too. It definitely looked like they were damaged when that patch above them was done.
Here is how it looks now.
She also sealed the exposed roofing nails that were part of the higher patch.
Then she moved on to the other section of roof to fix this shingle…
This is how it looks now.
When this was done, she went to the other side, were we can’t see the shingles from the ground, to check for any others that needed fixing. She also checked the area above their window, where water has been leaking in the winter. She did some more patching, but also noticed the area above the window did not feel as solid as it should.
The trees are starting to put out their leaves, which means the pollinators will be out soon.
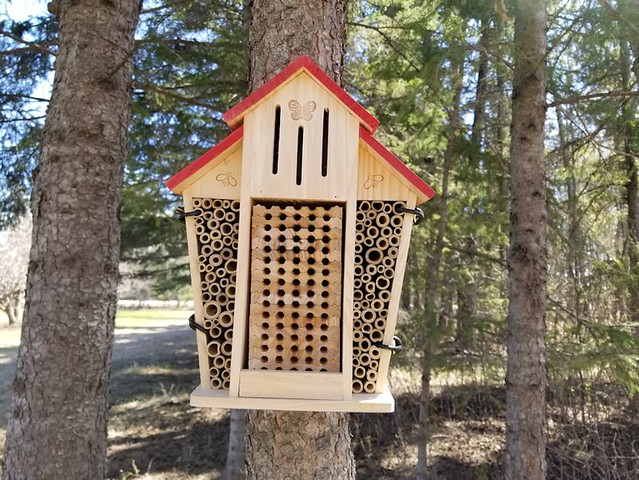
Time to put up the mason bee hive we picked up a while back.
We decided to place it near the crab apple trees, since that’s where the most flowers are soon going to be. That meant attaching it to one of the spruce trees.
Which… the box isn’t really set up for.
Under the disc that covers an opening into the butterfly space, there is just this to hang it with. Which might work in some areas, but I can see this falling in the wind, so easily.
I figured I’d try bungee cords, instead.
I had to find a tree small enough that my pair of cords could reach around both the width of the tree, and the depth of the hive.
I also turned it away from the apple trees, so it won’t have the north winds blowing right into the openings. This tree is also surrounded by other trees, providing shade and shelter as well. The next thing I want to do is provide a water source; just a shallow dish with some smooth rocks for the bees and butterflies to land on. I already have appropriate rocks. I just need to find an appropriate container and the right place to set it. Between watering the bird bath and the bee dish, there should also be enough mud available for the bees to use in the hive.
We’ve never had anything like this before, so we shall see how it works out. In the future, we plan to plant bee and butterfly gardens – well away from the house, since my husband is allergic to stings. (Most of the local bee species don’t sting, so it’s more honey bees, wasps and hornets that are of concern.) One of my brothers even has milkweed on his property, so I hope to get some growing here, too. If it does work out, I plan to get more of these, in different styles.
Also in future plans are setting up bat houses and maybe even purple martin houses – both do a great job of eating mosquitoes!
This is a story that began yesterday, when I found Beep Beep like this.
Yup. The family has finally outgrown the nest I’d made inside the “cat cave” box. Time to open things up again!
Aaahhhh!!! Much better! Lots of room to spread out.
This morning, I discovered Butterscotch had moved her kittens again. With the blanket she’d put them on before now gone, she just used a shelf.
Poor little things!
I had to move the cat cave set up – with Beep Beep and babies inside! – to get to them.
So I took advantage of the situation.
I put them all on top, then after pushing the whole set up back again, I checked out the babies.
It looks like all 4 of them are male.
I had also opened up the box nest that Butterscotch’s babies were in, taking the smaller box out and putting the pillow and little cat bed back inside the bigger box, but should I even bother putting the kittens back in there?
Where would be a good place to put them, instead?
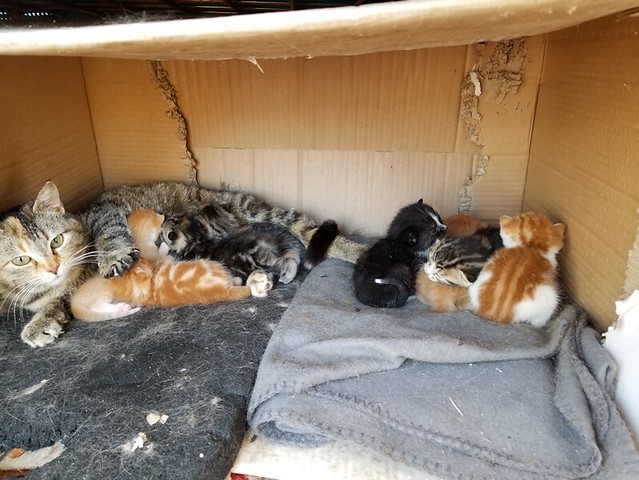
In with the other kittens sounded like a good idea.
Beep Beep came over to sniff them and immediately started to groom them, so she’s fine with it. As you can see, Butterscotch’s babies are real chill about it, too.
Checking them after doing my rounds, I see the kittens seem fine with it, too – one of Beep Beep’s kittens is cuddled right in with its cousins!
Butterscotch, on the other hand, wouldn’t even let me show her where I’d put her kittens. She and Beep Beep aren’t exactly best buddies, so I’ll be checking frequently to see how things are.
Today, I continued my spring clean up around the yard. Now that we have yard equipment in the side of the garage we’d stored the foam insulation from around the house last summer, this year I’ve put them into the barn for storage.
I’d love to empty that barn so we can actually use it.
All in good time!
For now, I went back to the jasmine bed, mulched it with straw and began saturating the mulch with water. Though we did get rain recently, it wasn’t enough and everything is still bone dry.
While the hose was running there, I decided to move the unused bird bath from beside the storage house to the flower bed by the bird feeder. I found a block to use as a foundation and used a hoe to dig down and level a spot for it, first. Once the bird bath was in place, I moved the bird feeder stand to its summer location. Over the next month or so, the flowers should hide at least part of the bases.
That bird bath needs a thorough scrubbing and re-painting. We shall see if that becomes a job for this year, or next. Or maybe we’ll get a new one.
I’m hoping the water is far enough away from the platform feeder that falling seeds will not become a problem. When the lilac beside it is in full leaf, it should provide some shade. This should slowly become a nice little bird garden, I hope. :-)
The birds were quick to come back to the feeding station, but I haven’t seen them checking out the water, yet.
I also cleared out the bricks that I took out when rebuilding the jasmine bed. I have decided what I will be using them for.
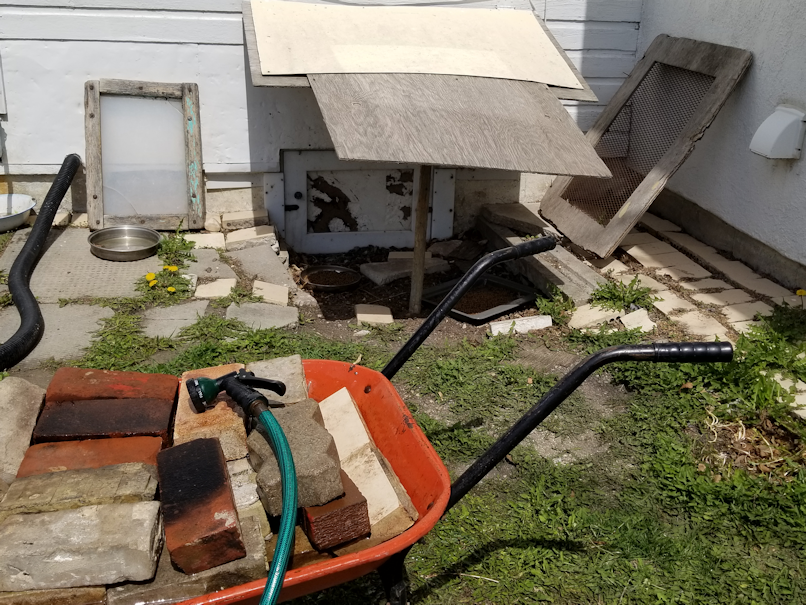
This is the window to the old part basement, where we used to throw logs in for the wood burning furnace. The roof that keeps precipitation from leaking into the basement is on a hinge, but I haven’t decided on how I will get it to stay all the way up while I work. If I really need to, I can also remove it until the job is done. The cat kibble is under there to keep it out of the weather. There are chunks of brick and blown in leaves, but otherwise I think it’s just dirt. The “retaining walls” built up on the sides are slowly getting unstable.
The plan is to clear all that out and redo it with a brick “floor” under the window. Which will also be a good time to get the foam insulation out of the opening and put the metal mesh window over it for the summer. The wood frame for that is rotting, though, so I hope to scrounge up the materials to redo that as well.
For now, I’ve just brought over the bricks and filled the wheel barrow with water. Partly to get rid of any dirt and whatnot stuck to them, but also to wash away any ants or other leggy critters that might get transferred over with the bricks. I’d seen some tiny red ants when I dug the bricks out, and some were still there when I moved them to the wheel barrow, so I want to make sure to get rid of those or any eggs that might be attached. I might not get back to this until tomorrow, though. It’s already gotten very hot out there – we are at 23C right now – and this area is in full sun.
That reminds me. Time to check on the kitties in the sun room again!
We noticed some damaged shingles yesterday, so I made a point of checking it out and looking for any other damage while doing my rounds this morning.
This is what we saw when we came home yesterday.
You can see the patch job above, where some shingles had flipped up. One of my brothers had fixed it, and now I wonder if these shingles came loose due to unseen damage done by feet while the patch was being worked on. The roof is old enough that it wouldn’t take much.
I also found this.
It looks like a shingle got flipped up.
I could not find any other damage like this elsewhere, though I cannot see parts of the roof from the ground. I’ll need to ask my daughters to check, from the second floor.
The North side of the old kitchen roof, however, is looking pretty black, getting darker closer to the eaves.
We can patch things up as needed, but the reality is, we need a new roof.
Plus new flooring.
Plus all the walls need to be redone.
Plus the wiring needs to be updated in places, and simply increased throughout the house.
What this house really needs is a total renovation.
Which would basically happen if we win the lottery or something.
I was able to tackle two areas in the East yard today. The first was planned; I decided to leave the remains of the wood chip pile where it was, and spread it out along Northwest corner of the spruce grove.
Some of the pile got moved to the cross, as the pile at the other end didn’t have enough chips to extend that far. This will make mowing around this corner easier. Eventually, I will be clearing further into this area, but that will have its own natural mulch of leaves and spruce needles.
This side is where they chipped the branches from the 2 big maples directly onto the ground. There is more cleanup needed here, plus that dead tree will need to come down at some point, so I wasn’t too particular about how much this area was spread out.
I have some thoughts about that dead spruce tree. I could have it cut flush with the ground. I could have the stump leveled at about a foot and a half high and use it as a seat, or put boards across it to turn it into a bench. I could have it cut a bit higher and put a table top on it, then add benches or seats around it. Or I could have it cut to a couple of feet, hollow it out and turn it into a planter.
Feel free to let me know what you think about these ideas in the comments. :-)
Once that was done, I finally got around to removing the foam insulation we put around the house in the fall. That got me eyeballing this odd little flower bed my mother made where she had transplanted a jasmine.
This is what it looked like after removing the foam insulation; I had tossed the little plastic fence things in there, just to get them out of the way.
It’s falling apart and, when I try to water the jasmine by the steps, the water just runs downhill, past that piece of pressure treated wood and the miscellaneous pieces of brick. I had a couple of other pieces of pressure treated wood, as well as other bricks. I figured I could use both to build up a little retaining wall, bricks as a foundation for the wood, then more bricks on the wood to create a higher wall.
The first thing to do, of course, is take out the bricks that were already there.
From where I was pulling things out, I get the impression that a bed was built up around the jasmine by the stairs when it was transplanted, and then it was extended when the second plant (I am not sure if it’s another jasmine; I don’t think so) was added.
I wanted a rectangular bed, since I was using the pieces of wood for walls, so I started digging it out to create level trenches to put them in.
I kept finding more bricks!
Using one of the pieces of wood as a guide, I began putting bricks into the trench as a foundation, leveling them off by eye. This is not intended to be permanent, so I’m not too worried about getting anything exact, but it will be there a few years, I’m sure, so I still want to get it solid.
After reaching the steps, I discovered a bit of a problem. Even using a block of concrete that was already there, the length of the bed was greater than the combined length of the wood I was using. I did have another piece that turned out to be just wide enough to fit, but…
Yeeeeaaaahhhh…
No.
I mean, I could cut it to size with a chainsaw (now that I have one that works), but it’s quite rotten and…. nah. Not happy with it.
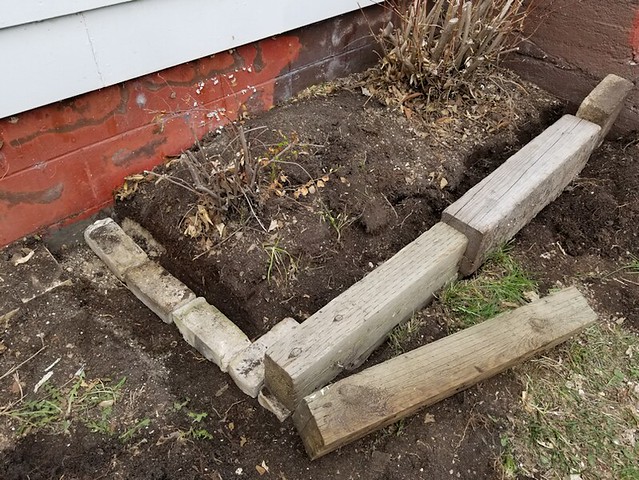
So I moved the end in a few inches, instead.
Once the brick foundation and wood pieces were in place, I used the soil I’d taken out to fill in the gaps.
Once that was done and stamped down, I realized I didn’t need to make it any higher.
I will likely need to bring in more soil for the outside of the bed, to tamp down and make sure the pieces of wood don’t just fall off their brick foundation. That can be done little by little, as needed, over the summer. I will also be mulching it with straw, when I start working on the bale.
So I now have to figure out what to do with the bricks. :-)
I still haven’t had a chance to process a new batch of critter pictures from the living room camera, so here is a kitty picture for you to enjoy! :-)
When I went into the sun room this morning, Beep Beep actually came out from her nesting box to say hello. This made for an opportunity to get a picture of her kittens without them being half hidden by mama.
Such adorable snoozies!!!
Butterscotch, on the other hand, came out from under the plastic couch against the wall.
Her nesting box was empty.
She had moved her kittens to a corner by the window. Long ago, I’d put an old seat pad on the dresser I use for tools for the cats to sit on, but they kept knocking it off. Eventually, it got knocked into that corner, where I couldn’t reach it without moving furniture. There is a homemade plant stand there as a shelf, and the pad was on top of its base.
That’s what the kittens were on.
Unfortunately, there is also broken glass from something the cats had knocked off a shelf back there that I can’t clean up until we’re able to empty the room for a total cleaning.
I ended up shifting some things around, got to the corner, managed to get the plant stand out, scooped the kittens into a little sling I made out of my shirt to carry them all at once, and moved them back to the box nest.
Butterscotch was not impressed.
Tough beans, mama. Your babies are going to be socialized this time!
As I was putting things back, and moving the homemade plant stand into the corner, I got what felt like a sliver. Checking it, however, I pulled out a little shard of glass. !!! It was a small wound, though, so I continued on.
Next thing I realized, I was leaving drops of blood all over the place. :-/
I am going to have to find some way to clean up that glass before a cat gets hurt. :-( They don’t normally go under there, but if Butterscotch is going to be trying to move her kittens, this could be a problem.
This isn’t the first time she tried to move them in the last day.
Yesterday, it was getting very warm in the sun room, but the old kitchen stays nice and cool. I was going to open the window in the storm door between the two rooms for some air circulation, but it wouldn’t budge. So I just left the doors into the old kitchen open and got the ceiling fan going in the sun room. I shut things down at the end of the day, but when my daughter went in later to do the cat litter, Butterscotch was at the door to the old kitchen and even sort of growled at her.
Then she heard the mewling coming from the wrong direction.
One kitten had been moved into the old kitchen, into an area by the old wood cook stove that is hard to get at. She found the kitten and had to move a bunch of things to get at it, then put it back into the box nest with its siblings.
After that, she did a head count of both litters, to make sure no others were missing!
Today, we got the second area in the south yard mulched with wood chips. It’s not as long as the first one done, so it was faster.
It was also faster because I changed equipment.
Among the things that disappeared from here before we moved in were things like shovels and spades – the stuff that didn’t get taken are almost all broken in some way. Yesterday, we made do with snow shovels to load up the wheel barrows. It was a pain in the butt, but they did the job.
Today, I dug out a spade I’d found last year. It’s broken, of course, but just the handle on the top. I was able to use the sleeve of my sweatshirt to protect my hand while using it, and things went much easier.
Here is how the bed looked before.
This is the largest of my mother’s white lilacs, at the West end of the bed, and where I cleaned out a big pile of horse droppings in between all those stems. I’ve never been able to figure out how that happened. I just can’t see a horse backing its hind end right into the bush and taking a dump. :-D
This is where we had cleared out the remains of some fencing that had been used as a trellis for vines. I’m guessing this was done before my mother discovered that Virginia creeper is so invasive! Hopefully, the mulch will prevent it from growing back.
The dirt patch by the tire around the tree is a favourite place for the outside cats to roll around. :-D
Here is how it looks now.
Alas, the cats have lost their rolling spot. ;-)
A lot of the wood chips were used for this, but there is more left than I expected.
I’m debating whether to use it on a nearby flower bed, or just spread it all out, right where it is.
For the amount that’s there, I’m leaning towards spreading it out where it is.
While doing my rounds this morning, I took some pictures at the logs from the two maples that were taken down. Check this out.
You can see how the ant-damaged, rotten core is slightly pushed in. I was curious to see just how loose it was.
The answer is:
Completely.
There were a couple of pieces like this, where I could pull the core right out!
Have I mentioned what a relief it is to finally have these trees down?