We are still in a polar vortex induced cold spell right now. I delayed doing my rounds outside until it had warmed up to -32C/-25.6F
I skipped switching out the memory cards in the trail cams again! Just the extra time to refill both bird feeders this morning was pushing it.
The heated water bowl was covered over even more than it was yesterday. Not just in frosted surface area, either.
This is after pouring off the old water. That’s a pretty solid layer of ice, left behind! Yesterday, it was more frost than ice.
The other water bowls were, of course, frozen solid. I had to do a fair amount of kicking to get them loose from the snow. When fresh water is added, the metal warms up enough to melt the snow around it, creating bowl-shaped pockets of ice that hold them in place.
Another reason why using old, broken frying pans make excellent water bowls. They can handle being kicked around, then bashed against things to knock the ice out. I used to use a wooden hand rail by the sun room to bash them against, but I didn’t like how much I was damaging the wood, so now I’m bashing them on the saw horses I’ve stored nearby. They’re old and damaged already, and I need to build new ones, so I don’t care if they get more beat up. :-D
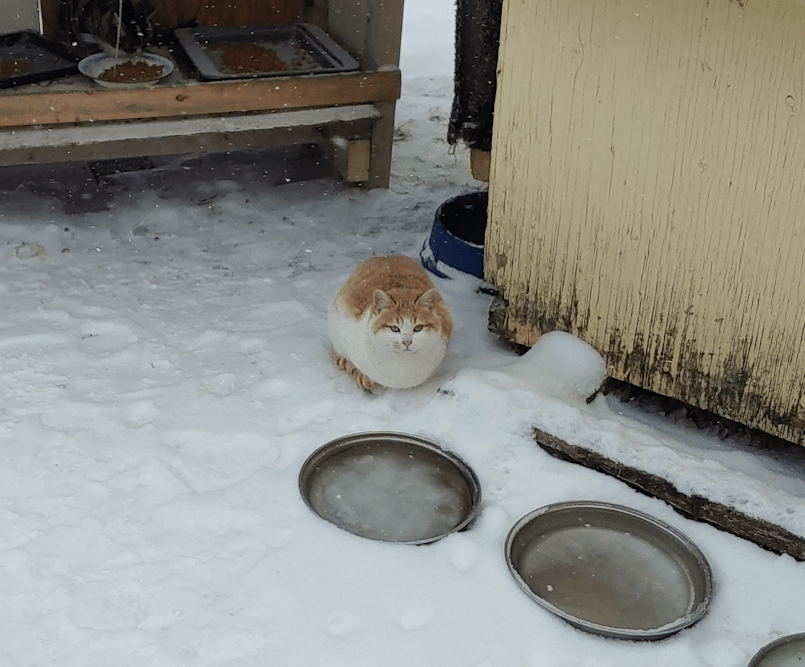
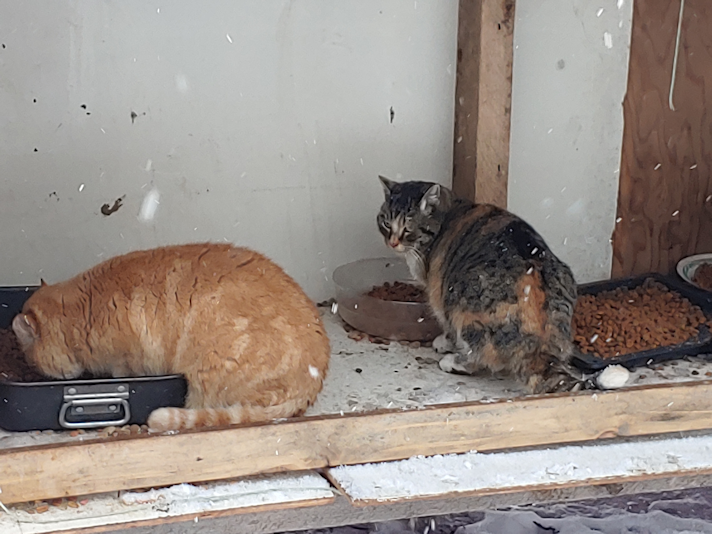
Creamsicle Jr. didn’t move from his spot the entire time I was there! He’s under the terrarium bulb, but with the dusk-dawn light sensor, I don’t think it was actually on at the time. I don’t see the red glow of the indicator light, which would visible about 6-8 inches under the outlet.
I did get joined by Ginger, but he was the only cat I saw outside, braving the cold!
With our main entry door falling off it’s hinges, I’ve been going through the sun room to go outside. Which means going through the old kitchen, which is unheated and probably not insulated; at least not by any modern standards. We go into there as little as possible in the winter.
The old kitchen is where we had our crab apple cider vinegar fermenting, and where I now have the mother stored.
It’s almost frozen solid! You can’t even see the mother, which is in the middle of the jar, immersed in vinegar.
I have no idea if this will kill the mother or not.
Does anyone know?
When I was a kid, this room never really got cold, since the wood burning stove was kept going almost constantly, as much to help heat the house as for cooking, so lack of insulation was never really an issue. The old kitchen is an add-on to the original log part of the house, though I don’t know when it was added on. I only know it was already there when my parents bought the property.
The forecasts say we’ll have one more day of this bitter cold, though it will be a bit warmer tomorrow. Today’s high is predicted to be -25C/-13F, with a wind chill of -31C/-23.8F. Tomorrow’s high is supposed to be -21C/-5.8F with a wind chill of -28C/-18F. After that, we’re supposed to keep warming up for the next week. Check this out!
It’s like temperature whiplash!
Time to think of warmer things. Like gardening. I think I’ve figured out a way to raise our seed trays up closer to the light in the fish tank greenhouse. If it works, I might not need to line the sides with foil.
Well, I’m certainly glad my daughter and I have telephone medical appointments this afternoon, and don’t have to actually go anywhere.
As I write this, we are at -34C/-29.2F, with a wind chill of -39C/-38.2F
It has actually warmed up a bit.
The heated water bowl is almost completely frosted over! Only a couple of cats came out into the cold. Their food bowls are still pretty full – even the one inside the cat house – but I added some fresh kibble, anyhow. The sun room is at -12C/10.4F, so it’s still frozen. They like the fresh kibble better; I think it’s easier on their teeth.
At these temperatures, I didn’t even try to switch out the trail cam memory cards. I doubt our vandal would be engaging in nefarious things in this weather. Plus, we still have the hard wired security camera to keep an eye on things.
Meanwhile, I’ve made the call to the number on our leaking hot water tank. I now have an authorization number and need only to go to the store it was purchased at, with the sticker from the tank, to get a replacement. He even saw on the file that this was already a warranty replacement tank, but he asked no questions.
At these temperatures, however, I am not going anywhere. Even if we lost hot water completely, we’d just go back to heating water on the stove as needed. I suspect it’s actually a good thing the tank is leaking the way it is, instead of water pooling on the bottom as it did, last time. That is probably the only reason why it’s not doing the weird things the other one started to do, since the water isn’t reaching anything sensitive; just making the insulation damp. Just a guess on my part.
Thankfully, this polar vortex that’s hitting us should last only a few days. By Wednesday, we should be back up to a more typical -21C/-5.8F. By Friday – which is when the van is going in to be checked – it is forecast to reach a balmy -10C/14F.
It’s past 1 am as I write this, but I just had to.
I went down into the old basement to treat the hot water tank with hydrogen peroxide before going to bed. This is what I found.
It’s leaking!
(That ring of minerals on the concrete is not new; it’s been there since the last time we had issues.)
We don’t go into the old basement often (and with the cats, we’ve put all the most breakable stuff into the old basement and blocked off the opening between the two basements, so there was no chance of kittens falling into the sump pump reservoir or otherwise hurting themselves). The last time anyone went down there, that I can remember, was my daughter, the last time the tank was treated. I called her over to see, and confirmed it wasn’t leaking the last time she was down there.
In trying to see where it was leaking it appeared to be coming from the bottom access panel, too. So we opened it up.
Yup. It’s been reaching that high!!
We’ve left the panel off. Tomorrow, I will call the number on the tank to talk about getting a replacement under warranty.
Again.
For those who are new to the blog, when we first moved here, this place still had the tank that was installed when my dad got the well dug near the house and installed running water. He got the tank second hand. When cleaning up the basements, I found the old warranty certificate and bill of sale for it, dated 1963, if I remember correctly.
It died shortly after we moved in.
Long story short, we went without hot water until we could afford to get a plumber to replace the tank for us.
That worked out well for a while, until the water started to get hotter and hotter, all on its own. We called the plumber and he changed the thermostat, but that’s when we discovered that it had started leaking at the bottom. When he opened the bottom panel, he found the insulation saturated with water.
Not long after that, we lost hot water completely.
We then had issues with discovering the local hardware store it was purchased at, not doing warranty replacements. I tried working with the company directly before finally finding a branch someplace else that had would honor the warranty. We then had to get the plumber back to install it for us, and it’s been working fine ever since. The only issue is one we’ve had since replacing the original tank; the hot water would start to get a sulfur smell. Every month or so, we would drain the tank a bit, then use the vacuum created to suction hydrogen peroxide through a hot water tap in what used to be the laundry sink. It needs to sit for at least 4 hours, so we would do it before bed, so the water could be used in the morning.
It’s been about 1 1/2 years since that tank was replaced under warranty. And not it’s happening again.
What the heck is going on? How does a second hand tank last for nearly 40 years, but new tanks aren’t even making it 2 years?
But at least we still have hot water. I guess it’s a good thing it started visibly leaking this time, before we started having problems. We don’t have the water getting super hot, like the tank started having issues last time. It’s “just” leaking.
I found them while looking for something else, of course. :-D
Here is where, on the tank, I want them to sit.
The bar across the middle has extra surface area in the corners of the ledge the covers rest on. There’s lots of room, here.
The outer corners, however, don’t have that, so there’s a lot less margin for error in positioning the pads well.
The first step was to clean off the ledge the frame rests on. An old toothbrush worked very well for that!
Since the cross pieces of the frames have an angled edge, to better fit into the space, I figured it would be easier to place the felt pads in position on the ledge first, adhesive side up, then placing the frame on top.
The felted pads I have were from a larger package with mixed sizes of circles, plus long, narrow ovals. The larger circles were used up, and all I had left were smaller ones, and some of the long ovals. I’d hoped I still had some larger circles left. If I had, I would have cut them in quarters, and fit them right in the corners, but half circles would have to do!
Once they were in position, I lined up the cover and dropped it down, pressing just enough to make sure the adhesive stuck, then removed it to press the adhesive in more thoroughly.
In this corner, you can see the pad will protect the tank’s frame from the wire. This was the edge of the roll, so no sharp bits sticking out, like the edges I had to cut, so I didn’t trim it.
And this is why I lined the pads up to the corners of the tank, rather than the frame. Yes, there’s a likelihood that the pad will get pulled off where it’s overhanging, if I leave it like that (I will trim it later), but it also isn’t sitting on the screw head. It was supposed to be countersunk, but some of the screws simply stopped and would not screw in any further. I am not sure what was stopping them but, whatever it was, I was wrecking my screwdriver’s tip, trying to get them to go in further, so I stopped. The others were just fine.
So the corners are padded now, protecting the tank’s frame from being scratched up, should a cat decide to jump onto the cover.
When I was fussing with everything to prepare for this, I did have a kitten not only jump onto one of the covers while I was there, but also walk across on the light fixture! Not a problem for a light kitten, but a potential problem, if one of the heavy adults tries to do it. Thankfully, they seem to not like the new covers and are staying off. At least while we’re around to see! The few times I’ve seen one of the adult cats up there, they have stuck to walking on the wood and stayed off the wire and away from the light fixture.
Meanwhile, the baskets and other items stored in the tank have been removed. I’ll need to take a vacuum to the bottom to clean it, then see how my seed trays fit on the bottom. That will help me decide whether the rigid insulation will be lining the inside, or the outside, of the tank. Whatever I do with the sides, the bottom will have its own layer of insulation lining it, too.
It’s remarkable how handy that insulation has been. I’m glad my daughter bought so much extra!
I’m going to need the little step ladder to be able to access the bottom of the tank. I could barely reach to get the smaller baskets out!
The joys of being short! LOL
Another little bit of progress made! :-) I can hardly wait to see how this works for starting seeds!
Outside my window, the sky is clear, the sun shines brightly, and not a twig or branch in my view is moving from anything other than birds landing on them.
As I write this, our temperature has warmed up to -24C/-11.2F, with a wind chill of -34C/-29.2F When I headed outside to do my rounds this morning, it was -25C/-13F with a wind chill of -38C/-36F.
At those temperatures, even the heated water bowl starts to freeze over! There’s actually a layer of ice forming under the frosted areas that you can just barely see.
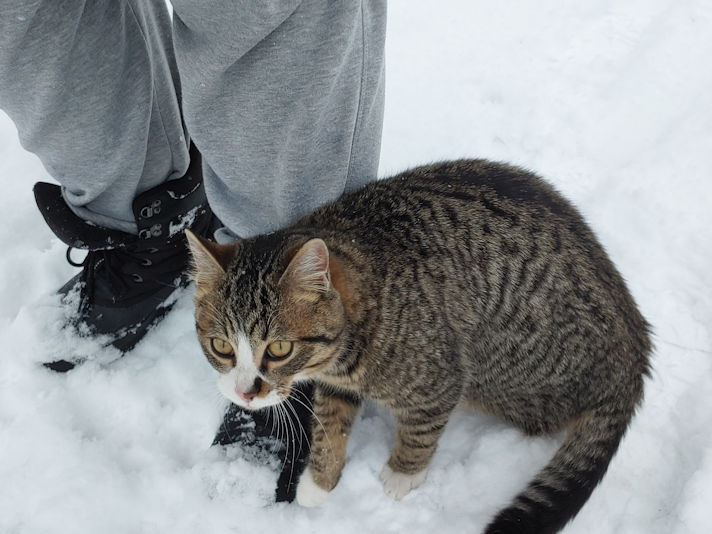
Nutmeg was content to watch me from the comfort of their shelter!
I am so thankful my brother went through all that effort to bring their old dog house for us to use. It’s working out so well for the cats!
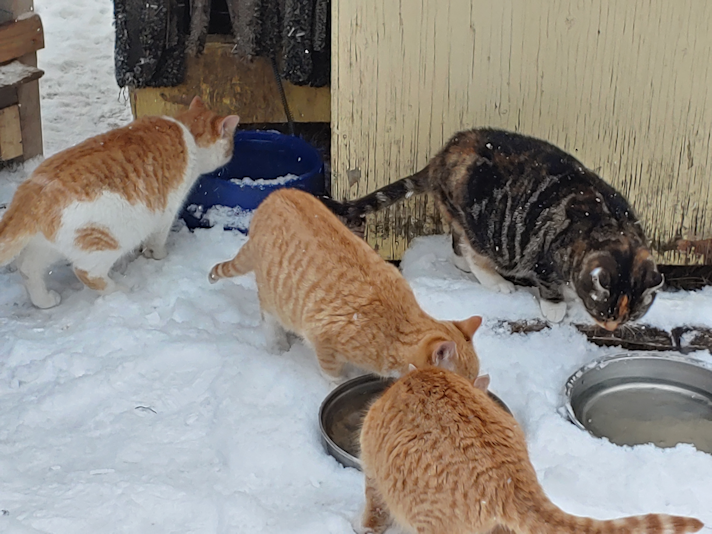
The cats that did come out into the cold were much more interested in the fresh warm water than the fresh food! The cat equivalent of a hot cup of tea on a cold day. :-D
When switching out the memory cards in the trail cams, I of course had to warm up the new camera with my hands, just to be able to see the screen. I wanted to see how it would take the micro disc my husband gave me.
Alas. I still got the “incompatible” message and had to format it in the camera, even though I made sure to format it on my computer. The card may be the same brand as the other one, but I guess it’s not an “ultra”. At some point, I’ll just have to buy another one of the card that works without having be formatted every time. At least I know what’s going on, now, and what I need to do to be able to see the screen.
At some point, the other camera is going to need to be replaced, too, so we’re already doing research on cameras more like the new one, but better able to handle the cold. We should have plenty of time, but I’d like to get one before it’s needed. I can’t complain about what we have. It’s still an excellent camera for the price, and I really appreciate some of the features it has, and the faster processing speed.
The second one was much faster to build than the first. :-D
For those who are new to this blog *waves hello* you can catch up on the project with part one and part two. Links will open in new tabs, so you don’t lose your place here. :-)
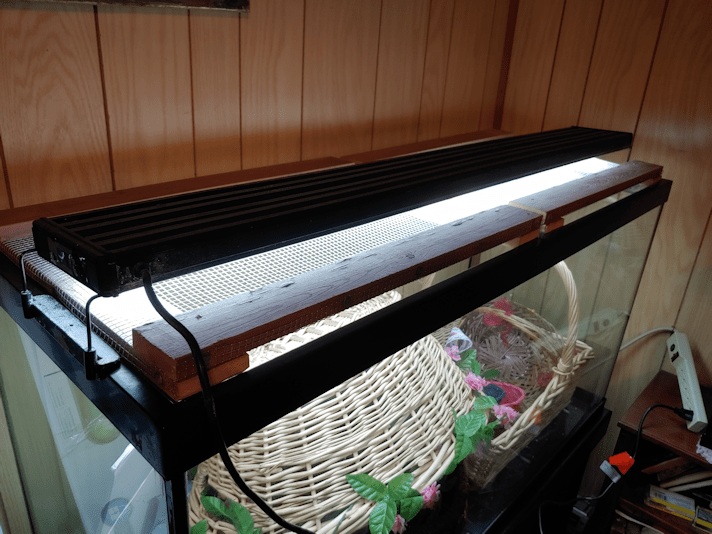
Once the second cover was done, I unpacked the light fixture, which has been sitting in its box next to the tank since the move, and tested it out. Considering what a disaster the movers were, I would not have been surprised to find the bulbs shattered or something.
It worked just fine! :-)
Of course, as soon the covers were on, cats were on it! So far, they have not tried to climb on the light fixture, but there is no doubt that they will, at some point. Hopefully, it will hold up okay.
I was concerned that the frame would create shadows in the tank, but that does not seem to be an issue at all!
Now I have to figure out how to set the time and program it to turn on and off. It’s been years since it was last done! There is time to look that up, though.
We still need to cover the sharp edges of the wire mesh, and I still want to put felt pads in the corners to protect the tank a bit, but other than that, the covers are done.
We still have the original light that came with the tank, which rested right on top of the original covers. The tanks will only hold so many seed trays. With things like the onion seeds needing to be started so much earlier than anything else, I can see us rotating trays out from the tanks and into the sun room (which should be warm enough, by the time the next groups of seeds need to be started), and using the second light there.
Now I need to figure out where to store my baskets, then line the inside of the tank with foil to reflect more light. Since this room is rather chilly, I plan to use pieces of rigid insulation on the bottom and around the sides, too. We will likely cover the insulation with foil on one side to make it easier to take it in and out, but I will see how the seed trays fit inside, first. If the insulation takes up too much space, I’ll put them on the outside of the tank.
Progress has been made! :-)
I am so looking forward to gardening this year! :-)
We’ve had ourselves a chillier morning today! Light snow, and bitterly cold winds from the south is what greeted me this morning, when I went out to do my rounds.
Kitty loaf is not impressed.
It does look pretty, though!
Switching out the micro disk cards on the new trail cam has gotten somewhat easier. The micro disk itself has become easier to take in and out; it isn’t as “sticky” as it was at the start. As long as I have enough of a thumbnail to push the card in, to either latch of unlatch it, it’s not too bad. :-D
When I open up the camera, I switch it from On to Set Up, first. The screen turns on, and that’s when I can see if the cold is an issue. If the screen is mostly blank and barely lit up, the camera is too cold. I’ve found I can use my hands to warm it up enough that the screen will start working. Which, on days like today, can be rather hard on the hands! Thankfully, it only takes about half a minute. Then I can switch the memory card and see if there are any issues.
When I got the camera, I got 2 micro discs along with it. I just ordered the recommended ones, not really noticing that one of them was actually a pack of 2. Those are the ones I’ve been using. The problem is, when I switch cards, the camera wants me to format the new card, every time, after giving me a message that the card is “incompatible.” So all those days when I found nothing on the card, it was partly because I couldn’t see the screen and missed these messages. Once the card was formatted in the camera, it worked fine. It didn’t matter if I’d already formatted it on my computer.
I shouldn’t have to do that every morning.
Last night, I dug up the extra card, formatted it on my computer, and used that, this morning.
The camera had no problem with it. No messages, and no need to format the card in the camera!
The cheaper cards were the problem.
On mentioning this to my husband, he dug around and gave me one of his extra Micro SD cards to use. It’s a 64 gig card. WAY more than needed. The other cards were 32 gigs, and even at highest resolution while set to take both photo and video, I could probably leave the card for a week and still have room to spare. The main thing is that the card won’t need to be formatted every morning. It’s even the same brand as the new one I put in this morning, so it should be fine. I’ll know for sure when I switch cards tomorrow morning.
It still doesn’t solve the problem of the camera not really working when the temperatures dip. Once it gets cold enough, it simply stops recording. It does start up again on its own, when the temperatures rise. This is frustrating, because in all other respects, I really love this new camera! But all the features I love about it are useless if the camera simply stops working when it’s cold. At least we have the second camera that keeps working. With that one, the cold is only an issue for the batteries, not the camera itself. As long as it can get any juice out of the batteries, it will keep chugging along.
Ah, the things we have to put up with, because of one person we can’t trust.
A few days ago, my husband got a phone call. There were two things odd about this. First, the call went to his cell phone. Being in a dead zone, any time a cell phone rings is downright startling. Second, the call turned out to be from Fed Ex. They had a package for him, and needed our physical address.
As near as we can figure, this was something my husband ordered back in November. After all this time, he’s actually already got a refund on it. He had been expecting it in the mail, too. Fed Ex doesn’t do box numbers!
So he called the number back using the land line and, after being on hold for about 45 minutes, finally got through to someone. After giving our physical address, he gave them precise directions on how to find us. The person he talked to even looked us up on Google maps and did eventually figure out where we were. Just inputting our physical address hadn’t worked! He then let them know about the locked gate, so they said they would send an email in advance, letting us know the package was on the way from the city.
We got that email, telling us delivery would be made yesterday. So when I went out to do my rounds, I unlocked the gate and left it open.
The last time we did that for the washing machine repairman, the gate was open only half an hour, and our vandal showed up and tried to break it again. So we were pretty uncomfortable having that gate open, but we also didn’t want the package to just be left in the snow in the driveway, either. We kept a close eye on the security camera’s live feed!
Then my husband let me know that we could close the gate up again. He just received an email. Apparently, FedEx couldn’t find us, so they weren’t going to deliver the package. They wanted us to call about getting it.
Which means, they would expect us to drive to wherever their warehouse is in the city, to pick up a package they’ve been paid to deliver to us.
I don’t think my husband plans to call back. There is no way we’re going to make the trip. UPS found us, no problem. FedEx can figure it out, too. Even when we were living in the city, we’ve had issues with them. They would actually leave notices on our door, saying no one answered when they knocked, but we had been home and no one knocked.
I was just happy to be able to close and lock the gate. No sign of our vandal, either!
Later in the afternoon, I did take advantage of the slightly warmer day to go get the mail and pick up some more deer feed and bird seed. We’d run out of both, that morning.
One of the things I’ve noticed when heading outside to do my rounds, is that our door has been making an increasingly horrible noise. The inner doors in the “new” part of the house are still the originals, and they are wooden, hollow core doors, not insulated steel doors, as are available today. These doors are heavier than interior doors, so I do think they have some sort of insulation inside them, but I really don’t know.
The “front” door, facing the spruce grove, almost never gets used, so aside from needing to put insulation between it and the storm door in the winter, to keep frost from building up at the bottom, inside the house, it’s fine. The door we actually use all the time is not doing so well! The house shifts with the seasons, so it’s not really a surprise that the door is scrapping the door jam now, and we can hear the wood of the door splitting and cracking at the bottom. So I’ve taken to lifting the door as I close it, to reduce the noise.
How much the door lifts was quite a surprise, so when I had the chance, I took a closer look.
*sigh*
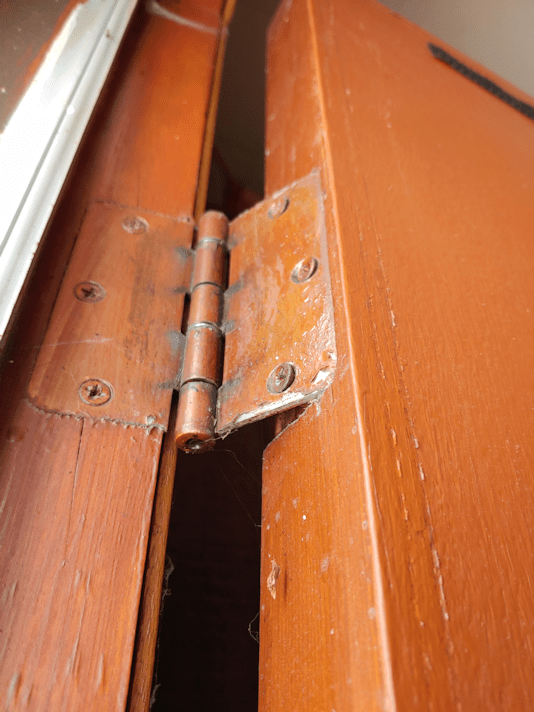
The door is coming off its hinges.
This morning, I snagged my husband to help me tighten the hinges. This is the top one.
It’s hard to see in the picture, but the screw heads are even slightly bent!
Of course, with the top hinge being so loose, the middle one is, too.
Thankfully, the bottom one is still solid, but that won’t last long if these ones get any worse.
There is a built in closest near the door, so it can’t be opened all the way. My husband held it open as much as he could for me to be able to fit the screwdriver in place. Normally, I would just open the storm door, but between the cold and the cats, that wasn’t an option. While my husband lifted the door and held it in place, I tightened the screws.
As I did so, I could tell this wasn’t going to work. The screws were barely catching on anything. Still, I hoped to at least get it a bit tighter than before.
*sigh*
As soon as my husband released the door, not only did it drop, but some of the wood split above the top hinge.
I reached up with my phone to get this picture.
In the photos, you can see there are cracks in the wood of the door frame, too.
We knew the front door needed to be replaced, and were already thinking we would replace the entire frame, too. I just didn’t think we’d need to do it because the door is falling right off the hinges!
Theoretically, we can install hinges in different locations, and that would tide us over until we can replace the door and frame completely. Given how loose the door is, we might not have a choice. Even if we had the money for a door kit now, we wouldn’t want to install it in the winter. Because you just KNOW something will do wrong and it’ll take forever to do! :-D My brother recently replaced one of the doors of his house, and he used a door kit, with two doors and the frame, as we would be doing here. Everything was standard sized, so it should have been a simple switch. It wasn’t, and it took him days to get it installed properly! I don’t think our doors are standard sized, so I don’t expect anything to do smoothly.
This is something were I would much rather hire someone to install it, rather than doing it ourselves. It would cost more, of course, but would be worth every penny.
*sigh*
Another thing on the list that just became a higher priority.
A while back, we tried a recipe for overnight bread, which you can read about here, and find a link to the original recipe we used.
I then tried an “over day” version, using the dough baby from my Babcia’s bread experiment. It was fantastically successful!
We’ve made it again, as a pretty basic no-knead bread and, once again, it turned out awesome!
If you are new to this blog and don’t know the background to this, you can read the story behind my experiment to try and recreate the bread my grandmother made in pre-WWII Poland, as my mother remembers it. Or you can check out all the posts about it at this link. All links will open in new tabs, so you don’t lose your place here!
Here is how we made No-knead bread, using the old dough method.
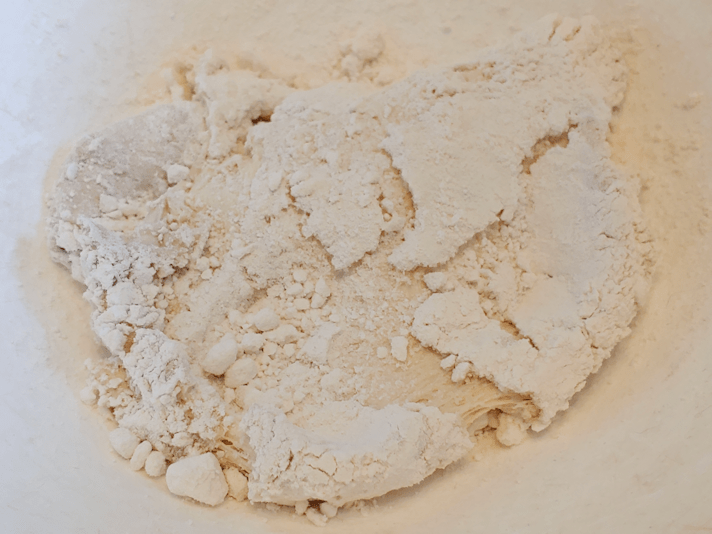
The first step is to dig the dough baby out of the flour it sleeps in.
My Babcia did bread baking once a week, and when the old dough sits that long, it tends to be dry enough to break apart into pieces before reconstituting it. This time, the dough baby had not been sleeping in its bed of flour for that long, and it was still quite… doughy! :-D
So I just pulled it apart a bit and placed it in the bottom of a very large bowl.
I don’t know how much that is. Maybe about 2 cups, including the flour stuck to it? The dough baby rises and collapses while stored in the flour, and I made no effort to measure the quantity.
I also pre-measured 2 Tbsp each of course salt and sugar, and 1 Tbsp of yeast.
The yeast would be optional. The dough would need more time to rise without it, which would give more of a sourdough flavour.
Four cups of very warm water was added to the dough baby. Since it wasn’t dry enough to break into pieces, I spent some time stirring it and breaking it up in the water.
Then, the sugar and yeast was added and mixed in, the bowl loosely covered, and it was left for about 10 minutes.
I like to use traditional active dry yeast, rather than quick or instant dry yeast, but that’s just me. The traditional yeast needs more time to proof in the liquid compared to the quick yeast, and the instant yeast wouldn’t need to be added at all at this point, but would be mixed in with the flour.
If I were not using yeast, I would leave the water, dough baby and sugar mixture in a warm place for much longer, checking regularly to see how active it was.
Here is how it looked after 10 minutes. I stirred it again to break up the dough baby a bit more.
Then it was time to add some flour.
I started by adding 3 cups of flour. It’s easier to mix in that amount compared to starting with just one cup.
I decided to use Durum wheat flour at this point, just because I have it. Use whatever flour, or mix of flours, you like best!
After the first 3 cups was thoroughly beaten in, I added another cup of flour and the salt.
More flour was beaten in, about a cup at a time at first, then a half up at a time.
How much flour to use is something I’ve never been precise about. I know there are bread bakers that weigh and measure precise amounts, but in my experience, that just doesn’t work. The amount of flour needed can depend on things like how fresh the flour itself is, to how much humidity there is in the air.
With 4 cups of water, I would have expected to work in at least 8 cups of flour for this recipe (with my usual kneaded bread, I typically used 5 or 6 cups of flour to 2 1/2 cups liquid).
We are very, very dry right now.
Today, I worked in 7 1/2 cups of flour, and probably could have done with a bit less.
By this point, I was working the flour in with my hand rather than trying to stir it with a spoon. If you have an electric mixer with a dough hook, go ahead and use it!
Before setting it aside to rise, right in the same bowl, I sprinkled some flour over the top and sides, in case it rose high enough to touch the bottom of the bowl’s lid.
Lightly cover the bowl, then set it in a warm place for about an hour. With our chilly our kitchen is in the winter, I heated our oven to its lowest setting (145F on “warm”), then shut it off before I started mixing the flour into the dough. The covered bowl is left in the warm oven, with the light on, to rise. Anywhere that is warm and draft free will do.
Here it is, after an hour. It just barely touched the bottom of the lid! :-D
The dough it then pushed down and worked a bit to incorporate the flour that had been dredged on top.
Next is a very, very important step.
A piece of the dough needs to be removed and set aside for the next batch of bread!
I dumped some flour on a container and plopped about a cup of dough onto it.
Once the new dough baby was set aside, the rest of the dough was dumped onto a 9×13 inch baking sheet that was lined with parchment paper. The last time I made this, I used a parchment paper lined lasagna pan, but I could also have split it into two parchment paper lined loaf pans.
If I didn’t have parchment paper, I would have well oiled the pan, first.
Speaking of oil…
After spreading the dough out to fill the bottom of the pan, I stabbed at the dough with my fingers to create “dimples”, then topped it with oil, course salt and dried parsley flakes.
I happened to still have some fake truffle oil that I used, but an olive or avocado oil would work just was well.
The pan was then set aside for the dough to rise again. Since this batch is so flat and thin, I started preheating the oven for 450F right away. Had I used loaf pans or the lasagna pan again, I would have let it rise longer before preheating the oven. If I had used no yeast at all, it would be left in a warm place until doubled in size.
While the shaped loaf was waiting to go in the oven, there is this to deal with…
The bottom of the bowl still has quite a bit of dough stuck to it!
We can’t let that go to waste!
Into the bowl went the new dough baby, and the flour it had been resting on.
While working the flour dregs into the dough baby, scrape as much of the dough stuck to the sides and incorporate it into the dough baby.
You probably won’t get all of it off the sides, which is okay.
The dough baby is now ready for a nap. I have a canister of flour that I bury it in, but it can also be buried right in a bag of flour, as long as you’re not planning to use the flour for anything else in between bread baking!
After the dough baby has been buried, it will rise quite a bit before collapsing in on itself, breaking through the surface of the flour. Remember to check on the dough baby later on, to make sure it is still covered in flour.
Once the oven is ready, place the pan of bread into oven and bake. If you wish, place a container with about a cup of water on the rack under the bread pan, to add some steam to the oven as it bakes.
For a very flat loaf like what I made today, it took about 25 minutes. A deeper loaf, or a pair of loaf pans will likely need 30-40 minutes. Bake it until it looks like this.
With the oil added to the surface, it will have a deep, golden colour when it’s ready.
When baked, remove from the oven and left to cool for a few minutes. Once it is safe to do so, remove the bread from the pan and onto a cooling rack (parchment paper makes that job a LOT easier!).
I really like the big, flat slab of bread, but it is a bit hard to cut a slice off! :-D
Here is how it looks on the inside.
The crumb is light and fluffy, yet still wonderfully chewy. The star of the show, however, is that golden, flavorful top crust! It’s just a lovely and delicious combination of textures and flavours.
The only problem with this bread is how difficult it is, not to just scarf it all down right away! :-D
Here is the recipe.
Old Dough No Knead Bread
Ingredients:
old dough set aside from previous bread baking
4 cups warm water
2 Tbsp sugar
1 Tbsp traditional active dry yeast (optional, or use 2 Tbsp if you don’t have old dough)
2 Tbsp course salt
about 7 or 8 cups of flour
small amount of good quality oil (olive oil, avocado oil, etc.)
small amount of dried parsley and course salt
Break up the old dough into a large bowl. Pour water over the old dough and stir. Add the sugar and yeast and leave to proof for about 10 minutes. If you do not have old dough, use the larger amount of yeast and proof it in the sugar water. If using only the old dough and no added yeast, leave the bowl in a warm place until the mixture is bubbly.
After the yeast and old dough has proofed, add 3 cups of flour and mix thoroughly until it forms a very smooth batter. (An electric mixer can be used at this stage.)
Add the salt and 1 cup of flour, mixing thoroughly.
Add more flour a little at a time, mixing thoroughly after each addition, until it reaches a thick but sticky consistency. Use your hands to mix in the last of the flour. (If you have an electric mixer with dough hook attachments, switch to the dough hooks at this point.)
Leaving the dough in the bowl, dust the top of the dough with flour and cover loosely. Place in a warm spot to rise until doubled in size.
Prepare baking pans by lining with parchment paper or oiling thoroughly.
When the dough has risen, punch it down again, folding it into itself to incorporate the flour dusted on top.
Dust some flour on a small plate or bowl. Remove about a cup of dough for the next batch of bread, setting it aside on the floured container until later.
Pour the remaining dough into the prepared baking pan(s). Using your hands, press the dough to fill the pan to the edges and corners, then stab into the surface with your fingers to create dimples in the dough.
Carefully sprinkle oil across the surface of the dough, then use your hand to spread it evenly across the surface.
Sprinkle the oiled surface with course salt and dried parsley.
Set aside in a warm place to rise.
While the bread is rising, return the dough set aside earlier to the mixing bowl, along with any flour in the plate or bowl. Use the flour and the dough ball to scrape off any remaining dough stuck to the surface of the bowl, working the dough ball until smooth. Shape the dough into a ball, then bury it in a container of flour, for use in the next batch of bread.
When the pan of rising bread is almost doubled in size, preheat the oven to 450F.
Place the bread in the centre rack of the preheated oven; if desired, place about a cup of water in an oven proof container on the lower rack to create steam.
Bake until the bread is a deep, golden colour – about 25 minutes when using a 9″x13″ baking sheet, about 30-35 minutes if using loaf pans, or a cake or lasagna pan. The finished loaf should sound hollow when the bottom is tapped.
Set aside to cool in the pan for a few minutes, then transfer the bread to a rack to finish cooling.
I took advantage of yesterday’s warmth with a trip into town. At one point, on the way back, I was driving through precipitation that couldn’t make up it’s mind if it was snow or rain! LOL We actually hit 3C/37.4F, which was a couple of degrees warmer than forecast.
Then the temperatures plummeted overnight. While the actual temperatures remained above -20C/-4F, the wind chills brought things down colder than -30C/-22F Apparently, there was even a storm last night, though it seemed to be well to the south of where we are. We got hit with high winds, mostly.
As I write this, we are at -17C/1.4F with a wind chill of -28C/-18.4F
While I was doing the cat stuff outside, most of them just stayed in the cat shelter and watched me though the windows. They still had lots of food in the kibble house, but I also toss some inside the entry of the cat house, where I have another food bowl. I don’t put much in there, since I don’t want to encourage other critters going in there. That food bowl was empty.
Some of the cats did come out for some warm water; the heated water bowl does the job, but when it’s cold like this, I like to give them water that is actually warm, and they really seem to appreciate it.
Then they all just disappeared! Not into the cat house, but running off around it, with some running under the storage house.
I discovered why when I turned around as saw we had a visitor!
My younger brother’s dog had come for a visit!
He just thrives in these temperatures! The colder it is, the more he loves it.
They have yard cats too, of course, so when he comes here, he expects to be able to come right up to ours and play! Butterscotch and Rolando Moon (and Beep Beep, if she were still outside) are more familiar with him, as he used to visit my late father all the time, but the other cats where born after we moved here, and the sudden appearance of a fluffy giant is rather frightening for them! Meanwhile, he just wants to play. :-D
As I was finishing my rounds, I managed to get him to follow me down the driveway and start heading home, but as I came back, he was suddenly bounding beside me, leaping and jumping in the snow, trying to get me to play with him!
Unfortunately, the winds made staying outside any longer than I had to, out of the question.
My goodness. I just glanced at my weather icon on my computer and noticed we’ve already started to drop in temperature. Looking out my window, it’s a clear and sunny day and looks like it should be quite pleasant out there, but we’re now -18C/-0.4F, with the wind chill down to -31C/-23.8F We’ve already hit the high of the day, and it is expected to keep slowly dropping from now on until tomorrow. We’ll have one more mild day tomorrow, then temperatures are supposed to plummet for a few days before getting mild again. With concerns over the vehicles, we plan any outings around the forecasts, which means quick run to check the mail and pick up more bird seed and deer feed will be done tomorrow.
Unlike our furry visitor, we do NOT thrive in this cold, and neither do the vehicles! :-D
The temperatures have gone up quite a bit today, and the outside cats are quite appreciating it!
I was very happy to see Rosencrantz this morning! I haven’t seen her in a couple of weeks.
Butterscotch also made an appearance this morning. I didn’t see her yesterday.
Her babies were just loving the new snow, running around a chasing each other in it. :-)
Butterscotch, however, would not come anywhere near me this morning, so I wasn’t able to check her wound at all. She seemed to be moving around fine, though, so that’s a good sign.
Nostildamus made up for her lack of interest, wanting all sorts of pets and attention!
He has such soft fur.
Today was a day when everything looked soft and fluffy. Even the trees.
The warmer temperatures brought with them the softest, fluffiest of snow. We got about 2 inches of it by this morning; two inches of mostly air!
The Potato Beetle is not amused. The kittens might be enjoying the snow of their first winter, but the adult cats seem much more ticked off about the whole thing! :-D
We’re supposed to drop to more normal, chilly temperatures after today, so I think I will take advantage of the day and make a trip into town to pick up a few things we are starting to running low on.
Just glancing at my weather icon on my toolbar as I write this, and see that we have reached 0C! (32F) The wind chill is at -6C/21F, which is still quite balmy! A wonderful day to get outside. :-)