CamPark T40 Trail Camera: first day review

I was quite looking forward to seeing how the new camera worked after it’s first night. We got a few centimeters of snow last night, and it was blowing quite a bit – I had 400 images of snow from the garage camera in my email this morning, and I’d already deleted about 300 before going to bed! So I did have some concerns that I’d have hundreds of stills and video of snow.

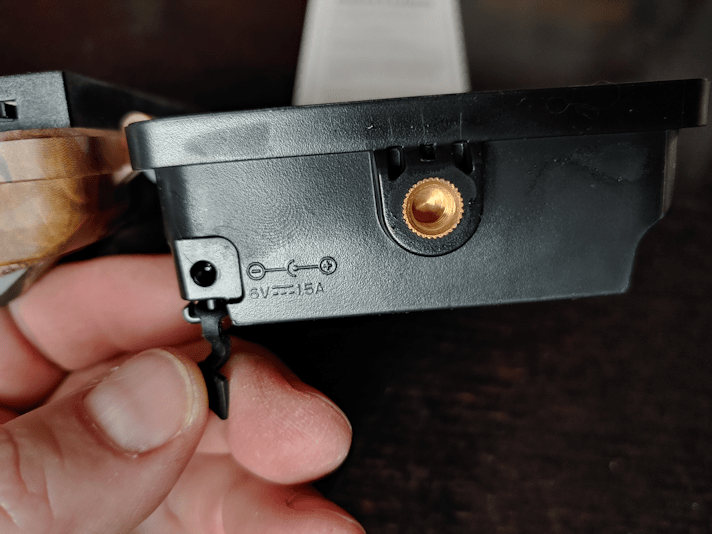
I did see one potential problem before even opening it. The camera is water tight, but snow accumulated on the top. Even brushing it off, it does mean moisture can potentially get into the camera when it’s opened. That is one benefit the old cameras, with their bottom latch, had over the side swing design.

I brought along a small, disposable bowl as a safety catcher for the micro SD card. I’m glad I had it! I was able to prep the new card from it’s little case, so I could quickly and easily switch cards, and have it waiting in the bowl. The card in the camera was easy enough to get out – it just needs to be pushed in and it will unlatch, as is typical. I then let it fall into the bowl rather than try and pull it out with my fingers. There is not a lot of space for fingers to grab the card. I do like the micro SD, but this is another thing that I would consider as better with the older cameras, because I am switching cards out daily.

As I suspected, putting the new card in is going to be an issue. It needs to be pushed in far enough to latch, but getting it to that point is not as easy. Just using a thumb for finger isn’t good enough. It has to be pressed in with a fingernail. Awkward to do while holding a bowl, and the camera itself wiggles. Until it catches, the memory card is pretty loose, and it would be way too easy for it to fall out – and it that little thing falls into the snow, the chances of finding it are very low! It would be much better if the slot were on the side, instead of the bottom.

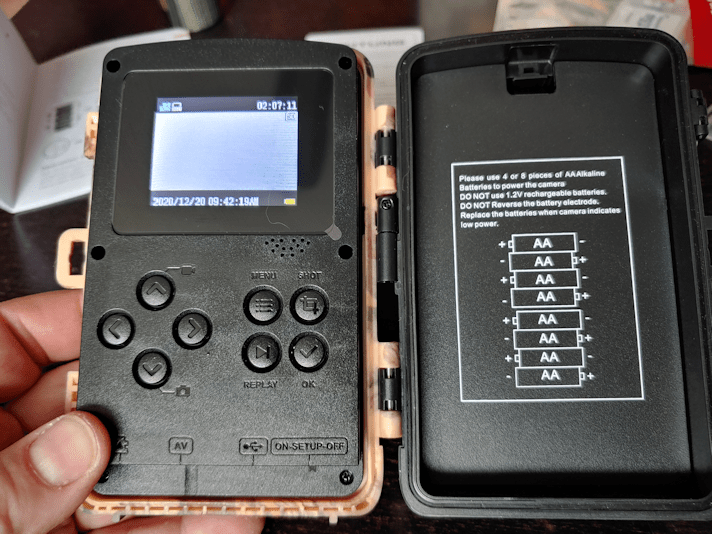
Once it was in, I tried to check the preview screen, as it was just black. It doesn’t “wake up” when the memory card is taken out, like the old camera’s did. I put it on set-up and the screen came live, but it didn’t even show the little start-up image. The screen was basically white, with a greyish bar across. I hit the menu button, and I could see text trying to show up in the grey area, but nothing readable. I figure the screen was not handling the cold very well.

Which did not bode well.

Once I started uploading files to the computer, however, I was encouraged. It’s set to take 3 still images, then a 10 second video, which means 4 files for every time the motion sensor gets triggered. There were a lot more files than just me fiddling with the set up.

I have it set to maximum quality for both stills and video, and I must say, I was really impressed! Here is the second of the three still shots it took of my brother’s dog, coming to visit.

The files are so large, I reduced this image to 25% of original, just to keep the file size down!

It was rather jarring to see such high quality images of my own face as I fiddled with the camera position. It turns out I make some rather strange expressions while concentrating… :-D

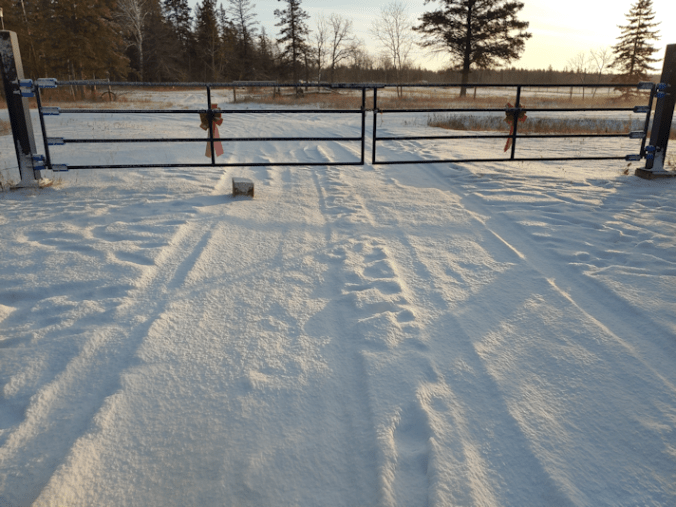
With the old camera, the gate barely fit in the frame, so this wide angle is awesome. More importantly, the motion sensor has a wider range, too. It caught one of the cats going by at the far end of the gate. With the old camera, it wouldn’t have even been in frame, never mind picked up by the motion sensor!

Also, I love the information bar across the bottom. It even includes temperature! Which was funny to watch as I went through the files. It started at 14C, still warm from the house. By the last file, it was at -17C!

It’s also much more readable. The old camera included time, date, file number and moon phase icon, all crammed into the bottom right of the image.

The processing speed on this is much faster. With the old cameras, when set to video, there is a delay between when the motion sensor is triggered and when it starts recording video. For, say, a vehicle driving by at normal speeds, that would leave me with either the very tail end of the vehicle, or nothing but a cloud of dust or snow, settling on the road. When set to still shots, it’s faster, but not by much.

This thing is fast enough that it can get the burst of 3 stills at the beginning, and the vehicle is still picked up in the short video. And not just the tail end, either. I’m very impressed.

As for night shots, it also seems to be smart enough to know not to turn on for snow! The other trail cam had a couple of videos triggered by snow. The new camera had none at all. There was one series of files taken when it was dark enough for the infrared flash, triggered by a vehicle, and that was the closest thing to night shots we got.

I am really happy with this camera so far! We shall see how it handles the upcoming weather, though. A storm is predicted to hit us tomorrow, and by Wednesday, we’re supposed to get 30-45cm (11 – 17 inches) of snow! January and February are our coldest months, so that’s when it’s really going to be tested.

At this point, however, my husband and I are already talking about getting more of these. They are inexpensive, and it would be really good to have cameras in other areas of concern.

The Re-Farmer

CamPark T40 Trail Camera unboxing

I have been really looking forward to this new trail camera!

This brand is not available in any of our local stores. The ones I’ve seen are pretty much the same design, if not the brand, of what we already had. I was perfectly willing to go with the same brand to replace the old camera which, after 2 years of constant use, has become finicky. I’ll talk about the features that convinced me to choose this camera, but ultimately, there were two things that really convinced me to get this one. The first was watching the video review, and the reviewer commented on how little battery power it uses. That is a big one, since I have found our current cameras – especially the older one – just suck through batteries. Especially in colder temperatures.

The other thing was the price. This camera uses micro SD, so I had to buy those (I got three 32 gig micro SD cards, though I only needed two), but the total still came out to just under CDN$90. The cameras we have now, which were bought for us by my wonderful brother, cost far more. He was able to get them on sale, as they are older models, so that helped, but if I were to get a new model of what we have now, we’d be paying anywhere from $150-$250 in the stores.

For us, we are using the trail cams as security cameras, so that is what we kept in mind when it came to the features that were most useful.

Let’s take a look at what’s in the box.

Along with the camera itself, there is a USB cable that allows you to hook it right up to your computer. There is the hardware to set up a permanent mount, or an alternate strap. For now, we will be using the strap, though the mount would be much more convenient. The camera will be mounted on a fence post, and we plant to take that fence out at some point. Once that’s done, we’ll have access to trees that will be much better to mount it on. It might be a couple of years before we get to that point, though!

There was also an instruction manual. I just hadn’t found it yet, when I took the picture! :-D

Here is one of the design features I like. It opens like a book. The side latches are easy to open and close, and you can even attach a very small lock, if needed. The seal is waterproof, which is essential for this design. Our other cameras open from the bottom and, while it is very quick to change out the memory cards, it becomes an issue when the batteries need to be changed.

With this design, the batteries can be changed without having to take the camera down. With our old cameras, the batteries are changed from below. Once the cover is popped open, they fall right out, but you can’t get fresh ones in without moving it.

The batteries were more trouble to put in than I expected, though. The springs seem a bit delicate, and move quite a lot. Hopefully, that will not be an issue. I won’t find out if it is, until it’s time to change them.

At the base under the batter case is the 1/4″ tripod thread for the mount. The DC connection is something I’m quite thrilled to see. If this camera works out, we might want to invest in a solar panel kit, which would plug in here, and not have to change batteries at all!

At the based of the cover half, there is the slot for the micro SD card. That was surprisingly hard to get in until it clicked in place. Switching memory cards is something I see as a potential problem. It is so tiny, and if I drop it, finding it again it going to be a challenge!! I will have to get into the habit of carrying something I can hold under the camera to catch anything that slips out of my clumsy fingers! :-)

There is an AV jack, the USB cable port, and the power switch.

The older cameras have small digital display for set up, but this one has a small screen and a mini computer, really. You can preview files, as well as use the camera as a manual camera.

The settings are another area with additional features that are important for our needs. Both our older cameras can do still shots or video. This one can do that, plus be set to do a burst of up to 3 still, then take a short video. I have it set to take 3 stills, then video. The length of video is also more flexible. Our older camera took videos at 30 seconds long , the newer one could go down to 15 seconds. We could set them for longer, but not shorter. Which is okay, except that when the motion sensor gets triggered by a car going by too fast for the camera to actually catch, we’re left with videos of dust or snow settling to the ground.

It’s the delay between shots that is going to make a huge difference. In the other cameras, the shortest delay is 15 seconds. A lot can happen in 15 seconds. Particularly when you’re recording someone vandalizing a gate. :-( The best I was able to set them at was 15 seconds of video (or 30, on the older camera), followed by a delay of 15 seconds. Even when doing stills, there’s that 15 second gap between shots.

This camera’s delay can be set as short as 5 seconds!

I now have it set to take 3 stills, followed by 10 seconds of video, with a 5 second delay.

There are a lot of other setting options as well. Photo and video qualities have quite a large range (I have those set to best quality for now). Motion sensor sensitivity can be adjusted for high, low and medium. I’ve left it at medium.

Oh, and while going through the settings, there is the most annoying beeping sound.

That can be shut off!

It can even be set to take time lapse photos, or to take recordings within a set time only, as well as being able to record audio. It can also be password protected.

Once I got the settings to where I wanted, it was time to attach the strap.

It has a simple locking buckle to hold it in place. The newer of our other cameras has a strap as well, and the locking buckle on that is of higher quality than this one. I don’t expect to be undoing it often, so that should not be an issue.

Finally, it was time to set it up.

Here is the old camera on the left. If you look at the bottom, right corner of the camera, you can see the latch to open the bottom. When the memory card is removed, the display screen turns on automatically, while the control buttons are protected inside.

This older camera came with a pair of elastic cords to attach it. It used to be on a tree, which was just small enough for the cords to wrap around. I like how easy the elastic cords are, for taking it on and off, but they limit what it can be attached to. On this fence post, they had to be wrapped extra around the post an to get it snug. The straps are more flexible as far as the size of what you can wrap it around, but it’s more of a pain to get in place. So there’s a trade off, there.

The camouflage pattern on the new camera is… not very camo. :-D

One of the other features on this camera is the “setup” mode. The power switch has “on”, “set up” and “off” positions. When it set up mode, lights flash when the motion sensor is triggered, so I could walk back and forth at the gate, and see exactly when and, more importantly, where I was triggering the sensor. Once it was set, I could open it up again and switch it from “set up” to “on.”

This camera has a wide angle lens (the camera it is replacing does not, but the newer one does) and the motion senor is also wide angle. This is important to me. With having two cameras on the gate, I was able to see just how much one camera or the other was missing, simply because the motion sensors weren’t being triggered in time. I think this one is going to be a solution to that problem.

After using the set up function to position the camera, I set it to the “on” position and left it. Tomorrow, we shall see what we got!

Besides me walking around and fussing with the camera. ;-)

The down side is, once it’s been set to “on”, there is nothing to tell me if the camera is actually working. With the older cameras, after switching the cards, I would make a point of triggering the motion sensor, so make sure they were working. I could tell, because there is a small red light, just to the left of the motion sensor in the photo, that would blink. A few blinks for a still short, or continued blinking for the duration of a video. They also made a quiet shutter-type noise. This camera is completely silent. It’s also too bright for the infrared flash to turn on, so I don’t even have that to go by.

Since there is nothing to tell me it’s doing anything, a part of me can’t help but think it’s not actually on.

We shall see what we find in the files tomorrow!

The Re-Farmer

Special delivery!

Look what I found this morning.

I had actually checked the tracking status last night, and was surprised to see it listed as delivered.

In the city.

It wasn’t visible from the security camera live feed, because…

… camouflage! :-D

At least the UPS driver found us! :-D Checking the trail cam video later, I saw him pull in, dash out the side of the van, slide the box under the gate, and dash off again.

So… among our projects for the summer is to build a person gate on the side of the main gate, and set up a box for deliveries. :-)

This is our new trail camera, to replace the one that’s gone funky and isn’t recording anything. It’s still trying to work – on some of the night videos on the other camera, I could see that the infrared flash was triggered, but there was nothing on the disk. Sometimes it works, sometimes it doesn’t

The new camera is up now, and I’ll be doing an unboxing post, next. :-)

The Re-Farmer

Babcia’s Bread Experiment, part 8: ham and cheese roll!

For the next while, as I remove part of the dough from one batch to use in the next batch, I will be taking out slightly larger pieces of dough, to make larger batches of bread with it, next time.

Our flour canister is tall and narrow, so I’ve made a point of flattening the dough baby a bit before burying it in the flour. When I opened the canister last night, I found the dough baby had grown enough to emerge from the flour like a mushroom!

I think today’s dough baby will the the last one I can fit into the canister! I’ll have to start burying them directly in the flour bag. They get so big! Which is encouraging, since that shows how lively the yeast is, so it’s a good problem to have. :-D

The dough baby was light, with a slightly crunchy dry shell, and a thick bubbly interior. The larger size made it a bit harder to tear apart to put in the little crock to soak overnight, so the pieces were a bit on the large size. That did not seem to make a difference to how it looked in the morning.

I soaked it in 2 cups of warm water overnight then, because I wanted to increase the amount of dough I was making, I cheated a bit and let maybe a tablespoon of commercial yeast proof in another cup of warm water. Right now, I’m getting enough to make the equivalent of 4 small loaves, and I eventually want to be making the equivalent of 4 large loaves. I don’t plan to get to my Babcia’s level of a dozen loaves at a time! :-D Making enough for 6 or 8 loaves, maybe, but not a dozen!

Once again, I used a mix of all purpose and Durum wheat flour, and let it rise only once before shaping. When I am no longer using commercial yeast, I’ll add an extra rising again. I also split it to do one half plain, and one half fancy. For the first half, I made it into 4 knotted buns and used a cast iron pan to bake them in again, which is working out very well.

The second half got divided again, to make a pair of rolled loaves.

Each piece was rolled out, then small pieces of leftover ham were scattered evenly, followed by generous amounts of shredded sharp cheddar, mozzarella and Monterey Jack cheese.

Before rolling them up, I did dampen the edges with water, but I did not try to seal the dough.

Once rolled up, the ends were tucked under, and they were left to rise.

The knotted buns were baked first, and turned out quite adorable.

The ham and cheese rolls, as expected, did leak out the bottom seam!

That’s okay. It just got crispy on the bottom of the pan, for some extra deliciousness. :-)

I would not recommend doing this without using parchment paper. :-D

A huge bubble formed under the top, as the cheese melted and the layers collapsed below. That did make it a bit hard to cut through! :-D

The ends that were tucked under were a lot more substantial. I the slices where the large bubble formed, the top crust was almost like a fancy chip! :-D

We had them for supper with tomato soup. It was a very nice combination! :-D The crispy cheese bits made for a lovely little treat, too.

I’d call this experiment a success! :-)

The Re-Farmer

Crab Apple Cider Vinegar: bottling day

For those of you who have been following this blog for a while, you may be wondering what happened with our cider vinegar.

Yeah. The stuff we were supposed to taste test 2 months ago, to see if it was done!

It’s been sitting in the old kitchen all this time.

Given how cold it gets in there, I wasn’t too worried about it.

For those who are new to this blog (welcome! Happy to see you!), you can check these posts out. All the links will open in a new tab, so you won’t lose your place here. :-)

Prepping a cap for an airlock – using the tools at hand
Making Crab apple cider vinegar: airlock or cheesecloth?
I am such a goof: crab apple cider vinegar reboot!
Crab apple cider vinegar, fermentation progress
Crab apple cider vinegar: straining day

One of the issues I had was, what to store the vinegar in? The last time I made it, I could just use a quart jar. What did I have that was big enough, easy to pour from, and that I could close? I discovered that one of our 1 gallon (4L) glass jug that we have for making mead has a top that fits the same caps from the 3L jugs currently holding hard apple cider vinegar (which is also ready for bottling), so I was able to use that.

Once I had the bread dough rising, I brought the ACV in out of the cold!

Both of them had visible mothers, floating on top. There was very little visual difference between the airlock and the cheesecloth jars. The airlock one had some condensation near the top of the jar, and that was about it.

I drew some out of each jar, using a turkey baster, to taste test.

Both of them had a mild, vinegar smell to them. Both of them were also had a VERY strong vinegar taste!

The girls taste tested them, too, and we all agreed that there was a slight difference in taste between them. The cheesecloth one (the girls did not know which glass was from which jar when they tasted them) has a slightly milder, more pleasant taste.

Meanwhile, I did a bit of research on what to do with the mother. We won’t be making this again until next fall. Can the mothers be kept for that long?

It turns out they can.

I was able to remove the mother from the cheesecloth jar before pouring, but didn’t have as much lock with the airlock jar. :-D So I put a small strainer over my funnel when I poured the vinegar into the cleaned and scalded jug. There wasn’t enough room for both jars in the jug, though. Yes, I mixed them together. I’d have kept them separate, if I’d had another small jug, but I did not.

Which was okay. I read that the mother has to be immersed in vinegar, and kept air tight, for storage. So the remaining vinegar was left in the jar, along with both mothers.

The gallon jug of ACV will go into the fridge for later use.

The jar with the mothers was sealed, and is now back in the old kitchen for storage.

I am quite happy with how this turned out. Having left it for so long, it’s a lot stronger than if we’d bottled it back in October, like we originally intended, but that’s okay. Using our own crab apples, from the one tree with the best, sweetest apples, not only resulted in a gorgeous colour, but it’s own unique flavour.

We will definitely be doing this again! Next time, though, we will just use cheesecloth and skip the airlock.

Now we just have to do a hydrometer test on the hard apple cider and see how it is. It would be awesome to have some of our own hard crab apple cider to enjoy with Christmas dinner! :-) Hopefully, I can get that done in the next day or two.

The Re-Farmer

Wicked!

My goodness, it’s wicked out there this morning!

That -12C (10F) isn’t too bad. It’s the -21C (-5F) wind chill!

Actually, I’m pretty sure that in our yard, the wind chill is more severe than that!

The amazing thing is that we are supposed to reach 0C (32F) by this evening.

The winds are driving into our yard from the south/southeast. One thing we have noticed since moving here is that it’s those south winds that are the worst! When it comes time to plant more shelter belt trees, that is where we will need to focus on.

With the cat house and kibble house, the winds are driving right into the active areas. There isn’t much we can do about it. Even shifting the kibble house to more of a 90 degree angle with the cat house, wouldn’t do much with these winds. The good thing is, when my brother built the shelter for his dogs, he added on that “porch”, and the entry has two layers of carpet strips. Without those strips, the wind would be blowing straight into the opening, even with the kibble house sheltering it more. Any wind that does get in is going into the “porch” area, and not affecting the main part of the shelter very much, so the kitties are still cozy inside.

The kibble house is working out very well, though. The inside is sheltered from the wind almost completely, so the cats can eat in peace. Even the gap under the kibble house is quite sheltered. The sheet of insulation I put under there (the photo is from when that was done; it was too cold to take photos this morning!) actually blocks spaces where the wind would be getting in from the south, since it fits under the support pieces.

The water bowls are not sheltered, though. The heated bowl near the entrance – which had ice forming across the top, again! – has some shelter, but the others along the side of the cat house are getting the full brunt of the wind.

I think, next year, we should build another small shelter for the non-heated water bowls. Depending on how it’s positioned, it can act as a wind break, while still allowing sunlight to reach the one window of the cat house they love to sit in so much! :-)

Amazingly, I still had cats following me around while I was switching out the memory cards on the trail cams. Poor Potato Beetle was shivering when I picked him up and carried him back to the house. The silly boy had been up on the roof, earlier. No shelter up there!

I am so glad we don’t need to go anywhere today.

Doing bread baking and laundry sounds really good right now! :-D

The Re-Farmer

Our 2021 garden: More seeds in! and… oops. :-D

Hmmm. Our internet is cutting in and out like crazy today, so I’m hoping I’ll be able to post this right away!

Today, our first batch of seeds from Veseys came in. Yay! There are more that will be shipped later, but even so, that little box was just jam packed! You can read about all that we ordered, and why we chose what we did, here (link will open in new tab).

This is what we got in today.

First, the wildflower mixes. These are both for planting in the fall, so we will have the summer to prepare the locations we intend to plant them in. The Western mix is intended for outside the yard, between the fence and the road, to attract pollinators. We have not yet decided exactly where the Alertnative Lawn mix will go, other than well away from the house. My husband is allergic to bee stings, so anything like these needs to be planted away from any doors, the path towards the garage, and the firepit.

Spinach is among the items we will have to ensure are protected from deer. In talking about it, the girls and I are leaning towards building simple box frames with wire mesh that will fit over the beds.

Here are 2 of the 3 varieties of beans we orders; a yellow variety will be shipped later, plus the peas. The collection I’d intended to order for peas suddenly went out of stock, so I ordered these as an alternative, and I’m still seriously considering ordering another variety or two. I like peas more than I like beans! :-D

The girls and I are looking into various trellis designs for these. Yes, I know, bush beans aren’t supposed to need them, but we are looking to grow as many things vertically as we can.

We already have 2 varieties of corn from Baker Creek Rare Seeds, so we might not actually plant these at all this year. It all depends on how well we are able to prepare growing spaces. The Rare Seeds varieties are priority, and we have to keep in mind that we don’t want them to cross pollinate.

The pelleted seeds will be much easier to plant!

We now have 4 varieties of carrots, and I will happily plant them all. Carrots are a favorite vegetable in our household. The challenge will be creating the soft, deep soil they need. We have space to create one more bed in the soft soil where the wood pile used to be, and that’s it. Our topsoil is shallow, and we have a lot of rocks. My mother always successfully grew carrots in the old garden bed area, but I don’t think the soil has been amended since my parents sold off the cows and retired from farming. Raised beds would be the solution. At this point, the girls and I are thinking we’re going to have to order in a dump truck load of garden soil. We have not yet decided where we will build permanent raised beds, so any beds we do build this year will likely be temporary.

At least we don’t have to worry about the deer going after the carrots.

Three of the 4 varieties of onions are in; the 4th variety are sets that will be shipped at planting time in the spring. I’m hoping to plant these in the old kitchen garden, near the house.

The beets are intended for the additional bed we’ll be preparing next to where the garlic is currently planted, where the old wood pile used to be. My daughters had wanted to get another variety as well, but they were sold out. These might be enough. Like the spinach, we are thinking of protecting these from the deer with a wire mesh box.

We got extra cucamelons, just in case the tubers I dug up and currently have stored in the old kitchen, where it’s not quite as cold as outside, don’t make it. We intend to plant these along the chain link fence bordering the south yard. The melons will be trellised, elsewhere. Possibly near…

…the squashes we will be trellising. :-) I am hoping to build squash arches for those.

The summer squash will, hopefully, be trained up stakes. We could get away with letting them spread on the ground, like we did last year, but it’s supposed to be healthier for the plants to train them up, while pruning off the lower leaves.

Speaking of summer squash…

Last summer we ordered a summer squash mix, with extra sunburst squash. We enjoyed them enough to order the same thing again for next year. I was a bit confused as I unpacked them from the box, however…

Somehow, I accidentally ordered three collections!

Totally my goof on that one.

I’ve offered the extras to my siblings. I don’t even know if they like squash. If they don’t want them, we’ll just keep them for next year! :-)

In the spring, along with the onion sets, cherry tomato mix, yellow beans and mulberry tree, we will be getting 4 varieties of potatoes. While using the Ruth Stout, no-till, heavy mulch method did work last summer, we are thinking of using grow bags or something similar, next year. Those would give us more flexibility and, hopefully, higher yields.

The more I think about the condition of our soil, and the spaces we will be working with, the more I think getting a truckload of garden soil is going to be the best thing we can do at this point. I would much rather build up the soil over time, but I simply did not expect the soil condition to have deteriorated as much as it did, over the years. Plus, given how much my planned timeline for cleaning up the yards has been pushed back, anything that we can to do make up for that will be good.

We just have to find a local source and see how much it costs. I think it’ll be worth it, in the long term.

The Re-Farmer

Christmas tree do-over

We tried to be creative with the Christmas tree, with so many kittens in the house. The older cats are not as much of a concern, but the little ones are another story!

Well, after several days of cat caused disasters, today I came into the dining room to find they’d trashed the tree. For the past few morning, I’d come out and find the tree skirt askew, ornaments on the floor, and branches bent. Clearly, they knew enough to wait until we were in bed to wreck havoc. However, this time, they’d gone in while we were all busy and done even more damage than what I’d already fixed in the morning. The tree was tied to the wall, so they couldn’t knock it over, but they clearly were climbing it as high as the ceiling, and trying to get into the shelves beside it, as even things from there were on floor. Nothing fragile, thankfully, but still…

After finding the last mess, I gave up.

I took the tree down completely – which only took a few minutes, considering we’d already decorated it sparsely.

My older daughter, who lent us her little tree to begin with, saved the day.

It turns out this tree can be flattened, without damaging it. She found a way to hang it flat against the door, then redecorated it.

She even used wrapping paper to hide the base, where the legs would normally be attached.

I think it looks even better now!

Later, I actually caught some cats under it, looking up forlornly.

The little monsters!

The Re-Farmer

Babcia’s Bread Experiment, part 7: having fun

After yesterday morning’s cat disaster, the girls were kind enough to drop their own projects and take over cleaning up.

While I was doing my rounds outside, the furry little monsters created another mess. One of the jade plant posts I’d managed to shield from their digging got knocked to the floor. *sigh* I was able to repot the plant. Not sure if it will survive. Once again, the girls took over the clean up so I could take care of other things. At least I wasn’t bread baking today!

The one down side of using my grandmother’s method to bake bread is, once I take the dough ball out of the flour and start it soaking overnight, it must be used the next day. There’s no way to postpone it if other things happen!

By the time we were doing cleaning up and putting things away, I started the bread baking much later than planned.

I did, however, cheat a bit. I wanted to mix up more dough, so I could take off more to set aside, for larger batches in the future. As it was, the overnight soak was not looking as active as I would have liked, so I did end up adding some yeast and a touch of sugar, and let that bubble up some more.

Then, since I have it, I used half all purpose flour, half durum wheat flour.

This is after it had about an hour to rise.

I notice a definite difference in the dough, when using the durum wheat flour. The dough feels smoother and more elastic. It was very noticeable when making the pasta, but even at half-and-half, for the bread, it is much nicer to knead.

My grandmother would have used whatever flour they had, so mixing it up like this is probably not all that different from how she did it.

After removing a portion to set aside for the next batch, I split the dough in half. The first half was left plain, though I did have some fun with it, anyhow.

I split the dough into 4 pieces (because there’s 4 of us), and made knots.

The resulting bread was a bit denser and chewier with the durum wheat flour in it. We all like our bread on the toothsome side, so we quite enjoyed it.

For the other half, I was going to do a cheese roll, but my daughter suggested rolling and folding it. With the extra gluten in the durum wheat flour, it could actually handle that, so I have it a try! This time, I made two loaves.

After rolling the dough out flat and as thin as I could, I used some of the herb butter my husband had made. I don’t know what all he included in there, other than a LOT of dill (the container slipped…), some caraway seeds, and a touch of lemon juice.

Then I added some shredded cheese. It’s a mix of sharp cheddar, mozzarella and Havarti.

Then I folded it in on itself.

It then got rolled out slightly and folded again, before final shaping. I had to use a touch of water to get the edges to stick closed.

Once in the pan, I flattened them out a bit more with my hands, before leaving them to rise.

Of course, some of the cheese did make its way through the dough as it baked, but my goodness, it looked and smelled wonderful!

It was quite flaky on the outside. On the inside, the dough absorbed much of the butter, leaving cheesy little pockets all over!

It was quite enjoyable! I don’t know that I would go so far as to do the folding method again (though it would be awesome to do that again with some sliced green onions, to make a version of green onion cakes!), but I definitely do it as a cheese roll in the future.

Until then, I am not going to have some with my lunch!

The Re-Farmer

Morning disaster

Ah, the “joy” of cats in the house.

When I picked up my mother to take her to the doctor yesterday, she came out with a big bucket riding on her walker, full of Christmas decorations. She didn’t want them anymore, and there’s lots of room on the farm, so…

*sigh*

We aren’t using even a quarter of our own decorations this year!

So last night, I went through the bucket – which turned out to be 2 of them, and they were fermentation buckets from wine making kits. I’m finding them all over the place! Now I have two more… *sigh*

What I found was one full sized sparkly garland, some smaller lengths, and bits and pieces that are so small or so messed up, they’re not even worth keeping for crafting. I filled a basket of baubles, most of which were newer, but a few of which I am sure I remember from my childhood. There were some random pine cones, some still glued together. Then there was a … garland “cake” with small red ornaments as the “cherries”. I have no other way to describe it! I believe it’s supposed to be a centerpiece? I don’t know.

The cats, of course, were extremely curious. As these were on the dining table until I could figure out what to do with them, I covered the whole thing with a shiny gold vinyl tablecloth that was in the one bin of Christmas decorations we brought up. The girls still ended up having to tuck it under and weight it down, because of course, as soon as the room was empty, the started jumping on it.

That was not part of the disaster this morning.

With my husband’s pain levels, he has very different hours than we do. It’s not unusual for him to be forced out of bed in the wee hours. He tries to help as much as he can, though, so he took over the job of topping up the cat kibble and refreshing their water in the basement – going up and down the stairs is painful, but it’s about the most exercise he can handle right now, so he does it. Then he fills a jug of water for the outside cats and leaves it for me, so I’m not having to run water while one of the girls is in the shower or something. He leaves that on the counter between the kitchen and dining room.

On the kitchen side of that counter, there’s the sink in the middle with counters and cupboards on either side. On the dining room side is a floating counter that’s about a foot higher than the sink. Very handy to reach from both sides. It’s also the perfect length and height that we fit a pair of cube shelved under it; a 9 cube shelf for dishes, bowls and platters, and a 6 cube shelf with cube storage boxes holding our hats and scarves, mitts and ear warmers, etc. Yes, all 6 of them are full of winter gear.

There’s enough space between the tops of these shelves and the underside of the counter to hold my many tiny bowls, jars and pinch pots, among other things.

The counter top has our advent wreath on it, as well as things like a fruit bowl, paper towel roll and other odds and ends. You know how it is. All flat surfaces immediately get filled! I’ve manage to keep it pretty open, lately.

Unfortunately, the cats do jump up on there, when we are not around, so I have been finding the candles askew on the advent wreath, and things knocked over.

This morning, I was awakened by some very unhappy exclamations from my husband – and more than a little blue language.

Coming out, I discovered him desperately trying to find something to soak up what turned out to be almost a gallon of water, while also chasing away cats.

One of them had knocked over the jug of water he’d prepped for me to give to the outside cats. Nearly a gallon of water.

My husband unrolled the remains the paper towel roll (which was already partially wet from the water hitting it on the way by) while I dashed (okay, hobbled…) for a mop.

The next while was spent mopping up and moving things. My husband’s back soon gave out and he had to leave.

The cube shelves are open in the front, of course, and water not only got into the shelf – and the stuff in it – but under the shelf before flowing around the counter and puddling all along the front of the sink. We’ve got a couple of those interlocking foam mats there, partly to make it easier on the back while doing dishes, partly to cover the damaged worn out floor, so that had to be removed, too.

Once the bulk of the water was cleaned up, I had to empty the 9 cub shelf and pull it out, to get there rest of the water out from under it. The cube shelf itself has water damage, but as I emptied it, I noticed more damage on the bottom shelves. The stuff we use the most off is kept at the top, the least often at the bottom, so we don’t have a lot of cause to see this. It seems that things the cats play with have been getting in there, and they’ve been digging to try and reach them. Enough that one cube actually has a hole scratched into it! How long that’s been there, I have no idea!

So right now, I’ve got the shelf out and drying. Then I had to do the outside rounds and feeding of critters. I’ve since cut some pieces of wood that will be placed under both shelves to lift them a couple of inches off the ground, so that if there is another spill, it won’t damage the shelves even more. Every single dish, bowl and platter will need to be washed before we can put them back.

Only then can I deal with the dining table and do the old dough bread baking I had planned for today.

*sigh*

At least it was just water, and nothing was broken.

I am now going to go investigate the unfortunate noises I’m hearing…

The Re-Farmer