Trying out the beets

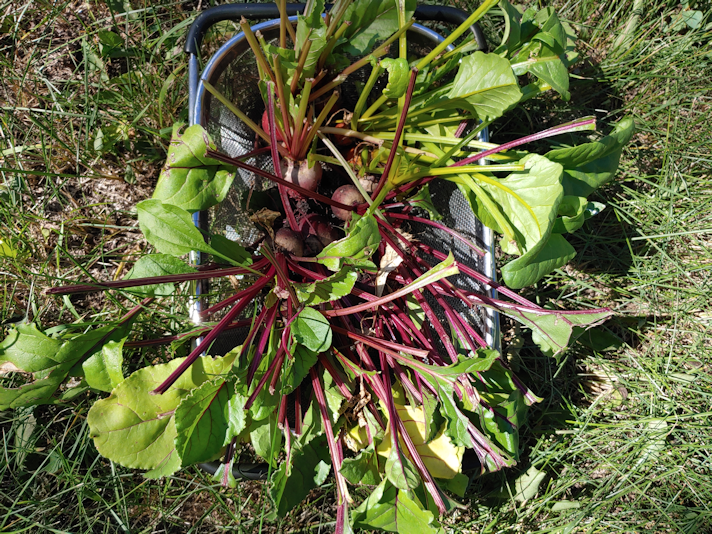
Many thanks to carolee of herbalbelssingblog for her suggestion on how to cook our little beets.

She wrote:

Even tiny beet thinnings are wonderfully tasty! Pulled whole and left intact, scrub the beet and root to remove any soil and give the green parts and stems a good rinse. Heat butter in a skillet and throw the entire beets in. Cover with a lid and let cook a couple minutes. Add a bit of chicken broth or water and cover again. Cook just until beet is barely tender and greens are wilted. Salt and pepper. (If beets are 1″ or more, I cut them off and cook them a couple of minutes by themselves before adding stalks and greens.) Enjoy!

Which sounds awesome!

Me being me, I had to modify things a bit. After scrubbing the beets, I found I did have to cut off the remaining greens and trim bits and pieces off, then cut them into similar sized pieces. I started them in butter, as suggested, but I didn’t have chicken broth.

I did, however, have leftover roasted ham still in its gel, so I cut off the last bits of meat from the bone, and used the gel as the liquid with the beets.

Because you can’t go wrong with pork, right?

There was quite a bit of the gel, and not a lot of beets, so I cooked the liquid down until it was basically a glaze.

My apologies for the following picture. :-D

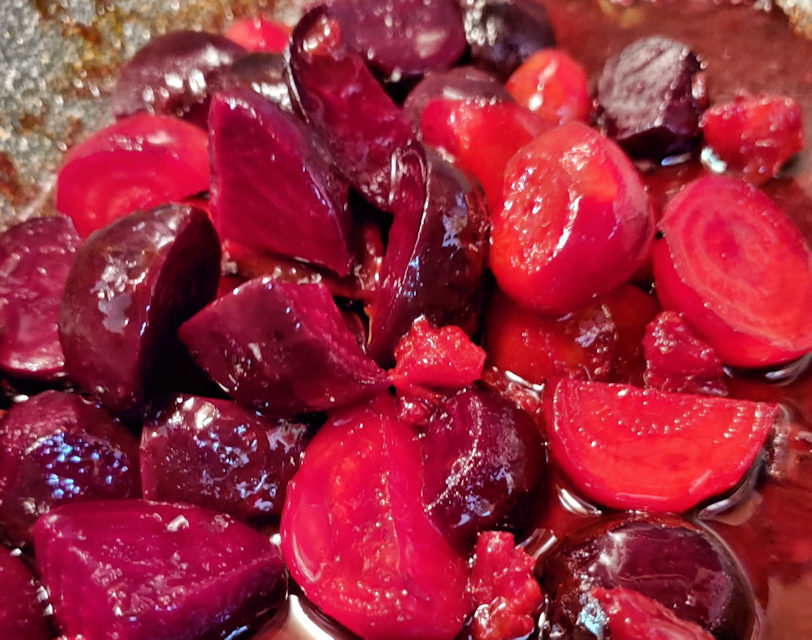
This is the better of the pictures I took.

Those deep red beets make it all look like carnage happened! :-D

You can still make out the rings in the beets with alternating red and white rings, though the white is dyed pink now! The golden beets were so few and so small, you can’t really see them at all. There is one right on top. Honest!

But those deep red ones… wow!

So how did this crazy combination taste?

Really good! It had a salty, “meaty” flavour, but the sweetness of the beets still came through, and the flavours complimented each other surprisingly well. Some major umami happening in there!

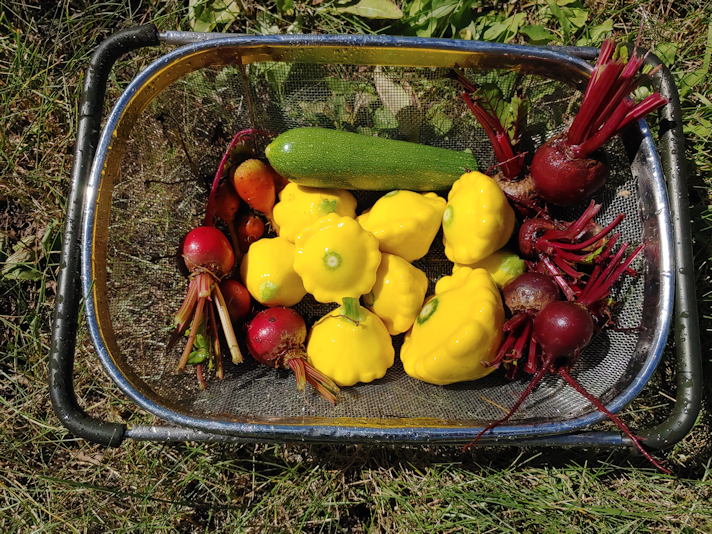
In another pan, I browned the last of the ham bits, added cubed sunburst squash and green zucchini, with a bit of water to cover and steam them, before cooking away the liquid. Lastly, I covered it all with beaten eggs and covered the pan again, turning the egg mixture a couple of times to make sure it was cooked through.

And that was lunch. :-D

I’ll likely try beets cooked this way again, though with some other liquid. Maybe even the recommended chicken stock! :-D

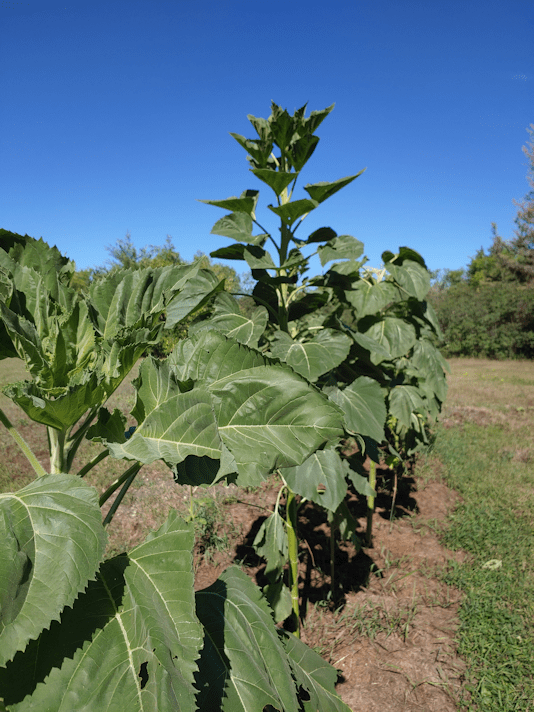
Meanwhile, I picked more sunburst squash this morning and we’re getting to the point of having to start preserving them. I’ve looked at some recipes to do a quick pickle with them, but so far, none have really appealed to me. Plus, they all called for ingredients I don’t have.

With today looking to hit 30C, it’s going to be an inside day, so I’ll have plenty of opportunity to look up other ideas.

We will most likely just freeze them. :-D

The Re-Farmer

Planning ahead: when to harvest sunflowers

This post is to follow up on a comment from My Home Farm about sunflowers. They’re doing some awesome things on their property and Victorian era house, so do head over to visit their website and YouTube channel!

On learning we were planting sunflowers, my mother had made a big deal about how the birds were going to eat them all. She had planted sunflowers in the garden in the past, and told me they never had a chance to get any, because of the birds.

Well, I know that isn’t quite true, since I remember as a kid, pulling sunflowers out of a head and eating them, inside the house. So we obviously managed to harvest at least one seed head! :-D

The sunflowers we have planted are intended to be used as bird feed over the winter, though we will certainly eat some of them ourselves. To do that, however, we need to be able to harvest and preserve the seed heads before the birds eat them off the plants!

In looking up how to do that a while back, I found this video.

After watching this, I am thinking that my parents may have left the seed heads out for too long, before trying to harvest them.

Any seed heads we harvest will be hung up in our basement to dry.

Right now, our giant varieties of sunflowers are still developing their seed heads. We haven’t had issues with squirrels or mice, but the deer do seem to enjoy them! Of the original planting of 2 varieties of giant sunflowers, we had about a 50% loss. Some simply didn’t germinate, but most were lost to deer. A third variety of giant sunflowers were planted to fill in the gaps, and almost all of them came up, with a few later lost to deer. It should be interesting to see if they will have enough of a growing season left to produce seed heads we’ll be able to harvest, too. We do intend to plant sunflowers again next year, including trying some other, unusual, varieties. We intend to plant more of each, with the expectation of losses, but will also try to fence things off to keep the deer away, too.

But first, we’ll see what we will be able to harvest, this year!

The Re-Farmer

Sad beets

While doing my rounds this morning, with my usual checking of the garden beds, I decided to try and harvest some of the beets.

Our poor, sad little beets.

I could tell that a deer had visited last night, as pretty much the last of the larger beet greens are gone. I had been looking at them while doing my rounds yesterday evening, thinking about how they were the only ones left, and now they’re gone, too!

Of the three varieties, the dark red Merlins have managed to survive the most, and have the biggest beets. This is the bed furthest from the spruce grove, and the one that had the last of its big leaves eaten last night.

The yellow Boldor variety seemed to be a favorite of the deer! As you can imagine, they aren’t very big. In fact, some of the ones I picked are so small, I’m not sure they’re even edible. I’m not sure, but I don’t think they have a developed flavour at that size. I’ve never tried to eat beets that small, so I really don’t know!

The Chioggia, which is supposed to have alternating rings of purple and white inside… I was able to pick only three of them.

It’s looking like most of the beets are a write-off.

But at least we’ve got lots of sunburst squash!

Yesterday, I was going to try cooking in the fire pit, and had prepared things in foil packets. It was way too windy, unfortunately, so I just baked the packets in the oven. With one of them, I’d cut sunburst squash, and all 3 kinds of zucchini, into similar sized chunks. After tossing them in olive oil and seasonings, I wrapped them in several layers of heavy duty aluminum foil, sealing them tight. After baking them for half an hour at 350F, I cut open the foil, added dollops of butter, then put them back into the oven until fork tender. They turned out very well! I think they would have turned out even better, cooked over a fire.

Among the things we’ve learned since moving here is, when we do set up a permanent outdoor cooking area, we will have to make sure there is shelter from the wind! It’s frustrating to have a wonderful day to cook outside, but not be able to do it safely because of the wind.

As for the beets, I’m not sure what to do with them. There are so few of them to work with!

Any ideas or suggestions?

The Re-Farmer

Brave babies

It was a lovely evening to do my evening rounds last night, so I found myself sitting in the sunroom, Potato Beetle curled up on the swing bench beside me, fiddling with my phone and enjoying the quiet.

When I suddenly realized there was a tiny tabby in front of me!

One of Junk Pile’s kittens was exploring through the open door, saw me, saw Potato Beetle and ran off, before I could get a photo.

Alas!

With where the bench is set up, the open inner door blocks my view of where the cat food is set up, but I could hear some crunching – and an almost non-stop, low growl.

That would be Junk Pile. Even as she sometimes comes a bit closer to give us a sniff, she keeps up that growl.

I ended up moving to the steps of the storage house to see if I could lure some kitties closer – or at least get them more used to me.

The food bowl I’ve put there for them was empty, but the ones by the house still had kibble in them, so I didn’t add more. I wanted to encourage them to go to the house.

Little Braveheart and her tabby sibling were willing to come out and play nearby. More Braveheart than Tabby, who often ran back into the spirea.

Unfortunately, Rosencrantz was in there, too, and she does not like Junk Pile’s babies. Any time one of the kittens went in there, I could hear her growling at them.

In the end, I think they felt my presence was safer!

Little Braveheart was even almost-kinda-justabout-willing to play with the stick I was wiggling around.

After a while, the kittens took to ignoring me and just running around and playing – which, in itself, is progress – before going to the house to eat.

Junk Pile, however, has three kittens.

Eventually, I spotted the shy one, peeking at me from the spirea. It never came all the way out, so I left, so as not to stress it too much.

Instead, I went into the sun room and dug up a baggie with a few cat toys in it, tossing some outside for the babies. Potato Beetle was with me again, and he went running after the toys, too. I was pleased to see that he and the kittens would sometimes play with the same toy together, with no animosity between them!

As I was walking back and forth around the front of the house, the kittens stopped running away immediately, and would either just ignore me, or pause to watch.

More progress!

Meanwhile, I went over to the junk pile, and was happy to see and hear some of Butterscotch’s kittens. She came out for pets, too. Earlier in the day, though the living room window, I saw one of her orange babies playing in the collapsed wine barrel that I’d cleared beside. I had hoped they would find it a good place to play, and they have! Now, when they do, we can see them from the house. :-)

It will take time, but I am hoping we can socialize these babies better than we were able to with Junk Pile and Rosencrantz. The biggest problem with working on that, however, is mosquitoes. I was being eaten alive while out there! I didn’t want to put on bug spray, as I’m sure the smell would be unpleasant for the kittens. Unfortunately, the times when the kittens seem to come out the most are also the times when the mosquitoes come out, too!

We’re working on it, though! :-)

The Re-Farmer

How does the garden grow?

Check out this sunflower!!

It’s just towering above the others! I figure it’s getting close to 7 ft tall. :-)

There are a couple of others that are getting really tall, too. Like this one.

You can really see the huge seed head developing on this one – and it should get much, much bigger!

But… something’s wrong with another tall one. It’s head is gone?

Nope.

Just fallen over.

It looks like some sort of grub got in there.

This is actually above my head, so I am seeing it better now, in the photo, than I could while looking at the sunflower. The head is still alive, so I’m hoping it’ll survive. It’s the only one that has this.

While going through the squash and harvesting some – the sunburst squash is very prolific! – I spotted an odd looking squash and took a closer look.

This green, bulb shaped squash is a sunburst squash! It looks completely different from all the others on the plant.

I left it, and look forward to seeing how big it gets, and if the shape changes. :-)

The girls and I have been talking about what we want to plant next year, and sunburst squash is definitely staying on our list!

The Re-Farmer

New compost location

Yesterday, I moved the metal ring the compost pile was in to its new location. I ended up using the same wires to hold the seam together; they’ll just be much easier to undo in the future! That allowed me to simply roll the whole thing over.

This is where we decided to put it. I’ve trimmed around this old tree stump many times, but those little trees (several kinds of them) keep coming back.

In the background, you can see part of what was cleared to get at the chokecherry trees, including another tree stump, and the pile of spirea and thistles from clearing towards the junk pile.

Now that we’ve discovered her babies, I fear Butterscotch has already moved them somewhere else. I hope not!

After taking a pruner to the saplings and adding a pile of dried weeds and grasses I’d pulled up when clearing here earlier, it looks full already!

The tree stump does take up a lot of space.

Time to start burning!

I needed to burn out all around the stump, to hopefully kill off the root systems those saplings keep growing from.

By the time I was done, several hours had past, and it was completely dark when the girls came to help me make sure all the coals were out and put everything away.

I had the hose going so much, spraying around the fire and keeping the sparks from getting far, it was actually muddy by the ring.

On the plus side, I got rid of the pile of spirea and thistles in the process.

Of course, I needed dry wood to keep the fire going, since much of what I was burning away was pretty green. So I raided the pile of branches by the garage that’s waiting to be chipped.

I couldn’t see anything, but I am convinced there is a wasp nest somewhere in that pile. I can hear them, and the sound is NOT coming from the nearby Chinese elm.

!!

This is how it looked this morning.

Hmm. I am thinking I might need to do this again, before we start using it for compost. The stump didn’t burn much, but that’s okay. It’s the area around it that has stuff I want to kill off, so they don’t start growing into the compost when we start it.

I’m thinking this will be a good location. We’re happy enough with the nearby garden beds (even with the deer decimating our beets) that we will continue growing there, so having a compost pile nearby will be handy. It’s closer to the house – but not too close! This is near where we plan to build the cordwood shed to use as an outdoor bathroom with a composting toilet. It might be in the way during construction, but the way things have been going, I’ll be happy if we can just dig out the sod where we want to lay down gravel and level things, first.

Though we plan to have a composting toilet, the contents will NOT be used for compost in any of our garden beds. I’ve seen many sites talk about how great human waste is for compost, and it absolutely horrifies me. It’s not the waste itself I have concerns with, but what might be in it. Not many people are in my husband’s situation, having to take more than a dozen different prescriptions, but even if it’s just OTC pain killers, hormonal birth control, or other prescriptions, it will be an issue. So we will have a separate dumping site, well away from anywhere food will be grown.

So that is how things are progressing with the new compost location.

One of these days I intend to get some dual roller composting bins. They are supposed to compost a lot faster but, for me, it’s more about accessibility and mobility. We may not need it now but, at some point, it will be more of an issue.

That’s one thing I learned about living in the housing co-op we were in before moving back here. It was one of the few places that had a lot of wheelchair accessible housing, and many of my friends and neighbours had a variety of mobility issues. Now, I see everything with different eyes. It did make the transition to my husband becoming disabled much easier, to be honest. It can happen to any of us and, as we age, it’s almost inevitable. One woman I know uses the term TAB to describe people without disabilities: Temporarily Able Bodied.

Accessibility is now an almost constant thought in the back of my mind as we work on things and plan ahead.

Even with composting.

The Re-Farmer

Clean Up: spruce grove perimeter, by the Saskatoons

One of the clean up goals that got shifted back a year, due to my husband’s hospitalization and other issues last year, was to clear the spruce grove. Not all of it; parts of it will be left overgrown to shelter critters. I do want to get most of it cleared. This will be a multi-year project, but at the very least, I want to get the perimeter done.

That was supposed to include clearing around and into the junk pile, but now that we know Butterscotch’s kittens are in there, that will wait.

We never did get a chance to clear things out to reach the Saskatoon bushes near the junk pile, but I still wanted to get that done so we can reach them, and the chokecherry trees beside them.

Here is how it looked when I started.

The spruce tree in the foreground is still alive, while the tree on the left of the photo is dead, as is the one by the junk pile on the right of the photo.

(Also, I set up containers for kibble and water for the babies, and yes, they’ve already discovered them!)

There had been quite a few bushes and spirea at the base of the live spruce tree, and crowding the horseradish, that I cleared away a couple of nights ago (it was too dark for photos at the time), so a start has already been made in this area.

The first thing to do was cut away the elms that have been growing in the old wine barrel planter that used to be such a favorite place for the kittens to nap and play in. Then I began working a bit towards the junk pile. Not too far, though, as the spirea in there creates places for them to hide in.

I’d forgotten about that tire rim that was buried in there… :-D

After moving the tire rim into the old wine barrel planter, I discovered something else.

Those are concrete blocks, buried in the soil!

When we first moved here, the wine barrel on its side in the bushes was intact enough that the cats would sit on it. It was another favorite spot for them, until it rotted out enough that the staves collapsed! :-D

It looks like the tire rim was placed on top of the blocks, then the barrel on top of the tire rim until it eventually got knocked over. Unlike the planter, this was a whole barrel, not one cut in half to be a planter. I don’t know what it was set up for.

I’ve left the blocks for now, and did not clear further around the remains of the barrel. I figure this makes a nice spot for kittens to play in!

I didn’t want to go any closer to the junk pile – I don’t want Butterscotch to move her babies! – so I started working around the other side. Some of this area, I’d cleared before, but it doesn’t take long for spirea to spread out again!

Here is how it looked when I stopped for the day.

I would have liked to continue, but even working in the shade, it was just getting too hot.

The Saskatoon bushes are still loaded with – now dried – berries. I’m sure the birds will enjoy what we could not harvest. The chokecherry trees in there should be ready for picking fairly soon. It is likely too late in the season to make a difference this year, but clearing up around them will likely result in better growing and fruiting conditions, too.

Here is another view.

For this photo, I’m standing near the horseradish and facing right into the Saskatoon bushes, with a few chokecherry branches hanging over from the side.

This is how it looks from further in.

All those skinny little trunks you see on the right half of the photo are chokecherries and Saskatoon bushes.

When I worked in here previously, I’d cleared away the spirea up to a spruce tree with an extension cord hanging down from it. So most of this area had already been done. I only worked closest to the Saskatoon bushes and chokecherry trees for now. Eventually, I want to clear all the spirea out of here. There are wild roses growing not far from here, and I would like to encourage those to spread, instead.

As for this area near the edge of the spruce grove, I want to keep it clear of undergrowth. It’s one of the areas I want to eventually set up a bench and create a little haven, near the stone cross my late brother set up at the very edge of the grove. If possible, this would be an area I’d like to encourage moss to grow as a ground cover.

It was a fairly small area that got cleared, but there was a lot in it! I was able to pull most of the spirea out by the roots. With some of them, there was a LOT of root coming up with them! The topsoil here is decades of decomposed spruce needles, so it’s quite loose, making it much easier to get those roots out.

Eventually, we will have the tree company that cleared our roof and power lines come back and take out the two dead spruce trees here. We were supposed to get that done this spring, or at least get the chipping done, but we ended up spending all our money fixing vehicles and replacing appliances. We probably won’t be able to get it done this year at all.

Which gives me more time to clean up the area, which will make it easier for them to get at the dead trees.

Little by little, it’ll get done!

The Re-Farmer

Time to move the compost ring

When we moved here, the compost pile we’ve been using was already set up in a metal ring, near the old garden. It’s been pretty full for a while, and well past time to start another one.

Today, I decided to dig out the metal ring in preparation for that.

The first thing I did was use a potato fork to lever under it and loosen it from the soil, and clear away some of the mulch around it or things growing out from under it.

The ring is made of two pieces put together, and this is one of the seams that I cleared.

It’s held together with a combination of electrical wire and barbed wire (without any barbs).

Between my dad and my brothers, I think we ended up with a whole lot of scrap electrical wire available, because I’m finding it used for stuff like this, all over the place!

The barbed wire, however, is a new one. :-D Not that I haven’t seen it all over; just that it’s usually limited to jerry rigging barbed wire fences, so it make sense for them to be there.

It took some fighting with it, but I managed to get the wire unwrapped and back through the hole. Yay! I can move the rings now!

Or… not?

Ah. Of course.

Even though I’d lifted the ring out of the soil earlier, it wasn’t enough to reveal the second set of wires, holding it together.

*sigh*

The electrical wire was easy enough to get loose, at least.

Hmmm.

At this point, I got a pair of pliers.

A pair of pliers that also had wire cutters on them. Which I needed to use, after I unwrapped part of it. The wire ran under the ring itself, with no way to finish unwrapping it from this side.

Finally, it’s clear! I could leave the other seam as is, and lift the whole thing out from the compost pile.

I don’t actually have high hopes for the compost we’ll get out of this. What we added to it should be fine, but when I tried digging into it to turn it, earlier it the summer, I was still finding lots of wood (the summer before we moved here, my sister and her husband had piled pruned branches into it, with plans to burn it, until my brother pointed out that it was too close to an apple tree!). I also found plastic garbage and pieces of fabric rags. What else might be under there, I don’t know!

It’s free!

Plenty of roots were hung up on the wires at the seams.

After talking about it with a daughter, I think we will move this over a tree stump near near where the old wood pile used to be. The stump itself is in the way of things, and having a compost on top of it will encourage it to break down faster. Once the ring is in place, I’ll use it to burn some of the stuff I’ve been clearing out of the edge of the spruce grove. Things like thistles and spirea don’t belong in the wood piles we’re planning to have chipped. Before, I’d put them in the fire pit, but there’s so much of it, plus we’re actually using the fire pit for cooking, now. Some of the saplings I cleared away from around the tree stump are already growing back, so starting off with a burn will ensure those are killed off, too.

I hope I can find a better way to close up the ring than using those wires, though.

The Re-Farmer

Garden rain barrel; redux

With yesterday’s rain, it wasn’t until today that the rain barrel set up by the squash beds was dry enough to try patching again.

The silicon sealant is white, and so is the Plasti Dip spray, so it’s hard to see! Especially after I spread the sealant into the cracks.

Hopefully, this will do the trick and there will be no more leaking. Though, to be honest, the amount that was leaking was so minor, I’m not too worried about it. It’ll just water the spruce tree it’s sitting next to! :-D

I’ll leave it to cure for at least 24 hours before refilling the barrel. Then we will see how well this worked. :-)

The Re-Farmer

Fungus fire

Yesterday afternoon, we had a constant, light rain.

The perfect time to light a sketchy fire!

Of the several fungus infected tree stumps we need to burn out, I started with the only one that isn’t cut flush to the ground. I figured I should get the bigger one done first; the rest will get done very quickly, in comparison!

The metal ring I rolled over from where I found it by the storage shed was just the right size.

You can see some of the fungus from last year, dried up on the side of the stump facing me. On the other side is the remains of an ants nest. When we cut what was left of the tree down and left the short length of trunk next to the pile of diseased branches we’d pruned earlier this summer, the ants moved with it!

So no killing of ants involved. :-)

Of course, I made sure to have a hose handy, even with the rain. The wood used as fuel is from the stack of diseased branches, which all need to be burned.

I set myself up with a chair and an umbrella, too. :-D

It took a while to build the fire around all of the stump, partly because I needed to keep the fire small. It wasn’t directly under another apple tree, but close enough to potentially damage some of the branches.

I’m not too worried about that particular tree. Of all the apple trees, that one has the smallest, least edible apples on it.

The birds and deer like them, though, so that’s good.

This tree is one of the ones I want most to protect.

It’s at the far end of the row of trees, and next to one of the stumps cut flat to the ground that we found fungal growth on, too. This tree already has tasty apples! It has the wonderful combination of sweetness and tartness that I love. There is one other tree, at the very end, that also has really good apples, though they take quite a bit longer to ripen. The main grafted part of that tree died, and it’s the suckers from the base that are producing such nice apples. Usually, it’s the other way around.

So I’m rather motivated to keep this fungal infection from spreading! We really should have done this in the spring, but the weather was not at all co-operative. Spores for these emerge in the fall, so we have a bit of time, yet.

When I stopped for the day, I scrounged for something to cover the stump with. The fire was out, but might still smolder, so I wanted to make sure it couldn’t flare up or spread.

That top of an oil drum is something I fished out of the edge of the nearby spruce grove when I cleared the north side of it. The metal sheet was just one of those things among the garbage we dug up near the old garden shed.

The fire got quite a bit of it cleared. I don’t know how far into the wood the fungal infection gets, but even if the fire killed that off, I still need to get the stump down to ground level.

For now, I’ve taken an ax to it to break it apart a bit. We’ll start another fire on it later and repeat the process as often as necessary.

We’ll see what the weather is like.

The Re-Farmer