One of the clean up goals that got shifted back a year, due to my husband’s hospitalization and other issues last year, was to clear the spruce grove. Not all of it; parts of it will be left overgrown to shelter critters. I do want to get most of it cleared. This will be a multi-year project, but at the very least, I want to get the perimeter done.
That was supposed to include clearing around and into the junk pile, but now that we know Butterscotch’s kittens are in there, that will wait.
We never did get a chance to clear things out to reach the Saskatoon bushes near the junk pile, but I still wanted to get that done so we can reach them, and the chokecherry trees beside them.
Here is how it looked when I started.
The spruce tree in the foreground is still alive, while the tree on the left of the photo is dead, as is the one by the junk pile on the right of the photo.
(Also, I set up containers for kibble and water for the babies, and yes, they’ve already discovered them!)
There had been quite a few bushes and spirea at the base of the live spruce tree, and crowding the horseradish, that I cleared away a couple of nights ago (it was too dark for photos at the time), so a start has already been made in this area.
The first thing to do was cut away the elms that have been growing in the old wine barrel planter that used to be such a favorite place for the kittens to nap and play in. Then I began working a bit towards the junk pile. Not too far, though, as the spirea in there creates places for them to hide in.
I’d forgotten about that tire rim that was buried in there… :-D
After moving the tire rim into the old wine barrel planter, I discovered something else.
Those are concrete blocks, buried in the soil!
When we first moved here, the wine barrel on its side in the bushes was intact enough that the cats would sit on it. It was another favorite spot for them, until it rotted out enough that the staves collapsed! :-D
It looks like the tire rim was placed on top of the blocks, then the barrel on top of the tire rim until it eventually got knocked over. Unlike the planter, this was a whole barrel, not one cut in half to be a planter. I don’t know what it was set up for.
I’ve left the blocks for now, and did not clear further around the remains of the barrel. I figure this makes a nice spot for kittens to play in!
I didn’t want to go any closer to the junk pile – I don’t want Butterscotch to move her babies! – so I started working around the other side. Some of this area, I’d cleared before, but it doesn’t take long for spirea to spread out again!
Here is how it looked when I stopped for the day.
I would have liked to continue, but even working in the shade, it was just getting too hot.
The Saskatoon bushes are still loaded with – now dried – berries. I’m sure the birds will enjoy what we could not harvest. The chokecherry trees in there should be ready for picking fairly soon. It is likely too late in the season to make a difference this year, but clearing up around them will likely result in better growing and fruiting conditions, too.
Here is another view.
For this photo, I’m standing near the horseradish and facing right into the Saskatoon bushes, with a few chokecherry branches hanging over from the side.
This is how it looks from further in.
All those skinny little trunks you see on the right half of the photo are chokecherries and Saskatoon bushes.
When I worked in here previously, I’d cleared away the spirea up to a spruce tree with an extension cord hanging down from it. So most of this area had already been done. I only worked closest to the Saskatoon bushes and chokecherry trees for now. Eventually, I want to clear all the spirea out of here. There are wild roses growing not far from here, and I would like to encourage those to spread, instead.
As for this area near the edge of the spruce grove, I want to keep it clear of undergrowth. It’s one of the areas I want to eventually set up a bench and create a little haven, near the stone cross my late brother set up at the very edge of the grove. If possible, this would be an area I’d like to encourage moss to grow as a ground cover.
It was a fairly small area that got cleared, but there was a lot in it! I was able to pull most of the spirea out by the roots. With some of them, there was a LOT of root coming up with them! The topsoil here is decades of decomposed spruce needles, so it’s quite loose, making it much easier to get those roots out.
Eventually, we will have the tree company that cleared our roof and power lines come back and take out the two dead spruce trees here. We were supposed to get that done this spring, or at least get the chipping done, but we ended up spending all our money fixing vehicles and replacing appliances. We probably won’t be able to get it done this year at all.
Which gives me more time to clean up the area, which will make it easier for them to get at the dead trees.
When we moved here, the compost pile we’ve been using was already set up in a metal ring, near the old garden. It’s been pretty full for a while, and well past time to start another one.
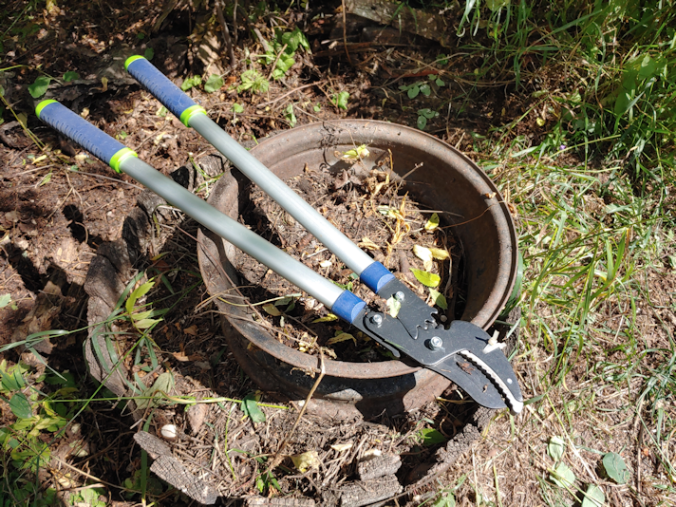
Today, I decided to dig out the metal ring in preparation for that.
The first thing I did was use a potato fork to lever under it and loosen it from the soil, and clear away some of the mulch around it or things growing out from under it.
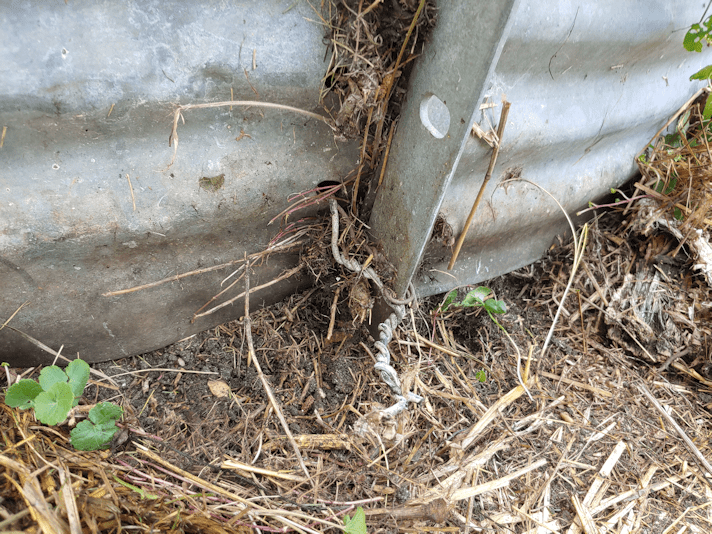
The ring is made of two pieces put together, and this is one of the seams that I cleared.
It’s held together with a combination of electrical wire and barbed wire (without any barbs).
Between my dad and my brothers, I think we ended up with a whole lot of scrap electrical wire available, because I’m finding it used for stuff like this, all over the place!
The barbed wire, however, is a new one. :-D Not that I haven’t seen it all over; just that it’s usually limited to jerry rigging barbed wire fences, so it make sense for them to be there.
It took some fighting with it, but I managed to get the wire unwrapped and back through the hole. Yay! I can move the rings now!
Or… not?
Ah. Of course.
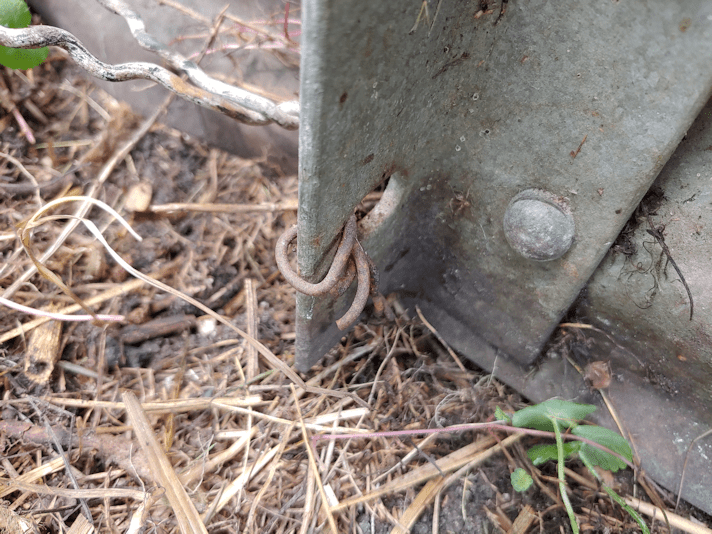
Even though I’d lifted the ring out of the soil earlier, it wasn’t enough to reveal the second set of wires, holding it together.
*sigh*
The electrical wire was easy enough to get loose, at least.
Hmmm.
At this point, I got a pair of pliers.
A pair of pliers that also had wire cutters on them. Which I needed to use, after I unwrapped part of it. The wire ran under the ring itself, with no way to finish unwrapping it from this side.
Finally, it’s clear! I could leave the other seam as is, and lift the whole thing out from the compost pile.
I don’t actually have high hopes for the compost we’ll get out of this. What we added to it should be fine, but when I tried digging into it to turn it, earlier it the summer, I was still finding lots of wood (the summer before we moved here, my sister and her husband had piled pruned branches into it, with plans to burn it, until my brother pointed out that it was too close to an apple tree!). I also found plastic garbage and pieces of fabric rags. What else might be under there, I don’t know!
It’s free!
Plenty of roots were hung up on the wires at the seams.
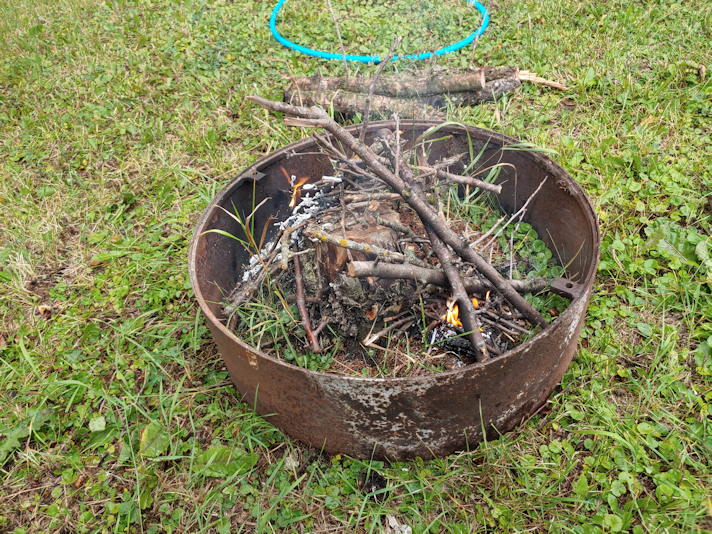
After talking about it with a daughter, I think we will move this over a tree stump near near where the old wood pile used to be. The stump itself is in the way of things, and having a compost on top of it will encourage it to break down faster. Once the ring is in place, I’ll use it to burn some of the stuff I’ve been clearing out of the edge of the spruce grove. Things like thistles and spirea don’t belong in the wood piles we’re planning to have chipped. Before, I’d put them in the fire pit, but there’s so much of it, plus we’re actually using the fire pit for cooking, now. Some of the saplings I cleared away from around the tree stump are already growing back, so starting off with a burn will ensure those are killed off, too.
I hope I can find a better way to close up the ring than using those wires, though.
Yesterday afternoon, we had a constant, light rain.
The perfect time to light a sketchy fire!
Of the several fungus infected tree stumps we need to burn out, I started with the only one that isn’t cut flush to the ground. I figured I should get the bigger one done first; the rest will get done very quickly, in comparison!
The metal ring I rolled over from where I found it by the storage shed was just the right size.
You can see some of the fungus from last year, dried up on the side of the stump facing me. On the other side is the remains of an ants nest. When we cut what was left of the tree down and left the short length of trunk next to the pile of diseased branches we’d pruned earlier this summer, the ants moved with it!
So no killing of ants involved. :-)
Of course, I made sure to have a hose handy, even with the rain. The wood used as fuel is from the stack of diseased branches, which all need to be burned.
I set myself up with a chair and an umbrella, too. :-D
It took a while to build the fire around all of the stump, partly because I needed to keep the fire small. It wasn’t directly under another apple tree, but close enough to potentially damage some of the branches.
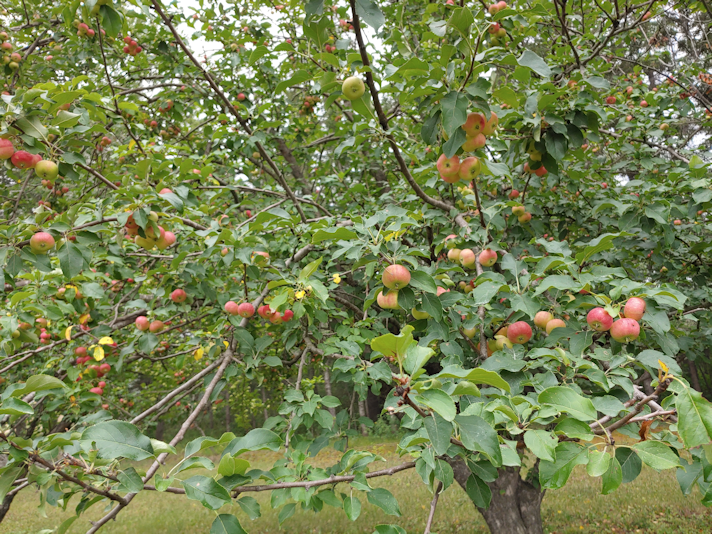
I’m not too worried about that particular tree. Of all the apple trees, that one has the smallest, least edible apples on it.
The birds and deer like them, though, so that’s good.
This tree is one of the ones I want most to protect.
It’s at the far end of the row of trees, and next to one of the stumps cut flat to the ground that we found fungal growth on, too. This tree already has tasty apples! It has the wonderful combination of sweetness and tartness that I love. There is one other tree, at the very end, that also has really good apples, though they take quite a bit longer to ripen. The main grafted part of that tree died, and it’s the suckers from the base that are producing such nice apples. Usually, it’s the other way around.
So I’m rather motivated to keep this fungal infection from spreading! We really should have done this in the spring, but the weather was not at all co-operative. Spores for these emerge in the fall, so we have a bit of time, yet.
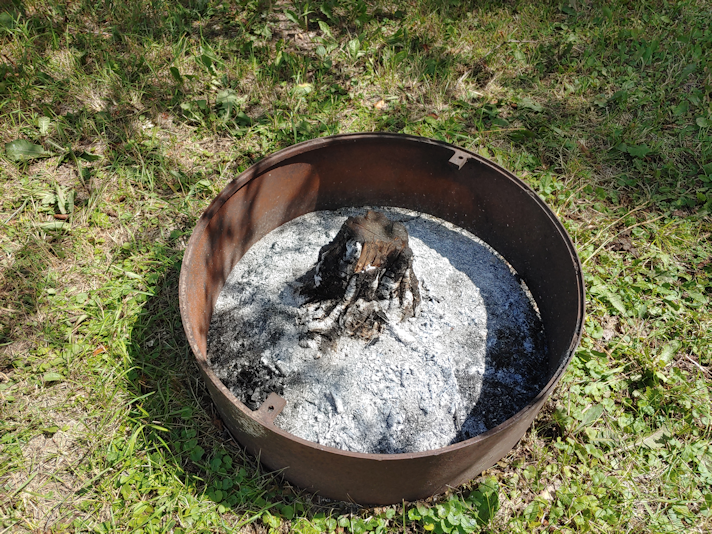
When I stopped for the day, I scrounged for something to cover the stump with. The fire was out, but might still smolder, so I wanted to make sure it couldn’t flare up or spread.
That top of an oil drum is something I fished out of the edge of the nearby spruce grove when I cleared the north side of it. The metal sheet was just one of those things among the garbage we dug up near the old garden shed.
The fire got quite a bit of it cleared. I don’t know how far into the wood the fungal infection gets, but even if the fire killed that off, I still need to get the stump down to ground level.
For now, I’ve taken an ax to it to break it apart a bit. We’ll start another fire on it later and repeat the process as often as necessary.
Normally, I would not have done clean up on a Sunday, but the chokecherries needed to be picked, and we couldn’t get at the two trees with the ripest berries.
Which turned out to be 4 trees… :-D
Here are the ones behind the garden beds where the old wood pile used to be.
The arrows are pointing to the two chokecherry trees. They are close enough together that I had thought they were just one tree at first. All around them are dead cherry trees with live cherry saplings coming up the bottoms, along with other odds and sots that have come up since I cleared things away last year.
I started on this side because I figured taking out the dead cherry trees would be the more difficult job. Especially since we were getting spotty rain, so I wasn’t going to string out extension cords to use the electric reciprocating saw!
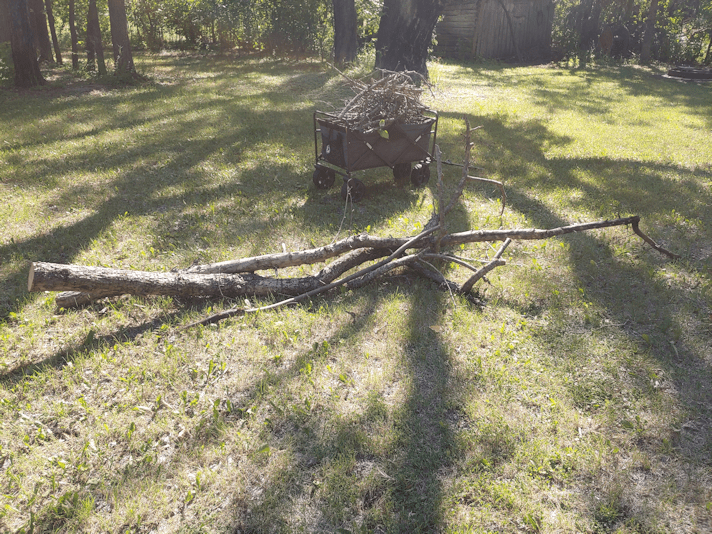
This is how it looked when I stopped.
The fallen spruce tree and poplars behind them kinda make it look like they’re not cleared, but there is plenty of space to walk around them now.
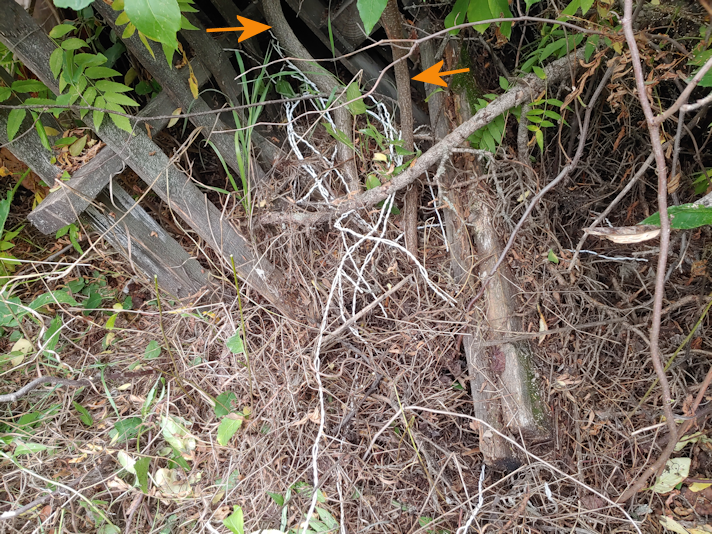
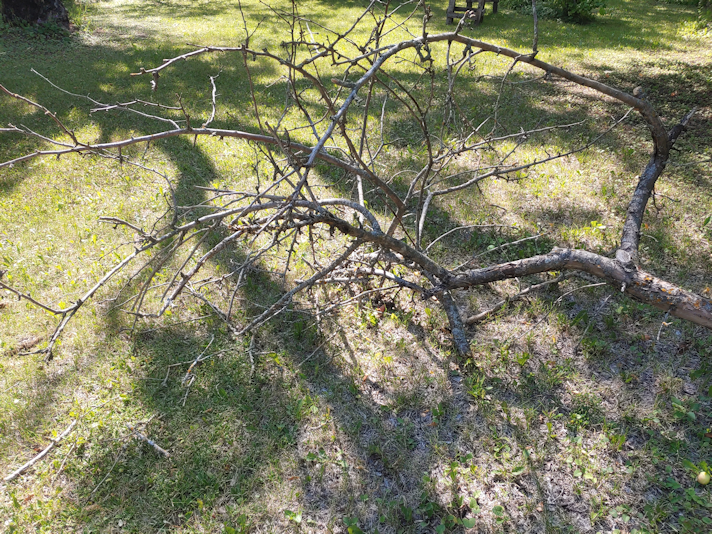
While the girls started picking berries, I moved on to the other side. This is how it looked before I started.
In the spring, I had cleared a path to the junk pile to access the wood stacked in it, and I’ve been trying to keep things clear around the Saskatoons. You can see those on either side of what’s left of the path, and the arrow is pointing to the chokecherry tree. Which is actually two trees next to each other.
Most of what’s here is spirea and thistles, with a bit of burdock, plus a few other things hidden by the spirea. I figured this side would be much easier to clear, since I could basically just yank them out of the ground.
I really should know better by now.
The spirea and thistles were, indeed, easy to pull up.
First, I’d forgotten about the fallen spruce tree in there, and how close it was to where I needed to go.
It’s been there for a long time, so I was pulling out bits and pieces that had broken off as it fell, as well as breaking off or pulling out rotten branches that were jutting out all over.
I’d uncovered the one stump that I already knew about, then found another, smaller one, beyond it.
As I worked my way closer, I found something else.
There’s a reason we call what started out as a pile of neatly stacked boards that used to be covered with a tarp, a “junk pile”.
So… that’s… wire? It looks like the wire from those little decorative fences you can get to put around garden beds.
Also, there’s an old pallet there.
Because, of course there is.
Don’t mind me. After clearing out the old wood pile and dragging away a couple dozen rotten pallets, I’m not much of a fan of those anymore! :-D I remember having to work my way around it, while searching for boards in the pile that weren’t too badly rotted.
As I worked my way closer, I found the chokecherry trees grew through the partially rolled up wire. Which gives an idea of how long it’s been hidden there!
That wire really does look like it’s from one of those little fences, undone. It even has cross pieces still wound into the twists.
At this point, I stopped!
It was clear enough to reach the trees, and most of the berries. So I started picking those, while the girls harvested carrots and little squashes. :-)
The piles of debris will wait until tomorrow to be hauled away!
This pile is almost all spirea and thistles, with a few smaller branches from the fallen spruce tree tossed in. I had to pull up some of the wildflowers, too. They’ve shown up all over the place this year, so there are plenty more around the yard.
This pile is mostly the cherry I cleared away from around the first chokecherry trees, plus the larger pieces of the dead spruce tree I was working around.
These are pieces I set aside to keep for future crafting or carving purposes.
As for the chokecherries, we picked about a gallon pail of them. The girls had picked from the tree by the squash beds, and the ones among the lilac hedge, too. Lots were left behind for the birds. We are finding more chokecherry trees deeper in the spruce grove, that are not ripe yet, so we will have more to pick, later on.
It’s a hot day today, but it’s going to get even hotter throughout the week, hitting above 30C/86F in a few days. Plus, I’ll be doing a lot of driving throughout the week. I figured if my brother could be out baling hay in this heat today, I can prune some deadwood!
There were two trees in particular I wanted to get at. Here is the first I worked on.
I had already cut the dead parts of the main tree, our first summer here. What was left were the suckers growing out the base. As the main part was grafted, what grew out the base was not the same type of apple as what had already died.
When I first worked on it, the live parts were bending low, so I left tall stumps of the original tree and used them as supports to tie the live ones to. One, growing out the middle, didn’t need the support.
As you can see in the photo, that’s the one that is now dead.
It actually did have leaves and even flowers this spring, but they didn’t last. As I cut it away, I was surprised it managed even that much. It was so dead and dry, I could only cut about half way, and then it was easier to break it off by hand.
One of the live branches was hanging down again, even though part of it was supported, so I got creative.
I found what was probably an old mop handle and zip tied it to one of the old stumps at the bottom, and to another live branch higher up. Then I lifted the bent branch and attached it to the support. Hopefully, this will be enough for it to start growing straight – or at least straighter – on its own. If nothing else, I won’t be getting my hair caught in it when I mow past it, anymore!
The next tree was a bigger job.
I’d actually thought I would be working on an old plum tree, but it was another apple tree that needed help.
There are two large branches on the apple tree that have died. In the background, you can see the dark coloured plum tree meandering its way up. The branches are so tangled, it was hard to see what belonged were, but it seemed that the plum branch still had live branches and little plums at the top.
I would see better, after the apple was cleared.
I took the slightly smaller branch off first (on the left of the trunk, in the above photo) using the reciprocating saw, and it came down fairly well. The branches at the ends were tangled with live branches, so it ended up standing upright on its cut end when it fell. Once I cleared that, it was time to get the big one down.
When cutting larger branches like this, you always have to be careful when it gets past a certain point, depending on the angle and weight of the branch. Once it starts breaking under its own weight, things can go in unexpected directions.
This one was a bit different.
It didn’t fall.
You can see the one live branch growing out the side, so I made sure to cut above it.
I cut right through, and it just sat there!
Hmmm… I wonder why that would be…
The live plum and apple branches were holding it up!
There was a lot to get tangled on!
For this tree, I used pruning spray on the cut branches, to protect the main trunk a bit.
There is still one branch alive on this tree, and it’s got quite a few apples on it.
The plum in the background does have a lot of dead branches, but at the top, it’s still alive. I am leaving it for now.
Usually, for stuff like this, I would have broken down the branches a bit, but otherwise just hauled it over to one of the piles of branches we’ve made while cleaning up over the past couple of years. I did things differently this time.
The small branches, I cut short and loaded into the wagon, to be used as kindling in the fire pit.
The large pieces will wait until I can co-ordinate with one of the girls to work on them.
The wood looks surprisingly solid. I’m going to see if anything can be salvaged for carving. If not, they’ll be cut to fire pit size for use during cook outs.
It isn’t much, but I’m happy to have gotten at least this bit done. There is another tree, an elm, near the fire pit area that is mostly dead. I actually thought it was dead our first year here, but after a rainfall, it perked up. Last year’s drought seems to have done it in, though. It’s quite large, though, so we’ll have to be more careful taking down the dead parts.
When we first moved here, three winters ago, there was a bird feeder mounted on a metal post at the opposite end of the flower garden where we currently have the platform feeder.
One of the first things I noticed about it was that there was a rock sitting on one corner of the base. I quickly discovered why it was there, when I lifted the top to add birdseed.
The whole thing tipped over to one side.
The rock was a counterweight, so it wouldn’t tip when birds landed on it, or in the wind.
Eventually, I took a look and discovered that the feeder had a metal mounting that fit over the post, so it could easily be lifted off.
Also, there were only 2 screws on one side, holding it in place, and that’s why the feeder kept tipping. Rather than add more screws. someone just put on the rock.
I’d set it aside for cleaning and painting, and for the past two years, it’s been sitting upside down on the bench near the main entry. I just kept forgetting about it.
This evening, my daughter wanted to add a second coat of paint to the bottoms of the picnic table legs, so I went out with her. We’d made a dump run, and I needed to hose out the plastic bin we put the cat litter bags into until we do. As I was putting the cleaned bin back next to the bench, I saw the feeder and realized this was the perfect time to prep it for painting. I just needed to take the two screws out and remove the post mount, first.
Of course, they were two completely different types of screws, that needed different screwdrivers.
One of them was actually bent.
That would be from the bird feeder tipping! I’m surprised they weren’t both bent.
Here is the feeder, after hosing it down to get rid of debris.
And spider webs.
I don’t know how much the birds would have used it, considering it was basically surrounded by the lilac, plus the maple tree that was growing through the middle of the lilac at the time. I’ve since removed the maple and pruned the lilac, so the post is now clear enough that I think the birds will use it, once we put it back again.
I suspect being engulfed in greenery had a lot to do with the feeder being so covered in lichen.
I scrubbed it as best I could, though there are still some crevices the brush I was using couldn’t fit into.
Which is fine. We’ll just paint over it.
I noticed there were holes drilled into the base to allow water to drain off. Considering much much water collected from the hose while I scrubbed, I don’t think they’re enough. I might drill a few more before we paint it.
If I remember… ;-)
I then flipped it upside down to scrub the bottom, then let it dry.
I see absolutely no sign that this was ever painted.
Yeah, the wood is definitely showing signs of rot.
It’s still pretty solid, though. Once it’s painted and the mount is properly secured, it will probably last for many more years.
The plan for tomorrow will be to head into the city for the rest of our monthly shop. Only one of my daughters will be coming along. I believe my other daughter is planning to do the first coat on the top of the picnic table while we are gone, when she takes a break from work. There should be plenty of paint to do the bird feeder, too.
I am also planning on painting the frame of the screened window I made for the old basement.
If all goes to plan, by the time this post is published, I should be in the city with one of my daughters, doing half of our monthly shop. While going over our list, we realized we will have to split it into two trips.
Of the various outdoor projects we need to work on, I decided to start on the picnic table. It meant working in the shade, and with water, so being out shortly after the hottest part of the day would be less of an issue.
I had company.
Creamsicle tired himself out, rolling in the dirt where the picnic table has been for the past couple of summers. :-)
We will be painting the picnic table a ridiculously bright blue that I found, but first, it needed to be scrubbed.
I started with the underside, since that required the most time. Here is how it looked before I started.
I had kinda hoped those white patches were old paint but, alas, they were not.
They were old, dry mold.
I spent the next while methodically scrubbing away everything but the underside of the table top.
Which revealed a fair bit, such as the state of these two legs.
There were rotten pieces that just sloughed off as I scrubbed.
I intend to paint the underside of the table, and especially the bottoms of the legs.
This old picnic table has a lot of rot on it, but it is still strong enough to sit at. The goal is to make it more pleasant to sit at, until such time as we can replace it. The paint may even add some years to it, but I don’t expect it to.
You can actually see the colour of the wood, now! :-D
At this point, I’ve scrubbed everything except the underside of the tabletop and only managed a cursory scrub of the few inches above it. Here, it became an issue of mobility. I don’t bend and reach very well anymore, which meant I needed to find a way to raise the whole thing higher.
The area I was working in is near the old garden shed, which is an area I was able to clean up of a lot of stuff, our first summer here. Among those things was a stack of what I eventually learned are chimney liners. They and the chimney blocks we are now using as a retaining wall/planters (with more in the basement) were intended to replace the crumbling chimney for the wood burning furnace.
They were acquired shortly after my parents bought the property. The chimney had needed replacing even then (about 50 years or so ago), but it just never happened!
So now I have the inserts stacked by the back of the house, waiting until I can figure out what to do with them.
So I grabbed three of them and set them up.
… after hosing off all the spiderwebs, first…
They were perfect. I wish I’d thought of using them earlier. It made things SO much easier on my back!
Here is the underside of the table top, with years of dirt and mold scrubbed away.
I can also see where some attempts had been made to strengthen and stabilize it. We had lived in a building my parents bought as an investment property in the “downtown” of our little hamlet, years ago. After many years of problem tenants costing them thousands in damages, they didn’t want to rent the house out anymore, so we lived there for a couple of years before moving out of province. While there, we got this picnic table for a whole $5. The municipality was replacing the picnic tables in public parks and selling off the old ones for next to nothing. So it was already old when we got it, but still in great shape. It just needed a paint job. Which we never got to do, before we left the province. So my late brother brought it to the farm. He is likely the one to add the angled braces supporting the middle board. That bar across the middle was an addition, too. It looks like a hole had been drilled though to support a shade umbrella, which is probably why the braces and support bar were added. Then there’s the other piece, with a lager hole drilled through it, to support an umbrella with a larger post. I’m pretty sure we have the umbrella that was used in there, stored in the sun room now. When we’re done painting, I plan to see if it fits.
Then it was time to flip it over.
I know my mother did make efforts to protect this from the elements. She’s the last person so have painted it, and she told me how she would cover it with a plastic table cloth over the winter, to protect the wood (she used thumbtacks to secure it, and some of them are still stuck in the wood!).
It has been a long time since anyone has done anything to protect it, since. She has been living where she is now for about six years, so it’s definitely been longer than that.
Long enough for lichen to start growing on it!
The top was a lot easier to scrub. :-)
There was red paint at one corner of the table top, as well as the seat below. I suspect someone used the table to do something else, and made a mess on the table. Whatever kind of paint it was, parts of it actually dissolved and washed away with the water!
I had to use the hose almost constantly as I scrubbed. Otherwise, it all just sort of smeared. !! There was also debris packed into the spaces between some of the boards that not even the jet on the hose nozzle could blast out. Among the nearby junk around the old garden shed, I found some wire sturdy enough that I was able to get the debris loose and clear.
When we first got this table, it was a sort of reddish brown colour. I think the provincial parks department got some sort of deal on the paint because, for a while, all park benches and picnic tables were painted that same colour! There’s no sign of it now, though I can see that someone did paint it a different grey some time before my mother’s final coat of blue-grey.
So the table is now prepped for painting!
When they had a chance, the girls came out to see how it looked, then we flipped it upside down over the chimney inserts again. Since we’ve got at least 1 city shopping day to do first, it won’t be right away but, hopefully, it can be done before we go back to get the rest of what we need for the month.
Hhmm. I should probably pick up another paint brush or two. You never know. We might have more than one person available to work on it at the same time! :-D
Once it’s painted and ready, we’re thinking of setting it up near the fire pit. We will be making sure to pick up things we can cook over the fire, and I’m hoping we’ll be able to use the fire pit quite a few times this year. The picnic table will get some good use, once it’s no longer nasty to sit at! :-D
Before I start on how things went with the clean up, I have another update. I just got off the phone with Canada Cartage – the company shipping our new washing machine.
They didn’t receive it at this end, so they will call us with a new delivery date when they have it.
I might still call the guy at Home Depot tomorrow morning, to see if he can pull a few strings. We’ve opted not to go into town to use the laundromat, and have instead been washing the necessities in the bathtub.
Oddly, my clothes have never been cleaner or softer. Ever. And all I’m going is leaving them to soak in hot water and detergent, then swishing them around a bit before rinsing them.
Weird!
I am happy to say that we have got the old kitchen done, and everything that needed to go back, has been brought in.
I’ll start with the old kitchen.
There wasn’t much left to take out of there. Most of it was behind the wood burning cook stove.
Which, interestingly enough, also hid another outlet.
No wonder insurance companies are such sticklers about wood burning stoves and furnaces!
That basin may well be older than I am.
I left it there.
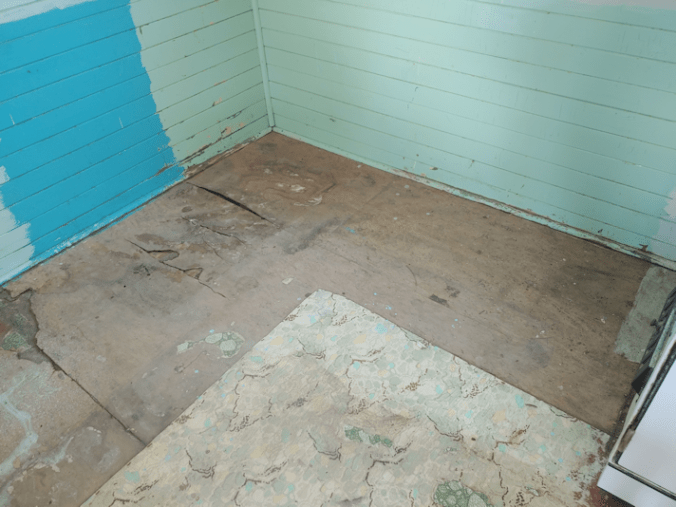
Once everything was out, including the floor mats (which were carefully picked up so that I could pour out the crud over a large garbage can!) and random nails and whatnot were swept up, I took stock of the floor.
This corner is the worst.
And there’s nothing we can do about it, right now.
I am guessing the previous freezer my parents used to have here cause this damage when it finally died.
The best I could do at this point was take the little shop vac to the area.
I vacuumed the window of what may well have been decades of dead bugs, too. I even vacuumed parts of the stove a bit.
A container of nails and… dirt? had fallen in here. I got most of them, but we have found so many random containers of rusty nails, I just swept up and threw away the rest.
I just had to remind myself of what was in this cupboard.
We will deal with this another time!
The weather outside was getting really, really windy, so the girls and I pushed to get everything inside. We will likely change things around later, but for now, it’s all in!
We considered moving the freezer back into the other corner and putting the couch where the freezer is. In the end, I just pulled it closer to the door, to make more space for the shelves we put back where they were before. They are extremely sturdy shelves, and are great to stand on when we need to access the breakers.
I decided to put the rocking chair in the old kitchen, too. More because of how I wanted to arrange the sun room.
A small shelf that was in the sun room is now tucked behind the stove. At some point, we can put a small lamp in there, so a person can sit on the couch and read, and have somewhere to put down a drink or something. There was even still room for a small garbage can.
The prie-dieu that I still have plans to refinish, fits perfectly in the nook on the other side of the stove. As do the folding camp chairs, some window screens, and even my dad’s old wheelchair tucks partway in.
So that’s done for now! I’ll be finding somewhere else for the giant enameled container that is handy. My mother used that for everything from washing and soaking cucumbers to make pickles, to making bread dough. We’ve made use of it ourselves, already. Finding a container that large – with a lid, too – is not so easy, anymore, so we’re not about to put it away in storage. (We put even more stuff into the storage house today, too. :-( )
When it came to the sun room, the focus was on anything tool and gardening related.
This is where that plastic couch used to be.
The yellow shelf in the corner used to be in the old kitchen. Previously, we had a dresser under the shelf across the window as my “tool box”. The wood at the bottom of the drawers ended up warping so badly, it took quite some finagling to get it open. So, out the dresser went and we grabbed that shelf from the old kitchen to replace it.
It was full of jars, and a plastic bucket of nails and screws that was so old, the plastic disintegrated when I tried to pick it up.
We’d put the shelf under the window, on bricks, in case water got in (it did), but this time, we decided against putting any shelf against that window. Partly because the shelf has a metal top that will be a great work surface. Partly because the inner pane of the double pane window is badly cracked. At some point, we’re going to have to take the pieces out, so no one gets hurt.
The bins used for cat kibble and bird seed now have their own spots, out of the way. Before, they were just on the couch. No way the skunks can get those lids open in there! :-)
Not that that will be an issue anymore, but I’ll cover that later.
The small garbage can is there told hold our wiener roasting sticks, and other fire pit supplies.
Here is the other side.
The swing bench is close to where it was before, and the cube shelf went back to it’s previous spot. We now have a tall box to hold the long and weird stuff, in the corner, and the table saw is easily accessible.
I’ll probably shift some things around later, but this will do for now.
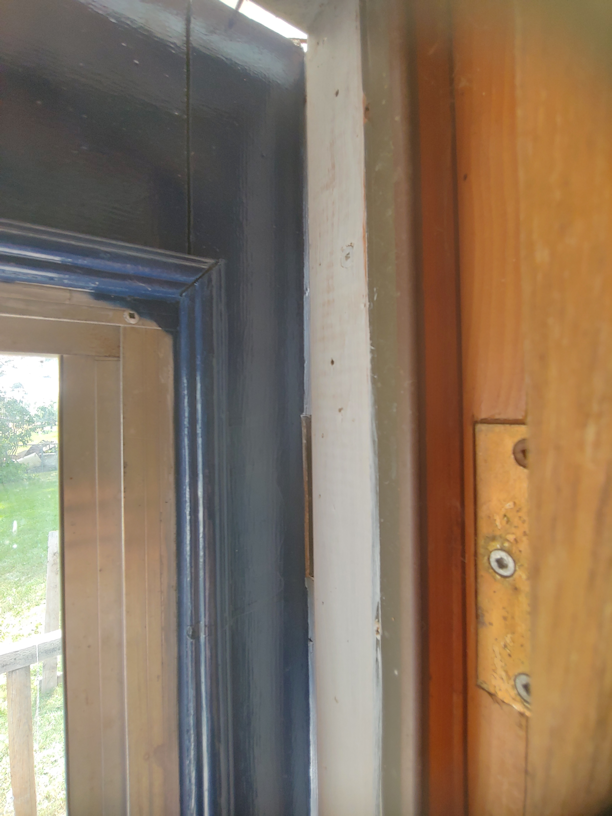
Then there is the door…
I can lift the replacement door to close it, but when I do, this is what the hinge is like at the bottom. It has only 1 screw, and it’s not all the way in, which is a good thing. I wouldn’t be able to close the door, otherwise.
At the top…
The top corner of the door is actually flush with the door frame.
I remember fighting with the old door to get it closed, and having to lift it. While I did check the bottom of the door frame, for some reason I never thought to look at the hinges. At least, not that I can remember.
Basically, that means that this has always been a problem. Right from when the old door was first hung.
Much of the sun room is salvaged materials, including all the windows and both doors. So I guess they just made do and lived with it. No one thought to fix the problem.
No wonder the previous door started to fall apart.
I’m going to have to jerry rig it myself.
*sigh*
Once that is done, then I’ll double check how much I need to trim the 2 pieces of door frame that we took off. For now, though, the door stays closed because it’s stuck at the bottom corner, where I have to lift it over the door jam. With the outside door closed, the inside door will now stay closed (it blows open easily, otherwise).
We can now keep the sun room closed. The cats can shelter in the old dog house my brother provided us, and no more skunks coming in!
Which means no more animal damage, urine or feces to deal with.
We can actually start using the sun room… as a sun room again! :-D
The girls took care of a huge job for me, in emptying out the old kitchen!
Well. As much as it will be.
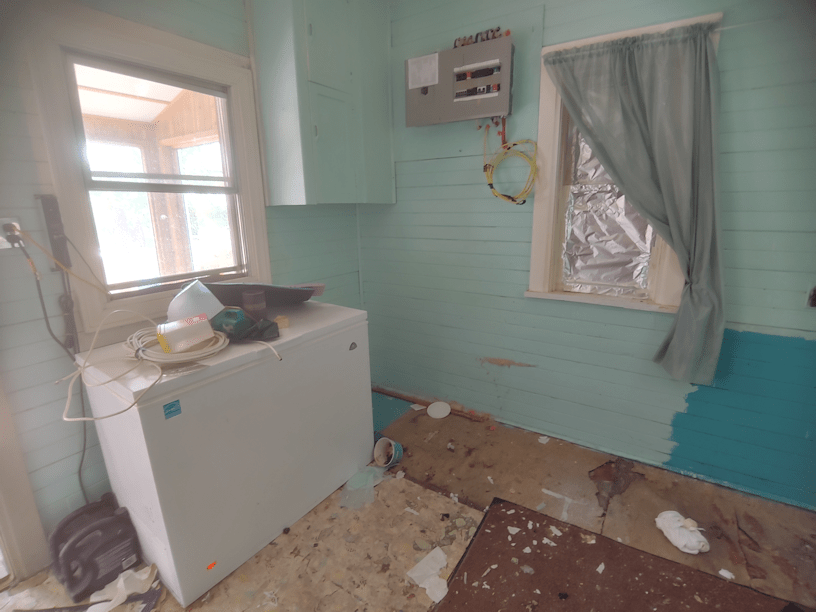
Here is how it looks now, while we take a break and get out of the heat.
When we first moved here, my younger brother had his larger freezer where the one in the photo now sits. They moved it out shortly after we moved in, freeing up some space for us.
There was a shelf in the corner, filled with a variety of things hidden behind a curtain. My mother had a thing for putting curtain rods on shelves, then hanging light and lacy curtains to hide the contents. I don’t think she understood that she was damaging the shelves in the process. Mind you, with most of the shelves, it really didn’t make much difference.
This corner is where our current freezer, which had belonged to my parents, used to sit. When I was a kid and we were still using this kitchen, there was a fridge in this corner.
I have zero memory of there being a fridge in this kitchen!
When I started cleaning up the old kitchen before, I had put a utility shelf in this corner. In no time at all, things ended up dumped in front of it, because we had no place else to put them, and it became completely inaccessible!
That corner is where we will be putting the plastic couch from the sun room.
After taking this picture, I took down the curtain over the window that doesn’t have aluminum foil on it. It has a screen, so I tried opening it to get some air circulation, but it would only open half an inch. Ah, well. Better than nothing!
The window with the foil over it is supposed to get replaced. The replacement window is actually leaning against a wall, between the doors to the house and to the sun room.
We are not going to be replacing the window just yet, but I will keep that in mind as we set things up again.
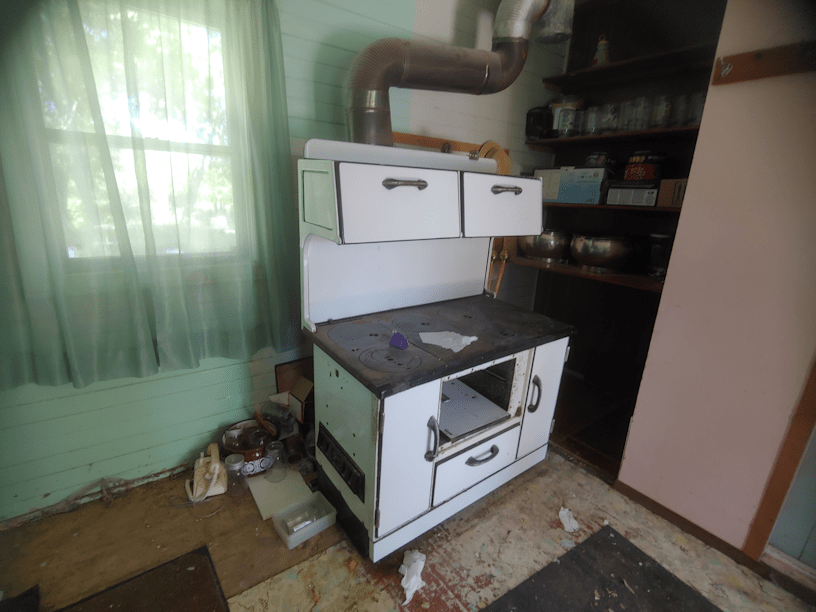
Ah, the old wood stove! This is what my mother cooked on, until the addition was added to the house and we got an electric stove, to go with having running water and an indoor bathroom.
The hinges on the door are broken, as if someone tried to stand on it while open.
There are still ashes in there!!
Eventually, I want to clean it up and pick up some stove blacking – I even found some in one of our local hardware stores.
It’s amazing that this stove was going almost all day, every day, and the kitchen never caught fire. There is NOTHING protecting the walls and floor.
We will not be doing anything to what’s on the shelves in that little nook just yet.
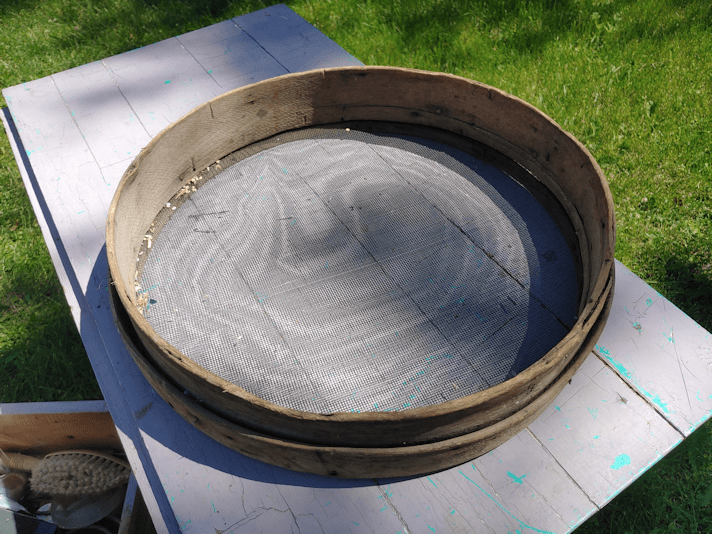
Of course, there were all sorts of things the girls cleared out. The dresser in the photo being one of two larger items, plus lots of things like this sifter screen. It was used to clean the chaff and dirt out of seeds. It’s old and the wood is rotting, but it’s being kept. It’s very likely my dad made it himself. The screen is ordinary metal window screen. The wooden frame was very likely salvaged from a peach basket or something like that.
As the girls took things out, I started hauling some of the stuff either to the junk pile, or into the storage house, which is where that sifter went. I hate that we’re adding things into there. We’ve made no attempt to start cleaning it out. When we do, we’ll definitely need to use masks and gloves. If I can find some coveralls that would fit us, that would be good, too.
Among the things I took in were a large and a small shop vac. When my daughters started talking about using a shop vac on the floors, one of them wondered if the large shop vac worked. I had taken a look at it while carrying it over, I thought that, while it might run, it probably doesn’t vacuum anymore. The little one was
(Aaaannnd… that’s it. I’m done for the day.
As I was writing the above, the phone rang. My sister had taken my mother to the cemetery, and accidentally locked her keys in the car. Long story short, it turns out her car has a combination touch screen she’d forgotten about, but since they were in the area, my mother wanted to see the yard. I am now completely drained. We’ll finish the job tomorrow.)
Where was I?
Ah, yes. The little shop vac. It was wrapped up in a plastic bag, so my daughter didn’t realize what it was. The old kitchen had (and still has) lots of jars that we put into the wagon, so before my daughter had to go back to work, we brought the wagon to the storage house and assembly lined passing them all up the stairs and stacking them in a space I’d prepared for them. Then I brought the little shop vac to the sun room to plug it in and test it out.
It works! So we have a little shop vac – small enough to fit into a grocery bag! – to help clean up the floors. This will be a huge help in the old kitchen, with it’s bits and pieces flooring.
After doing the glass, we stopped to take a break, and I started on this post. Then I got the call from my sister. It turns out she’d tried to call several other people first, including her husband who has spare keys, before being able to reach me. The concern was, there is no shade at all in the cemetery, and it was way too hot for my mother to be in the sun.
So I headed out to go get them, thinking to bring them here to wait for my brother in law – or I could take my mother straight home.
It turned out to be a moot point. I got to the cemetery, and there was no car! Clearly, they’d gotten it open.
Then I saw a car I’d passed on the way over, coming back up the road. I haven’t seen my sister’s newer car in a while, so I hadn’t recognized it. I learned she’d gone to the house closest to the cemetery (which is off the main road and cut into the bush) to make the calls, since her cell phone was locked in the car along with her keys. After reaching me, she got through to her husband, who told her to just use the combination. She’d forgotten there was one! Along the frame of the driver’s side window is basically a touch screen of numbers. She didn’t remember the combination, but her husband did, so they were able to get in. I guess they were on the way to the farm when they saw me going by and turned around.
Since they were there, my mother wanted to come see the yard. She insisted, she didn’t want to come into the house (stairs are difficult for her). I had already told them we had emptied the sun room and old kitchen, and everything was spread out in the yard. They were okay with that, so I sent a message to my family to let them know the situation, and off we went.
What does it say that I get better cell phone reception at a cemetery in the bushes than we do here at the farm? :-D
Once we arrived, my sister parked in the shade of the yard. I asked her if my mom had brought her walker, and she hadn’t, so I went and got my father’s walker. We keep it handy for times like this (and in case I ever need it!). My sister and I also moved the plastic couch into the shade of my mother’s white lilacs, for later.
We then did a tour around the yard, and it was about what I expected. My mother had no real interest in the progress made, and all the interest in the things she didn’t like. Oh, I’d pulled up the spirea over there! Yes, Mom. It was spreading and killing things off. I want the lilacs, not the spirea.
Which is when she told me she had also tried to keep up with pulling them out of that spot, too.
And why did I want those piles of sticks all over the place?
I don’t want them there, but we have to put the branches somewhere. They will be cleaned up in time.
We went around to the old stone cross my late brother had salvaged off a building he’d demolished, which was another area I’d pulled up spirea. I’d been given a hard time about that, too, but now the area is filled with wildflowers. My mother had already graciously given me permission to pull up the spirea in that area. There is one patch of spirea by the storage house that we are keeping. The butterflies and other insects just love them, and it’s a place where we can keep it under better control. My mother was, at least, happy to see how well the grapes are doing (no comments on their no longer being buried in spirea and now on a trellis, though), only to launch into how I need to water them. I really have to water them, because they’re under a roof (meaning, the eaves of the storage house), and they’ll do really well if I just water them.
…
Yes, Mom, I know how to water plants.
She didn’t know what to make of the cucamelons.
Then we started walking towards the old garden area, and she could see the sunflowers at the far end.
What are those sunflowers doing there? Did you plant them?
Yes, Mom. We’ve been talking about that a few times, now.
What are those over there? Are they squash?
Yes, those are squash.
*long pause*
Oh, there used to be such a beautiful garden here! It used to be so beautiful!
*sigh*
She couldn’t, of course, go into the garden, because it is so rough. My sister and I went down to the end of the apple trees, and she had a few things to say about the horrible plow job. The summer before we moved here, she and her husband were the ones trying to cut the lawn in the area. The problem is that, instead of plowing in straight rows in the same direction, so the furrow overlap each other, my younger brother had gone in circles, instead. That left the mounds the were are now struggling with. We’re not sure why he did it this way, but my sister suspects alcohol was involved! :-D
Since I’d mowed a path, my mother was able to go through the maple grove with her walker, all the way to the old willow tree that we’d lost a big chunk of in a blizzard last fall. My sister remembers that tree being huge, even when visiting at the farm before my parents bought it. Then we went over to the fire pit, and I told my sister about how I found the bricks around it. She was amazed, partly because she remembered those bricks being there, and didn’t realize they’d been completely covered.
I tried to talk to my mother about some of the plans we had, but she wasn’t interested. Instead, she wanted to go to the storage warehouse, where almost all the things my parents left behind are now packed away in. I managed to convince her to first stop for a rest in the shade. After a nice rest and hydration, we made out way over.
She actually insisted in going inside, struggling up the few stairs to get in. The building is jam packed, with only a couple of narrow areas to walk in, but she squeezed her way through. Some of the cardboard boxes have started to collapse under the weight of their contents, and I found some things that could not be boxed where knocked onto the floor, including a little mirrored altar of my mothers. The original crucifix was long gone, and another had been put in it’s place. We found that on the floor. My mother decided to take it with her. It turned out to be the first gift she and my dad received, when they got married! Then she started pulling out the large framed pieces, eventually digging out a print of Mona Lisa.
She ended up taking that with her, even though she had nowhere to hang it!
Then she started digging at the end of the path, trying to reach something. There was a bunch of curtain rods from when we cleaned out the sun room, originally. I convinced her to let me get them for her, but when I asked which she was after, she’d completely ignored me. So I grabbed several and held them for her while she picked a couple of the least damaged ones.
My sister and I eventually persuaded her to stop trying to rearrange things and start heading out.
Then she decided she wanted to go into the storage house.
!!!
My sister immediately pointed out how difficult it would be for her to get up those stairs. I had to plead with her, not to go in. I reminded her of her breathing problems, telling her I’d been in and out of there several times, and my own lungs were starting to burn from it (as I type this, I can still feel my throat burning from talking so much, after being in there). I promptly got told that I needed to leave the doors and windows open to get the smell out. I told her it needed a major cleaning, plus there are no screens on the windows, and I didn’t want anything to get in and get trapped (my sister says that’s probably how the dead squirrel that is now a skeleton on the kitchen floor got trapped in there). She still insisted I should leave the door open and open windows.
What was it she was after in there? Maybe I could get it?
It turns out she was worried about a pair of brass candlesticks, and whether they were still there. They are actually a pair of menorahs, and I assured her, they were still on the shelf, covered with a light curtain. Oh? I didn’t cover them! was her response. Well, someone did. They’re still there.
In the end, my sister and I ended up going into the storage house, and we each grabbed a candlestick, took them to the door and showed them to her.
As we put them back, my sister and I were talking for a bit, but I just couldn’t stay in there any longer. My lungs were burning. Even my sister was already noticing it affecting her, so we headed out. I got more lectures on how I needed to leave the door open, and how I need to clean things. Eventually, my sister pointed out that I had stopped cleaning things, and they should probably leave so I could get back to it.
Which they did, but by then, I was done. That hour or so with my mother drained more energy out of me than two days of working on the sun room and old kitchen. I would so love to have a better relationship with her, but she just can’t seem to find anything good to say, without undermining it with by making sure I know what a bad job I’m doing, or how wrong what I’m doing it, etc. I’ve reached a point in my life where she can no longer hurt me, but my goodness, it just sucks the energy right out of me! She couldn’t even resist making a snarky comment about the sweatpants I was wearing; the ones I wear when I know I’m going to be doing dirty manual labour, that used to be my husband’s. They have elastic around the ankles, to help keep the wood ticks out. No recognition at all that I dropped everything to go and get them when they were stuck at the cemetery, and that’s why I was still in my grubbies.
But I did get a lecture about how she won’t be around forever, and after she’s gone, we’ll remember and miss her.
*sigh*
I wouldn’t be surprised if my mother lived to be 100. For all her complaining, she’s got an amazing constitution. Even when she had abdominal surgery and they kept her in the hospital for a week, she recovered faster than when I had a much less invasive day surgery! I was about to say she could get hit by a truck and survive, but… she’s already done that.
So I’m done. Wiped out. Exhausted. Not physically, but mentally.
My daughter headed out to secure some of the stuff so they won’t blow away. I’m going to go do the watering with fertilizer I’d planned on doing, once things cooled down a bit.
I’ll at least be able to say I finished one thing, today, after that!
Today, I finally started on a job that should have been done at the start of spring! Between the rain and the heat wave, and various appliance catastrophes, we just never got to it.
It’s still 24C (75F) out there as I write this, so it was still uncomfortably hot for the work, but it’s much more bearable than what we had last month!
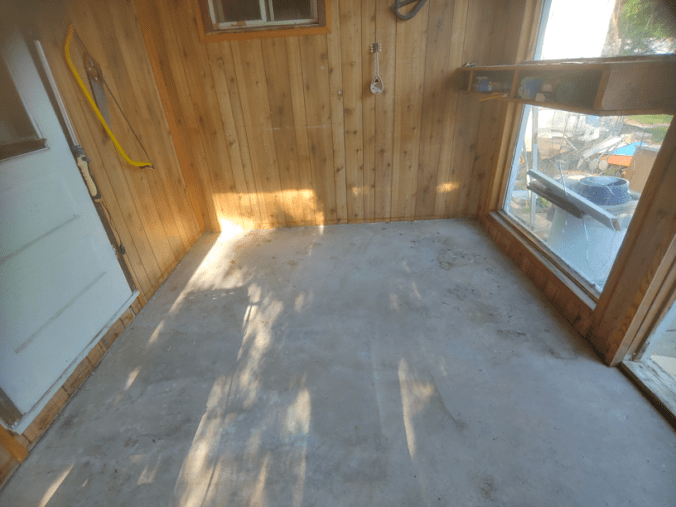
My goal today was to empty out the sun room, so I could sweep up the concrete floor.
Here is what it looked like once I emptied it (except for the table saw; I’ll move that when I’m ready to use it).
This is after 2 winters of the sun room being used by the yard cats as a shelter, and 1 summer as a kitten maternity ward.
Also, visiting skunks. Most of the poop on the floor under where the plastic couch was sitting is skunk poop, which is distinctively black in colour.
Here is how it looks now.
It was a pretty gross job, but still nowhere near as bad as it was when we first cleaned it out.
Washing the floor will wait until we are done with a whole bunch of other stuff, first.
The cushions from my late father’s swing bench – one of his favourite things was to lie on that for a nap in the sun room! – have been hosed off and are hanging to air out. I set up the kiddie pool we ended up using to mix soil and peat, and it now has some of the dirtier old blankets, pillows and cushions we’d given to the cats, soaking in it. Other items are draped and got hosed off, and the biggest blanket is waiting for its own soak, tomorrow.
I hosed down some of the furniture and shelves, too, and it will all stay in the yard overnight. Tomorrow, the girls will empty the old kitchen out, as much as possible. Once that’s done, I’ll do what I can about the floor in there (I doubt I’ll be able to wash it), and the plastic couch will go into there instead of the sun room. The utility shelf currently in the old kitchen will go into the sun room.
I’ve also finally taken off the parts of the door frame I need to trim narrower, so we can finally close the replacement door. Once they were off, however, I discovered something odd. In spite of being sized to the old door, carefully measured and trimmed, I still couldn’t close it once the frame pieces were off. It was hitting the bottom. I had to lift the door in order to close it.
I remember the old door did that, too.
Once I lifted it and closed it, I looked at the hinge side and discovered that the frame itself is wider on the bottom than on the top. !!! So the door is hanging at an angle, and that’s why it needs to be lifted to be closed. Which, of course, pulls the hinge away from the frame. From the looks of it, that’s been a problem for a very long time!
Well, I’ll just have to figure out how to fill the gap, then rehang the door.
Replacing the old broken door turned out to be a much more complicated job than any of us expected!
By the time we’re done, though, we should not only have the sun room reclaimed, and my husband will be able to use it again, but the old kitchen should be a usable space, too. Other than to just shove things in that we have no other place for, that is! LOL