When setting the old dough to reconstitute and ferment overnight, I had some concerns about temperature. The crock was sitting on our dining table, and that room gets pretty chilly. I did warm up the rice bag we have been using to warm our fermenting hard apple cider (which is probably ready to be bottled, but we haven’t gotten around to it yet) and set it under the crock, to help keep it at least a little bit warm.
While investigating some cat noises in the wee hours of the morning, I checked it and found it was looking pretty much the same as when I’d left it. So I warmed the oven up a bit, then put the crock in, shut the oven off and left the light on.
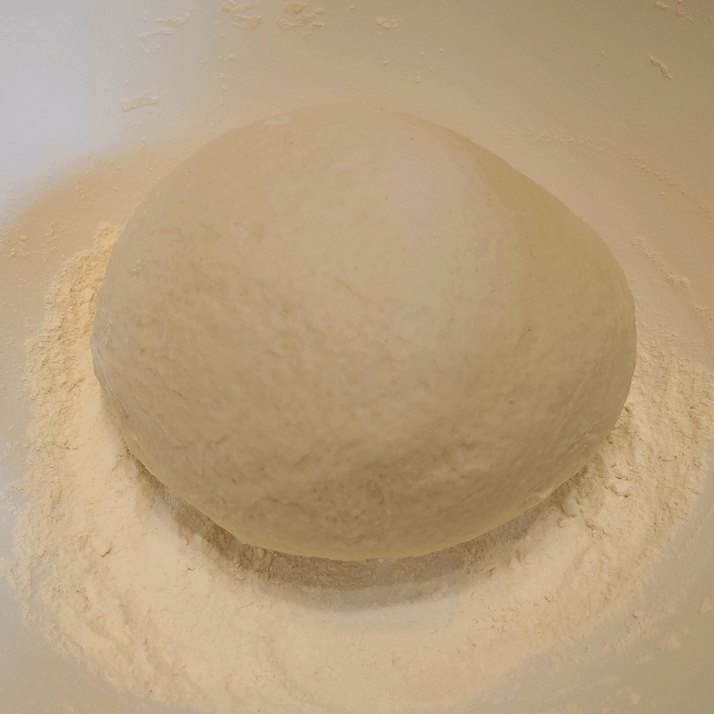
This is how it looked about 3 hours later.
Warming it up, did the trick! I’ll have to keep that in mind, as we continue experimenting.
I warmed the oven up a bit again, then put the crock back for another 3 hours or so, before I was able to start making the dough.
That’s looking nice and puffy!
I find it interesting that the pieces are still distinctly separate. When I stirred it, before adding it to some flour and salt in a bowl, I found the pieces separated and stretched, before starting to mix together. The water under the old dough pieces was pretty much clear until I mixed it, too.
I added this to a bowl with 3 cups of flour and 2 tsp of Kosher salt and mixed it together. I kneaded another 4 – 4 1/2 cups of flour in before turning it onto my table and kneading it for another 5 – 10 minutes.
Normally, I would oil the bowl the dough will be rising in, but my grandmother would not have done that, so I used flour, instead.
With this batch, I’ve got the same amount of water as the first batch the old dough came from, but I’m using less flour. That first batch was too dense. With only a little more than 4 cups of flour in here, after I remove some dough for the next batch, I think I’ll just make one large round loaf this time, instead of two.
Next time, I think I’ll up the water and flour quantities a little bit, and make a bigger batch. I don’t think I’ll adjust the amount of salt, though. Not unless I end up doubling the recipe or something.
The dough is now covered and set aside for its first rising. I’ll give it at least an hour, probably two, before punching it down and leaving it for a second rising.
I will post again, later today, with the final results! :-)
I may have mentioned in past posts, about my mother’s memories of bread baking in pre-WWII Poland. I was fascinated by what she could tell me. With no commercial yeast available, I had thought my Babcia (grandmother) had used a sort of sourdough. I know my father remembers this; a portion of the bread dough would be set aside to continue to ferment, and be used in the next batch of bread.
My grandmother did something different. She allowed her old dough to dry.
We lost our own sourdough starter, the Sourceror this past summer. It almost made it to 2 years, but we had a real problem with fruit flies this year. Somehow, they managed to get into the container and contaminated it.
Having a big bubbling bowl on the counter has been a bit of a problem for other reasons, so the more I heard about how my Babcia saved her dough, the more I wanted to try it.
My mother’s memories go back to the late 1930’s, early 1940’s. Then WWII happened and they eventually ended up in Canada, where commercial yeast was available. After questioning her about it, this is what I’ve been able to piece together.
Babcia would bake bread once a week. She would set aside some of the dough, adding in the scrapings from the wooden dough bowl, form it into a ball, then burying the ball in the flour. The night before she would be baking bread again, she would take out the dried ball of dough, break it up into pieces, and soak it in water overnight. In would get all bubbly, and that would be her yeast for her bread baking, with the cycle continuing each time.
My basic bread recipe includes things like oil, sugar, eggs, milk… all things that I just couldn’t see handling sitting in a bag of flour for a week without going off. On questioning my mother, I learned Babcia used none of these things. It simply wasn’t available. Her bread was flour, water, a bit of salt, and the reconstituted old dough. That’s it.
The flour would have been flour they milled themselves (at least they did until the Nazi’s caught them using an illicit hand mill and destroyed it), using grain they grew themselves. My mother says corn flour was also sometimes used, which they also would have grown themselves. The ingredients may have been few, but my mother remembers it as being the best bread; especially when corn flour was added. She remembers it was light and fluffy, too.
My mother was too young at the time to remember a lot of details, though, so I did some research. I know that bread can be as basic as flour and water, but if salt is used, would that be a problem? I know that sugar feeds yeast, while salt retards it. How would having salt in the dough affect the old dough yeast cake? Also, how much dough was set aside? My mother remembers a “ball”, but as young as she was, her sense of how large that was would be distorted.
In my research, I found quite a bit about “old dough” bread baking. This gave me a lot of the information I was looking for. For some types of old dough baking, dough is set aside before the salt was added, while others were taken out after. Both work. As for how much was taken out, I eventually found a general “about the size of an egg” description.
What I didn’t find was anyone who used old dough that was stored in flour. Nor did I find any that stored the dough for weekly baking. Most described setting the old dough aside in the fridge for 2 or 3 days, at most. In some forums I found, people described using it in their daily baking. Not a single person described using their old dough the way my mother remembers her mother did it. They all used wet dough. None used reconstituted dry dough.
I have decided, instead of getting a sourdough going again (for now), I will try and recreate my Babcia’s bread.
Of course, some things I will simply not be able to recreate; at least not now. We’ll be using plain old AP flour. I won’t be adding corn flour right away. I don’t have a big wooden dough bowl like my Babcia would have had (with a wooden dough bowl, yeast would have gotten into the wood itself, adding its own layer of flavours). I also don’t have a wood burning masonry stove (something similar to this, with a sleeping area on top) like my grandmother would have been baking in.
I found some proportions for ingredients for 2 loaves that I will start with, and I will probably experiment with making some a couple of times a week before I start adjusting quantities for larger batches.
One of the main differences in this experimental process is that I don’t have a yeast “mother.” My mother has no memory of where her mother got hers from. It was always just there. She may well have gotten her first old dough from the family members she was living with (my great grandparents having already gone to Canada to start a homestead, only to not be able to send for their children as they had planned, because of WWI). However, as they saw the warning signs leading to WWII, they abandoned their farm in Eastern Poland, taking nothing but the clothes on their backs and a goat they could milk for food, to settle in Western Poland. At that point, my grandmother likely got another old dough ball from one of their new neighbours.
It’s amazing how much history is intertwined in something so ordinary as how my grandmother leavened her bread!
So this is what I will be doing in my experiment that will possibly span years.
Today, I have started a first batch of plain bread; it’s rising as I write this, and I will post about it separately when it’s done.
I will be using a commercial “sourdough” yeast I happened to find, in this first batch.
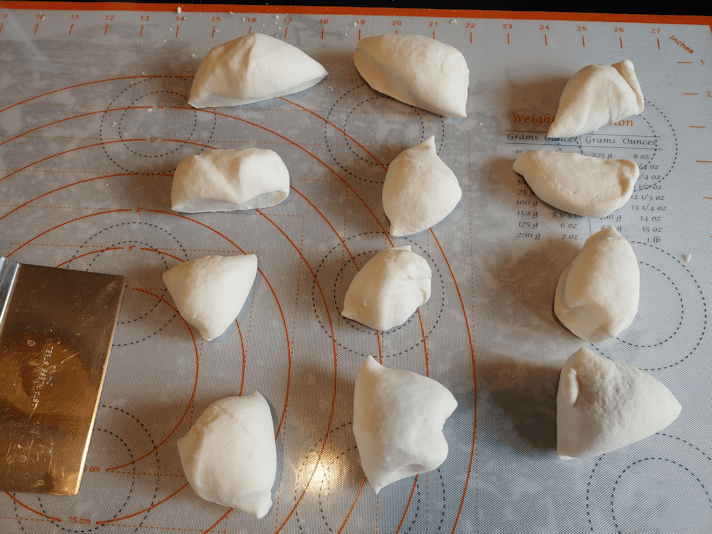
After the dough is risen and before I shape it into loaves, I will break off some of the dough and store it in a container of flour, then bake the rest of the dough as usual.
In a few days, I’ll reconstitute what should be a mostly dried ball of dough overnight, make another 2 loaf batch, then continue repeating the process.
What should happen: the flavour of the bread should change and develop over time, just as with a sourdough.
What might happen: I’ll have sucky bread that doesn’t rise properly? The dough ball will start molding? The yeast will die off and I’ll have to start over? I have no idea.
For the first few months, at least, I will stick to the same basic mix of flour, water, salt and the old dough for yeast. Eventually, I will try adding corn flour. If I do decide to modify the recipe in other ways, it will be by doing things like kneading in herbs or shredded cheese or whatever, after the dough ball has been removed. I won’t be adding things to the base recipe, like sugar, milk, oil or eggs.
After I’ve done a few batches, and assuming this works, I plan to give some to my mother to taste. Hopefully, she will remember enough to be able to tell me if I’ve succeeded or not! :-D
Today, I bring to you a variation of the traditional Polish dish called haluski. You can go here for a traditional recipe with some common variations. The link will open in a new tab, so you won’t lose your place. :-)
Oddly, though my parents were both born in Poland, and I grew up with a lot of traditional Polish foods, haluski was not one of them. Mind you, when I was a kid, I hated cabbage and probably wouldn’t have eaten it if my mother did make some! Even so, my parents also took us to Polish celebrations and events in the city, and I have no memory of this dish. I did not discover it existed until within the past year or so, while looking up things to do with cabbage!
Of the recipes I found, the most basic is onion, cabbage, noodles, and a lot of butter. Some include bacon, kielbasa or a variety of cured meats, like pancetta. I tried making it with bacon, and we liked it enough that it has since become a fairly regular dish in our household. My husband is not too keen on cabbage, though. ;-)
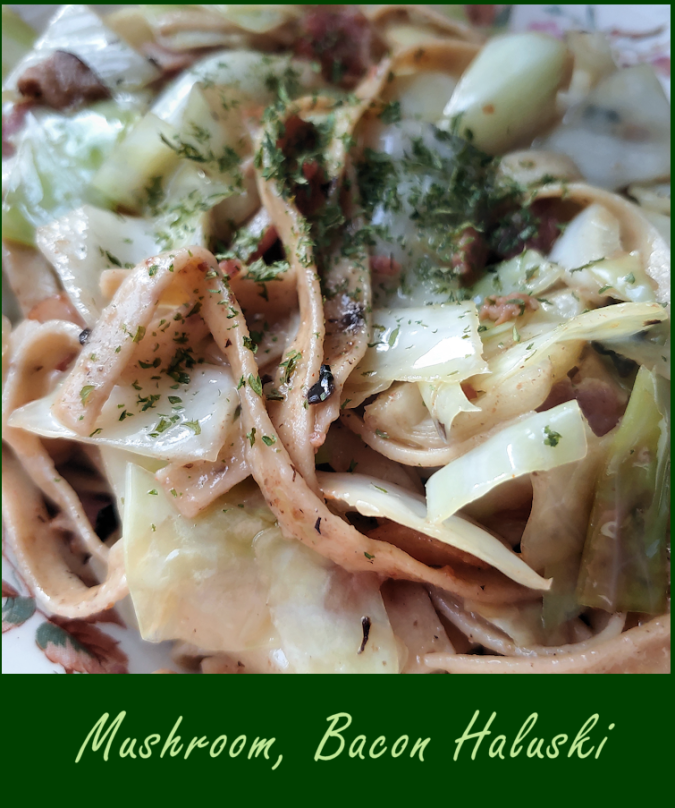
This time, I decided to experiment with the recipe, and I am very happy with the result. The plain egg noodles were replaced with mushroom egg noodles and, because I still had some left, I included dried mushrooms as well.
The dried mushrooms are a mix of white button mushrooms, crimini and shiitake mushrooms.
The next time we dry mushrooms, we need to do a whole lot more! :-D
The noodles I used are a brand that is easily found in our area, usually in its own little display. They are made with 2% porcini mushroom granules.
While preparing the noodles according to package instructions, I chopped the cabbage and onions, cut the bacon into small pieces, and set the dried mushrooms to reconstitute in boiling water. If I were using fresh mushrooms, I would have just sliced them.
Not pictured is the butter and seasonings. The seasonings can be just salt and pepper. As I still have some left, I used mushroom salt, as well as freshly ground pepper, garlic granules and paprika. Fresh garlic can be used instead of the granules, adding them in just before the cabbage.
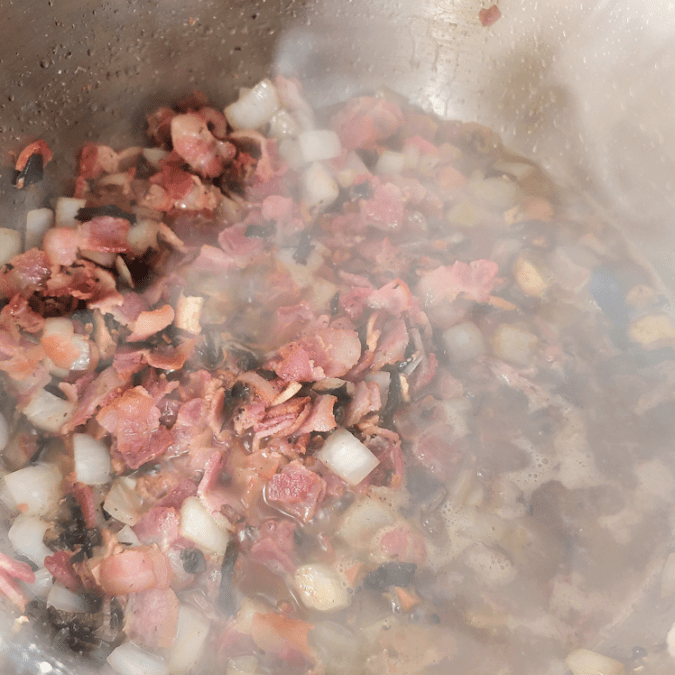
The bacon pieces were added to a large pot and fried until they started getting crispy. The bacon fat is used in place of butter at this point.
Then the onions were added and, after they had softened a bit, the reconstituted mushrooms were added. The liquid was included, too, which helped deglaze the pot. The seasonings were also added at this point.
Where I using fresh mushrooms, I would have added them to the bacon before the onions.
Next, the cabbage was added, along with a dollop of butter, and cooked until soft.
By the time the cabbage was ready, the noodles were cooked and drained.
The cooked noodles were then mixed in, along with another dollop of butter.
Here is the end result, sprinkled with dehydrated parsley from our garden.
The mushrooms and mushroom noodles were a very tasty modification to this traditional dish. The flavour they add is not overpowering, but there is a whole new layer of umami in the dish that works very well! I think it would have done nicely with a dollop of sour cream on top, too.
Here is the recipe! If you give it a try, I hope you come back to let me know how you like it. :-)
The Re-Farmer
Mushroom, Bacon Haluski serves 4, generously
Ingredients:
1 medium cabbage 1 medium yellow cooking onion 1 package bacon slices, 500g 1 package mushroom egg noodles, 350g 1/3 cup dried mushrooms of choice seasonings to taste (mushroom salt, pepper, paprika and garlic granules were used for this recipe) butter, as needed
Directions:
remove outer leaves from cabbage, core and chop into pieces about the same size as the noodles
chop onion and slice bacon into roughly half-inch pieces
line a small bowl with a coffee filter. Add the dried mushrooms, breaking up any larger pieces, and cover with boiling water
cook noodles according to package directions
while the noodles are being prepared, place the bacon pieces into a large pot. Cook on medium high heat until desired crispness, stirring frequently
add chopped onion and cook until the onion begins to turn translucent, stirring frequently
add the reconstituted mushrooms (the coffee filter makes it easier to pick them up out of the liquid). Cook briefly, then add the liquid the mushrooms were soaking in. Stir to deglaze the bottom of the pot.
add seasonings. Continue cooking, stirring often, until onions are soft and the liquid is cooked down until almost gone
add the chopped cabbage, along with about 1/4 cup butter (adjust quantities of butter as needed). Combine well and continue cooking, stirring often, until cabbage is at desired tenderness
add cooked and drained noodles to the cabbage mixture, adding more butter as desired
combine well. Cook until the noodles are heated through.
At our last Costco trip, we picked up large packages of three different types of mushrooms. After using as much fresh mushrooms as we wanted, I planned to dehydrate the rest. I really like the mushroom salt we’d made, but wanted to have mushroom powder, without the salt, to use. The powder is an excellent flavour enhancer.
We had used a dry “gourmet mushroom blend” we’d picked up at Costco to make the salt, but it looks like they don’t carry it anymore. So I decided to just dry our own mushrooms.
I had used a coffee grinder to made the mushroom powder for the salt. The mushroom blend had some very large pieces – large enough that I cut them with scissors before I could put them in the coffee grinder. Even so, some of the thicker, more leathery pieces would jam the blade.
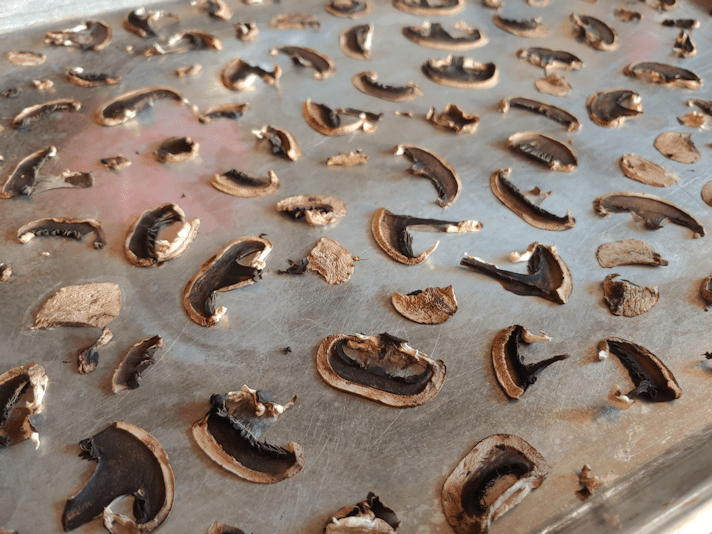
With that in mind, I very deliberately sliced the mushroom pieces quite thin, before laying them out on baking sheets to dry. I had enough button mushrooms to fill one sheet, while the other was filled with shitake and crimini mushrooms. The “warm” setting on our new oven is 175F, but I put it at the lowest temperature it would go: 145F. Then I left the trays in the oven overnight.
This morning…
Well… they did dry very thoroughly!
This is the sheet of white button mushrooms. They had been quite crowded together, and I could barely fit all the pieces in. They are now about 1/3 – 1/2 the size before drying.
They are also thoroughly stuck to the pan.
The shitake mushrooms didn’t shrink anywhere near as much, and were easy to loosen.
These are the crimini mushrooms, which are also very stuck to the pan! I have been using a spatula to try and scrape them off. We’ll keep working at it, little by little, as we are able, throughout the day.
Well, I wanted powdered mushroom, and I’m getting powdered mushroom!
Normally when I dehydrate in the oven on pans, I like to use a cake rack to allow air circulation under whatever I’m drying. Some things are just too small for that, which is why I didn’t use any this time. I was thinking that it might have been better if I’d had a drying screen, but looking at how the pieces have adhered to the pans, I’m thinking they would have done the same to a screen. At least with a pan, I can scrape them off and still use them. If they had stuck to a screen, there probably would have been no way to get them unstuck without damaging the screen.
So in the future, I’ll know to cut crimini and white button mushrooms thicker! I know we should be able to leave them whole, or just cut them in half, but I don’t want big pieces. I’ll have to find that balance.
We’ll just have to get more mushrooms and try again.
Not that we need an excuse to get more mushrooms! :-)
While making scalloped potatoes yesterday, I wanted to find a way to use the carrots from our garden I had picked that morning.
If they had been larger, I would have just sliced them thin and layered them with the potatoes, but these were on the small side.
So I got creative.
Here is how I ended up making the the scalloped potatoes.
For the cheese sauce, I used 1 medium onion, sliced thin, butter, flour, seasonings, whipping cream and cheese.
We already had old cheddar and grated Parmesan in the fridge. I also picked up a cheese that has recently showed up in local stores that is just awesome. BellaVitano Reserve. We’ve tried the three different varieties we have available, and I picked up Tennessee Whiskey this time. They have an Espresso one that it really good, too. I shredded this, plus the cheddar, and mixed it all together with some grated Parmesan. I used most of it in the sauce, saving some for later.
For the seasonings, I used mushroom salt, freshly ground pepper, garlic powder and paprika. For the liquid, I like to use whipping cream, but it can be made with milk or a lighter cream, though why anyone would want to, I don’t know. ;-)
To make the sauce, the onion first gets slowly cooked in about a tablespoon of butter until soft. Then, a couple more tablespoons of butter is added. When that’s melted and bubbling, the flour (about 2 tablespoons) is added and cooked, stirring constantly with a whisk, for maybe a minute. Then 2 cups of room temperature cream is added, little by little, with pauses to whisk it smooth. For the first while, the flour thickens the cream very quickly. After all the cream is added, the sauce is simmered, while constantly stirred with a whisk, until it is slightly thickened. Then the seasonings are mixed in. Finally, the heat is turned off, then the shredded cheese mixture is stirred in until melted. After tasting to see if the seasonings need adjusting, it is set aside.
For the rest of it, I had potatoes peeled and sliced thin and the carrots were peeled and shredded. I didn’t count how many potatoes I used. They were on the small side, so it was probably around a dozen. The shredded carrots made about 3 cups, loosely packed.
In a buttered baking dish, I put a layer of potato slices, topped it with 1/3rd of the shredded carrots, then added 1/4th of the onion and cheese sauce. This was repeated two more times, then the top layer was just potatoes and the last of the sauce.
It then went into a 350F oven for about 40 minutes.
Shortly before the time was up, I took a ring of Polish sausage and cut it into slices. The slices were then laid on the top of the potatoes.
I hadn’t originally planned to use the sausage, but I happened to have it, so why not? :-)
I did have some concerns at this point. We’re still getting used to the new stove, and haven’t used the oven much at all in this heat. When stabbing the potatoes with a fork before adding the sausage, they were still surprisingly hard. I had forgotten to cover it with foil at first, so that might be why.
I covered with foil at this point, but it really should have been added right from the start.
With the sausage on the top, I put them in for another 10 minutes. Most recipes for scalloped potatoes that I’ve seen say to bake for 40-50 minutes, and I was shooting for 50 minutes in total. After that, I added the rest of the cheese mixture on top.
Back in the oven it went, though without the foil. I didn’t want the cheese to stick to it. I then baked it until fork tender.
It ended up taking a lot longer to cook than I expected.
Also, handy hint. Put the pan on top of a baking sheet, in case the sauce bubbles over.
We’ll be testing out the oven’s self cleaning function, next…
:-D
When it was fork tender, I took it out and topped it with chopped parsley I’d picked from our garden that morning.
This was quite an experiment from how I usually make scalloped potatoes. They are usually just the potatoes and onion-cheese sauce, these days. I was very curious as to how the carrots worked.
They pretty much disappeared!
I used some of each type of carrot we have; white satin, rainbow (orange, pale yellow, and white), and deep purple. The purple carrots left colour on the potatoes, but with them being shredded, and such a long cooking time, they all pretty much disintegrated and disappeared into the sauce. I could taste a hint of their sweetness, but that was it.
I would definitely be up to including them again.
The addition of sausage… well, you can’t go wrong with adding kielbasa!
The cheese mixture worked really well, too. That Tennessee Whiskey cheese added to the flavour, but did not overpower.
Welcome to my “Recommended” series of posts. These will be weekly – for now – posts about resources and sites I have found over the past while that I found so excellent, I want to share them with you, my dear readers. 🙂 Whether or not I continue to post these, and how often they are posted, will depend on feedback. Please feel free to comment below, and if you have a favorite resource of your own, do share, and I will review them for possible future posts.
I hope you find these recommendations as useful and enjoyable as I have!
My very first Recommended post was for the YouTube channel Liziqi. I love the video format that makes it accessible to all, including those who don’t understand any Chinese language. Since discovering this channel, I’ve found a couple others that I now follow that are similar, yet very different. This is one of them. XiaoXi’s Culinary Idyll, which focuses on both cooking and hand crafts.
I didn’t know that, when I stumbled on the first video I saw: How to make delicious braised chicken out of stone.
Out of stone? That certainly piqued my curiosity when it showed up in my feed, recommended by YouTube.
As I started watching the video, I was perplexed. Where is the chicken? What is he going to do with that rock he dragged out of a riverbed?
By the time I got to the cooking part of the video, I was completely hooked.
How do you braise a chicken out of stone?
First, find a rock and carve it into an exquisite cooking pot.
This is a very new channel, less than a year old at the time of this writing. So it didn’t take long for me to go through all of the videos.
The first videos started off with a very different feel. At first, it was straight up cooking videos.
Other videos featured a lot more people and activities.
Then the crafting portion came into the picture – with a sense of humor!
Are you having trouble making traditional noodles by hand? That’s okay – use a machine!
First, cut down a tree…
As I worked my way through the videos, from oldest to newest, I got the sense that the makers of these were kind of feeling their way around on the focus. Where the Liziqi videos started out with just her, filming herself until she could finally hire a couple of people to do the recording for her, these videos appear to have been made with a professional film team from the start.
I’m okay with that.
The format they seem to be settling on is basically just the one guy who first makes a thing, then somehow uses that thing to prepare a food. Both of which are gorgeous.
Then you get to watch him eat. :-D
I readily admit, every time I see the guy working in his shop, I suffer from an extreme bout of tool envy.
You’ll see him doing everything from forging a frying pan (one of the few videos where he cooks food, but you don’t see it being eaten at the end), to weaving various useful objects (I will never look at a bamboo steamer the same way again!), to making things with wood and resin and…
…succulents?
While there is a lot of focus on traditional crafts, there is definitely a modern, even high tech, side to some of these videos.
While these are hardly “how to” videos, they are still quite inspiring – whether you’re looking for ideas on things to make, or ideas for cooking traditional Chinese food!
Or going fishing with a woven, waterproof hat you just made.
Even if you have no interest making the things or cooking the food, the videos themselves are beautiful to watch, and seeing his exquisite attention to detail is a pleasure in itself.
One of my Recommended posts was for the Historical Italian Cooking YouTube channel. Recently, they put out a new video for a super simple dish made with ingredients we typically have on hand. Today, I was able to give it a try!
Here is the video.
You can also visit this link for the written recipe.
This is an ancient Roman dish; chickpea and leek soup, with a fried flatbread called lagana.
About the only thing we had to go out of our way to get for this recipe was the white wine.
There was one ingredient we couldn’t find, though. Durum wheat flour. Any type of flour is just now becoming easier to find, but there’s no chance of finding any out of the ordinary flours. All Purpose flour, which is what we have, is made with a blend of hard and soft red wheat. Here in North America, durum wheat tends to be used in pastas. It’s the sort of thing we’d have to go to specialty stores to find. I’m sure I could find it in the city, but certainly not locally.
So I substituted AP, since that’s what I had.
First, the soup ingredients.
Another substitute I made was to use canned chickpeas instead of soaking dried chickpeas overnight. The recipe called for 2 leeks, but has almost no other quantities given. I had 2 leeks, but they were pretty massive, so I used 2 cans of chickpeas to balance out the quantities. There’s also the white wine, some olive oil, and caraway seeds ground with a mortar and pestle. I eyeballed most of the quantities based on watching the video. :-)
The soup was started by boiling everything but the leeks in salted water for 10 minutes. Then, the leeks are added and cooking continues for another half hour.
While that’s being done, the flat bread is made.
The flour was the other thing with a quantity given: 300 grams.
Unfortunately, my kitchen scale disappeared. So we had to use a converter. I used a little under 2 1/2 cups of flour. Salt is added, then a dough is formed with some warm water. That’s it, that’s all!
After the dough is kneaded until smooth, the recipe said to divide it into 10 pieces. There are 4 of us in this household, so I divided it into 12 pieces, instead.
The pieces of dough are then rolled out into rough circles.
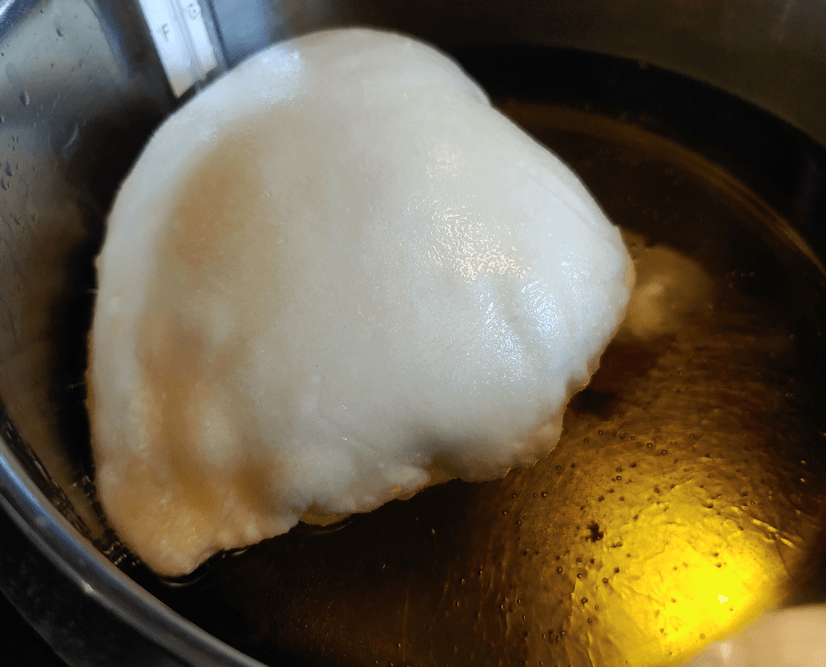
The recipe calls for olive oil to be used to fry the bread. Olive oil has a low smoke point, so I modified the recipe a bit more. I added a bit of vegetable oil to increase the smoke point a bit. I was just frying in a pot on the stove, so this was more of a safety issue.
Once the oil was hot, the rolled out dough was fried, one at a time.
The dough bubbled up a bit in the video, but not into big dough pillows like this! :-D This could be because of the different type of flour, or even because of the oil blend.
Not that I’m complaining! :-D
These fried up very quickly. Maybe half a minute on each side, to get them to a golden brown, before placing them on paper towel to drain. The bubbles cracked on a couple of them, allowing oil to get into the pockets. That took a fair bit of draining! The bread was finished well before the soup itself was.
They look absolutely amazing!
Taste test time!
The soup itself was very mild tasting. Possibly because I used more water than in the recipe. I couldn’t distinguish individual flavours of the caraway or the wine, for example. No one ingredient overpowered the other.
The lagana bread had a surprising amount of flavour for something that is just flour, salt and water! The outside was crispy, while the inside was chewy. It went incredibly well in the soup. A real balance of flavours. Making one without the other would not be as good as the two together.
This is a remarkably easy soup to make. The lack of quantities in the recipe made it a bit more interesting to work out, but that just gives room to adjust to one’s one preferences!
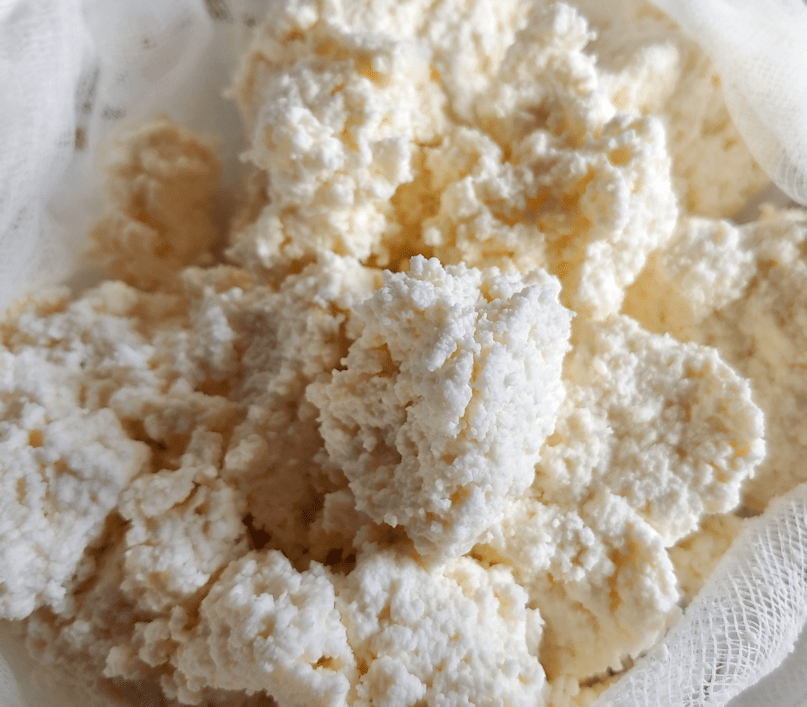
This photo was taken right after the bag was taken down from the hanging rig.
Of course, I gave it a taste.
It has very mild in flavour, as to be expected with a cheese like this. Lightly salty – I probably could have added maybe an extra half teaspoon, instead of the quarter teaspoon or so I added, to adjust for using 4L instead of 1 gallon. It has a light, almost creamy texture to it.
Because it’s so loose, I squeezed it together in the cheesecloth a bit, then put it back into the colander over the bowl, put a plate over it and weighed it down with my stone mortar. Just for a couple of minutes, to make it easier to transfer into a container.
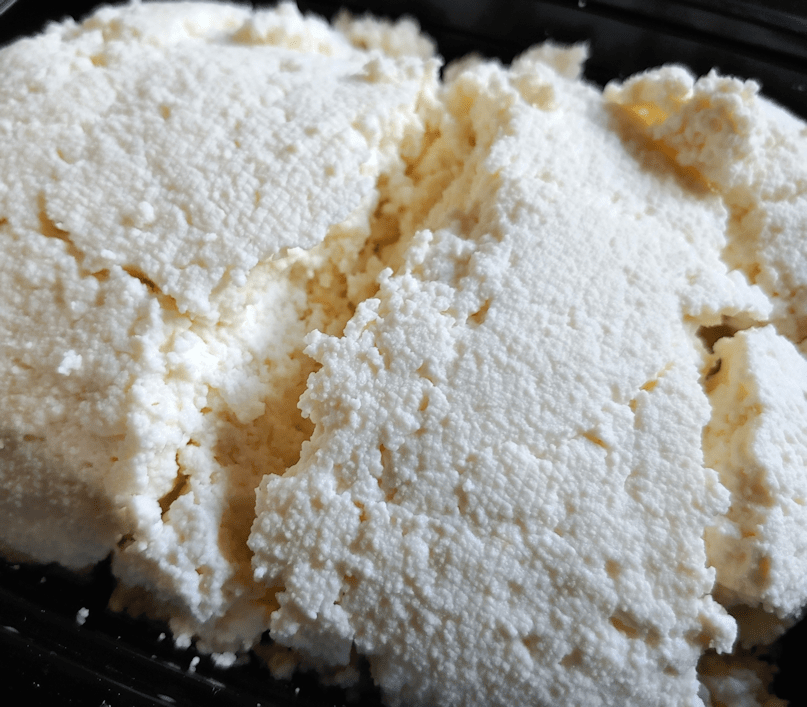
Since it’s such a fresh cheese, it will need to be finished quickly.
I don’t think we’ll have a problem with that! :-D
Then, because I had a big bowl of still-warm whey handy, I made up a double batch of bread, using whey for the liquid. This works out really well. Yeast seems to really like whey. The dough has a softer feel to it while kneading, and the finished bread is lighter, with a delicate crumb and a lovely flavour.
We’ll be storing the rest of the whey in the fridge to use in other baking. It would be awesome in a sourdough bread!
I’m quite pleased with the end result of this cheese. Definitely something I will be making again, and maybe playing around with adding things, like fresh herbs, to it at the salting stage.
I’m happy to say that I was able to deliver a little care package to my mother for her Easter. I called right after dropping off my daughter to see if she needed anything at the grocery store, but she was able to order everything she needed from the grocery store and have it delivered. Which means they were able to accommodate her in regards to her not being able to pay over the phone. I thought that might be the case, as the grocery store near her caters to a lot of seniors in similar situations.
When I got there, she met me at the door, since her building is on lockdown. Technically, I could have visited her and it would have been okay, but the less people from outside come in, the better.
After the drop off, I went to the grocery store near her place and scored big time!
Not only did they have big bags of cat kibble, but they were well stocked in pretty much everything! They even had a big display of large pack toilet paper, though they were selling for over $30. We are fine for that, so I didn’t get any. Their yeast section was completely full, and I was able to get a nice big jar of the traditional (slower acting) yeast. Between this, what we’ve already got left at home (even after baking day, yesterday) and our sourdough starter, we’re set for a good long time. :-)
Finding a candy thermometer was just bonus! I won’t have to make to with a meat thermometer, when I try a new cheese recipe after Easter.
Once home, I got a couple of pots doing with more eggs; one with the tea dying mixture, and the other with onion skins. We’ve been collecting onion skins all year, and there was so much, I couldn’t even use it all. (click here for how we do our three different types of eggs)
Once the eggs were at the stage where they could be left unattended, I got the dining table all pretty.
Which has fascinated the cats.
Cheddar, at least, was polite about his curiosity. He just sat on a chair and rested his chin on the table cloth. I’ve already found Two Face, just sitting on the table, like a bread loaf.
Once the table was cleared of cats… again… I worked on preparing other basket ingredients.
Each of the items has symbolic significance, some of which are old traditions for our Polish family, while others are traditions we added ourselves. Along with the bread, which symbolizes Jesus (the “bread of life”), and the eggs, which symbolize the Resurrection and new life, we have:
ham; to represent joy and abundance, marked with a cross made of cloves
sausage; representing the favor and generosity of God
butter; to remind us of the goodwill we should have towards all things. We like to make different flavored butters. This year, I’ve added parsley, garlic granules and paprika. Like the ham, it’s marked with a cross of cloves, and the fish shaped bowl it’s in is a reminder for us to be “fishers of men”.
salt; in one of the tiny jars, it symbolizes prosperity and justice, and is a reminder to be the “salt of the earth”.
cheese; this year, marinated goat cheese, but we’ve used many different kinds of cheese over the years, as a symbol of moderation
vinegar; the other tiny jar has red wine vinegar, as a reminder of the wine vinegar mixed with hyssop that Jesus was given to drink, just before he spoke his last words. This is one of our own, added traditions.
olives and olive oil (in with the marinated goat cheese): this is another of our added traditions, symbolizing wisdom, peace, and hope.
Not pictured is the horseradish, which symbolizes the pain of crucifixion. Traditionally, it can be made into a paste with beet juice, with the sweet juice representing the joy of resurrection. We’ve included the beet juice with our pink pickled eggs.
Other items that would be appropriate to add are a candle, a bottle of wine, and sprigs of greenery.
By the time we’re done, there’s enough food in the basket to feed us for a couple of days! Typically, we eat the blessed food as a brunch on Easter morning.
Gosh, I love making these baskets so much!
Now it’s time to check on the eggs, and prep the horseradish! :-)
Today, while the girls continued to work on the basement (I have yet to go down to see their progress!), I worked on baking our Easter bread.
Then, since I was baking anyway, I made some sourdough soda bread, and another double batch of what has become my usual standby, a basic bread recipe modified by the addition of rolls oats and various seeds. This recipe, plus chia seeds and minus the rye flour. Lately, I’ve also included hemp hearts as well, which adds a really nice flavour and texture. Thanks to my dear friend, I even had yeast to use for the non-sourdough recipes. :-)
In this photo, the braided loaf is for our Easter basket, and I made 4 mini loaves with the other half of the recipe. In the back, left, are the loaves of sourdough soda bread. Which did NOT want to rise today. The house was a bit too chilly today, even though it has been warming up again, outside.
In between batches and rising times, I also made a soup using one of my meals in a jar mixes with sausage. The mix had brown lentils, red lentils, orzo pasta, turmeric cous cous, dehydrated vegetables, dehydrated onions, mushroom ketchup powder, 1 cube of vegetable bouillon and 1 cube of chicken bouillon.
The seedy bread was shaped into mini-loaves that made excellent bread bowls.
This was soooo good to break my Good Friday fast (for health reasons, I do not do a total fast).
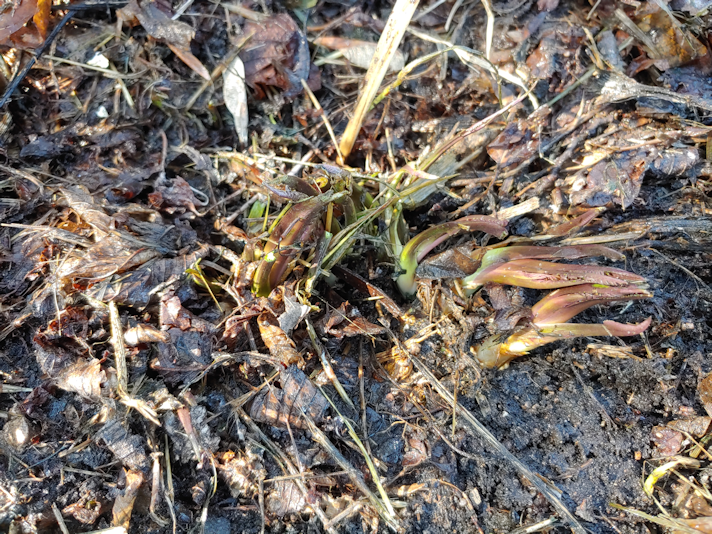
While doing my rounds this morning, I checked the ground near the power pole in the old garden, where there is horseradish planted. It was rock hard, but I hoped that things would have warmed enough to dig some up by this evening.
After scraping aside last year’s leaves, I found the horseradish has already been trying to grow.
The ground was certainly starting to thaw out by this time, but the soil here is so full of rocks, it didn’t make that much of a difference. I can’t understand why my mother planted these here. For a plant that is grown for its roots, rocky ground would have been something to avoid. The area has always been much rockier than the rest of the garden; so much so, my parents eventually stopped using it completely. The base of the power pole, however, has rocks and gravel packed around it, so it’s even worse than anywhere else.
I did manage to break off a couple of pieces, then decided to see what I could find in the other spot my mother had planted horseradish; at the base of a spruce tree near our feeding station. I had hoped that, between the wood chip mulch and possibly a bit more sunlight, the ground would be thawed out more.
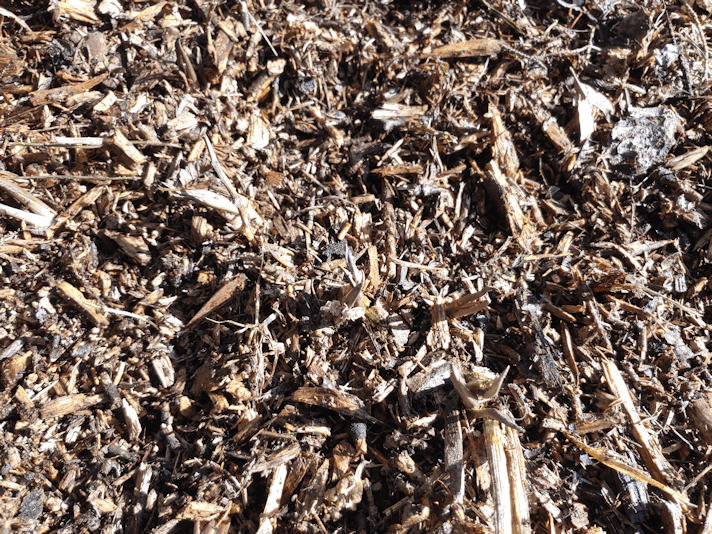
The horseradish here isn’t as big or prolific, but I could see where it was starting to grow.
I did scrape away the wood chips, but it’s still pretty hard to see.
There isn’t as much growing here, and they’re much smaller, but the ground was indeed a bit softer, so I got a couple of decent chunks out. The ground isn’t rocky here, but of course, there’s plenty of tree roots. Again, I don’t understand why my mother chose this location.
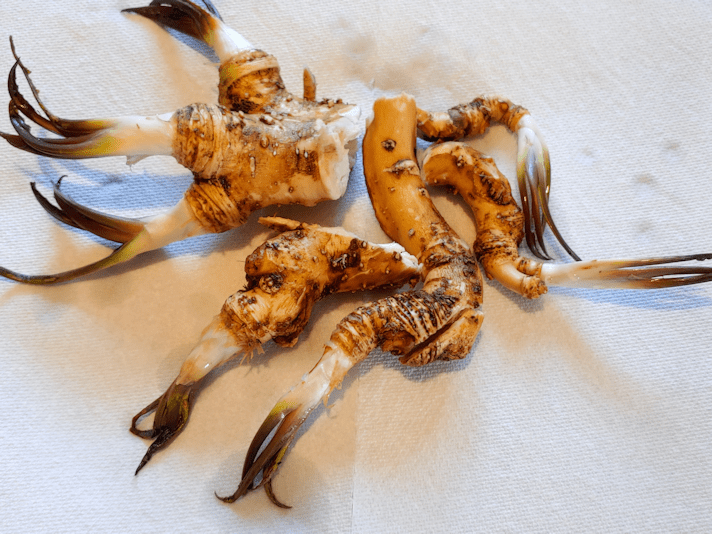
After much washing, then scrubbing with an old tooth brush to get into the crevices, I now have several chunks to use.
That big piece with three sprouts? I could potentially plant each of those, and have three fresh plants.
I think the two little ones will be enough for my mother. If all goes to plan, I hope to swing by her place tomorrow with a care package for her. I’ll leave these as is, so she can prepare them as she wishes – or plant them in her own little garden plot outside her window. :-)
We only need a bit for our own basket. I have been thinking of planting horseradish in softer ground; perhaps in a raised bed or planter. Something that will allow a straighter root to develop. If I can think of a good spot for that, I might do that with the big piece. My mother always kept a piece of horseradish, with the green parts still attached, in the basket to be blessed with the rest of the food, specifically to share with friends to transplant, or to transplant herself. I’ve tried it myself a few times, but the only one that succeeded (and didn’t get dug up by squirrels) was the one I’d included with our Easter basket the last time we were able to visit with my father, 5 years ago. I took it back with us to plant when we got home, and it actually survived. It got left behind when we moved, of course.
Normally, we would finished putting all our basket contents together tonight, in preparation for taking it to church for the blessing tomorrow morning, but since there is no church blessing, we’ll finish arranging the basket tomorrow and do our own blessing whenever we’re ready. I still want to do onion skin dyed and tea dyed eggs, which will be the last things that require any cooking.
For now, I think I’ll head down into the basement and see how things are looking after all my daughters’ hard work! :-)