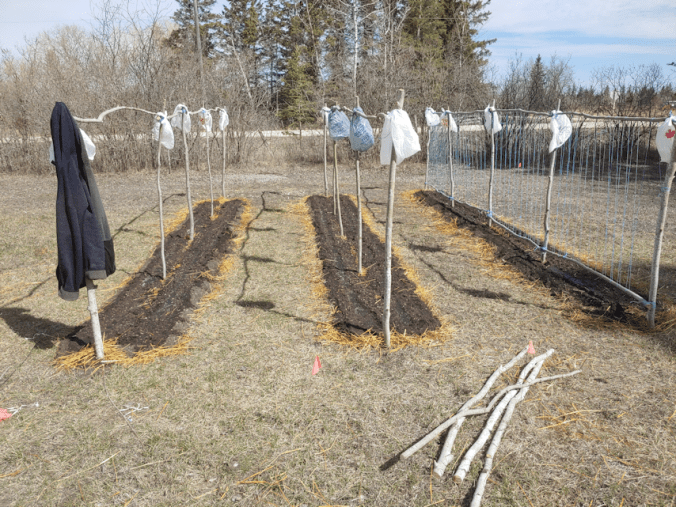
This morning, I got the peas planted in their new beds.
I also added our first line of defense against birds and deer: flappy, noisy grocery bags.
As soon as we can, those will be replaced with whirligigs, wind chimes, flags, flashy things – whatever we can find that will startle critters, but not act as potential sails and pull the trellises down!
While covering up the seeds, I made a point of pressing down little trenches on either side of the seeds, where water can collect and soak in, rather than flow off the soil. I made slightly deeper trenches on the insides. The more water gets through the soil to the straw and old soil below, the better for the ground to soften up and encourage worm activity. That was one thing I noticed when digging the post holes. I think I saw only one worm, and I’m not even sure if I’m remembered that correctly or not. :-/
Everything else being planted in this area has to wait until after the last frost date, so when I was back from helping my mother with her grocery shopping (I showed her pictures of what we’ve done so far. She had nothing positive to say, of course. ;-) ), then making a dump run, the girls and I moved on to where we will be planting things that can go in before our last frost date.
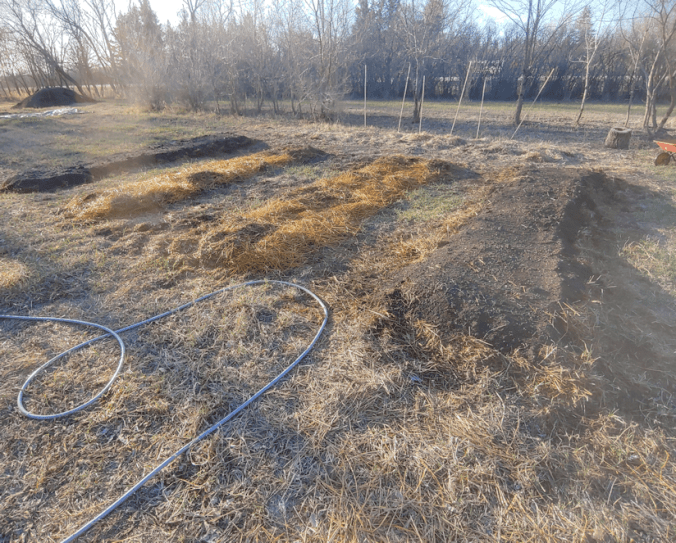
The two beds now covered in soil had looked like the long bed with the bamboo poles, before. Aside from raking around the edges to clean them up, adding the raked up material onto the beds, all we did was cover them with several inches of new soil.
The straw layered beds were rakes around the edges and evened out to more or less match the first two in size, then got thoroughly soaked. Then the soil beds got soaked, too.
Tomorrow, they will all get another soak, and then the straw will be covered with soil. After that, the two short beds that are off frame will be lengthened to match these ones in size, then they’ll be soaked, topped with soil and soaked again. Meanwhile, our onion seedlings are being hardened off for transplanting. Until they’re ready, we will continue to soak down the beds to get them thoroughly, deeply moist. This area had a summer under mulch and black plastic before we planted in it last year, so the soil is decently soft. We mostly want to encourage the break down of the straw.
Once these beds are ready, plus a couple in other areas we will be planting cold-hardy seeds, we will be able to move back to where the peas are and continue marking off and preparing beds for what will be planted there in June, after the last frost date.
I am so glad we were able to get that soil!! It’s going to make such a difference.
Oh, I’m going to be in for a world of hurt, tomorrow.
It’s going to be worth every bit of it! :-D
But first, I have to show off the little Crespo squash baby!
I got this photo last night.
This is how it looked, less than 24 hours later.
Then I checked it this morning, the leaves hadn’t broken free of the soil yet. Every time I look at it, it’s noticeably bigger! It’s still the only one of the Crespo squash that has sprouted. Hopefully more will emerge, soon. :-)
Today, the priority was to get the pea beds ready, and that took me pretty much all day! Thankfully, the girls were able to come out and help quite a bit, which made some jobs faster.
The first thing that needed to be done was to dig post holes and set up the uprights for the new pea trellises.
That… got interesting. The posts could not be buried at all the same depth, that’s for sure.
My apologies for the out of focus photo, but you can still see the bottom of this post hole. Yeah, that’s a rock. A rock big enough I couldn’t dig around it to pull it out!
Others were more like this one.
What I ended up having to do was to start with a spade to remove the sod on top. Then I used a trowel to pull out the bigger rocks or find and remove pieces of roots. Then I would use the post hold digger until I hit more rocks it couldn’t get through. If I needed to go deeper, I’d use the trowel again to get the rocks out, then use the post hole digger again.
I set the posts at each end first, between the flags marking the width, then strung a cord between them to make sure the other posts were in a straight line. Every 5 feet was marked with the post that would be going there.
Then the holes got dug, and the line put back across again, and I’d double check the distance for each pole before setting it.
With the girls helping, tying the cross pieces in place was much, much easier and faster!
I tried the cordless drill to see if I could drill pilot holes and place at least one screw at each pole of the first trellis we did. The batteries couldn’t hold enough charge to finish drilling a hole. I had a hard time just to reverse the drill back out again! So that jobs is going to have to wait.
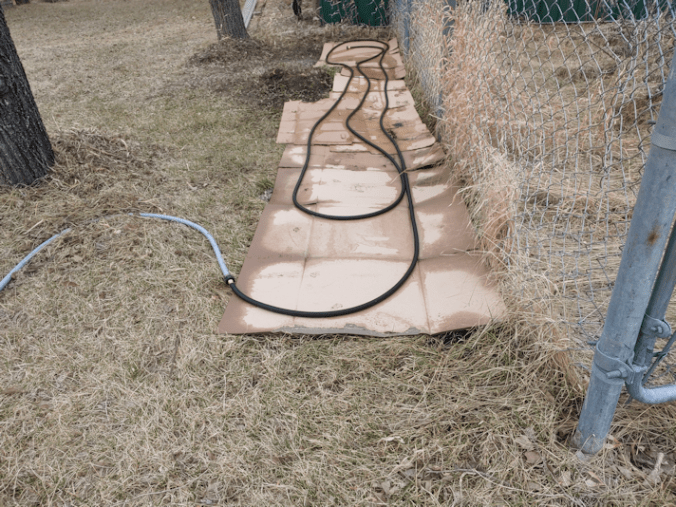
We put all our hoses together, and it wasn’t enough to reach all the way, so we moved the rain barrel to a new spot. For the first bed, we had shredded paper that we soaked on the mesh top of the rain barrel, then placed along the row before topping it with straw. We were able to wet the straw down, before taking a break for lunch, and my older daughter went back to working on commissions.
Then my younger daughter and I continued preparing the beds. These are now ready for planting! The new trellises are not done yet, though. The first trellis will have a single row of peas in the middle, with the seeds planted alternately on either side of the bottom cross pieces.. The other two will have double rows, planted about 2 ft apart. After the peas are planted, the trellises will get A frame supports at each upright, with cross pieces at the bottom, and then they will be strung similar to the first one. Once the top cross pieces were in place, I got the measurement I needed. To finish this, I’m going to need 20 poles at about 5 1/2 ft long, plus another 12 poles at 5 ft long for the bottom cross pieces. My husband went ahead and ordered some more cord that I can use to string supports for the peas, sweetheart that he is. :-)
We made quite the dent in the pile of soil! :-)
Before we finished for the day, the girls started laying down straw for a pair of re-oriented beds, then hosing them down.
The three, small beds in the middle that ran East/West are being turned into two longer beds oriented North/South. For the peas, we could get away with laying down the soil in narrow rows where the peas will be planted, rather than the entire space. These beds are going to be intensely planted with onions, spinach, purple kohlrabi and purple kale, at the very least. There are two more smaller, former potato beds that are going to be lengthened to match these ones, and they will be intensely planted, too, similar to Square Foot gardening. So these beds are going to need a whole lot of soil added all over. Thankfully, these beds are much closer to the pile of soil!
By this time of the day, the winds had picked up significantly, so wetting the straw was needed as much to keep it from blowing away as for preparing it to have the soil added on top. I’m going to see if I’ve got anything else I can layer on there before adding the soil. I tried digging into the old compost pile yesterday, and the first thing I hit was the remains of some Styrofoam packaging, of the sort you might buy meat in. Plus a hard plastic lily, which was actually kind of pretty. I know my mother would never had thrown things like that into the compost pile, which means that someone else was using it for garbage, after she’d moved to her apartment. *sigh*
I might not be able to work on this area tomorrow, as I’ll be helping my mother with her grocery shopping in the afternoon, but I hope to at least get the peas planted in the morning. We’re supposed to get very warm tomorrow afternoon, so it would be good to get them in early.
I’m pretty excited about finally getting our first seeds into the ground! :-)
A while back, the girls and I decided to create a bed in an unplanned area. Today, things got pleasant enough outside that I quickly finished part of it.
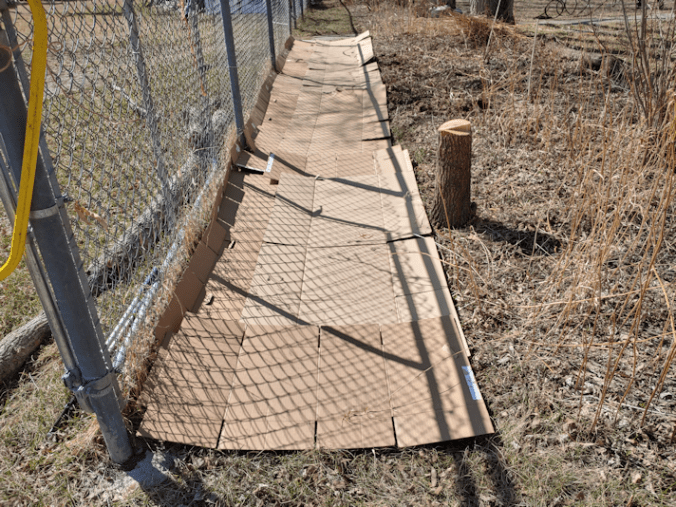
This is the side that will have the Strawberry Spinach planted. These can be successively sown every two weeks, starting before the last frost date, so I wanted to get it finished.
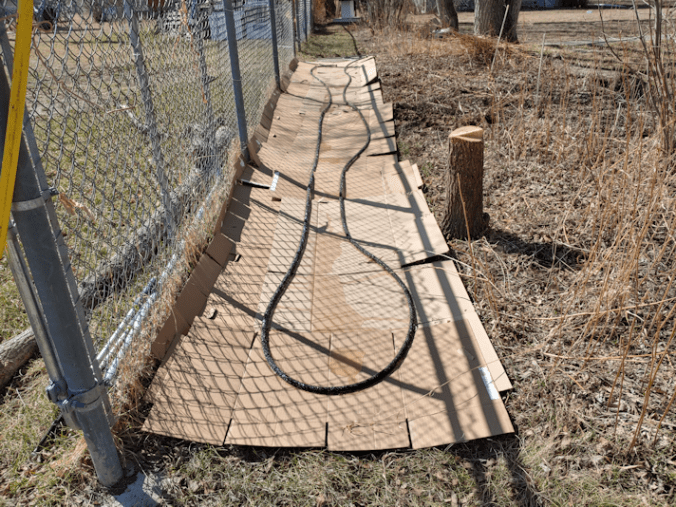
It’s warm enough to have the garden hoses out, though we still have to be careful to make sure they don’t have water in them overnight. This meant I was able to give the cardboard layer a solid soak, first. Before we lay the cardboard down, the dead grass and leaves had been raked away, and that got put back on top of the cardboard, followed by another soak, a layer of straw, another soak, then a layer of garden soil, followed by a final soak. Over the next while, weather willing, I want to continue to soak the new garden beds as often as I can before planting, to get them damp through the layers (at least those we can reach with hoses!). That will help the layers break down faster, plus they will act as a sort of sponge, so the beds will need less watering later.
At least, that’s the theory!
The rest of this area still has just the cardboard, which also got a thorough soaking, to kill off the grass and soften the soil a bit until we get the asparagus crowns that will be going there.
At least I got one area done today! The winds had picked up quite a bit, but this corner seems to be more sheltered. That should be good for the plants!
We have the handsome Ginger to greet us! He’s been quite the character, and a lot of fun. :-)
The outside cats were happy for breakfast. :-)
We finally took the tarp off the top of the kibble house. We got some rain yesterday; enough to soften the ground a bit. It should be fine until we get some paint.
My daughter wants to paint it yellow. !! Not a bright lemon yellow or anything like that, thankfully. :-D
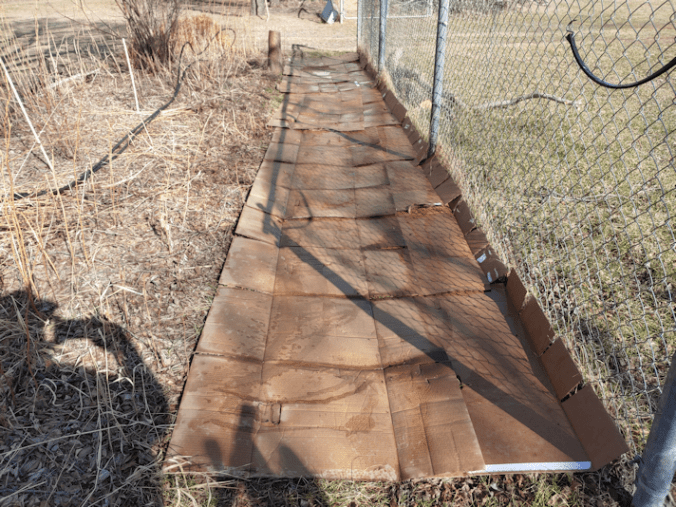
The girls and I removed most of the mulch from the garlic beds the other day, and uncovered many more sprouting garlic. Most were a bit on the yellow side, since they hadn’t worked their way through the mulch to the light, yet, but they are already looking nice and green and strong.
We moved the mulch over to the new bed, then covered it with a sheet of metal we scrounged from the outer yard, so the wind wouldn’t blow it away. We will have to build a box around this bed. At this point, if I add soil to the top as planned, it’s high enough that it’ll just fall off on the sides. I think we have some scrap wood in the barn we can use for that. It’ll be temporary, so it doesn’t need to look fancy or anything! :-)
After doing my morning rounds, I had some calls to make. One of them was to the court office about the restraining order I applied for against our vandal. The last time we had a court date, everything had been cancelled again, due to our province’s extended restrictions. I was told everything was deferred to after April 23rd, and to call around them. Well, that was on Friday, but I remembered too late in the day, so I called today.
The person I spoke to told me that they were holding court sessions now, and that I have a court date on May 21st. She wanted to check something, though, and said she would call me back.
Which is when I found out that the file had actually been in court on Friday. Our vandal was represented by a lawyer. The court offices informs the lawyers when things change, but people who don’t have representatives have to call themselves to keep updated. :-/
Nothing came of it, other than the new date, and it’s just on the morning docket. It will likely go to a trial date after that. One of the possibilities she said that might come out of it is a mutual restraining order. He stays away from us, we stay away from him. Before our move, I was in a situation where I agreed to one of those, and I regretted it. The type of restraining order I applied for would mean our vandal would have to stop drinking – and provide proof of that regularly – and have his guns removed. I believe his drinking has a lot to do with his behaviour. He often sounds drunk in those bizarre messages he’s been leaving with my mother. I would hope if he were at least sober, he might finally get the help he needs. It would, however, drag things on longer. His having a lawyer, and our not being able to afford one. I have LegalShield, which gives me free, unlimited phone consultations, among other things. If I need a lawyer to represent me in court, I would get a discounted price, but we don’t have the funds to spare to begin with, so that’s a moot point. I’m not going to let what he’s doing to us financially ruin my family, even if he’s willing to financially ruin himself, apparently. He has no defense, really. About the only thing a lawyer can do is drag it on. That’s just going to cost him more money – and he’s already said that he’s willing to sell his farm and be homeless, so he can sue me, my mother and my siblings.
I wonder what his wife thinks of that. :-/
Anyhow.
After that, there was an unplanned trip into town, and then a stop at the post office. We crossed paths with our vandal in the process, but only passing him on the road. I could see him well enough to tell that he recognized our vehicle, too. He lives near enough that, when I was working outside later one, I could hear him and his chainsaw, as he cut wood.
A part of me wonders how it would work out, if he really did follow through with his threats. He’s already got his silly suit against me, wanting me to pay him for things that aren’t his, and that I don’t claim to own in the first place. What can he do by going after me? We own nothing, so we have nothing to lose. He’s the one willing to bankrupt himself. And if he does end up selling his farm to pay for lawyers, well… we won’t have him living so close and creeping through the bushes from the road, and whatnot.
What a mess.
Whatever happens, happens. We’ll deal with things as they come.
Once at home, though it’s been a pretty chilly day, I did get to start on one project outside.
My daughters and I have spent quite a bit of time, working out where to plant what, so we know where to build beds to plant in. Then I realized we completely forgot about the purple asparagus crowns that will be shipped later, to arrive at time of planting in our zone 3 region.
We’d talked about them before, but hadn’t made any decisions. Where my mother had asparagus was ruled out. She’d planted trees and bushes in that garden, so that area no longer gets enough hours of sun in a day. Asparagus will produce for up to 20 years, so we couldn’t include them in most of the areas we will be planting in this year.
After talking about it, we settled on a spot where we had not originally planned to have any garden beds at all this year.
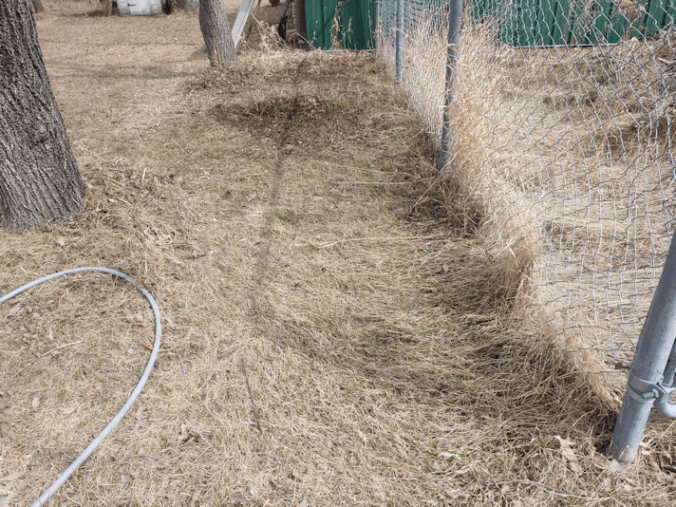
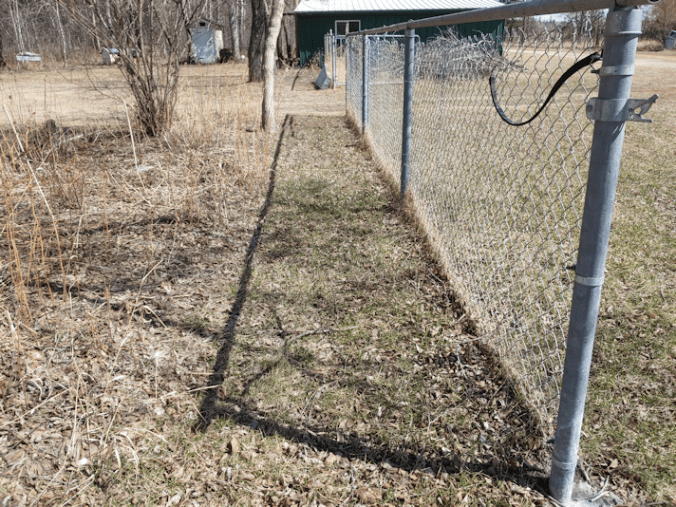
This is the spot we settled on, after I’d raked it out.
Part way down is where there used to be one of my mother’s tire planters that I’d taken out. I’d dumped the soil out to remove it, and found it was on top of the remains of an old maple.
I know it was an old maple, because it immediately began sending up suckers.
I had covered it with the soil inside the planter as much as I could. The flowers that were in that planter have been showing up, which was nice to see at least. :-) Much of this area is difficult to maintain, though. So now we will be planting two things here. At the far end, on the other side of the remains of maple, is where we will be planting the Strawberry Spinach. In reviews on the Baker Creek website, where I bought the seeds, it was mentioned that these self seed easily, and it was recommended to plant them in a permanent location because of this. That was kept in mind when we chose this location.
In the foreground is where the asparagus will go. For that, we will need to dig a trench long enough for the 6 crowns we will be getting.
Digging a trench here is going to be a challenge.
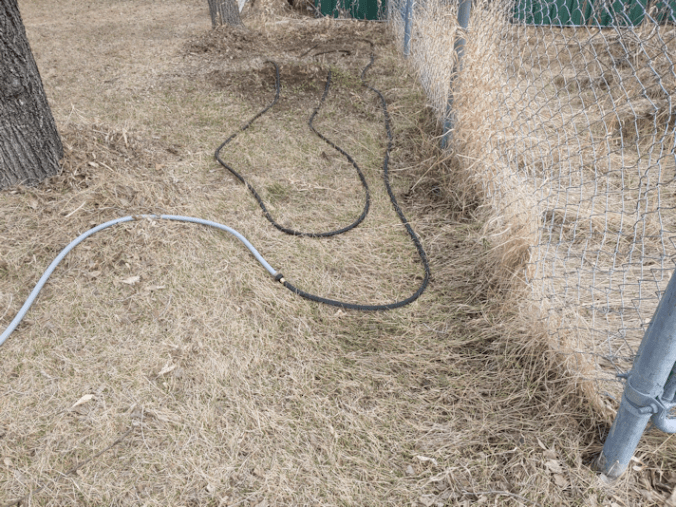
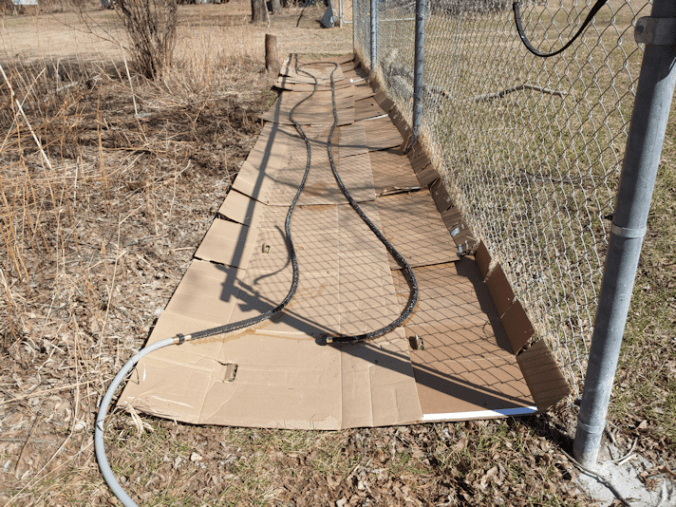
So today, I set up the soaker hose directly on the ground to start. Saturating the soil will make it easier to dig the trench.
While that was soaking, I prepped as many cardboard boxes as I could find, removing any tape or stickers on them.
My daughters helped me to lay the cardboard under the soaker hose, and we left it running for a while as we checked other areas. The rain barrel was full, so we used it to fill our watering cans and wet down the cardboard more, and finally just left the soaker hose going for about an hour. The above photo is what it looked like when I turned off the water.
(We are now out of cardboard. :-/ We do still have some moving boxes left, but they’re in really good shape, so we’re saving them for something else.)
We were planning to put straw over the cardboard, too, but it was way too windy today. We have several weeks before the asparagus crowns will arrive, so covering the area now will help kill off the grass, as well as make it easier to dig a trench, later. We’ll just have to keep soaking it. Where the Strawberry Spinach will be planted can have mulch and soil added to it at any time.
I’ve been looking at instructions for planting asparagus, and some places say to dig a trench 15 inches/38cm.
That’s not going to happen!
Those articles, however, also say to fill the bottom third of the trench with compost. We don’t have compost left.
Other articles say to soak the crowns in compost tea for 30 minutes before planting.
Since we don’t have compost to make compost tea with, that’s not happening, either. Our new garden soil, however, has plenty of compost in it.
I’m reading that the crowns should be planted 1 1/2 – 2 ft/46-61cm apart. We will be getting 6 crowns. That space isn’t long enough to plant them in one long row, but it’s wide enough to plant them in 2 rows, so we’ll need to made a double wide trench – about 24-30 in/61-76cm wide. A depth of 8 inches/20cm should be good, but we will be building the area up, so we won’t need to go quite that deep. I don’t know if we even could go any deeper, with the trees being so close. I expect to find a lot of roots under there. By the time we’re done, this area should be about 4-6 inches/10-15cm higher than it is now, so all we really need to do is get rid of the top layer of grass roots.
Hopefully, we will be able to remove more of that tree stump and cover the remains over, in the process.
Once it’s done, we should be able to leave things here and just keep them maintained, for the next couple of decades.
The forecast for today has changed, and we are expected to be even warmer than originally predicted. Before trying to get my husband to the lab in town for his blood work (he never even got to the counter to get his requisition; the line up was out the door, and was moving so slowly, he ended up leaving, due to his pain levels), I saw we’d already reached 13C/55F, which was originally our predicted high. The new high for the day was listed as 18C/64F. As soon as I could after we got back, I headed out to get the new bed done, before things got too hot.
Yeah. I know. It’s not really “hot”, but we’re not acclimatized yet!
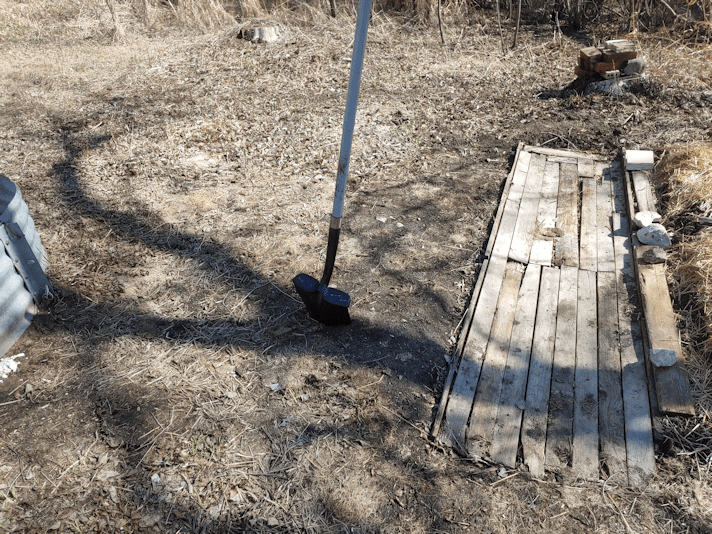
This is what it looked like before I started.
I would like to point out how deep into the soil the spade is. This is actually really, really impressive. Pretty much anywhere else in the yard, I would not be able to get the spade that deep, even while standing on it – and I’m no lightweight! Typically, I’d shove the spade into the ground, turn around to do something else, only to have it fall over, moments later. What a difference with soil that has been buried for decades under where the wood pile for the furnace used to be.
The first thing to do was remove that lovely soft soil.
And more roots.
We’ve de-rooted this area three times, and I was still finding old cherry roots!!
Also, worms. Lots of worms!
I dug down until I hit gravel. Which was not as deep as the other two beds that our garlic is planted in.
You can see a root sticking out that I couldn’t remove. I decided it wasn’t worth going back to the sun room to get something to cut it with. Some of the other roots I pulled out went under the boardwalk on the side! I’d dug those areas down to the gravel, too.
Being near the compost ring, this bed is narrower than the others, as well as shallower.
Being right next to the compost ring came in handy, though.
I pretty much emptied the compost ring, then walked back and forth on it to stomp it down.
Using the contents of our compost pile like this, we aren’t getting a chance to get any finished compost! Which is fine. It’s still organic material for our garden beds.
Speaking of which…
Next came a layer of straw.
Unfortunately, the wind was really picking up, and things were blowing away, so I made sure to tromp all over the straw, too.
When it came time to return the soil, I did much of it by hand. This allowed me to break up lumps, remove rocks, old tree roots, weed roots, and gently cover the worms.
This is where a soil sifter would make things a lot easier.
Well. Except for the “gently cover the worms” part. That would be more of a “bash the worms to bits” thing. So I don’t mind doing it by hand!
With the previous beds, I returned the soil that was dug up, plus added the soil from where the paths are. I’m not making a path on the other side, so it’s just the soil I removed. I’d used that side area to pile grass clippings last year. Most was used elsewhere, but there still was some left, and that got added to the bed as well.
We will be adding some of the lovely new garden soil to this, but not yet. By this point, it was just too windy to keep working on it. Hopefully, it will calm down a bit, later. After today’s high of 18C/64F (it’s already 17C/62F), we’re supposed to drop to -3C/26F, with “isolated flurries”. Tomorrow’s high is only 2C/35F, so if I can get this finished today, that would be great.
I do want to break out the soil testing kit first, though. I want to compare soil samples from this area, with the big garden area, and with the new garden soil. That should be quite interesting!
So there is the new, layered, garden bed, almost complete. This will be a good bed for root vegetables. I think we’re planning to put a variety of beets in here, though maybe it would be better for carrots. We have several varieties of both beets and carrots, so we might even do one of each. We shall see!
A lot of our seeds packets say to direct sow “as soon as the ground can be worked.” Which, obviously, can be done now. With the predicted overnight temperatures, though, I don’t think I’d be willing to chance it for another week even if we cover them with plastic. Even cool weather crops have their limits! That will just give us more time to prepare the beds. We’ll have to go over the seed packets and figure out just how big some of them will need to be and start marking them out. That will help us make some decisions on exactly where different things will be planted. Especially those that will need trellises and other supports.
We have lots of work to do, and I’m so thankful to finally be able to get at it!!
My younger daughter and I took advantage of it and built a new garden bed in the area we plan to plant tomatoes.
The tomato seedlings are doing well, as are the luffa.
They have roots starting to show out the bottoms of the pots already!
The onions in the sun room are doing well, but not to much the ones planted more recently.
As for the gourds, none have sprouted yet but, from what I’ve read, they do take a long time to germinate.
Here is where the tomatoes will be going.
We did absolutely nothing to the ground before we started. There really wasn’t any point of even trying.
The first step was to cover the grass.
Actually, the first step was to cut down that maple. I’d already noted that it was creating so much shade when in full leaf, that a unique lilac in the flower bed beside it was being killed off. The stump was left high and will become the support for a seat. The main trunk and some of the larger branches are being kept for future projects.
We’ve been saving the cardboard boxes from cat litter, and their flaps were placed against the fence as a short barrier to hold in the soil.
Well… after spending some time removing all the tape. It took more time to get all the tape off than to lay out the cardboard!
Those and some moving boxes were enough to cover the entire space between the flower bed and the fence. :-)
Then, we broke out the new soaker hose! :-)
We will likely be going below freezing tonight, so the water will still need to be shut off from the basement when we’re done, but for a warm day like today, we could use the hoses for a while.
The soaker hose is 50 ft/15m, so we’re looking at approximately 25 ft/7 1/2m for the new bed.
While letting that soak, my daughter and I began bringing loads of straw over from the bale in the big garden area.
We probably could have left the water running all day to soak it thoroughly, but we didn’t bother. We did move the soaker hose over by the haskap berry bushes, though, and left the water running while we moved on to the next step: spreading the straw.
Actually, I spread the straw while my daughter filled a couple of wheelbarrows of soil and brought them over. Once the cardboard was covered, we tromped back and forth on it, stamping it down, then lay the soaker hose back over it.
We left that to soak and took a walk around the big garden area and talked about changing a few things.
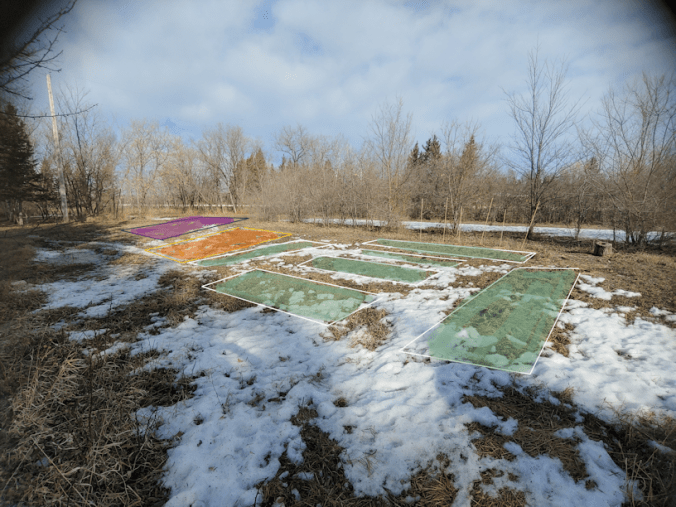
The above image shows the existing beds from last year’s garden, in green. The three smaller beds in the middle were going to be where our three varieties of spinach would be planted. I was thinking we might change those up completely. Instead of three short beds oriented East-West, it would probably be better to have two longer beds oriented North-South, like the two we already have. One of the North-South beds was supposed to have shallots planted in it, but the shallot seedlings failed, so we’ll still have three beds available to plant spinach (and whatever else we interplant with them).
Eventually, we will be building accessible raised beds here, so nothing is permanent at this point, anyhow.
There’s also the two small beds – the shorter green rectangles in the above pictures – where we’d planted potatoes last year. There’s nothing stopping us from making those longer, stretching into the skinny bit that’s marked in orange.
So that’s what we’ll do with those areas.
By the time we went back to the new bed, my older daughter was done work for the day and was able to join us.
The first thing they did was stop using the larger wheelbarrow, because it sucks. :-/ Actually, they both do. We need to get a new wheelbarrow! Just one good one is enough. :-)
So one daughter had shovel duty, filling the smaller wheelbarrow, while the other brought it over and dumped it, then I spread the soil until a new load was brought. The job was done very quickly!
The area of straw left uncovered will be a pathway. At some point, we’ll put in some pavers or something, but for now, the straw and cardboard will keep the weeds and grass down. That and lots of tromping it down with our feet. :-)
Each of the haskaps got a load of soil around them, too.
Then, because the hose was handy, the soil got a brief watering, more to keep it from blowing away than anything else.
Our last frost date is June 2, so this will have more than a month for the straw to settle. We’ve got one more warm day, then we’re supposed to get snow. Long range forecast sees more snow and rain into the first few days of May. Any precipitation we get will help settle it more, and we’ll be able to see if we need to add more soil or not.
If all goes well, I will use tomorrow to dig a new bed next to the garlic beds, before things cool down again. That one will be a lot more physical labour than this one was!
Since I went and build up a bed and walkway yesterday, I kinda had to continue today! :-D
Here is where I left off, yesterday.
The goal was to create another bed with compostable material buried in it, and make a second walkway.
The first thing that had to be done was to break up all the soil inside the frame and pull out any weeds and roots I found. Then I loosened the areas the walkway was going to go. This area had been mulched with grass clippings, so there weren’t a lot of weeks that needed to be pulled out of there.
Then it was time to dig out the new bed, just keep enough to start hitting gravel. Of course, there were more roots – and rocks! – to take out.
There wasn’t much in the new compost pile I could use for this, so I also loaded up a wheel barrow full from the old compost pile. That got topped off with another wheel barrow full of old, damp straw.
The compostable material got buried, with extra soil added from digging out the walkway. I wanted this one to be slightly narrower than the other, to give me more room for a third bed, if I decide to do another one.
I had to make many trips to the junk pile to find enough wood to do the walkway 3 layers deep, like the first one.
Once this was done, I went to clean up the mess I’d made digging for pieces of wood in the junk pile. A lot of the pieces were either too rotten, or too full of nails, staples and screws!
Cleaning that up led to finding all sorts of things, so that will get it’s own post!
So we now have to beds ready and waiting for the garlic to come in. Tomorrow, I will get one of the girls to help me move the frame and see if we can fit a third one in. I don’t even know if we’ll have enough garlic to need three beds, but if it’s feasible, I’d rather have it and not need it, then need it and not have it!
When I cleared out the old wood pile from the yard last year, the soil I found below was a very pleasant surprise. Still, there was a whole lot of clean up that needed to be done this spring, before we could plant anything. We were still finding some pretty strange things in there! The biggest challenge was all the tree roots crisscrossing the area.
Now that we’ve had our first vegetables growing in there, it was interesting to see what was coming up along with them! After being buried by a wood pile for decades, there were still seeds and root systems that managed to survive and sprout. There was plantain (the weed, not the banana!), which is not surprising; that stuff can grow anywhere and is very hardy. Clover was more of a surprise, but there was also a lot of some long, delicate green plant that I didn’t recognize at all. I thought it might be a flower of some kind, but it never had any. There were flowers that came up, too, and since they came up where the khol rabi failed, to, I let them bed until today, when they were basically done blooming, anyhow.
All this meant that in digging over the beds, I was basically stopping with every fork full to break up the soil with my hands, so I could pull out as many weeds with their roots as I could.
I also found tree roots I’d missed in the spring!
While fighting with the roots, my feet sinking into the soft, soft soil, I kept thinking about where and how we would plant the garlic. The spaces to walk on, in between the beds of carrots and beets we’d planted, was packed down harder than the rest, of course, and it almost seemed like wasted soil!
Also, I discovered that, like the girls had discovered when planting deep bulbs, it seems even here, there is only about 8 inches of topsoil before I started hitting a lot of rocks.
We’ve got three kinds of garlic coming, which meant three beds. How and were did I want to arrange them?
Then I remembered I still had a 4’x8′ frame from the goat catcher we’d built.
Those are coming in very handy!
I dragged it over, and the area I’d worked on turned out to be almost exactly the size of the frame!
That’s when I started to go a bit crazy.
I started to dig out the soil inside the frame.
Hitting more roots, of course.
By this time, plan had started to form in my mind.
All the stuff I’d added to the compost a little while before?
It ended up in the space I’d shoveled out, along with some damp straw that I raked up from around the old dog houses, where they had been used as insulation around them.
When it came time to return the soil to the space, I kinda went overboard again…
I kept digging.
The vague plan in my mind took into account walking paths, and I didn’t want to be sinking in the soil. The pieces of wood I’d used to walk on weren’t very stabled, but what if…
What if they were laid down on an area that was dug down and leveled to just above the gravel?
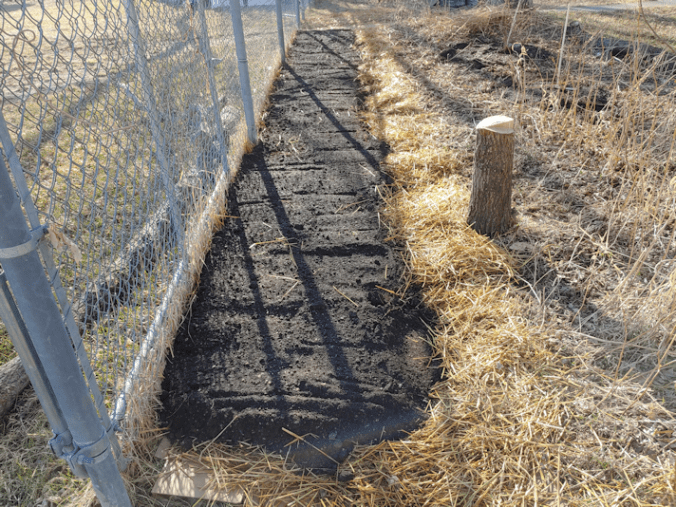
So after I used a hoe and rake to even out the mound of soil, I used them to even out the pathway and started laying down boards.
This is how far I got before stopping for supper.
This is where I pause to say how much I appreciate the girls. While I’m outside doing stuff like this – which I consider fun – they’re inside taking care of the cooking and housework – which I loathe.
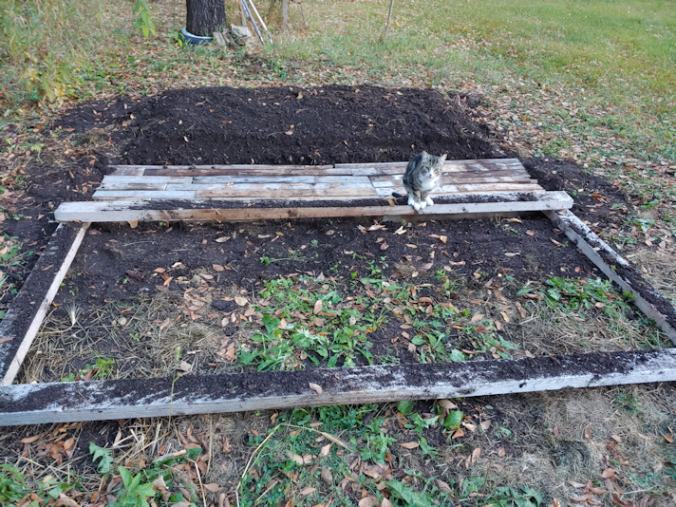
Then I went back to finish the job, and this is how it looked.
The wood I was using was salvaged from the junk pile in the spring, and some of if was slightly wider. I used the wider ones to make “walls” on either side of the path, then laid down three layers of boards in the middle. This made them a lot more stable to walk on, and also made the path the same thickness as the height of the “walls”. I had to cut a few to size to fill in gaps at the ends, which worked out all right.
This is old wood, some of which was already starting to rot. If I’d had the option, I would have put down gravel or something. These will do the job for now, and perhaps some day we’ll replaced them with flagstones or something.
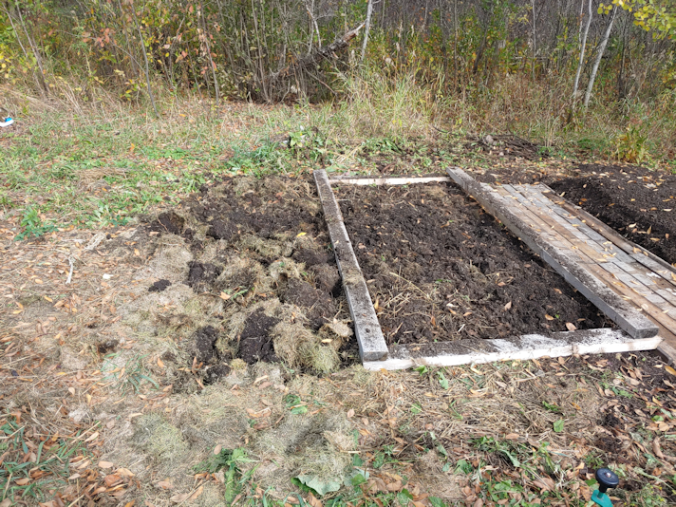
When the girls came out to see how it looked, I snagged one of them to help me move the frame to the other side of the path.
This is where the second bed will be.
With 3 varieties of garlic, it looks like I’ll have to make three of these. It looks like there is just barely enough space to do that, before reaching the metal ring around the compost, though I could put the third one at a right angle to the others, instead.
I don’t know if I’ll be up to doing three of them! I don’t know how many cloves we’ll get out of a pound of seed garlic, each. If I do only two, I could split one variety between the two beds.
We shall see, after the second one is done.
I made a whole lot more work for myself by doing this, but… I think I like it better!
Yes! Finally! The weather is cooperating, and I was able to get our potatoes in!
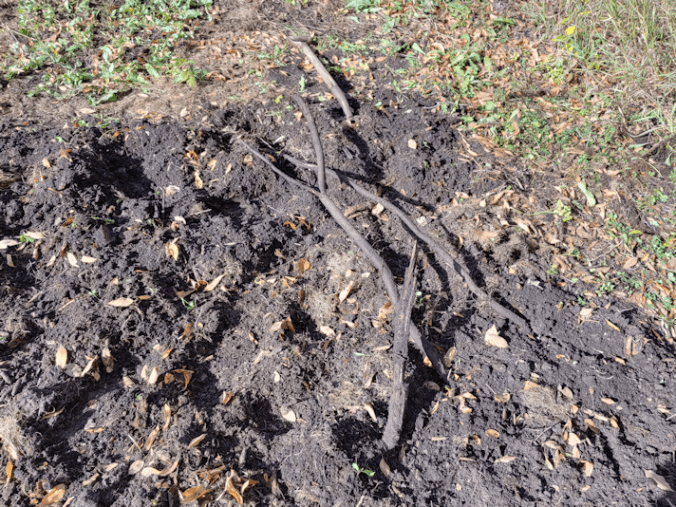
From a previous post, this is what I was starting with.
The frames are just there to mark out where the beds will be. As you can see, there’s a fair bit of grass and weeds. It has been a while since this area had any sort of gardening done in it.
While the no-till, no-dig method we’re using is something that can be done directly on the grass, I wanted to add at least some amendments, first.
I used a wheelbarrow to mix 1 bag of manure with a slightly larger volume of peat.
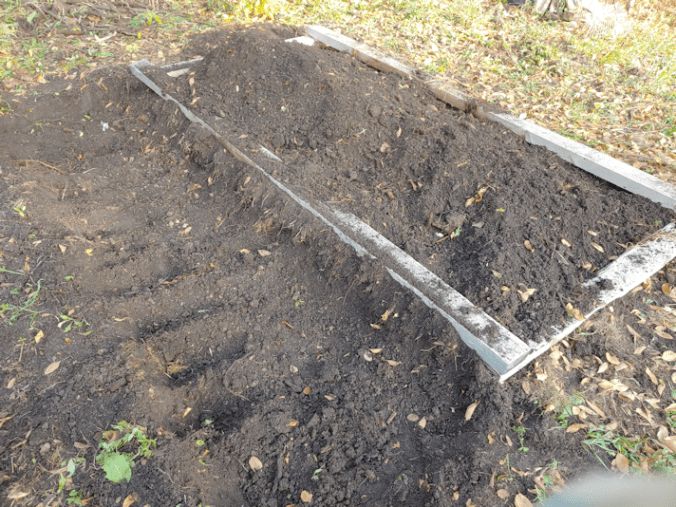
After spreading it out on one of the beds with a rake, I used another bag of manure mixed with peat on the second bed. I then topped them with a thin layer of straw, making sure to use the damp straw from the bottom of the bale, where it was starting to decompose already.
I had hoped to use some material from our own compost pile, but as I dug around, I did not find any usable material. I had tried to clean out some of the older compost, from before we moved here, but as I dug around, I found more stuff I missed. Twigs and branches are one thing. It looks like people had stared to use it for garbage, and I found pieces of wood that were probably used as support stakes, plastic trays from transplants, and even a piece of fabric. There was some well composted material, but it was so full of sticks, it was unusable.
I’m thinking we will need to start a completely new compost pile somewhere else. This one is looking like a write off. :-(
So, no compost of our own for the potato beds.
Once both beds were spread with the manure and peat mixture, I gave them a very thorough watering. Even though we’ve had rain for the past couple of days, the soil was still pretty dry.
After soaking the beds, I added the potatoes. Each box was 3 pounds of seed potatoes. That worked out to 3 rows of 6 potatoes (plus 1 extra, so I put 2 small ones together) in one bed, and 3 rows of 5 potatoes in the other.
After spreading the potatoes out, I went back to evenly space them and push them gently down to have contact with the ground. With one potato, I went to pick it up, but it wouldn’t move.
???
I tried again, but it was stuck to the ground.
Amazingly, in the space of a couple of minutes, this one potato that had direct contact with the ground and shot out a 3 or 4 inch root, with capillaries! I wish I’d made the effort to take off my muddy gloves to take a photo, but instead, I dug a quick hole in the ground where I wanted it to be and “transplanted” it. I still can’t believe a potato could grow a root so deep, so fast, even after seeing it with my own eyes!
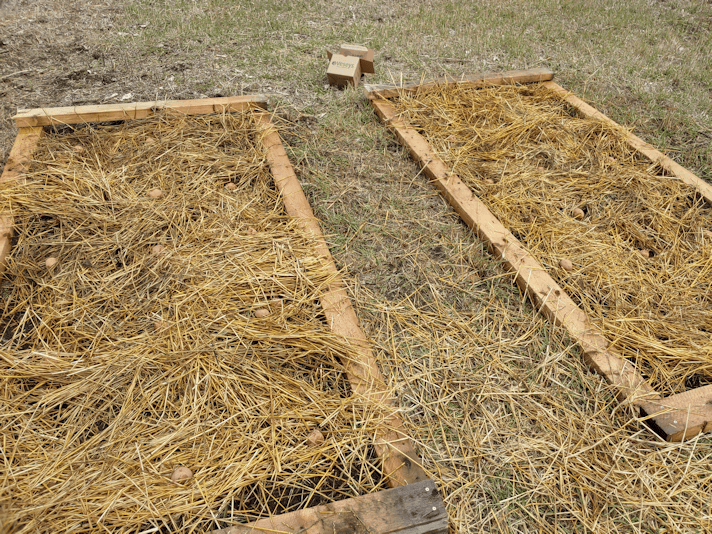
The next step was to cover the potatoes with a deep layer of straw. Again, I used straw from the bottom of the bale, where more of it was already damp and some was starting to decompose already. I made a layer roughly a foot deep.
I then scattered more peat across the top, then tamped it all down with the back of the spade. This peat is as much to add some weight to prevent flyaway straw as it is to amend the soil.
After the above photo was taken, I spent the next while thoroughly soaking the straw.
With this method, I saw recommendations of putting a layer of hay (which I don’t have, so I’m using straw) 2 feet deep. This is definitely not 2 feet deep. Over the next day or two, I plan to soak the straw some more, add another layer, then soak it again. After that, I should not need to water it much, if at all, for the rest of the growing season. I’ve heard people using this method say that no watering is needed at all, because the mulch maintains moisture as it breaks down, but I expect to need to water it at some point. It all depends on whether we have another drought this summer.
After the straw has started to settle and pack itself down, I will remove the frames to be used elsewhere.
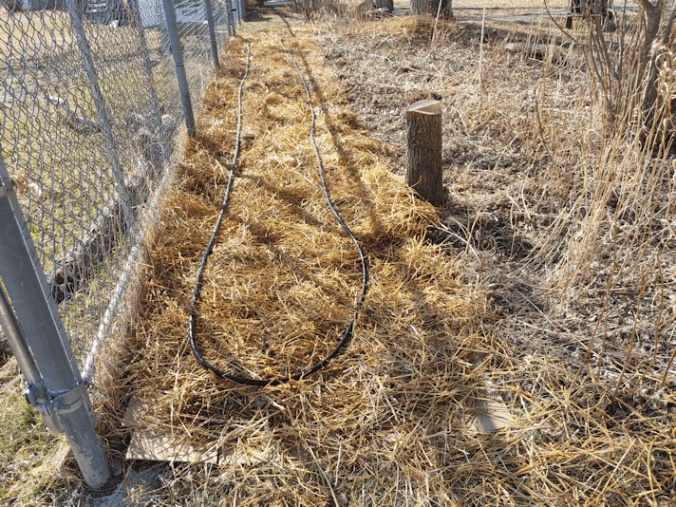
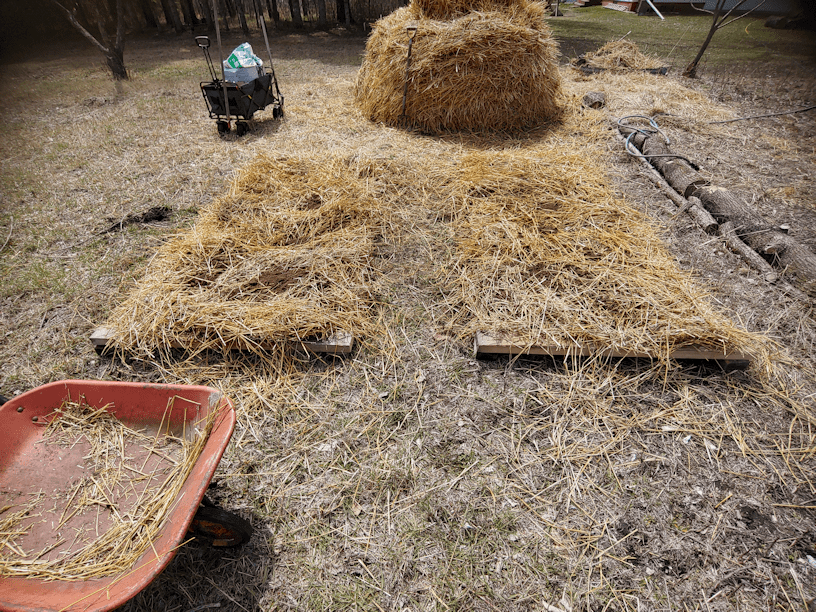
Once this was done, I checked out the area we are planning to transplant our squash seedlings. We had covered this area last year with straw, then covered with tarps, to amend the soil and try to kill off the grass and weeds. We still ended up having to use Round Up. Even covered with tarps, weeds where pushing their way through the straw and lifting the pegged down tarps off the ground!
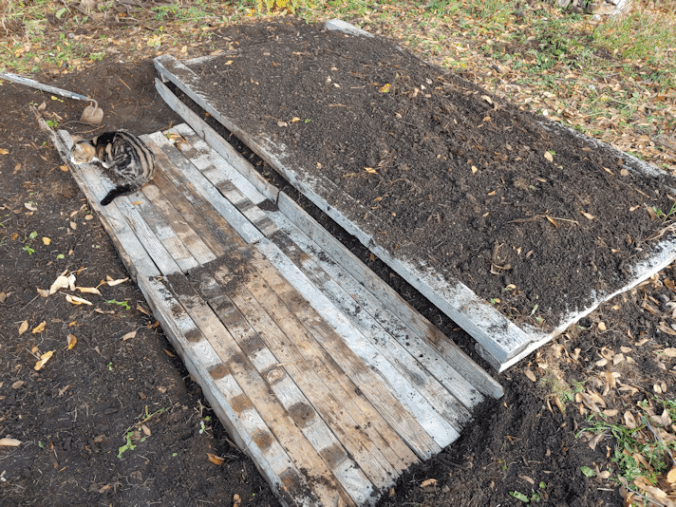
This is how the area looks now.
The black tarps in the back are there to warm up the mulched soil on that side a bit faster.
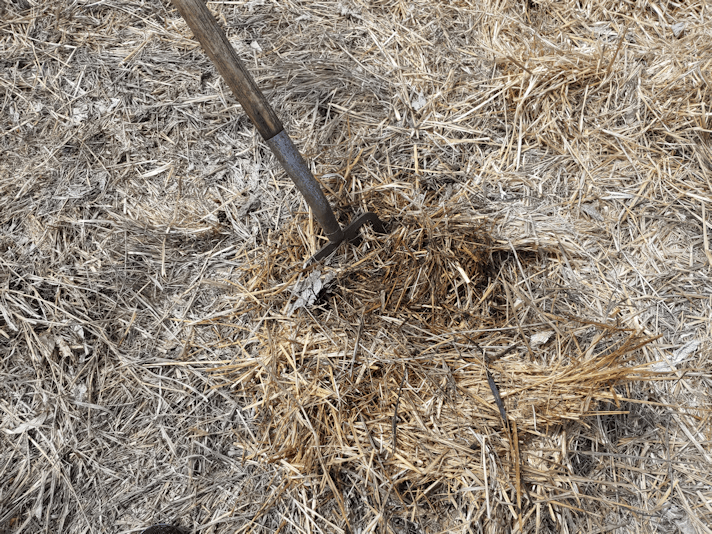
I could not do this here, last year. In fact, the soil was so hard, we were bending tent pegs while fastening down the tarps. While working on the potato beds next to this area, I would sometimes shove the fork or the spade into the ground to set it aside while I did the next thing, and ended up leaning them on the bale or wagon most of the time, because the ground is just so hard. Yet here, I could sink the fork’s tines their entire length down!
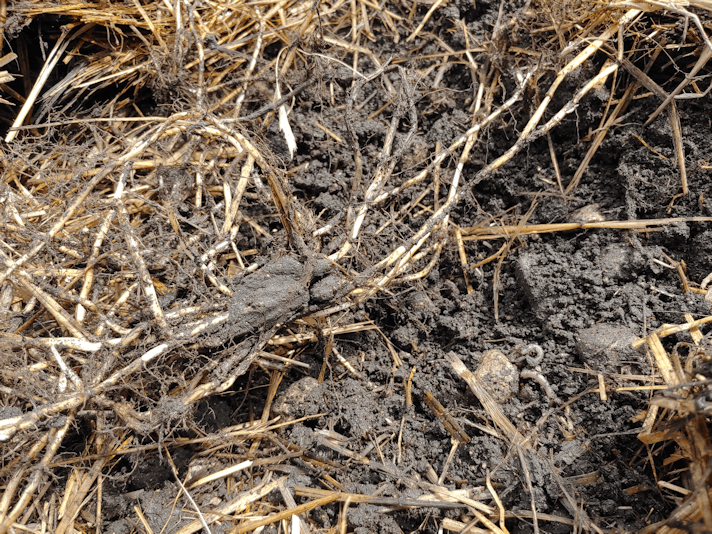
I pushed aside some of the mulch and dug around a bit. There are still a LOT of quack grass roots in there. I pulled some up, and you can see the bundle of roots in the above photo. The soil is quite “sticky”. The exciting thing was uncovering a worm. A very good sign!
Which means our efforts last year are paying off. The soil is already improving. When it’s time to transplant into the area, we will still be dealing with rocks and root systems, but the ground is now workable.
It’s amazing, what a mulch can do to improve soil conditions!