This morning, as I headed out to do my rounds, the sun room thermometer was at about 10C/50F. During the night, I saw it dip as low as about 5C/41F.
I moved away the reflect to get some photos of the new bins with the kulli corn. The picture of the smaller bin didn’t turn out, though.
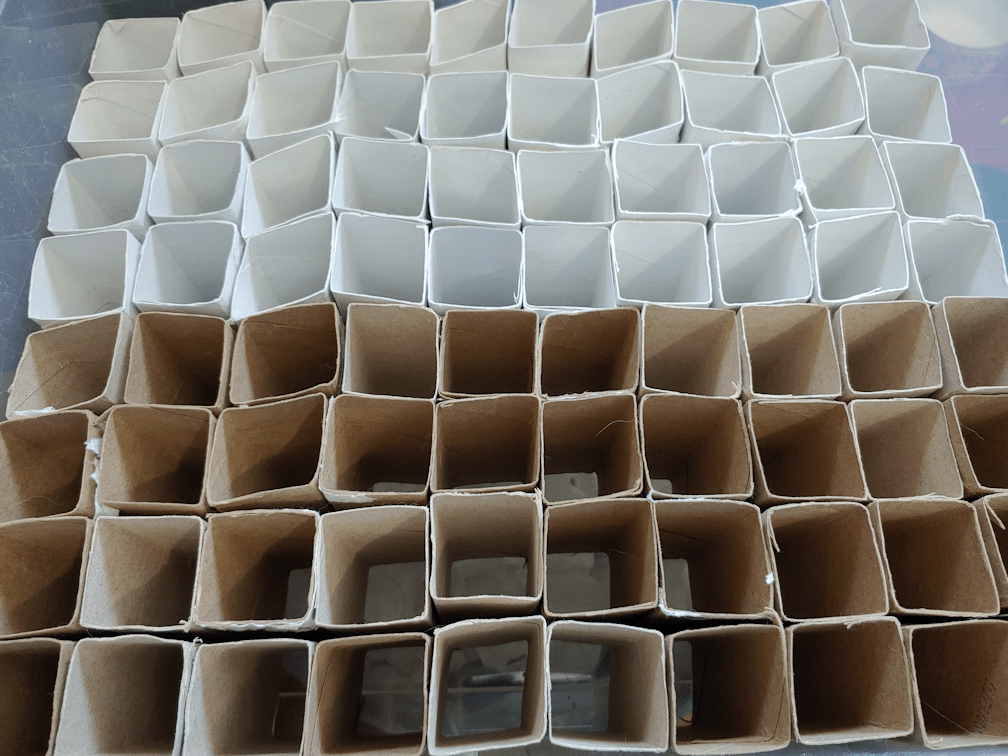
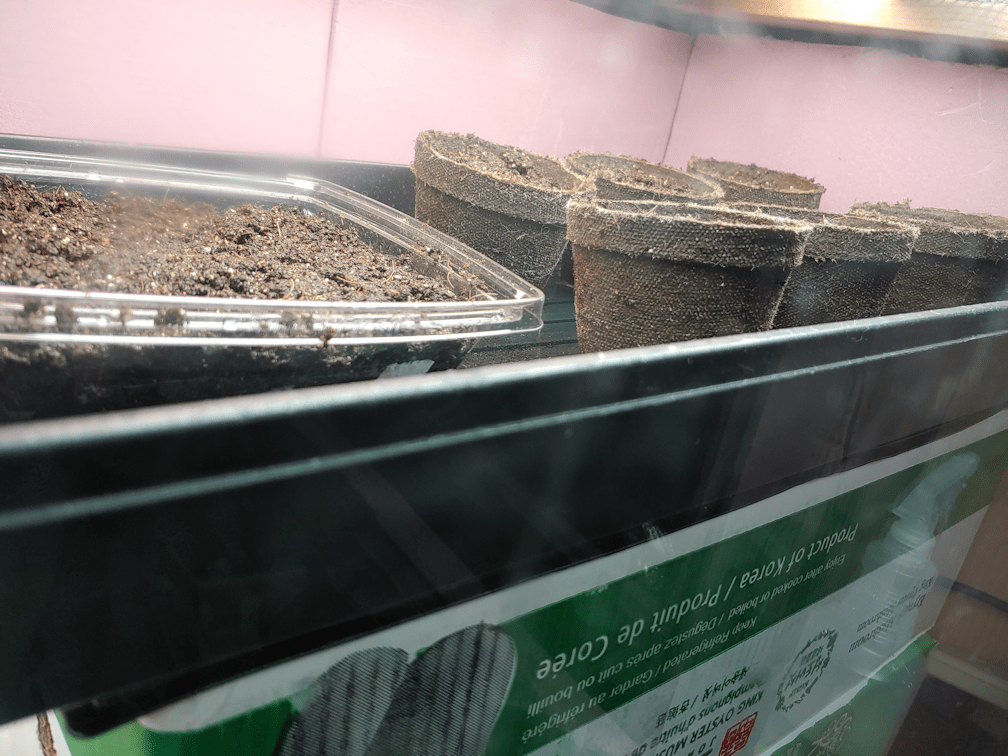
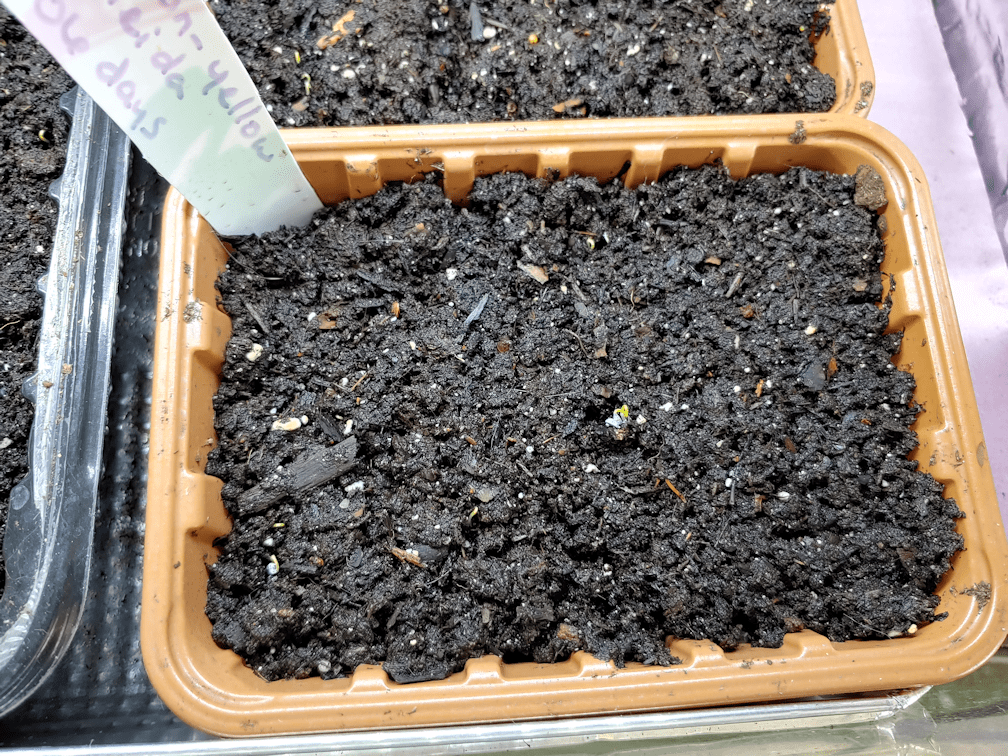
Here is the larger bin with 80 toilet tube pots in it. That white plastic is marking off the pots that are empty. When one daughter finished the smaller bin, she started helping her sister from the other side, so the empty pots ended up in a really weird place. :-D
They planted all the seeds, including the little, bitty extras. I don’t expect those to germinate, but who knows? Even without the extras, I don’t expect 100% germination. It should be interesting to see what we get.
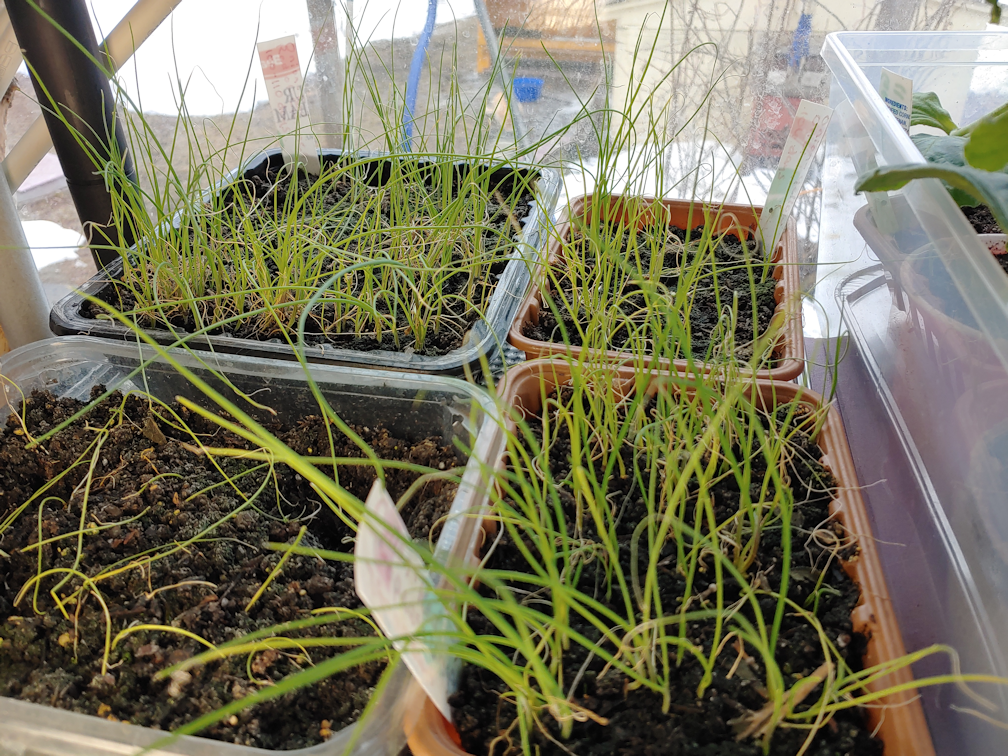
The three trays of bulb onions are doing better in the sun room than they were in the mini-greenhouse, but that tray of shallots is really struggling. :-(
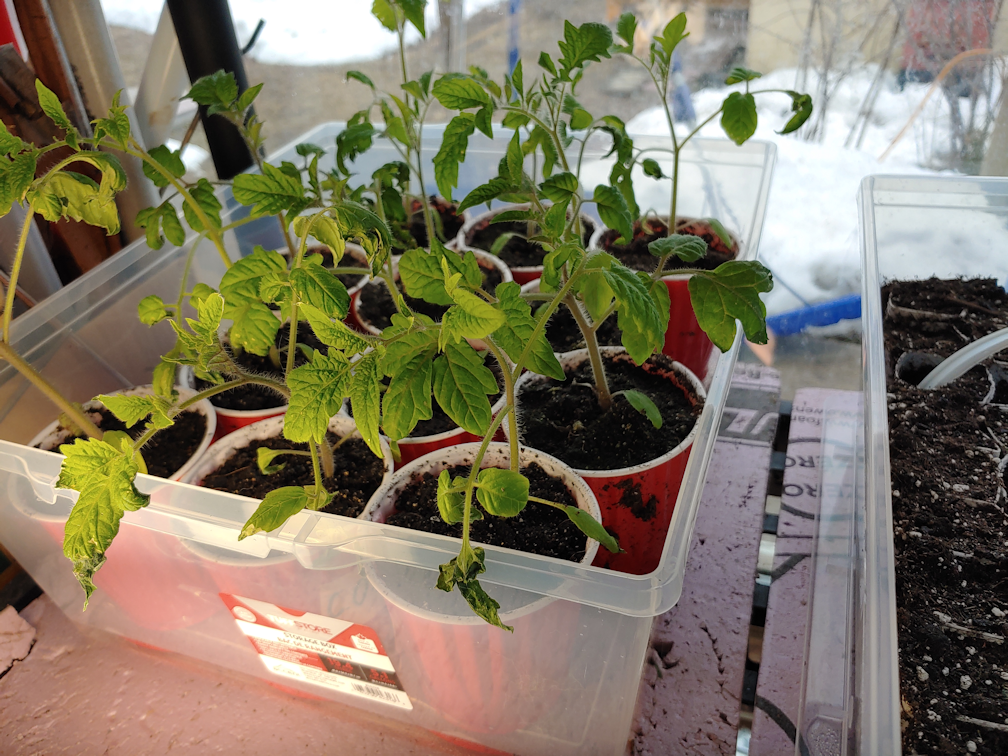
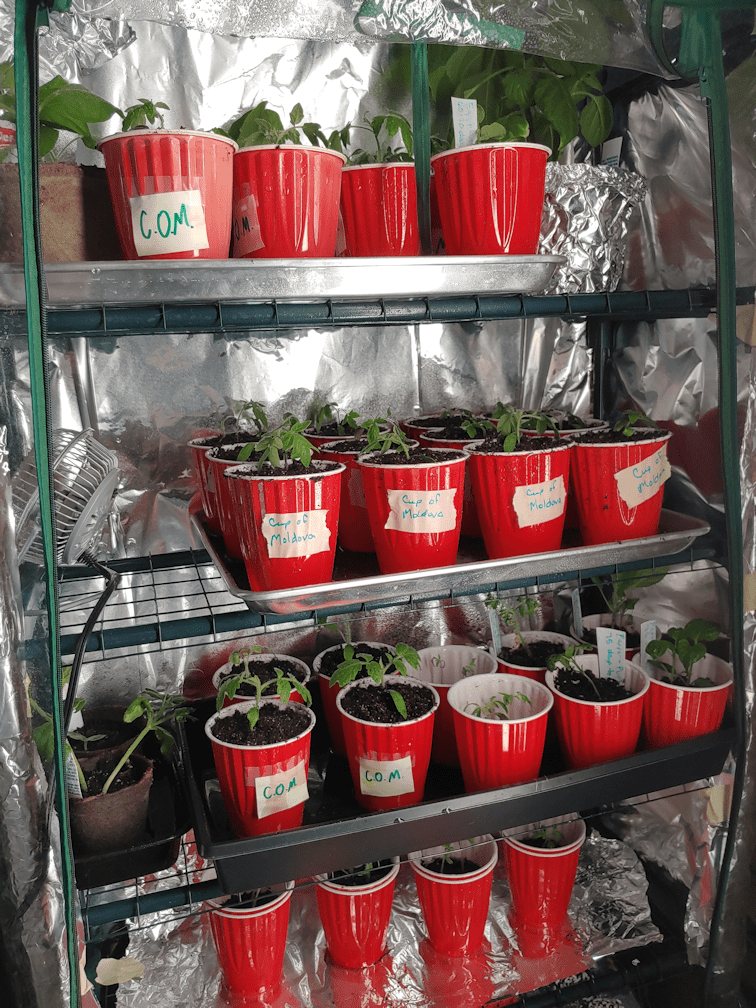
The Cup of Moldova tomatoes have recovered from their first night in the sun room rather well. You can see leaves with cold damage on them, but the remaining leaves are looking quite strong. Even the Crespo squash and Canteen gourds seem to be doing just fine.
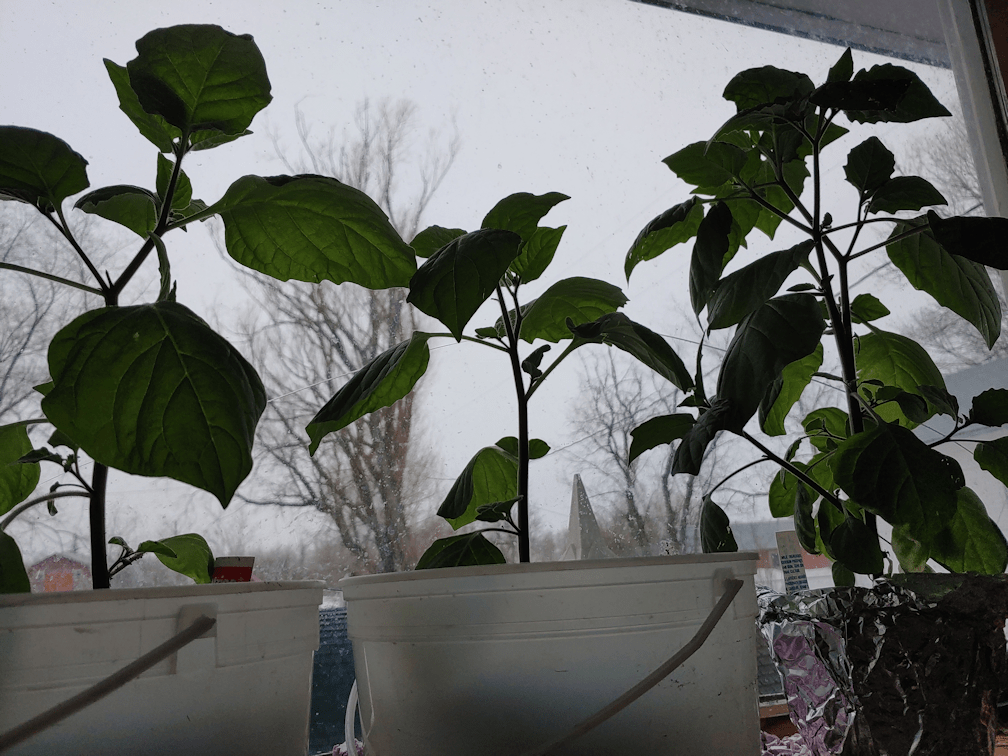
Likewise with the Wonderberry.
There are some seedlings in the mini-greenhouse that are starting to look like they can be moved to the sun room, as does the tray of bunching onions. We’ll have to do a bit of re-arranging, since the sun room ended up being a feline recovery room again, to make space for everything.
It will be good when we finally have a small greenhouse or polytunnel. Hopefully, we’ll have something in time for next year.
This week is 6 weeks away from our average last frost date, so we started our next batch of seeds.
We had the Kulli corn, the Chocolate Cherry tomato and Yellow Pear tomato to do. We were also still considering starting the last few Spoon tomato seeds, since they were so fun last year, but in the end, decided against it. Four types of tomatoes is enough!
Of course, I found extra to start.
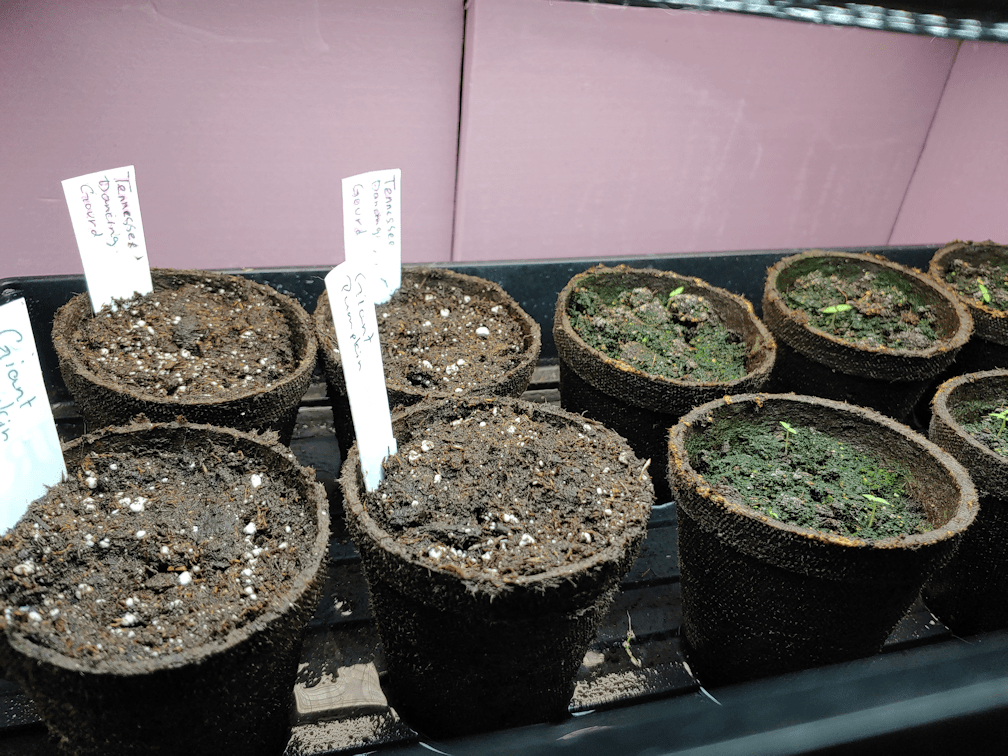
Looking over our seedlings, I noticed that one pot with Tennessee Dancing gourds still has not germinated, while the other had a single sad looking little plant that was looking ever more wimpy…
… it turned out to be dead.
Well, then.
We still have seeds from last year, so I scarified a few and started them soaking before I headed out for errands.
Then, just because I’m curious…
… I scarified then set to soak the two giant pumpkin seeds that were given out for free at the grocery store near my mother’s place. Her town has a giant pumpkin contest every year and, in the spring, there’s always a big basket full of envelopes with just a few seeds in them, available for free (though they do request a limit of one packet per family).
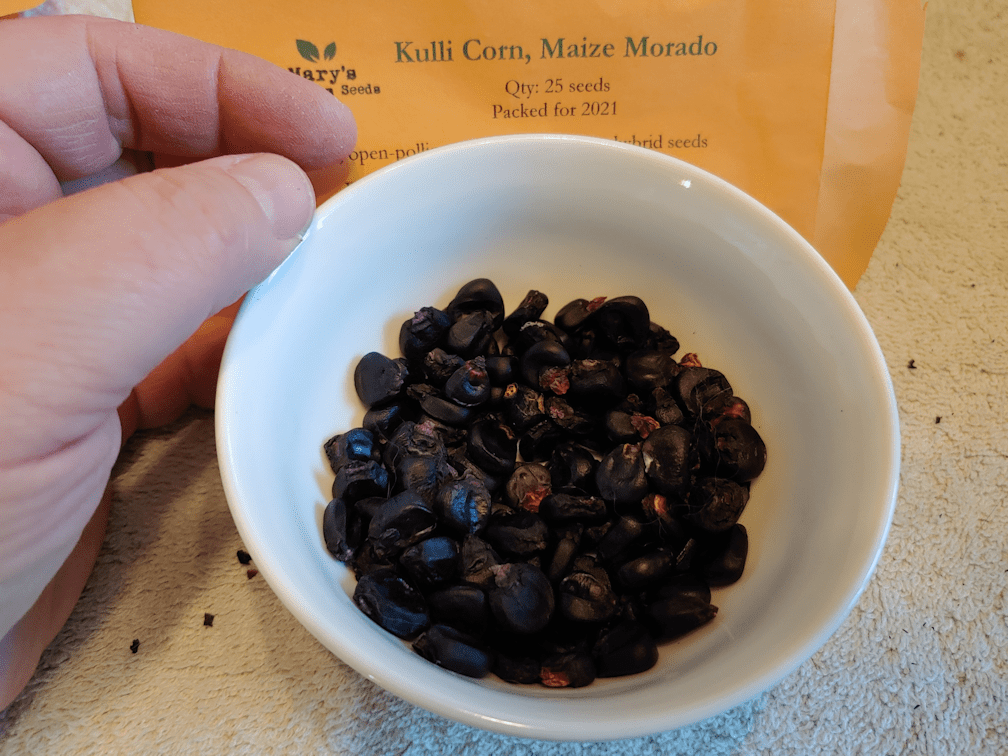
Before filling the bins with toilet paper tube pots with soil, I decided to count how many corn seeds we actually got. Each package was supposed to have 25 seeds, but I know sometimes there are extras, and we were going to put one seed in each tube.
There turned out to be a total of 106. :-D Granted, some of the extras were really tiny, but we intended to plant them anyway.
I didn’t get a chance to take a picture, so here’s an old one of the larger bin. It fits 8 rows of 10 tubes. I actually ended up changing the tubes in the picture out for different tubes. The tubes from some brands are longer than others, and I ended up switching to a brand – the Costco Kirkland brand – that had taller tubes.
The big bin held 80 tubes, while the smaller shoe-box size bin held 4 rows of 8, so we would have empties. We still filled them all with soil, so that the tubes could support each other.
Before we started filling the tubes with the growing medium, I set the corn to soak. My daughters did their best to fill the tubes without getting too much of the soil in between the tubes, while I potted up the gourds and pumpkin seeds, then started working on the tomatoes.
Which is when I got a phone call from my brother, to talk about the latest on our vandal’s court case against me that was supposed to be today, but got cancelled. I’d sent a message to the court clerk about the conflict in dates, saying that I’d been told on the phone our vandal had picked 2 dates, and some of the issues we have to deal with as to why we chose the November date. I added that the earlier December date would work better for us, but I didn’t think our vandal would agree to any date we selected and suggested the court simply assign a date and we’d all just work with it.
We got a response saying that, since we couldn’t agree on a date, we’d have a teleconference call in early May with the court clerk to set up a trail date. The response was to my email, with our vandal’s email added on, so he got to see what I wrote.
Well, he responded in a reply-all. One of the first things he said was that he had NOT selected the November date, just the May one, and said something about how he felt my comment on not agreeing on dates was inappropriate, and he just wanted to get the whole thing over with as soon as possible. I’m paraphrasing of course, but it was pretty brief.
Hhhmmm. Now that I think about it, his wife probably wrote it. He’s not typically that succinct.
Anyhow.
Basically, he tried to make it sound like I had lied, and that he was a victim.
Of course, I forwarded the emails to my brother, since he’s my witness and he’s the one that needs to book time off work to attend. He phoned me this evening and we talked about the situation.
Which is kind of funny, realy.
You see, our vandal goofed. I had written that I was told on the phone that he’d picked the two dates. He basically accused me of lying – however the court clerk (or whatever her official position is; I can’t remember right now) who wrote the email is the same person who phoned me, telling me she’d already called him and the two dates he’d picked. Which means that, in trying to imply that I was lying, he was actually implying that the person we’ve been corresponding with is the liar.
I don’t think he realizes that at all.
I’m guessing his attempt to play the victim backfired on him.
By the time I finished talking with my brother, the girls were done with the corn, putting the lids on the bins to protect the pots from the cats, and tucking the tomato seeds out of feline reach for me. So I finished those up.
A few things got moved out of the big aquarium greenhouse and into the mini-greenhouse to make space. The ground cherries stayed. Those are the super tiny seedlings you can see on the left. This is on the warming mat, so that’s where the gourds and pumpkins went.
The tomatoes should also be getting extra warmth, but there isn’t room for them over the heat mat until we can move the ground cherries out. (The bunching onions just got moved over to the upcycled plastic stray you can see on the right.) I ended up putting 5 tomato seeds in each cup, with 3 cups per variety, half filling them so the seedlings can be “potted up” later, by just adding more soil. It should be interesting to see how many germinate, and if we’ll get enough strong seedlings to thin by transplanting.
We’re going to have an awful lot of tomatoes. Which is weird with just 2 out of 4 people liking tomatoes – at least for fresh eating. Still, I’d rather plant extra and have enough to afford losses.
The kulli corn went straight to the sun room.
Potato Beetle got out of the sun room while I was using the wagon to bring my earlier purchases through (yes! I was able to get big bags of cat kibble!!), slipping under the wagon and out the door before I could do anything. The sun room was over 25C/77F !!! at the time, so I left the outside doors slightly open as much to cool things down, as to give Potato Beetle a chance to come back in.
When I came in with the bins holding the corn, I found a skunk eating Potato Beetle’s kibble! I shooed it outside, and found a second one in the kibble house.
I shooed that one away, too, then topped up the kibble trays just enough to make noise and maybe get Potato Beetle’s attention. A bunch of cats came running, but no Potato. :-(
Well, now that the corn is in the sun room, he lost one of the spots he likes to sit in, anyhow. I do wish we’d been able to get him back in for the night, at least.
I’ll get pictures tomorrow, when it’s light out again. So far, the toilet paper tubes in these bins works out very well. The final word on it, though, will be when we have to get them out for transplanting!
Now that Lent is over, I’m back on social media and my gardening groups. Today, one of them posted a list of seeds to start indoors over the next week. Based on that list, we’re behind, but our June 2 frost date is quite late, even for a zone 3. Most of the people in the zone 3 gardening groups have last frost dates in the second half of May. Still, because we have so very many seeds to start indoors, I think I will slowly work on them over the next couple of weeks. The remaining gourds would probably do better with an earlier start, I think, and some of the winter squash probably would, too. As long as they are all done within the next 2 weeks, it should work out, and not be too overwhelming when it comes to finding space for all the pots before the older seedlings also get added to the sun room.
Meanwhile, we’re still getting weather alerts, and still being told we may get as much as 10cm/4in of snow, just on Sunday. We’re supposed to start getting snow tonight, and mixed precipitation tomorrow. But then, according to the weather apps, we’re snowing right now, and there isn’t a flake to be seen in the infrared flash of our security camera (though I’ve been seeing plenty of cats and skunks running around on the driveway! :-D ).
It seems to strange to be starting seeds for relatively heat loving plants, when we’re possibly getting yet another snow storm!
Before coming back inside, I remembered to check out the flower I spotted on the Wonderberry.
Such a pretty, tiny little thing!
Then I killed it. :-(
I pinched off all the flower buds that I could find, so the plant will put more energy into growing foliage. With no insects to pollinate them this early anyhow, blooming is just wasted energy for the plant. Hopefully, it will continue to do just fine until we can plant it outside.
The sunroom was about 16C/61F at the time I did this! That’s over 20 degrees Celsius warmer than outside! If the temperatures didn’t drop down to about 3C/37F overnight in there, all our seedlings would be set up in the sun room right now. I’m hoping, as things warm up over the next few days, we’ll finally be able to start doing that. After Easter, we’ll be starting the seeds that need to be started at 6 weeks before last frost. That will be the Kulli corn and the remaining tomato varieties; yellow pear and Chocolate Cherry. We have a very few Spoon tomato seeds left. Maybe we’ll finish those off, too.
It’s the four week seed starts that are going to need the most space. These include: – the remaining gourds we’ll be doing this year (Yakteen and Apple) – all the summer squash (Endeavor green zucchini, Goldy yellow zucchini, Madga, Sunburst yellow pattypan and G Star green pattypan) – and pumpkin, including three types of hulless seed pumpkins (Styrian, Kakai and Lady Godiva), the Baby Pam from last year that didn’t germinate at all, but I hope will work if we scarify the seeds first, plus some giant pumpkin seeds that were given away for free that I’d like to try. – all the winter squash (Little Gem/Kuri and Teddy from last year, Georgia Candy Roaster, Winter Sweet and Boston Marrow) – all the melons (Halona and Pixie, from saved seeds, Kaho watermelon and Zucca, plus some seeds saved from grocery store melons we liked) – cucumber (Eureka)
These are all things we do want to plant quite a bit of each type, since they are being grown more for preserving than for fresh eating. Except the melon. We might freeze or pickle some, but mostly, we’ll be eating those fresh, and I can hardly wait!
We’re also going to be using many of the squash in particular to reclaim portions of the old garden area. Anything that is doesn’t need to be trellised, or their fruit is too big to trellis, we’ll take advantage of their spreading habits and large leaves to shade out the weeds beyond the hills and mulch we’ll be planting them in.
After that, we’ve got the stuff we’ll be direct sowing, some of which can be started before last frost. We’ve got 4 types of turnip (I ordered 2, but got 2 more as freebies), 2 types of bread poppies, strawberry spinach, I think 2 types of beets this year, 3 types of pole beans, including 1 shelling type, 2 types of bush beans left over from last year, 2 types of peas, 4 types of carrots, 2 more types of corn, including a popcorn, 3 types of radishes, which I still want to grow for their pods, not their roots, 3 types of spinach from last year, 4 types of lettuce from last year, and 2 types of chard from last year. Then there’s the stuff that will be shipped when it’s time to plant, including 3 types of potatoes, sunchokes and sweet potato slips.
I don’t know where we’re going to plant a lot of this. We do have a general sort of map set out. Quite a few things will be planted in temporary beds to help prepare the soil for future plans, and some things will be interplanted with others, so they’ll be sharing beds. We will likely need to build more temporary trellises, too. In the end, though, we’re still figuring things out, so we have no fixed plans. Almost everything is going to have to be flexible.
Getting this all in is going to be a wonder in itself!
One of the first things I do in the morning is check on the seedlings, turn on the lights, and do any tending they might need.
The newly transplanted and potted up plants seem to be doing very well – with one possible exception.
The Wonderberry we have left from the first planting is just too big for the top of the mini greenhouse.
I mean, look at this beast! It’s getting huge!
And what’s that I see???
Yup. Those are flower buds!!
I planted these really early, after doing some online research, but it seems it was too early.
So what do I do with the poor thing? We can’t leave it out, or the cats will destroy it.
The only safe place for it is in the sun room.
Except…
Yeah. It’s too big for the shelve space, too.
There was only one thing left to do.
I now have it sitting in the window on the other side of the door, which is a pair of smaller windows with a shelf in between. It’s actually a great spot for a plant like this. The problem is mostly the temperature, though it also gets less light. In the other shelf, there is at least the lights provide a bit of warmth. This spot is too far away for that to be any help.
I don’t think the sun room dipped below freezing last night. When I first looked in, in the morning, it was at about 8C/46F, but I expect it to get above 20C/68F in there as the day warms up. However, we’re supposed to start cooking down again, with a high of -5C/23F by Thursday – and more snow on Wednesday, Thursday and Friday. The Southern parts of the province are even getting weather alerts, as a Colorado Low swoops in, potentially bringing as much as 20cm/8in of snow. That, in turn, is leading to flooding alerts in regions to the North.
None of which is anywhere near us, but we’ll still be affected by the system with cooler temperatures and more snow.
At least the current warm weather is reducing the amount of snow we have now, so if we do end up with more, it’s not going to be as much of an issue.
The receding snow is starting to reveal that we are going to be picking up quite a lot of fairly large branches, once we’re able to do the spring yard cleanup.
The new beds along the chain link fence are now clear of snow, including the asparagus bed. Which, unfortunately, has a lot of grass and weeds already starting to grow. There’s less than half an inch of thawed soil on the top, but that’s enough for the weeds.
There was a surprise, though.
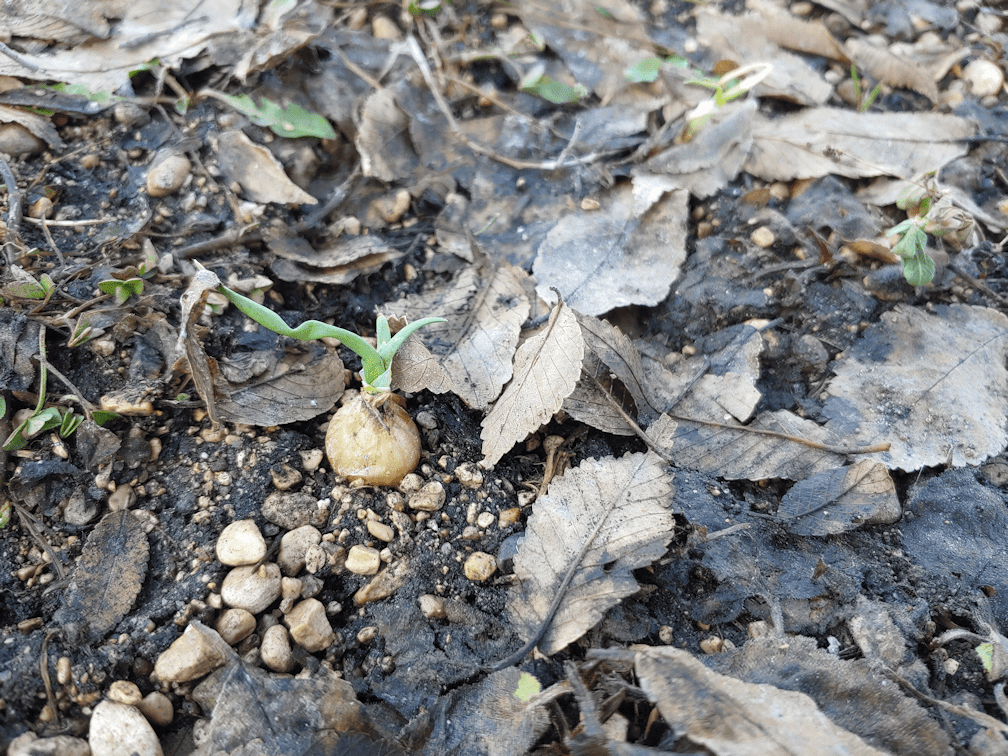
There are onions growing!
We had transplanted the tiniest of seedlings around the asparagus bed last year, mostly because I didn’t want to toss them. They established themselves, but hardly grew at all, and we just left them. Even when cleaning up in the fall, we just let them be.
I found about 8 or 10 of them, starting to grow!
It should be interesting to see how they do. As this would be their second year, if we leave them, they should go to seed.
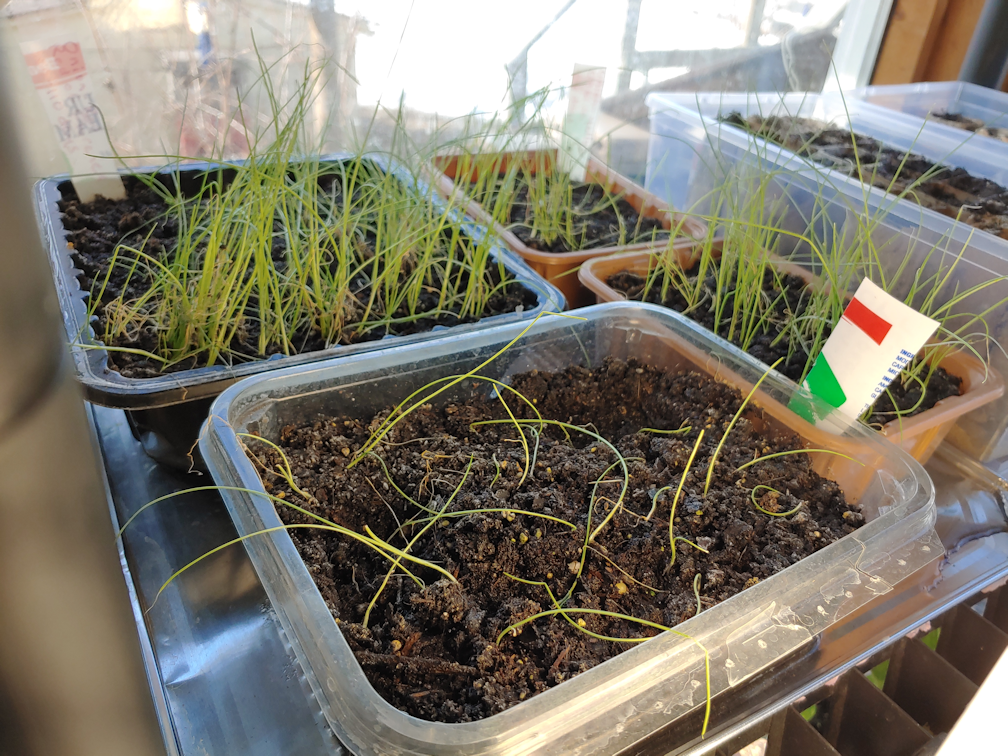
Speaking of onions and seeds, the seedlings we moved to the sun room seem to be doing rather well.
In fact, I think they’re actually perking up and getting stronger. Well. Maybe not the shallots. It’s really hard to tell with what’s left of those! But the red and yellow onions seem to be getting bigger and stronger.
We might have something to transplant, after all!
I might still get sets, though. In this household, we just can’t really have too many onions! :-D
With our average last frost date of June 2, today works out to be 8 weeks for seed starts. In addition to starting new seeds, our replanted Cup of Moldova seedlings were ready to be thinned and potted up.
We also needed to make space.
While the sun room’s daytime temperature neared 20C/68F, while the outside temperature reached a high of 4C/39F, the overnight temperatures dropped to just above freezing.
We decided to take the chance, and move the onions and shallots to the sun room. I’m not very encouraged by how they seem to be doing, and I figure we’re going to need to buy sets later on, anyhow. More on that, later.
We also had to pot up the Wonderberry. The only one that survived from the first planting is large enough that it can only fit into the top of the mini-greenhouse, where the frame comes to a peak. The second planting had two that were getting pretty big, so they got separated and repotted, too. There was also a whole lot of removing of pots where the seedlings did not survive, and re-arranging the big aquarium greenhouse so that the new seed starts could go on over the heat mat.
Eventually, we were able to start the new seeds!
There were only two things that needed to be started, as the others on the list were for 8-10 weeks, and we’d already started them at 10 weeks.
One was Aunt Molly’s Ground Cherry. The seeds are so small and few, they came in a separate envelope in the packet. Still, my daughter divided them up, and planted 6 pots with them.
While she worked on those, I started on the Red Baron bunching onions.
They have such pretty seeds!
These were densely planted in a repurposed grocery store salad container.
These are now on the heat mat.
The pots that had been on the heat mat got shifted over, but are still in the big aquarium.
Here we have our squash and gourds, and the second planting of eggplants and purple peppers. There are a few survivors of the first planting, but the way things are going, I figure extras will always be a good idea!
This tray had the second planting of the Cup of Moldova paste tomatoes, planted in Red Solo cups. A couple of them had only one seedling in them. For the rest, I gently removed all but one from each cup. The cups were only half full of seed starting soil, so my daughter potted them up by simply adding more to fill the cup. While she worked on that, I filled more cups and transplanted the tomatoes that had been removed, burying the stems until they were much like the others. I ended up doing a dozen cups, on top of what my daughter filled.
Hopefully, most of these will survive to be transplanted!
We were able to fit them all into the mini-greenhouse, though a bit more re-arranging needed to be done. The Sophie’s Choice tomatoes are much smaller, and not ready to be thinned or potted up, yet.
The largest Wonderberry is now in one of those Jiffy pots that can be buried directly into the ground, as are the two smaller Wonderberry. The smaller ones are in the tray, where they can be watered from below, but the big one was on its own. To allow for watering and not making a mess, my daughter wrapped the pot with aluminum foil.
Since we have to keep the mini-greenhouse enclosed, I have the mini fan set up to blow are up one side, so it can circulate under the cover without blowing directly onto any plants. A salvaged window screen gets set across the bottom, then the flap is brought down, its bottom tucked under the screen, and the zippers pulled down as far as the screen, so hold it in place. It’s the best we can do to keep it from getting too hot in there and to allow fresh air in. For seedlings this big, the cover would be removed completely, but certain cats would simply destroy everything.
It will be good when all the plants can finally go into the sun room! These are, however, much more fragile than the onions.
I had a couple of spare oven liner trays that I picked up for inside the small aquarium greenhouse. We’re not using that right now, as anything that goes into it seems to struggle. That’s where these onions had started out. They should be quite a bit bigger, and there should be more of them.
That one tray that looks the sparsest is the shallots. The soil even looks dug into. I suspect one of the cats actually managed to reach through a gap in the cover flap over the screen we put in front of the mini-greenhouse.
Concerned for the overnight temperature drop, I remembered a small light that we’ve used in the sun room before. It has an incandescent, full spectrum bulb in it.
It also gets quite warm, and we’ve made use of that heat for everything from keeping plants warm, to keeping recovering cats warm!
So that got set up on the empty shelf under the onions. The shelves all have scrap pieces of rigid insulation on them. Most of the inside of the shelf is covered by the reflector we made using a larger piece of rigid insulation. So the space should hold warmth a fair bit. The light fixture would help, plus even the LED shop light does warm up, just a bit. Between all that, I’m hoping the shelf itself will hold a pocket of warm compared to the rest of the room.
We’ll see what difference it makes.
So this is where we are at, 8 weeks before last frost. We have a few more seeds to start at the 6 week mark, but it’s the 4 week mark that is going to be a doozy. The fast majority of our seeds, both in variety and in quantity, are supposed to be started by 4 weeks. This includes the winter and summer squash, pumpkins, remaining gourds, melons, watermelons, and the last of the tomato varieties. We don’t plan to start many of the tomatoes, but we do intend to plant quite a lot of the various squash and melons.
Finding the space for everything is going to be quite the challenge. It’ll be May by then, though, which means the overnight temperatures in the sun room should be warm enough that we could even start some seeds in there, and not just in the large aquarium greenhouse. Some of what we’ve started will be ready for hardening off, too.
Looking at the long range forecast, we’re going to have a rather chilly Easter weekend, and things aren’t going to warm up very much after, either. I’ve been looking at the 30 year averages, though, and these temperatures are pretty much bang on for the average.
This morning, while tending our seedlings, I spotted a newcomer!
That is a Crespo squash seedling!
This tray, on the heat pad, needs to be watered about twice as often as the tray next to it.
Where the Cup of Moldova tomatoes are doing quite well! The big aquarium greenhouse has been working out the best among our three set ups.
The Sophie’s Choice tomatoes got moved from the small aquarium greenhouse to the mini-greenhouse, in hopes that they will start doing better. I’m not sure why things are not doing as well in that little greenhouse. I suspect it has to do with lack of air circulation. The mini-fan we had on the aquarium greenhouses, moving it back and forth between the two, is now set up in the mini-greenhouse. We can’t open up the cover because of the cats, so the fan is needed more in there, than with the aquariums. I hope we can figure it out, though, because that’s little tank is currently wasted space that could be growing things! We do have a pedestal fan, but it’s not tall enough to provide air circulation in through the screen covers on the tanks. We’ve looked at different ways to set it up, but so far, we haven’t been able to come up with anything suitably cat proof.
It’s become such an issue, that we’re coming up with plans to build a “door” between the living and dining rooms, so that we can turn the living room into a safe zone for plants – all our plants – and not have to have all these barricades and shields around them. My older daughter has diagrammed a plan for a removeable frame to fit into the opening between the two sets of shelves between the living room and dining room, which would support a “door”. It would be made using hardware cloth, for maximum light and air to pass through. One of the shelves has an opening through it that we’ll have to frame a screen on, as well. We’ve really got to come up with something, because all the stuff we’re doing to try and protect the plants from the cats isn’t all that good for the plants! Especially since we are starting so many seeds indoors and, next year, will likely be starting even more. That will be a summer project, if we can get the materials we need to build it.
Last night was the first night we had the outside doors to the sunroom closed, so no cats – or skunks – could come in. It had reached temperatures of 20C/68F in there yesterday, yet this morning, it was just barely above 0C/32F, which means it was even colder, overnight. There is no way we can move any of our seedlings into there, without having to bring them back into the house overnight, which we won’t be able to do. Our overnight temperatures are going to be warming up, though, so we’ll have to keep monitoring the room. I might set the ceramic heater bulb up overnight, just to see what a difference it makes.
Some things will be started right in the sun room, but not for a while, yet. We’re still preparing, though, including getting the toilet paper tube “pots” set up in a bin.
This will be for the black Kulli corn. I’m not going to bother folding bottoms onto the tubes, so as to give the roots more depth. We have a total of 100 Kulli seeds (unless there are extras in the packets, which sometimes happens), and I thought I’d be able to put 100 tubes in this bin. If it had been square, it would have worked but, alas, it is a rectangle. Instead of the 10 rows of 10 I thought would fit, we could only fit 8 rows of 10. We do have more of the smaller bins we used to start the tulip tree and paw paw seeds in (still no signs of anything in those, but I’m not expecting it, yet). They can fit 4 rows of 8, so we’ll be able to work it out. The corn won’t be started until early May, though. The sun room’s overnight temperatures should be just fine by then.
I picked up more bins in this size; there was only 2 left in the store I found them in, so I now have 3 “spares”. I also got more of the smaller bins, and we now have 4 available to use for new starts. With their transparent lids, they can be used as little greenhouses, and they will make things much easier to move around when it’s time to harden off the seedlings. The toilet tube pots fit really well in these, so we’re going to continue collecting the tubes to use to start seeds in the bins.
While I have purchased pots that can be planted directly into the soil when it’s time to transplant seedlings, the sheer number of such pots we will need makes buying enough for all of them bad for the budget. In particular, I want to start the kulli corn in biodegradable pots, for as little root disturbance as possible.
After last year’s attempt to use toilet paper tubes failed dramatically, largely due to using peat as a growing medium (it simply would not absorb moisture all the way through!), we’re going to try things a bit different this time.
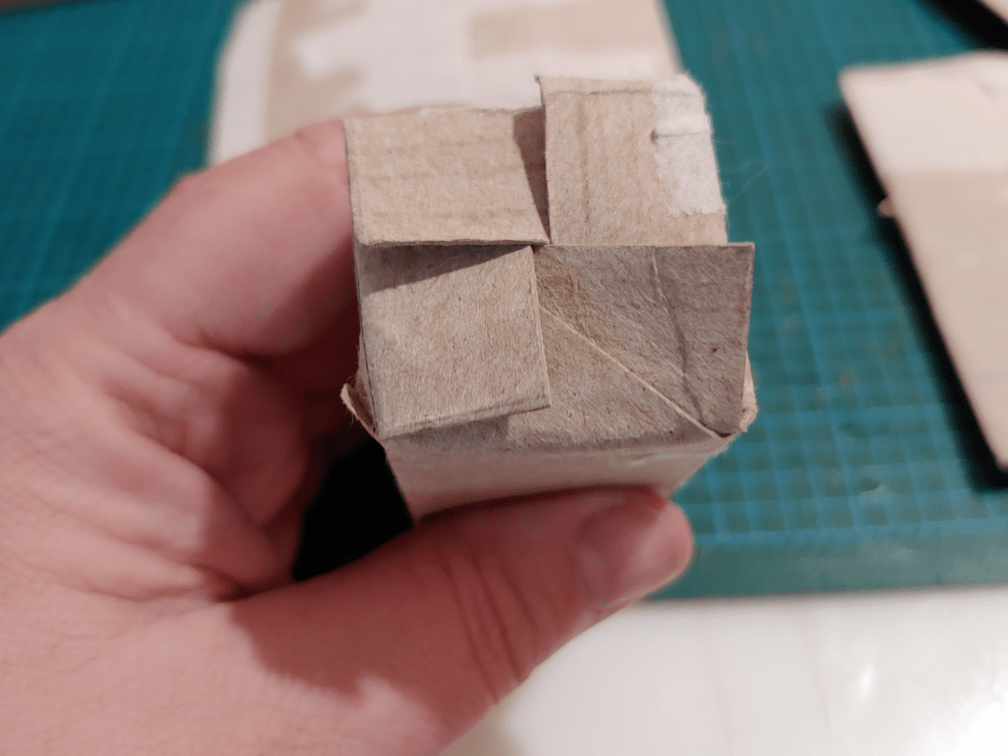
There are a lot of web pages and videos on how to make pots from toilet paper tubes. This one is the best one I’ve seen so far. There’s the added bonus of it showing the pots made into squares, which was what I was thinking of doing already.
It’s pretty basic, really.
We knew we’d need a lot of tubes, so we’ve been saving them for many months. Last year, I had a fairly large box that we would drop the tubes in, and when we ran out of room I’d transfer them to a storage bin, to make more space.
Which was really silly, now that I think about it. It only matters if you want to keep the tubes round, and there is no need for that at all.
This little box has two layers of tubes in it. After flattening a tube, I’d drag it across the edge of the bathroom counter, to crease the fold even more.
It’s amazing how many tubes can be fit into such a small box this way!
Today, I snagged some of them to make pots for the tree seeds. I don’t know if there are any roots starting to show in the little baggies of soil. I am thinking it would be much less disruptive on the roots to “transplant” them now – when there may not even be any roots yet – into little pots, compared to trying to move them out of the baggies when the roots are actually visible.
So I grabbed a dozen tubes for the paw paw seeds, first. The different brands all have different tubes. The ones I grabbed were the tallest, with the thickest carboard.
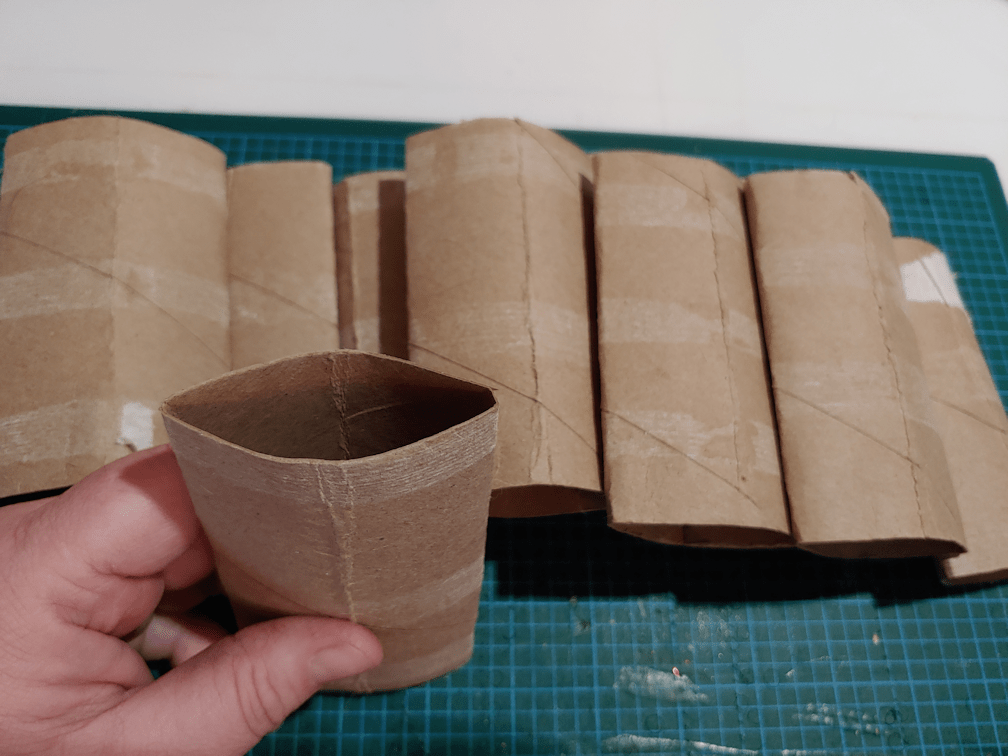
This first batch was done like in the video.
The first thing that needed to be done was give them all a second crease for the square, keeping the sides even by lining up the first creases with each other. The carboard was way too thick to fold them like he does in the video.
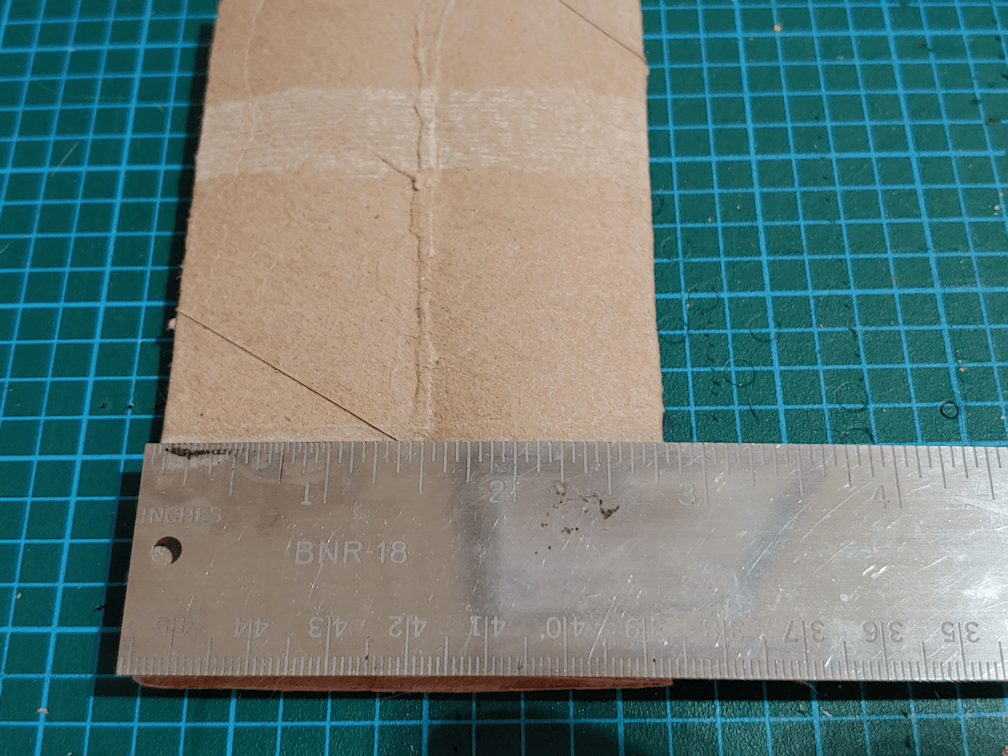
Then, just because I prefer sharp creases, I ran the tubes over the edge of the desk I was working on. You can tell the difference it made in the photo above. The tube I am holding is not being squeezed in any way. For the other one, I’d laid the tube flat on the desk and pulled my metal ruler over it to sharpen the crease. Which it did, but not as much as using the edge of the desk.
The creases were about 1 1/2 inches apart, so that is the distance than needed to be marked from the edge.
Since I had the cutting mat and a metal ruler, I only needed to mark one tube out of six. After lining them up along the bottom edge of the cutting mat, I could line the end of the ruler up to the side edge and the long edge with the mark on the first tube, across all the tubes.
Using the ruler to hold the tubes in place, I could mark them all at once, then repeat for the next batch. This way, it only took two lines to mark all 12 tubes.
The next step was to cut slits at the creases, up to the marked line, to create flaps.
Then the flaps were all folded inwards to create a bottom.
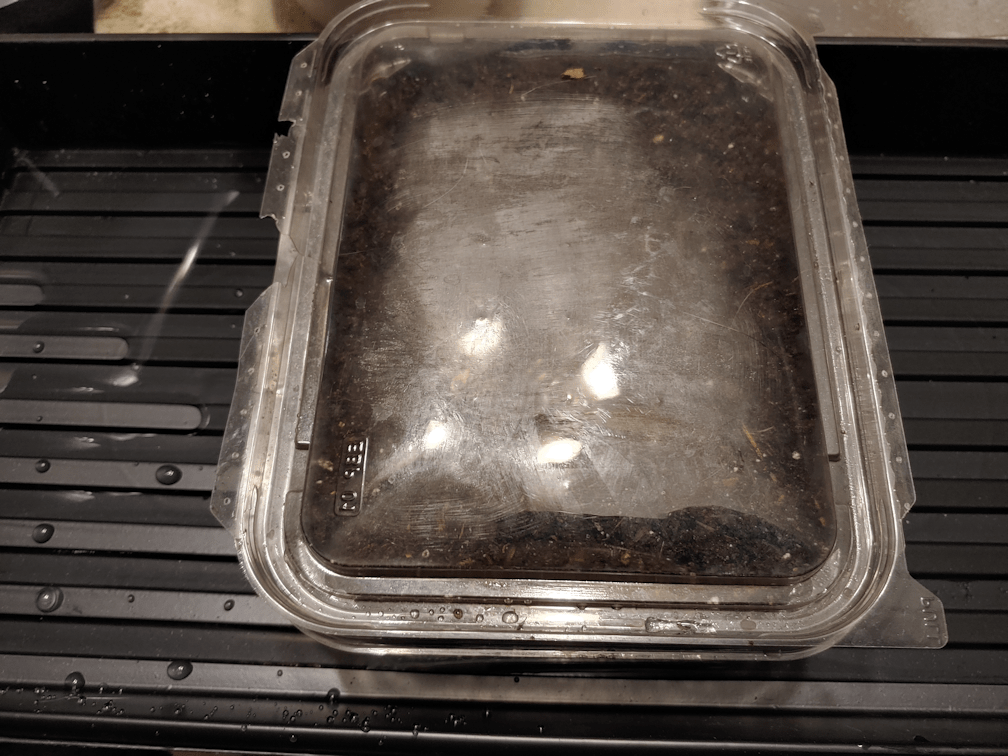
Once they were all folded under, I set up the storage container I got for them, and some water.
All the bottoms got dipped in water, then tucked into the storage box.
With these tubes, four of them fit snugly across a short side, so they’re not going to flop around. This was an important consideration when I went looking for bins to use for this. When we used the toilet paper tubes last year, the tubes came apart completely once they got wet, even as the peat in the middles remained bone dry. I wanted straight sided bins that were fairly small, to hold them all tightly. If the tubes were still round, they would have taken up more space, but there would be gaps between them, and I didn’t want those gaps, either.
These now will be left to dry, and we’ll fill them tomorrow.
For the next batch, more tubes were needed. We have 26 tulip tree seeds to transfer.
After grabbing a bunch of tubes, I found a couple of shorter ones. There is a surprising amount of variance between brands! I switched out the shorter ones for taller ones.
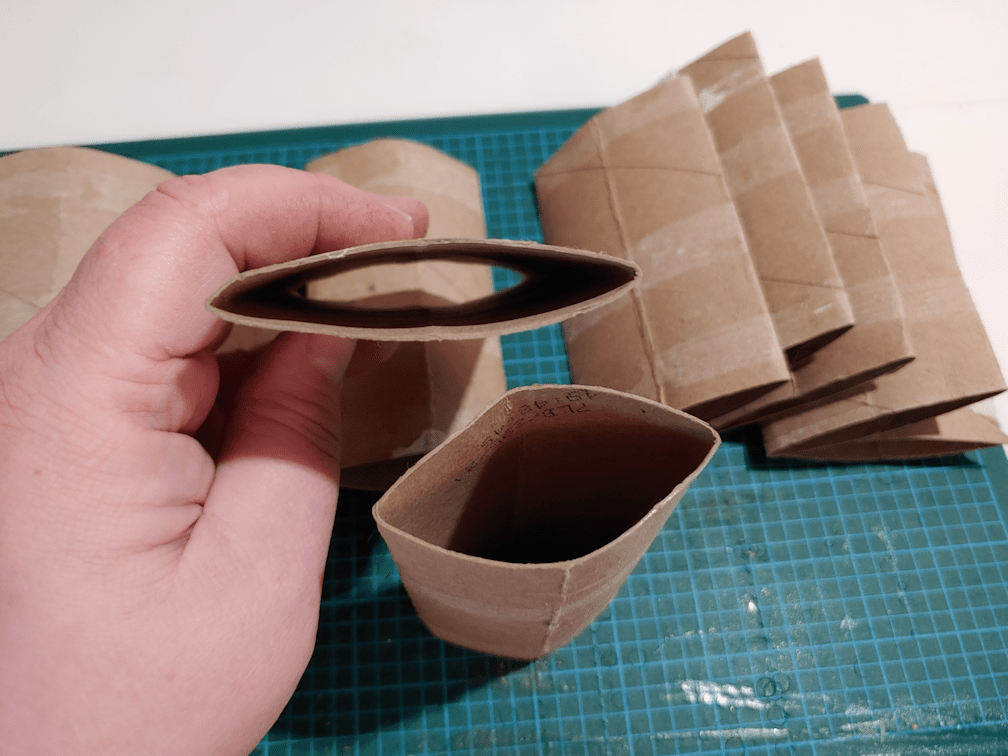
Height is why I wanted to change how the bottoms were done for this batch. With how the first ones were done, each flap completely covers the bottom, making a 4 layer thick base. There’s no need for that.
So for these ones, instead of cutting flaps that were half the width of each side, I went for a quarter of the width.
That worked out to be 3/4s of an inch. Each square in the grid on the cutting mat is 1/4 inch, so the tubes were all lined up to the base line of the grid…
…then the ruler was lined up with the 3/4 inch line, on each side of the row of tubes.
Which was a bit of a pain, when it came to using the ruler to hold the tubes in place while marking the line, since there was a space under the ruler.
It was much easier to do it from the middle instead of the ends. :-D
Then the tubes all got slits cut along the creases, up to the line.
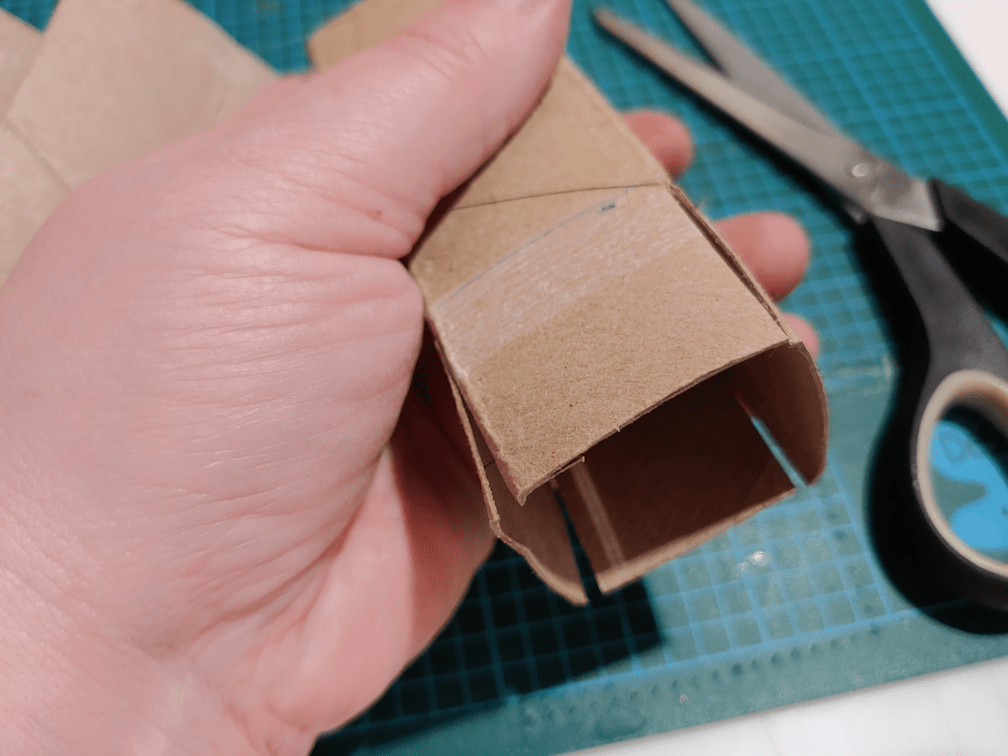
When folded in, this allowed for them to overlap and be locked into position.
These tubes were slightly shorter than the ones used in the previous batch, but by doing it this way, the pots ended up taller, as you can see in the comparison above.
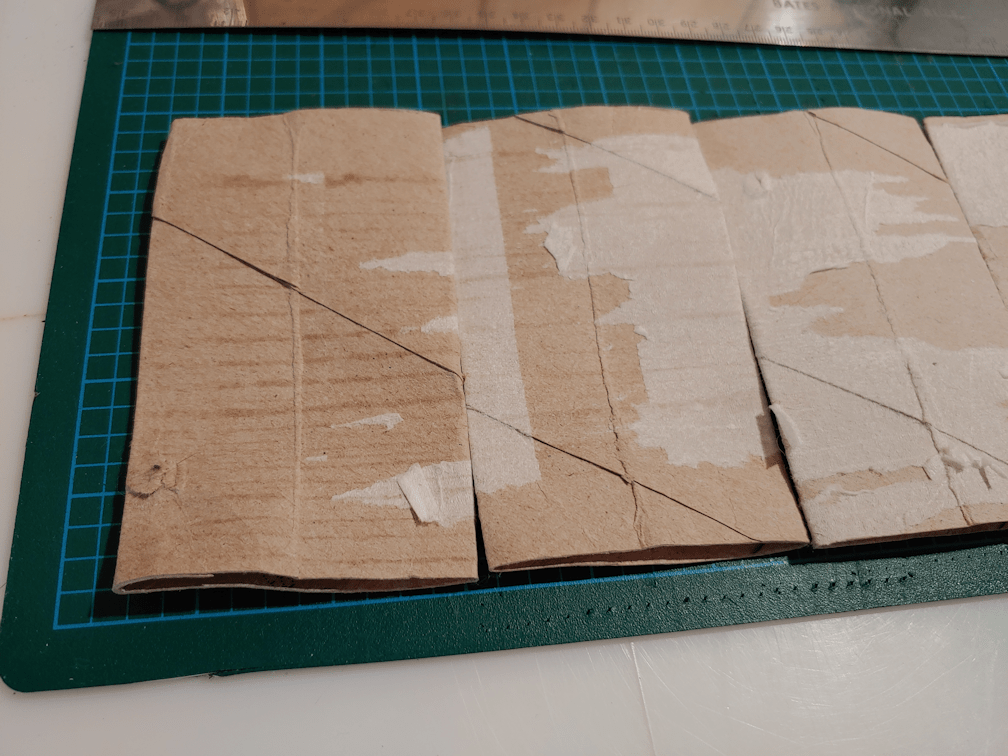
Since the flaps could hold themselves in place, I could have skipped the water part if I wanted to, but I chose not to. They got dipped.
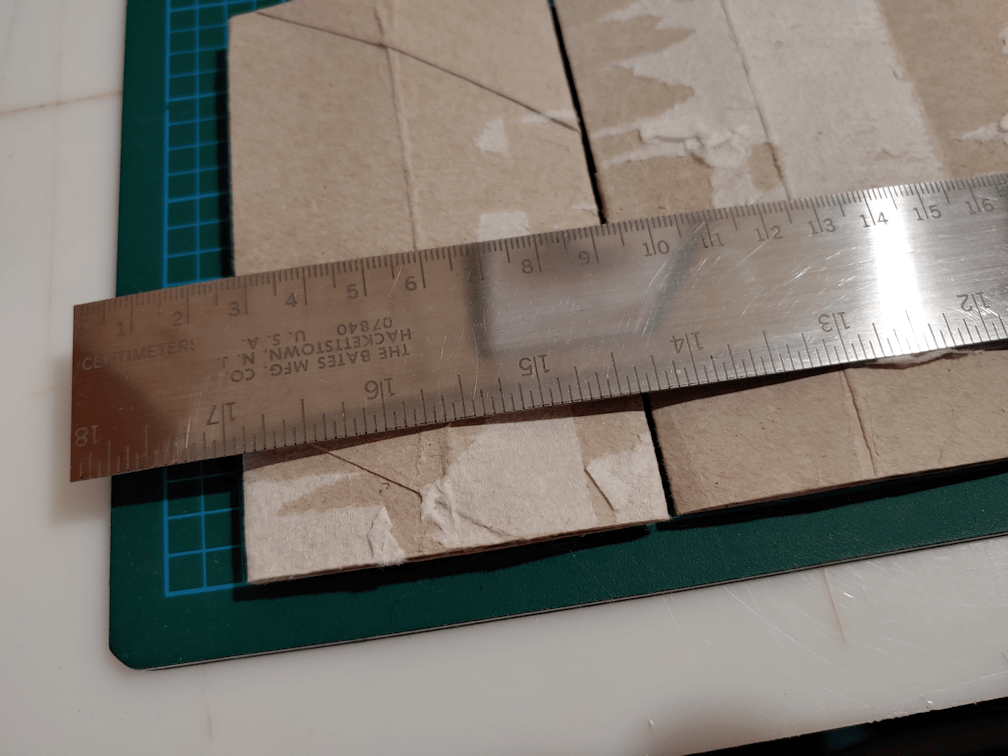
This brand’s tubes were not only a different length, but also a slightly different width. Just enough that they did not fit snugly across the short side. However, 8 tubes did fit snugly along the long side.
Tomorrow, these two sets of pots will be filled and planted with tree seeds. The tree seedlings will remain in pots for 2 years before being transplanted to their permanent locations outdoors. Starting them in these will allow us to “pot up” the seedlings into large pots as they get bigger, without disturbing the long tap roots they are expected to develop.
After these are done, we’ll start prepping tubes for the kulli corn. As with the tree seeds, it will be one seed per tube, so we will need 100 of these. I was able to find slightly larger versions of these bins, and one should be able to fit all 100 of these pots. The bins also have lids of the same transparency as the bins, which will allow us to use them as cat-proof greenhouses, if necessary.
I think I might have to pick up more of them. They’ll make moving seedlings outside to harden off much easier, too! They also happen to be pretty inexpensive, too. After much searching when doing shopping trips in the city, I found them at a local Red Apple store, which was just an added bonus. I’d actually found some at the local dollar store I was going to settle for, but the sides weren’t quite as straight, and the lids were opaque. I’m glad I decided at the last minute, to try another store.
The dollar store bins will instead be used to hold the little odd balls of yarn and small crochet projects on the go by my desktop, that the cats keep managing to steal away, so matter how diligently I bag them up!
Okay, for better or for worse, we now have stuff in the mini-greenhouse! Let’s see if we’ve succeeded in making it cat proof. :-D
The first thing today was to get the shallots started.
There are a lot less seeds than I remember from last year. I’ll have to look back at last year’s photos and double check.
The container is a mixed greens salad container from the grocery story. It has drainage holes in the bottom, and the seed starting mix is pre-moistened.
With such easy to see seeds, after scattering them I used a chopstick to separate any that were right up against each other, and spread them out more evenly. Then they got a spritz with water, a light layer of more soil mix, then spritzed again.
The container’s lid is recessed, and I didn’t want it too close to the soil surface, so I just plopped it on upside down. I then left it in a tray with water under it, to be absorbed from below. While it was sitting, it was time to work on the aquarium greenhouses.
The red and yellow onions are doing quite well. I rotated the trays after adding more water below them. The reflective light from the aluminum foil at the back, which is closest to the trays themselves, is clearly making a difference. All the sprouts were leaning towards the back of the tank! :-D
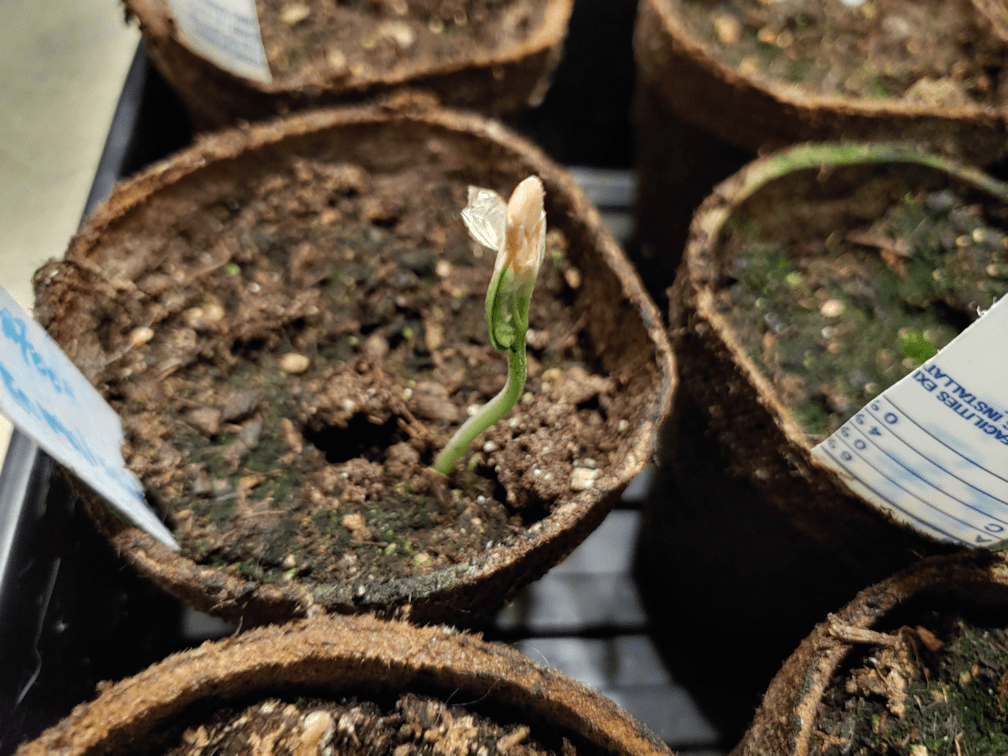
We have our first Wonderberry sprout! These were taken out and got more water added to the outer cups, as well as a spritz, then set aside for later, so they wouldn’t get knocked over while the seedling tray was being moved around.
You can just see that a new luffa gourd is starting to sprout! It’s right against the wall of the pot at the top of the photo.
I very carefully removed the seed covering from the leaves of the canteen gourd. Normally I would avoid doing that, but I’m glad I did this time. It was really solid, and had to be broken apart to get it off.
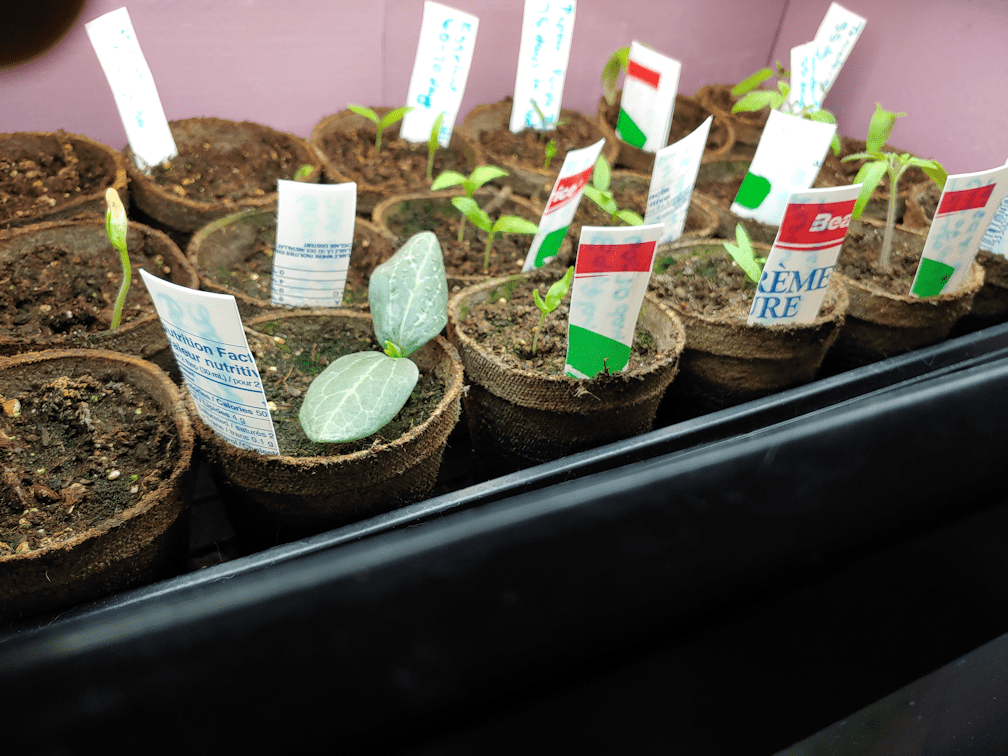
Here are the tomatoes, on either side of the eggplants and peppers.
The tray usually gets water on the bottom well before the pots dry out this much, but when the pots are damp, they are difficult to move. They feel like they’re about to fall apart. Which will be good when they get transplanted into the garden, but not so good when I need to move them around!
With the eggplants and peppers, they were thinned to 2 plants per pot. As they get larger, we will probably thin them to one plant per pot. We don’t need a lot of either of these. Three plants each should be fine to meet our needs.
The plan was to transplant all the strongest tomatoes to thin them – but there were a lot of them! Especially the Cup of Moldova. They’re doing really well in here. In the end, there was just one seedling that didn’t get transplanted because it was so tiny.
We half-filled red Solo cups with soil and used a chopstick to make holes for the transplants. Then I ended up using a steel poultry trussing needle (which never gets used to truss poultry; I’m not even sure why I originally bought them!) to loosen and tease out the transplants as carefully as I could. After they got tucked into their new pots, more soil was carefully spooned around them to about half way up their stems and gently pressed in, just enough to make sure there were no air spaces, before they all got a spritz of water.
Each of the original pots was left with one tomato plant. With the Cup of Moldova, we ended up with a dozen transplants, making 15 altogether. These cups were used last year, too, and already had drainage holes in the bottom. If we needed to, we could double cup them, but for now, they fit into the baking tray, in one of the higher shelves of the mini-greenhouse, above the back of the chair it is tied to. I’d rather it was lower down, but with the wider baking tray, that’s where it fits.
With the Sophie’s Choice, there were only 7 strong enough to transplant, and they fit in the tray with the shallots container.
When it’s daylight, we’ll assess whether or not we need to set up a light from the other side. There may be an issue of the high tray shading out the lower one.
Then the original tray went back into the big aquarium greenhouse, on the heat mat, and the tray got a generous amount of water added, to moisten the pots from below.
In doing the transplants, the tomatoes also got moved to one end of the tray, while the eggplants and peppers are now next to the gourds. That was just because it was easier to reach the tomatoes while transplanting them.
Hopefully, these will survive their transplanting well. It should be interesting to see the difference between how the tomatoes in the mini-greenhouse do, compared to the ones in the aquarium greenhouse. There is going to be a substantial difference in light and warmth.
But first, we’ll see just how tempting the trays in the mini-greenhouse are for the cats, or if they will be left alone!
There are still two more shelves open in there. The next time we need to start seeds, which should be in two or three weeks, we should be able to move things out of the aquarium greenhouses, into the mini-greenhouse, and have the new seed starts put into the aquariums. If the weather co-operates, by the time we’re ready to start more seeds in April, we should be able to transfer the biggest seedlings into the sun room. I’m sure these tomatoes will need to be potted up by then, too.
This is the first time we’ve had so many seeds to start indoors. It’s going to be a juggling act!
Okay, in between dealing with all sorts of other issues, I think we’ve found a way to set up the mini-greenhouse in a cat-proof way.
The frame is sitting on top of a very sturdy, heavy oak chair. It’s tied to the chair legs in a couple of places, and to the back, to stabilize it.
The patched up plastic cover is also over the back of the the chair, for further stability, though it’s tight enough to make zipping it closed a bit of a challenge.
For some reason, I got it in my head that it had 3 shelves, but it has 4. We have two plastic seed starting trays, one with pots, one just a base, that fit perfectly on the shelves. We also have two baking trays that can hold larger, heavier pots, if needed, and can still be used to water from below. They are shorter and wider than the shelves, but if we need to use them, they should fit on the top two shelves. With the cover going over the back of the chair, the bottom half is pulled too tight for them to fit there.
The bottom shelf is flat on the chair seat, so that cats should not be able to get through from below, and the cover is stretched snug enough at the bottom, they shouldn’t be able to get through there, either.
We’ll leave it for a day or two to let the cats get used to it, and see if they manage to knock it over or anything like that. There is the potential that they could knock the entire chair over, even as heavy as it is.
The mini-greenhouse is facing the window, but there is a shelf behind it, and we might be able to set up more light from the other side, too.
If it seems to work out with the cats, we’ll be starting shallots in there, first. And if it still remains cat proof, I’m hoping to be able to transplant the excess tomatoes out, next.
First, to follow up on my previous post, I was able to get my mother’s car started. I left it to run for a bit before moving it to the other part of the garage – and plugging it back in again!
While it was running, I decided to use the time to dig out another cat path.
Because I’m a suck that way.
This is a path to a shed that’s slowly collapsing, and is in view of the security camera live feed. I constantly see the cats struggling through the snow to get through. I got about 3/4s of it dug out before moving the car, then finished it almost the rest of the way.
I left the shovel at the end for scale. There’s probably about 2 inches or so of snow on the ground.
I didn’t dig any further, because I know there are things buried underneath, and the snow level starts to drop there, anyhow. It was actually an easy dig. Once I broke through the harder packed top layer of snow, the snow under it was very loose and crystalline, making it light and easy to shovel.
I had closed up the doors to the garage, and the doors where my mother’s car normally gets parked have a old tire in front, to keep them from opening (I really hope we can replace those doors this summer!). The tire warms up nicely in the sun, so it’s a favourite spot for cats to hang out, out of the snow.
Potato Beetle was sitting on it as I started my way back, so I paused to pet him, immediately noticing what looked like fresh blood in the fur in an ear! It took me a while to find it, but he has what looks like a fresh wound on the side of his neck. All I could really see was a dark patch in his fur. It wasn’t actively bleeding, and I couldn’t look too closely, but I am concerned.
Potato Beetle seems to now be at the bottom of the pecking order, and a target. After talking about it with the family, I turned the power bar back on in the sun room, for the light, heat bulb and heated water bowl. There is still food in there, and I’d been letting cats in while doing my rounds, to nibble on it. Potato Beetle has been the one that tends to go in there the longest. He was born in there, so he’s very comfortable with the sun room.
One of my daughters has brought in a litter pan, and we’ve set the box nests up again. Now, we just have to find him again. We will bring him into the sun room for his own protection, and to hopefully get a better look at the wound.
Spring cannot come soon enough. Potato Beetle is on the adoption list, but the outside cats aren’t going to be done until the inside cats are adopted out.
As I am writing this, I can see cat after cat on the security camera live feed, using the path I dug out!
Let us now think of spring, and green and growing things.
Like onions!
This is the tray that first starting showing sprouts, but only now are they big enough to actually show in a photo. I got mixed up about which onions these were. These are the Red of Florence onions, not the yellow bulb onions I got in my head for some reason. I mean, it’s not like we forgot to label them or anything! LOL
Just this morning, we finally saw sprouts in the other two trays. Here, you can see a little clump of Oneida onions sprouting in the middle, and a couple more little sprouts in the bottom left corner.
It’s really hard to spot the sprouting Tropeana Lunga in this tray. Again, bottom left corner of the tray.
You can even see an Oneida sprout near the edge of the other tray.
I must say, having things sprouting right now is a huge psychological boost!
Having said that, I just got some messages from people I was going to meet at the grocery store this evening, and it’s just been cancelled, due to the blizzard conditions we are supposed to have by then.
So it looks like I’ll either be driving in now, or waiting until Sunday.