Okay, in between dealing with all sorts of other issues, I think we’ve found a way to set up the mini-greenhouse in a cat-proof way.
The frame is sitting on top of a very sturdy, heavy oak chair. It’s tied to the chair legs in a couple of places, and to the back, to stabilize it.
The patched up plastic cover is also over the back of the the chair, for further stability, though it’s tight enough to make zipping it closed a bit of a challenge.
For some reason, I got it in my head that it had 3 shelves, but it has 4. We have two plastic seed starting trays, one with pots, one just a base, that fit perfectly on the shelves. We also have two baking trays that can hold larger, heavier pots, if needed, and can still be used to water from below. They are shorter and wider than the shelves, but if we need to use them, they should fit on the top two shelves. With the cover going over the back of the chair, the bottom half is pulled too tight for them to fit there.
The bottom shelf is flat on the chair seat, so that cats should not be able to get through from below, and the cover is stretched snug enough at the bottom, they shouldn’t be able to get through there, either.
We’ll leave it for a day or two to let the cats get used to it, and see if they manage to knock it over or anything like that. There is the potential that they could knock the entire chair over, even as heavy as it is.
The mini-greenhouse is facing the window, but there is a shelf behind it, and we might be able to set up more light from the other side, too.
If it seems to work out with the cats, we’ll be starting shallots in there, first. And if it still remains cat proof, I’m hoping to be able to transplant the excess tomatoes out, next.
First, to follow up on my previous post, I was able to get my mother’s car started. I left it to run for a bit before moving it to the other part of the garage – and plugging it back in again!
While it was running, I decided to use the time to dig out another cat path.
Because I’m a suck that way.
This is a path to a shed that’s slowly collapsing, and is in view of the security camera live feed. I constantly see the cats struggling through the snow to get through. I got about 3/4s of it dug out before moving the car, then finished it almost the rest of the way.
I left the shovel at the end for scale. There’s probably about 2 inches or so of snow on the ground.
I didn’t dig any further, because I know there are things buried underneath, and the snow level starts to drop there, anyhow. It was actually an easy dig. Once I broke through the harder packed top layer of snow, the snow under it was very loose and crystalline, making it light and easy to shovel.
I had closed up the doors to the garage, and the doors where my mother’s car normally gets parked have a old tire in front, to keep them from opening (I really hope we can replace those doors this summer!). The tire warms up nicely in the sun, so it’s a favourite spot for cats to hang out, out of the snow.
Potato Beetle was sitting on it as I started my way back, so I paused to pet him, immediately noticing what looked like fresh blood in the fur in an ear! It took me a while to find it, but he has what looks like a fresh wound on the side of his neck. All I could really see was a dark patch in his fur. It wasn’t actively bleeding, and I couldn’t look too closely, but I am concerned.
Potato Beetle seems to now be at the bottom of the pecking order, and a target. After talking about it with the family, I turned the power bar back on in the sun room, for the light, heat bulb and heated water bowl. There is still food in there, and I’d been letting cats in while doing my rounds, to nibble on it. Potato Beetle has been the one that tends to go in there the longest. He was born in there, so he’s very comfortable with the sun room.
One of my daughters has brought in a litter pan, and we’ve set the box nests up again. Now, we just have to find him again. We will bring him into the sun room for his own protection, and to hopefully get a better look at the wound.
Spring cannot come soon enough. Potato Beetle is on the adoption list, but the outside cats aren’t going to be done until the inside cats are adopted out.
As I am writing this, I can see cat after cat on the security camera live feed, using the path I dug out!
Let us now think of spring, and green and growing things.
Like onions!
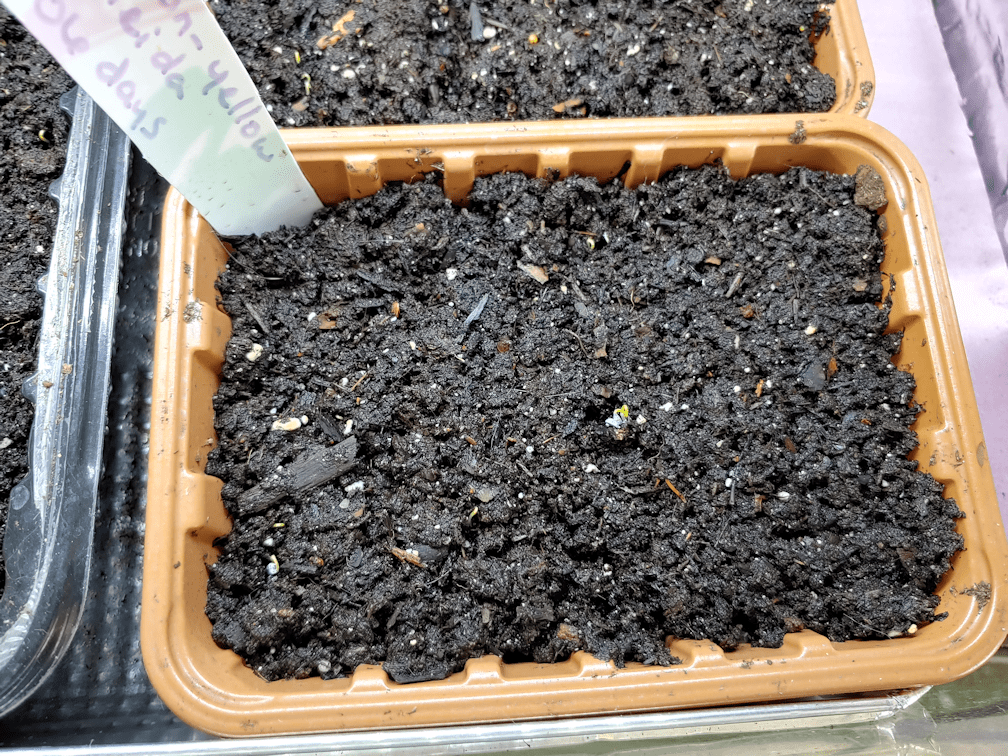
This is the tray that first starting showing sprouts, but only now are they big enough to actually show in a photo. I got mixed up about which onions these were. These are the Red of Florence onions, not the yellow bulb onions I got in my head for some reason. I mean, it’s not like we forgot to label them or anything! LOL
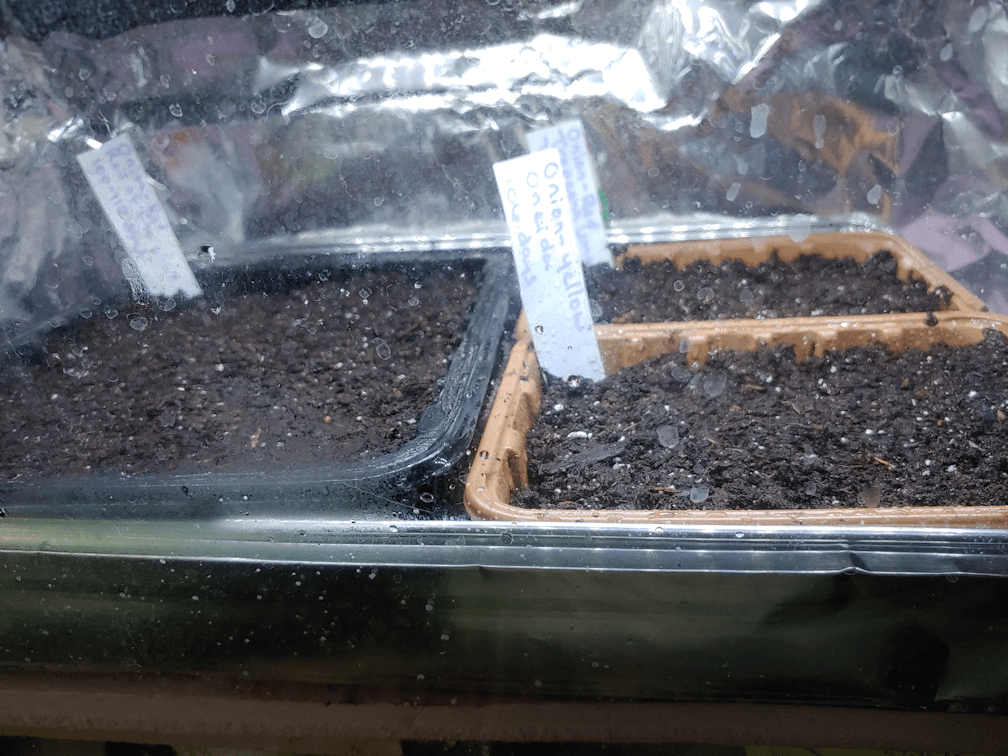
Just this morning, we finally saw sprouts in the other two trays. Here, you can see a little clump of Oneida onions sprouting in the middle, and a couple more little sprouts in the bottom left corner.
It’s really hard to spot the sprouting Tropeana Lunga in this tray. Again, bottom left corner of the tray.
You can even see an Oneida sprout near the edge of the other tray.
I must say, having things sprouting right now is a huge psychological boost!
Having said that, I just got some messages from people I was going to meet at the grocery store this evening, and it’s just been cancelled, due to the blizzard conditions we are supposed to have by then.
So it looks like I’ll either be driving in now, or waiting until Sunday.
I needed some garden therapy today, so I got some onion seeds started.
We have seeds for 3 types of bulb onions, 1 of shallots and 1 of bunching onions. Today, I focused on the bulb onions.
Last year, we planted our alliums in Jiffy Pellets, repurposed K-cups and cardboard flats from eggs (don’t use those. They suck. Literally. The cardboard sucked all the moisture out of the growing medium!) before finally using doubled Red Solo cups to try and make up for losses.
This year, we’re doing things very differently. I’m going to try bulk sowing. Here are a couple of videos about that.
This next video shows the transplanting.
Obviously, we are in a much colder zone than he is, so I’m adjusting accordingly.
We already had our small aquarium greenhouse prepped. The first thing I needed to do was see how many seeds we had of each type.
The Red of Florence had the most seeds in its packet. The grey seeds from Veseys are Oneida, a yellow onion. The fewest are the rarer Tropeana Lunga which, like the Red of Florence, are an elongated red onion.
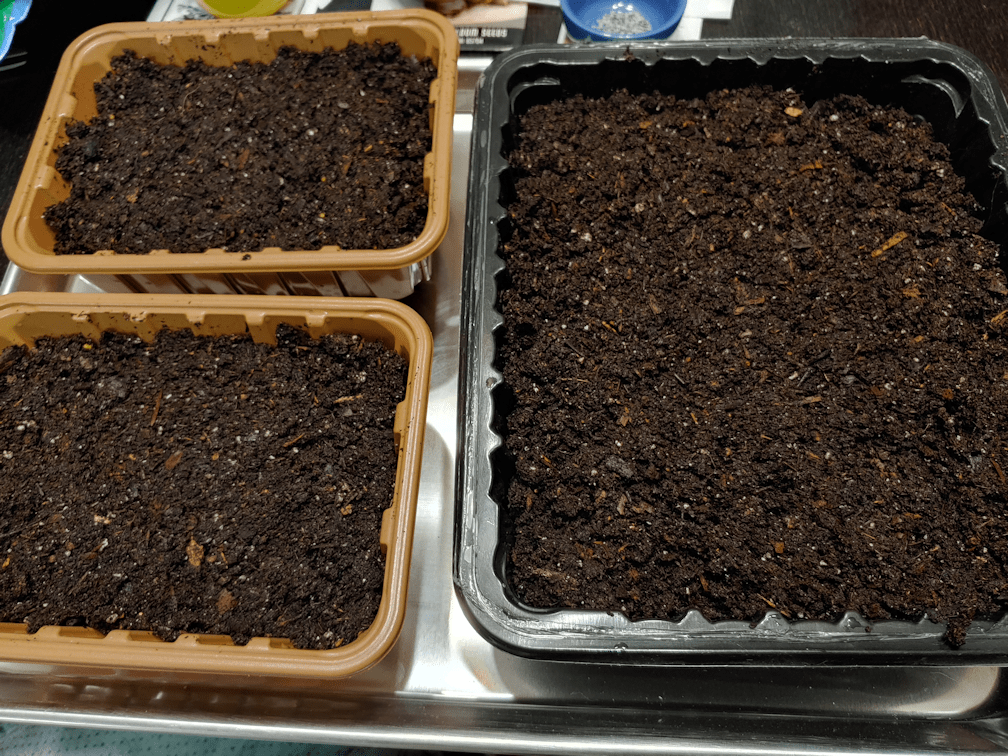
We are using re-purposed trays from the grocery store this year. The smaller ones were from mushrooms. I think the big one was from ground beef. We’ve had it for a while, so I can’t quite remember.
They got a good cleaning, and drainage holes were punched into the bottoms, then they were set into a baking pan.
They were filled with pre-moistened seed starting mix; I just dumped the remains of a bag into my largest mixing bowl and mixed in warmish water until it was evenly damp. Onions don’t need things as warm as other seeds, so no heat mat needed, but our house is on the cold side. I figured slightly warmer water would not go amiss.
The seed starting mix was pressed down just enough to make sure there would be no air pockets.
Then it was time to scatter the seeds.
Gosh, it feels so weird to sow them this densely!
I like that the grey seeds of the Oneida are so nice and visible. :-)
The seeds got a very fine misting at this point.
Then they were topped with about a quarter inch of seed starting mix, again gently pressing to get rid of air gaps. The tops got another misting, and water was added to the baking tray and left to be absorbed, while I cleaned up.
Finally, they went into the small aquarium greenhouse. The three trays fit perfectly in the oven liner tray folded into the bottom. More water was added to the oven liner tray, to water from below.
This tank has aluminum foil around the sides because the light we have for the tank is not as bright as on the big tank, and all that reflective light will help keep them from getting leggy. At least, that’s the theory!
This leaves the shallots to start next. Their days to maturity is a bit shorter than for the bulb onions. The Red Baron bunching onions need only 60-65 days to maturity, so they can be started much later.
I’m not sure how we’re going to be able to work it with the shallots, as far as space in the aquarium greenhouses goes. We’ve got some time to figure it out before they need to be started, but not much.
As for the other seeds we have in the big aquarium greenhouse, they seem to be doing fine, so far. Nothing has germinated yet, of course, so it’s too early to tell if the heat mat is making a difference. We just keep checking and adding water to the tray and misting the tops, as needed. The tray over the mat has been needing refills regularly, but today is the first time I added more water to the outer cups of the Wonderberry.
We need to get the rest of those Cup of Moldova tomato seeds started, since we want to grow a lot more of the paste tomatoes. I’ll likely start those using the doubled Red Solo cups, though we’d have to find a cat safe place to move the aloe vera pots, to make room for more seed starts. Which is a shame, because they are doing so well under the lights of the tank! So are my daughter’s orchids, one of which is blooming very enthusiastically right now, but we should be able to leave those in the tank until it gets warm enough to safely hand them in front of a window again. The aloe, however… the cats just love digging them up! :-(
Ah, well. We’ll figure it out. The main thing is that the bulb onions are started.
Plus, garden therapy was done its job. I’m feeling much more positive, now. :-)
For at least a decade, there has been an increase in people who have decided to move out of the cities, get themselves an acreage, and live as self-sufficiently as possible.
Which is basically, how I grew up.
Things have really changed, though, and modern homesteaders have a lot more resources, options and choices than was available when I was a kid, 50 years ago, never mind what our pioneers had. I found this very encouraging to see.
A couple of decades ago, while part of an online homeschooling support group – pre-social media, when everything was by email (and dinosaurs roamed the earth) – I often saw people waxing poetic about how we all need to go “back to the land”, and live these organic, subsistence lives, and all our food would be free and we would barter for everything else, and so on. It had a lot more to do with ideology than anything else. Going back to the farm was a dream of mine since I moved away in my late teens, so I could appreciate many of the sentiments they expressed. Unfortunately, this romanticized view was wildly unrealistic, and I found myself trying to remind people that there are reasons people, including farmers, moved away from that life.
Most of them didn’t get it.
Once we moved to the farm, 4 years ago, in a caretaker role, how things were done when I was a kid just wasn’t an option, and I’m quite okay with that. Most of the land is rented out, so we just have our corner to work on. My mother had a massive garden that had been slowly neglected for many years, as my parents retired from farming and age reduced their mobility, no matter how much my siblings tried to help. We can finally work on our dream to be as self-sufficient as possible, but we have to do a lot of things differently than how we did it when I was a kid.
It was in researching this that I found this dynamic and growing homesteading community. These were people who may have gone in starry eyed, but were also realistic and determined, and they were making it work. The aging hippies I couldn’t get through to all those years ago, with their ideological blinders, could never have done what these awesome people were doing. It was very exciting!
Then, the last couple of years happened.
As people saw their jobs disappearing, their livelihoods destroyed, prices skyrocketing, and government restrictions stifling people’s ability to do some of the most basic things, a lot of people are suddenly having real concerns about being able to feed themselves and their families.
During WWII, governments actively encouraged families to grow Victory Gardens, and even gave out information and resources to help people do it. That sort of thing isn’t happening now. Instead, we are having to rely on each other to figure out how to grow what, for too many people, are literally survival gardens.
Whatever your reasons for wanting to start growing as much food for yourself as you can, I heartily encourage you! You won’t get any sermons or lectures from me. I do hope that I can, at the very least, provide some information and inspiration.
Start where you’re at
Your circumstances are going to be unique to you. If you’re already on an acreage, great. If all you’ve got to work with is a hall closet and some makeshift grow lights, great. You can start where you’re at, even if it’s just poking some holes in a bag of potting soil to grow some greens in a sunny window. Little by little, it’ll get done!
What I will be sharing here is going to be geared mostly to people living in colder climates – and by that, I meant Zone 2 or 3 (depending on what Canadian zone maps are being used, we live in either 3a or 2b).
I will add one thing I’ve heard quite a number of very experienced, prolific gardeners say. If they had to depend on their gardens for survival, they’d starve! It takes a lot to grow enough food to actually provide enough for even one person to last from preservation to the next year’s harvest, and it will still need to be supplemented with other things. I’m still somewhat amused and perplexed by my mother trying to lure us out here by saying we could grow a garden and not have to buy groceries anymore. Even as big as her garden was, plus having chickens and cows, sometimes pigs, turkeys and geese, a root cellar and lots of canning and freezing, we still had to buy groceries.
So you’re still going to need to buy stuff. Hopefully, just a lot less!
With that in mind, as you plan what to grow in your own personal survival garden, here are some things to consider when making decisions.
Grow what you will eat.
I’ve looked at so many lists out there, for things like what to grow to feed a family for a year, or what to grow in your climate, and so on, and frankly, a lot of stuff on those lists are foods I just don’t like. Others, I can’t eat. There are four of us in our household, and we have very different tastes. Which means that our focus will be more on growing things all of us enjoy eating, then including smaller amounts of things only one or two of us like to eat. As wonderful and appetizing as I find tomatoes and bell peppers, they both make gag, but two people in our household enjoy eating them, and all of us can eat processed tomatoes. Now, those two people REALLY like their tomatoes, so growing more of those than peppers for fresh eating makes sense, as well as growing a lot of tomatoes that are good for making tomato paste to last us for months. It’s a sort of juggling game.
Try new things
What we find in the grocery stores is there because those varieties can handle large scale growing and transportation. When you’re growing your own, you can have a lot more choices. This is a time to grow new varieties of things you know you like, and if you have the space and resources for it, grow something you’ve always wanted to try, but couldn’t for one reason or another. Which kinda ties in with my next point to consider.
Grow at least one thing for fun
Yes, growing food to ensure your family has something to eat when times are tough is serious business. The whole point of the list I’ll be presenting to you is to be able to get as much bang for your buck as you can. At the same time, growing something just for fun is a great morale booster. As you go through what various seed companies and nurseries have to offer, you’re bound to find something that just puts a smile on your face. If you have the space and resources for it, go for it!
Keep in mind your region, climate and particular circumstances.
While the zone maps are very handy, that doesn’t mean there aren’t exceptions. There are things my mother successfully grew in our Zone 3 that were rated at Zone 5. She didn’t even doing anything different for them, either! This is a good time to find and get involved with a community of people in your region and zone, online or off, to learn from. If you are growing outdoors, look at what is rated for your zone, but also consider whether you can create microclimates. If you have only a balcony or patio, there are lots of places where you can learn about container gardening or vertical gardening. If you are growing indoors, there are resources geared specifically for that.
Storage and preservation
If you’re growing food to feed your family, and trying to grow as much as possible in your space, it’s not going to be much good if you grow more than you can eat, but can’t preserve it! There are many options available; freezing, dehydrating, water bath canning, pressure canning and even freeze drying, if you can afford the machine! You might even be able to create a root cellar in some corner of your home. Refrigerator pickling and fermenting are options, if you don’t have canning equipment.
If you’re going to store and preserve food, you’ll need somewhere to put it. What methods you have available to save your food will help you decide what makes the most sense for you to grow.
Things will go wrong. Do it anyway
One thing that is going to happen is, there will be failures at some point. It’s inevitable. Sometimes, you’ll make a mistake. Sometimes, there will be circumstances completely out of your control. It happens. The beauty is, you can still fail “up”. Honestly, you’ll probably learn more from the failures than the successes! Of course, it’s always a good idea to learn from others as much as you can to avoid failures, but it’s still going to happen. Since being here at the farm for 4 years, and only gardening for 2, we knew we were trying to grow in far from ideal conditions, and had some setbacks, yet we still managed to have food from our own garden that we could enjoy.
When it came to making a list of things that might work well in a survival garden, I looked for things that could be grown in colder climates, had high yields, and could be stored or preserved, while also keeping time in mind. So let’s start with the fastest growing things, first!
There are quite a few things that can go from seed to plate in less than a month. Some in less than 10 days! Micro-greens and sprouts can be grown very quickly, can be grown indoors in trays or jars, continually throughout the year. Many seed companies now has sections for sprouts, and quite a variety of things can be grown for their sprouts. Many sprouts can be grown in jars – alfalfa, mung beans, lentils, radishes, and more. Gelatinous seeds, such as flax, chia, cress, arugula and psyllium, can be sprouted in trays. For microgreens, you can try beets, swiss chard, broccoli, cress, peas, radishes and sunflowers.
If you want to give things a bit more time, leafy greens such as pretty much any type of leaf lettuce, spinach, chard, kale, bok choi and radishes can be grown and harvested very quickly. Many of these don’t like heat much, so they can be planted outdoors early in the spring and sowed successively until the heat of summer, then sowed again for a fall crop.
These quick growing plants are nutritional power houses, but they don’t have a lot of calories. They’re not going to keep anyone going for long, so it’s good to think of these as a supplement, and something that can provide nutrition until other foods can be harvested.
Short term
By “short term”, I am talking about the things we typically think of in our annual vegetable gardens. These are things that can take a few months before you can start harvesting anything, and can potentially keep feeding you and your family throughout the winter, with proper storage and preservation.
Root vegetables: carrots, parsnips, beets, radish bulbs, turnips, rutabagas… there are many to choose from, and many varieties of each! Stored properly, they can last for months on their own, but they can also be pickled, pressure canned, frozen, and dehydrated. With these, they are one seed, one plant (except beets; their seeds are actually clusters of seeds), but they produce so many seeds, most packets will provide more than needed for a typical household.
Bulbs and tubers: potatoes, sunchokes/Jerusalem artichokes, sweet potatoes – yes, there is a cold hardy variety of sweet potatoes out there! – bulb fennel, celeriac and more.
There are many varieties of potatoes, some more prolific than others, and some better for storage than others. A good source of seed potatoes will give that information. Potatoes also come in determinate and indeterminate varieties. Indeterminates are good for potato bags and towers, while determinate are good for hilling or Ruth Stout growing methods. Sunchokes will grow in just about any type of soil, and can be so prolific, they are sometimes considered invasive.
Special mention: the alliums are excellent bulbs to grow, but tend to require a lot more time, unless you are starting onions and shallots from sets, or spring garlic. Hard neck garlic needs to be planted in the fall, while onions and shallots from seed – which gives a lot more choice in varieties – need to be started indoors very early. In my garden groups, I’ve found Zone 3 gardeners that start their onions from seed as early as January! Onions also come in long day and short day varieties. If you are in a northern Zone, look for long day varieties. Of course, some varieties store longer than others but, properly cured and stored, they can last a very long time! Onion greens can be eaten as the bulbs mature, and hard neck garlic produces scapes that need to be removed to produce bigger bulbs, and they are delicious, making them dual crops to grow.
Summer squash and zucchini: There are many varieties of summer squash, and they all tend to be quite prolific. Just a couple of plants can provide plenty of baby squash that mature fairly quickly, and if they are left to grow larger, some varieties can be stuffed and baked. Most summer squash start to get tough as they get larger, and are not a storage vegetable, but they can be pickled, canned, frozen and dehydrated. Zucchini is a bit of an exception, in that it can be used as both a summer squash while small, or a winter squash if allowed to grow to full size.
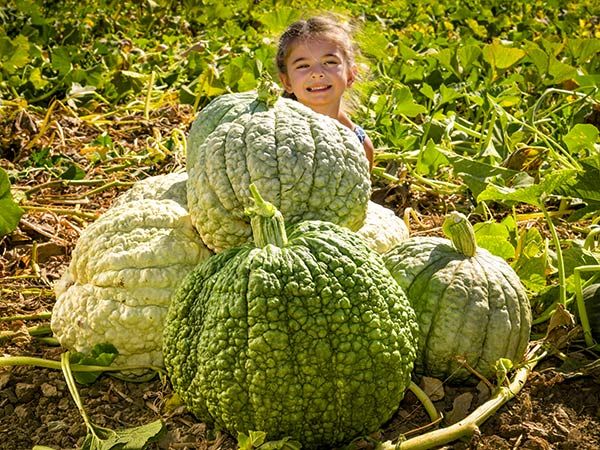
Winter squash and pumpkins: These are squash that can grow to sometimes colossal sizes, but there are also varieties that are small, fast maturing and very prolific. Once they reach maturity, the fruits are cured and can be stored for the winter months. Some varieties reach their best flavour after weeks or months in storage. They can also be frozen, canned, shredded and dehydrated.
Legumes: there are few vegetables out there that provide more bang for your buck than legumes! Especially beans. Bush beans can be grown for their pods, and when they’re done producing is about when pole beans are ready for harvesting, and of course there are shelling beans, which are grown for their fully mature and dry seeds. Peas, chick peas and lentils can also provide a lot of food from just a few plants. Dried legumes, stored properly, can last for years, making them one of the most efficient foods to grow.
We could fit about a hundred of these tiny Spoon tomatoes into a single Red Solo cup.
Tomatoes: tomatoes are a fruit that deserve their own category. The varieties available is staggering! However, if you are looking to get the most pounds per plant, look at growing a mid sized variety. Aside from fresh eating, they can be frozen, canned or dehydrated on their own, or be used as an ingredient for sauces and salsas, and so much more.
Cucumbers: As with tomatoes, there are a really amazing number of cucumber varieties available, but most fall into one of two categories; slicers, for fresh eating, and picklers, for preserving. They all tend to be fast growing and very prolific, too.
Peppers: I wasn’t sure about including peppers on this list. They are excellent producers, but growing them in our colder climate seems to be touch and go. I’ve heard from people who have had great success with them, while others have tried for many years, but have never had a harvest. Peppers can be canned, preserved in oil, frozen, dehydrated, pickled and made into relishes.
While being able to grow food quickly is important, it is also useful to consider the long haul. If you have the space for it, there are things that may take several years before they begin producing, but once they do, the harvests will be bounteous!
Asparagus: asparagus can be grown from seed or you can buy crowns to transplant into trenches. It can take three years before they can be harvested, and even then, for the first year or two, harvests should be minimal. Once they are established, however, asparagus will keep producing for up to 20 years!
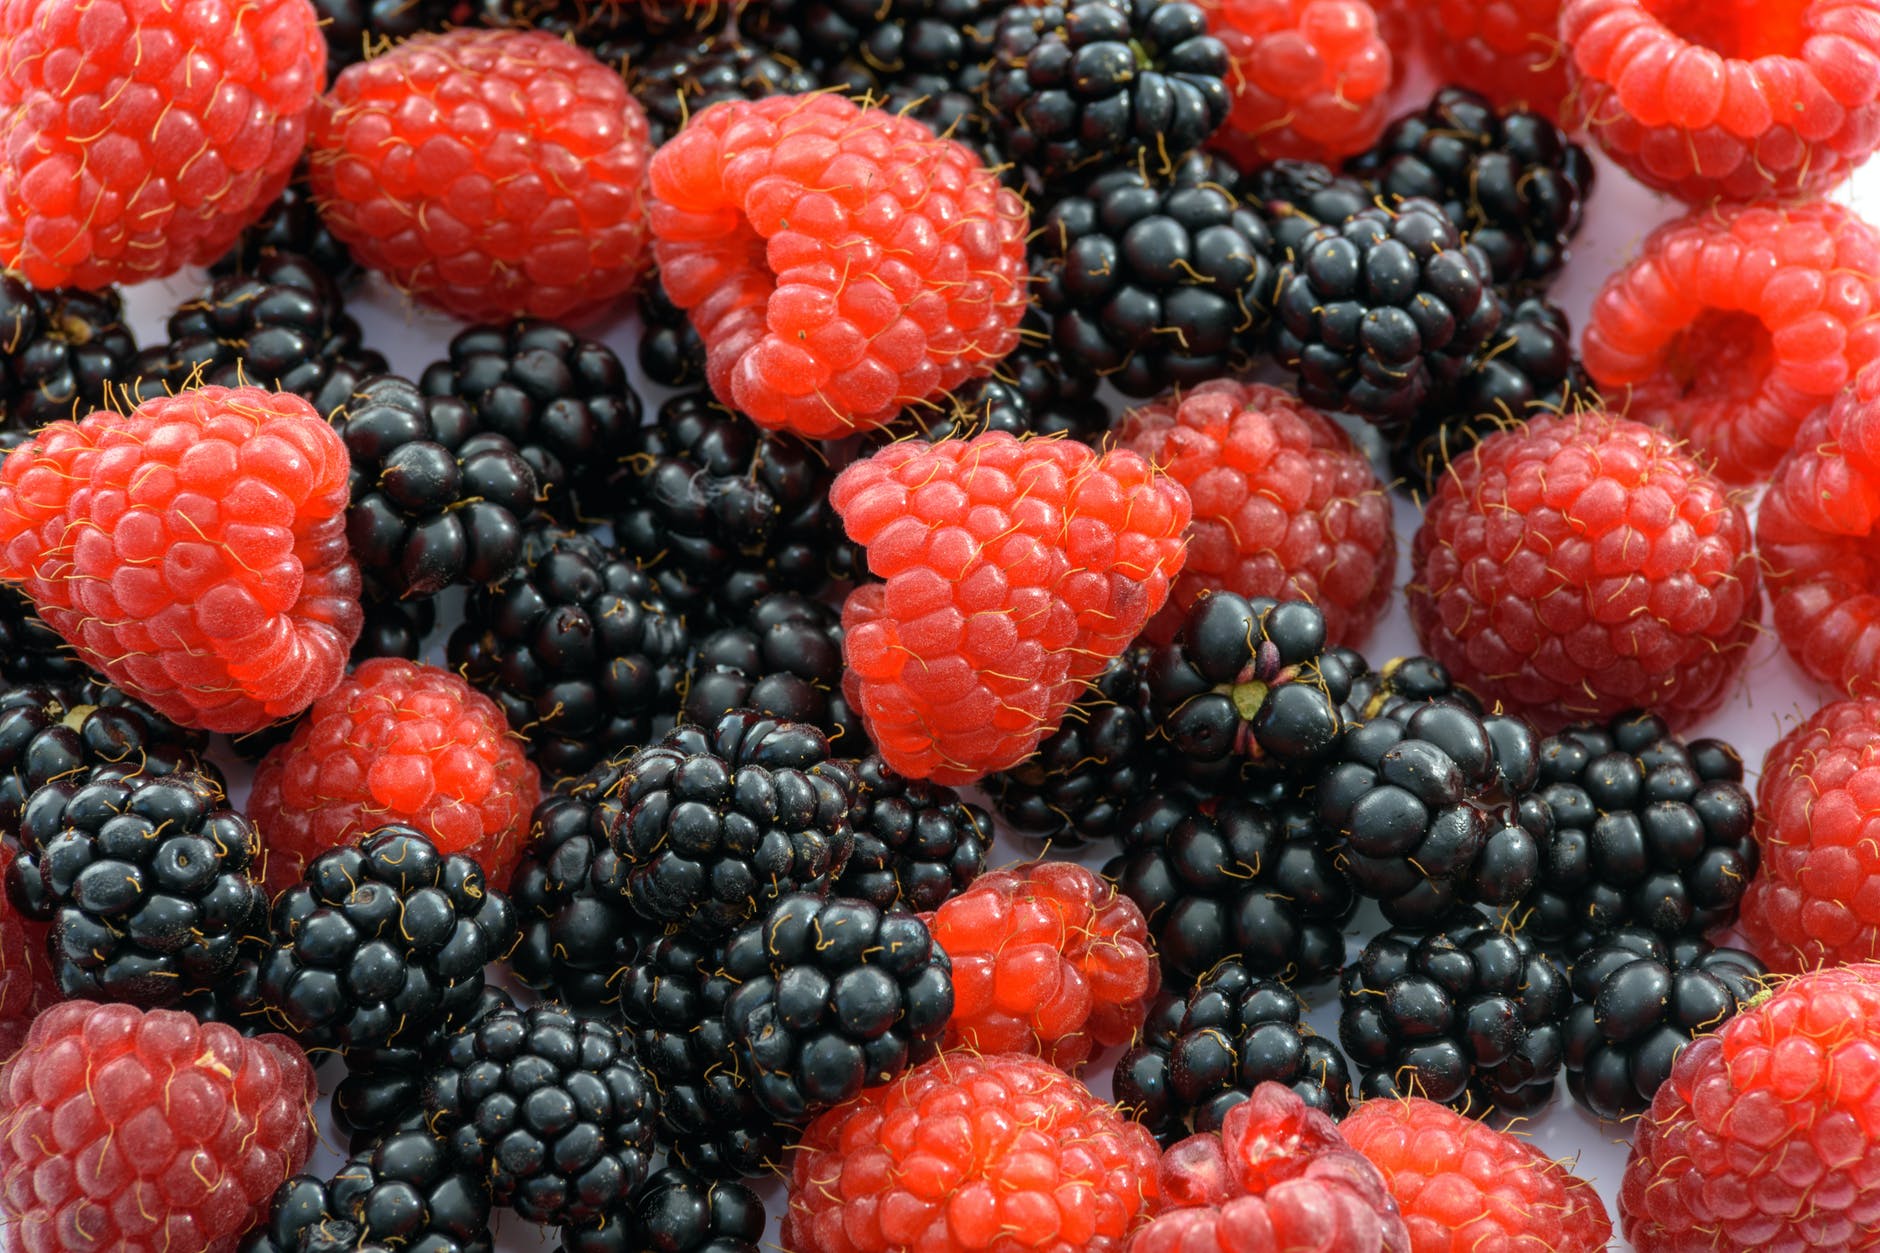
Raspberries, currants, gooseberries and haskaps: Haskaps are the new berries on the block, and are exceptionally cold hardy. They require male and female plants to produce, and can potentially begin producing berries in their first year. Raspberries are available as regular cane (new canes produce berries in their second year, then die back) or primal cane (new canes produce berries in their first year). Choosing varieties that mature at different times can give you fresh berries for months. Currants and gooseberries, once established, can produce fruit for many years. Berry bushes can provide a great deal of fruit per plant. Along with being used fresh, frozen or dehydrated, as well as made into jams and jellies, they can be used to make vinegars, syrups and wines.
Grapes: yes, there are Zone 3 grape varieties. I’ve even seen a Zone 2 variety. Grape vines are very long lived, and have the potential to provide fresh and frozen fruit, jelly, and wines for many years.
Hedge bushes and trees: There are a number of larger berry bushes that can double as shelter belts and natural boarders. Some, like sea buckthorn and bison berry, do well in poor soils, and while they may be considered invasive in warmer climates, they tend not to be, in our Zone 3. The Rugosa rose produces large edible hips, and their flower petals are edible, too. Saskatoons are a more of a tree than a bush, and absolutely delicious. Chokecherries produce many berries, but are better used in syrups, vinegars, etc. than eaten fresh. Many of these will provide enough berries not only for your own use, but for birds as well!
Now we’re really going for the long haul! Here, we are looking at things that can take five or ten years before they start producing food – but once they do, they will continue for decades to come.
Fruit trees: there are a remarkable number of fruit trees that can grow in colder zones. Apples, pears, apricots, cherries and plums can all be grown here. While a single mature tree can provide enough fruit for the entire family, many need to be planted with a pollinator, which can be a different variety.
Nut trees: there are not a lot of nut trees that can grow in Zone 3, but some, like the Korean Pine, are hardy to Zone 2! Hazelberts and beaked hazelnuts are also very hardy. Others, such as the black walnut, can grow in Zone 3, but the nuts may not have enough for a growing season to fully mature.
Okay, so all this is a lot more than just a “survival” garden, but we all start somewhere, right? :-) Little by little, it’ll get done!
I hope you find these useful in working out what are the best things for you to start growing in your own particular situation.
For those who have already been doing this for a while, please feel free to leave a comment, sharing your own experiences. What worked best for you? What didn’t work? Is there anything you would tell someone who is just starting out now? Let us know!
This year, I joined a number of gardening groups on social media. Either local groups or cold climate/zone 3 gardening groups. It’s pretty cool to see how many first time gardeners have been joining the groups and asking all sorts of questions.
This is the time of year for planting hard neck garlic, as we did yesterday, and there is a LOT of discussion on these groups right now, and people are sharing some really good links.
One really good video I saw shared was uploaded just yesterday, and it give a lot of good information. I think you’ll enjoy it, too.
He talks about hard neck garlic, soft neck garlic, seed garlic and even using store bought garlic, too.
I didn’t realize Elephant garlic isn’t actually garlic!
He talks about lots more, including harvesting “wet garlic”, which was something I wondered about when checking our own garlic last year.
Among the most discussed things I’ve been seeing in the gardening groups has been how deep to plant the cloves. There is a LOT of differing, even conflicting, advice. The thing is, the conflicting advice isn’t necessarily wrong. There can be quite a bit of variance, based on climate zones. For those in zone three, like myself, this was an excellent link that was shared. I also found this video, specific to planting garlic in zone 3.
I found it interesting that he says to leave the curing garlic out in the rain!
For those who aren’t necessarily in colder climates, here’s a video from MI Gardener (published September, 2018)
A lot of gardeners on my groups get seeds from MI Gardener, too, and are very happy with what they get.
There is a lot of information and advice out there, but if you can’t follow all of it, you know what? You can still get good garlic! We didn’t plant our cloves as deep as recommended for out zone, yet they survived the Polar Vortex just fine. We don’t have compost or manure to add, and we still got decent sized bulbs. That’s one of the beauties of gardening. You can do all sorts of things “wrong”, and chances are, you’ll still get decent results. What works in your own specific garden may also be quite different from what works in other places, too, so it will always be a learning experience.
Which is half the fun of the whole thing!
For those reading, do you have other things you plant in the fall? I’ve read about a number of vegetables that can be seeded in the fall, and plan to try it in the future, as we get our garden more established. If you plant garlic, do you plant hard or soft neck varieties? What works for you?
I wasn’t going to harvest our potatoes yet, since they can stay in the ground until after we get frost. It is, however, Thanksgiving weekend here in Canada, and dangit, I want to have some of our own potatoes! :-D
The fingerling potatoes are still growing, but the Yukon Gem and Norland potato plants are completely died back, so those were my target for today.
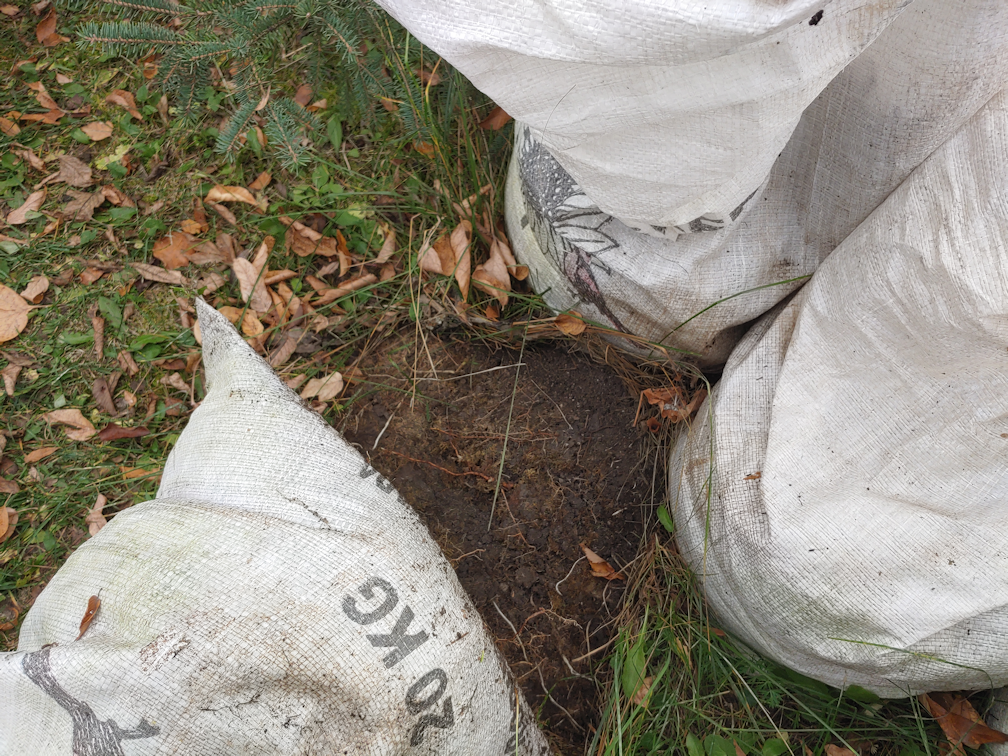
Using old feed bags as grow bags was an experiment for us, and it was interesting to see that roots had made their way through the bottoms of the bags. These will definitely not see another year of use, and they were also weathered enough to start tearing a bit while I moved them, but that’s still pretty good, considering they would have been thrown out, otherwise.
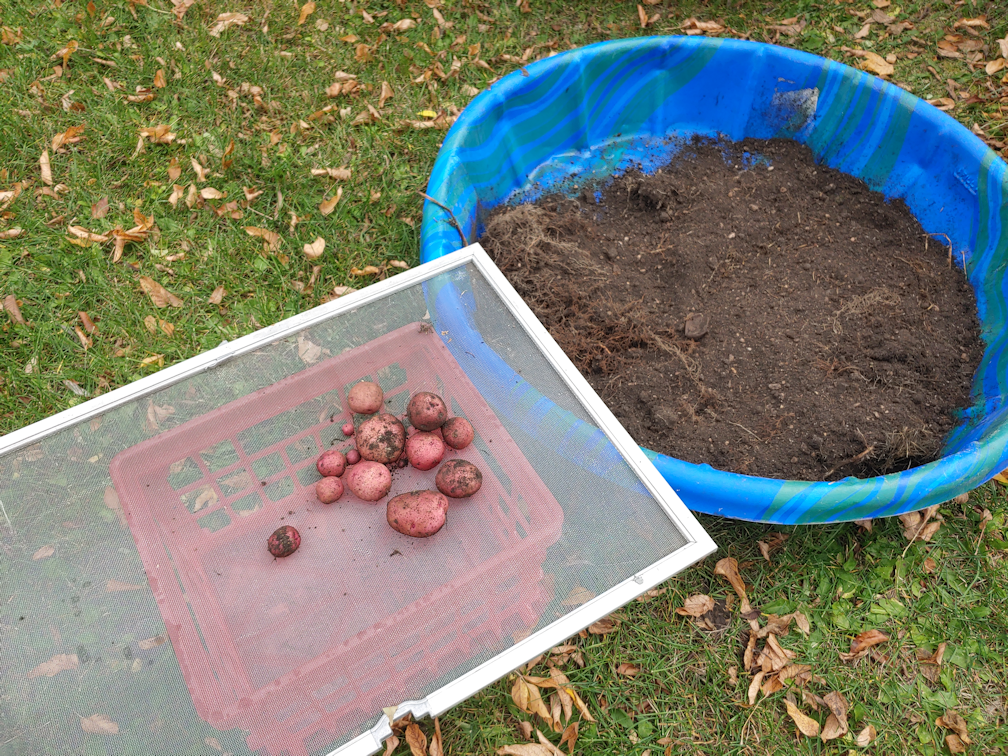
That kiddie pool is, once again, the handiest thing ever! So are those old window screens I found on the barn. :-D The bags got dumped into the pool, where I could go through the soil to find the potatoes and set them aside on the screen.
This is the contents of the very first bag I emptied!
Each variety was planted in five feed bags. We did gather some potatoes earlier, and I tried to take out just a couple from each bag, so there was originally a few more than what you can see here.
I had assistance from a Nosencrantz, ferociously hunting leafs!
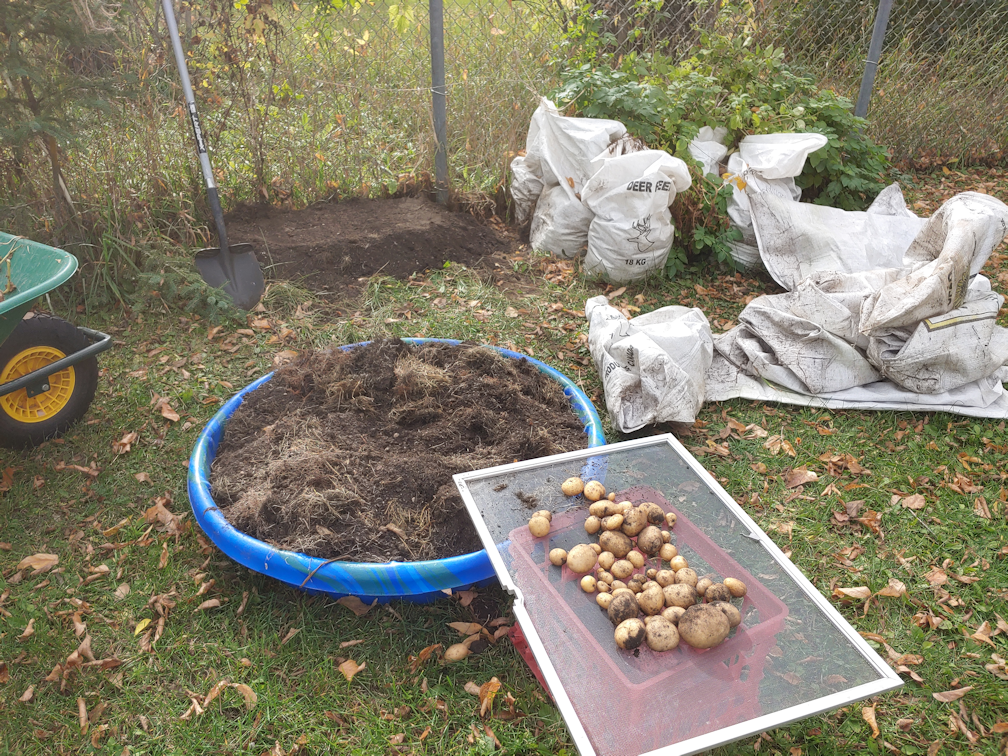
By the time I was working on the Yukon Gem potatoes, the kiddie pool was too full, so I moved aside the remaining bags and started to return some of the soil to create a new bed for planting. For the amount of soil, the new bed will extend along the fence further than the rows of bags are, as I don’t want to to be too wide or too deep. Unless I change my mind at the last minute or something, we will be transplanting some perennial flowers that need to be divided.
One of the nice things I noticed while picking through the soil to find the potatoes, was how many nice, big fat worms I found! They managed to make their way through the bottoms of the bags. I could even see worm holes in the soil under the bags, too.
Here they are! All of the red and yellow potatoes we got.
Such a small harvest, but not too shabby, considering this year’s growing conditions. These will sit outside on the screens for a bit, but with so few potatoes, there’s no need to properly cure them. We’ll be eating them pretty quickly. In fact, quite a lot of these will be used up this weekend, with Thanksgiving dinner. :-)
It should be interesting to see what we get with the fingerling potatoes!
As for how the grow bags did compared to doing the Ruth Stout, heavy mulching method we did last year, I would say these did better. I didn’t know about indeterminate and determinate potatoes before this. If I’d known, I would have specifically looked up indeterminate varieties for these bags, and would have kept filling them with soil and mulch over the summer. That would have resulted in a higher yield. It just happened that all the varieties we chose were determinate, so they grew all on one level. The main thing was that there was no sign of any slug or insect damage on the potatoes. With the Ruth Stout method, I found a lot of slugs as I dug up the potatoes, and quite a few holes in the spuds.
For next year, I am thinking we definitely want to look into doing something like this again; maybe grow bags again, or some other way of doing a potato tower. I think it will depend on what kind of varieties we go with next year, and if I can find indeterminate varieties. I was looking at different websites last night, including some that specialized in only potatoes, and just about everything is marked as sold out. I’m hoping that’s because of the time of year, and that they will come available again after harvesting and curing is done for the winter. I’d like to try sun chokes and sweet potatoes, too – there is one place I’ve found that sells sweet potatoes that can grow in our climate. I think I’m the only one in the family that actually likes sweet potatoes, though (the rest of the household just sort of tolerates them), so I wouldn’t have to grow many. I’ve never found sun chokes to buy and taste, so that will be something to try just to find out if we like them or not!
We’ll have to find a new place to grow potatoes next year, though, since this spot will become a flower bed. We’ll have to think about that! Especially since I hope to increase the quantity we plant. Over time, we’ll need to grow a LOT more potatoes to have enough for four people, to store over the winter, but we’ll get there little by little.
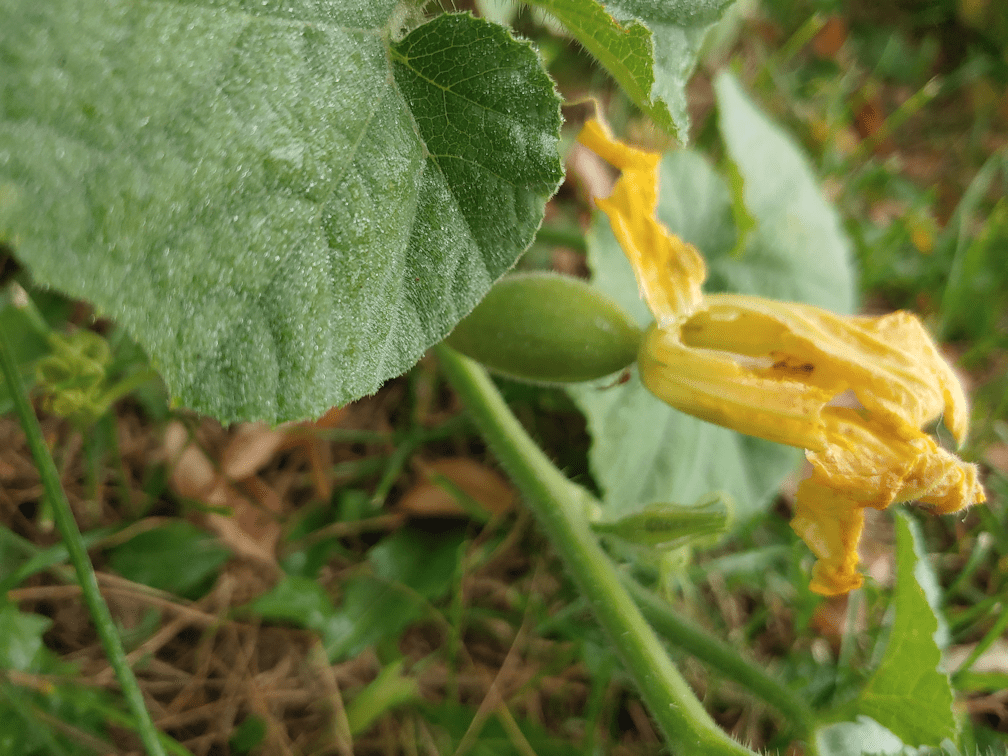
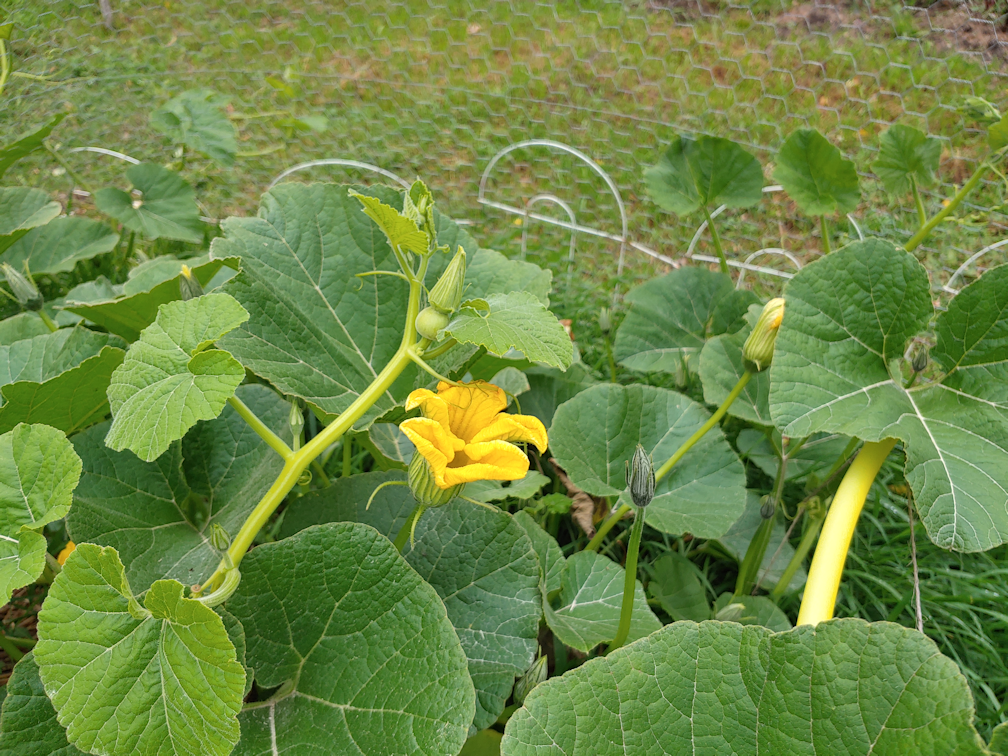
Things are really enjoying the rain we’ve had recently. Including the Ozark Nest Egg gourds.
I noticed that there were both male and female flowers blooming at the same time, so I decided to try hand pollinating them. The previous newly formed gourds have all withered away, so I hope these will take.
The problem is that by the time there are more male flowers blooming, the female flowers have already closed up. I opened the larger ones to pollinate, just to see if they will take. I had to do the same thing with the luffa gourds. We shall see if it works!
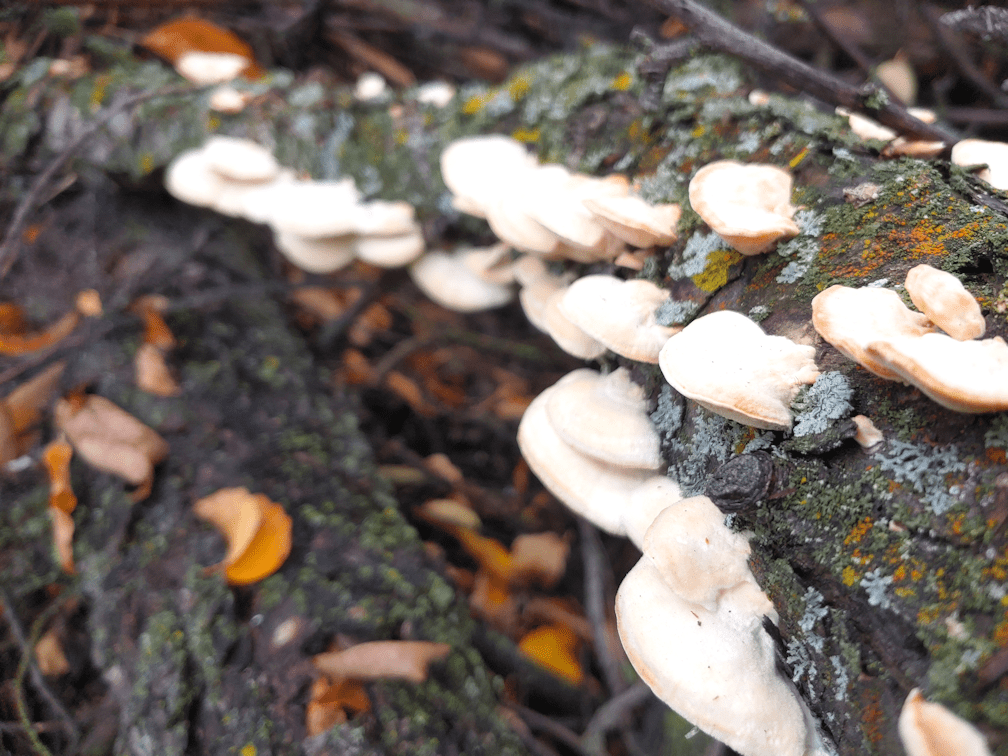
The gourds were not the only things to appreciate the rain.
These weren’t there when I walked past this branch pile, yesterday!
It’s amazing how quickly mushrooms can develop quite large, pretty much overnight!
The Re-Farmer
(ps: this was supposed to be posted yesterday, but my computer stopped responding and I had to shut it down. :-/)
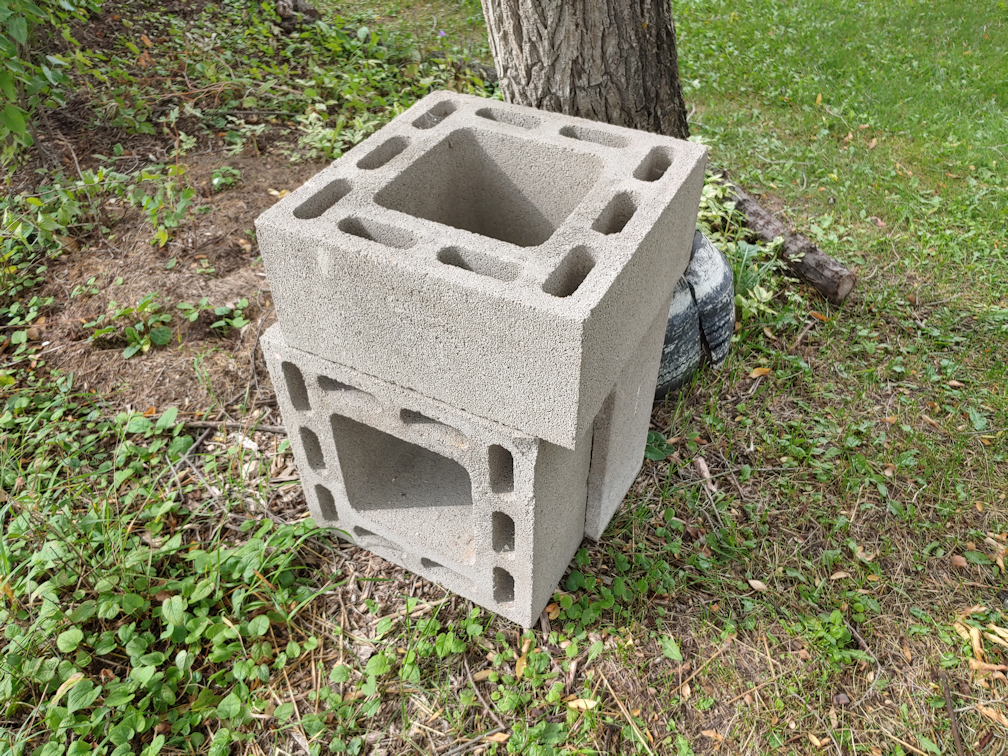
It has remained too damp to try cutting wood, so I worked on a few other things today. One of them was to start getting the remaining chimney blocks out of the old basement, to where they will be set up for next year.
The blocks themselves are not too much of a problem. I can carry them well enough. The main problem is the stairs. If I could simply walk up the stairs, it would have been fine. However, I don’t do stairs well at the best of times, and these stairs have unfortunate dimensions, as well as being unusually steep, to fit into the space available. Which meant setting the blocks down on a step, then cautiously lifting it up, one step at a time, with one hand, while hanging on to the rail with the other. Slow going, and rather dangerous. :-/ Once at the top of the stairs, my husband would open the door for me, keeping the cats away, and slide it aside while I went for another. With his back injury, even sliding them was probably more than he should have done, but he managed.
For now, I only got three out. There are four more left in the old basement. There’s one more in the new basement, but I’m keeping that. It was the perfect height and solidity to use as a surface when I was doing some wood carving.
As I was carrying them out to the yard, with my husband getting the three doors I had to go through for me, while also keeping the cats at bay, I got curious as to how much they weighed. My husband estimated about 25 pounds, but I knew they had to be heavier than that. So I brought over our scale to weigh the last one before taking it out. It turned out to be 53 pounds, so not bad at all. Mostly just awkward. As I sit here writing this, I am starting to feel issues with my right shoulder, from lifting them up the stairs the way I I had to, though. :-/ Fifty three pounds is a bit much for one arm, while scrunched over and squeezed between two walls and a rail!
Of the ones that were outside, all but one were used for the retaining wall in the old kitchen garden. The last one is hidden behind the three I brought out, leaning against the tree. We will have a total of eight blocks by the time the rest are brought up from the basement.
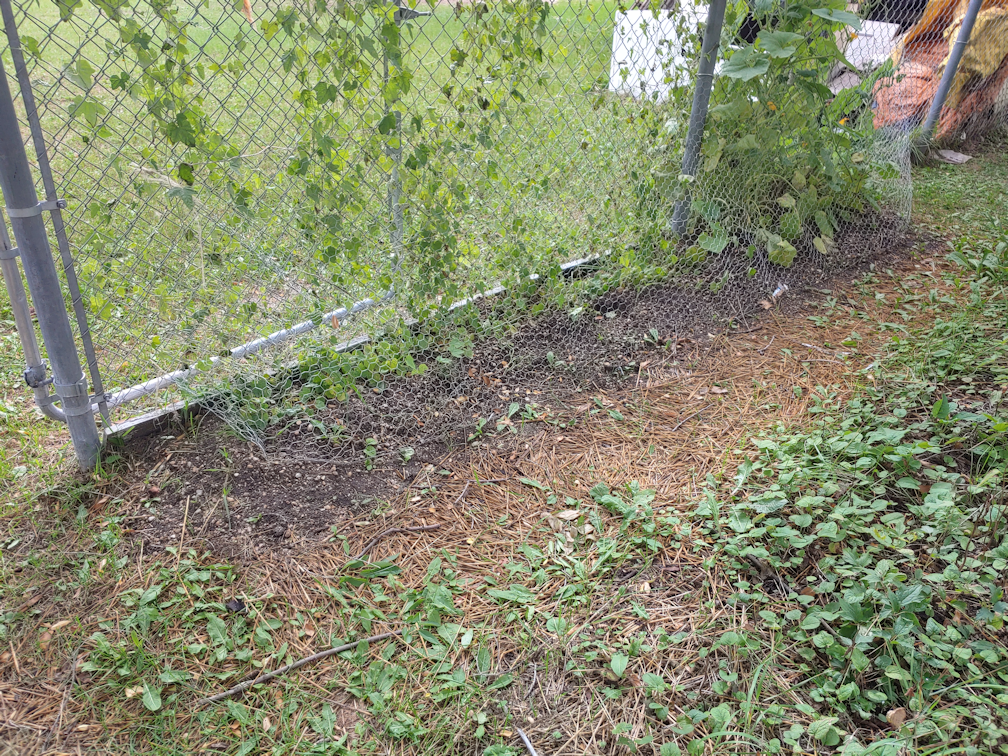
This is where they are going to go, when it’s time to clean up the cucamelons and gourds. We were intending to have them here for this year’s garden, but were not able to get them out of the basement in time, so I want to get that done little by little until they are needed. In this spot, the ground slopes just enough that there is a larger gap under the chain link fence. The cardboard flaps we pushed up against the fence before adding the soil ended up falling under, and the soil started washing away when we watered, so I had to use boards I found in the barn to short it up. The blocks will eliminate that problem, and will make good “containers” to plant into next year.
With that done, I got a few other things done, including picking up more fallen branches from yesterday’s wind, eventually heading over to check out the Crespo squash. I’d noticed more flowers opening, and I wanted to see how the two squash that were forming were looking.
It was a pleasant surprise to look at one of them, and find another little squash developing!
Then I spotted another one, high above the hill they are planted in.
Then I spotted another…
And another…
And another!!!
Which is when a started to walk around the critter barriers, looking closely for any more, and counting.
I spotted twelve. !!! A full dozen, that I could see, baby Crespo squash!
Some were very tiny – even smaller than the one pictured above, while others were surprisingly large.
I did not expect a variety that produces such large fruit would also be so prolific!
The problem, of course, is this.
The first official day of fall is only 5 days away, and leaves are already starting to turn.
The certainly won’t have enough growing season left to reach the size shown in this photo from Baker Creek.
Well, at least I know that, if started indoors early enough and protected from critters, it will grow well in our area. I want to try these again, next year!
You know, it’s a good thing that we labelled the things we planted in the garden beds, and left those labels there.
Because apparently, my memory sucks.
For the past while, I’ve been posting photos of our sunflower seed heads. Particularly the Mongolian Giant sunflowers.
The transplanted ones are much taller and stronger, and further along – at least in the row that wasn’t eaten by deer!
The other, direct seeded ones, next to the transplanted ones that got eaten, are developing their seed heads and blooming, but they are smaller and less robust plants. Even most of the eaten ones have been recovering and are producing seed heads. Their stems are stronger. They’re just shorter.
While checking on them this morning, I noticed the labels at a direct seeded row in one of the blocks was lying on the ground, so I picked it up to push it back into the ground at the end of the row it was at.
Which is when I noticed what was actually written on it.
Hopi Black Dye.
Hold on. I thought this bed was all Mongolian Giant…
So I went to the other bed and looked at the label.
Mongolia Giant.
Which is when I remembered; I’d deliberately planted the Hopi Black Dye seeds in the southern bed, regretting that I’d put the Mongolian Giant transplants in the southernmost row, because they would shade the smaller Hopi Black Dye sunflowers.
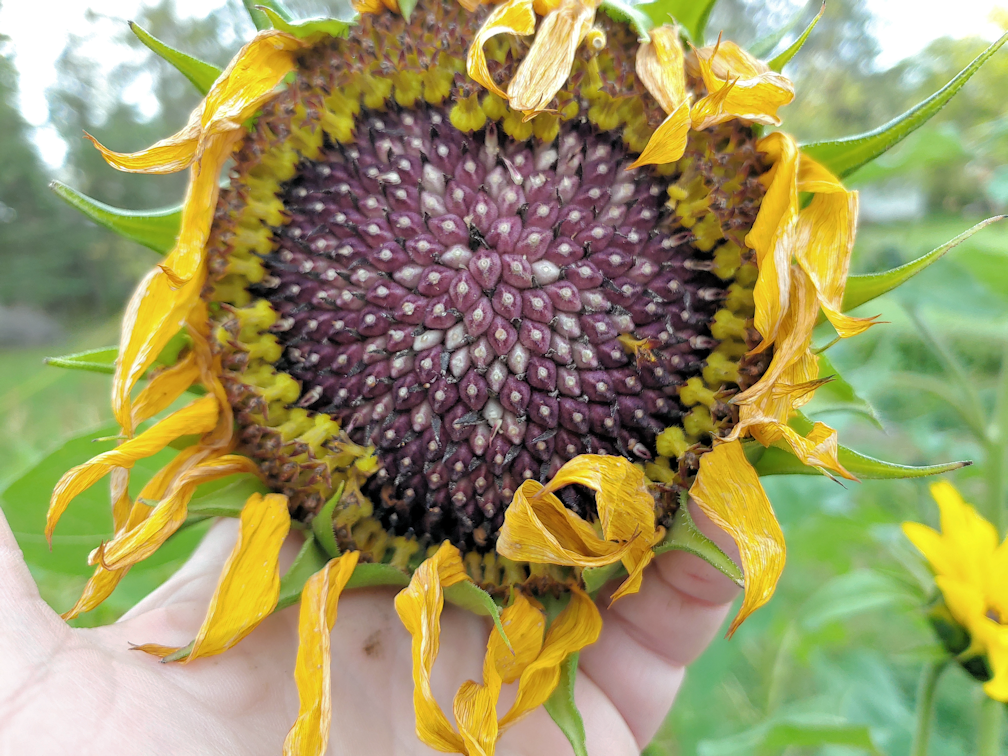
One of the flowering seed heads is starting to droop as it matures, so I took a closer look, brushing off the spent flowers.
Yeah. That’s definitely purple.
For some reason, when I remembered transplanting the Mongolian Giants in the southernmost row of the two sunflower blocks, my brain decided that the southernmost block had also been direct seeded with Mongolian Giants. I’ve had it backwards for months. But now that I’ve actually looked at the labels after all this time, I remember that I’d direct seeded the Hopi Black Dye sunflowers in the southern block, where they would get more light, even with the taller transplanted Mongolian Giants shading them a bit. Which turns out not to have been an issue, since the transplants in that row were chomped by deer, and are now shorter than the Hopi Black Dye, so they are getting the most light of all the sunflowers out in these blocks.
Which means we have quite a lot of Hopi Black Dye sunflowers with seed heads open and developing, and only a few Mongolian Giants.
And that, my dear friends, is why I’ve gotten into the habit of labeling things, taking lots of photos, and using this blog as a journal for documentation, writing things down as soon as I can, as much as possible. Lord knows, I obviously can’t trust my own memory for things like this! :-D
I love having so much space around the house. I really do! But taking care of it is a … well… you know…
After all this rain, I got mowing done, but never had the chance to do the week trimming around the edges. The lawn needs mowing again already, even without more rain, which is a good sign. This time, I decided to do the trimming, first.
I started yesterday.
I got all the areas on the south side of the house, particularly around the kibble house, cat shelter, well cap and other things in front of the sun room that is hard to get to even with a push mower.
Then I went around the edges in the front yard, including the sidewalk to the small gate, which has sections tree roots have pushed upwards high enough the mower can’t go over anymore, without hitting it.
Doing the south yard includes trimming around the bed the haskaps are in, the bed where the white lilacs are, in between or around various trees, around the asparagus bed, around the potatoes in their bags, around the storage house on two sides, and the outside of the chain link fence. With pauses to McGyver a fix on the chain link vehicle gate that got backed into by our vandal a couple of years ago that really needs its hinges replaced, and to finally drag out some bricks and rocks from under one of the lilacs growing against the storage house.
Then the east yard got trimmed, including as much as I could into the edge of the spruce grove that has been cleared. There’s only so far I can go into there with the trimmer, as I need to get in there with the lopper to get the trees that are trying to grow back. There is a space between the house and where more lilacs and the cherry trees we are keeping, with the now-gone bird houses at either end, that is easier to use the trimmer on instead of trying to maneuver the push mower. Driving through with the riding mower is a bit tight, with the concrete stairs in the middle of the house. I also used the trimmer in an area we’ve been slowly clearing to access into the spruce grove, where we will eventually be building the cordwood shed that will be an outdoor bathroom, but for now will be access to the largest group of dead trees we need to cut down.
For the west yard, I just did the edge of the old kitchen garden retaining wall. The grass in the west yard is so sparse, I probably won’t mow it at all.
By the time all that was done, so was I, so I stopped for the night.
Today, I finished the trimming.
Sort of.
I finished the edges in the north yard, then worked around all the low raised beds in the main garden area. The ones that the onions were in have been left alone, and I’ve given up trying to weed the decimated carrot bed (which, amazingly, has recovering carrots in it!), and the paths in between have gotten so overgrown, it was getting hard to see the beds at all. That took a while to get done! While I was at it, I trimmed in between the raspberries as much as I could. Then I dragged the trimmer over to the Crespo squash and the Montana Morado corn. With the squash, I could only trim around the barriers we’ve put around it. It is recovering amazingly well, which is kind of sad, since there isn’t enough growing season left for them to develop any squash. As for the corn, I used the trimmer in between each row, being careful not to take out any of the peas that are growing with the corn, but falling into the paths. For the longer ones, I tried to get them to grow up the corn stalk they are closest to. I found quite a few pea plants that are blooming!
This area is the “sort of” part. It is so rough, the trimmer is the best way to cut the grass and weeds. Not today, though.
Then it was time to drag the trimmer over to the far garden beds.
Did I mention this is an electric trimmer?
Just as we need 300 feet of hose to reach the furthest areas of these beds, I needed 300 feet of extension cords. That allowed me to trim around the squash tunnel, most of the Dorinny corn and the transplanted Hopi Black Dye sunflowers beside them. The peas planted among the Dorinny corn are doing pretty good, too. I trimmed around the green pea trellises, too, even though there are no longer any peas growing there. Of course the purple peas and the three bean beds got done. It looks like I will be picking beans tomorrow. :-)
Then the corn and sunflower blocks got done, which meant going in between every row with the trimmer (there is just no way to weed this area anymore), again being careful not to take out any of the pea plants. Then the summer squash got done, and finally all the crap apple trees.
You know those cartoons, where a character is going through a spooky forest, and the tree branches turn into hands that clutch and grab? That’s what crab apples trees do. It’s almost impossible to walk under them without getting snagged! Thank goodness I was wearing my cap. The last time I worked under them and forgot to wear one, I found myself having to untangle branches from my hair. There is just something weird about how these apple branches catch onto everything!!
What I didn’t even try to do, besides skipping the old garden area by the purple corn and Crespo squash, is anything in the maple grove. Once again, it is so sparse, I will likely skip it.
I look forward to when the areas between the trees are filled with moss, flowers and other lawn replacements we are working towards.
Anyhow. That was it for the day!
The mowing will wait until tomorrow.
Until then, the girls are watering the garden beds for me right now. This is the first time they’ve needed to be watering since we finally got rain. That’s the longest time we’ve been able to go without watering, all summer.