Well, that “blowing snow advisory” has certainly been valid.
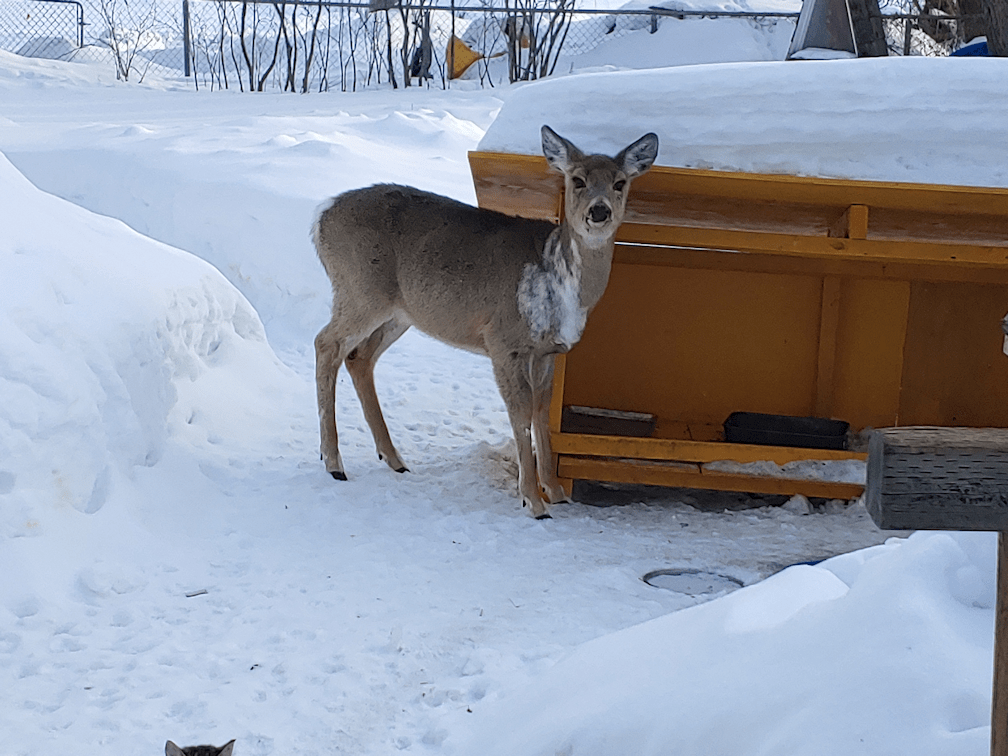
My husband noticed the piebald deer heading for the kibble house again, so I figured that was a good time to empty the kitchen compost bucket – and get her away from the kibble. When I opened the door from the sunroom, pausing to take this photo, she just stared at me until she saw me moving outside.
I don’t think she appreciated the interruption of her snack!
I topped up the kibble for the cats, while I was out.
Since it was a quick run to the compost pile, I hadn’t bothered putting on a coat. It was only -12C/10F, after all!
Of course, that didn’t take the wind chill into account. I don’t know what it was at the time, but we’re at -13C/9F right now, and the wind chill is -23C/-9F. Brrrr!!!!
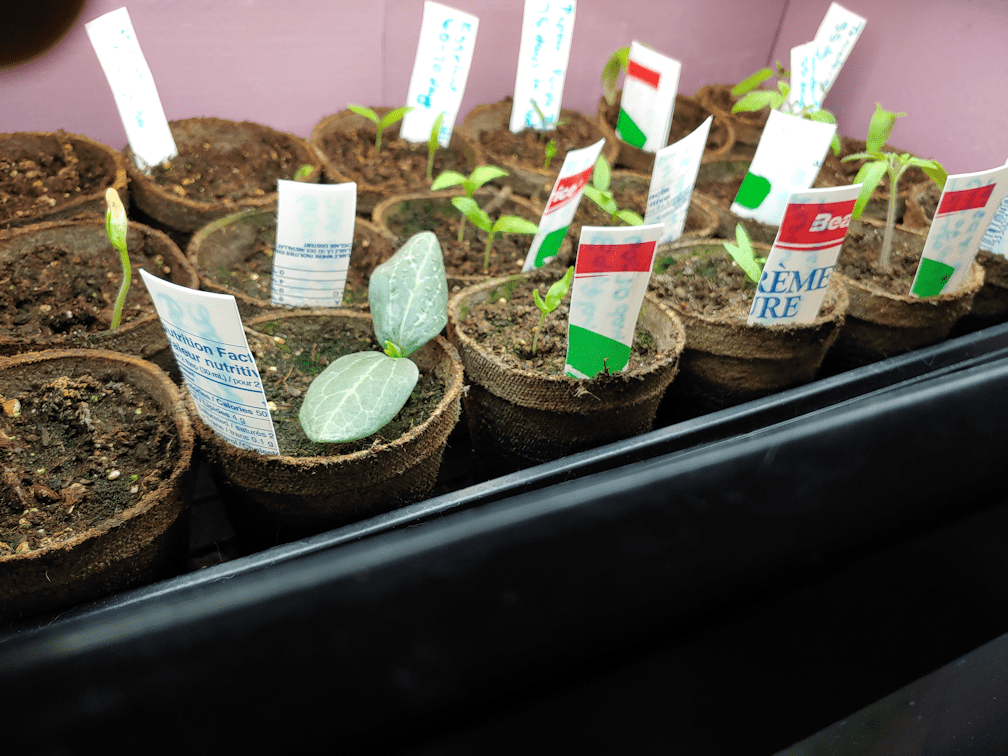
But I’m thinking of spring as we tend the seedlings. I’d mentioned in my last post that the seedlings in the mini-greenhouse were not looking well, so I decided to get some photos to show what I meant.
At which point I discovered I’d forgotten to drop and zip closed the front of the plastic cover.
Much to my surprise, the cats have made no attempt to go into it! Perhaps they’ve satisfied their curiosity already. I decided to leave it open, for now.
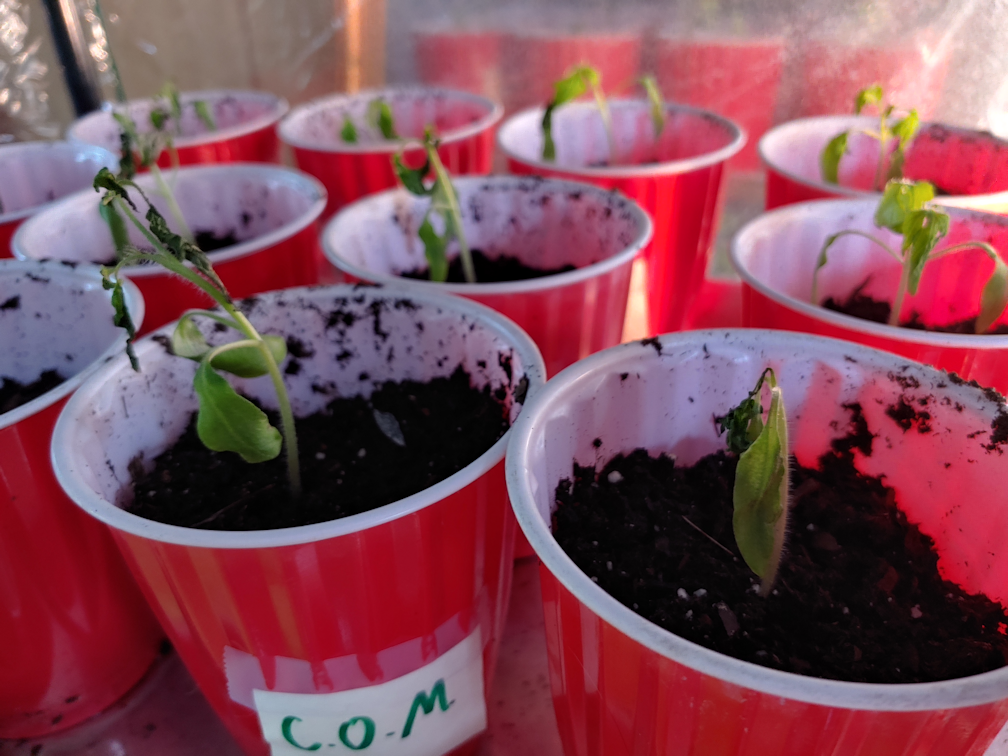
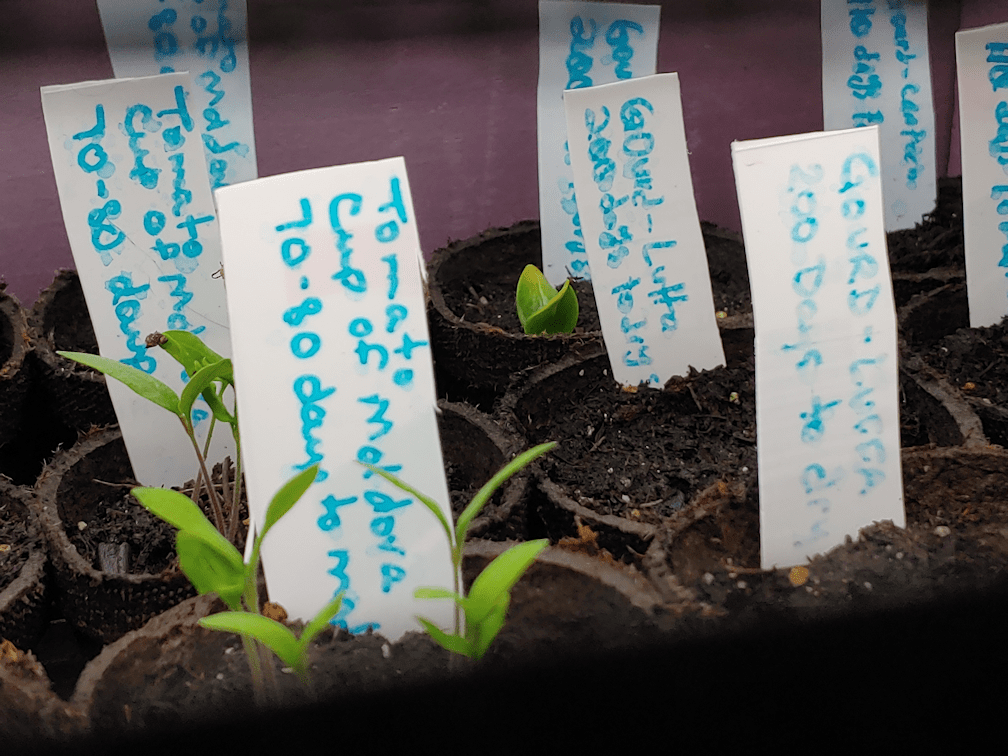
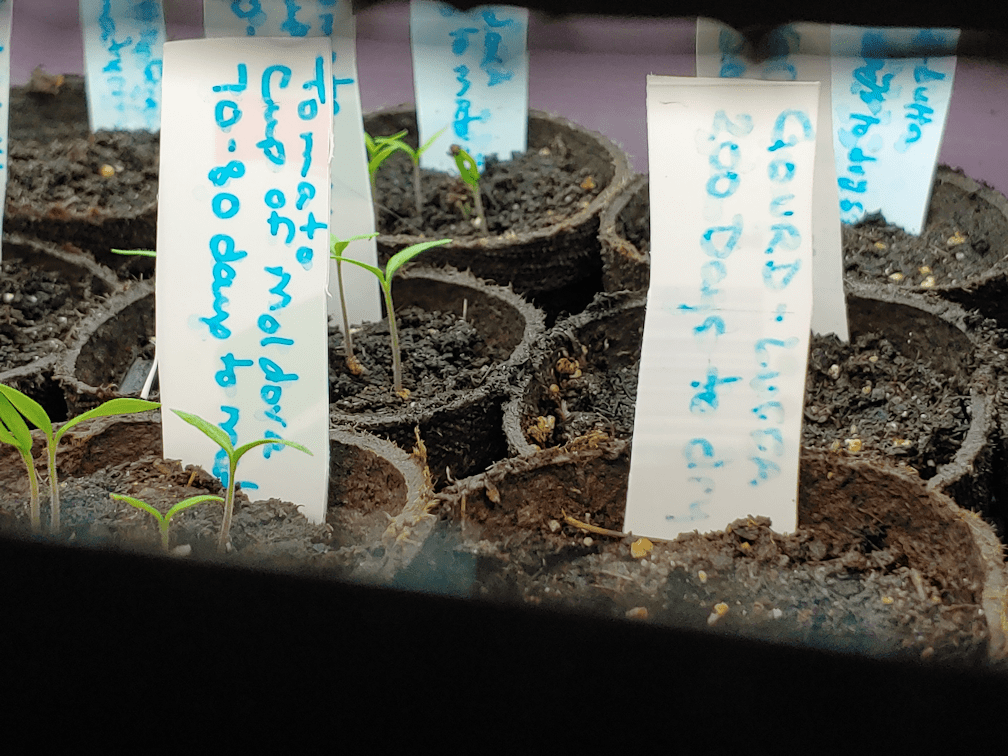
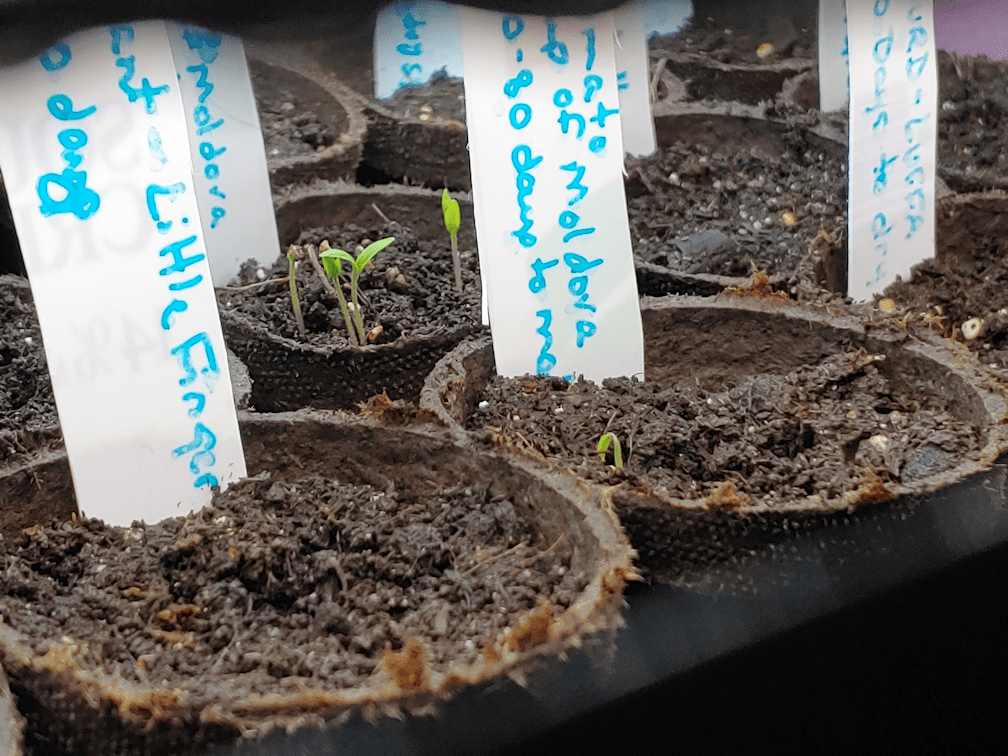
These are the Cup of Moldova seedlings that got potted up as we thinned them out. They are actually looking worse now than this morning, and I don’t know why. They had been doing quite well after being transplanted, then suddenly… this.
Were they over watered? Too hot in the mini-greenhouse? Not enough light? Not enough air circulation? Any or all of the above? I have no idea. I’m hoping that leaving the front of the cover open will be helpful.
The Sophie’s Choice that got eaten are… well, the two that were down to just stems are dead, but the ones that still have leaves on them… I don’t know. They might still survive.
These are the ones that got repotted after a cat lay on and crushed the original pots they were in. They actually are doing better than anything else in the mini-greenhouse. The damage done to them is more visible now. Surprisingly, the peppers and eggplants that got the most shmooshed are doing pretty good! The remaining tomatoes are showing damaged leaves, but beyond that, they look like they will recover.
I guess we’ll see over the next few days, how many are complete losses, and how many will survive.
Okay, for better or for worse, we now have stuff in the mini-greenhouse! Let’s see if we’ve succeeded in making it cat proof. :-D
The first thing today was to get the shallots started.
There are a lot less seeds than I remember from last year. I’ll have to look back at last year’s photos and double check.
The container is a mixed greens salad container from the grocery story. It has drainage holes in the bottom, and the seed starting mix is pre-moistened.
With such easy to see seeds, after scattering them I used a chopstick to separate any that were right up against each other, and spread them out more evenly. Then they got a spritz with water, a light layer of more soil mix, then spritzed again.
The container’s lid is recessed, and I didn’t want it too close to the soil surface, so I just plopped it on upside down. I then left it in a tray with water under it, to be absorbed from below. While it was sitting, it was time to work on the aquarium greenhouses.
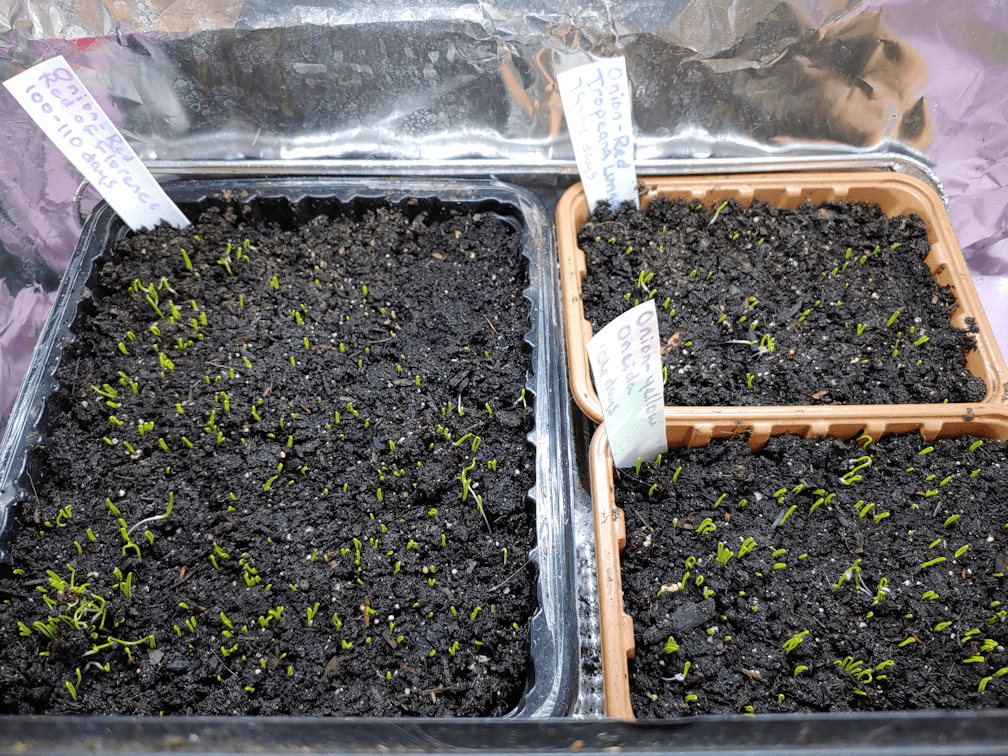
The red and yellow onions are doing quite well. I rotated the trays after adding more water below them. The reflective light from the aluminum foil at the back, which is closest to the trays themselves, is clearly making a difference. All the sprouts were leaning towards the back of the tank! :-D
We have our first Wonderberry sprout! These were taken out and got more water added to the outer cups, as well as a spritz, then set aside for later, so they wouldn’t get knocked over while the seedling tray was being moved around.
You can just see that a new luffa gourd is starting to sprout! It’s right against the wall of the pot at the top of the photo.
I very carefully removed the seed covering from the leaves of the canteen gourd. Normally I would avoid doing that, but I’m glad I did this time. It was really solid, and had to be broken apart to get it off.
Here are the tomatoes, on either side of the eggplants and peppers.
The tray usually gets water on the bottom well before the pots dry out this much, but when the pots are damp, they are difficult to move. They feel like they’re about to fall apart. Which will be good when they get transplanted into the garden, but not so good when I need to move them around!
With the eggplants and peppers, they were thinned to 2 plants per pot. As they get larger, we will probably thin them to one plant per pot. We don’t need a lot of either of these. Three plants each should be fine to meet our needs.
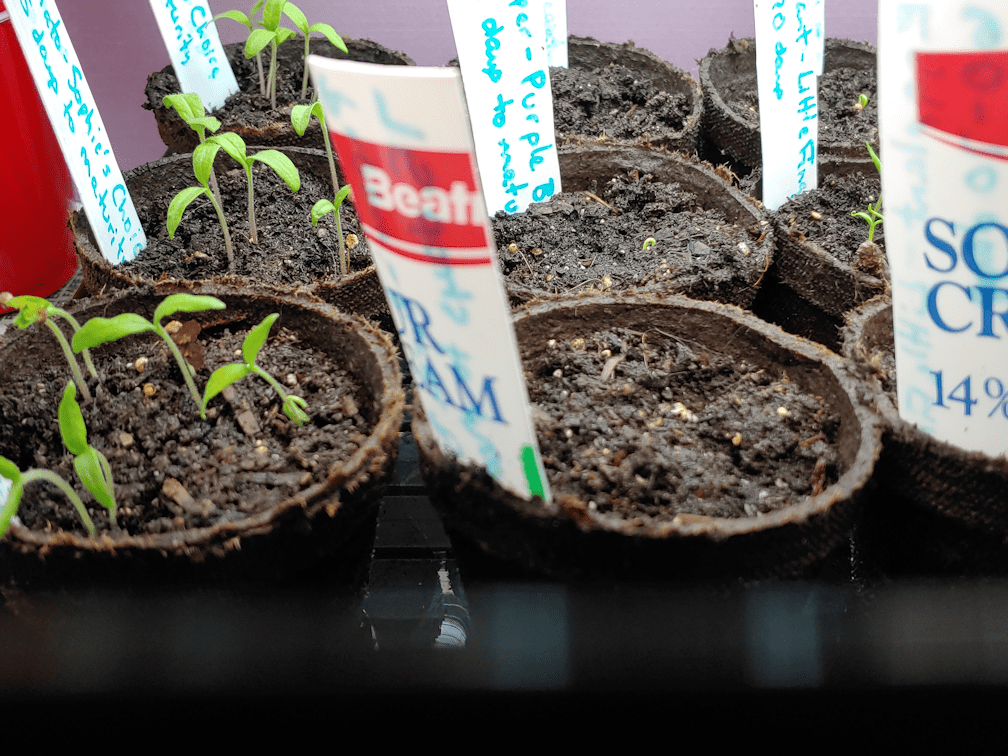
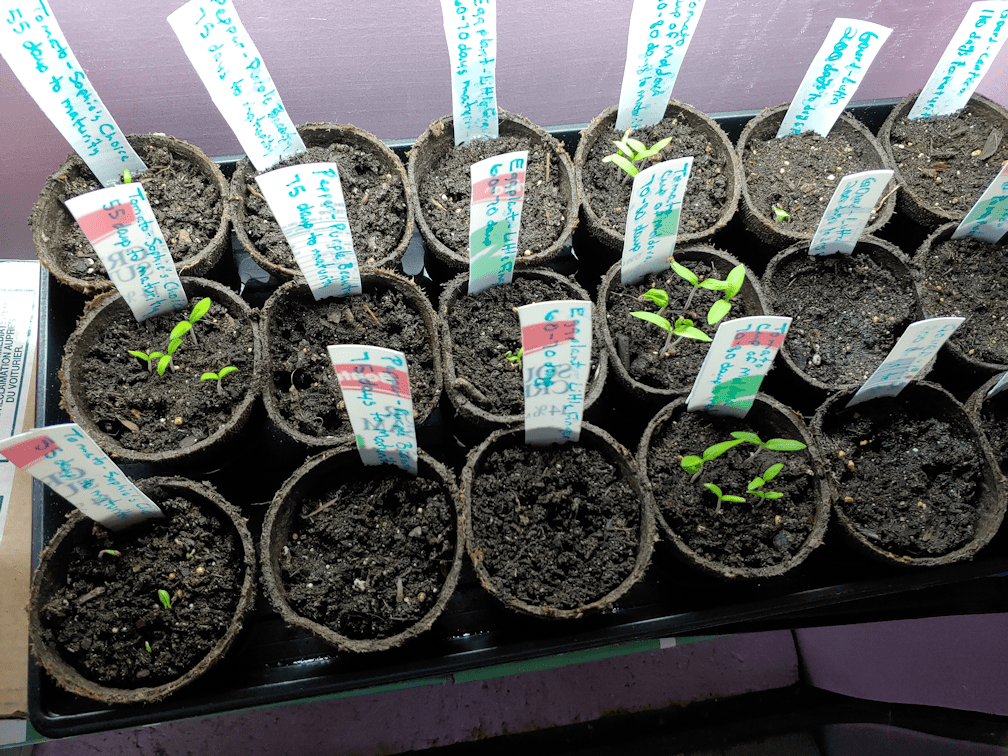
The plan was to transplant all the strongest tomatoes to thin them – but there were a lot of them! Especially the Cup of Moldova. They’re doing really well in here. In the end, there was just one seedling that didn’t get transplanted because it was so tiny.
We half-filled red Solo cups with soil and used a chopstick to make holes for the transplants. Then I ended up using a steel poultry trussing needle (which never gets used to truss poultry; I’m not even sure why I originally bought them!) to loosen and tease out the transplants as carefully as I could. After they got tucked into their new pots, more soil was carefully spooned around them to about half way up their stems and gently pressed in, just enough to make sure there were no air spaces, before they all got a spritz of water.
Each of the original pots was left with one tomato plant. With the Cup of Moldova, we ended up with a dozen transplants, making 15 altogether. These cups were used last year, too, and already had drainage holes in the bottom. If we needed to, we could double cup them, but for now, they fit into the baking tray, in one of the higher shelves of the mini-greenhouse, above the back of the chair it is tied to. I’d rather it was lower down, but with the wider baking tray, that’s where it fits.
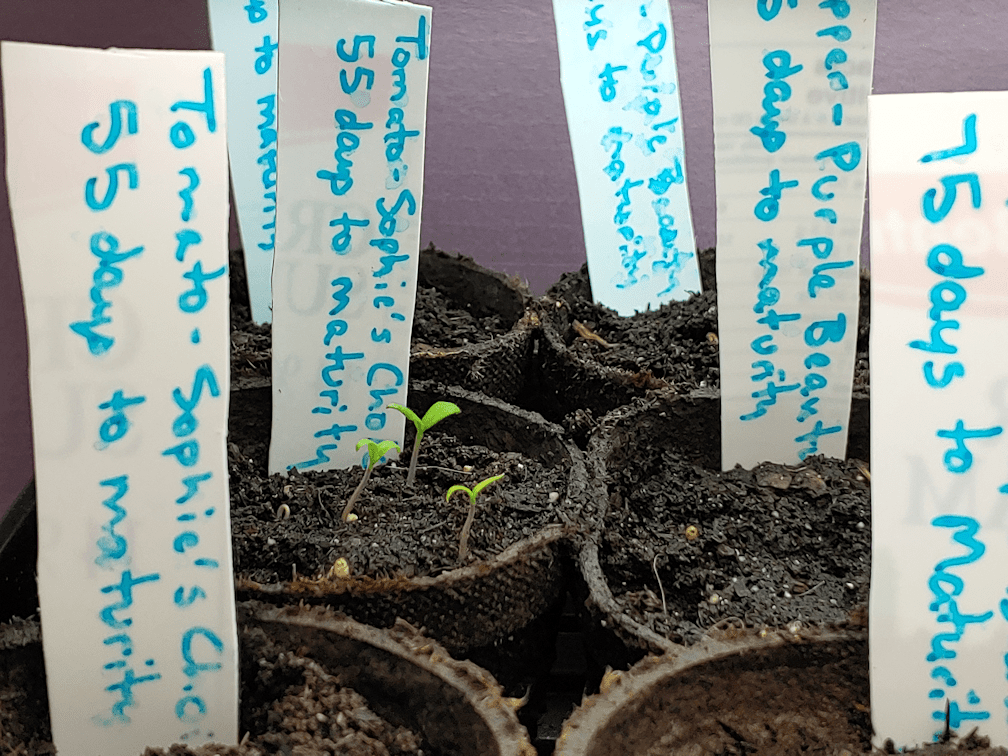
With the Sophie’s Choice, there were only 7 strong enough to transplant, and they fit in the tray with the shallots container.
When it’s daylight, we’ll assess whether or not we need to set up a light from the other side. There may be an issue of the high tray shading out the lower one.
Then the original tray went back into the big aquarium greenhouse, on the heat mat, and the tray got a generous amount of water added, to moisten the pots from below.
In doing the transplants, the tomatoes also got moved to one end of the tray, while the eggplants and peppers are now next to the gourds. That was just because it was easier to reach the tomatoes while transplanting them.
Hopefully, these will survive their transplanting well. It should be interesting to see the difference between how the tomatoes in the mini-greenhouse do, compared to the ones in the aquarium greenhouse. There is going to be a substantial difference in light and warmth.
But first, we’ll see just how tempting the trays in the mini-greenhouse are for the cats, or if they will be left alone!
There are still two more shelves open in there. The next time we need to start seeds, which should be in two or three weeks, we should be able to move things out of the aquarium greenhouses, into the mini-greenhouse, and have the new seed starts put into the aquariums. If the weather co-operates, by the time we’re ready to start more seeds in April, we should be able to transfer the biggest seedlings into the sun room. I’m sure these tomatoes will need to be potted up by then, too.
This is the first time we’ve had so many seeds to start indoors. It’s going to be a juggling act!
After seeing my weather apps flashing warnings for the blizzard that, thankfully, missed us, now I’m seeing new alerts.
This time, for extreme cold.
Which is NOT missing us!
The -23C/-9F is one thing. The -36C/-34F wind chill is something else. And look at those overnight temperatures! Yikes. Thankfully, the wind is mostly from the north. One of my daughters and I were out there for an hour or so, shoveling out the paths, so we were mostly sheltered. Not so much when my daughter was clearing the paths to the compost pile, back of the garage, and the outhouse. I had to use the wheelbarrow to clear away snow closer to the house, since the surrounding piles are too high, and the snow just falls back into the paths in that area, but at least I was out of the wind!
The temperature has actually dropped in the short time since I took this screen cap, and I’m now seeing -25C/-13F with a wind chill of -37C/-34F.
Previous long range forecasts had us warming up again right now, which clearly isn’t happening… but then, they never included another blizzard, either. Now we’re seeing the cold staying for four more days, before things are supposed to start warming up, and keep slowly warming up into March.
We’ll see how accurate that turns out to be!
Having a bit of garden therapy after shoveling snow was nice, even if it was just a tiny bit. It’s not like the seedlings need much tending.
The onion trays are starting to look a bit hairy – and not just from all the cat hair all over the top of the soil (and everywhere else in the house… LOL). With this tank being a bit cooler, and not having a heat mat under it, today was the first time they needed a top up of the water in the aluminum tray underneath them.
As for the big aquarium greenhouse, I decided to switch things around.
The two rows of gourds had been next to the end of the tank. Yes, there’s insulation against the glass, but it still gets pretty cool, with that end of the tank next to an outside wall. The heat mat below was also a bit off centre, so the canteen gourds would have been getting ever so slightly less warmth from below. I decided to move the gourd end of the tray to the middle, away from the colder side of the tank, making sure they were completely over the heat mat as well.
There is still just the one luffa growing. There are more Cup of Moldova tomatoes coming up than expected! My daughter had issues with seeds sticking to each other, while she was trying to plant just 4 or 5 per pot. I’d like to simply transplant the extras, while they are still tiny, as demonstrated in this video.
The problem is, we don’t have any more cat-proof space for more pots. We could bring in the mini-greenhouse from the sun room; that would give us space for 3 trays of the size the current pots are in, but we still haven’t figured out how to keep the cats from clawing their way under the plastic cover again. At least not without making it just as impossible for us to get in, as needed. I hate the idea of “wasting” thinned seedlings, if we don’t have to! Especially since the Cup of Moldova tomatoes are the ones we want lots of, for preservation purposes.
Ah, well. We’ll figure it out! Thinking about such things is great garden therapy, when it’s so frickin’ cold outside. :-D
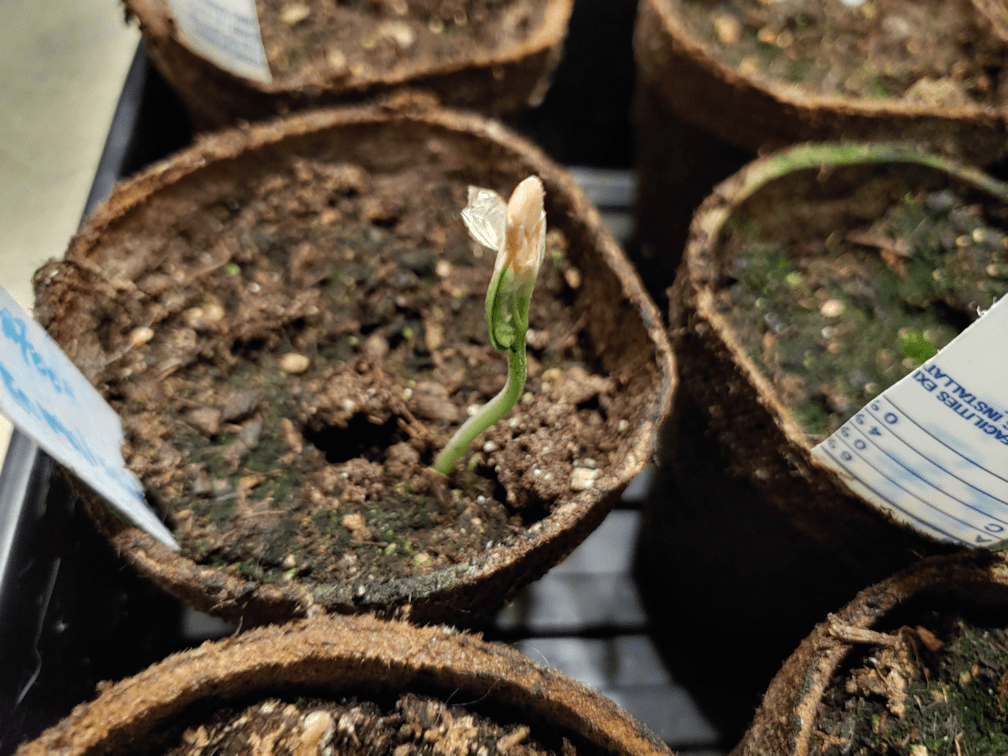
While tending the seed trays last night, I spotted a new first sprout. This morning, it was big enough to get a photo of.
Barely!
There in the middle, you can just see our very first Purple Beauty pepper sprouting!
Which means that, at this point, the only thing in the tray that has not had any sprouts at all are the canteen gourds. The luffa still has just the 1 sprout. It looks like all the tomato seeds have germinated by now, and there are more eggplant and onions sprouting, too.
Oh, there are no Wonderberry yet, either. They are the ones planted in the double cups next to, but not on, the heat mat, so that might be why.
I am very happy with what looks to be a very high germination rate, so far!
First, to follow up on my previous post, I was able to get my mother’s car started. I left it to run for a bit before moving it to the other part of the garage – and plugging it back in again!
While it was running, I decided to use the time to dig out another cat path.
Because I’m a suck that way.
This is a path to a shed that’s slowly collapsing, and is in view of the security camera live feed. I constantly see the cats struggling through the snow to get through. I got about 3/4s of it dug out before moving the car, then finished it almost the rest of the way.
I left the shovel at the end for scale. There’s probably about 2 inches or so of snow on the ground.
I didn’t dig any further, because I know there are things buried underneath, and the snow level starts to drop there, anyhow. It was actually an easy dig. Once I broke through the harder packed top layer of snow, the snow under it was very loose and crystalline, making it light and easy to shovel.
I had closed up the doors to the garage, and the doors where my mother’s car normally gets parked have a old tire in front, to keep them from opening (I really hope we can replace those doors this summer!). The tire warms up nicely in the sun, so it’s a favourite spot for cats to hang out, out of the snow.
Potato Beetle was sitting on it as I started my way back, so I paused to pet him, immediately noticing what looked like fresh blood in the fur in an ear! It took me a while to find it, but he has what looks like a fresh wound on the side of his neck. All I could really see was a dark patch in his fur. It wasn’t actively bleeding, and I couldn’t look too closely, but I am concerned.
Potato Beetle seems to now be at the bottom of the pecking order, and a target. After talking about it with the family, I turned the power bar back on in the sun room, for the light, heat bulb and heated water bowl. There is still food in there, and I’d been letting cats in while doing my rounds, to nibble on it. Potato Beetle has been the one that tends to go in there the longest. He was born in there, so he’s very comfortable with the sun room.
One of my daughters has brought in a litter pan, and we’ve set the box nests up again. Now, we just have to find him again. We will bring him into the sun room for his own protection, and to hopefully get a better look at the wound.
Spring cannot come soon enough. Potato Beetle is on the adoption list, but the outside cats aren’t going to be done until the inside cats are adopted out.
As I am writing this, I can see cat after cat on the security camera live feed, using the path I dug out!
Let us now think of spring, and green and growing things.
Like onions!
This is the tray that first starting showing sprouts, but only now are they big enough to actually show in a photo. I got mixed up about which onions these were. These are the Red of Florence onions, not the yellow bulb onions I got in my head for some reason. I mean, it’s not like we forgot to label them or anything! LOL
Just this morning, we finally saw sprouts in the other two trays. Here, you can see a little clump of Oneida onions sprouting in the middle, and a couple more little sprouts in the bottom left corner.
It’s really hard to spot the sprouting Tropeana Lunga in this tray. Again, bottom left corner of the tray.
You can even see an Oneida sprout near the edge of the other tray.
I must say, having things sprouting right now is a huge psychological boost!
Having said that, I just got some messages from people I was going to meet at the grocery store this evening, and it’s just been cancelled, due to the blizzard conditions we are supposed to have by then.
So it looks like I’ll either be driving in now, or waiting until Sunday.
Yesterday, we only knew a luffa had germinated because I happened to take a photo from above, while tending to the pots.
This morning, it was big enough to be able to see!
I am so thrilled to see any gourds at all, sprouting already.
Checking the onions in the small aquarium greenhouse, it looks like we have some yellow onions starting to sprout. There’s just a couple of small, white worm-like bits starting to show in the soil.
This morning, I opened up the large aquarium greenhouse to refill the water tray over the heat mat, and give everything a spritz. This involves moving mini fan off, setting one light fixture on top of the other and pushing them back, then removing the wire mesh covers to access inside.
Once the covers were off, I took the opportunity to take a picture of the sprouts.
Here, you can see that the Sophie’s Choice tomatoes are now sprouting in all three pots, and the Cup of Moldova growing bigger every day. The eggplant is still slower, but the ones that have sprouted are definitely looking bigger.
But wait… What’s that?
Over on the right, near the back corner.
Is that…???
Yes!!! Yes it is!
A luffa has sprouted!
I went back to look again, and I still could not see it from standing next to the tank. I could only see it in the photo taken from above.
I am so thrilled!!!
Last year, it took ages for the various types of squash and gourds to germinate. The luffa did germinate earlier than others – and some never germinated at all – but I absolutely did NOT expect any gourds to germinated this early.
I am crediting the heat mat for most of this. For the luffa, the scarification and pre-soaking probably helped, too.
Checking our seed starts this morning brought as a cheerful surprise!
The Cup of Moldova tomatoes are enthusiastically sprouting in all three pots. My daughter had tried to plant only 4 or 5 seeds in each pot, but some of them were stuck together. Now that they’re sprouting, a lot more are coming up than she expected!
I didn’t try to take off the cover to get photos, so this is my trying to get pictures through the narrow gap between the cat proof covers, and the top of the tank. :-D
Now, we even have Sophie’s Choice tomatoes coming up! Considering they weren’t there last night, they grew with incredible speed in less than 12 hours!
With one type of tomato already starting, I was kind of expecting the second type to sprout soon, but we had one more surprise waiting for us.
There are now Little Finger eggplants starting to show!
I notice that all the first sprouts are coming up in the middle row of pots in this tray. I have no doubt that the warming mat under the tray is making a big difference in helping seeds to germinate. I suspect that the inner cups are also slightly warmer than the cups that are closer to the glass. Even with the insulation against the back, there is going to be a temperature difference. It may only be a degree or two, but that would be enough to affect which seeds germinate fastest.
From the looks of things so far, we also have a very excellent germination rate.
I am curious to see what the germination rate will be for the luffa and canteen gourds. The luffa are seeds from last year, and each pot got only 2 seeds. They were scarified and pre-soaked, so that should help, but they are much slower and more temperature dependant than the tomatoes, eggplants and peppers.
Wow! I was just checking something in my WordPress dashboard, and realized that this post is number 3,500 for this blog! What a chatterbox I am. ;-)
This morning, I opened up the large aquarium greenhouse, to spray the pots and add more water to the tray on the heat mat.
There were more sprrrooots!
It is still only the Cup of Moldova tomatoes that are showing, and they are growing remarkably fast!
The aquarium greenhouse set up is working quite well. Even the little one is working out. The cats had repeatedly knocked the screen window being used as a cover off the top, by jumping on the overhang. A couple of days ago, I discovered where the cats had been getting into the space in the basement that was supposed to be a dry bar, but never got finished. We’ve got all kinds of breakable things stored in there. Somehow, a cat managed to create an opening in the blocked off rafters above. While picking things back up again, I noticed a smaller screen window. It turned out to be exactly as long as the small tank, though a bit wider, so there it still an overhang. Just not much of one. It hasn’t been knocked off since.
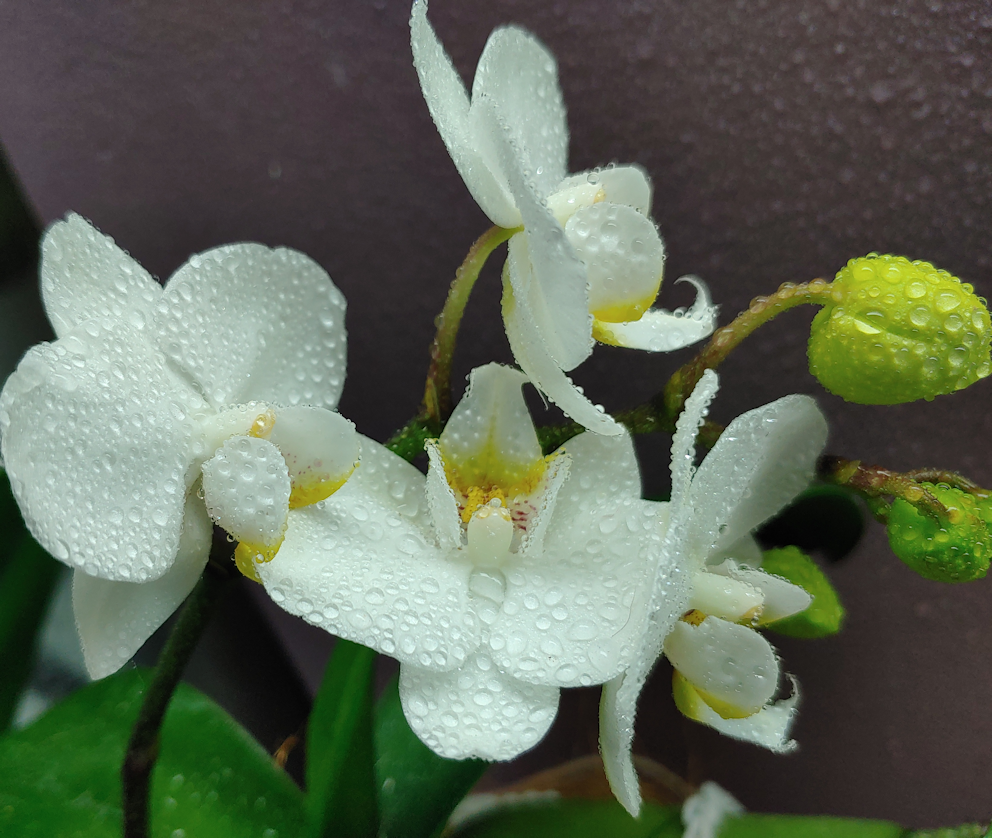
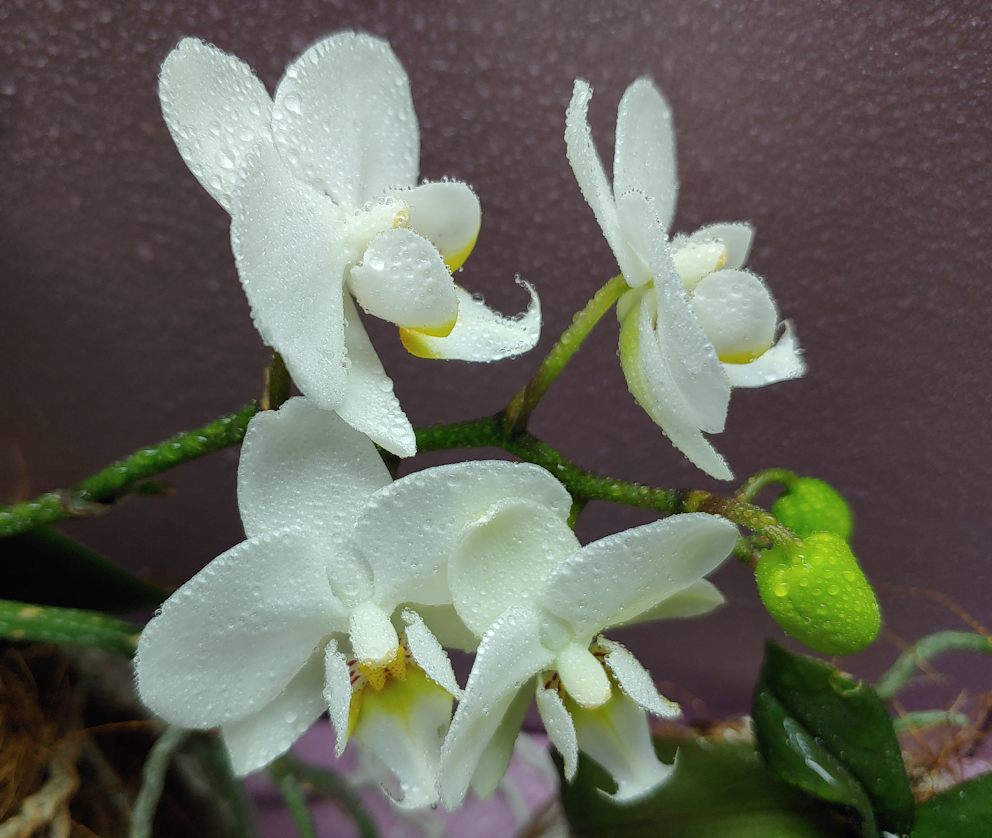
The larger tank has my daughter’s remaining orchids in it, and they are really liking the space!
One of them is blooming with the strongest looking flowers I’ve ever seen on it!
Since I was spritzing the seed starting trays, I sprayed the orchids, too.
The second orchid is a lot smaller, and my daughter is not quite sure how it’s doing. It was an unexpected surprise to find that hanging them in front of the living room window, while safe from the cats, turned out to be too cold for them once winter hit. If I remember correctly, she lost one while it was still at the window, and another died shortly after they were transferred into the tank. These are the only two left.
I think I might get her another orchid for her birthday this spring. :-)
While on the subject of seedlings and growing things, I made an unplanned order last night. It was through someone on a hardy fruit and nut tree group that I’m on.
I got tree seeds.
The person I got them from is in Ontario. Most of his seeds are zone 4 and above, and he was sharing about his paw paw seeds, which are a zone 4 tree, though some places rate it as a zone 6. I talked to him for a bit about growing them in zone 3. Previously, I did find one tree nursery that advertised having zone 3 paw paws, but when I asked people on the group about the company, I got an overwhelmingly negative response. One of those negative responses is that they get their zones all wrong (and also had a habit of shipping dead trees!). So while it would be time saving to buy saplings from a nursery, we were going to wait on that. However, we might have better luck growing them from seed, ourselves.
The other seeds I got were tulip trees. They are another zone 4 tree, but that might just mean they grow more slowly in our zone 3, like with black walnut. I looked them up, and tulip trees can get quite huge.
The seeds we get will already be cold stratified, so when they arrive, we can go straight to germinating them. Both will be grown in containers for the first year or two, and we can overwinter them in the sun room or the old kitchen, until they are ready to be transplanted permanently.
Because of their large size at maturity – potentially 70-130 ft/21-40m tall (for comparison, the spruces in the grove near our house are about 65ft/20m tall), with 30-60 ft/9-18m wide canopy – if we get any surviving tulip trees, they can be planted either along the north property line, or well to the south of the outer yard, to be part of our shelter belt. These would be a tree for the pollinators and wildlife and, potentially, for a valuable wood.
The paw paws are a much smaller tree, and I can see these being planted in the old garden area, further from the house, where we are planning to plant berry bushes, fruit and nut trees already. They can reach 15-25 ft/4-7m in height, and 15ft/4m wide. Growing from seed, we’re looking at about 6 years, before we can expect any fruit.
Buying trees as saplings may shorten the time, but buying the seeds are a lot cheaper. We’ll be getting a dozen paw paw seeds and twenty tulip tree seeds, all for less than $20 – and that includes shipping. Even if we have an only 50% germination rate, that’s potentially 16 trees. The only thing I’d want to buy special is extra deep pots to start them in, to have room for their tap root. I already have the instructions for how to get them started, care for them in their containers, and transplant them.
As for growing in our zone, the person I’m buying them from can only guarantee them to zone 4. He’s never had anyone try the tulip tree in zone 3, however he’s had someone successfully grow their paw paws in zone 2b, getting hit with temperatures as low as -40C/-40F without extra protection, and surviving. Even in the group, when I’d asked in the comments about zone 3 for the paw paws, I had someone share that they’re growing them successfully in zone 3, though their seedlings are still too young to be producing fruit, yet.
I do hope this works out. If not, however, we’ll only be about a few bucks for a total of 32 tree seeds. Unlike the mulberry tree we got, which cost over $60 for the one sapling, got killed by an unusual, out of season, cold night, then even the remaining stem got eaten by deer.
I figure it’s worth taking the chance.
And if we’re going to be growing food trees, with how long they take before they mature enough to produce, we need to be starting as soon as we can.
With the cold and snow outside, it is so exciting to see green things growing in our aquarium greenhouse.
The one pot with the Cup of Moldova seedlings had more popping up by morning, but by evening…
Yes!! There is now a seedling in another pot!
It is still only the Cup of Moldova tomatoes that are sprouting. I find it interesting that they are germinating so much faster. Especially compared to the other tomatoes, Sophia’s Choice, which have a much shorter “days to maturity”.
What’s great is that, at this stage, you can almost see them growing. Talk about a psychological boost!
The Re-Farmer
Update: about 2 hours after I took the above photo, I looked again. The one sprout in the front is now standing tall, and another has popped up next to it – and the third pot now has a sprout showing, too!