I also remembered to get a picture of the bone broth I made, before tucking it into the fridge.
I started off by roasting the meaty bones, lightly drizzled with avocado oil (it was handy) and sprinkled with salt. Those went into the slow cooker with chunks of onion, celery, carrots and ginger, plus salt and pepper. The slow cooker was set on high for 1 hour, then on low for 8 hours.
Then it sat on “warm” for quite a while, as I wasn’t able to get to it right away. Once that was shut off, I allowed it to cool before trying to take the big pieces out. I have a large slow cooker, so it took quite a long time to cool down to a temperature that wasn’t dangerously hot. I am losing my grip strength as I get older, and I didn’t want to risk burning myself if I dropped something.
I took out as much as I could with tongs, first. The meat had fallen off the bones, and that got separated out (and became a snack, later on). Then I set up a stock pot on the stove and strained the liquid through a fine mesh sieve into the pot. All the strained out solids got tossed.
At this point, I would estimate there was a little over a gallon – maybe 5 litres – of broth. I then started reducing it, which took a few hours.
I considered reducing it to the point where I could set it in the oven for a final dehydration, which would have given me “portable soup”.
In the end, I decided against it, because I had the other ingredients added with the bones. Though, according to the video, the “keep warm” setting on my oven can’t go low enough to dehydrate it properly.
By the time I decided it was reduced enough, what was left fit into two 750ml jars. These were meant to go into the fridge to use right away, rather than being canned, so I just used regular lids, not canning lids, loosely added until they cooled down completely.
I’d say there’s roughly 5 cups of broth and maybe 3/4 cup of fat on the top between the two jars. The fat can be used for any high heat cooking. Since the broth was reduced so much, we now have a concentrated broth where just a little will go a long way.
Now I’m trying to think of what I want to make with it, first!
This morning I collected our largest harvest yet, for this year!
I had some help, too.
When I prepared to transplant the melons, I set up a trellis for them using Dollarama steel fence posts and welded wire mesh salvaged from the old squash tunnel from years ago. When the Spoon tomatoes were planted in the other half of the bed, I use bamboo stakes to make them their own trellis.
Well, with the melons barely growing at all, they’re not going to need the trellis. So, with my daughter’s help, we pulled the posts, with the wire still on them, and moved them over to the corn and Arikara squash bed. It’s loosely set up for now, but the 4′ square bed will get a wire fence around it – the mesh is just long enough! – to hopefully keep the raccoons from getting into the corn, when the cobs are ready. I’ll probably have to put some sort of cover over it, too, or they’ll just climb up and over.
The corn bed has plastic netting around it. Hopefully, they will be dissuaded from the corn rather than tearing their way through.
After moving the melon trellis away, the Spoon tomatoes can now be reached from both sides, so my daughter helped me pick tomatoes on one side, while I did the other.
I’m glad I remembered to bring a separate container for the Spoon tomatoes!
There was also a whole two Royal Burgundy beans to pick, from the three surviving plants. I did pick a small handful of yellow bush beans last night, though, so there was enough to actually use. While checking last night, I noticed some ripening Sub Arctic Plenty tomatoes and this morning, one was ready to grab.
After that, I dug up some potatoes, then winter sown carrots from the high raised bed.
In the next image in the slide show above, you can see a very wonky potato!
That was from roots.
These potatoes were picked from about the middle of the bed, so at least twenty feet away from the trees. My garden fork was digging up more roots than potatoes.
Those trees have got to go.
Then I remembered we have herbs and stuff, so I went to the old kitchen garden, where I gathers some lemon thyme, lemon balm and oregano. In the winter sown bed, I grabbed a few Swiss Chard leaves. I even grabbed some bulbils from the walking onions, since we don’t want them to spread any further.
Once inside, the longest time was spent getting all those little green bits of stem off all those Spoon tomatoes! I also set aside some of the ripest looking ones to collect seeds from, later. Their seeds are so tiny, I’ll have to consider how best to do that!
In the last photo – which looked much better and in focus on my phone, I swear! – it what I made with it. There’s still potatoes and Spoon tomatoes left, plus the one Sub Arctic Plenty tomato, but I used up all the carrots, julienned, a handful of bush beans cut small, the onion bulbils and a whole head of garlic. We still have fresh garlic left of the ones that were too far along for curing and winter storage. Then there was the chard and herbs.
When I went into town to get kibble yesterday, I also picked up some chicken legs and thighs that were on sale, which my older daughter prepared last night, so breakfast (brunch?) was the vegetables gathered this morning, plus oven roasted chicken legs.
1 large shallot, chopped (I would have used onion, but I didn’t feel like going to the root cellar to get one) 2 stalks of celery, sliced lengthwise and chopped into small pieces 2 medium sized potatoes, peeled and chopped into small cubes 1 ripe avocado, smashed into mush cream cheese; roughly 2 oz (basically, I cut what was left of the piece in the fridge in half) whipping cream; about half a cup 3 cups water and enough bouillon powder to make chicken stock (because that’s what I had available) 1 can chicken (a Costco can, so about a cup of chicken chunks) enough ghee for sauteing (I normally would have used butter, but remembered we had ghee)
Preparation:
Melt the ghee in a saucepan until hot, then add the chopped shallots and celery pieces. Sauté until they start to be translucent. Add the potatoes and stir into the shallots and celery. Add the water and bring to a boil, adding the bouillon powder when it’s hot enough to dissolve quickly. Keep stirring occasionally.
After the water has boiled for about 5 minutes, stir in the smashed avocado. Return to boil and simmer for a few minutes, stirring occasionally.
Add the chunk of cream cheese. Return to boil and continue to simmer for a few more minutes, stirring continually until the cheese is completely melted.
Add cooked chicken chunks and return to a simmer for a few more minutes, or until the potato chunks are fully cooked, stirring frequently.
Stir in whipping cream and return to a simmer to heat it through.
Today, I decided to make something I haven’t made in many years. A no bake cookie.
I was first introduced to them by a friend in high school, while visiting her place. She called them S**t Balls, and that’s the name that has stuck for me!
KH, if you’re reading this, yes, it’s you’re fault! 😂
Since then, I’ve found them by many other names. It wasn’t until I got a community cookbook from the mid 90’s gifted to me that I actually saw a recipe for them. In fact, there were three almost identical recipes, all with different names! There is 5 Minute Boil cookies, using all brown sugar, Chocolate Drop Cookies, using all white sugar but skips the salt, and Fiddle Diddles, using margarine instead of butter, skipping the coconut, but including salt.
My version is a blend of all three.
Here is a slideshow of progress photos, for a double recipe.
Here is the basic, single recipe, and then I’ll go into more detail.
S**t Balls – No Bake Chocolate Cookies
2 cups sugar, white, brown or half and half up to 1 cup cocoa 1/2 cup butter 1/2 cup milk 1/2 tsp vanilla 3 cups rolled oats
Combine sugar, cocoa, butter and milk in a saucepan. Bring to a boil. Keep at a boil for 2 – 5 minutes (shorter time for white sugar only, longer time for brown sugar only), stirring constantly.
Remove from heat, stir in vanilla, then stir in rolled oats.
Drop spoonfulls onto trays lined with waxed or parchment paper. Cool until set. Can be chilled or frozen.
Optional ingredients: 1 cup shredded coconut (but why ruin your cookies??) 1/4 tsp salt
Easy Peasey!
First hint: use a bigger pot than you might think you need.
For my double recipe, I used our bigger stock pot. Once it starts boiling, it can bubble and expand quite a lot, and when the vanilla gets added at the end, it can sometimes foam right up.
Second hint: prepare your trays ahead of time. For my double recipe, I ended up using three 9×13 baking trays, lined with parchment paper.
In the first photo with the ingredients, I have doubled everything except the cocoa. Some recipes use only a 1/2 cup of cocoa, or even just 4 tsp, which is nothing. However, a cup of cocoa is a lot, so in doubling the recipe, I left the cocoa at 1 cup.
There is no salt in the photo, but as I was getting the mixture to a boil, I did add a few cranks from our salt grinder. Nowhere near the half teaspoon for a doubled recipe, but enough to make a difference. A touch of salt brings out the sweetness. Not that this recipe needs anything to bring out the sweetness!
The main ingredient is sugar, and what sugar you use can make a HUGE difference!
If you want a soft and chewy cookie, go with all brown sugar. You definitely have to boil it for a full 5 minutes, though. In the past, I’ve found ambient humidity can make a difference. Even after boiling at least 5 minutes, when it was humid out, the cookies just wouldn’t set and remained sticky and gooey. They still tasted good, but could only be eaten with a spoon!
If you like a dry cookie, use all granulated sugar, and you can get away with boiling it for only 2 minutes. With my double recipe, I boiled it for three minutes. The longer you boil it, the drier the cookie will be.
Of course, if you go with half and half (which is actually what I usually do), you’ll get a cookie that’s a bit moister, but not completely soft. For that, boil it for about 3 or 4 minutes.
The butter I used was still cold from the fridge, so I broke that up with my wooden spatula and stirred pretty constantly while bringing the mixture to a boil. It would be very easy for the sugar to start burning, so watch your temperature, too. Medium high is more than enough to get it to a boil and keep it there.
After the boiling time is done, take it off the heat and stir in the vanilla. Next, add the rolled oats and stir that in very thoroughly.
With the rolled oats, I used slow cooking oats, which have thicker flakes. You could use quick oats as well, but I find they lose their texture more. It’s just a matter of preference.
If you are using shredded coconut, it would be added with the rolled oats. Which we have never done, because none of us like shredded coconut. Ew.
Once the rolled oats are well mixed in, it’s time to drop the cookies.
I used a pair of soup spoons for this; one to scoop up the mixture, the other to scrape it off and onto the prepared pan.
Which can get very messy.
The two photos at the end with the cooling cookies, the first one is of the first tray of cookies, the second is of the third tray of cookies. You can see the first tray, there is more “spread” to the cookies, because it was still quite hot. It got easier to drop the cookies as the mixture cooled down. If you want to shape them a bit, you can use the spoons like you’re doing a quenelle, except round. I couldn’t do it with the first tray, as the mixture was still too hot and runny, but by the time I was doing the last of them, the mixture was starting to harden a bit too much!
With the size of spoons I used, I ended up with about 65 cookies in total, filling about 2 1/2 of my 9×13 trays. To chill them (and keep them safe from cats walking on them), the trays got moved onto the chest freezer in the old kitchen, where it is at or below freezing.
There you have it! A decidedly… questionable looking… no-bake drop cookie that takes very little time to make.
I let the tomato sauce we made yesterday cool over night – with the current overnight temperatures we are getting right now, the kitchen gets really cold, so there were no concerns there!
This morning, I ladled it into some size medium Ziploc bags.
We did use some of it last night, while it was still hot. I still ended up with 6 bags for the freezer.
I left them on the baking sheet in the freezer, so they’d stay nice and flat while freezing.
Once this was done, I prepped more pans, then washed and sliced some Black Beauty tomatoes to dehydrate. Only 2 pans fit in the oven. I should look into getting extra oven racks. With enough oven racks, we could use all our 9×13 baking pans at the same time, and have room to spare for air circulation.
Something to keep in mind over the next while.
Anyhow, those went into the oven on the lowest “warm” setting, which on our new oven is 145F. I left the oven door propped open slightly with a wooden spoon to let the moisture out. It’ll still take a long time, though. Some of the slices ended up a bit on the thick side.
I also completely forgot to take any photos!
I’ll be sure to take some when it’s time to flip them.
The main thing is, these could stay in the oven to dry out, and I could go do other things. I was intending to get to the trellis bed again, but that didn’t happen. You’ll see why in my next post! I’m pretty excited about it. 😊
After selecting the ripest Roma VF tomatoes, I gave them a wash and left them in the water while working on the onions and garlic. I wanted those on the bottom of the roasting pans to make sure they would get completely immersed in any liquid released by the tomatoes. I wanted them to cook until they were so soft, they’d disappear into the sauce.
When it came time to process the tomatoes, things went a lot faster than fighting with those little onions and garlic! I was going to leave the skins on, so I only needed to cut the stem ends off (and any damaged bits), then give them a squeeze. With the shape of the Roma, it was easy to do it sort of assembly line style, cutting the ends off and lining them up on the cutting board, cut side down, until the board was mostly full, then squeezing the seeds out into a bucket for the compost.
A handy tip to make things easier: place a cutting board inside a baking pan with low sides. I have a whole bunch of 9×13 baking pans that are perfect for this. They are large enough to fit a cutting board with room to spare to catch liquids or keep items handy, and the sides are low enough to not get in the way of my hand or the knife as I cut.
All the recipes I found had the amount of tomatoes by weight – usually 4 lbs. I had no idea how many pounds of tomatoes I had, so I just winged the quantities for the other ingredients, and split everything between the three pans.
After all the tomatoes were cut and seeded, I added more olive oil and carefully turned the tomatoes to coat them, while trying not to move the onions and garlic on the bottom too much.
The recipes I found had oven temperatures ranging from 300F to 425F, and while some had cooking times, most were “until the skins start to blister”.
I decided to go lower and slower. I put the three roasting pans into a 325F oven. I checked them at about 40 minutes, then added another half an hour.
While they were roasting, I went and got some fresh oregano and thyme. I didn’t get a lot of oregano, because the plant is mostly blooming right now, and the bees were loving the flowers. So I just found a few smaller stems. I picked about the same amount of the thyme sharing a pot with the oregano. We have German Winter Thyme in the old kitchen garden, but the seed pack for these ones didn’t include a variety name.
This gave me a chance to try out the herb chopper I picked up at a Dollarama not long ago. It came with a cutting board with a recess matching the curve of the blades. It did a pretty good job, though with the slightly larger oregano leaves, they sort of got caught between the blades while just rocking it, so it needed to be lifted and shifted with each cut. That was not as much of an issue with the thyme leaves.
I like it.
When the timer went off on the oven, the kitchen needed to be used for other cooking, so I just shut it off and left the pans in the oven. Then, before I started on the final cooking, I made sure to do all my outside stuff and other little things, so they were in the oven for probably 2 or 3 hours. They were still quite warm when I took them out!
When transferring them into my big stock pot, I was very happy to see how softened the onions and garlic were! Exactly what I was after. All three roasting pans really filled that pot!
At this point, I added the chopped herbs and salt. Sea salt, because we happen to have some at the moment. After stirring that in, I turned on the heat, then used the immersion blender on it. Not for long, but that things is very efficient, so there were just a few larger pieces that got missed.
After that, I kept it at a simmer for about another couple of hours, stirring frequently. I tasted it a few times and ended up adding more salt (twice), some pepper, some dried sage, a bay leaf and a splash of lemon juice.
Towards the end, I removed the bay leaf and took the immersion blender to it again. This time I kept it going for longer, so make sure there weren’t any big pieces of tomato skins anywhere.
I like that this pot has a measurement scale inside it. After the first blending, the sauce reached just under the 7L mark. When it was done, it was at the 6L mark. I could have cooked it down further, but I think it’ll be good enough.
For now, the sauce is cooling down. I plan to put it into freezer bags and freeze them, though we will probably use some of it with a meal, first.
I think the next processing I will do is to dehydrate slices of the Black Beauty and Indigo Blue tomatoes. Those can be left in a warm oven, unattended, while I get other work done.
A dehydrator would be a useful gadget, but we really don’t have the space for one. At least not where we also have access to an outlet.
For now, the oven will do just fine, and tomorrow, I hope to get some work done outside at the same time!
I filled my large colander with the ripest of the Roma VF we have laying on a screen in the cat free zone, as well as the ripest Indigo Blue Chocolate and Black Beauties, filling the colander to almost overflowing.
After going through a number of recipes, I decided to not blanch them first. The Roma got topped, halved and seeded first, then went into my larger stock pot. I considered doing the other tomatoes separately, but didn’t want to mess with more pots and just mixed them all together.
When we processed tomatoes last year, we blanched and cooked them, before running them through a sieve, so any seeds were no longer viable by the time they went into the compost heap. This time, I seeded them first. I expect we’ll be having some volunteers in the compost pile, next year! 😄
For the seasoning, I kept things simple. I harvested some fresh yellow onions, picking ones the cats rolled on and broke the stems, since those were not going to be getting any bigger. They were a decent size, though, and I only used three of the bunch I picked. The rest got braided and are now hanging in the cat free zone (the living room) with the garlic to cure.
I grabbed a garlic bulb that turned out to have two huge cloves, as well as a bunch of fresh thyme from the pot in the living room. Along with that, I added some freshly ground salt; my husband picked up new salt and pepper grinders to replace our old and breaking ones, and got a container of Himalayan pink salt chunks for the salt grinder, too. I also added a bit of sugar and lemon juice.
Once the tomatoes had stewed long enough that the skins could be easily removed, I sautéed the onions and whole garlic cloves in some ghee until the onions were translucent. I was going to strain the tomatoes through a fine colander I have, but I couldn’t find it, so it went through a large sieve, instead. This sieve has a quite fine mesh on it. I don’t know how much difference it would have made if I’d used the colander, since there really wasn’t a lot of pulp in there, but the end result was more like tomato juice than tomato sauce!
Which is why it ended up taking much longer than expected to cook it down to a more sauce like consistency.
All those tomatoes had filled my larger stock pot. By the time I strained out the skins, it barely filled half of my smaller stock pot. I cooked it down until it seemed thick enough, then poured the sauce into sterilized 750ml canning jars. I was able to fill two, plus maybe a third of the last jar. That one got a twist off lid. In the photo, the whitish chunks are the broken up pieces of garlic cloves. Mmmmm….
They are now sitting out to cool over night, and then they’re going into the fridge. There isn’t enough there to bother actually canning the sauce.
I think with the next batch, though, I might take the time to make tomato paste again – this time on the hot plate on the dining table, to free up the kitchen, like we did last year. I don’t expect to be making as much as we did last year, and we only got a dozen 125ml jars of paste at the time. They went over so very well, though, they didn’t last long. That’s why my original intention had been to grow so many paste tomatoes this year, and it just didn’t happen. Hopefully, we’ll be more prepared, next year!
Altogether, this took about 5 or 6 hours to finish. If we’d been working with more tomatoes, I would have broken out our giant stock pot – the one that’s big enough to brine a turkey, with room to spare – to cook down the tomatoes. That’s what I used to make the paste last year.
We still have plenty of tomatoes resting on the screen in the living room and, of course, lots more on the vines, so we will be doing this again, probably a couple more times.
I did get a bit of a nap in before I started, but I am still so very tired. I’ll expect I’ll be sleeping on the couch again tonight, too. The family did keep checking on my room, and my husband even had Snarly Marlee in the living room to give her a break from the kittens for a while, and there were no new messes. Hopefully, things will stay that way, but my mattress is still damp from the previous ones.
I so look forward to getting cats and kittens adopted out!
Speaking of which, still no sign of The Phantom. The Cat Lady and I have been discussing alternatives if she doesn’t show up, and tomorrow she plans to drop off a trap for us.
Still no interest in the kittens she shared photos of.
Since they are friendlier and easier to catch, she’s going to see about booking us to get a bunch of males fixed, next.
As much as I’d like to get the outside cats fixed and adopted out, we really need to adopt out more inside cats. Some of them are inside only because they were going to get taken and adopted out, and it just didn’t end up happening.
Last night, I finally got around to making some butter, using whipping cream. It’s been ages since I’ve made butter! I decided to try it again when I was picking up butter at the local grocery store, and the cheap, house brand butter had gone up in price so much, it was actually more expensive than whipping cream.
Making butter is easy and relatively fast when using an electric mixer. It can also be made by putting the cream in a well sealed jar and shaking it. Hopefully, with someone that can take turns shaking it with you!
To make butter with an electric mixer, a fairly large bowl is needed, since it will be in the fluffy, whipped cream stage for quite a while. It feels like it’s taking so long, whipping and scraping the sides and whipping and scraping and whipping and scraping some more, when then suddenly it “breaks” and you’ve got butter!
Also, even with a deep bowl, you’ll get cream splattering all over! You are forewarned! 😄
One thing about using a mixer is that the churned butter’s initial texture is very different. You don’t get a lump of butter. Instead, you get this.
The beaters keep the butter from forming larger pieces, so you get lots of very little pieces, instead. This photo was taken after the butter had been drained of buttermilk, then rinsed with cold running water. The smaller pieces made it easier to gently turn it while it drained, being very careful not to push the butter through the sieve.
Once drained through the sieve, there’s still water in the butter than needs to be removed as much as possible. That’s actually the part I find most difficult. It might be easier if we had one of those old style butter presses, but I just had my flat wooden spatula to squeeze and mash the butter in a bowl. I’d press it, drain the liquid, press it again, drain the liquid, and when I thought I was done, I’d press it a bit more and get even more liquid out! Finally, I got to the point where I could mix in a bit of salt to taste. Then, I pressed the butter into a small bowl with a lid, and put it in the fridge to sit until we use it today.
In the end, I estimate I got about 1 3/4 cups of butter, and about the same volume of buttermilk. A pound of butter is 2 cups, so there’s less butter from 1L of whipping cream, but we also got two products out of it. That buttermilk will be very nice in baking!
Whether or not it’s worth making butter with whipping cream is debateable. At least if price is your measurement. Whether it’s the cream or the butter that’s more expensive seems to change rather quickly. About a year ago, I remember whipping cream selling for over $8 for 1L, while butter was still under $4 a pound. The next time I went shopping, the price of whipping cream had gone down again, though still higher than butter was at the time. If you consider being able to control the amount of salt, the flavour, and getting buttermilk as well, the benefits do add up.
If the price of butter keeps going up, while the price of whipping cream remains more stable, it may well become the most cost effective way to get butter!
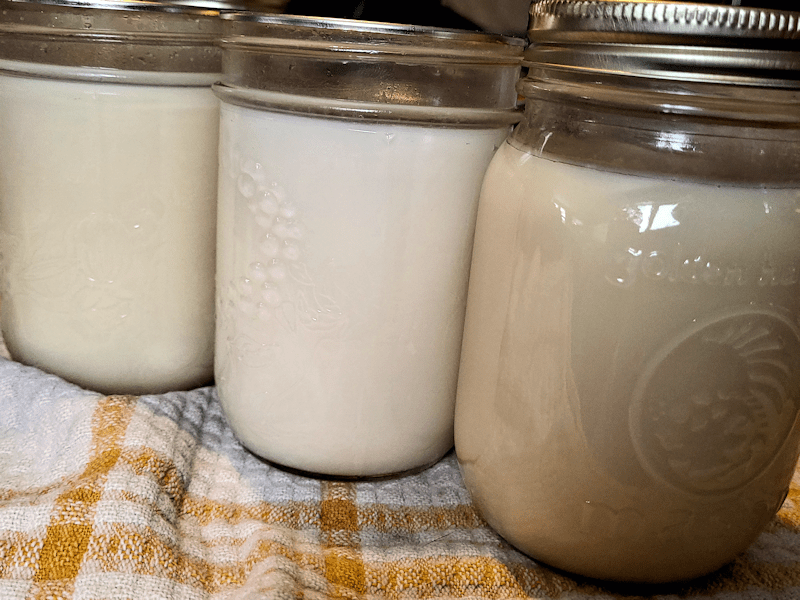
While putting the jars of rendered lard into boxes, I remembered to take a picture of jars from each batch, together.
The batches are in order, with the first batch on the left, and the third batch on the right. My younger daughter ended up doing most of the work for the third batch, as I was not feeling well enough. I just got to jar it up the next day.
The third batch turned out smaller than I expected, with only 5 full jars – and I filled them only to the top of the “shoulders” of the regular mouth jars – and a 6th that was not quite fill. The fat was so thoroughly rendered that when I did the cracklings, there was only an extra couple of tablespoons out of them, so that didn’t even make it into a jar.
Also, I much, much prefer the wide mouth jars.
You can see the second batch is noticeably lighter than the other two. The second batch had less time in the slow cooker, and also got the most fat rendered off the cracklings.
Altogether, we got 22 500ml jars of lard, including the crackling lard and partial jars, out of 3 batches.
Now that we’ve got so much lard available, we can do things with it that have nothing to do with cooking.
Yesterday, my daughter looked up some lotion recipes and picked a really, really basic one.
It was too messy an involved a job for her to take process pictures, so here’s the finished product!
She use one pint (500ml) of lard and beeswax.
We just happen to have some cosmetic grade beeswax, left over from when my husband was making his own mustache wax for a while. Expensive stuff, that’s for sure!
The instructions my daughter found were pretty vague, so she didn’t measure how much beeswax to use. She melted the lard on a makeshift double boiler, then added the wax until she felt there was enough. She things the might have used a bit too much. It doesn’t take a lot.
She also added a bit of Jasmine, from the Demeter Scent Library, that she had. Once it was all melted, she beat it with an electric blender until it was cool, the poured it into sanitized 250ml jars. Of course, with 500ml of lard, there was extra, but not enough to use another jar, so that’s just in a bowl to be used first.
The lotion seems to work well. It doesn’t absorb very well, but then, I find the commercial lotions don’t absorb well, either. The Jasmine scent is very light. I like it! I look forward to other such experiments.