For those of you who have been following this blog for a while, you may be wondering what happened with our cider vinegar.
Yeah. The stuff we were supposed to taste test 2 months ago, to see if it was done!
It’s been sitting in the old kitchen all this time.
Given how cold it gets in there, I wasn’t too worried about it.
For those who are new to this blog (welcome! Happy to see you!), you can check these posts out. All the links will open in a new tab, so you won’t lose your place here. :-)
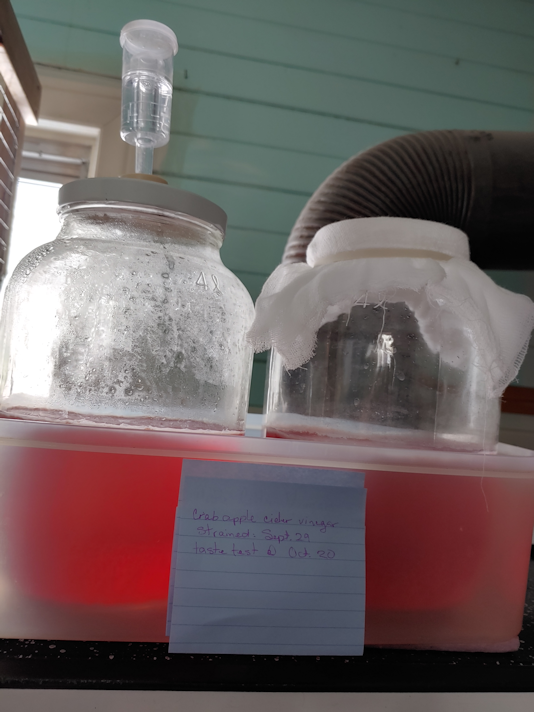
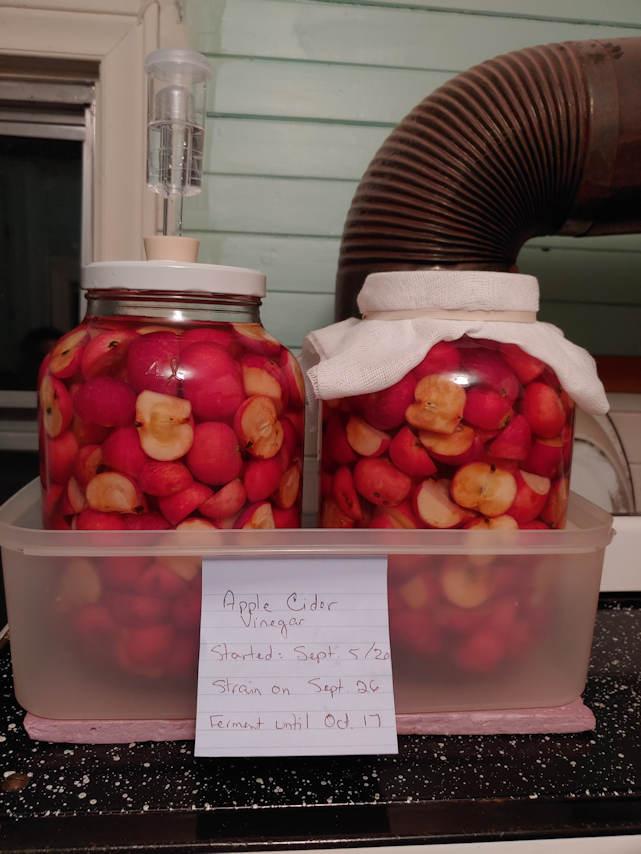
One of the issues I had was, what to store the vinegar in? The last time I made it, I could just use a quart jar. What did I have that was big enough, easy to pour from, and that I could close? I discovered that one of our 1 gallon (4L) glass jug that we have for making mead has a top that fits the same caps from the 3L jugs currently holding hard apple cider vinegar (which is also ready for bottling), so I was able to use that.
Once I had the bread dough rising, I brought the ACV in out of the cold!
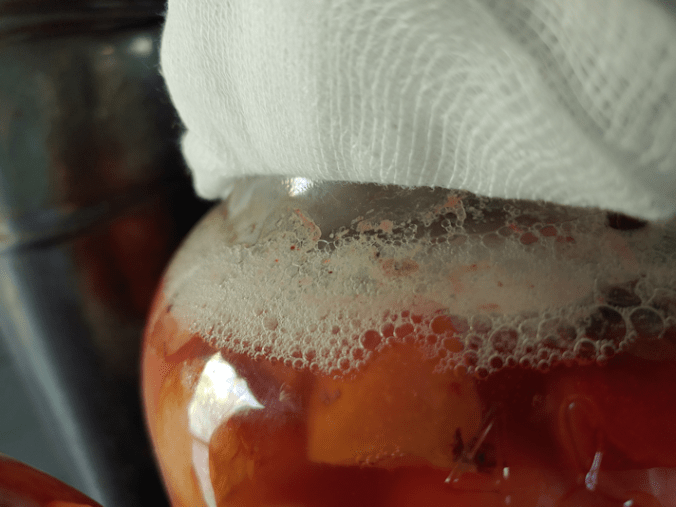
Both of them had visible mothers, floating on top. There was very little visual difference between the airlock and the cheesecloth jars. The airlock one had some condensation near the top of the jar, and that was about it.
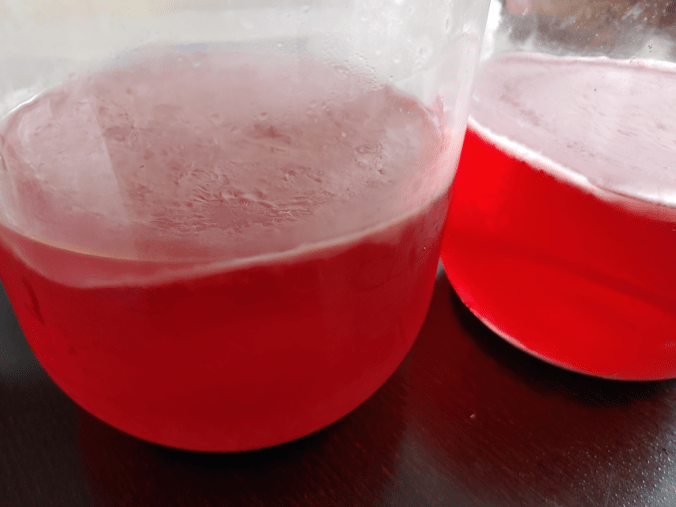
I drew some out of each jar, using a turkey baster, to taste test.
Both of them had a mild, vinegar smell to them. Both of them were also had a VERY strong vinegar taste!
The girls taste tested them, too, and we all agreed that there was a slight difference in taste between them. The cheesecloth one (the girls did not know which glass was from which jar when they tasted them) has a slightly milder, more pleasant taste.
Meanwhile, I did a bit of research on what to do with the mother. We won’t be making this again until next fall. Can the mothers be kept for that long?
It turns out they can.
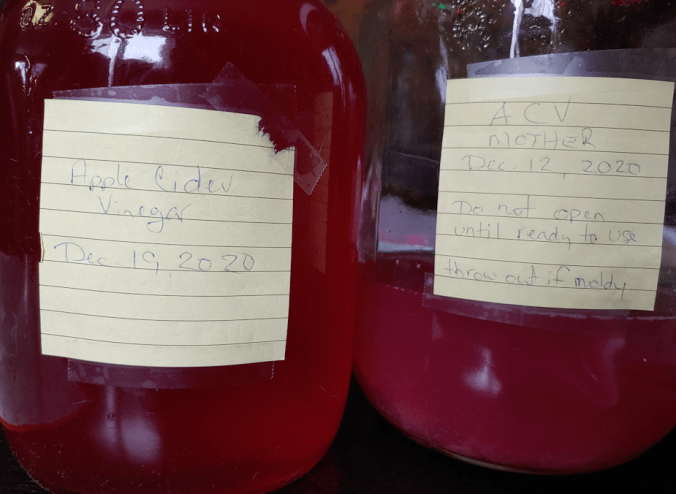
I was able to remove the mother from the cheesecloth jar before pouring, but didn’t have as much lock with the airlock jar. :-D So I put a small strainer over my funnel when I poured the vinegar into the cleaned and scalded jug. There wasn’t enough room for both jars in the jug, though. Yes, I mixed them together. I’d have kept them separate, if I’d had another small jug, but I did not.
Which was okay. I read that the mother has to be immersed in vinegar, and kept air tight, for storage. So the remaining vinegar was left in the jar, along with both mothers.
The gallon jug of ACV will go into the fridge for later use.
The jar with the mothers was sealed, and is now back in the old kitchen for storage.
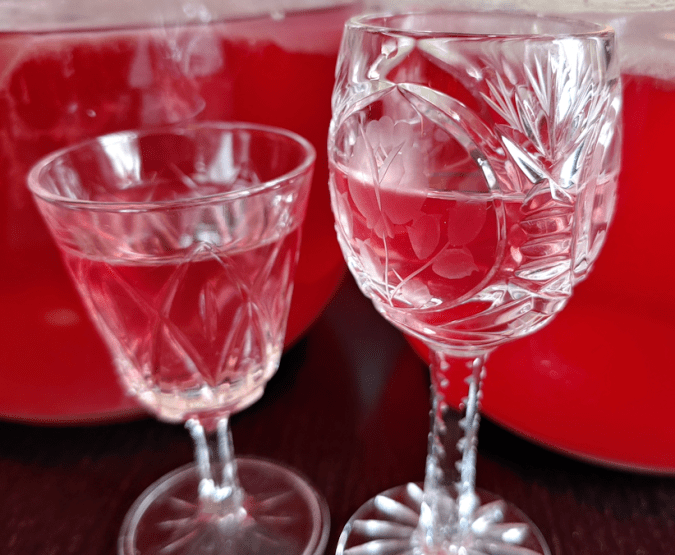
I am quite happy with how this turned out. Having left it for so long, it’s a lot stronger than if we’d bottled it back in October, like we originally intended, but that’s okay. Using our own crab apples, from the one tree with the best, sweetest apples, not only resulted in a gorgeous colour, but it’s own unique flavour.
We will definitely be doing this again! Next time, though, we will just use cheesecloth and skip the airlock.
Now we just have to do a hydrometer test on the hard apple cider and see how it is. It would be awesome to have some of our own hard crab apple cider to enjoy with Christmas dinner! :-) Hopefully, I can get that done in the next day or two.
After yesterday morning’s cat disaster, the girls were kind enough to drop their own projects and take over cleaning up.
While I was doing my rounds outside, the furry little monsters created another mess. One of the jade plant posts I’d managed to shield from their digging got knocked to the floor. *sigh* I was able to repot the plant. Not sure if it will survive. Once again, the girls took over the clean up so I could take care of other things. At least I wasn’t bread baking today!
The one down side of using my grandmother’s method to bake bread is, once I take the dough ball out of the flour and start it soaking overnight, it must be used the next day. There’s no way to postpone it if other things happen!
By the time we were doing cleaning up and putting things away, I started the bread baking much later than planned.
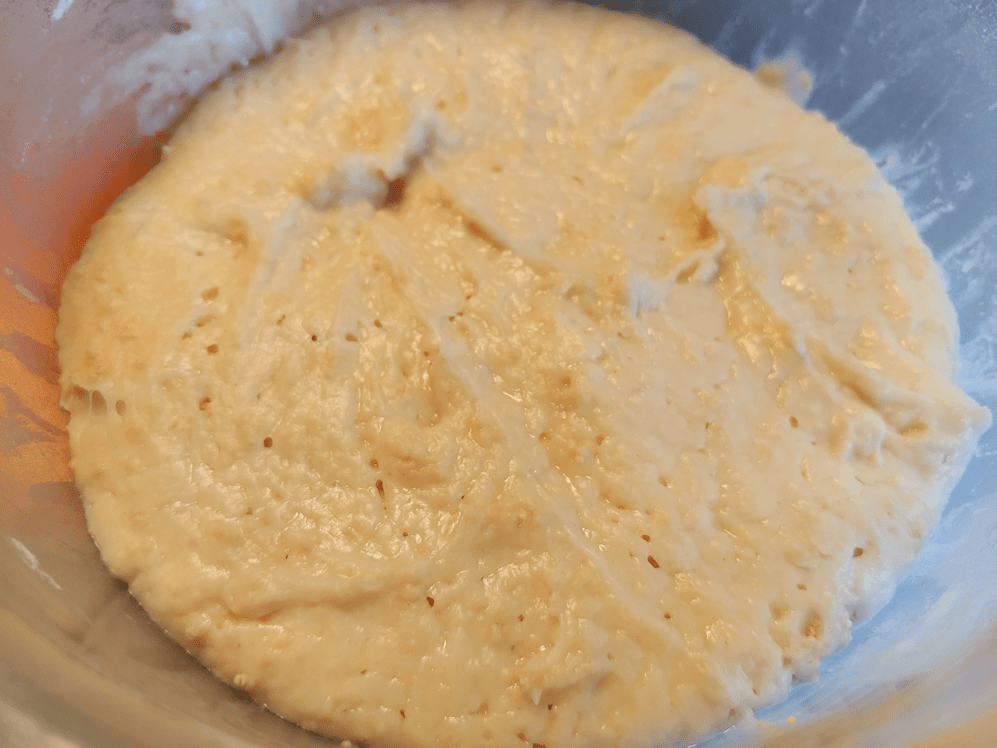
I did, however, cheat a bit. I wanted to mix up more dough, so I could take off more to set aside, for larger batches in the future. As it was, the overnight soak was not looking as active as I would have liked, so I did end up adding some yeast and a touch of sugar, and let that bubble up some more.
Then, since I have it, I used half all purpose flour, half durum wheat flour.
This is after it had about an hour to rise.
I notice a definite difference in the dough, when using the durum wheat flour. The dough feels smoother and more elastic. It was very noticeable when making the pasta, but even at half-and-half, for the bread, it is much nicer to knead.
My grandmother would have used whatever flour they had, so mixing it up like this is probably not all that different from how she did it.
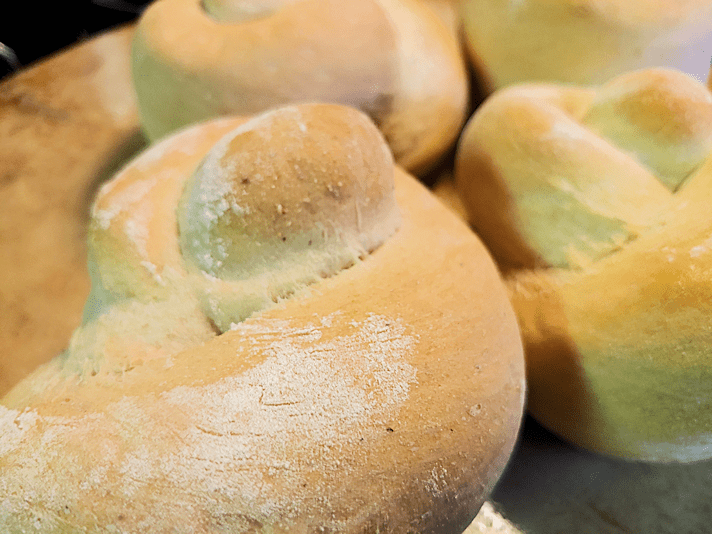
After removing a portion to set aside for the next batch, I split the dough in half. The first half was left plain, though I did have some fun with it, anyhow.
I split the dough into 4 pieces (because there’s 4 of us), and made knots.
The resulting bread was a bit denser and chewier with the durum wheat flour in it. We all like our bread on the toothsome side, so we quite enjoyed it.
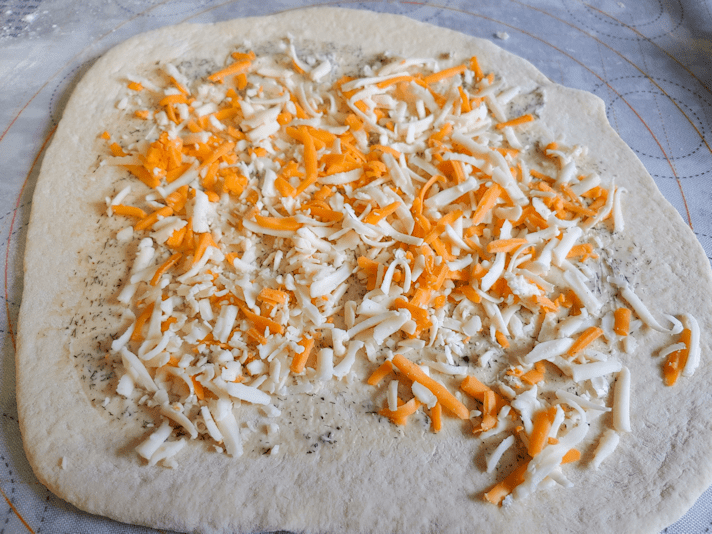
For the other half, I was going to do a cheese roll, but my daughter suggested rolling and folding it. With the extra gluten in the durum wheat flour, it could actually handle that, so I have it a try! This time, I made two loaves.
After rolling the dough out flat and as thin as I could, I used some of the herb butter my husband had made. I don’t know what all he included in there, other than a LOT of dill (the container slipped…), some caraway seeds, and a touch of lemon juice.
Then I added some shredded cheese. It’s a mix of sharp cheddar, mozzarella and Havarti.
Then I folded it in on itself.
It then got rolled out slightly and folded again, before final shaping. I had to use a touch of water to get the edges to stick closed.
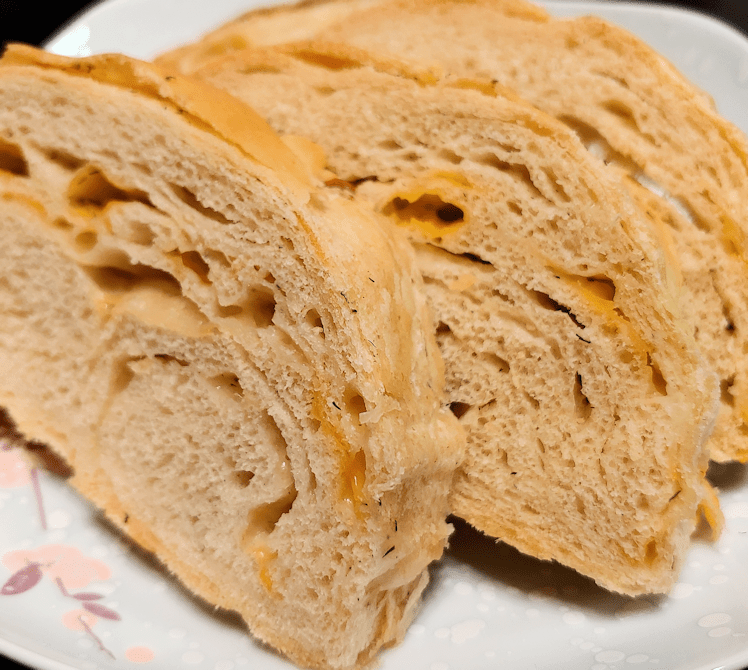
Once in the pan, I flattened them out a bit more with my hands, before leaving them to rise.
Of course, some of the cheese did make its way through the dough as it baked, but my goodness, it looked and smelled wonderful!
It was quite flaky on the outside. On the inside, the dough absorbed much of the butter, leaving cheesy little pockets all over!
It was quite enjoyable! I don’t know that I would go so far as to do the folding method again (though it would be awesome to do that again with some sliced green onions, to make a version of green onion cakes!), but I definitely do it as a cheese roll in the future.
Until then, I am not going to have some with my lunch!
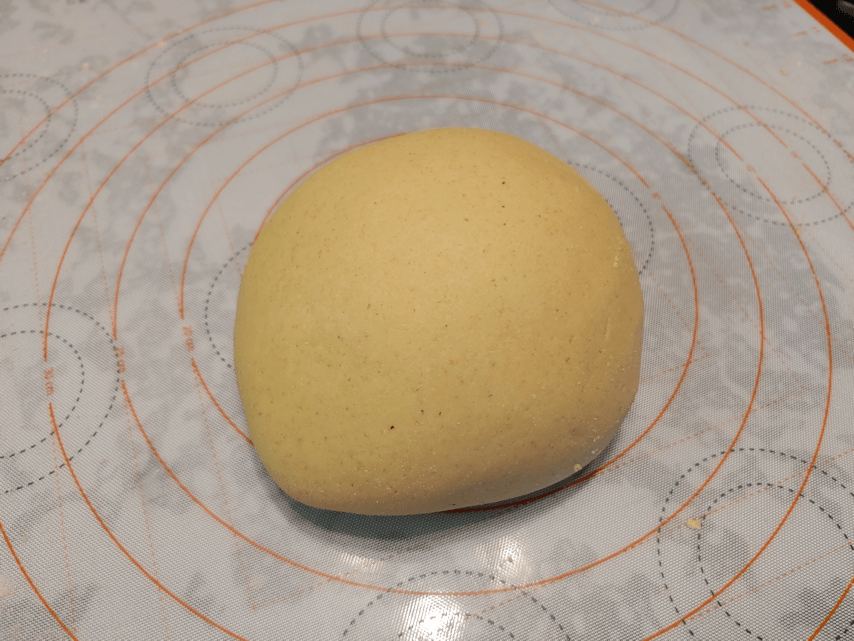
Today, we got to use our pasta machine for the first time, while making pasta for the first time. :-)
Granted, I have made pasta-like noodles before, before, but nothing quite like this.
Of course, I did some research first. I wanted something really basic for a recipe. This turned out to be just flour and eggs. Most places I found went with a ratio of 2 eggs per 1 cup of flour. I did find one that used a ratio of 2 eggs per 3/4 cup of flour. As for quantities, it was recommended 1 egg per person.
Based on that, we could have gone with 4 eggs and 2 cups of flour, but I went ahead and did 6 eggs with 3 cups of flour.
I worked the dough in a bowl until the dough was well formed, then turned it onto our kneading mat.
This turned out to be waaaayyy too dry! I would expect relative humidity would affect the dough, like it does with bread, and we are very dry right now. I simply could not knead in the rest of the flour.
The flour had bits of dough in it, though, and I wasn’t about to let that go to waste.
If you are a pasta aficionado, you may want to look away right now… ;-)
I remembered that one resource I found that used the 2 eggs: 3/4 cup flour ratio. It had a recipe calling for 7 eggs to 3 cups of flour.
I decided to add an egg.
Of course, I couldn’t just knead in an egg, so I beat it in a bowl first, then beat in the flour that I couldn’t work into the dough. I even broke off some pieces of the dough and mixed that in, to get it thicker.
I then opened up the dough so I could add the additional egg mixture into the middle, then fold the dough over it.
Kneading that in was pretty messy, anyhow!
Once it was thoroughly worked in, I only needed to add perhaps a tablespoon of flour onto the mat to clean up the stickiness, then I kneaded it for 10 minutes.
I’m sure I broke all sorts of rules or committed some terrible faux pas in doing this, but hey – it worked! The dough was wonderfully smooth and elastic, and just barely sticky.
At this point, I covered it with some plastic wrap and let it sit for 20 minutes.
While I was looking things up, there were a few points I kept seeing repeated. One was that the pasta cooked extremely quickly, so before I even started it, I made a use-watcha-got meat sauce. The other thing I kept seeing was to use extra salt in the water the pasta would be boiled in. Since they cook so quickly, they don’t have the chance to absorb salt from the water, if the usual amount was used.
So while the pasta was resting, I made a few final touches on the meat sauce, then prepped a pot of salted water. No one mentioned how much more salt to add, so I winged it. :-D
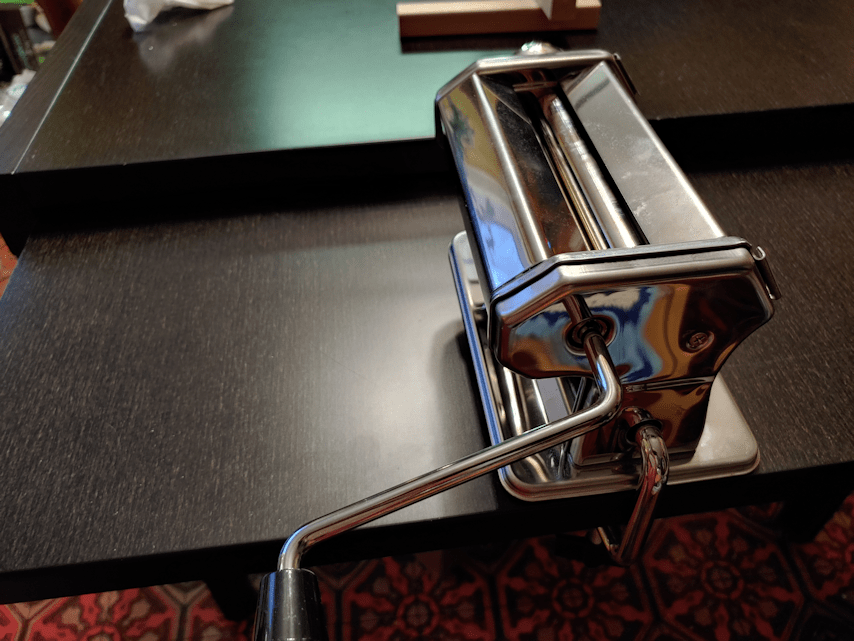
The next thing to do was set up the pasta machine.
What’s hilarious is that the first image has the pasta photoshopped onto the machine completely wrong. It shows cut pasta coming out of the flat rollers. :-D
The machine comes with a clamp to attach it to a table, but our table has a different design. It can expand to twice its size. The two halves of the table top slide one over the other when it’s closed, with a support piece running under them at each end. The whole thing is about 6 inches wide – way too much for the clamp to fit around.
It worked out though.
I was able to partially slide out the extension, and still have a stable surface to clamp on to.
When it was time to start rolling the dough, I started with only half of it. The first time I rolled it through the machine, though…
It just tore apart!
I spent some time going through the instruction manual to figure out why. I ended up using a rolling pin to thin it out more, first, and dusted more flour on each side. That seemed to do the trick.
Another thing I kept reading was to make sure to roll the dough thin enough to see through. I kept reading that the pasta will thicken as it cooks, so it’s better to roll it thinner.
In reading the instructions, it said to set the machine at 1, for the widest setting, rolling the dough through, folding it in half, rolling it again, about 5 or 6 times, then working it thinner and thinner until about 3.
There was one problem with that.
The numbers on the machine are backwards from the numbers in the instructions! The widest setting is 7, not 1. :-D Which doesn’t really matter, as long as it works, but I did find that funny.
It took a while to get the hang of it. One problem I encountered was that the crank handle kept falling off! The pasta also tended to go off to one side. After a while, a daughter was able to come give me a hand, too, which made things much easier to handle.
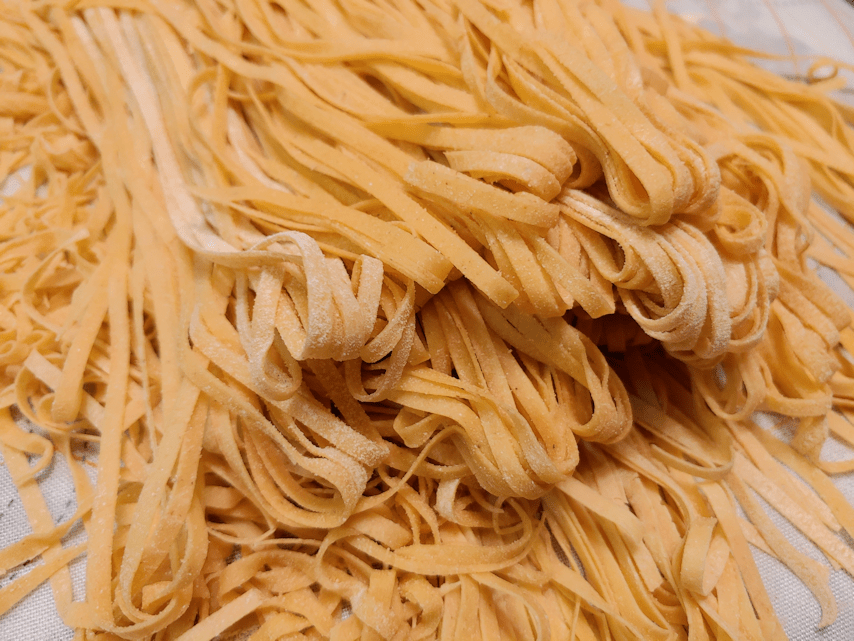
The pasta sheets kept getting longer and longer, and I ended up having to cut them in half. Then do it again! In this photo, we have the 4 sheets draped on the pasta drier, ready for us to put the cutter attachment on and start cutting them.
I have to add that I’m really glad I waited until we found Durum flour for this. We could really feel the difference in how well the pasta held out to all the stretching and handling.
The first ones we cut were still hilariously long, so we cut the remaining sheets in half again.
Their widths might have been consistent, but their lengths certainly weren’t! :-D
After finishing the first batch, they got to dry while the second half of the dough was prepped. This half went much faster, now that we knew what we were doing! Also, we split the second batch of dough in half, right from the start.
Once they were done, it was time to get the water boiling. After a while, I took the longest pasta pieces and broke them in half, to make them a more reasonable length!
Just before the water was boiling, I took them all off the drying rack, to make them easier to handle and carry and break any really long pieces that got missed..
Don’t they look pretty?
And yes. I did cook the whole lot!
Here, I have pretty much just added them to the water. It hasn’t even come back to a boil, yet, and already the pasta is half cooked!
I boiled them for 2 minutes, but that was probably at least half a minute too long! :-D
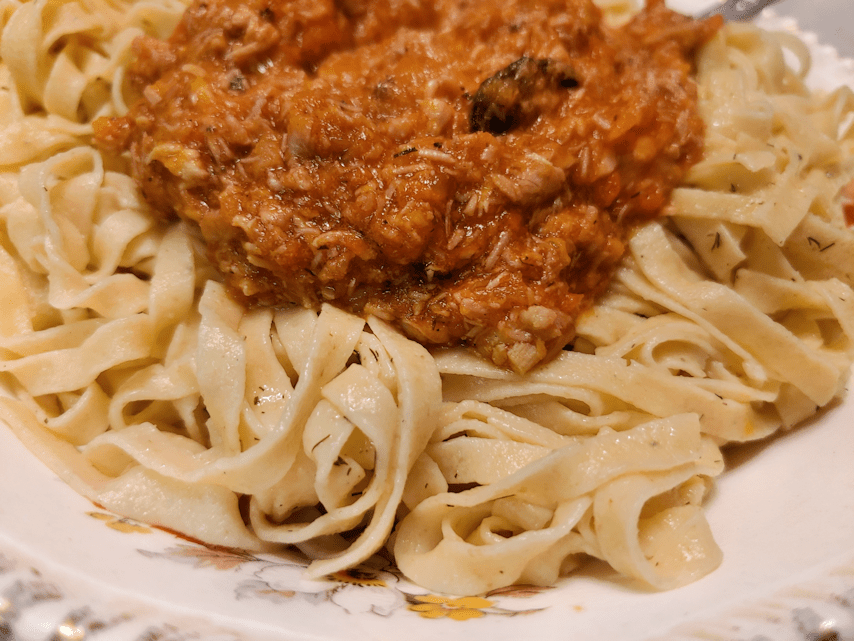
After draining them, I tossed them in some herbed butter my husband made earlier in the day.
There was have it! Fresh made pasta, with meat sauce.
So, how did it taste?
Many of the sites I found with recipes raved about how good they were, and how you’ll never want to eat store bought pasta again, and so on.
It was good, but I don’t know that I would say it was that good! At least, not when considering the amount of physical labor involved. The family did all really enjoy it, though.
I actually found the pasta a bit thin. I like a toothsome pasta. In rolling it out, I went to the recommended “3” on the knob, based on what I’d read (the instructions with the machine suggested going to 3, but with the numbers reversed on the knob, that actually meant 4). It was certainly thin enough to see through, but I think that, next time, I’ll just bring it down to 4 on the machine.
It does use a lot of eggs, though. We’ll have to buy more, before we can do this again! Or we could make it with just water. The instruction manual has a recipe, too.
We definitely can do some experimenting! :-D
All in all, I’d say this was a success, and I am quite glad we got the machine to make the job easier! Even with the handle falling off so often! :-D
Okay, so after accidentally killing off our ball of old dough “yeast”, I had to start over. Since I have no idea how my grandmother got her first ball of old dough, this is all a guessing game, anyhow!
This time, I went with another old technique: the sponge.
It’s just 2 cups warm water, 2 cups flour and 2 Tbsp of yeast, mixed together. This is the sort of thing one might put into the fridge overnight, to bake in the morning. Instead, I put it in the oven that was warmed up to its lowest setting, then turned off.
After about an hour or more, the resulting sponge was all soft and fluffy!
I added another half cup of warm water, which also made it easier to transfer it to my big mixing bowl, then added the salt and flour, as usual.
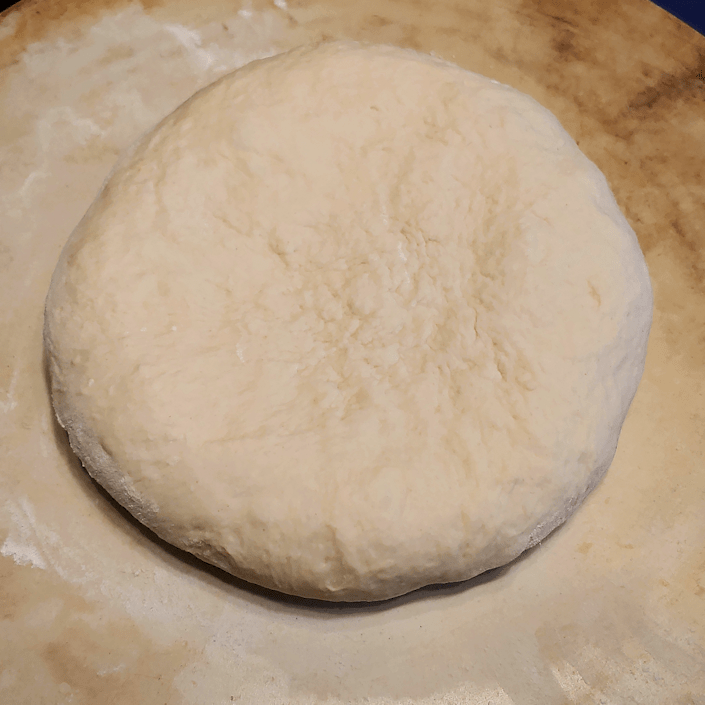
Once I’d kneaded in as much flour as I wanted (I have to catch myself and not add too much!), the dough was set aside to rise in a floured bowl. Once again, it went into a warm oven to rise.
But not before I took out a dough baby! My mother described my grandmother as taking dough out for the next batch after the second rising, when she was shaping the loaves. Since I’m using actual yeast in this, I did only one rising before shaping the loaves. I flattened the ball out this time, to see how that changes things as it sits buried in the flour.
As for the rising dough, it ended up taking about 2 hours, even with using commercial yeast!
This would have been a 2 loaf recipe, but I decided to play around a bit.
I made 4 plain mini loaves, first.
Yes, there are only 3 in the picture. My husband already ate one. :-D
After taking the picture, I ate one, too!
The other half was used to make surprise buns. During our city shop, I’d found a gouda-like cheese (I can’t remember what it was actually called) with truffle in it. There was still some left, so I cut it into small slices and wrapped them inside the dough.
I did try and seal the dough well, but as you can see in the photo, the cheese still made its way out, and started bubbling in the middle!
I can hardly wait to try it out!
With our new dough baby, I will have to make a point of using it every few days again. Since I didn’t start out with an “instant sourdough” yeast, it will take longer to develop that sour flavour. At least, that’s my assumption.
I will also keep taking the dough baby out for the next batch at the start, as the dough it being setting aside to rise. That way, I can do things later on, like knead baking soda in again, or knead in things like herbs or shredded cheese or anything else that catches my fancy.
Our first batch of bread using old dough, in the manner my Babcia used to do, is now done. I did mess up a bit, which I will talk about below.
Here is how the dough looked after the first rise. I had left it for about 1 1/2 – 2 hours, give or take.
That is just beautiful.
My mother described my Babcia as “punching down” the dough. I know exactly what she was talking about, since this is what she did with her bread baking. My mother used a huge, enameled bowl with a lid, which we still have, for one big batch of bread. She would get it ready for its first rise before going out to milk the cows in the morning. By the time those chores were done, the dough was overflowing the giant bowl, knocking the lid askew. She would put the dough back in, scraping dough off the lid and adding it in, too, then literally punch it down with her fist. She would then put the lid back and leave it for a second rising, which would also overflow. She would gather it up again and punch it down before continuing on to form loaves and buns.
For such a small batch, I just took it out and gave it a light kneading.
The dough felt beautiful! Soft, light, fluffy and elastic. I probably could have skipped a rising, but I really want to recreate what my Babcia did as much as possible, so back into the bowl it went.
Both times, I set the bowl into a warm oven with the heat off and the light on.
This is possibly where I made my first mistake. The dough did not rise as much the second time. Usually, dough rises faster during a second rising, but after an hour, it really hadn’t risen as much as I would have expected. I probably should have left it for another half hour, at least.
I didn’t do that.
With this batch being rather small, I formed just one loaf out of it (after removing a portion for the next batch), then giving it another light knead.
In my starter batch, the two round loaves I shaped had puffed upwards quite a lot, so this time I pressed the loaf flat, then set it aside, covered with a tea towel, to rise while the oven preheated to 425F.
Which may have been my second mistake. I probably should have let it rise for a while, before preheating the oven. Not only am I too used to how quickly yeast bread rises, but our new oven preheats faster than the old one!
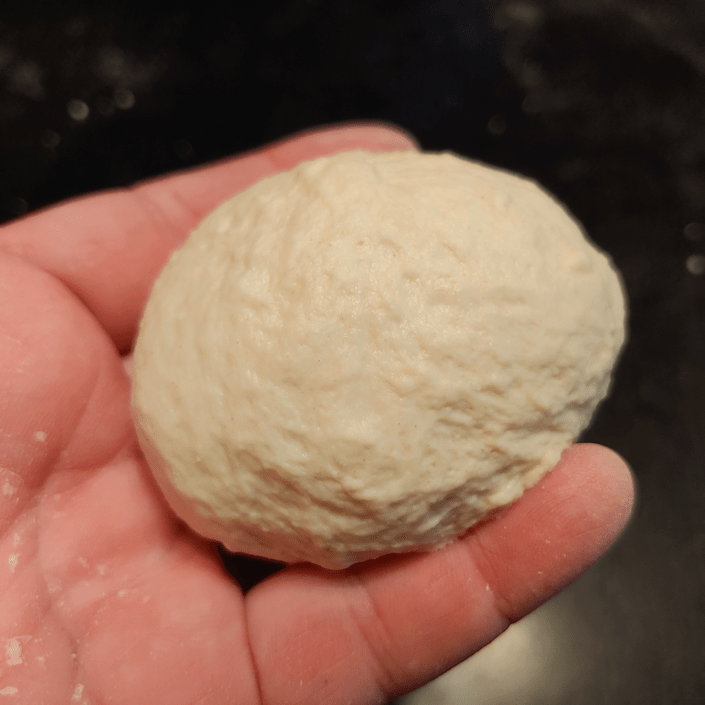
Meanwhile, I used the piece of dough I’d set aside to pick up the bits of dough stuck to the bowl and table top, as my mother described my grandmother doing, kneaded it enough to incorporate it all, then buried it in our canister of flour. I took out slightly more dough this time, as in the next batch, I intend to increase the quantities of flour and water.
When the oven was ready, I scored the loaf and put it in, checking it after half an hour, then adding more time.
I’m certainly glad I flattened the loaf as much as I did! It still became very much a ball!
This was taken out at about 40 minutes.
Which was most definitely a mistake.
Though I made sure to do the “thump” test to check if it was done, when I finally cut it open, the centre seemed slightly underdone. I probably should have left it in the oven for at least 5 or 10 more minutes. I am really bad for taking bread out too early, as I am constantly thinking they are going to burn! :-(
What to do?
Toast it!
Sort of.
I cut it into pieces, laid it back on the baking stone, and put it back in a 350F oven. After about 15 minutes, I flipped them and put them back for another 10 minutes.
Here is the end result!
It looks really great, at least! It still felt a bit heavy and dense, though.
The first taste test was with a plain piece.
The flavour is a bit milder than the starter batch. This makes sense, since that one used a commercial sourdough yeast. The sourdough yeast included rye, which I could taste in that starter batch, but I am not getting any rye flavour with this batch. There is, however, a very slight sourdough flavour. I expect this flavour to develop with every batch we bake. Overall, though, the flavour was very neutral.
The texture was slightly dense and chewy, but not under-cooked and doughy, as I feared it would be.
The one thing I had an issue with, was the crust. It had a thick, crunchy crust that crossed over to that “watch you don’t cut your mouth up” level. This may have been exacerbated by “toasting” the bread pieces again, but from what I saw when I was cutting it, I could see it was already going to be an issue.
The second taste test was with butter and, of course, that one tasted better. Fat is flavour, after all!
I found myself thinking this would be a very good bread to dip in an herb infused olive oil! The neutral base flavour would make a great carrier for other, more strongly flavored things. That neutrality will likely disappear over time, as each batch should develop a more distinct “sourdough” flavour.
So this first batch of bread using old dough was both a success and a not-quite-success.
The use of the old dough in place of yeast or sourdough started worked very well. There was plenty of yeast activity in there. Even without the use of sugar in the bread, the yeast did its job – when I gave it the time to do so!
The other success was reducing the amount of flour. It did mean making one loaf instead of two, but the dough itself turned out much better for it.
The not-quite-success part of it had more to do with my not giving it the time it needed, I think. I’ve made sourdough bread were I’ve left the dough to proof for an entire day, so it’s not like I don’t have the patience for that sort of thing. But I did see the signs and simply chose to go ahead, anyway. The end result was probably not as could as it could have been, because of it.
Plus, of course, I need to be concerned less about over-baked bread, and more about underdone bread, and leave it in the oven for longer! I should probably increase the oven temperature to 450F. That’s the temperature my daughter bakes her French bread in, and her much larger loaves bake up wonderfully.
I will leave the “bread egg” in the flour for a couple of days, then make another batch, tweaking things with what I’ve learned with this attempt.
Yesterday, we hit 27C/80F. An unexpected result of that is, all number of house flies and other flying insects emerged from wherever they were slumbering in the previous cool, and got into the house.
Which meant a night of cats making a ruckus while chasing bugs all over the house.
I got very little sleep.
Today was much cooler, but rather than being outside, taking advantage of it, I ended up passed out for a couple of hours.
Cuddled by a couple of cats, of course. The buggers! It’s a good thing they’re so cute.
Anyhow.
While puttering about the house, trying to get at least some productivity in, I was in the old kitchen and checked on the apple cider vinegar. It’s been a couple of weeks since I started – or should I say, restarted – them, so I figured it was time for a progress report.
For my new followers (welcome! Happy to see you here. :-) ), you can visit our first making of apple cider vinegar with our crab apples here. This year, we decided to make a larger quantity, with some experimentation. You can read about our first attempt here, and after discovering I made a really silly mistake, the reboot is written about here. (All links will open new tabs, so you won’t miss your place. :-) )
Here is how the jars look now.
The old kitchen is a very dark room. The south facing window has the sun room in front of it, so it doesn’t get any direct sunlight. The west window, which would normally provide a lot of light at the end of the day, is covered with aluminum foil (which predates our moving here), so there is zero light coming through there. The north facing window is what’s providing what light you can see in the above photo. Without turning the light on in the room, it was too dark to get a photo without moving to the window side of the jars.
This is a good thing. The instructions said to put the jars in a cupboard, and we just don’t have any with the space for these jars, so a room that never gets bright works just fine. The concern I had was how cold this room is. Fermentation requires warmth.
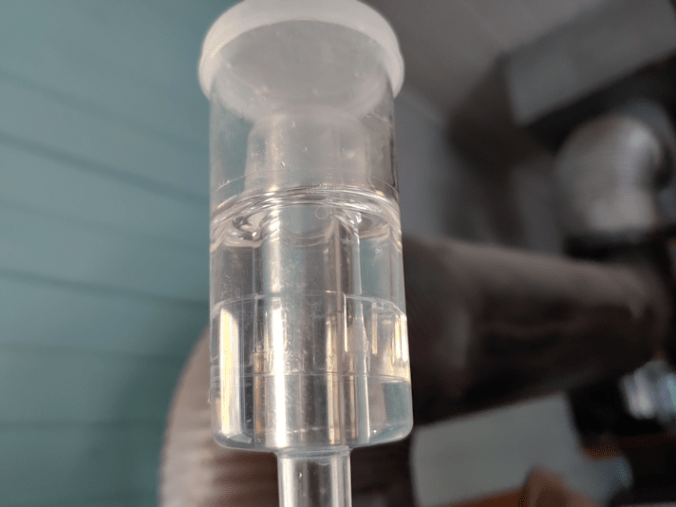
As you can see, there is no activity in the airlock at all. If there had been, the plastic cap on the inside would have been pushed to the top as it filled with CO2.
However, this is not the same as fermenting alcohol, so not seeing activity in the airlock does not necessarily mean nothing is happening.
And things are most definitely happening in there!
Both jars look the same. At this point, I see no difference between the one with the airlock and the one with the cheese cloth. Both have this layer of bubbles at the top, and when turning the jars to check them, more bubbles enthusiastically make their way up the jar. There most definitely is active fermentation going on.
One good thing about doing this in the larger jars like this: it’s nowhere near as messy as our first attempt! The fermenting vinegar had bubbled up enough to reach the coffee filter covering it and leaked a bit, inviting all sorts of fruit flies to check things out. This year, had I not had to throw away the first batch, with the its very full jars, it may well have bubbled up, and the one with the cheese cloth, at least, would likely have had a mess. There may be more headspace than needed in these jars now, but it seems to be better that way.
There also doesn’t seem to be any sign of mold or rot or anything of concern. The glass canning jar lids being used as fermentation weights are doing the job of keeping the floating apple pieces submerged.
So far, everything is looking good!
Next week we’ll hit the 3 week mark and, according to the instructions I’m following, that’s the time to strain out the apple pieces, return the vinegar to the jars, and let them sit for at least another 3 weeks.
I’m very curious to see if there will be a noticeable difference between the two jars.
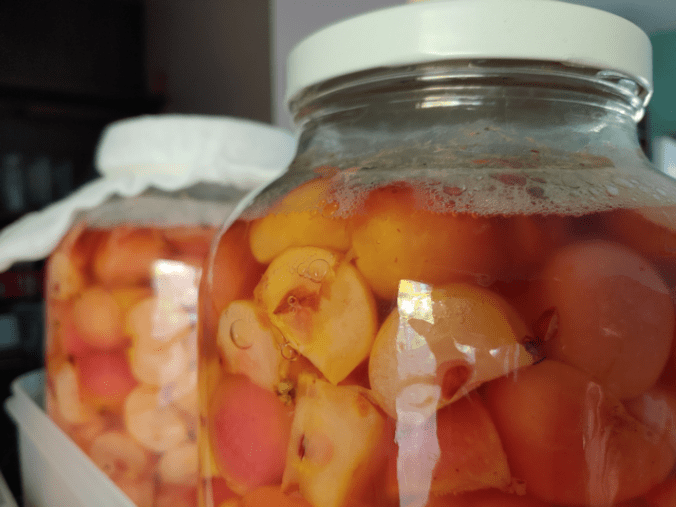
This is how the crab apple juice looked, right after we got finished setting up the fermentation.
This is how they looked this morning.
The photo does not do justice to how bright the colour is!
When I was checking these last night, the tops were full of dense foam, which has mostly collapsed, but you can certainly see how high it got.
Their temperatures seem to be holding at between 18 and 19C, and – most importantly! – we are seeing activity in the airlocks. Not a lot, but it’s definitely started to bubble!
Today was our first attempt at making hard apple cider. We are using the remaining apples from the one crab apple tree we have that produces the most amazing, sweet, delicious little apples, after using some of them to start an apple cider vinegar.
When we first moved here and saw how many crab apple trees we had around the property, we looked into what was needed to make hard apple cider. At first, we didn’t think it would be anything we could do, or at least not anytime soon. Making hard apple cider, we found, required using a large press to crush whole apples, then sealing up the resulting juice to ferment a few months.
We didn’t have a press, and with so many other things on the go, we were not about to build or buy one, either.
They started making hard apple cider, using store bought juice. Sometimes, right in the container it was packaged in!
We could make hard apple cider without having a press, after all!
One of the things we found when cleaning up this place after moving in, was a juicer exactly like the one we had to leave behind when we moved. I think one of my siblings bought it for my mother, but she hardly used it. Everything was still in its original packaging, even!
We decided to try making hard cider using our own juice.
Now, making it using store bought juice in the bottle they were sold in works, because everything comes pasteurized and sanitized off the shelf. Basically, enough juice needs to be poured off to make room for the sugar and yeast, an airlock gets put on, and you can leave it to ferment to get a very basic hard apple cider.
Of course, doing it the traditional way, with a press, the juice didn’t get pasteurized or filtered or anything.
We decided to try making our own hard crab apple cider with raw, unpasteurized, unfiltered juice. The juice would be going straight from the juicer to the sanitized gallon jugs, so the chance for contamination would be very lower.
Lower than trying to do it the old fashioned way, that’s for sure!
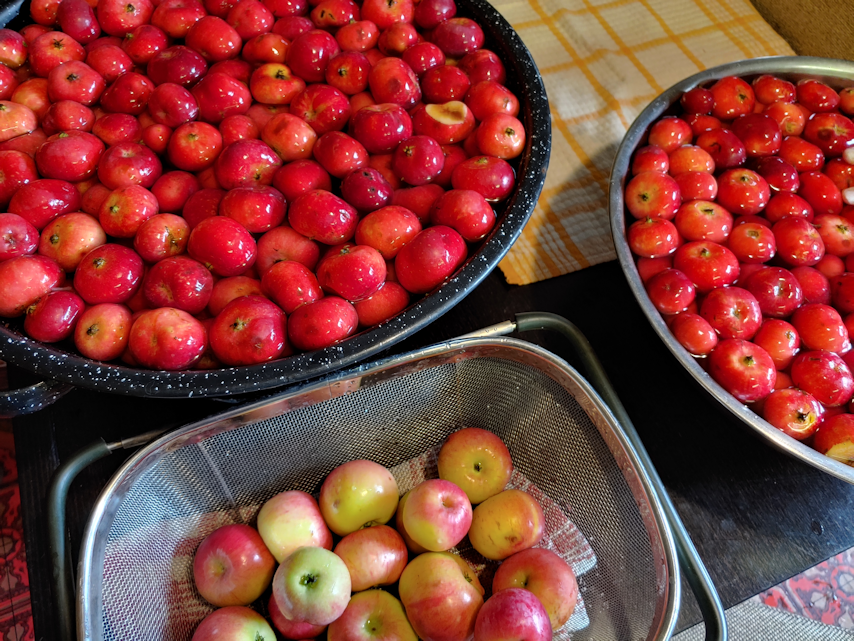
The first step was to clean the apples and de-stem them. They didn’t have to be cored, but the stems would cause problems with the juicer.
The crab apples from the one tree completely filled my two largest bowls. Though I cut away some obvious nasty bit, I wasn’t worried about light bruising. I also have the not-quite ripe apples from the tree that broke in the wind storm.
It’s a good thing we had so many of these apples this year, since I had to toss the cider vinegar, and start over again.
Juicing the apples turned out to be more difficult than expected. It was made slightly easier when we found a way to raise the juicer high enough that a 1L pitcher could fit under the spout. We had 2 one gallon jugs, and a gallon is about 4L, so I could use the pitcher to loosely measure how much juice I was putting in. However, these little apples don’t have a lot of juice in them, and their pulp kept jamming the machine. My daughter kept having to stop the juicer, open it up and peel away the pulp that accumulated on the perforated metal cone inside, instead of going out the back. The pulp was so dry, it could be taken off in ribbons!
Using information I got from one of the hard cider making videos, I used 2 cups of sugar per gallon. Each got 2L of juice before I put in a bung and shook the heck out of them to dissolve the sugar.
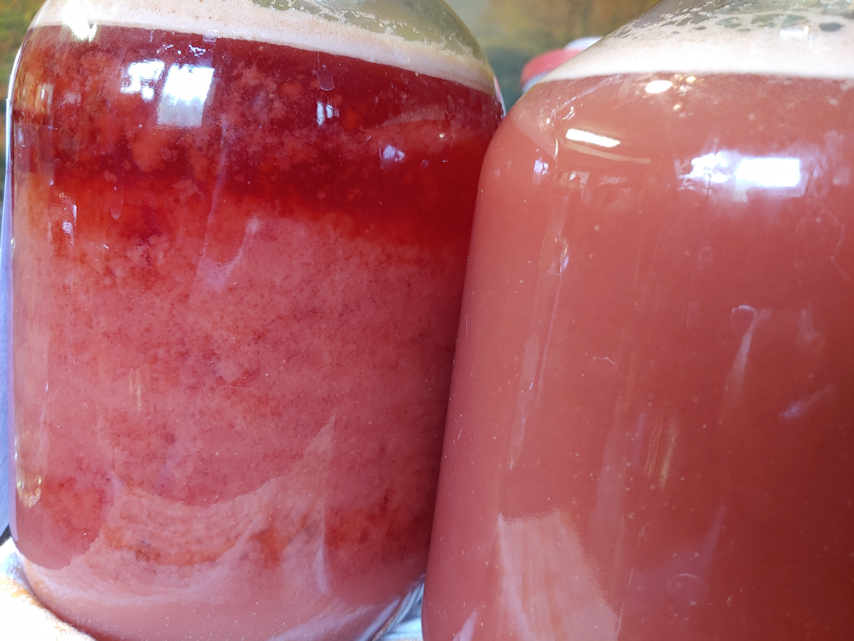
Look how pink that is!!
Also, you might notice the liquid is not at the same level. Though these are both 1 gallon jugs, one is actually bigger than the other. They are 1 gallon at about the “shoulder”, which leaves space for the fermenting liquid to bubble up a bit.
I also used the same wine yeast we’ve been using for everything else; I don’t know the specific strain of yeast, but it’s basically what is available for a non-sparkling wine from the local brewing supply store. Again, following what I saw in the video, I dissolved about a tsp of yeast in a bit of juice, then added it to the full jugs, after getting a hydrometer reading.
After the yeast was added, they got another thorough shaking, then the airlocks were put in place.
I’m also trying to be more diligent about recording everything. I have to admit, I still don’t understand the hydrometer information, so I wrote down all three readings. It has a “potential alcohol by volume” measure right on there, but I keep reading that it isn’t any good, and that it’s better to use the specific gravity reading. It doesn’t help that I can barely see the tiny numbers and lines in the first place!
I found it interesting that the readings for the 2 jugs that were made up identically, are slightly different. It’s possible that the different sized jugs means that one does have slightly more juice in it than the other, and that could explain the difference.
The juice is not only incredibly pink, but incredibly cloudy! They were, of course, just shaken when this photo was taken. You can tell which one got finished first, as the cloudiness is already starting to settle.
We have set the jugs up on a side table in the dining room for now. It’s not a particularly bright room, it’s warmer than the old kitchen, and we can keep an eye on them. I just took a look at them, after they’ve had several hours to settle. I will have to take a photo of them during the day. They look very different right now! The sediment has settled to the bottom, and the clear juice in the middle is looking a deep, deep pink – but there is a significant layer of lighter pink foam at the top! I used the temperature gun on them, and got different readings, depending on where I aimed it. The top, where the foam is, was fluctuating between 19C and 20C (66-68F). The middle was around 17-18C (62-64F), while the bottom, where the sediment has settled, is 17C (62F). Which I think is good.
Also, I’ve turned the thermostat up for the house. It was set just below 15C/59F when the furnace turned on earlier today, so I’ve upped it a few degrees! So the ambient temperature will not be too cold, either.
I have no idea how this will turn out. Will the fact that we used raw, unfiltered juice be a benefit, or a disaster? Will we get something that tastes horrific, or wonderful? Considering how great the apples themselves taste, I would hope the resulting hard cider would be its match. I have no idea. This is a total experiment for us!
As for the remaining apples, it took so long to juice enough to fill the jugs that we didn’t juice the rest of them. I had started cutting them up to cook them into a dessert, but realized I didn’t have the energy for that left, so they ended up in the freezer! Meanwhile, my poor daughter had been standing at the juicer for so long, her back was starting to give out on her! We couldn’t even plug it in somewhere where she could sit down, since there are so few outlets in this house.
Last night, I procrastinated cleaning the dining room by starting the apple cider vinegar! :-D
I slightly modified the recipe I used last year, which you can find here. (Link will open in a new tab.)
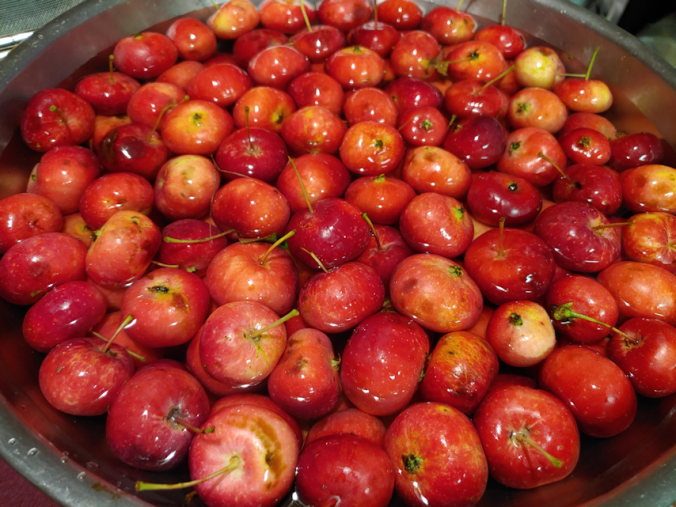
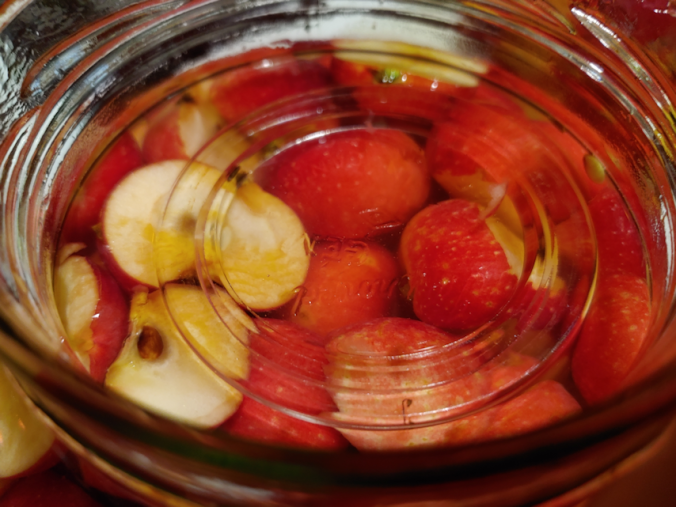
I started off by using one of my gallon jars to measure out apples from one of the 5 gallon buckets. As the apples would be cut into pieces that would fit more tightly, plus I would expect to cut away nasty bits, or even toss entire apples, I filled the jar to the top twice, then added a few extra. I have a large enough bowl to be able to give them a bit of a wash, then leave them to soak while I prepped other things.
Last year, I sterilized things with boiling hot water. Since then, we have started brewing, so along with extra airlocks, we also have sanitizing solution. So one of the changes this year is to use that to sanitize everything, instead of scalding them.
Since I was doing a lot more crab apples this year, I put the cut pieces into water with a bit of lemon juice as I worked. Last time, for the amount of apples I can, there was no need for anything to keep them from browning until I was done. I cut them all into halves or quarters, depending on the size of the apple – or used what was left after cutting off any nasty bits! As expected, there were some losses, but not all that much. In fact, I could have done with fewer apples for the jars!
The recipe said to fill the jar 3/4s full, and I ended up with almost full jars! Even after shaking down, they were still full to the shoulder.
The recipe called for 2 Tbsp of sugar for a 1 quart jar, so for these, I used 8 Tbsp of sugar per jar. The recipe calls for filtered water. Last year, I happened to have some water bottles I could use, instead of our very hard, iron rich, well water. We currently buy refills of water for drinking that is first filtered, then treated with UV light and reverse osmosis. That is what I used to dissolve the sugar in, first.
The next change from last year was the use of a “starter.”
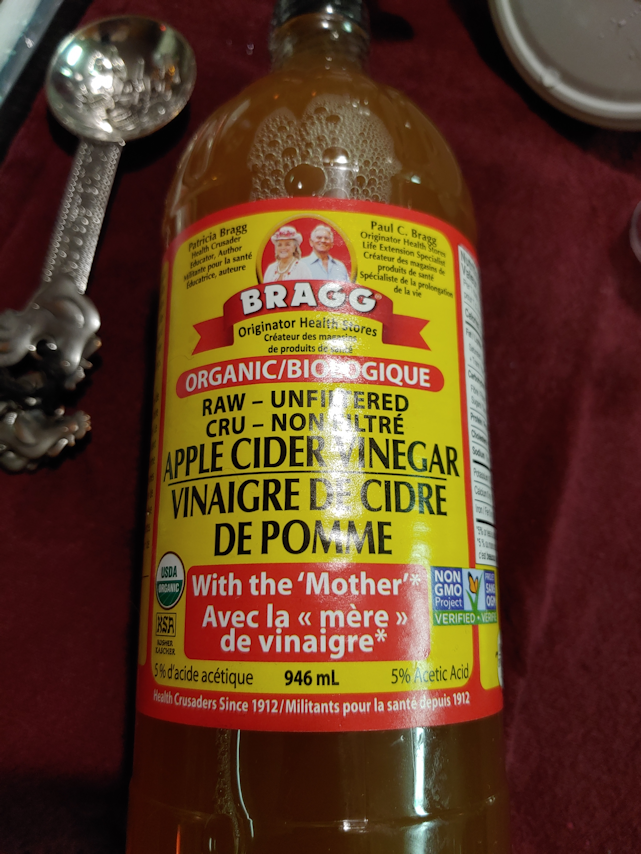
I’ll admit that when I normally buy apple cider vinegar, I buy whatever is cheapest. It gets used as an ingredient in cooking, so I don’t feel the need to anything fancy or expensive. When making the cider vinegar last year, it relied on the water, sugar, apples and whatever natural bacteria in the air “contaminated” it. Since I plan to use an airlock this year, and everything has been well sanitized, it’s not going to get that exposure. So I picked up a bottle of Bragg raw, organic, unpasteurized ACV, with the “mother”, to use as a starter and introduce the little critters needed for fermentation.
In doing my research, I found one person who used this same brand as a starter in his own ACV. He was using a large crock and just sloshed a bunch in, with no measuring, so I was left with no real idea of how much to use. I decided that 2 Tbsp per gallon out be enough. To make sure I got some of the “mother” that had settled on the bottom, I gently turned the bottle back and forth and upside down a few times first.
Once the starter was added, I filled the jars the rest of the way, with about an inch of headspace, with the filtered water.
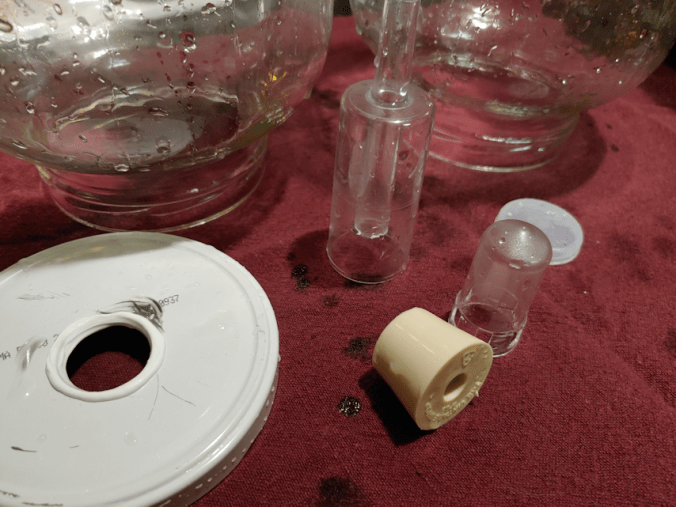
When doing this last year, I didn’t have any fermentation weights and made do with some small jars. I still don’t have fermentation weights, but with the nice, wide openings in these jars, I had something else I could use.
When I was a kid helping my mother with canning, snap lids wasn’t a thing, yet. She used either wax or glass lids with rubber rings to seal. In cleaning up the basements and the old kitchen, I’ve been finding lots of these glass lids. I cleaned and sanitized a couple of them, and they look like they’re just the right size to keep the apple pieces submerged! :-)
Now comes the experimental part.
The two jars were made in exactly the same way. One of them now has the airlock cap, while the other is covered with layers of cheesecloth, held in place with an elastic band. They are not sitting on top of the warming shelf of the old wood cookstove in the old kitchen. I placed a small piece of foam insulation down, first. The old kitchen stays quite cool throughout the summer, and is even cooler now, so the metal would be quite cold. During fermentation, there will be bubbling and foaming, and a possibility that the liquid might reach the cheesecloth, or even overflow, so they are in the plastic container to protect the top of the stove from any drips.
Now, it sits for three weeks. During this time, we’ll be checking them daily. I look forward to seeing what differences there might be, between the two methods, as well as comparing to how it turned out last year.
Hopefully, no fruit flies will be attracted to the one with the cheesecloth! We have a fruit fly problem in the kitchen right now, but so far, they haven’t been found in the old kitchen.
I still have about 7 or 8 gallons of apples left, even after my mother took some home. Tomorrow, I plan to juice them and start making some hard crab apple cider! The traditional way to do it is to use a press to smush the whole apples, then leave the juice to ferment on its own. We don’t have a press, but we do have a juicer, so I’ll be using that, plus some of the yeast we picked up to use for mead making. We have four 1 gallon jugs, plus a half gallon jug, to use for fermentation, so there’s plenty to be able to do both. :-)
This should be fun!! :-)
The Re-Farmer
Update: Sept 7, 2020 – I goofed! But you won’t spot my mistake here. Visit this follow up post to see what I did wrong, and how I fixed it.
Today I found myself heading into town for a trip that included a stop at the hardware store. I took advantage of being there to look for some Dremel tips.
The didn’t have the individual tip I was looking for.
I ended up getting this, instead.
I think I’ve got enough tips for quite a few projects, now! :-)
So, of course, I had to find a reason to use it. :-)
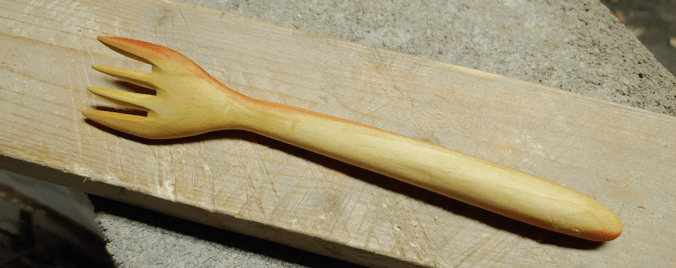
A while back, I posted about making a maple spoon.
You see that chunk of wood beside it?
That’s what I worked with, today.
This is that same piece of wood, roughed out.
Not for a spoon, though. Today, I was determined to make a fork!
For this project, I used everything I had around to remove the excess wood. The 4 way rasp got a lot of use, but I also used several of my new Dremel tips, the big K-bar knife, and a couple of my fine saws.
Basically, I see no point in dulling the blades on my carving knives any more than I have to! :-D
I saved cutting the tines for when I was ready to start using sandpaper on the rest of it.
I used a carving knife, as well as a fine tip on the Dremel to shape the tines.
Unfortunately, while sanding them, the wood broke off the tip of one of the inside tines.
Which meant I had to shorten all the others to match.
Here it is, after sanding.
Front
Back
The end result is the wonkiest of forks!
But it’s still a fork. :-D
Here is it, after oiling.
Front
Back
Oh, gosh, it’s the funniest looking fork, ever! :-D
Here it is, next to the spoon made with the same wood.
The spoon could use another coat of oil!
Well, I at least accomplished what I set out to do. Even if it does look totally wonky!! :-D
I still have wood left from the piece I used for these. I suppose my next project should be a knife. :-)