Today I found myself heading into town for a trip that included a stop at the hardware store. I took advantage of being there to look for some Dremel tips.
The didn’t have the individual tip I was looking for.
I ended up getting this, instead.

I think I’ve got enough tips for quite a few projects, now! :-)
So, of course, I had to find a reason to use it. :-)
A while back, I posted about making a maple spoon.

You see that chunk of wood beside it?
That’s what I worked with, today.

This is that same piece of wood, roughed out.

Not for a spoon, though. Today, I was determined to make a fork!
For this project, I used everything I had around to remove the excess wood. The 4 way rasp got a lot of use, but I also used several of my new Dremel tips, the big K-bar knife, and a couple of my fine saws.
Basically, I see no point in dulling the blades on my carving knives any more than I have to! :-D

I saved cutting the tines for when I was ready to start using sandpaper on the rest of it.

I used a carving knife, as well as a fine tip on the Dremel to shape the tines.
Unfortunately, while sanding them, the wood broke off the tip of one of the inside tines.
Which meant I had to shorten all the others to match.
Here it is, after sanding.

Front 
Back
The end result is the wonkiest of forks!
But it’s still a fork. :-D
Here is it, after oiling.

Front 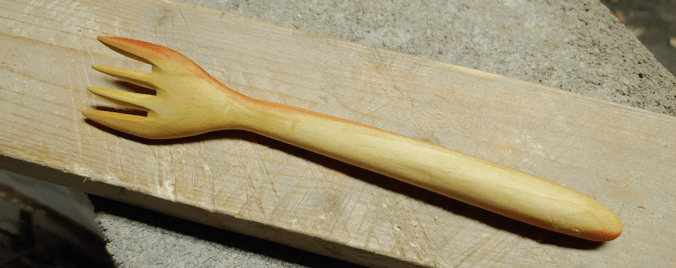
Back
Oh, gosh, it’s the funniest looking fork, ever! :-D
Here it is, next to the spoon made with the same wood.

The spoon could use another coat of oil!

Well, I at least accomplished what I set out to do. Even if it does look totally wonky!! :-D
I still have wood left from the piece I used for these. I suppose my next project should be a knife. :-)
I’m looking forward to it!
The Re-Farmer


Hahaha, I have that same dremel kit. It’ll handle most anything.
LikeLiked by 2 people
Good to know! There was another one available, with more tips, but it was way out of budget.
LikeLiked by 2 people
If it’s the one I’m thinking of… That think is pretty much for professional machinists with all the stuff it’s got. :)
LikeLiked by 1 person
Very possible – which would make it well beyond my needs. I think I’m going to be quite happy with this kit.
LikeLiked by 1 person
I, too, have the same kit!
LikeLiked by 3 people
Cool! Hearing that others have it makes me feel more confident about my little splurge! :-)
LikeLiked by 1 person
Oh, it’s well worth it. Do NOT overlook those off white (cotton?) polishing wheels either. Used correctly, they’re a miracle worker. :)
LikeLiked by 1 person
I was eyeballing those. What do you typically use them for?
LikeLiked by 1 person
Well, in the case of your spoon for example, they could be used to polish the oil into it nicely. I think the most common use is with a polishing compound on metal to get it to a showroom finish. With the right compound I *THINK* they can even be used for *light* deburring. I’ve used them with McGuire’s Plastic Polish to defog pieces of clear plastic also.
LikeLiked by 1 person
That’s good to know. Thanks!
LikeLiked by 1 person
That takes a lot of patience and talent … I like your wonky fork and that you stuck with it!
LikeLiked by 2 people
Thanks! As with the spoon, I was surprised to be able to start and finish it in one sitting. I’ve actually got the beginnings of another spoon and fork started, but I used scrap lumber for them. It turns out pine is noted as a very difficult wood to carve, and I can see why! This old maple has been much easier to work with.
LikeLiked by 2 people
Pingback: Year End Review: top 10 posts! | The Re-Farmer