So… I’m a suck. Especially when it comes to the cats.
But if you have been following this blog for a while, you knew that already. ;-)
While our basement maternity ward is certainly warmer than outside, when I checked on the mamas and babies earlier today, I noticed that the babies felt a bit chilly.
Therefore, on the principle of “put on a sweater, Mom is cold”, I decided to borrow and set up the upstairs heater at the end of the basement where the newborns are. Then, I had to stay in the basement, since it’s not supposed to be left on unattended.
Which gave me the opportunity to finish the hanging rig I’d whipped together when making cheese.
I had already done some basic sanding, as well as a bit of damage repair, a couple of days ago. Having picked up some more sandpaper yesterday, I could now finish the job.
The piece with the crack I’d glued was rough enough that I actually used a rasp we found while cleaning the basement, to get the roughest parts a bit smoother. I then spent the next couple of hours working my way through sandpaper grades until all the pieces were silky smooth.
The basement got nice and warm while I was doing that. The mamas and kitties seemed to be quite content with this. :-)
Then, because I had some, I rubbed the wood with mineral oil.
If I hadn’t had any, I would have eventually picked up some type of varnish, or maybe paint, to finish it with later.
In my rush to make the rig, I’d drilled a pilot hole in the cross piece a bit off. I was going to drill a new hole, lined up with the other side, but when I measured it, the new hole would have been just too close to the existing one. So I left it. I’ll just have one leg a bit off from the other.
The final step was to reassemble it, using wood glue at the ends of the side pieces to stabilize it.
Here are the before and after pictures.
It really doesn’t look a lot different, but trust me. It is! No possibility of getting splinters anymore, for starters. :-D I’m glad I happened to have the mineral oil to treat the wood. Once the glue has cured, it will be nice and solid, too.
We’re now all set for any future preserving we do that requires hanging a bag to drain. Plus, if we had to, we could even add a couple more cup hooks to hang up to three jelly bags or something, if needed.
This photo was taken right after the bag was taken down from the hanging rig.
Of course, I gave it a taste.
It has very mild in flavour, as to be expected with a cheese like this. Lightly salty – I probably could have added maybe an extra half teaspoon, instead of the quarter teaspoon or so I added, to adjust for using 4L instead of 1 gallon. It has a light, almost creamy texture to it.
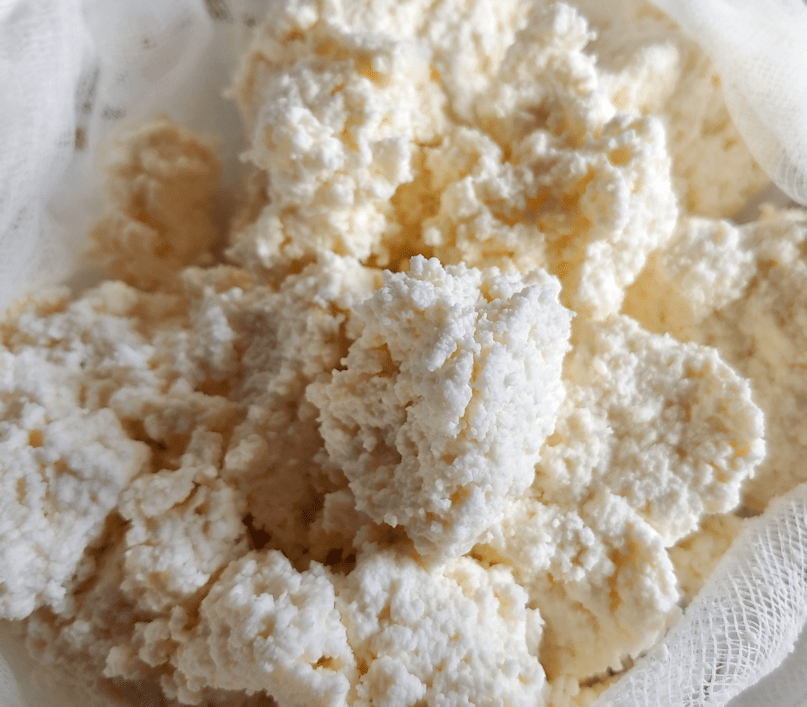
Because it’s so loose, I squeezed it together in the cheesecloth a bit, then put it back into the colander over the bowl, put a plate over it and weighed it down with my stone mortar. Just for a couple of minutes, to make it easier to transfer into a container.
Since it’s such a fresh cheese, it will need to be finished quickly.
I don’t think we’ll have a problem with that! :-D
Then, because I had a big bowl of still-warm whey handy, I made up a double batch of bread, using whey for the liquid. This works out really well. Yeast seems to really like whey. The dough has a softer feel to it while kneading, and the finished bread is lighter, with a delicate crumb and a lovely flavour.
We’ll be storing the rest of the whey in the fridge to use in other baking. It would be awesome in a sourdough bread!
I’m quite pleased with the end result of this cheese. Definitely something I will be making again, and maybe playing around with adding things, like fresh herbs, to it at the salting stage.
I’ve been planning to do this for a while, and finally had the chance today: making lemon cheese. I’m using a recipe I found here. Do check this site out. Especially if you’re interested in different ways of preserving food, though there is lots more there, too.
After sanitizing my equipment, I started heating the gallon of milk.
Well… not quite.
This is Canada, and our “gallon” of milk is actually 4L, as you can see on the very handy measurement inside the stock pot I am using. A litre is just a bit more than a quart. At 4L, the difference is enough to warrant adjusting the quantities of the other ingredients.
Which are lemon juice and salt (I used Kosher salt).
For a gallon, the recipe called for 8 Tbsp of lemon juice and 1 Tsp of salt and I adjusted those quantities up slightly when I measured them out.
After heating the milk to between 185F – 190F (I got to break in my new candy thermometer. :-D ), the milk is taken off the heat and the lemon juice is added. (I used 3% homogenized milk.)
It curdles immediately.
It then gets covered and left to sit for 15 minutes.
Which is when I dashed downstairs to do a quick build. The cheese would need to be hung to drain later, and we don’t have a good set up for that. We’ve made do with whatever we could come up with when making jelly or yogurt cheese, but we plan to be doing more of this sort of thing in the future, so having a rig to hang things to drain would be very useful.
Since we have also finished the basement and have some pieces of wood handy, I can actually do something about it!
When my timer went off, I’d reached this point.
There was just enough of the wood we used to build a frame to block the entry into the old basement, to cut 2 ft long side pieces. One of them is missing a chunk at one end, but it’ll do. I then cut a matching 2 ft long cross piece for the top, and a pair of base pieces.
Then my timer went off and I headed upstairs. Thankfully, my daughter was handy, and she took over with putting the curds into a cheesecloth lined colander over a bowl, to drain for 10 minutes. That was just enough time for me to finish my rig.
I used what screws I had that were long enough, which were really way too long for the job, but whatever. I also added a cup hook to the centre of the cross piece to hang things from.
It is a pretty ugly rig right now. Normally, I would have sanded the pieces and used more appropriate screws. It’s kinda wobbly, but steady enough for the job.
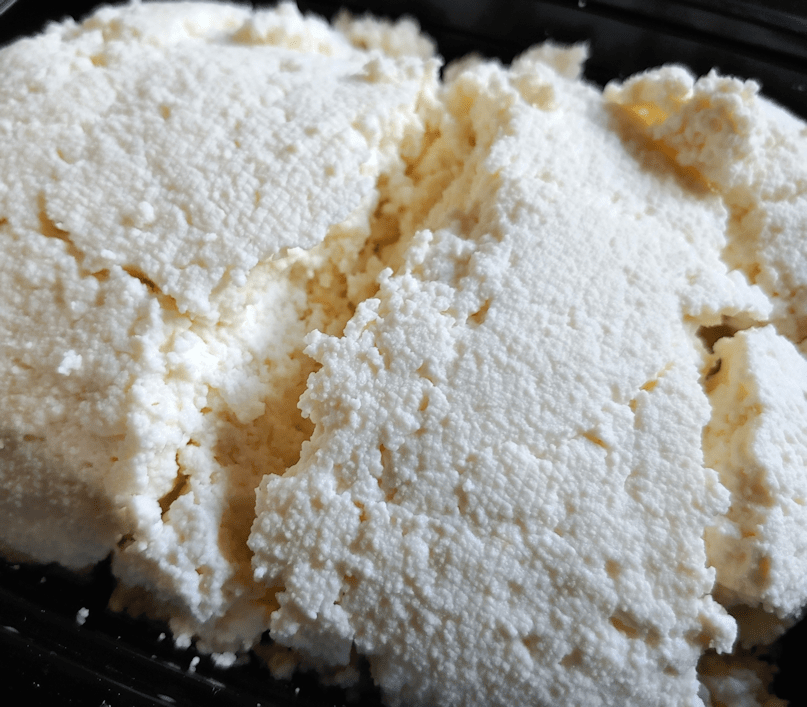
By the time I took it upstairs to give it a good cleaning, it was time to add salt to the cheese curds.
Here they are, after salting.
This is basically cottage cheese, really. My daughter had given it a quick taste after salting it and says it tastes quite different from cottage cheese, but we’re not washing the curds or anything like that, either.
The recipe then says to hang it for 30 minutes for a spreadable cheese, or up to 2 hours for a dry and crumbly cheese.
We were using a fresh cheese cloth, without cutting it down to size, so I ended up tying the cheesecloth around the cross bar instead of using the hook.
We checked it after half an hour and decided to let it hand for the 2 hours. We’ll see how it looks, then!
When we’re done with all this, I will probably take the rig apart and finish it properly. Give the pieces a good sanding, then screw it back together, with some wood glue to make it more stable.
I am so loving having that space in the basement to be able to do projects like this!!!
One of the bonuses of our move to the farm I grew up on is that we could take part in a childhood tradition; the blessing of our Easter baskets. It was many moves and many years before we were able to find a Polish church that did basket blessings, and be able to take ours in.
That didn’t stop us from doing our traditional baskets. It was one of my favorite traditions, growing up, and even when we stopped going to church for many years (for a variety of reasons), we still did our baskets and simply blessed them ourselves.
Which is what we’ll have to do this year, since none of the churches are holding any sort of services during the lockdown, other than online.
We did start some of our preparations already. For the cheese portion of our basket, we decided to do marinated goat cheese again. I made up two 250ml canning jars for our basket (I’m hoping to get one of them to my mother, along with some fresh horseradish), plus two 500ml ones, just for regular eating.
Tomorrow, I hope to make some fancy bread for the basket. Probably a Braided Egg Bread again, though I haven’t completely decided yet.
Today, I started pink pickled eggs; one of three ways we like to do eggs for our basket. The recipe for pink pickled eggs that I followed before is here. This year we, strangely, had a hard time finding anything other than shredded beets at the grocery store, so I modified the recipe a bit. I found 1 small jar of tiny pickled beets and used the juice from that to colour the liquid, plus sliced some of the beets and included them in with the eggs. With so little beet juice, I figured the addition of the beets themselves would help add colour. The other change I made was to include the fresh herbs I had left over from making the marinated goat cheese; thyme and rosemary.
When preparing eggs for the basket, we always cook way more than we need, so that we can use only the most perfect eggs for the basket.
Which is difficult, when the eggs need to be peeled first. There have been times when we’ve boiled a dozen eggs, and not a single one could be peeled without tearing apart!
So today, I tried a combination of “hacks” to get the job done.
The first is to add baking soda to the cooking water. Yes, it does make a difference.
The next is to cool the cooked eggs down as quickly as possible. Putting the eggs into an ice bath is one way to do it, but our well water gets so cold, we can get away with using tap water.
The final one is something I tried for the first time today, and it worked beautifully!
Shaking them in a jar.
Okay, so it wasn’t quite that simple. :-D
I grabbed a small canning jar, though any jar (with a lid) just a bit bigger than an egg would work. Theoretically, you can use a small glass and cover the top with your fingers, but that would get pretty messy. The first jar I tried was a 500ml (pint) size, and I found it a bit too big and ended up using a 250ml jar instead.
Leaving the eggs in their cold water soak, take one egg and put it in the jar, along with enough water to fill the jar about half full or a bit more. It can be helpful to crack the shell a bit before putting it in the jar.
Then, put on the lid and start shaking. Vigorously, but not too violently!
The shaking does a few things. The most obvious is, it cracks the shell quite thoroughly. This is where you have to find a balance on how much water is in the jar when you shake it. Too much, and the water protects the egg from cracking as much. Too little, and the egg can get bashed apart.
The shaking also separates the membrane from the white of the eggs – which would have already been spurred along by the addition of baking soda to the cooking water, and the quick cool down. And finally, it lets water work its way between the membrane and the egg white, making it much easier to remove the shell.
After a thorough shaking, dump the contents back into the water with the rest of the eggs. While holding the cracked egg under water, start peeling away the shell. If it still sticks, do the shake again. :-)
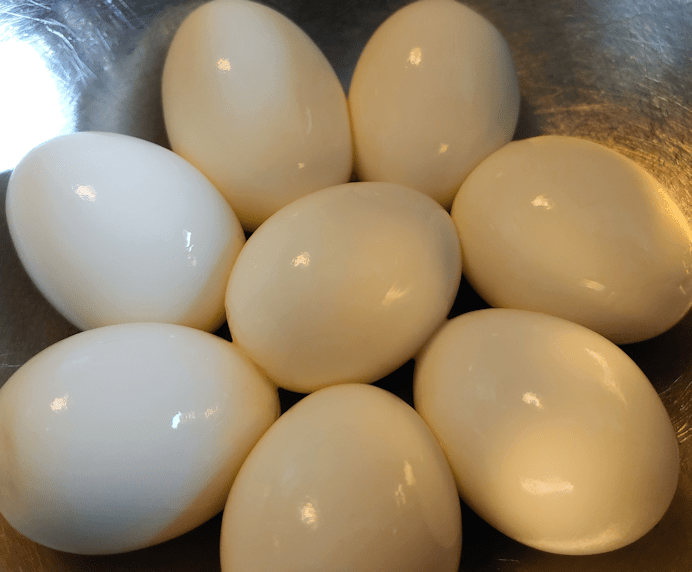
Out of the package of 18 eggs I cooked, I got 8 that were perfect enough for the basket; two for each of us.
This is what happens when an egg is shaken up too vigorously.
Here are the best eggs, ready for the fridge.
They should have at least 3 days to marinade in the pickling liquid, which is just in time for Easter.
Of the remaining eggs, there was one that broke during cooking, which left another 8 eggs suitable for pickling. I did up another container the same way, minus the beet juice. It still has beet slices with the eggs, so it will have just a hint of pink. That one will be for regular eating.
It is going to be a delicious Easter celebration this Sunday! :-)
First, you may have noticed a change in the menu at the top. I now have a separate tab for sourdough. If you’re looking for information on making a sourdough starter, or trying some of the recipes we’ve been using, that’s where you’ll find quick links to all the relevant posts.
There’s a reason I’ve done this. :-D
We have long been the sort of family to keep a pantry stocked of basics and do a lot of “from scratch” cooking. Part of it was because that’s what we wanted to do, but there was many a time when finances left us with little choice.
Since we’ve been living on my husband’s long term disability income, which comes in once a month, we’ve also been in the practice of stocking up once a month, long before we found ourselves living out in the boonies.
Which means that many of the things people are being called to do, with the Wuhan virus lockdowns, are things we were already doing. Now, however, there are more people doing it, which means we’re suddenly having a harder time finding things that have never been an issue before.
Like yeast.
Now, to be honest, I did have troubles finding the type of yeast I wanted. It was far easier to find super quick acting or bread machine yeast, than the slower acting yeasts I preferred. But that’s just me being picky. :-D Right now, there just isn’t any type of yeast to be found, even as supplies of flour and sugar have been restocked in many places; at least in the cities.
I have given up Facebook for Lent, which is probably an extra blessing this year, as I’m missing out on all the social media crazy that I’m sure is going around right now. I still use their messenger, as I can use it on my phone without logging into Facebook, so I sometimes get people sending me information that way, but beyond that, I’m pretty much out of the social media loop.
With so many people suddenly stuck at home and having to learn how to cook and bake, plenty have turned to social media to discuss and share. Since I’ve mentioned to a few friends and family members about my inability to find yeast, I had someone message me with something they found.
It was instructions on how to “make your own yeast.”
Now, right off the bat, I knew things were off. That’s not how yeast works. You don’t “make” yeast. Yeast is a living thing, and wild yeast floats in the air around us all the time. Now, it could have meant instructions on how to make something like commercial yeast, but that’s not what was in the photo.
What it really was, was instructions on how to make a sourdough starter.
Which was great. As a recipe, it could have made a very nice sourdough.
The reason I say “could” instead of “would” is because how it turns out depends on the wild yeast that finds a home in the mixture and starts colonizing it. It’s entirely possible for a nasty strain to take hold, and instead of getting a nice, bubbly mixture that smells wonderful, you get something that’s black or red or otherwise nasty, and it needs to be thrown out. That’s why even some sourdough starter recipes include adding a bit of commercial yeast. This is to ensure that a strain of yeast that is known to be safe is established.
There are lots of reasons people so readily adopted commercial yeast.
Even if it was colonized by a lovely strain of yeast, sourdough starter is not something you can substitute 2:1 with commercial yeast. It doesn’t work that way. Starter is a living thing that needs to be tended and fed and stored properly if it’s not going to be used very often. It also behaves differently than commercial yeast, typically taking much longer to rise (unless your recipe calls for something like baking soda which triggers a chemical reaction… do feel free to visit the sourdough tab to learn more). That slow rise is one of the attractions of sourdough baking, as it allows all sorts of lovely flavours to develop.
Oh, and the Pinterest worthy photo of a mason jar full to the top with lovely, bubbly sourdough starter?
Don’t do it. It may not be as aesthetically pleasing, but this is what it should look like.
A starter needs lots of room to bubble and expand. Put it in a little mason jar, and you’re going to have a mess to clean up before long! Also, if you’re going to be doing any serious level of baking with sourdough, you’re going to need more than a tiny jar will give you. We keep ours in a giant plastic bowl (no metal!). Some of our recipes call for 4 cups of starter, so we keep a fairly large amount of starter bubbling away.
Having yeast is really handy. That’s why, even though we have a sourdough starter we’ve managed to keep alive for a year and a half now, I still like to have commercial yeast.
I recently spoke to my mother about not being able to find yeast. She told me how, in her younger years, no one used yeast. She’s shared memories of her childhood before, so I already knew that part. When bread baking, her mother would set aside a piece of the dough for the next baking day. I knew that part, too, as it was a common technique at the time, and my dad has also shared memories of his family doing the same. Her mother would bury the set aside piece of dough into the flour.
Wait… I didn’t know that part!
In fact, this was a method I’d never heard of before. My grandmother would bury the piece of dough in the flour. A dry crust would form on the outside, and it would need to be soaked before it could be used in the next batch of bread.
I think I might have to try that!
So what’s my point about all this?
Well, for those who are new to baking and wondering what to do about not having commercial yeast, you’ll be fine. You can make a sourdough starter. Just know that this is something that takes time to get established. Or you can make flatbread, with no leavening at all. There are options. The trick will be to sift through the misinformation that’s out there. It’s not as hard as some make it out to be, but it’s not as “easy” as others make it out to be, either.
I supposed it comes down to, if it sounds too good to be true, it probably isn’t!
We did make one change in the recipe. We didn’t have any extra virgin olive oil. We did, however, have avocado oil, so we used that, instead.
It worked very well!
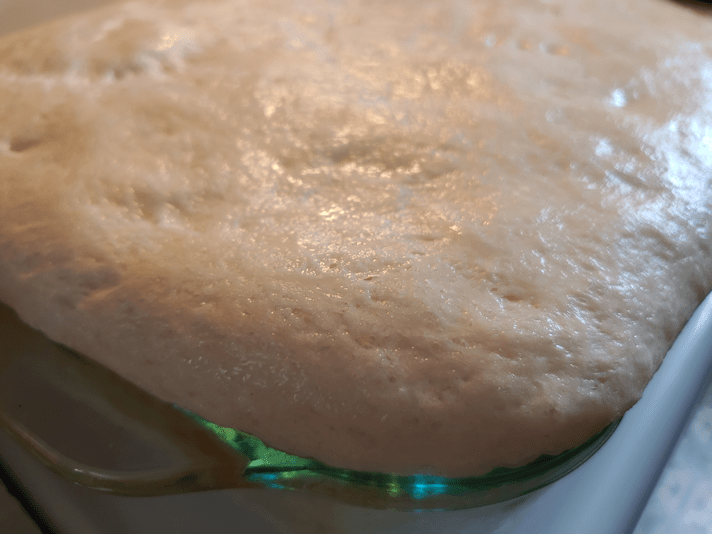
We also didn’t have the type of pan they recommended. We have 9×13 pans. Just not with high sides. So we used a slightly smaller glass pan. The dough has a second rising in the pan, and was very close to overflowing before it was vigorously poked at to deflate it.
For a recipe with no oil in the dough, it uses quite a lot of oil! And butter. The baking pan is buttered, first, then oil added, then the dough put in.
Just before putting it in the oven, more oil is drizzled over the top, and sprinkled with Kosher salt. After it’s baked, butter is melted with garlic, which is drizzled on top.
The end result is both beautiful and delicious. That salty, buttery, garlicky topping is sublime! The texture is moist and chewy, and there were some pretty large bubbles in there! Even the bottom crust has a very nice texture, thanks to the butter and oil combination.
I rather like avocado oil better than olive oil in a lot of things, but it’s frightfully expensive stuff. Costco has it at much better prices, at least.
This recipe is definitely worth trying out! It has rising instructions for both an overnight dough and a same day bread.
Now excuse me, while I go back to enjoying this Focaccia!!
Today my daughters did the baking, starting with a sourdough “batter” bread.
There’s a reason the word batter is in quotations…
The girls have been finding recipes they like and, after trying them out, adding them to a notebook with any modifications or adjustments they’ve come up with.
I’d made myself a ponytail hat last winter, but forgot it at the clinic during one of our doctor’s visits. No one turned it in to the lost and found. I finally got around to making a new one. :-)
I used two strands of medium weight yarn and a 6mm hook. The main body of the hat is just half-double (hdc; known as a half-treble in the UK) worked in a spiral. To figure out where to put the opening, I just kept putting it on my head until it was long enough to reach where I usually wear my braid, then did a chain 4, skip 4 stitches to make the opening.
Warm hats are, of course, a necessity for this time of year, but most hats irritate the heck out of me. If they’re long enough to cover my ears, they get into my eyes, and every time I move my head, the back of my hat gets pushed up. My ears get uncovered and the hat gets pushed into my eyes. My long hair, of course, also gets in the way of having it sit right on my head.
The joy of making my own hats, is that I can figure out how to work around that.
Along with the opening to pull my braid through (which then helps keep the hat in place), after a few more rounds, I switched from hdc in the back to dc (double crochet, or treble/triple crochet in the UK) on the sides, and sc (single crochet, or double crochet in the UK) across the front. The end result is a wavy edge with longer sides that snuggle warmly around my ears, while the slightly shorter back doesn’t get pushed up when I move my head around, and the even shorter front doesn’t get into my eyes, but it still long enough to keep my forehead warm.
I probably should have done this at the start of winter, rather than the end, but it’ll do the job just fine! :-D