Well, I’d hoped we could actually finish the squash tunnel today, or at least get the side cross pieces at the top done, but we didn’t get quite that far.
But, progress was still made.
Most importantly, we got the supports up in the post holes.
In refilling the post holes and tamping the soil down, a few of them did need to have more soil added. A good way to reduce some of the lumps in the old garden, left from when it was last plowed before we moved here.
It’s very… rustic looking. That’s a trend now, right? :-D
And no, that middle pole isn’t actually tilted. The tree it’s made from is bent. All the pieces are wonky in shape! :-D
It’s also still very flimsy right now. Joining them at the sides with cross pieces should fix that.
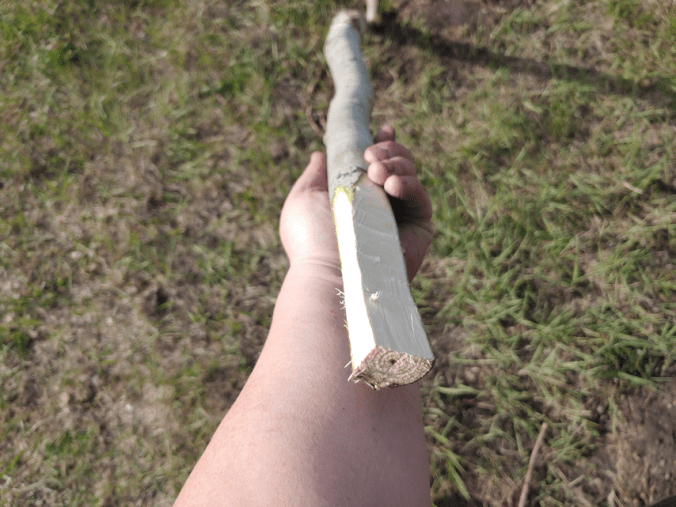
It was already starting to get hot by the time this was done, so we took advantage of the morning shade to transplant the Mongolian Giant sunflowers. It wasn’t until evening that I was able to work on the next step for the squash tunnel. I cut a total of 8 of the 16 cross pieces needed at 5’6″, then trimmed matching flat pieces at each end.
I also trimmed one side of the flattened ends a bit; just enough to have a narrow flat surface on what will be the top.
The flat parts are intended to butt up against the upright and the top cross piece. It will wait until tomorrow, but the plan is to screw the cross pieces to the upright, then add one more screw through the top cross piece, down into the side piece – and hopefully not hit another screw in the process. This should give it some more stability. The other 8 cross pieces will be attached a few inches from the bottoms, which should strengthen it even more, as well as provide a place to attach mesh for the vines to climb.
There are a couple of problems we need to figure out how to get around, to finish the job. We do have a cordless drill, but both batteries no longer hold a charge, and the company doesn’t make them anymore. Until we get around to buying a new one, we have several corded drills to choose from. Getting extension cords to reach this far, though… that’s going to take a bit! We have a pair of 100′ extension cords, which won’t reach reach from the outdoor outlet on the side of the house. I remember how far I could reach while using the electric weed trimmer, and three extension cords. We’ve since gotten more cords, so I think we’ll have enough to reach around the structure.
The next challenge is, we’re short. Well, except my husband, and he’s broken. ;-) To be able to drill a pilot hole through the stop cross piece will require clambering up and down a step ladder. For our gimpy household, that is somewhat risky!
But, it’ll need to be done. With this structure, we can’t get away with tying the cross pieces on with twine, like with the pea trellises.
With 5 uprights and 4 cross pieces per side, only two cross pieces can be placed up against the overhangs at the top, so each side will have two cross pieces mounted just under the other two. Which will hopefully also contribute to the stability. If that’s not enough, we’d have to add supports on the inside of the corners, and I really don’t want to get that finicky with a temporary structure.
We may not have finished the squash tunnel, but we accomplish other things, but that is for my next post! :-)
Not that long ago, we were dealing with freezing temperatures. Now we’ve got a heat wave!
Today’s high was predicted to be 24C/77F. Instead, we reached 28C/82F. Tomorrow’s high is supposed to be 28C… does that mean we’ll be going to break 30C/86F? :-(
Hot as it was, we needed to get started on the squash tunnel. Thankfully, we could at least work in mostly shade.
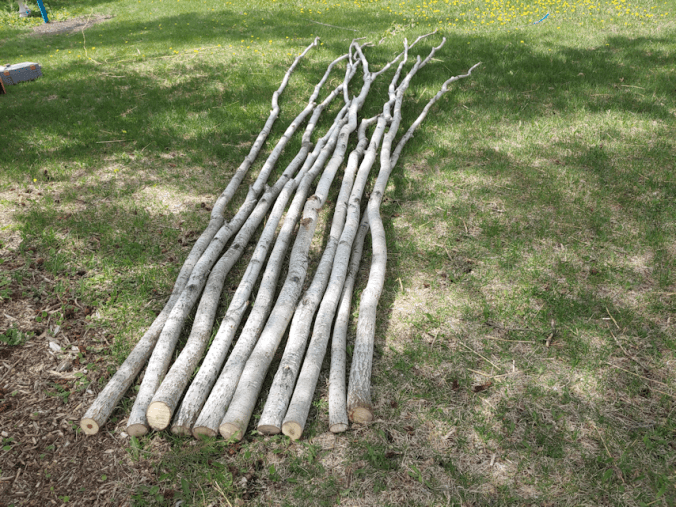
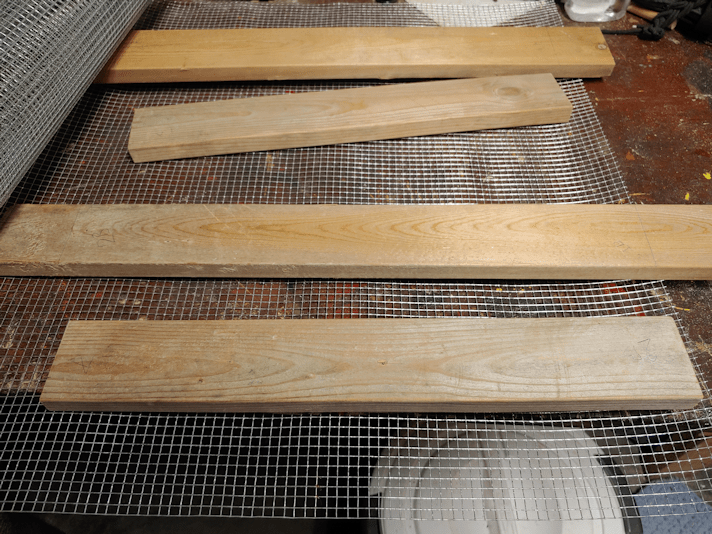
The first thing to do was go through our pile of poplar we’ve cleared out of the spruce grove, and pick the strongest, straightest ones. Straight for the first 7 feet, at least!
The upright supports were cut to 7 feet, but there was still enough from each of them to cut cross pieces at 5 1/2 feet. Of those, the strongest ones were selected, and at least 3 inches was trimmed from each end to have a narrower, flattish part to attach to the uprights.
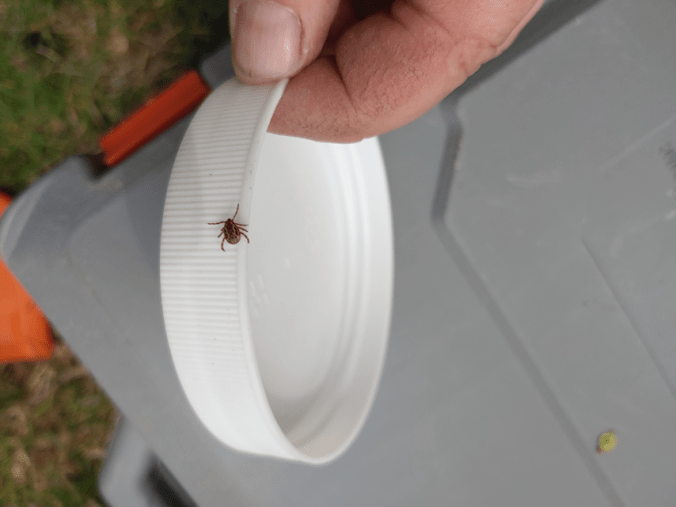
While preparing to screw the pieces together, I found our first wood tick of the season! We ended up finding a couple more, later on.
Time to dig out the bug spray to go with the sun screen… :-(
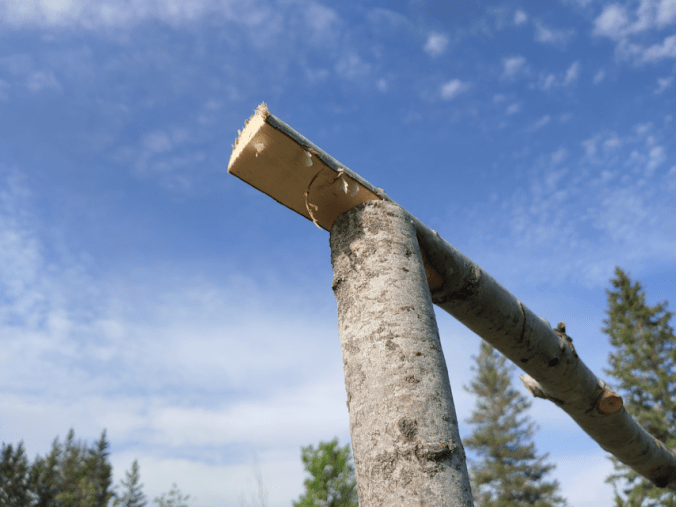
The uprights need to be 5 feet apart, and the cross pieces were to be attached to their tops. I measured out and shoved some sticks into the ground as guides. The bottoms of the uprights would be centered at the pegs at their based, while the tops would be placed with the two sticks at the top on the outsides, to have them lying parallel at 5 feet. The cross piece could then be laid out and the flat sides lined up to the tops. Pilot holes were then drilled and they were screwed in place.
Which sounds a lot easier than it actually was. A few cross pieces needed extra trimming to rest against tops of the uprights. Sometimes, the uprights needed to be turned until they all fit together as flush as possible. Still, it got done.
There they are! Five sets up upright supports for the squash tunnel! They just needed to be dragged out to where the squash tunnel will be set up.
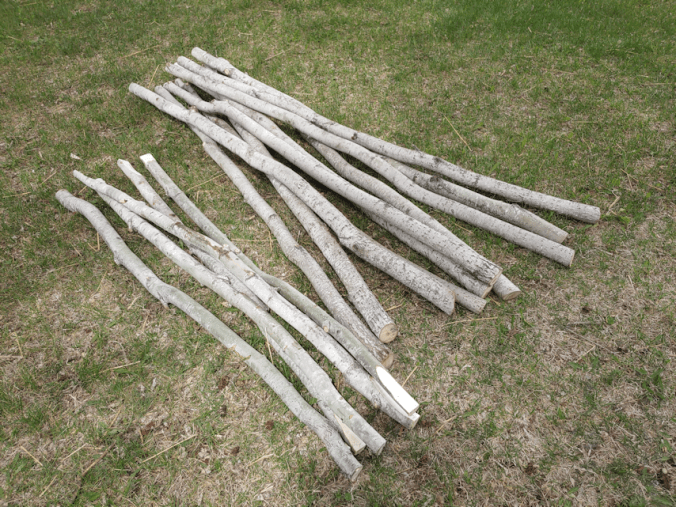
At this point, they are very rickety. Unfortunately, with some of the screws pulled right out of the wood, so we had to redo them with longer screws. Which, thankfully, we had!
By this point, we’d reached that 28C/82F, so once we finished with these, we packed everything away and went indoors to get out of the heat for a few hours. The next stage was to dig the post holes, and there wasn’t any shade to be had, so we waited.
When I finally did head out, I first took the time to water the garden beds and blocks from the rain barrel by the peas. I was able to use the watering can to water everything but the Dorinny corn before the barrel was too low for me to refill the watering can anymore.
While I was watering, I found a friend.
Such a cute little frog!!
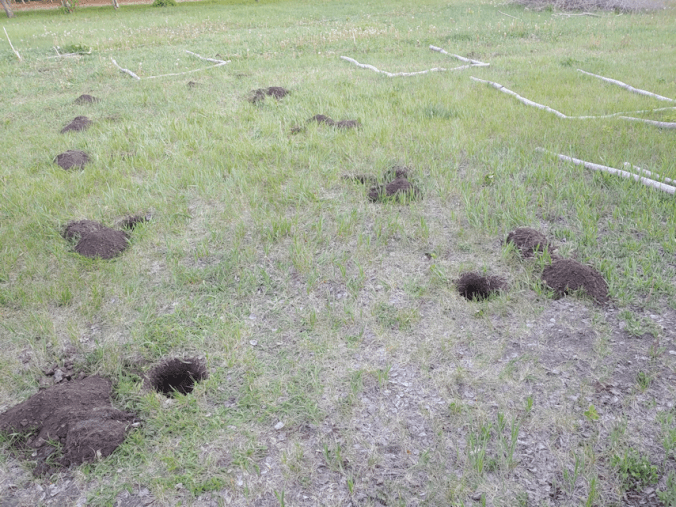
Then it was time to start the post holes. Each spot was marked with a flag, so I started by using the space to stab out a circle around each flag, then moving it so I could remove the sod. Once the sod was out, I went in with a hand trowel to take out the bigger rocks, then used a lopper to take out the many roots I found.
I had company.
I love how Rolando Moon will just hang out while we’re working outside. She doesn’t want us to pay attention to her. She just wants to be close by. She even settled down for a nap!
Finally, I brought over the post hole digger and got to work. It’s pretty much a one person job, so the girls took care of the evening watering, refilled the rain barrel by the peas, and watered the last corn block. Once the barrel was full, I decided to set up the sprinkler over the corn and sunflower blocks, to make sure the seeds got the moisture they need to germinate. Going over them with the watering can may or may not have been enough, so I wanted to make sure they got a thorough soaking while I continued digging post holes.
All done! Ten post holes, all 5 feet apart.
That was it for today!!
Getting those supports in will be a three person job. Particularly since they are still so wonky. Two people will be needed to place the supports into the holes, while the third person will back fill the holes. They will still be rather fragile until the cross pieces are added to the sides. We weren’t able to pick up a cordless drill on this month’s budget, so we’re going to have to string together a whole bunch of extension cords to drill the pilot holes! The cross pieces at the top should have enough extra length that we can put a screw through them, into the side cross pieces, too. We’re all short, though, so we’ll need a step ladder to do that!
I want to add cross pieces near the bottoms of each side, too. We’ll need a total of 16 pieces to do tops and bottoms of both sides, and then we can put either wire mesh or netting for the vines to climb up and over the tunnel. Then, we can start making the beds themselves, to transplant the winter squash, gourds and melons into. These will be on the outside of the tunnel supports only, keeping the tunnel nice and wide on the inside. If all grows well, it should create a nice shaded space that we can put chairs in, to rest and enjoy while tending the garden. :-)
Next on the list are the beds for the summer squash, and the block for the Montana Morado corn. They’re getting quite big in their cups, and hardening off nicely. I hope they handle being transplanted okay! I do with the toilet paper tubes had worked out. That would have been much better and less disruptive to the roots. Well, we’ll know for next time: pre-soak the growing medium before putting it into the tubes!
The next week or so is going to be very, very busy!
Once again, our temperatures have lurched from one direction to the other! From days cold enough for the furnace to turn on, and overnight lows below freezing, we’re back to the heat. It’s past 7:30pm as I write this, and our temperature is still at 24C/75F. A week from now, we’re expected to hit 31C/88F.
Well, by then we should be transplanting our squash seedlings, so that will be good for them, at least!
This morning’s job was to direct sow our bush beans. I am so glad we picked up that extra hose. The mini-beds we made for them needed to be soaked, re-soaked, then soaked again, before I even planted the seeds. I can’t believe how quickly things have dried out already, though I suppose with the winds we’ve been having, I shouldn’t be surprised. You can even see that the pea trellises have been moved around by the winds! I even found one end of a cross piece had come loose after one particularly windy days. The bags may work to startle critters, but they also act like sails.
The yellow and green bean packages had 200 seeds each. With a 20’/6m double row, we still had seeds left over. The purple beans were packed by weight, and a 50g package was just enough for its double row.
Once planted, they all got watered, and watered again! Normally, I would have pre-soaked the beads, but these were inoculated seeds, and I figure soaking them first would have washed off the inoculant!
After the beans were done, we set up the sprinkler to start soaking down the rows for the corn and sunflowers. We left it running over one side for a few hours, then moved it to cover the other end. Much to my surprise, the sprinkler can cover all but 3 rows. There isn’t a lot of pressure, this far out!
Our afternoon project was to see what we could do about protecting our spinach beds. After scrounging in a little shed near the barn, we dragged out the last of some narrow old, salvaged boards. Many of them had several 3″ deck screws in them that had to be removed, first. There were 13 boards, and we ended up using 12 of them, because they were not all the same length.
The roll of chicken wire (or 1″ hex wire) we got was 25′ (7.6m) long and 4′ (1.2m) wide. We have three spinach beds we need to cover. While the beds themselves are about 3-4′ (about a meter) wide and roughly 15′ (just over 4.5m) long, the rows of spinach were, of course, less than that. So we were able to use the roll to cover 2 spinach beds. Well, mostly.
We stole a couple of hoops from the small beet bed by the garlic beds to hold the wire up in the middle. The sides are held in place with sticks, that have a bit of mesh hooked onto their tops, so they are helping hold that up, too. Once we get more hoops, we’ll be able to stop using the sticks to hold up the mesh, which will allow us to move the covers to harvest the spinach.
The edges of the chicken wire were sandwiched between boards that were screwed together. Because of the different lengths, we had to cobble them together. A couple ended up with small gaps between the ends of boards, but they were still secure. The covers don’t really leave much room to do a second sowing, though, which we could do any time now, if we wanted. I think I will skip it, and save the seeds to sow later in the summer for a fall crop.
Like everything else we’re doing this year, this is a temporary thing, so we don’t need to get too fancy. When we build our permanent, high raised beds, we will make protective covers that fit properly, and be properly framed and supported. Right now, neither one completely covers the rows of spinach, so the ends might still get nibbled at, but it should be fine. If we want, we can tie on brightly colored or metallic ribbons to flap in the wind and discourage critters.
I’ll have to make a trip to the local dollar store again and see if they’ve restocked on things like pinwheels. I’ll pick up more hula hoops, too. I figure a couple more rolls of the chicken wire would not be a bad idea. I think we still have enough of that wood in the basement that we can make one more cover for the third spinach bed. For the small beet bed, I’m hoping the mosquito netting we ordered will come in soon, but if not, we can use chicken wire.
While in the city, I also picked up 200’/60.9m of yellow rope to string around where the corn and sunflowers will be planted. If what I read about deer not having good depth perception, so having two shorter fences a few feet apart works as well as a high fence, is accurate, we should be able to string just one “fence” of the yellow rope around half the garden, since it’s already so close to the barbed wire perimeter fence. Since most of the other half will be edged with squash, which deer don’t like, we might not need to do much more than that. We shall see!
Now that the blocks for the corn and sunflowers have been soaked down, tomorrow’s job is to plant the corn, with radishes in between to help break up the hard soil, and direct sow the rest of the sunflowers. The transplants are not done hardening off yet, and all our transplanting will wait until after June 2, regardless of what the weather forecasts are right now! The forecasts change so often, I don’t really trust them beyond a couple of days, and, even then, they are frequently wrong for our area.
Once the seeds are sown, we can finally get back to working on the squash tunnel!
We had a beautiful warm day today – prefect for working outside!
Our peas are among the things that require the most preparation before we can direct sow them, so we decided to focus on building trellises for them. After looking over some design ideas, drawing some sketches and making some decisions, I headed out with my baby chain saw and rifled through the pile of poplar poles we kept after doing some clean up and testing out the cordless pruner.
That baby chainsaw made cutting poles to size very fast!
In the background are the support poles, cut to 6 ft lengths. The poles on the wagon are the cross pieces. I am short a few to be able to complete all the beds, but I ran out of medium sized poles. We are saving the bigger ones for the squash trellises, as they will have the most weight on them. The smaller ones will be good as stakes, but are too thin to be cross pieces.
I’ll just have to do more clean up and gather more poles! :-)
Our purple peas have the fewest seeds, so it got the simpler trellis design.
I started by laying out the support poles near where they will be set. Each bed will have 5 support poles, with the biggest ones on the ends, and the middles.
That rain barrel in the background is the one I patched up last year, to keep water at ambient temperature near our squash beds. We will need to fill it with water soon, so it doesn’t blow away! It’s going to take all our hoses put together, to reach that far.
After finding the centre of the first bed, I started digging a post hole – and immediately started hitting roots and rocks!!
I did drag over one of the post hole diggers we found, to try it out.
I’m pretty sure it has pieces missing. :-D
It can handle smaller pebbles, but roots and larger rocks were a problem. For some of the rocks, I had to get in there and bring them out by hand, because not even the spade could get them out. We only have one spade, and I don’t want to break it! We did have a second spade. The handle broke while I was digging holes for the haskaps. :-/
First pole is in!
The pile of rocks was later added to the top of the soil around the post. The soil that was put back into the hole and tamped down was a lot softer, and sank down quite a bit.
Shortly after that, my younger daughter was able to join me, and the rest of the poles went in much faster. :-)
Attaching the cross pieces was a bit of an issue. What I really would have liked to do was screw them together. There’s no way to do that manually, since we’d end up pushing the poles around in their holes. We don’t have enough extension cords to reach this area to use a corded drill and drill pilot holes. Our cordless drill is old and the batteries no longer hold a charge – and it’s old enough that the brand no longer uses the same batteries and does not make them anymore. Once we work out a solution, we’ll go back and put in screws.
Before adding the cross pieces, we measured and marked heights at the top and bottom of each support pole, then cut flattened spots on the ends of the cross pieces and at the marked areas of the support poles. When cleaning up the basements, we found a ball of old bale twine, so we used that to tie the crosspieces in place. That twine is really old, so while it’s holding surprisingly well right now, I expect it to disintegrate fairly quickly.
Once that was done, I used the twine to weave on strings for the peas to climb.
Which took quite a long time! The ball of twine was lots of shorter pieces. I kept stopping to tie ends together and make centre pull balls, to make wrapping around the cross pieces easier. I ended up using most of the ball, so we’ll have to find something else to use for the other trellises.
This bed is now ready to layer straw and soil down. We might even be able to find something usable in the old compost pile to add to the layers. We don’t have a lot of material that can be used to build over that grass, but anything is better than what’s already here! And we can deal with weeds.
It seems a bit much, to do all this burying of posts for a temporary garden, but wind is something we have to take into consideration. Hopefully, we were able to get the support poles deep enough that they won’t be blown over.
The other two beds will have double rows of peas planted in them, so the trellises we build there will not have the cross pieces at the bottom. Instead, we will put cross pieces about a foot away from the centre poles, at about the same height as these ones. Once these trellises are strung, they will form a sort of A frame, with each row having it’s own side of strings to climb.
When I was a kid, my mother always grew peas, but never used trellises. One of my jobs as a child was to flip the rows of peas, so that the sun could reach the other side of the plants. I do remember a lot of yellowed or rotted leaves when flipping my mother’s un-trellised peas. This would have been due to lack of sunlight in the bunched up plants, and contact with the soil. There was likely fungal issues, too, but as a child, I wouldn’t have recognized it for what it was. It worked, and we always had lots of peas, but this will be healthier for the plants, and should result in better yields.
While I was working out here, I was able to hear people out and about, walking on the road, etc. The old house across the road from us has no one living there, but the current owners come out regularly. It was so wonderful to hear the voices of children, playing outside! At one point, I was even visited by a very friendly little dog. The only down side was having our vandal come driving by on his ATV, very studiously avoiding looking our way and pretending to be doing something else other than creeping on me. As if his driving over, turning around and going home again wasn’t making it really, really obvious. :-/
We definitely need privacy screens! The corn and sunflowers will help, once they’re tall enough, but when we clear the fence line so we can repair the fence, we’ll be removing what little screening we have in that area right now.
For now, I’m rather pleased with our “rustic” pea trellis. Not too bad for something made of completely salvaged materials!
One thing about our internet being a problem is that we’re really learning what browsers and websites are data hogs of one type or another. Chrome is better than Firefox, and WordPress is just awful. Not just the editor, but simply trying to view other WordPress blogs. I don’t know what they’re trying to do in the background, but it’s more than our internet can handle and they are constantly timing out or only partially loading.
Today, I’m trying a new browser, and it seems to be working MUCH better. Which is weird, because I’m using Tor right now, and it’s an onion, so you would think it would be worse, not better!
Either way, here I am, able to write a blog post!
As much as possible, we keep Sunday as a day of rest. What often happens during that rest period is that it becomes a time of inspiration. Today was one such day, and I came up with a garden solution.
When I posted about our layout plans for this year’s garden, one of the things mentioned is that our potatoes aren’t anywhere on it; we are planning to grow potatoes in containers this year.
The question was, what to use as containers?
The easy solution would be to buy grow bags. That requires money, of course. Money that would be more efficiently spent elsewhere. We had a number of things around the property we could use, but each had more negatives than positives about them.
So that problem got set aside, and we got to thinking about other things. Like how to preserve our harvest. Particularly the root vegetables. I got to thinking about the bags from deer feed and bird seeds we’ve been accumulating, and how they might be usable.
Which is when the inspiration hit.
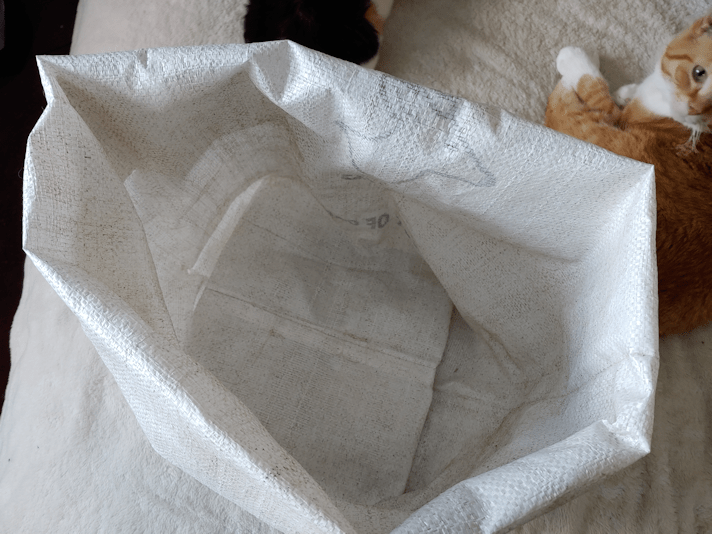
The feed bags would make excellent grow bags!
The bags are simple tubes with seams sewn on the top and bottom. The seams are basically slip stitched, so to open them, I trim one end of the thread close to the bag, then yank. The whole thread pulls out, leaving the top of the bag undamaged. Once the bags are empty, they lie flat.
So I grabbed one to experiment.
To use them as grow bags, they need a flat bottom. To create that, I folded the ends of the seam so the points met at the middle, then stitched them in place. Because of the layers of thickness from the seam, I had to do two rows of stitches on either side of the seam. I used a back stitch, as that would hold better. The thread I used was salvaged from the inside of a very long length of paracord. My younger daughter had made herself a corset, but the lacing she got was not long enough. The lacing is the same as the outside of paracord. My husband bought a 1000 yard roll of black paracord a while ago, so we had plenty to use. It took a while, but we got the inner strands out, which we then separated into individual strands to keep for other things. It’s remarkably strong, and we didn’t want to waste it! It was perfect for this job.
This is the end result. A flat bottomed bag with sides that can be rolled up or down to the height desired. The bags will allow for drainage, and are strong enough that we will be able to move them around as needed.
They’re fairly small. The bags are more long and narrow than wide, and the bird seed bags are taller than the deer feed bags. They are large enough for just a couple of potatoes, or maybe three or four fingerling type potatoes, at most. So we’ll need a lot. I don’t mind the smaller size, since that means they’ll be easier to move after being filled. We are pretty sure we know where they will go, but if that doesn’t work out, being able to easily move them is a bonus.
I brought in the rest of the bags from the sun room, which turned out to be another 12 bags, plus we’ve got two more bags of feed on the go. Over the next month or two, we will be getting more of both deer feed and bird seed, which will likely give us another 8 bags to work with. After that, we’ll just be buying bird seed, but by then, we’ll be planting, so it won’t matter. Until we actually get the seed potatoes, we won’t know how many we’ll have, since they’re sold by weight, not number of potatoes. If we don’t have enough bags, we’ll just try some of the other ideas we were thinking of.
I’ve stitched up three, altogether, to get the hang of it, and now they are set aside. Over the next few weeks, we’ll stitch up the rest so that they will be ready for our planting in late May or early June. Being in bags, we should be able to get away with planting earlier.
The cats, meanwhile, are absolutely fascinated by these bags, and all the smells that came in with them! :-D
I found them while looking for something else, of course. :-D
Here is where, on the tank, I want them to sit.
The bar across the middle has extra surface area in the corners of the ledge the covers rest on. There’s lots of room, here.
The outer corners, however, don’t have that, so there’s a lot less margin for error in positioning the pads well.
The first step was to clean off the ledge the frame rests on. An old toothbrush worked very well for that!
Since the cross pieces of the frames have an angled edge, to better fit into the space, I figured it would be easier to place the felt pads in position on the ledge first, adhesive side up, then placing the frame on top.
The felted pads I have were from a larger package with mixed sizes of circles, plus long, narrow ovals. The larger circles were used up, and all I had left were smaller ones, and some of the long ovals. I’d hoped I still had some larger circles left. If I had, I would have cut them in quarters, and fit them right in the corners, but half circles would have to do!
Once they were in position, I lined up the cover and dropped it down, pressing just enough to make sure the adhesive stuck, then removed it to press the adhesive in more thoroughly.
In this corner, you can see the pad will protect the tank’s frame from the wire. This was the edge of the roll, so no sharp bits sticking out, like the edges I had to cut, so I didn’t trim it.
And this is why I lined the pads up to the corners of the tank, rather than the frame. Yes, there’s a likelihood that the pad will get pulled off where it’s overhanging, if I leave it like that (I will trim it later), but it also isn’t sitting on the screw head. It was supposed to be countersunk, but some of the screws simply stopped and would not screw in any further. I am not sure what was stopping them but, whatever it was, I was wrecking my screwdriver’s tip, trying to get them to go in further, so I stopped. The others were just fine.
So the corners are padded now, protecting the tank’s frame from being scratched up, should a cat decide to jump onto the cover.
When I was fussing with everything to prepare for this, I did have a kitten not only jump onto one of the covers while I was there, but also walk across on the light fixture! Not a problem for a light kitten, but a potential problem, if one of the heavy adults tries to do it. Thankfully, they seem to not like the new covers and are staying off. At least while we’re around to see! The few times I’ve seen one of the adult cats up there, they have stuck to walking on the wood and stayed off the wire and away from the light fixture.
Meanwhile, the baskets and other items stored in the tank have been removed. I’ll need to take a vacuum to the bottom to clean it, then see how my seed trays fit on the bottom. That will help me decide whether the rigid insulation will be lining the inside, or the outside, of the tank. Whatever I do with the sides, the bottom will have its own layer of insulation lining it, too.
It’s remarkable how handy that insulation has been. I’m glad my daughter bought so much extra!
I’m going to need the little step ladder to be able to access the bottom of the tank. I could barely reach to get the smaller baskets out!
The joys of being short! LOL
Another little bit of progress made! :-) I can hardly wait to see how this works for starting seeds!
A while back, we tried a recipe for overnight bread, which you can read about here, and find a link to the original recipe we used.
I then tried an “over day” version, using the dough baby from my Babcia’s bread experiment. It was fantastically successful!
We’ve made it again, as a pretty basic no-knead bread and, once again, it turned out awesome!
If you are new to this blog and don’t know the background to this, you can read the story behind my experiment to try and recreate the bread my grandmother made in pre-WWII Poland, as my mother remembers it. Or you can check out all the posts about it at this link. All links will open in new tabs, so you don’t lose your place here!
Here is how we made No-knead bread, using the old dough method.
The first step is to dig the dough baby out of the flour it sleeps in.
My Babcia did bread baking once a week, and when the old dough sits that long, it tends to be dry enough to break apart into pieces before reconstituting it. This time, the dough baby had not been sleeping in its bed of flour for that long, and it was still quite… doughy! :-D
So I just pulled it apart a bit and placed it in the bottom of a very large bowl.
I don’t know how much that is. Maybe about 2 cups, including the flour stuck to it? The dough baby rises and collapses while stored in the flour, and I made no effort to measure the quantity.
I also pre-measured 2 Tbsp each of course salt and sugar, and 1 Tbsp of yeast.
The yeast would be optional. The dough would need more time to rise without it, which would give more of a sourdough flavour.
Four cups of very warm water was added to the dough baby. Since it wasn’t dry enough to break into pieces, I spent some time stirring it and breaking it up in the water.
Then, the sugar and yeast was added and mixed in, the bowl loosely covered, and it was left for about 10 minutes.
I like to use traditional active dry yeast, rather than quick or instant dry yeast, but that’s just me. The traditional yeast needs more time to proof in the liquid compared to the quick yeast, and the instant yeast wouldn’t need to be added at all at this point, but would be mixed in with the flour.
If I were not using yeast, I would leave the water, dough baby and sugar mixture in a warm place for much longer, checking regularly to see how active it was.
Here is how it looked after 10 minutes. I stirred it again to break up the dough baby a bit more.
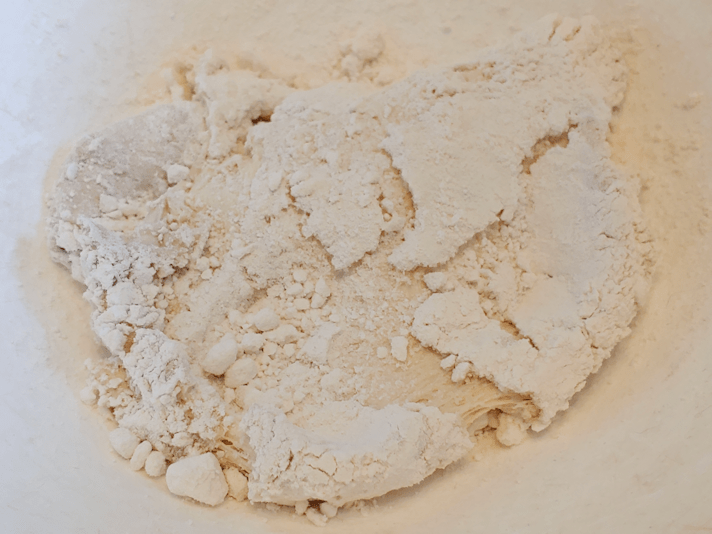
Then it was time to add some flour.
I started by adding 3 cups of flour. It’s easier to mix in that amount compared to starting with just one cup.
I decided to use Durum wheat flour at this point, just because I have it. Use whatever flour, or mix of flours, you like best!
After the first 3 cups was thoroughly beaten in, I added another cup of flour and the salt.
More flour was beaten in, about a cup at a time at first, then a half up at a time.
How much flour to use is something I’ve never been precise about. I know there are bread bakers that weigh and measure precise amounts, but in my experience, that just doesn’t work. The amount of flour needed can depend on things like how fresh the flour itself is, to how much humidity there is in the air.
With 4 cups of water, I would have expected to work in at least 8 cups of flour for this recipe (with my usual kneaded bread, I typically used 5 or 6 cups of flour to 2 1/2 cups liquid).
We are very, very dry right now.
Today, I worked in 7 1/2 cups of flour, and probably could have done with a bit less.
By this point, I was working the flour in with my hand rather than trying to stir it with a spoon. If you have an electric mixer with a dough hook, go ahead and use it!
Before setting it aside to rise, right in the same bowl, I sprinkled some flour over the top and sides, in case it rose high enough to touch the bottom of the bowl’s lid.
Lightly cover the bowl, then set it in a warm place for about an hour. With our chilly our kitchen is in the winter, I heated our oven to its lowest setting (145F on “warm”), then shut it off before I started mixing the flour into the dough. The covered bowl is left in the warm oven, with the light on, to rise. Anywhere that is warm and draft free will do.
Here it is, after an hour. It just barely touched the bottom of the lid! :-D
The dough it then pushed down and worked a bit to incorporate the flour that had been dredged on top.
Next is a very, very important step.
A piece of the dough needs to be removed and set aside for the next batch of bread!
I dumped some flour on a container and plopped about a cup of dough onto it.
Once the new dough baby was set aside, the rest of the dough was dumped onto a 9×13 inch baking sheet that was lined with parchment paper. The last time I made this, I used a parchment paper lined lasagna pan, but I could also have split it into two parchment paper lined loaf pans.
If I didn’t have parchment paper, I would have well oiled the pan, first.
Speaking of oil…
After spreading the dough out to fill the bottom of the pan, I stabbed at the dough with my fingers to create “dimples”, then topped it with oil, course salt and dried parsley flakes.
I happened to still have some fake truffle oil that I used, but an olive or avocado oil would work just was well.
The pan was then set aside for the dough to rise again. Since this batch is so flat and thin, I started preheating the oven for 450F right away. Had I used loaf pans or the lasagna pan again, I would have let it rise longer before preheating the oven. If I had used no yeast at all, it would be left in a warm place until doubled in size.
While the shaped loaf was waiting to go in the oven, there is this to deal with…
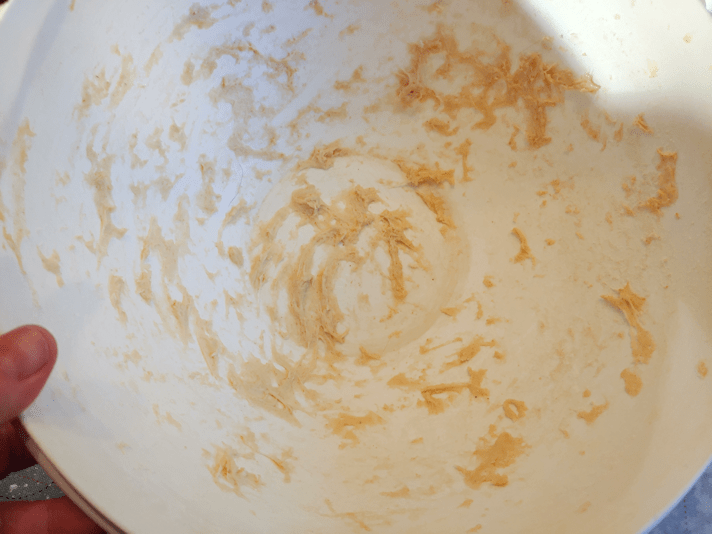
The bottom of the bowl still has quite a bit of dough stuck to it!
We can’t let that go to waste!
Into the bowl went the new dough baby, and the flour it had been resting on.
While working the flour dregs into the dough baby, scrape as much of the dough stuck to the sides and incorporate it into the dough baby.
You probably won’t get all of it off the sides, which is okay.
The dough baby is now ready for a nap. I have a canister of flour that I bury it in, but it can also be buried right in a bag of flour, as long as you’re not planning to use the flour for anything else in between bread baking!
After the dough baby has been buried, it will rise quite a bit before collapsing in on itself, breaking through the surface of the flour. Remember to check on the dough baby later on, to make sure it is still covered in flour.
Once the oven is ready, place the pan of bread into oven and bake. If you wish, place a container with about a cup of water on the rack under the bread pan, to add some steam to the oven as it bakes.
For a very flat loaf like what I made today, it took about 25 minutes. A deeper loaf, or a pair of loaf pans will likely need 30-40 minutes. Bake it until it looks like this.
With the oil added to the surface, it will have a deep, golden colour when it’s ready.
When baked, remove from the oven and left to cool for a few minutes. Once it is safe to do so, remove the bread from the pan and onto a cooling rack (parchment paper makes that job a LOT easier!).
I really like the big, flat slab of bread, but it is a bit hard to cut a slice off! :-D
Here is how it looks on the inside.
The crumb is light and fluffy, yet still wonderfully chewy. The star of the show, however, is that golden, flavorful top crust! It’s just a lovely and delicious combination of textures and flavours.
The only problem with this bread is how difficult it is, not to just scarf it all down right away! :-D
Here is the recipe.
Old Dough No Knead Bread
Ingredients:
old dough set aside from previous bread baking
4 cups warm water
2 Tbsp sugar
1 Tbsp traditional active dry yeast (optional, or use 2 Tbsp if you don’t have old dough)
2 Tbsp course salt
about 7 or 8 cups of flour
small amount of good quality oil (olive oil, avocado oil, etc.)
small amount of dried parsley and course salt
Break up the old dough into a large bowl. Pour water over the old dough and stir. Add the sugar and yeast and leave to proof for about 10 minutes. If you do not have old dough, use the larger amount of yeast and proof it in the sugar water. If using only the old dough and no added yeast, leave the bowl in a warm place until the mixture is bubbly.
After the yeast and old dough has proofed, add 3 cups of flour and mix thoroughly until it forms a very smooth batter. (An electric mixer can be used at this stage.)
Add the salt and 1 cup of flour, mixing thoroughly.
Add more flour a little at a time, mixing thoroughly after each addition, until it reaches a thick but sticky consistency. Use your hands to mix in the last of the flour. (If you have an electric mixer with dough hook attachments, switch to the dough hooks at this point.)
Leaving the dough in the bowl, dust the top of the dough with flour and cover loosely. Place in a warm spot to rise until doubled in size.
Prepare baking pans by lining with parchment paper or oiling thoroughly.
When the dough has risen, punch it down again, folding it into itself to incorporate the flour dusted on top.
Dust some flour on a small plate or bowl. Remove about a cup of dough for the next batch of bread, setting it aside on the floured container until later.
Pour the remaining dough into the prepared baking pan(s). Using your hands, press the dough to fill the pan to the edges and corners, then stab into the surface with your fingers to create dimples in the dough.
Carefully sprinkle oil across the surface of the dough, then use your hand to spread it evenly across the surface.
Sprinkle the oiled surface with course salt and dried parsley.
Set aside in a warm place to rise.
While the bread is rising, return the dough set aside earlier to the mixing bowl, along with any flour in the plate or bowl. Use the flour and the dough ball to scrape off any remaining dough stuck to the surface of the bowl, working the dough ball until smooth. Shape the dough into a ball, then bury it in a container of flour, for use in the next batch of bread.
When the pan of rising bread is almost doubled in size, preheat the oven to 450F.
Place the bread in the centre rack of the preheated oven; if desired, place about a cup of water in an oven proof container on the lower rack to create steam.
Bake until the bread is a deep, golden colour – about 25 minutes when using a 9″x13″ baking sheet, about 30-35 minutes if using loaf pans, or a cake or lasagna pan. The finished loaf should sound hollow when the bottom is tapped.
Set aside to cool in the pan for a few minutes, then transfer the bread to a rack to finish cooling.
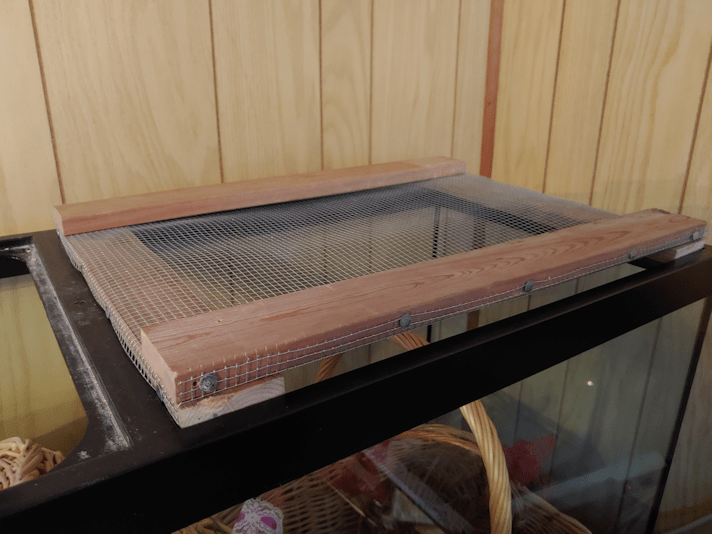
Yesterday, I got started on making covers for our big fish tank, to keep the cats out. Today, I assembled the first one.
Of course, things did not go to plan.
Does anything ever? :-D
One of the things I needed to figure out was how to secure the hardware cloth to the frame pieces, for those inevitable times when a cat jumps on them. All I’ve got for materials is whatever we can find lying around the farm. While doing my rounds this morning, I went digging in the side of the garage where we store the lawnmowers and snow blowers. I knew there were some roofing nails in there, so I grabbed a while bunch and brought them inside.
Here is the first problem.
All of the nails were huge. There was only a single smaller size, and it was still too large. What I wanted to do was secure the mesh to the tops/bottoms of the boards making up the frame. Previously, we’ve used a staple gun to do that, but these were not for things where the wire mesh was expected to hold weight. Particularly not the sudden weight of a cat leaping onto it from above.
The mesh was going to have to be secured along the sides.
That meant cutting it with a half inch overlap on all sides.
I’m getting closer to the end of my roll of 1/8 inch mesh, and it really does not want to unroll at this stage! :-D I had all the boards on there to hold it down, and it still kept rolling itself back up again!
Once the mesh was cut to side and flattened, I affixed it to one side.
Normally, I would have used the staple gun to tack it in place, but I couldn’t find it anywhere. Which is really weird, because I’m the only person who uses it!
So it had to be tacked in place by screwing in the cross piece, holding the wire as taught as I could in the process.
Then I took out one of the screws in each corner.
I had placed the wood in place on the tank and marked each one with pencil, but once the hardware cloth was in place, I couldn’t really see my marks anymore. Plus, with the cross pieces a fraction too long, I had to make sure I didn’t line the side pieces up to the other end, or the while thing would be to big.
So I quickly drilled a pilot hole in each of the other corners of the cross pieces, then went back to the tank.
This way, I could place the long pieces where they were meant to sit, line everything up, then add a couple of screws through the pilot holes to hold them in place.
Then it was back to the basement to continue.
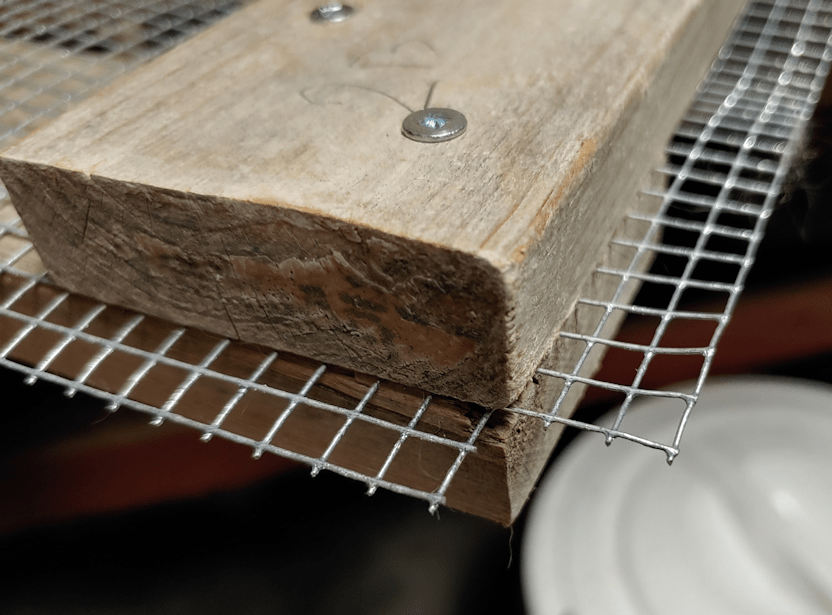
Once each corner was secured with a pair of screws, it was time to bend the wire mesh. Since the sides would be bent in one direction, and the ends in the other direction, I first cut out the corners.
The wood pieces may have been lined up to the tank, but no matter how careful I tried to be, the wire mesh ended up uneven.
Ah, well.
Once the mesh was bent, I drilled pilot holes for each nail (to prevent the wood from splitting) and hammered them in. The flat tops of the roofing nails were perfect for securing the mesh. Very different from how I had to do it with the larger mesh on the screen “door” we made to keep the cats out of the old basement.
Time to test it out again!
Oh, dear.
The addition of mesh and nails – especially the nails – made it wider. It wasn’t so much that it no longer fit. I could have let it just rest on the nail heads, I suppose. They would, however, damage the tank’s frame.
There was a very easy solution to this problem.
Flip it upside down.
With the cross pieces being every so slight too long, I used my Dremel to take off the corners at roughly a 45 degree angle.
It now fits!
Unfortunately, the wood is a bit warped, so it doesn’t sit flat, but it should still do the job.
There are still a couple of things I need to do. One is to find some way to cover the edges of the hardware cloth, for safety reasons. I’ll probably just use Gorilla Tape, if we still have some.
The other is to find my self-adhesive felt pads. The kind that’s meant to go on the bottoms of chair legs or the like, to protect floors. Since the bottom is now the top, the screw heads are facing down, and each corner screw is sitting on the plastic ledge in the corners of the tank. It wouldn’t be an issue, if I weren’t expecting cats to jump on it, so a bit of padding would be a good thing. I haven’t seen them since we packed for the move, though. :-/
Aside from those 2 things, this cover is done.
The other one will wait for another day! :-D The earliest we should be starting any seeds is in late March, so we have time! :-)
I have spent some time thinking about how we can convert our big fish tank into a greenhouse to start seeds in, while also making sure the cats couldn’t jump in.
The original covers the tank came with would have been ideal, but the hinges on those broke long ago.
Since a piece of the filtration system broke during the move, it’s just been sitting in a corner. To keep the cats out, we cut pieces of foam core to fit across the top, then covered the whole thing with a huge table cloth. It turned out to be a great place to store baskets in, and the top became a favorite place for the cats to hang out.
Until they broke through.
We ended up cutting some rigid insulation to fit and taping it in place, which worked much better. With their jumping from the piano onto the top of the tank, though, they’ve knocked even that right off!
What this means is that the cats are used to having access to the top of this tank. If I set it up as a greenhouse to start seeds, they’re just going to jump in, unless I find a way to cover it.
The tank has a bar across the centre and, after thinking about it for a while, I decided to make a pair of wood frames with hardware cloth, that will fit on each side of that centre bar. That way, if I need to get at the seed trays inside, I just need to lift one smaller cover at a time, rather than struggling with one large cover.
I fully expect the cats to jump on while I try to do anything in there!
Today, I got started.
The first thing was to take a tape measure to the inside of each half of the top, as well as the lip the original covers used to sit on. Each side is 16 3/4 inches by 22 3/4 inches. The ends and centre bar have a 1/2 inch lip, while the sides have a 1/4 inch lip.
I then grabbed a couple of pieces of wood I’d salvaged from a shed and started by cutting the long sides. Once I had 4 of them cut, I double checked that they fit properly.
They fit just fine, with a little bit of play that will make putting them in and taking them out easier.
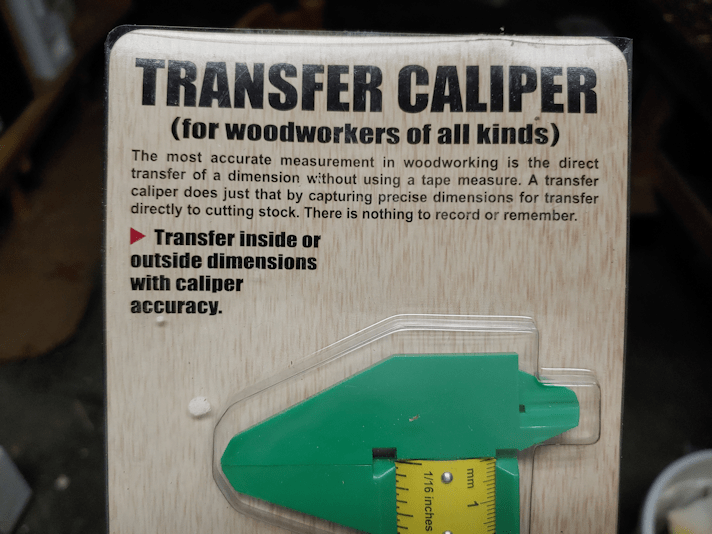
While I was checking the fit, my daughter came by. As we were talking, she reminded me of one of her Christmas gifts to me.
I wish I’d remembered them before I took the measurements! This thing is MUCH easier for me to read than the tiny lines and numbers on my tape measure. It made marking the distance to cut the short pieces a lot easier, too.
Another reason I wish I’d remembered them before I took the measurements.
When I checked the short pieces, they were just a hair too long! The difference is so slight, I could probably sand it to size.
But I shouldn’t need to.
This is how the frame will be laid out. The hardware cloth will be sandwiched between the top and bottom pieces at the corners. I haven’t figure out what I can use to secure the hardware cloth best. Ideally, the wire mesh would be sandwiched between wood all the way around, not just at the corners, but I just don’t have the wood to do that. Nor can I think of anything we have that could be used in a similar way. Whatever I come up with will have to not just support the weight of a cat that’s decided to lie on it, but the force of a cat jumping onto it from the top of the piano. All sorts of ideas some to mind, and get discarded just as quickly. :-/
The thing I’m holding in place in the photo is one of the supports for the light fixture. The L bars insert into ports at the bottom of the light’s frame, so where they are is where the bottom of the light fixture will be.
Once I double checked how everything was going to fit together, I moved on to the next step.
Washing the pieces of wood.
They were probably sitting in the shed I found them in for more than 10 years. My mother tells me that shed was full of lumber when she moved off the farm, some 7 years ago, so what little we found in there was the junk that wasn’t worth stealing, I guess. :-/ Still better than nothing, I suppose. Anyhow. There was a whole lot of grime on them, so I gave the pieces of wood a quick scrub. They don’t need to be really clean. I just need to be able to handle them without getting filthy, and trying to scrub them after the hardware cloth is in place is just not a good idea! :-D
So they are now all laid out in the basement with a fan on them, do dry. I will continue to work on the frames tomorrow!
One of the recommendations for using grow lights to start seeds is to have the lights very close to the soil, and gradually increase the distance as the seedlings grow.
That won’t be an option with this set up.
I’m thinking of lining the inside of the tank with aluminum foil to reflect more light onto the seedlings. It doesn’t need to be from top to bottom; just at seed tray height. Which means I could probably get away with lining all 4 sides with foil in the big tank. I will probably line 3 sides of the 20 gallon tank, too.
The other thing to consider is warmth. We don’t have grow mats, and it’s unlikely we will be able to get any. We do, however, have more pieces of rigid insulation that we can put under the trays, or even along the sides closest to the walls. The LED lights won’t generate heat, but I’m sure we could find some way to warm up the tanks enough for seeds to germinate.
Progress on the set up has, at least, finally begun!
Yesterday, I made another batch of bread using the old dough stored in flour as a starter. I did change things up a little bit, though.
One of the things about trying to recreate how my grandmother did this is, I’m relying on my mother’s childhood memories. There would definitely be things my mother never noticed, never saw, or simply doesn’t remember. In reality, my grandmother would have made do with what she had, so while their bread would certainly have been as basic as flour, salt and water, if she had had other ingredients, she would have used them. I know they would have made their own butter and rendered their own lard. They may even have pressed their own seed oil (my mother does remember processing hemp, so they likely had hemp oil, too). They likely had honey or some type of sugar, if only rarely. It’s hard to say, though, since my mother doesn’t remember very much of that, and none of my research so far has turned up more historical detail. There just isn’t a lot out there to describe how people in poor, backwater villages ate because, frankly, most of the people recording such things either didn’t know about them, or were indifferent to how ordinary people lived.
I do think that there is room to experiment a bit and still be pretty true to how Babcia would have done things, even if they were only on special occasions or when she happened to have access to ingredients.
With yesterday’s baking, one of the things I changed up was how long the old dough was left to soak in warm water. My mother says it was left overnight. My grandmother had a large lump of old dough, for her weekly baking of a dozen or so loaves, but I’m not working with such quantities. The amount I’d set aside from the last batch was the largest I’d done yet, and it was getting too big for my canister of flour. In fact, I didn’t get any pictures of it when I took it out, because there was just too much flour all over, it was bigger than the plate I’d brought to hold it, and I just broke it up into my crock right away.
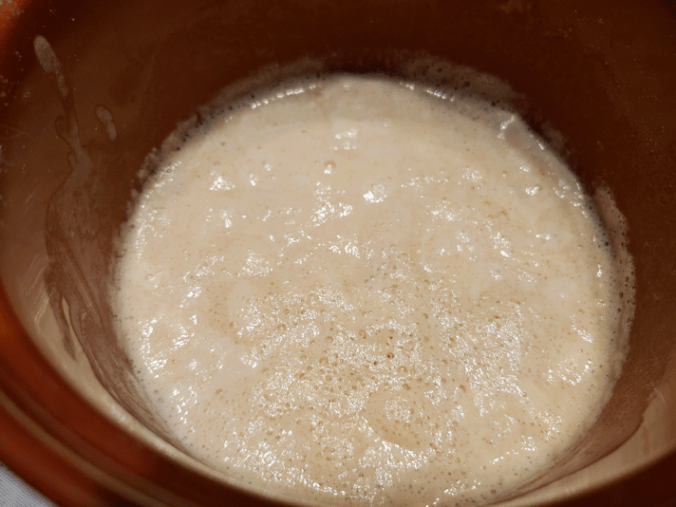
When the old dough was left to sit in a warm oven overnight, it seemed to me that this was too long. It was no longer actively bubbling by morning. So this time, I decided to just let it sit for a few hours. I also added a small amount of sugar (about a tablespoon to 2 cups of water that had been boiled, then allowed to cool down to the right temperature) to feed the yeast. Last time, I supplemented with a bit of commercial yeast, but not this time.
This is how it looked, after about three hours sitting in a warm oven.
Just look at how bubbly that is!
I did add a bit more sugar (another tablespoon or so) to the dough as I mixed it, too. No added yeast. This was a slightly larger batch than before, too. Previous batches used about 3 cups of water in total, to 4 or 5 cups of flour, but this time I used about 7 cups of flour to 4 cups of water. Then, after cutting away a piece of dough for next time, I tried something else.
I kneaded in a cup of thick cut rolled oats. This is something my grandmother would have had, at least sometimes, so I have little doubt that she would have included it, when it was available.
Normally, I would have added the oats at the very beginning, leaving it to soak in boiling water until it was cool enough that the yeast or sourdough started could be added. I wasn’t sure how that would affect the dough set aside for next time, though, so I left it until later.
I knew the flakes would still soften while the dough was rising, and it would add some texture, too. Kneading it in was a challenge, though! I deliberately left the dough stickier than I usually would have, just to make working in the rolled oats easier, and it was still trying to fly all over the place! LOL
Unfortunately, I completely forgot to take pictures after this!
The dough itself just did not want to rise! Yes, it was in a warm oven, but I’m using a plastic bowl (metal can react with sourdough, affecting the flavour, and this is pretty much a kind of sourdough), so I didn’t want to make the oven much warmer. It did rise some, and again as I formed the loaves, but even the smaller loaves didn’t rise as well. I really should be leaving it to rise for far longer, but it’s just to dang cold.
It does rise more while baking, of course, so that helps. The bread was still dense, but it did still have plenty of air bubbles in it. The rolled oats did soften up, as expected, while still adding a bit of nice texture and a subtle flavour.
Speaking of subtle flavours, there is most definitely a light sourdough taste developing.
I made a total of 8 small loaves out of this batch; 4 round loaves (basically just big buns!) baked in a cast iron pan, and 4 long loaves baked on a pizza stone. At 400F, the round loaves needed about 40-45 minutes to bake, while the long ones needed about 30-35 minutes. I have no idea how long my grandmother would have baked hers, since she had a masonry stove, and I don’t know what method she used to determine when the temperature was right.
As for the bread it self, it was quite tasty. I like the addition of the rolled oats. This morning, I cut one of the little long loaves into slices, pan toasted one side in butter, then topped each with a slice of mozzarella, for breakfast. It was very nice! It probably would have been nicer to broil the cheese, but I didn’t feel like fussing with the oven. :-D
Next time, I’ll have to remember to take pictures through the whole process. :-D