We are having a nice day today, before temperatures drop quite a bit tomorrow, so I wanted to get some more done on the old kitchen garden. We’ll expected to have only one cold day before it warms up again, so we should still be okay for getting things done.
With the new raised bed done, it was time to work on the south edge of the old kitchen garden.
This is where my daughter has planted her irises, and at the far right is where her daffodils are. The bulbs were planted deeply, so that they would better survive our winters, but it meant I could only dig around the top few inches. Which is where most of the roots and rhizomes are, so that worked out.
We had a couple of boards on the ground to mark where the outer edge was, though they were mostly covered by grass and weeds. After moving those out, I used where they were as my guide for were to work while clearing things. Once I’d weeded as much as I could, I wanted to see what I could do about the stepping stones and the paths we’d be leaving open in the wall it will be edges with. I found one more paving stone, like we’ve got as stepping stones under the kitty’s butt. I also tried to find matching, unbroken bricks for the gap in the wall.
The other stepping stones are actual stones. After digging around the rock pile near my late father’s car, I found a couple that had split and were nice and flat.
If you look just above the handle of my digging tool, you’ll see a bit of green. That is one of the irises that, for some reason, it still green. I wanted to make sure it was protected when we use the stepping stones.
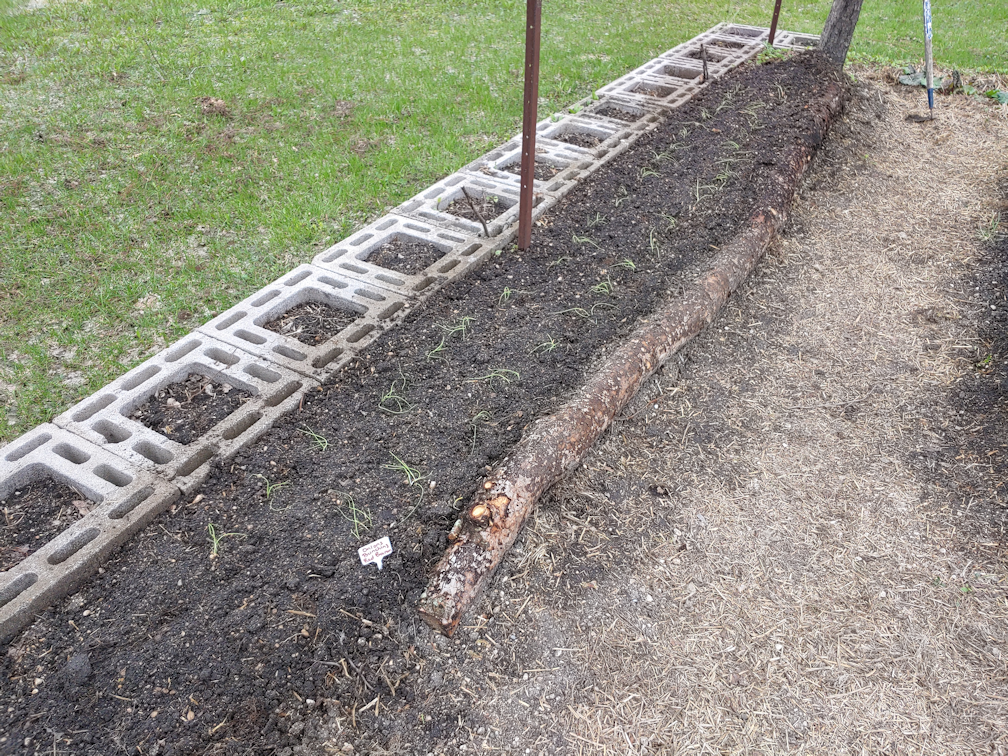
The stones and bricks were laid down, then I dug a shallow trench along the outer edge. I was able to fit the shortest log left over from before between the concrete block retaining wall and the bricks, without having to shift the bricks much at all. The longest log from the pile just happened to be the perfect length to fit between the two pairs of bricks, with no adjustments! The last log I added didn’t need to reach all the way to the laundry platform, since that area is sheltered by the mock orange tree you can see the leaves and branches of in the bottom corner. I just hope I didn’t cover that single Egyptian Walking Onion that’s somewhere in there. That thing has managed to survive for many years. I’d hate to be the one that finally killed it!
The logs are just there as temporary place holders. My daughter wants to use rocks to create more of a wall along the edge. Once the logs and stepping stones were in place, I spread the rest of the sifted soil on the tarp all along the edge, and the logs will help keep the soil in place.
This is the first year we were able to protect that onion enough for it to grow bulbils. You can see they’re sprouting, but no roots had started to form, so I moved it out. Then I found another onions while I was weeding.
I figured, what the heck. I may as well plant them!
I planted them along the raised bed, covered them with a grass clipping mulch (and put some around that one iris by the stepping stones), then added sticks at either end to mark it. I knew for sure that there wasn’t anything else planted there. I figure they will be sheltered by the log wall, and still get full sunlight, too. If they survive the winter, we might have more walking onions next year!
That done, I gave everything a thorough watering, including washing the soil off the bricks, stepping stones and the log edge.
After that, it was just a matter of clean up. The pile of roots and weeds went to the burn barrel.
The area is now done. The next area I need to work on is the L shaped bed around the double lilac. I’ve got lettuce I left to go to seed in there and that’s it. With the weather we’ve been having, though, I’m not sure we’ll be getting any seed out of them this year. We shall see.
I found a little round cucumber lying on the ground and picked it, leaving the others to get a bit bigger. There were a few peas to pick, as well as some carrot thinnings. I would have thinned more of the purple carrots, but they are a very long variety, and our soil just doesn’t want to give them up!
I grabbed some of the smallest Red of Florence onions for today’s cooking, and decided to grab a few little turnips, too. There was one Magda squash I went ahead and grabbed. There was also a single green zucchini, and one large-ish sunburst squash, that I left to get a bit bigger.
The yellow bush beans are almost done. I couldn’t see very many developing pods left as I picked these. The purple Carminat beans are very prolific! There are so many more of them, compared to what’s on the green pole beans.
In that pile of green pole beans, however, there were two extras.
They are from this one little bush bean plant, grown from a leftover seed of our first planting of green bush beans under the sweet corn. The second planting of green bush beans are starting to develop pods, while this lonely original had a couple ready to pick.
I’m happy that this year, we at least have plenty of these two varieties of beans. The Red Noodle beans still show no signs of blooming, though they are at least starting to climb the trellis more. I’m curious about how the shelling beans will turn out, given how incredibly small and fragile the plants turned out to be. There are a lot of pods developing, too.
We planted so much this year, with hopes of having lots of food, in many varieties, to have over the winter. I always expect to have at least some losses. I didn’t expect to have so many total, or near total losses! Which makes me extra thankful to have what we do have.
Though we have been grabbing lettuce and spinach leaves, as needed, this morning we our first harvest from the garden!
One bed with onion sets planted around it got a hair cut. They were trimmed down to about 6 inches, and that almost filled the colander. I did see one that was starting to form a bulbil, so I left that to go to seed. Onions are bi-annual, but with sets, their time in dormancy has them acting as if they are in their second year, instead of their first. With the onions we grew from seed, I would like to leave some to overwinter, so we can get seed next year, but I have to figure out how to do that and have them actually survive the winter.
I also gathered the very last of the scapes in the big garlic. The other garlic that is behind is not yet showing signs of scapes.
In the high raised bed, the first spinach we planted was starting to bolt, so I pulled them all up, before they could get too bitter.
After trimming off most of the leaves, the remains were laid along either side of a row of onions to act as a mulch. They are more on the wood chips than against the onions. These onions are from seed, and are looking like they could use a trim, too, though they are quite a bit smaller than the onions from sets.
The other row of spinach looks like we’ll be pulling it fairly soon, too.
Once those are out, we can plant something else. I still have radish and chard seeds that would work. Most likely, chard will be planted. We’re not big on radishes and, if the conditions had been better, they would have been planted much earlier to try their pods, rather than for their bulbs. It’s too late in the season to grow radishes for their pods, I think.
We’re nowhere near the stage where we can be harvesting something out of the garden every morning, so it was really nice to be able to have something like this now. What we don’t use fresh right away will be cleaned, trimmed, chopped and either frozen (at least the onions), or dehydrated (that worked really well for the spinach, last year).
If we do any dehydrating, though, we’ll be doing small batched in the oven, rather than using the screens. All the mint we had dehydrating, and by the time they were done, there was only enough left to barely fill a small jar. The cats wrecked the rest! At least with the mint, there is still lots in the garden.
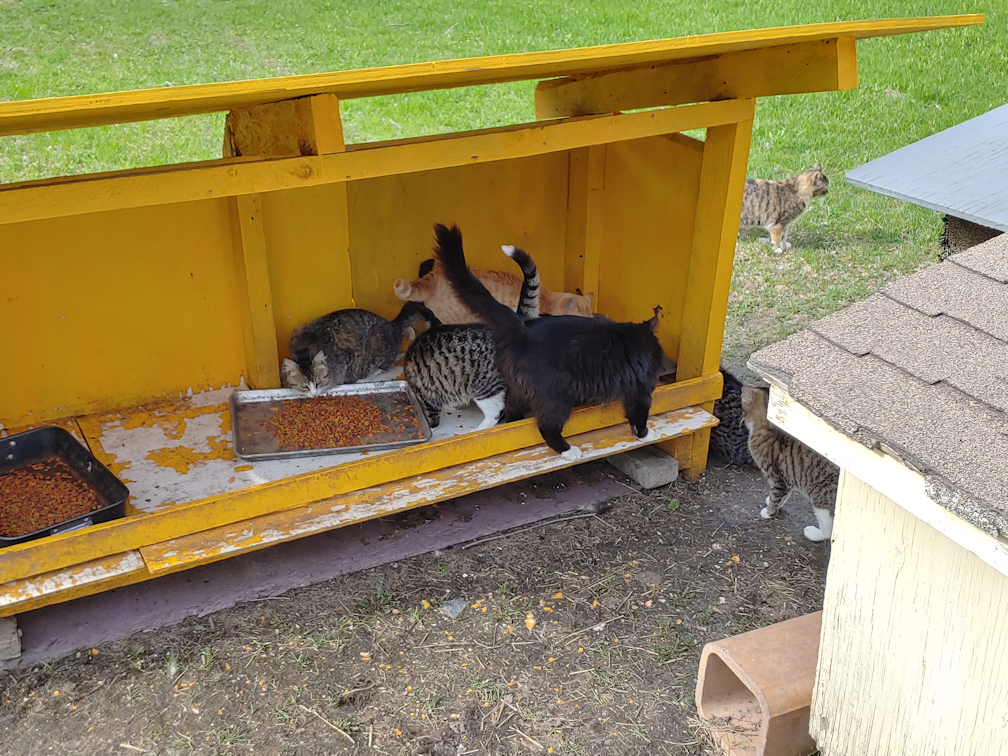
Today has turned out to be a warmer day than predicted, and beautifully sunny. When heading out to do my morning rounds, I had a whole crowd of hungry kitties, waiting by the sun room door for me!
They were running around so much, I didn’t even try to count them. While putting food in the kibble house, TDG not only let me pet him, but let me pull the big ole wood tick in the tip of his ear! In fact, he didn’t even seem to notice I did it.
Which reminds me; while topping up the cat food last night, I got to touch Rosencrantz a bit and finally got a closer look at one of her ears. I thought she might have lost the tip to frost bite over the winter, but the tip is still there! It’s just badly torn. Not a new injury. Not much we can do about it, unfortunately.
The transplants got set outside for hardening off. They were supposed to be out for 5 hours, but we ended up bringing them in a bit early. The winds really picked up, and some of the pots were being blown around.
Wind or no wind, I was determined to get the old kitchen garden finally planted!
This is now our beet bed. We bought two types of beets this year, Cylindra and Bresko, plus we had some Merlin left over from last year. The support posts handily divided the bed into three sections, so that makes it easy to keep track of where one type starts and another one ends.
After the bed was seeded and watered, I broke open the roll of netting. This is the stuff my daughter picked out that I thought could be used for deer fencing. It’s a much finer net than I expected! The black just disappears, too, but in the photo, you can see where the excess is bunched up along the sides. I’m really glad I found that big bag of cheap tent pegs in the garage. We used quite a few of them to pin down the edges of the netting. The short ends are held in place at one end by a stick rolled up in the excess, while at the other end, the excess went under a board I was using to mark the end of the bed.
Next was the L shaped bed. Lettuce went into there. I thought I had 4 types of lettuce left over from last year, but it turned out one of the envelopes was empty. That actually worked out, for the amount of seeds in the remaining packets.
The hard part was covering the odd shaped bed. One of my daughters came out and we sized up a piece of netting for the longer part of the L shape and cut it. The netting is 14′ wide, so we stretched it out on the grass and cut it in half.
The short side of the L, up to the label you can see near the bottom of the photo, is one type of lettuce, which is about as much as the other two together! There were still a few seeds left over, including some that had spilled in the baggie the seed packets were in, so those got scattered in the odd little bit of space next to the rose bush. They didn’t get covered with netting; the space is too small to bother.
The long side of the L shape was pretty easy to cover, but the short side curves around the lilac and gets wider at the end. While I used pieces from the canopy tent frame as supports at one end, there weren’t enough of that length for the whole bed, so I dug out some metal support rods I got last year. They’re not very strong and some had pieces broken off, making them shorter. Those matched the tent frame pieces more easily, but other were full length. I could push most if them deep enough to match heights, but with a couple, I kept hitting rocks that were big enough, I couldn’t seem to get around it. That one stake that has a spider web of cords from it is the highest of them all, and there was no way I could adjust it to avoid the rock I was hitting, and still have it where I needed it. (The bottoms of water bottles are there to keep the netting from falling down the stakes) That extra height in particular made pegging the netting down more of a challenge. In the end, we just had to push some of the stakes inwards to create some slack. We managed it, though.
That left one more bed to plant in.
For this bed, I transplanted the Red Baron bunching onions, in little groups of 3 or 4 seedlings. These are not going to get covered, since nothing eats the onions. Hopefully, the cats will leave the bed alone!
While working on this, I checked out the small bed we planted the poppy seeds saved from last year. I think they are starting to come up, but there are so many things coming up with them, it’s hard to tell! For all the roots I dug out of these beds, we’re still going to have a lot of weeds to fight off.
Now, the only thing left in the old kitchen garden are the retaining wall blocks. I’d transplanted mint into alternating blocks, but they’re not showing yet. I don’t know if they’re going to show up later, or if they got killed by the winter cold. It takes a lot to kill mint, but they did just get transplanted. I’ll leave those for now, but still plan to plant things in the remaining blocks. I just haven’t decided what, yet, since we will likely not be covering those. Plus, this area gets shaded by the ornamental apple trees a lot. With the T posts there, we could put up trellis netting and plant climbers, but anything like that would be deer or groundhog buffet, so we would have to find a way to cover them. It was very difficult to cover the retaining wall blocks last year. We’d planted lettuce in it last year, which we were able to protect from the deer, but didn’t count on the groundhogs getting at them.
We’ll figure it out. We can tuck something into the blocks, later one. For now, I’m just glad to finally get this garden basically done!
Oh, before I forget, just a quite update on my mother. I called her up this morning, and she’s still in a lot of pain. She’s quite surprised by it, it seems. She’s also disappointed. She thought that the doctor would be able to fix her. I tried to explain, they can’t fix everything, but she started taking about how, with all the modern technology we have, there must be something. I had to go back to using my husband as an example, since he’s been dealing with debilitating back pain for a very long time now. Even if they technically could do surgery for one thing, the risk was too high for little benefit, and it would have to be done again in 2 years anyhow – and that wasn’t even for the main source of his pain, for which there is nothing that can be done other than painkillers and, for some of it, physio. He hasn’t been able to do physio since we moved here. Some things just can’t be fixed. I don’t think my mother realised just how fortunate she is to have reached 90 and not had to deal with something like this before.
Ah, well. It is what it is. We just deal with the hand we’re dealt with!
It was a bit cooler and overcast this morning, but still pleasant enough to get the plants outside for a couple of hours.
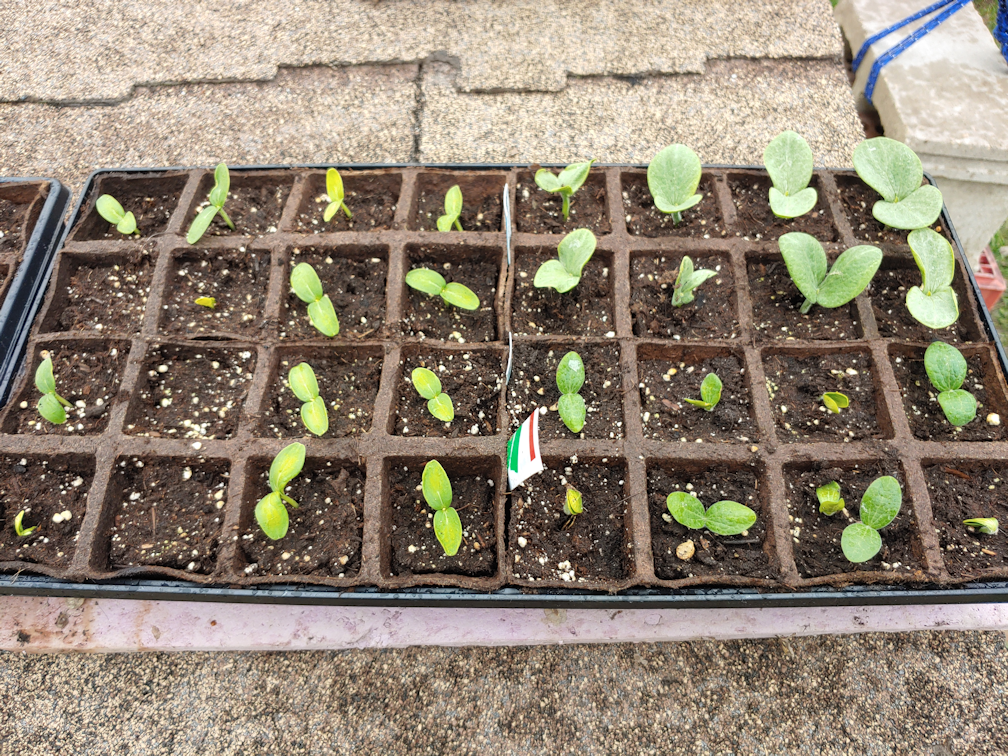
I am really happy with the newest seedlings. This tray has the cucumbers in the left half, with the Teddy and Red Kuri winter squash on the right. It took so long for the winter squash to germinate, I wasn’t sure they’d make it, but we have 100% gemination!
The purple peas in this tray are getting nice and big. The summer squash in the other cells took a long time to germinate, too, but they seemed to get a boost after I put the warming mat under them. It’s hard to see, but even the green zucchini is finally germinating, next to the peas. I thought the Magda squash had started to germinate, but not quite yet. We had less success with those the last 2 years we planted them, too. Our first year, we had only 2 surviving plants. Last year, there was just the one. Magda squash just seems to have a harder time of it.
So far, only 2 of the yellow zucchini have germinated. Last year, we had some germinate, but when they started producing fruit, they were green, and we no yellow zucchini at all. I’m hoping that won’t happen again, this year!
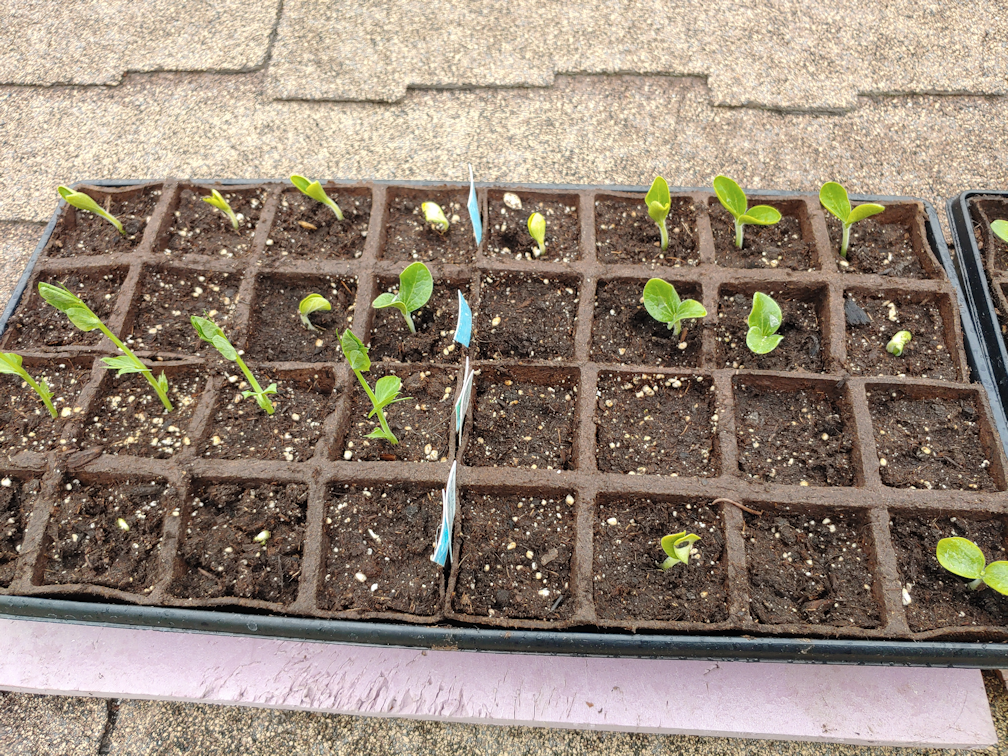
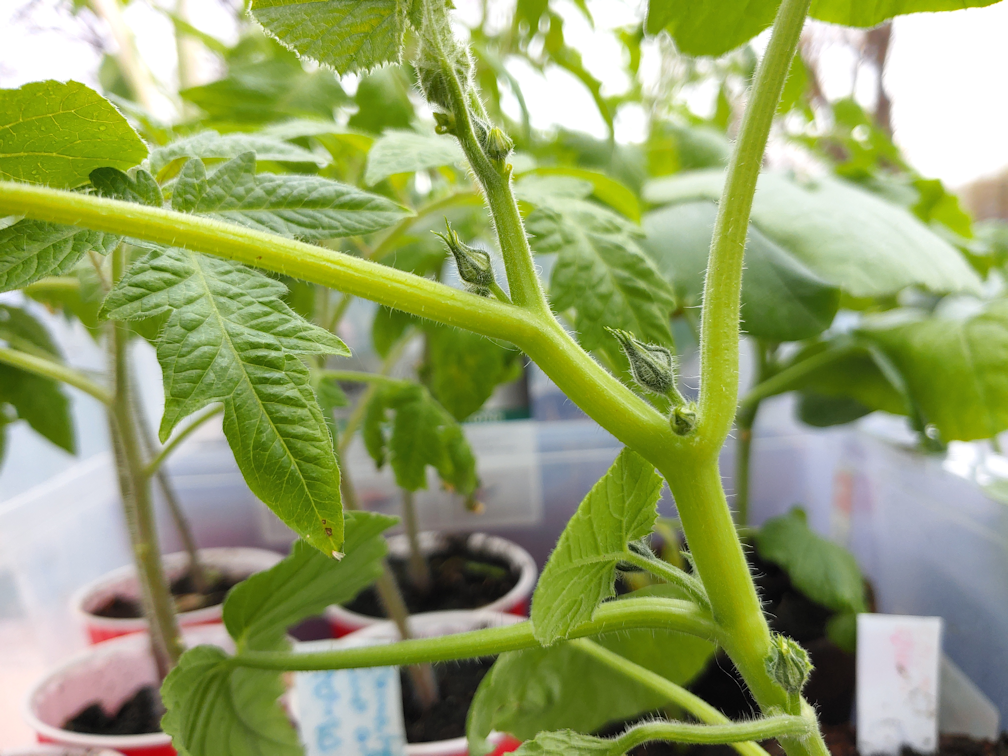
The transplants seem to be quite liking their time outdoors, and even the newest little tomatoes in the foreground are looking generally robust.
We have 3 Crespo squash – and they are budding! Would you look at that!
I considered pinching them off, but these first flowers would be all male flowers. The next batch of buds should be both male and female. So I’m thinking to just leave them? I don’t know. There is very little information out there on how to grow Crespo squash. They do seem to be very enthusiastic growers!
While moving the blooming Wonderberry in and out of the sun room, we have been brushing the 3 plants against each other, in hopes to pollinate them, just in case. I don’t know how if they are self pollinating or not. Nowhere I’ve looked about them even mentions pollinating.
The transplants were left out for 2 hours today, which gave me time to work on our very first direct sowing – and transplanting – in the high raised bed.
The first thing to do was dig trenches through the wood chip mulch, so that things could be seeded/planted into the soil beneath. We have three varieties of spinach seeds from last year, and for this bed, I chose Lakeside, which is the fastest maturing variety of the three. The tray of onions I grabbed are the red onions, Tropeana Lunga, which should look like this when they mature…
This image belongs to Heritage Harvest Seed. You can see what else we ordered with these, here.
By planting the onions around the spinach, they should help with keeping away harmful insects, and maybe even keep hungry critters away. The high raised bed is buffet height for deer, though, so we will be covering them later.
There is space to do a second planting of spinach in two weeks, which will also finish off the seeds we’ve got left of this variety.
The largest Tropeana Lunga seedlings filled the two outside rows, but there were still a few tiny seedlings left. The size that would be considered not worth planting. I hate to just toss seedlings, though, so I ended up sticking them in the soil at the base of the raised bed on the north end. When this was a low raised bed, it was quite a bit longer, so the soil is softer on that end. If they take, great. If not, that’s okay, too. We don’t have a lot of this variety, so I’m hoping to be able to overwinter a couple of bulbs to go to seed next year.
I was left with nice, soft potting soil in the tray the onions seedlings were growing in, so I used that to gently top the spinach seeds, and put just a little around each onion plant, more to keep the wood chips from falling onto them than anything else.
I have to say, I LOVE the high raised bed to plant in! It was completely pain free, with no strain on my joints. Well. I suppose that doesn’t include my arthritic fingers, but I didn’t even notice pain in my hands, either. It took me less than half an hour to plant into this bed
I didn’t bother watering these, since it was already starting to rain by the time I was finishing up. It’s been raining off an on, ever since. My daughter and I got a bit damp when we headed out later on, to figure out exactly where to plant our tree order when it comes in. With 30 silver bison berry to plant, those were the ones we need to figure out the most. They should be planted 3-4 ft apart. Since we are doing these as a privacy hedge, we will planting them 3 feet apart, with most of them along the east end of the garden area, leaving a lane just wide enough to drive through, if necessary, between them and the fence line. Taking into account where the phone line is buried, we’ll be able to plant two staggered rows of 10, though as we get closer to the spruce grove, we many need to jump the rows closer to the fence itself, to keep that driving lane open. There is a branch pile that will be in the way of any lane we leave open, but we’ll still be able to plant around it.
We’ve got 5 sea buckthorn that will be planted nearer the north fence line, to close a gap in the lilac hedge. Any remaining bison berry can also be planted along the lilac hedge, and still keep the lane over the telephone wire clear. This will leave a gap in the privacy hedge, once they’ve grown to full size, that will need fencing or a gate to close it off from deer.
The Korean pine are a whole other issue. Originally, I wanted to plant them in the space between the north side of the spruce grove, and the crab apple trees. These, however, have an 18 foot spread. At their mature size, they would completely fill that space, and we need at least some of it to be kept open to drive through. The alternative was along the north side, which would make an excellent wind break, but with that 18 foot spread and the lilac hedge, we’d be planting them on top of the phone line. Not going to happen.
Which means we’ll have to plant them in the outer yard.
Just past the fence on west side, which has a gate that leads into the garden, there is a space where we can plant 2 of them. Then there is the gate to the secondary driveway – our “emergency exit”, if you will. It was through here that one of our truck loads of garden soil was delivered.
The remaining 7 seedlings will need to be planted on the other side of that back gate, along where there is already a couple of rows of spruces, with some willows at the south end. If we plant them 18 feet apart (we might go with 16 feet), we will have a row of seedlings matching the length of the existing shelter belt trees.
The only problem with this is that the south end is currently under water.
Still, knowing that this is a low spot will help. We can make sure to basically build things up a bit, so that the seedlings will stay above water during spring melt.
Then we’ll have to make sure to put something over them to protect them from being eaten. I don’t know that deer would eat Korean pine, but they could certainly damage them, just by walking over them.
We have not yet received a shipping notice for the trees, but with so many holes to dig, the earlier we get started, the better. Hopefully, by the time they do arrive, we’ll be ready and can plant them right away.
Oh, I just double checked my order! We’re not getting 9 Korean pine. We’re getting 6.
Which means we won’t be digging holes in water, after all. :-D
It’s going to feel weird getting our little 2 yr old plugs and planting them so far apart. Especially since they will grow very slowly for the next 3 years. Which is exactly how my mother ended up planting so many trees way too close together! :-D
Oh, my goodness. I just checked the short range weather forecast, and it’s changed yet again. We’re supposed to get more rain over the next couple of days, then for the two days after that, we’re supposed to get a mix of rain and snow!
What I planted in the high raised bed should be cold hardy enough to handle that, but we might cover it anywhere, just in case, at least for the night.
Last year, May was a very warm month. On this exact day last year, we had a new record high of 30C/86F. The record low for today, -4C/24F, was set in 2002.
After a long, cold winter, it seems we’re getting a wet cold spring.
Still, there are things we can plant. I just hope things warm up decently in June, so we can get the warm weather transplants in!
This morning, as I headed out to do my rounds, the sun room thermometer was at about 10C/50F. During the night, I saw it dip as low as about 5C/41F.
I moved away the reflect to get some photos of the new bins with the kulli corn. The picture of the smaller bin didn’t turn out, though.
Here is the larger bin with 80 toilet tube pots in it. That white plastic is marking off the pots that are empty. When one daughter finished the smaller bin, she started helping her sister from the other side, so the empty pots ended up in a really weird place. :-D
They planted all the seeds, including the little, bitty extras. I don’t expect those to germinate, but who knows? Even without the extras, I don’t expect 100% germination. It should be interesting to see what we get.
The three trays of bulb onions are doing better in the sun room than they were in the mini-greenhouse, but that tray of shallots is really struggling. :-(
The Cup of Moldova tomatoes have recovered from their first night in the sun room rather well. You can see leaves with cold damage on them, but the remaining leaves are looking quite strong. Even the Crespo squash and Canteen gourds seem to be doing just fine.
Likewise with the Wonderberry.
There are some seedlings in the mini-greenhouse that are starting to look like they can be moved to the sun room, as does the tray of bunching onions. We’ll have to do a bit of re-arranging, since the sun room ended up being a feline recovery room again, to make space for everything.
It will be good when we finally have a small greenhouse or polytunnel. Hopefully, we’ll have something in time for next year.
Well, I’m happy to say that the Wonderberry that got moved to the sun room did survive it’s first night.
It had been on a plant stand that was being stored on that shelf anyhow, but I had to take that out and place the pot lower, as the height put it under the shadow of the eaves. From what I could tell, the temperature did stay a few degrees above freezing in there, even without the “grow” lights on, and what little warmth they provide.
The true test will be at the end of the week, when a blizzard is supposed to hit, and daytime highs are supposed to be below freezing.
Today, I went into town to pick up the last few things we need for our Easter basket – though how much we’ll be doing on Easter is going to depend on how accurate the forecasts turn out to be!
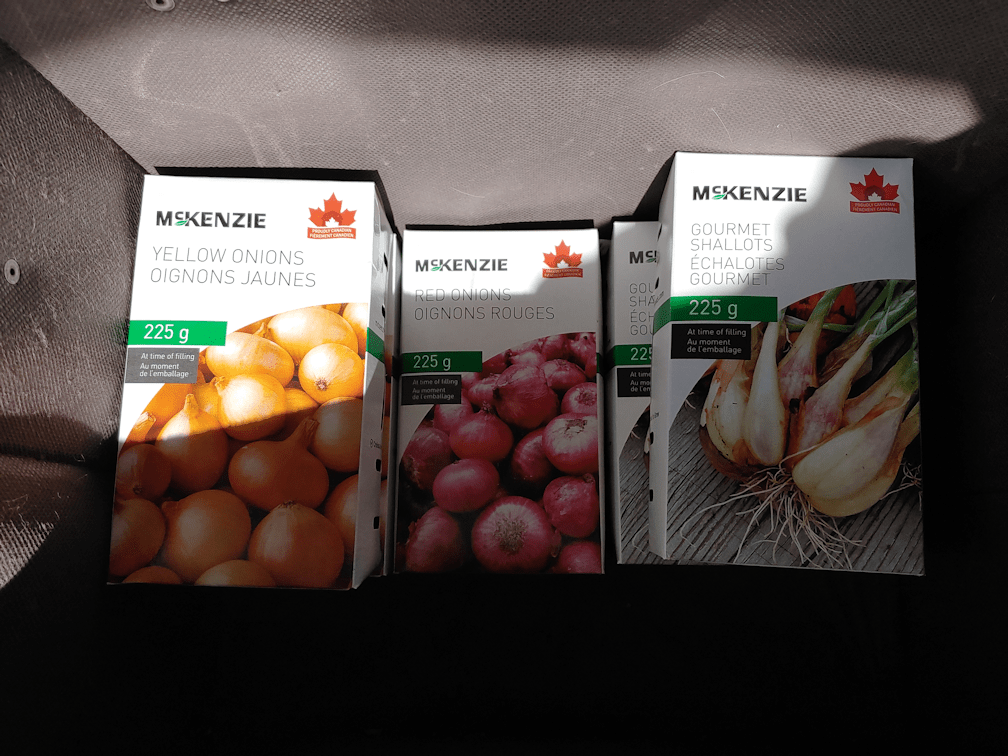
Walking into the grocery store, I immediately spotted the back of a new display near the door. Even from behind, I knew exactly what it was and headed right over.
Yup. I bought sets! Just in case the onions and shallots we are growing from seed are not very successful, though they do seem to be doing better now that they’re in the sun room.
The boxes are by weight rather than quantity, so I took a look in the boxes of yellow onions and shallots to see, more or less, how many sets were in there, then decided to get two boxes of each. I stuck to just one box of red onions, because we don’t use those as much as yellow onions. Plus, we have two other varieties of red onions from seed. I remember from last year that, even though the seedlings were quite small, the surviving onions we grew from seed ended up being just as big as the ones we grew from sets, so we’ll see how it goes.
Yes, we want lots and lots of onions. Depending on how things go, I wouldn’t mind having enough to not only store in the root cellar, but to dehydrate, use in various preserves and so on. Of the ones we bought seeds for, I would like to save seed, as some are rarer varieties. Onions produce seed in their second year, so we’ll have to plant those somewhere where they can be overwintered.
We are going to have a much larger garden this year, but for things like the onions and a few other things, we will be interplanting them with other things, for efficiency of space and – hopefully! – to help protect them from any critters, should the temporary fencing we’re planning to put up, fail.
Though we have three varieties of potatoes on the way, I was sorely tempted by the bags of seed potatoes that were also new on display. In the end, I decided against it. At least for this trip! As with onions, it would be really hard to grow too many potatoes! I think if we do pick up more seed potatoes, it will be different varieties I’ve seen elsewhere, though. The ones I saw today where the same basic varieties we normally see in the grocery store that are still pretty inexpensive, even with the increases in prices.
For all that the soil is in pretty bad shape and we’re breaking new ground for a number of things, I am thankful that we do have the luxury of space for gardening. Planting in less than ideal conditions is better than not being able to plant at all!
One of the first things I do in the morning is check on the seedlings, turn on the lights, and do any tending they might need.
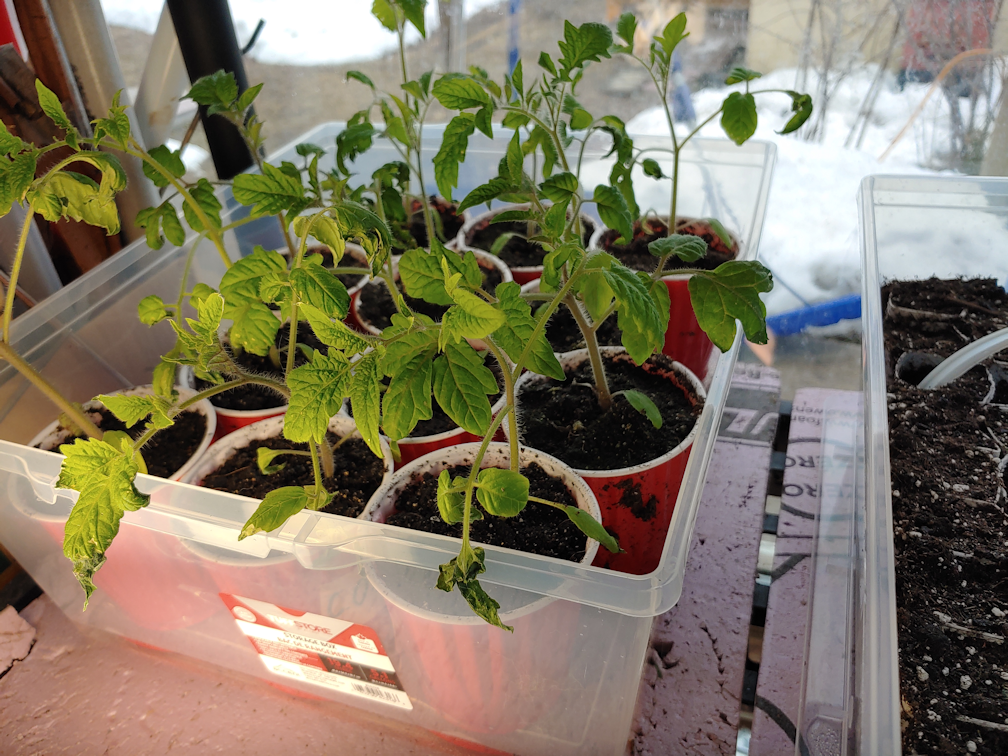
The newly transplanted and potted up plants seem to be doing very well – with one possible exception.
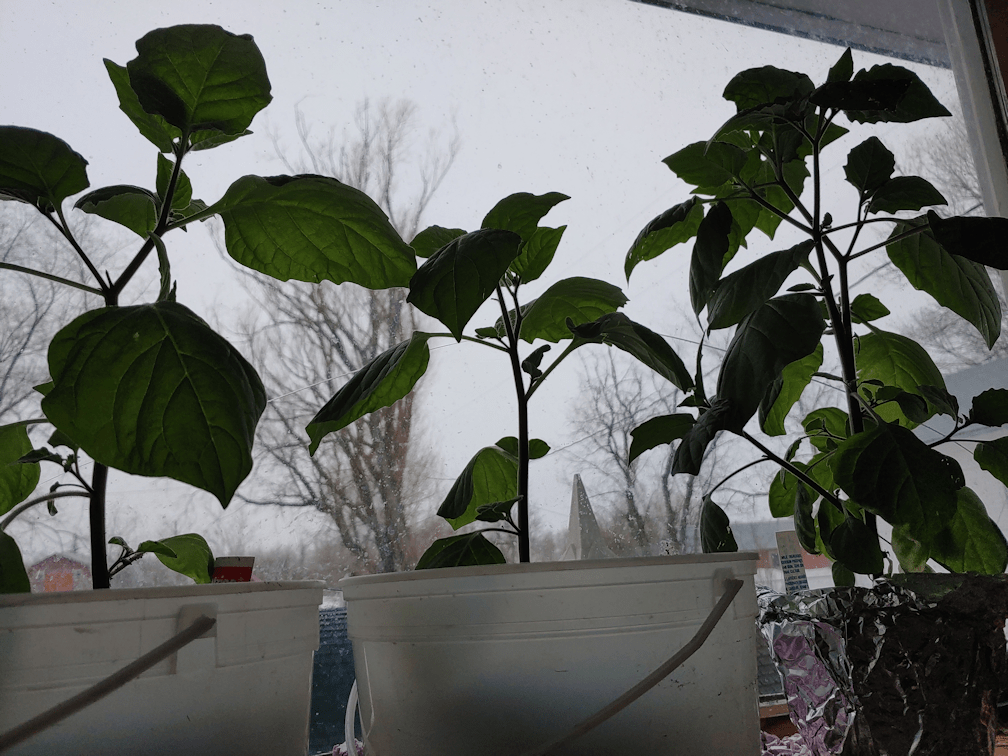
The Wonderberry we have left from the first planting is just too big for the top of the mini greenhouse.
I mean, look at this beast! It’s getting huge!
And what’s that I see???
Yup. Those are flower buds!!
I planted these really early, after doing some online research, but it seems it was too early.
So what do I do with the poor thing? We can’t leave it out, or the cats will destroy it.
The only safe place for it is in the sun room.
Except…
Yeah. It’s too big for the shelve space, too.
There was only one thing left to do.
I now have it sitting in the window on the other side of the door, which is a pair of smaller windows with a shelf in between. It’s actually a great spot for a plant like this. The problem is mostly the temperature, though it also gets less light. In the other shelf, there is at least the lights provide a bit of warmth. This spot is too far away for that to be any help.
I don’t think the sun room dipped below freezing last night. When I first looked in, in the morning, it was at about 8C/46F, but I expect it to get above 20C/68F in there as the day warms up. However, we’re supposed to start cooking down again, with a high of -5C/23F by Thursday – and more snow on Wednesday, Thursday and Friday. The Southern parts of the province are even getting weather alerts, as a Colorado Low swoops in, potentially bringing as much as 20cm/8in of snow. That, in turn, is leading to flooding alerts in regions to the North.
None of which is anywhere near us, but we’ll still be affected by the system with cooler temperatures and more snow.
At least the current warm weather is reducing the amount of snow we have now, so if we do end up with more, it’s not going to be as much of an issue.
The receding snow is starting to reveal that we are going to be picking up quite a lot of fairly large branches, once we’re able to do the spring yard cleanup.
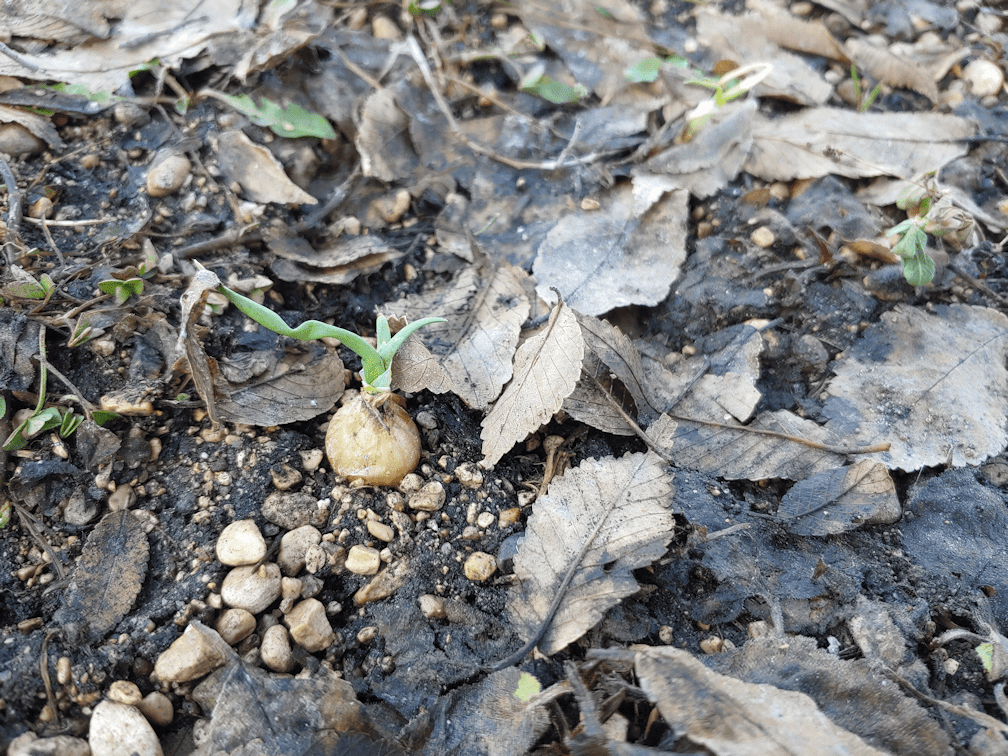
The new beds along the chain link fence are now clear of snow, including the asparagus bed. Which, unfortunately, has a lot of grass and weeds already starting to grow. There’s less than half an inch of thawed soil on the top, but that’s enough for the weeds.
There was a surprise, though.
There are onions growing!
We had transplanted the tiniest of seedlings around the asparagus bed last year, mostly because I didn’t want to toss them. They established themselves, but hardly grew at all, and we just left them. Even when cleaning up in the fall, we just let them be.
I found about 8 or 10 of them, starting to grow!
It should be interesting to see how they do. As this would be their second year, if we leave them, they should go to seed.
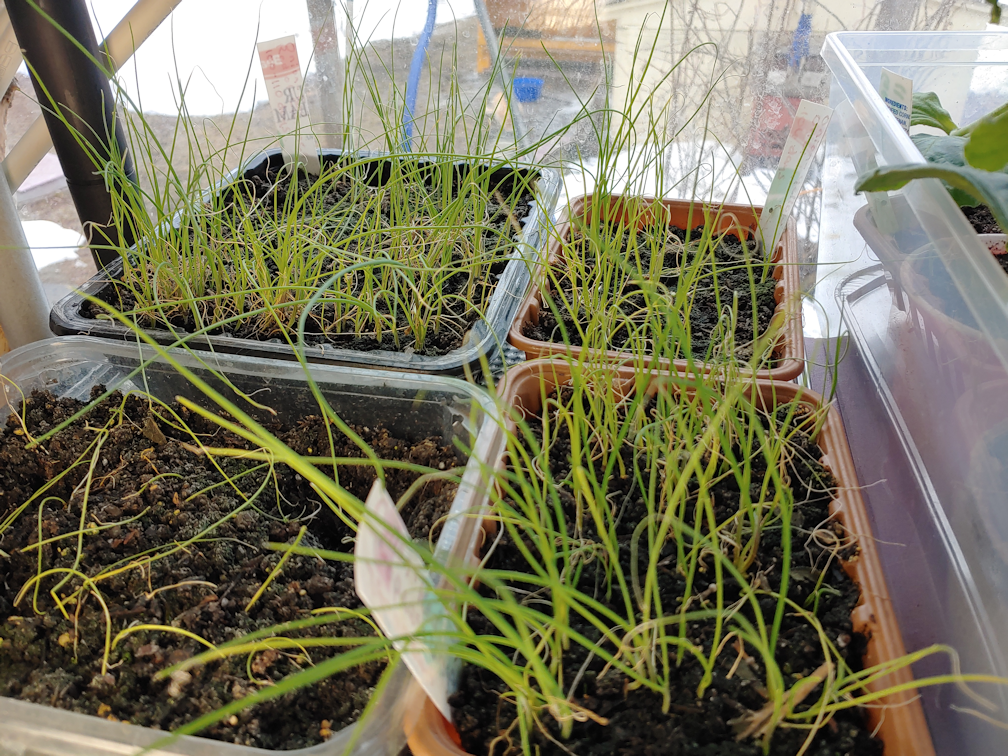
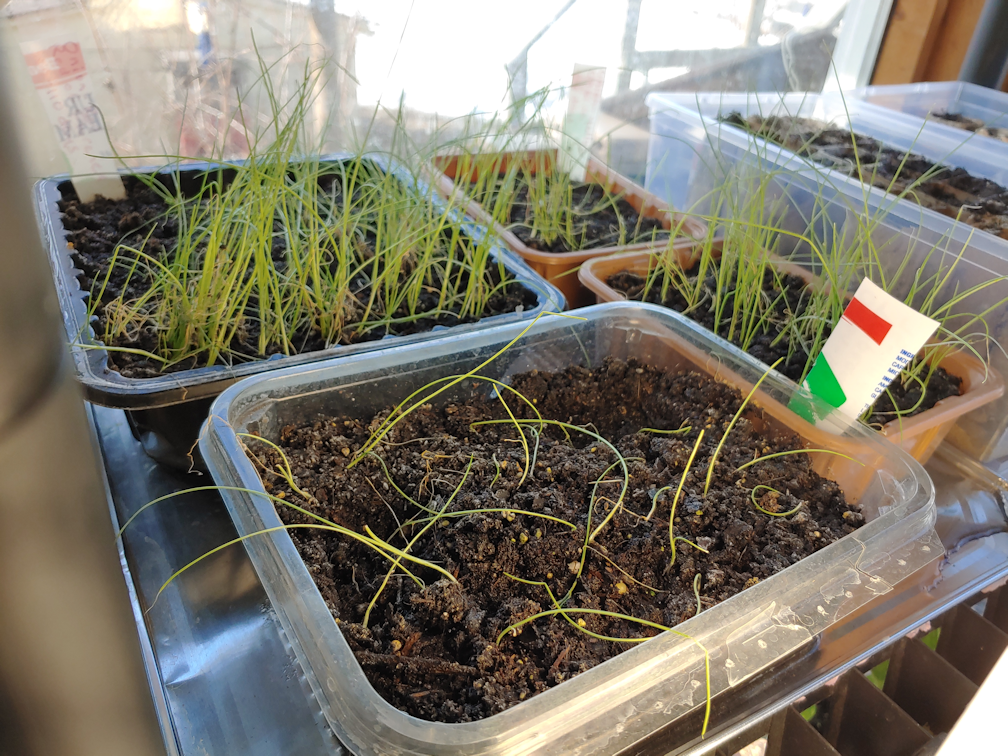
Speaking of onions and seeds, the seedlings we moved to the sun room seem to be doing rather well.
In fact, I think they’re actually perking up and getting stronger. Well. Maybe not the shallots. It’s really hard to tell with what’s left of those! But the red and yellow onions seem to be getting bigger and stronger.
We might have something to transplant, after all!
I might still get sets, though. In this household, we just can’t really have too many onions! :-D
After seeing my weather apps flashing warnings for the blizzard that, thankfully, missed us, now I’m seeing new alerts.
This time, for extreme cold.
Which is NOT missing us!
The -23C/-9F is one thing. The -36C/-34F wind chill is something else. And look at those overnight temperatures! Yikes. Thankfully, the wind is mostly from the north. One of my daughters and I were out there for an hour or so, shoveling out the paths, so we were mostly sheltered. Not so much when my daughter was clearing the paths to the compost pile, back of the garage, and the outhouse. I had to use the wheelbarrow to clear away snow closer to the house, since the surrounding piles are too high, and the snow just falls back into the paths in that area, but at least I was out of the wind!
The temperature has actually dropped in the short time since I took this screen cap, and I’m now seeing -25C/-13F with a wind chill of -37C/-34F.
Previous long range forecasts had us warming up again right now, which clearly isn’t happening… but then, they never included another blizzard, either. Now we’re seeing the cold staying for four more days, before things are supposed to start warming up, and keep slowly warming up into March.
We’ll see how accurate that turns out to be!
Having a bit of garden therapy after shoveling snow was nice, even if it was just a tiny bit. It’s not like the seedlings need much tending.
The onion trays are starting to look a bit hairy – and not just from all the cat hair all over the top of the soil (and everywhere else in the house… LOL). With this tank being a bit cooler, and not having a heat mat under it, today was the first time they needed a top up of the water in the aluminum tray underneath them.
As for the big aquarium greenhouse, I decided to switch things around.
The two rows of gourds had been next to the end of the tank. Yes, there’s insulation against the glass, but it still gets pretty cool, with that end of the tank next to an outside wall. The heat mat below was also a bit off centre, so the canteen gourds would have been getting ever so slightly less warmth from below. I decided to move the gourd end of the tray to the middle, away from the colder side of the tank, making sure they were completely over the heat mat as well.
There is still just the one luffa growing. There are more Cup of Moldova tomatoes coming up than expected! My daughter had issues with seeds sticking to each other, while she was trying to plant just 4 or 5 per pot. I’d like to simply transplant the extras, while they are still tiny, as demonstrated in this video.
The problem is, we don’t have any more cat-proof space for more pots. We could bring in the mini-greenhouse from the sun room; that would give us space for 3 trays of the size the current pots are in, but we still haven’t figured out how to keep the cats from clawing their way under the plastic cover again. At least not without making it just as impossible for us to get in, as needed. I hate the idea of “wasting” thinned seedlings, if we don’t have to! Especially since the Cup of Moldova tomatoes are the ones we want lots of, for preservation purposes.
Ah, well. We’ll figure it out! Thinking about such things is great garden therapy, when it’s so frickin’ cold outside. :-D
I needed some garden therapy today, so I got some onion seeds started.
We have seeds for 3 types of bulb onions, 1 of shallots and 1 of bunching onions. Today, I focused on the bulb onions.
Last year, we planted our alliums in Jiffy Pellets, repurposed K-cups and cardboard flats from eggs (don’t use those. They suck. Literally. The cardboard sucked all the moisture out of the growing medium!) before finally using doubled Red Solo cups to try and make up for losses.
This year, we’re doing things very differently. I’m going to try bulk sowing. Here are a couple of videos about that.
This next video shows the transplanting.
Obviously, we are in a much colder zone than he is, so I’m adjusting accordingly.
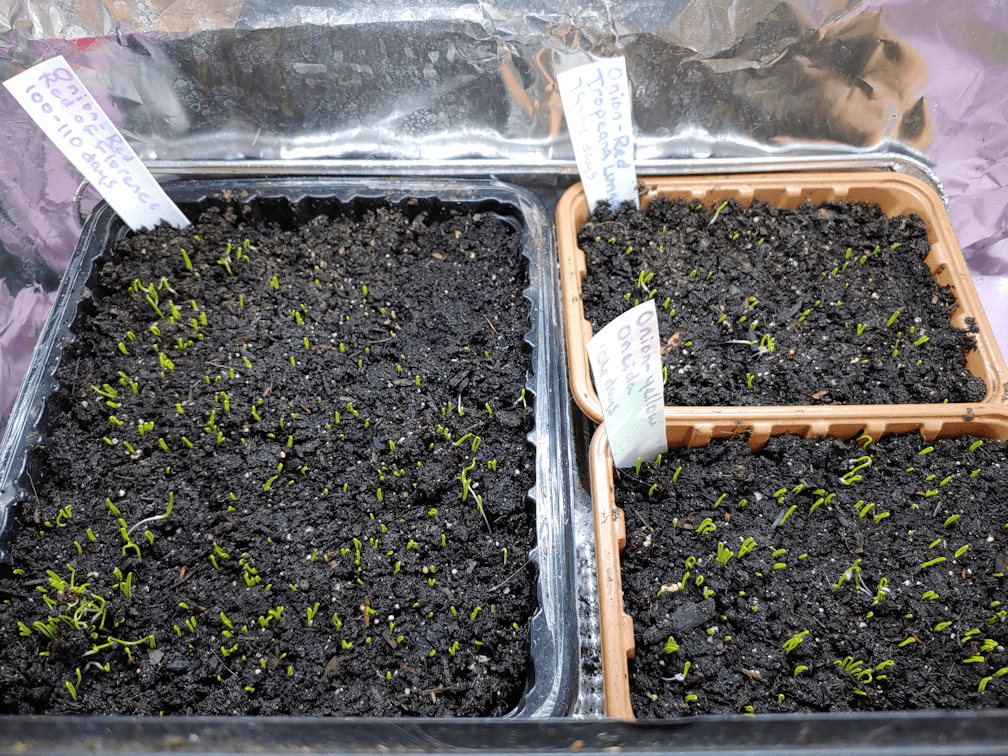
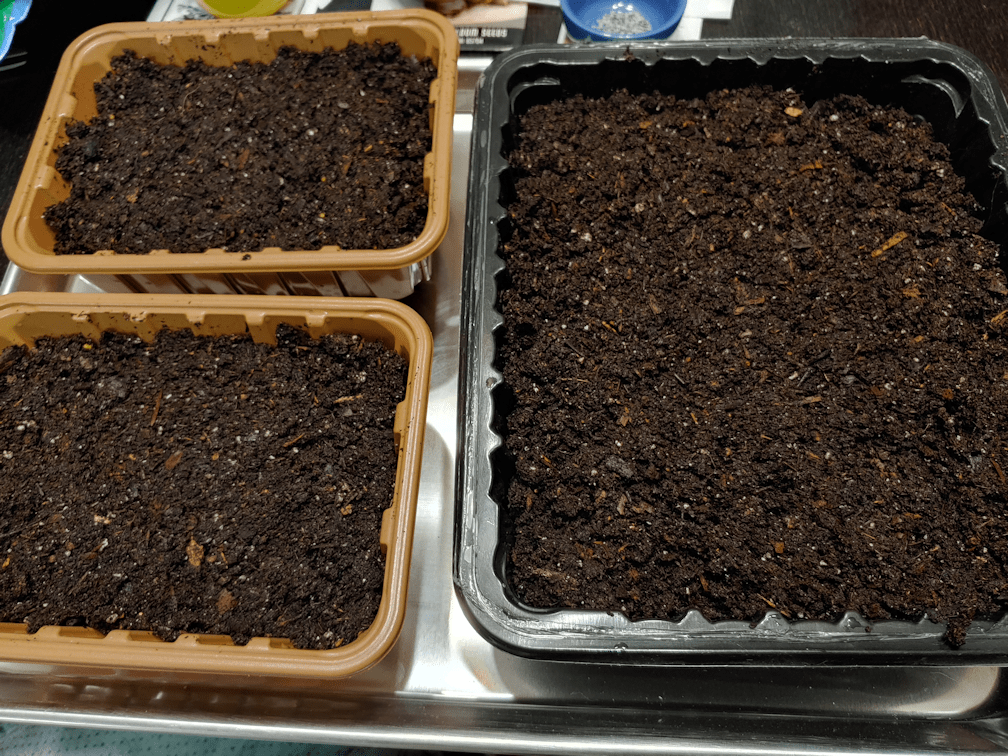
We already had our small aquarium greenhouse prepped. The first thing I needed to do was see how many seeds we had of each type.
The Red of Florence had the most seeds in its packet. The grey seeds from Veseys are Oneida, a yellow onion. The fewest are the rarer Tropeana Lunga which, like the Red of Florence, are an elongated red onion.
We are using re-purposed trays from the grocery store this year. The smaller ones were from mushrooms. I think the big one was from ground beef. We’ve had it for a while, so I can’t quite remember.
They got a good cleaning, and drainage holes were punched into the bottoms, then they were set into a baking pan.
They were filled with pre-moistened seed starting mix; I just dumped the remains of a bag into my largest mixing bowl and mixed in warmish water until it was evenly damp. Onions don’t need things as warm as other seeds, so no heat mat needed, but our house is on the cold side. I figured slightly warmer water would not go amiss.
The seed starting mix was pressed down just enough to make sure there would be no air pockets.
Then it was time to scatter the seeds.
Gosh, it feels so weird to sow them this densely!
I like that the grey seeds of the Oneida are so nice and visible. :-)
The seeds got a very fine misting at this point.
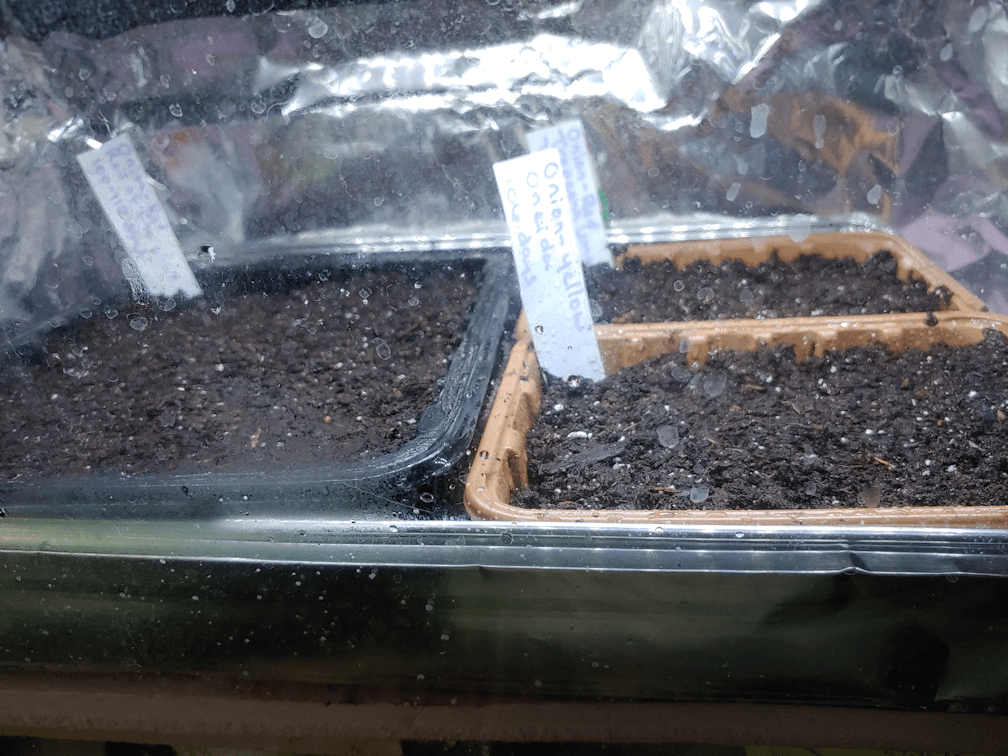
Then they were topped with about a quarter inch of seed starting mix, again gently pressing to get rid of air gaps. The tops got another misting, and water was added to the baking tray and left to be absorbed, while I cleaned up.
Finally, they went into the small aquarium greenhouse. The three trays fit perfectly in the oven liner tray folded into the bottom. More water was added to the oven liner tray, to water from below.
This tank has aluminum foil around the sides because the light we have for the tank is not as bright as on the big tank, and all that reflective light will help keep them from getting leggy. At least, that’s the theory!
This leaves the shallots to start next. Their days to maturity is a bit shorter than for the bulb onions. The Red Baron bunching onions need only 60-65 days to maturity, so they can be started much later.
I’m not sure how we’re going to be able to work it with the shallots, as far as space in the aquarium greenhouses goes. We’ve got some time to figure it out before they need to be started, but not much.
As for the other seeds we have in the big aquarium greenhouse, they seem to be doing fine, so far. Nothing has germinated yet, of course, so it’s too early to tell if the heat mat is making a difference. We just keep checking and adding water to the tray and misting the tops, as needed. The tray over the mat has been needing refills regularly, but today is the first time I added more water to the outer cups of the Wonderberry.
We need to get the rest of those Cup of Moldova tomato seeds started, since we want to grow a lot more of the paste tomatoes. I’ll likely start those using the doubled Red Solo cups, though we’d have to find a cat safe place to move the aloe vera pots, to make room for more seed starts. Which is a shame, because they are doing so well under the lights of the tank! So are my daughter’s orchids, one of which is blooming very enthusiastically right now, but we should be able to leave those in the tank until it gets warm enough to safely hand them in front of a window again. The aloe, however… the cats just love digging them up! :-(
Ah, well. We’ll figure it out. The main thing is that the bulb onions are started.
Plus, garden therapy was done its job. I’m feeling much more positive, now. :-)