Our 2026 garden: planting carrots and cucumbers, trellis added, and food forest progress

Well, my day of rest yesterday, such as it was, is done and today, I got some work done in the garden.

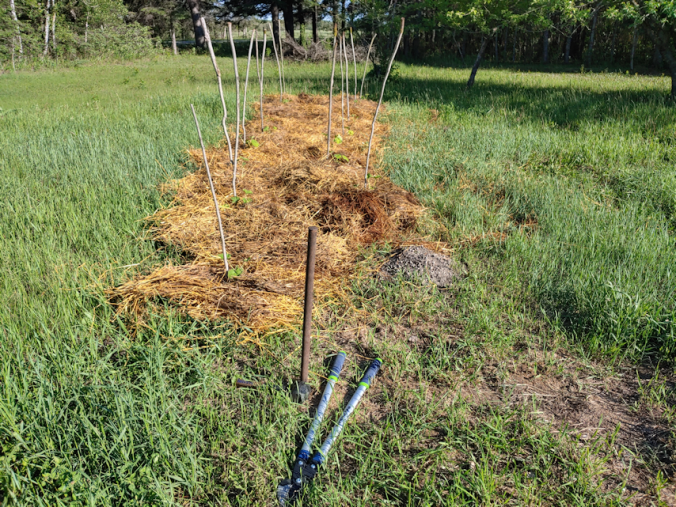
The first thing I wanted to do was plant thew carrot seed tape I’d picked up. These went into the trellis bed, next to the Rainbow Mix carrots.

The boards that had been used to protect the Rainbow Mix carrots until they germinated were simply set aside in the bed when they were no longer needed. The first task was to move those off and remove the leaf mulch that was under it. The whole bed got a weeding, and I used a garden stake to make a planting furrow, then used the jet setting on the hose to break up any lumpy bits of soil and saturate the furrow.

The carrots I chose were Scarlet Nantes; a basic orange carrot. I didn’t clue in that the seed tape was perforated and designed to be split into two lengths to total 15 feet, until I’d already set down two or three feet into the prepared furrow. I broke it off, split the roll and finished off laying it down. The result was a few feet short of the furrow I’d made, but that’s okay. It meant the three boards I had were more than long enough to cover the entire planted area – after it got one more watering.

There was a small section available along where the peas were planted, as I ran out of this variety of peas before I could fill the entire row.

I was going to try planting the short season luffa there, but I simply could not find the package. I know I had some left after direct sowing them in the bed against the chain link fence. I know I even saw them the last time I was going through my seed bins. Today, however, I could not find them anywhere.

I’ve had several packets of seeds, including seeds I’d saved myself, disappear, and I’m at a total loss as to where they might be!

So I picked the Eureka cucumber, which is a dual purpose cucumber. I’ve got some in the seed tray, replanting after the tray was decimated. Pretty much nothing is germinated out of the second sowing. I’m hoping this location, which gets quite a lot of sun, will do better. They are older seeds, though, so I don’t expect a high germination rate.

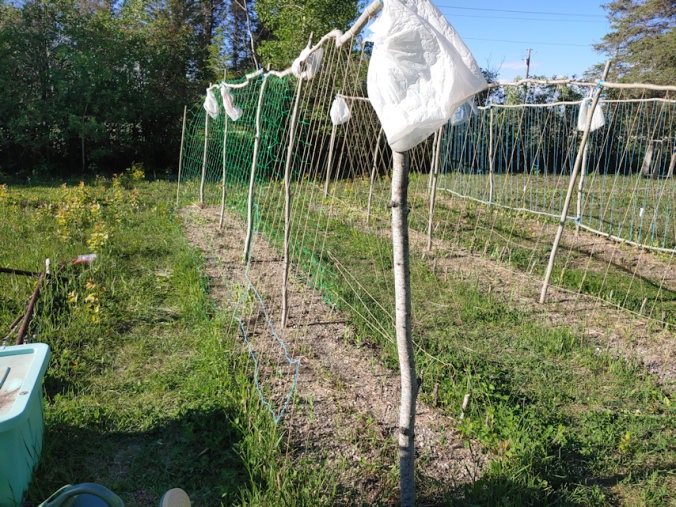
That done, I needed to set up trellis netting for the peas, and this time I wanted to attach permanent horizontal supports. Before I started on that, I moved off almost all the pieces of wood and boards weighing down the cardboard to the far end of the cardboard covered area. That is covering what will be a path and the matching garden bed. I didn’t want to trip over any of the weights. Later on, I think I’ll see of the large tarp I had is the right size to cover the entire space. The cardboard has formed gaps in the high winds we get, so it’s not quite killing off everything underneath it anymore.

I salvaged lengths that were used in the old squash tunnel we built long ago. It’s still standing, though bits and pieces of it have been repurposed over the years.

I dug out eight lengths, roughly 5 feet long, though a couple were shorter, to use as horizontal supports. The spaces between the vertical supports for what will be a trellis tunnel after the matching bed gets built are a little less than 4 1/2 feet apart. It’s variable, due to the different thicknesses of the verticals. That meant there was an overlap with most of the horizontal lengths. Only one of them ended up being just barely long enough.

Each length was tied in place first, just to hold it until I could screw the ends in to the vertical supports, alternating setting each horizontal length above or below the previous one. The northernmost vertical post has a tendency to lean inwards, so I made sure it was pushed into position before screwing in the horizontal support, to hold it in place.

One the horizontals were secured, I got out a couple of nets with 4″ squares for the peas to climb. One of them reaches roughly 3/4 the length of the bed. After the first one was set in place, with the bottom pegged into place near the bottoms of the row of peas and the new planting of cucumbers, I started the second net from the opposite end of the bed to fill in the space, and overlapped the rest.

It was a pain in the butt to get the netting to stay at the top horizontal support, while I set the bottom half at an angle to secure it to the bottom horizontal supports, trying to make it as snug and straight as it would go, using ground staples on the base. I had some length of a sort of plastic cordage salvaged from last year, that I used to secure the bottom half of the netting at an angle from the base of the wire “fence” the peas are currently attached to – literally – to the bottom horizontal supports, making sure to match the squares of the overlapping sections of netting as close as I could. Then the top half got secured to the higher horizontal support. I wasn’t as concerned about that part, since the peas are unlikely to get that tall.

Last of all, to “train” the peas to attach themselves to the trills, it was just a matter of tipping the wire fencing towards the trellis slightly. Some of the peas are tall enough, they mostly just sort of fell towards the trellis netting and will soon start climbing that.

The next thing I wanted to get done was work around the plum, gooseberry, apple and haskap. The chicken wire around the plum tree needed to be removed, and the entire area weed trimmed and cleaned up.

Before I started on that, though, I salvaged the last section of wire on the old squash tunnel to use, as it’s quite a bit longer than what was around the plum.

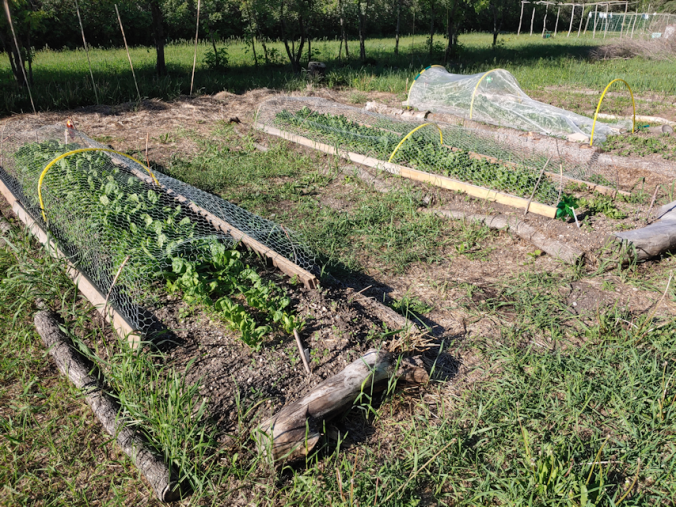
You can see the chicken wire in the first two images above, before I started pulling supports out and using the weed trimmer.

You can see how the row looked after the weed trimming in the third image. After that, I went ahead and removed the tomato cage fencing around the gooseberry and apple. I left the wire tomato cages over the haskap.

I was considering a few things to do for the area and decided to use the chicken wire to fence off as much as I could. I brought a bundle of bamboo stakes to support the wire. The ground is too hard to drive the bamboo stakes in, so I used on of the metal supports that I’d removed from around the apple tree to make a hole in the soil first – they have handy points on their ends – before I could push the bamboo into the holes and in solid.

I ended up using both lengths of salvaged chicken wire. The two together was just long enough to go around the plum, apple and gooseberry, with openings on either side of the cracked rain barrel. There’s enough space that I could get inside without too much trouble, and I hope no deer will notice the gap and squeeze it’s way in! Later on, I plan to set a couple of brightly coloured rope between the bamboo stakes to further discourage the deer. So far, the wire tomato cages will continue to be enough to protect the haskap.

I had two very thin bamboo stakes left from the bundle, so I wove them through the wire at the top. These will help keep the verticals in place, as well as provide support for the chicken wire in a space the hose goes over, when it’s time to water the trees.

Hopefully, this will keep the deer from getting to, and chomping, the greenery!

Once everything was cleaned up around this area, I took advantage of having the weed trimmer out and finally got to clearing around the old crab apple stumps, and the live trees as well. My brother had come over while I was working on the trellis bed, pruning away the low hanging branches. One of them had hit my SIL in the face while she was mowing. He cleared so many branches, he ended up attaching their little trailer to their zero turn mower and using that to remove the branches and set them on one of the branch piles near the fire pit. He even trimmed a low hanging maple in another area that was starting to hang lower and lower, getting in the way even when just walking.

The old stumps had been buried in tall grass when my SIL decided to mow along there, and she ended up hitting one of them because she hadn’t seen it. Once the branches were cut away, my brother used his zero turn mower to mow closer to the trunks, now that it could be done. He got a lot closer to the trees than he was able to get to the stumps! I got the weed trimmer to clear to bare earth around the trees and stumps, pausing to cut away some suckers that were trying to grow back along one of the stumps. I was on my second battery by then, and was able to do most of the spaces between the silver buffalo berry as well before it died. My brother had used the weed trimmer earlier in the day and the battery he’d used wasn’t recharge yet, so I was done with weed trimming for the day!

That done, I popped inside for supper, then headed back out to water the garden. I got some water soluble fertilizer in the hose attachment to fertilize and water at the same time. I’m hoping that will help the weaker plants that are struggling a bit from the cold nights we’ve been having. I’d set the hose up to the leaking rain barrel where I’d just fenced things off, so I was able to water the food forest trees, too. I didn’t have the energy left to do the nut trees in the outer yard, though.

While I was watering, my brother messaged me with a link from Amazon to a solar powered critter scarer. We’ve been messaging as I was working on this post – I’d need at least four of them! My brother has ordered one, and I’ve ordered one. Within the next couple of weeks, we should have at least one in to test out. They are triggered with motion sensors to flash lights and make 14 different pre-recorded noises to scare animals, or you can record your own sounds. I’m not sure I like the idea of having super loud sounds of things like dogs barking or gunshots coming out of our garden in the night, though! Still, it’s worth a try if it’ll keep my garden and fruit trees from being eaten by critters!

All in all, I am happy with how much I got done today, and the trellis bed now finally has permanent horizontal supports attached to the vertical posts. Eventually, I’ll be adding one long piece across the top, but that’s going to require trimming the tops of the vertical supports to match heights, and for that I’ll need to set up our little scaffolding to reach. I’ll need to snag a daughter to give me a hand, too.

All in good time.

Little by little, it’s getting done!

The Re-Farmer

Our 2024 Garden: planting and netting

Today, finally, we planted the German Butterball potatoes.

Orders of perishables like this get sent out in time for planting, which means we could have planted them weeks ago. The Purple Caribe had to wait until the bed they were intended for was redone. We hadn’t quite decided where to plant the German Butterballs, but today we decided to use one of the prepared raised beds in the West yard, where we also needed to tend to the bed with peas, carrots and spinach planted in it.

The first thing we did was weed the bed, again. My daughter went digging around with the garden fork first, pulling out the bigger stuff she found, while I followed along and dug deep with my hands and pulled out the smaller stuff. Once again, we were finding lots of tree roots from the nearby Chinese elm. We went over the bed twice, finding more roots, each time!

I did remember to use the pH meter to see if there was any change, before we topped up the bed. At this point, the bed was amended only with the sulfur granules. I was thrilled to see the needle was actually, ever so slightly, moved. It’s still pretty much at 8, but the needle is now just barely touching the green colour at the 8, instead of about as far as it could possibly go on the alkaline side.

We then added a wheelbarrow load of soil left over from amending the previous beds. This soil has more sulfur granules in it, plus peat. Once that was spread out, we worked it into the bed with our hands – and pulled out more roots. Then, while my daughter went to fill watering cans from the rain barrel, I used the stirrup hoe to stir and level the soil – and pull out more roots – before using my hands to create a broad trench down the middle.

There turned out to be exactly 32 potatoes, so we laid them out evenly in two rows. Yes, they are probably being planted too close together, but this is the space we have available, so it’ll have to do.

Once we had the potatoes set out where we wanted them, I went around with a garden trowel and dug a hole for each one, while my daughter followed along and watered the holes, then I followed along behind her, planting each potato into the watered holes. Once she was done, she went to get more water from the rain barrel, while I covered the potatoes and used the soil from the sides to create hills over them. They got a final watering in the trench between them, then we put a cover over the bed, so the cats won’t go in and use that nice soft soil as a litter box!

Before we’d gone outside, I set the sugar snap pea seeds I bought yesterday to soak. Unfortunately, I’d put them in the bowl last night, and it got knocked over by the cats. My older daughter and I found most of them, but from the 24 seeds I’d counted when I opened the packet, we were down to 21 – and only because I found one more this morning.

I’m not impressed with the inside cats right now! It’s been no end of them getting into things they shouldn’t, lately!

Once the potatoes were done, my daughter went to get the peas while I used a bamboo stake to make a row of holes for them. I planted the previous two rows of snap peas, so I knew where I could do that, and not be on top of the previous rows. There may, possibly, be a single pea from the first planting emerging, but I’m not sure, yet. Last night, I found that something had dug into the bed over where some peas had been planted, and there was no sign of any peas when I pushed the soil back. I think most, if not all, that first planting of peas died off for some reason.

Once that was done, I went to the garden shed to get the trellis netting. That’s when I spotted Broccoli’s babies! I got the netting out, as a tiny calico hissed silently at me, then called my daughter over to look. She had already finished planting the peas by then. We paused for a bit to move the babies to a carrier, then my daughter went on mama-baby watch while I continued. I gave the bed a watering, first, then set the netting up on the T posts. Then it was back to the shed, partly to see if Broccoli was looking for her babies, and partly to get some netting to put around the bed. I’d already grabbed a bundle of supports and set six of them up around the bed. Unfortunately, the bundle of netting I grabbed was not long enough to go all the way around. There’s about 2/3 of one side that’s not shielded by netting. The netting is there to keep things from eating the spinach that’s coming up, as well as to keep the cats out. We’ll have to go through our other bundles of netting to see if we have either something short enough to fill the gap, or long enough to go all the way around, and replace what I put up today.

Eventually, we will need to set up something outside the beds to secure the T posts. If the peas actually start to grow, their weight will pull the T posts inwards, so we’ll need something to keep that from happening. There’s no hurry on that, though, since we’ll only need it if the peas survive in the first place! I don’t assume anything, at this point.

So we did manage to accomplish the goals we had for before things got too hot – we’re now at 26C/79F. 28F/82F, if I go by the website instead of my phone app.

For all the warmer highs we’re getting, over the next week to ten days, our lows are expected to dip to 1 or 2C/34 or 36F, which means we could get frost. If the long range forecasts are at all accurate, we’ll start to bed overnight temperatures consistently 6C/43F or warmer, which is about the minimum we’d need for the soil to get warm enough for direct sowing anything that isn’t cold hardy, like the peas and spinach. Mind you, with plastic covered covers for the raised beds, we could plant things and the covers will protect them.

What we really need to get working on is harvesting logs to build the raised beds we need. It’s too windy to try and cut down dead spruces, but we can process the ones that are already down.

We’ll have to make sure we use plenty of bug spray before going into the spruce grove. Not for mosquitoes. Those aren’t out yet. For wood ticks! It’s been a really bad year for them, already. So far, I’ve only pulled them off myself before they’ve attached themselves, but I’ve been pulling lots of them off of Syndol. With his long fur, he can’t get them off his neck or near his ears on his own. The short haired cats that let me pet them have no ticks. Just Syndol. Which makes me wonder about the other long haired cats, that don’t let us handle them like Syndol does.

Also, while I was writing this, Broccoli has been seen around the kibble house and walking around the sunroom, to the back of the house, but she has not gone into the sunroom. With her babies sleeping peacefully and not meowing, she would have no way to know they are there!

Moving them was a big risk. I hope she finds them, soon!

The Re-Farmer

Our 2021 garden: today’s progress

It was a hot and windy day today, and my younger daughter and I ended up making a quick run into town, but we did get some decent progress in the garden.

summer squash, mulched and prepped

My older daughter braved the hottest part of the day and added more soil to the 15 summer squash mounds.

I waited until it was cooler.

I added a stake near each plant. The stakes are some of the smaller poplars we cleared our of the spruce grove, trimmed to about 3-4 feet in length. In the foreground of the photo, there is a metal bar stuck in the ground. It has a point at one end. I can’t remember at the moment, where we found it, but it was a happy find! I used it, and a mallet, to make holes in the ground. Then the stakes, skinny end down, were pushed in as far as I could, beyond what I managed with the steel bar, then the soil carefully stomped down to secure it. As close to the plants as they were, that meant mostly just on one side. Once those were in, the area was mulched with straw. The idea is to secure the stems of the squash to the stakes, as they grow, and pruning the bottom leaves, little by little. We shall see how that works!

Also, I really need to get this area mowed, before the next rains come!

I had found some trellis netting, so my daughter finished the last sections of pea trellis with that, along with adding soil to the summer squash. The peas are getting tall enough to start climbing! The peas I planted later, to fill the gaps left by those that did not germinate, are sprouting, too. I’m really looking forward to having fresh peas! I can’t remember the last time I had fresh-from-the-garden peas.

If you look to the left of the photo, you can see what is a problem in this area: all those tree seedlings! They are spreading through root systems, like quack grass. Usually, I would have mowed over them by now, but we’re going to have to cut them back by hand this year.

spinach beds

My younger daughter, meanwhile, went all out and thinned all three spinach beds.

Yes, this was taken after the beds were thinned!

The furthest one, under the netting, is the one that got the most deer damage, but parts of it are doing well. You can see at the end of the closer beds, the smaller spinach at the ends the deer got at.

With the spinach she gathered, I currently have two trays drying in the oven, and made myself a huge spinach salad for supper. The reason we went into town was to get ingredients to make spinach dips. Both cold and baked versions. :-) I’m really looking forward to that!

This last one is just to show how well the potatoes have been doing! At this rate, some of them are going to need topping up, soon! I’m very excited to see how productive these will be at the end of their season.

With today’s progress, my goal for tomorrow is to get working on that squash tunnel. The luffa needs something to climb! :-D

The Re-Farmer

Our 2021 garden: Crespo squash, and pea beds ready!

Oh, I’m going to be in for a world of hurt, tomorrow.

It’s going to be worth every bit of it! :-D

But first, I have to show off the little Crespo squash baby!

I got this photo last night.

This is how it looked, less than 24 hours later.

Then I checked it this morning, the leaves hadn’t broken free of the soil yet. Every time I look at it, it’s noticeably bigger! It’s still the only one of the Crespo squash that has sprouted. Hopefully more will emerge, soon. :-)

Today, the priority was to get the pea beds ready, and that took me pretty much all day! Thankfully, the girls were able to come out and help quite a bit, which made some jobs faster.

The first thing that needed to be done was to dig post holes and set up the uprights for the new pea trellises.

That… got interesting. The posts could not be buried at all the same depth, that’s for sure.

My apologies for the out of focus photo, but you can still see the bottom of this post hole. Yeah, that’s a rock. A rock big enough I couldn’t dig around it to pull it out!

Others were more like this one.

What I ended up having to do was to start with a spade to remove the sod on top. Then I used a trowel to pull out the bigger rocks or find and remove pieces of roots. Then I would use the post hold digger until I hit more rocks it couldn’t get through. If I needed to go deeper, I’d use the trowel again to get the rocks out, then use the post hole digger again.

I set the posts at each end first, between the flags marking the width, then strung a cord between them to make sure the other posts were in a straight line. Every 5 feet was marked with the post that would be going there.

Then the holes got dug, and the line put back across again, and I’d double check the distance for each pole before setting it.

With the girls helping, tying the cross pieces in place was much, much easier and faster!

I tried the cordless drill to see if I could drill pilot holes and place at least one screw at each pole of the first trellis we did. The batteries couldn’t hold enough charge to finish drilling a hole. I had a hard time just to reverse the drill back out again! So that jobs is going to have to wait.

We put all our hoses together, and it wasn’t enough to reach all the way, so we moved the rain barrel to a new spot. For the first bed, we had shredded paper that we soaked on the mesh top of the rain barrel, then placed along the row before topping it with straw. We were able to wet the straw down, before taking a break for lunch, and my older daughter went back to working on commissions.

Then my younger daughter and I continued preparing the beds. These are now ready for planting! The new trellises are not done yet, though. The first trellis will have a single row of peas in the middle, with the seeds planted alternately on either side of the bottom cross pieces.. The other two will have double rows, planted about 2 ft apart. After the peas are planted, the trellises will get A frame supports at each upright, with cross pieces at the bottom, and then they will be strung similar to the first one. Once the top cross pieces were in place, I got the measurement I needed. To finish this, I’m going to need 20 poles at about 5 1/2 ft long, plus another 12 poles at 5 ft long for the bottom cross pieces. My husband went ahead and ordered some more cord that I can use to string supports for the peas, sweetheart that he is. :-)

We made quite the dent in the pile of soil! :-)

Before we finished for the day, the girls started laying down straw for a pair of re-oriented beds, then hosing them down.

The three, small beds in the middle that ran East/West are being turned into two longer beds oriented North/South. For the peas, we could get away with laying down the soil in narrow rows where the peas will be planted, rather than the entire space. These beds are going to be intensely planted with onions, spinach, purple kohlrabi and purple kale, at the very least. There are two more smaller, former potato beds that are going to be lengthened to match these ones, and they will be intensely planted, too, similar to Square Foot gardening. So these beds are going to need a whole lot of soil added all over. Thankfully, these beds are much closer to the pile of soil!

By this time of the day, the winds had picked up significantly, so wetting the straw was needed as much to keep it from blowing away as for preparing it to have the soil added on top. I’m going to see if I’ve got anything else I can layer on there before adding the soil. I tried digging into the old compost pile yesterday, and the first thing I hit was the remains of some Styrofoam packaging, of the sort you might buy meat in. Plus a hard plastic lily, which was actually kind of pretty. I know my mother would never had thrown things like that into the compost pile, which means that someone else was using it for garbage, after she’d moved to her apartment. *sigh*

I might not be able to work on this area tomorrow, as I’ll be helping my mother with her grocery shopping in the afternoon, but I hope to at least get the peas planted in the morning. We’re supposed to get very warm tomorrow afternoon, so it would be good to get them in early.

I’m pretty excited about finally getting our first seeds into the ground! :-)

The Re-Farmer

Our 2021 garden: building the first pea trellis

We had a beautiful warm day today – prefect for working outside!

Our peas are among the things that require the most preparation before we can direct sow them, so we decided to focus on building trellises for them. After looking over some design ideas, drawing some sketches and making some decisions, I headed out with my baby chain saw and rifled through the pile of poplar poles we kept after doing some clean up and testing out the cordless pruner.

That baby chainsaw made cutting poles to size very fast!

In the background are the support poles, cut to 6 ft lengths. The poles on the wagon are the cross pieces. I am short a few to be able to complete all the beds, but I ran out of medium sized poles. We are saving the bigger ones for the squash trellises, as they will have the most weight on them. The smaller ones will be good as stakes, but are too thin to be cross pieces.

I’ll just have to do more clean up and gather more poles! :-)

Our purple peas have the fewest seeds, so it got the simpler trellis design.

I started by laying out the support poles near where they will be set. Each bed will have 5 support poles, with the biggest ones on the ends, and the middles.

That rain barrel in the background is the one I patched up last year, to keep water at ambient temperature near our squash beds. We will need to fill it with water soon, so it doesn’t blow away! It’s going to take all our hoses put together, to reach that far.

After finding the centre of the first bed, I started digging a post hole – and immediately started hitting roots and rocks!!

I did drag over one of the post hole diggers we found, to try it out.

I’m pretty sure it has pieces missing. :-D

It can handle smaller pebbles, but roots and larger rocks were a problem. For some of the rocks, I had to get in there and bring them out by hand, because not even the spade could get them out. We only have one spade, and I don’t want to break it! We did have a second spade. The handle broke while I was digging holes for the haskaps. :-/

First pole is in!

The pile of rocks was later added to the top of the soil around the post. The soil that was put back into the hole and tamped down was a lot softer, and sank down quite a bit.

Shortly after that, my younger daughter was able to join me, and the rest of the poles went in much faster. :-)

Attaching the cross pieces was a bit of an issue. What I really would have liked to do was screw them together. There’s no way to do that manually, since we’d end up pushing the poles around in their holes. We don’t have enough extension cords to reach this area to use a corded drill and drill pilot holes. Our cordless drill is old and the batteries no longer hold a charge – and it’s old enough that the brand no longer uses the same batteries and does not make them anymore. Once we work out a solution, we’ll go back and put in screws.

Before adding the cross pieces, we measured and marked heights at the top and bottom of each support pole, then cut flattened spots on the ends of the cross pieces and at the marked areas of the support poles. When cleaning up the basements, we found a ball of old bale twine, so we used that to tie the crosspieces in place. That twine is really old, so while it’s holding surprisingly well right now, I expect it to disintegrate fairly quickly.

Once that was done, I used the twine to weave on strings for the peas to climb.

Which took quite a long time! The ball of twine was lots of shorter pieces. I kept stopping to tie ends together and make centre pull balls, to make wrapping around the cross pieces easier. I ended up using most of the ball, so we’ll have to find something else to use for the other trellises.

This bed is now ready to layer straw and soil down. We might even be able to find something usable in the old compost pile to add to the layers. We don’t have a lot of material that can be used to build over that grass, but anything is better than what’s already here! And we can deal with weeds.

It seems a bit much, to do all this burying of posts for a temporary garden, but wind is something we have to take into consideration. Hopefully, we were able to get the support poles deep enough that they won’t be blown over.

The other two beds will have double rows of peas planted in them, so the trellises we build there will not have the cross pieces at the bottom. Instead, we will put cross pieces about a foot away from the centre poles, at about the same height as these ones. Once these trellises are strung, they will form a sort of A frame, with each row having it’s own side of strings to climb.

When I was a kid, my mother always grew peas, but never used trellises. One of my jobs as a child was to flip the rows of peas, so that the sun could reach the other side of the plants. I do remember a lot of yellowed or rotted leaves when flipping my mother’s un-trellised peas. This would have been due to lack of sunlight in the bunched up plants, and contact with the soil. There was likely fungal issues, too, but as a child, I wouldn’t have recognized it for what it was. It worked, and we always had lots of peas, but this will be healthier for the plants, and should result in better yields.

While I was working out here, I was able to hear people out and about, walking on the road, etc. The old house across the road from us has no one living there, but the current owners come out regularly. It was so wonderful to hear the voices of children, playing outside! At one point, I was even visited by a very friendly little dog. The only down side was having our vandal come driving by on his ATV, very studiously avoiding looking our way and pretending to be doing something else other than creeping on me. As if his driving over, turning around and going home again wasn’t making it really, really obvious. :-/

We definitely need privacy screens! The corn and sunflowers will help, once they’re tall enough, but when we clear the fence line so we can repair the fence, we’ll be removing what little screening we have in that area right now.

For now, I’m rather pleased with our “rustic” pea trellis. Not too bad for something made of completely salvaged materials!

The Re-Farmer