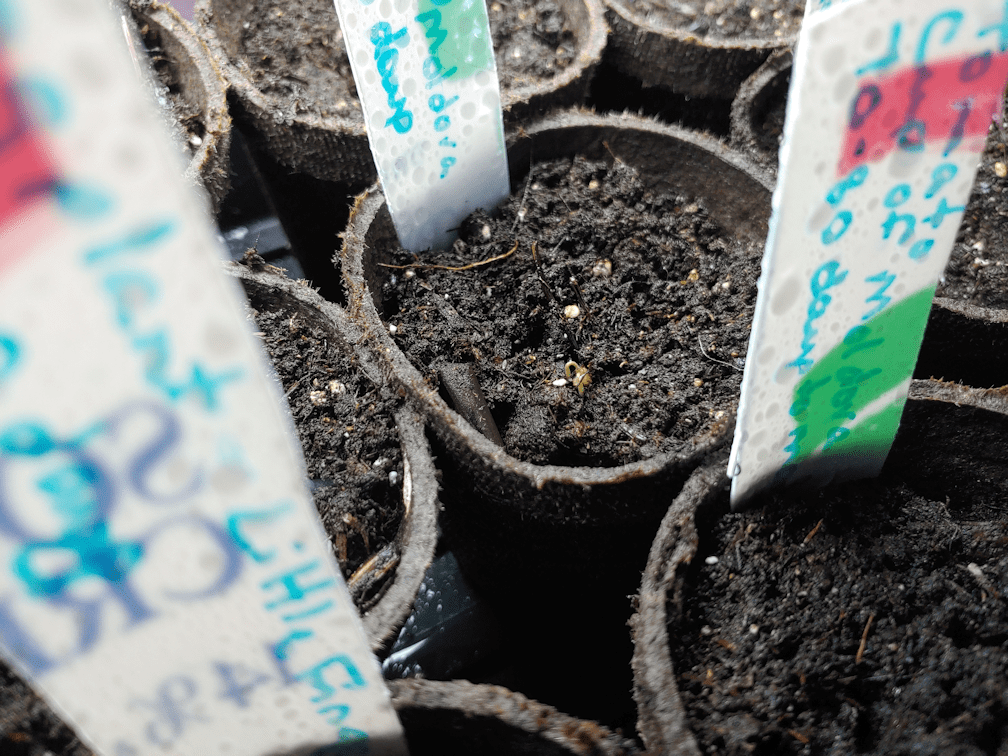
Looking back and how long it took for tomatoes to sprout, in this same aquarium greenhouse, last year, I’d say having that heat mat may have made the difference!
As I sit here, I can see more snow coming down in the security camera life feed. Seeing just this one little sprout makes the end of winter feel so much closer, despite the new snow on the ground!
I needed some garden therapy today, so I got some onion seeds started.
We have seeds for 3 types of bulb onions, 1 of shallots and 1 of bunching onions. Today, I focused on the bulb onions.
Last year, we planted our alliums in Jiffy Pellets, repurposed K-cups and cardboard flats from eggs (don’t use those. They suck. Literally. The cardboard sucked all the moisture out of the growing medium!) before finally using doubled Red Solo cups to try and make up for losses.
This year, we’re doing things very differently. I’m going to try bulk sowing. Here are a couple of videos about that.
This next video shows the transplanting.
Obviously, we are in a much colder zone than he is, so I’m adjusting accordingly.
We already had our small aquarium greenhouse prepped. The first thing I needed to do was see how many seeds we had of each type.
The Red of Florence had the most seeds in its packet. The grey seeds from Veseys are Oneida, a yellow onion. The fewest are the rarer Tropeana Lunga which, like the Red of Florence, are an elongated red onion.
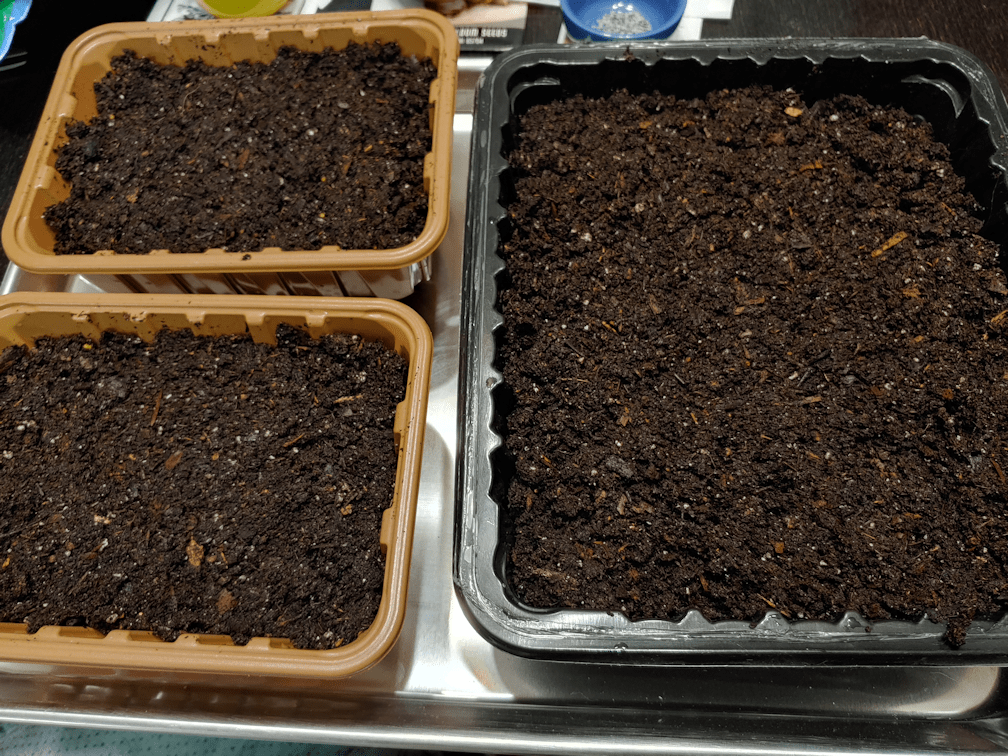
We are using re-purposed trays from the grocery store this year. The smaller ones were from mushrooms. I think the big one was from ground beef. We’ve had it for a while, so I can’t quite remember.
They got a good cleaning, and drainage holes were punched into the bottoms, then they were set into a baking pan.
They were filled with pre-moistened seed starting mix; I just dumped the remains of a bag into my largest mixing bowl and mixed in warmish water until it was evenly damp. Onions don’t need things as warm as other seeds, so no heat mat needed, but our house is on the cold side. I figured slightly warmer water would not go amiss.
The seed starting mix was pressed down just enough to make sure there would be no air pockets.
Then it was time to scatter the seeds.
Gosh, it feels so weird to sow them this densely!
I like that the grey seeds of the Oneida are so nice and visible. :-)
The seeds got a very fine misting at this point.
Then they were topped with about a quarter inch of seed starting mix, again gently pressing to get rid of air gaps. The tops got another misting, and water was added to the baking tray and left to be absorbed, while I cleaned up.
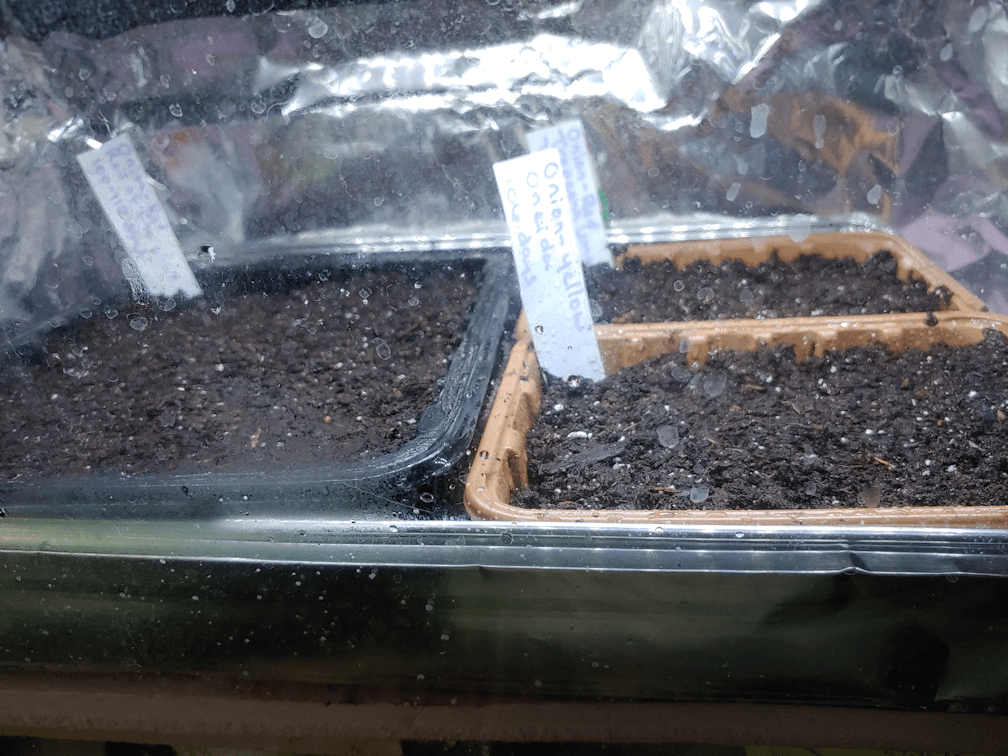
Finally, they went into the small aquarium greenhouse. The three trays fit perfectly in the oven liner tray folded into the bottom. More water was added to the oven liner tray, to water from below.
This tank has aluminum foil around the sides because the light we have for the tank is not as bright as on the big tank, and all that reflective light will help keep them from getting leggy. At least, that’s the theory!
This leaves the shallots to start next. Their days to maturity is a bit shorter than for the bulb onions. The Red Baron bunching onions need only 60-65 days to maturity, so they can be started much later.
I’m not sure how we’re going to be able to work it with the shallots, as far as space in the aquarium greenhouses goes. We’ve got some time to figure it out before they need to be started, but not much.
As for the other seeds we have in the big aquarium greenhouse, they seem to be doing fine, so far. Nothing has germinated yet, of course, so it’s too early to tell if the heat mat is making a difference. We just keep checking and adding water to the tray and misting the tops, as needed. The tray over the mat has been needing refills regularly, but today is the first time I added more water to the outer cups of the Wonderberry.
We need to get the rest of those Cup of Moldova tomato seeds started, since we want to grow a lot more of the paste tomatoes. I’ll likely start those using the doubled Red Solo cups, though we’d have to find a cat safe place to move the aloe vera pots, to make room for more seed starts. Which is a shame, because they are doing so well under the lights of the tank! So are my daughter’s orchids, one of which is blooming very enthusiastically right now, but we should be able to leave those in the tank until it gets warm enough to safely hand them in front of a window again. The aloe, however… the cats just love digging them up! :-(
Ah, well. We’ll figure it out. The main thing is that the bulb onions are started.
Plus, garden therapy was done its job. I’m feeling much more positive, now. :-)
Though it is very early in the year, we have our first seeds started indoors today. A lot of people in our zone have already got seedlings, while still others are saying, it’s way too early.
So which is it?
I happened on a video today, talking about planting peppers and eggplants, which we are doing for the first time this year. Both are plants we never grew when I was a kid, so I have zero familiarity with them.
This particular video mentioned something I’ve never heard before, yet had wondered about.
When reading the seed packets, they say things like “start indoors 4-6 weeks before last frost date”.
Last year, we had a lot of issues with some things not germinating. Some took forever to germinate. Others never did at all. This was particularly true of various squash, plus all the Hope Black Dye sunflowers – with did finally all germinate, when I started taking the trays outside, while hardening off other seedlings.
What got mentioned in this video, is that when they say “4-6 weeks before last frost,” it’s actually from germination, not from planting the seeds. So if you have something that needs to be started, say, 6 weeks before last frost, but the packet says the seeds take 7-10 days to terminated, then the time to start them indoors is 6 weeks, plus 7-10 days.
That actually makes so much more sense to me.
I’d already made a list of which seeds needed to be started when, and these were the ones that needed at least 8 weeks.
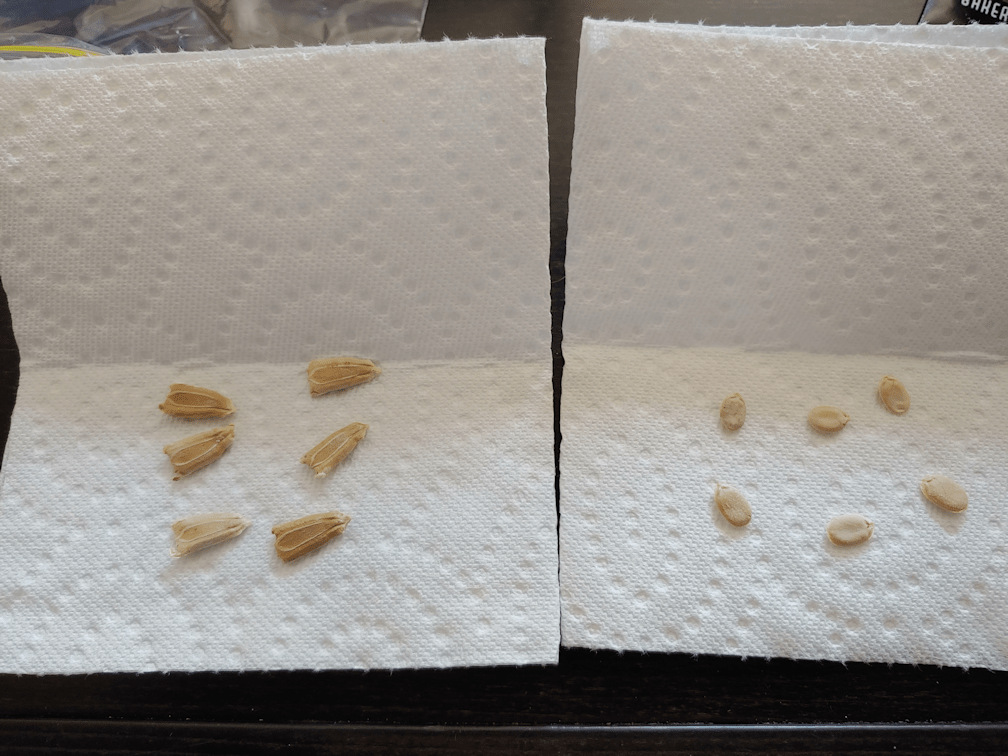
The gourds were started first, as they needed extra steps. Among the things recommended that I wanted to try was scarification and pre-soaking.
So that’s what I started this morning.
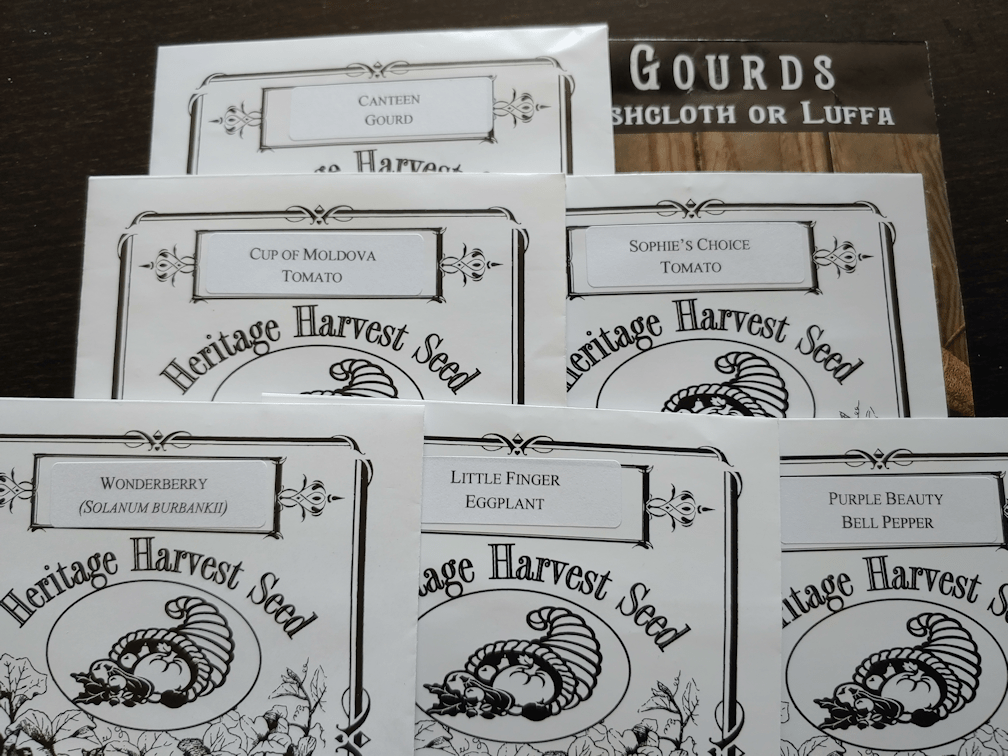
Of the gourds we will be trying to grow this year, I chose the Canteen gourd to start early, as the gourds are supposed to get quite large. The other gourds I want to grow are smaller at full maturity.
Which lead me to another thing. With the luffa, we’re not after “days to maturity”, which is 110 days, if I remember correctly. We’re after the sponges, so we need for those mature gourds to dry out. That puts them at 200 days. Even starting now, we might not have that long for them. It will depend on whether or not we get another really long summer again. Of course, in the end, everything depends on the weather.
I chose 6 of the plumpest, healthiest looking seeds from each, then carefully snipped their outer shells with a nail clipper, before putting them inside the folds of a paper towel.
Then they went into sandwich baggies, and the insides were sprayed with water, before being sealed and left to sit. Most places recommended leaving them overnight, but I left them “overday” instead. ;-)
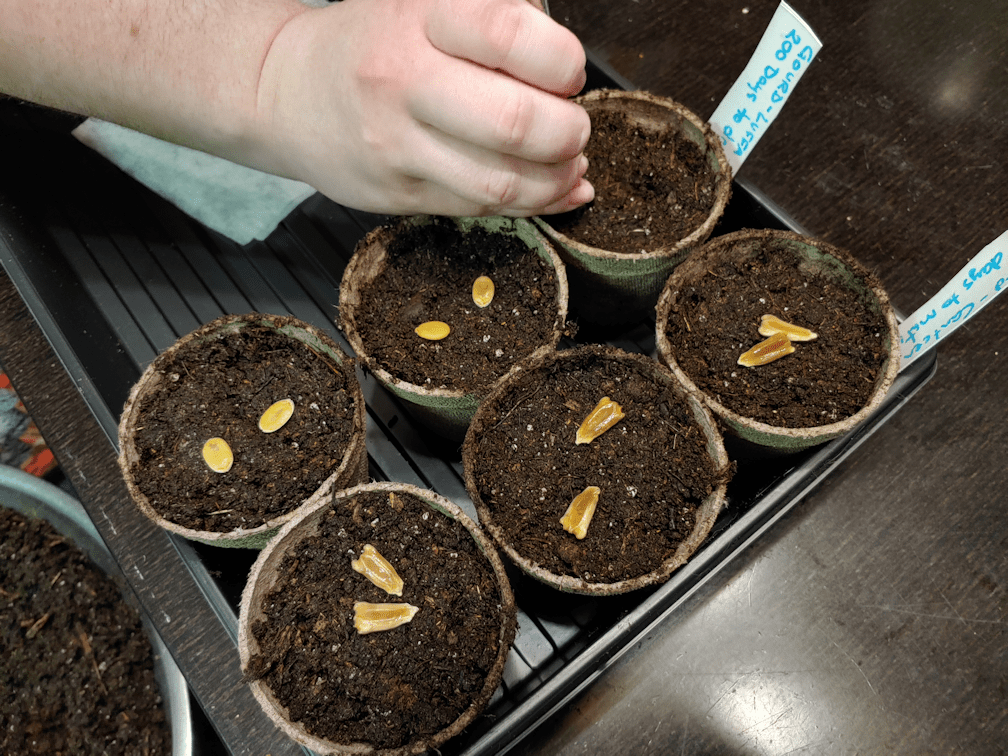
Then they went into planting pots filled with pre-moistened seed starting soil. My daughter used a chopstick to push them the inch into the soil they needed to go. Once covered, the tops of the soil got sprayed with water.
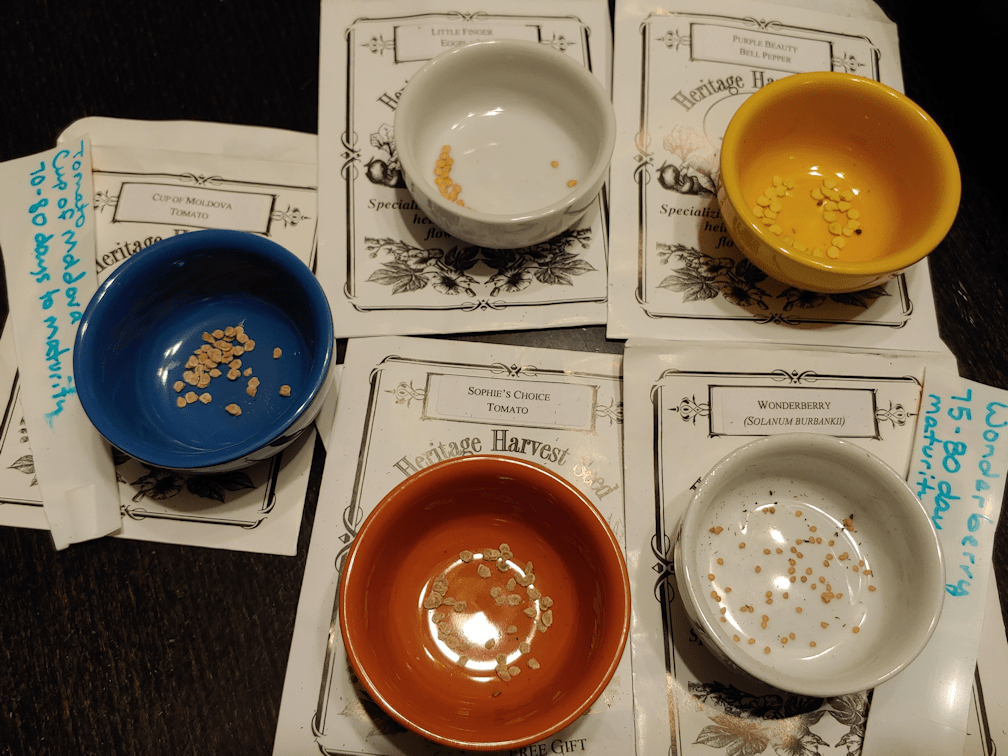
Then it was time to take a look at the rest of the seeds and see what we had to work with. None of the packets have a lot of seeds in them, but we are not after a lot of individual plants.
The Sophie’s Choice tomato was a conundrum for me. Everything I read about them said they needed to be started very early; a couple of weeks earlier than other tomatoes. Yet they are an early tomato, with only 55 days to maturity. At only 55 days, we could start them outdoors and they’d have plenty of time to mature. Odd.
For all but the Wonderberry, we decided to plant about 5 seeds per pot, and three pots each. With the gourds, that filled an entire tray.
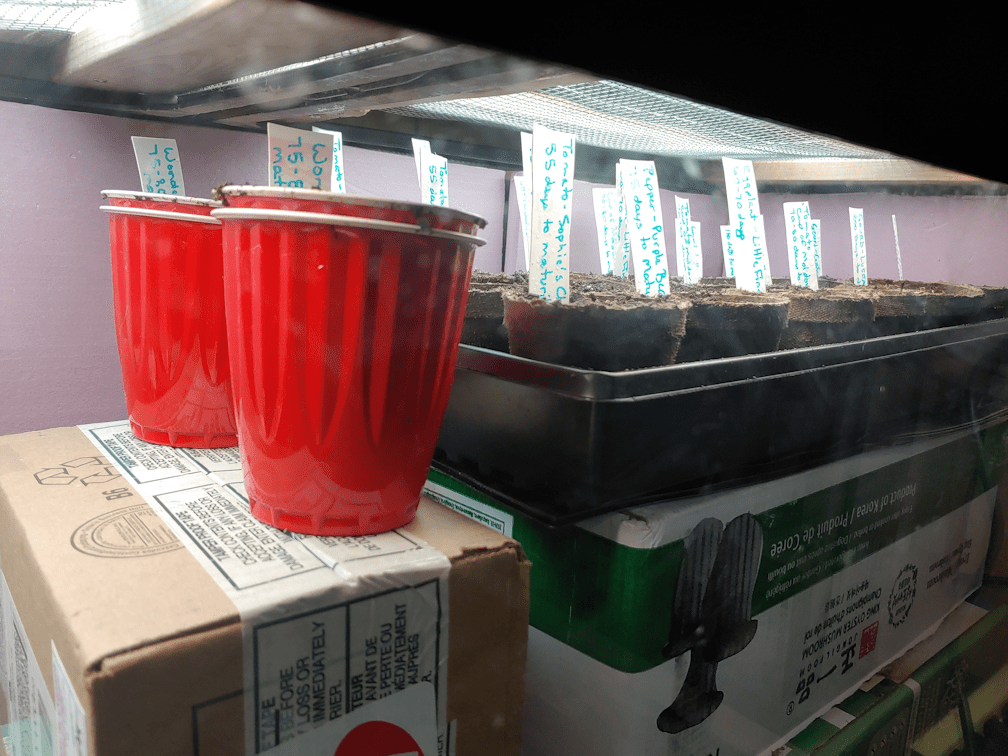
The Wonderberry got planted using the double cup method. I reused some of the Red Solo cups we used last year, with the inner cups having drainage holes in the bottom, so they can be watered from below, using the outer cup.
We still had seeds left over, even with how little was in each packet, so that’s nice.
We used more boxes to bring the tray and cups closer to the lights, inside the big aquarium greenhouse. The heat mat fits under the tray. I’m hoping that just being near the mat as well as close to the light fixtures, one of which does warm up, will be good enough to adequately warm the Wonderberry in their cups.
The double cups got water in their bottoms before they were put in place, and water was added to the tray once it was settled on the heat mat. We do still have a little fan blowing into the tank, though it’s over the orchids and aloe in the other corner. We won’t be able to cover these with a plastic dome, as typically recommended, so I’ll be making sure to use a spray bottle to keep the tops moistened, since the smaller seeds are so much closer to the surface. There’s quite a bit of water in the tray so, with the heat mat, that should help increase the humidity levels, with the fan hopefully keeping things from starting to mold.
The heat mat doesn’t have a thermometer, nor do we have a soil thermometer, so we’ll have to monitor these fairly closely. Everything is plugged into a power bar, which gets shut off every night, so there will at least be that break. If it seems to be getting too warm – unlikely, for what we’ve got planted in there – we can put something under the tray to elevate it. Once the seeds germinate, we can probably take the mat out entirely.
The next things we’ll be starting are the onions, which won’t need the heat mat, but when it comes time to start the rest of the tomatoes, and all the squash, we’ll need both the heat mat and space – and space is going to be harder to come by! We do have a mini greenhouse, the frame of which we are currently using in the sun room to hold the heater bulb for Butterscotch and Nosencratnz, as they recover. We did try to use it in the living room last year, as it does have a zippered cover, but the cats still managed to get into it. If we could find some way to keep the cats out of it, it would go a long way to helping with our space issues!
We’ll figure something out.
The main thing is, we’ve got stuff started that need that extra time indoors.
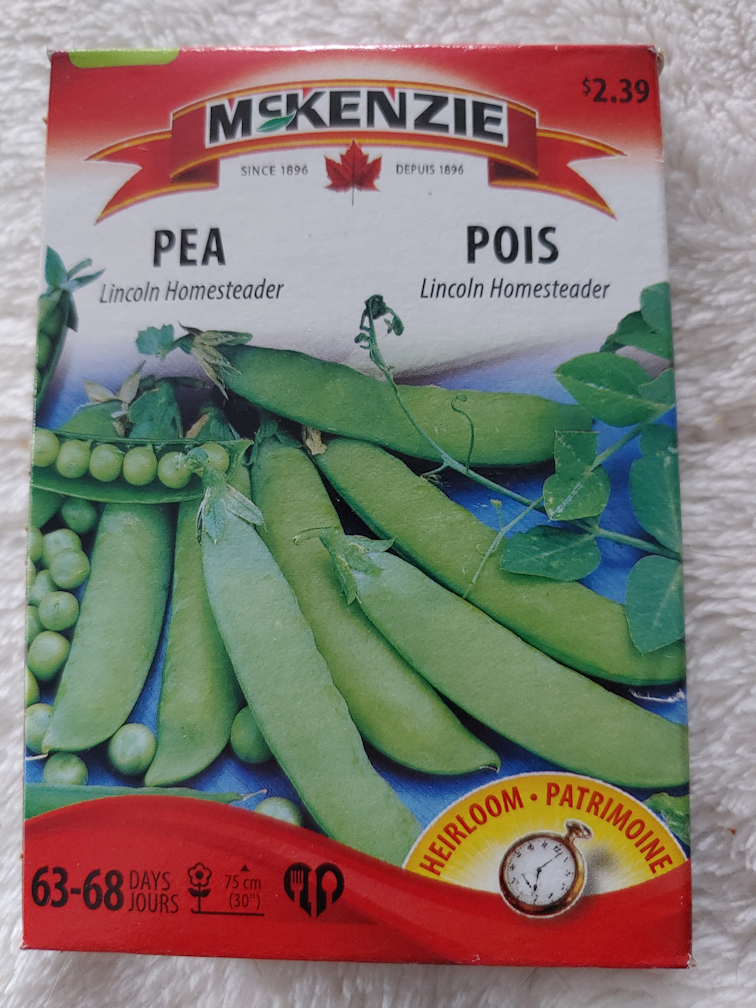
Well, this is it. Today, I placed my last order for our 2022 garden. While I was doing the first half of our monthly shop, I also picked up some pea seeds. I am now done ordering things we are planning to grow this year.
First, the peas.
There are so many varieties of peas, I have been struggling on which ones to pick. While at the Walmart, I saw a new McKenzie Seeds display, and finally settled on one. As much as I love edible pod peas, I decided to go with shelling peas.
Some selling points on these: very productive, heat tolerant and disease resistant. Plus, of course, they’re supposed to be tasty. While I hope we don’t get another drought this year, our summers to get as hot as our winters get cold, so heat tolerant peas are a good thing.
My daughters are not big on peas, but they have never had peas, fresh from the garden. The ones we grew last year did not really produce, due to the heat (just the odd pod, here and there), then the green peas got eaten by a groundhog! The peas sown late in the season, in with the corn, were planted for their nitrogen fixing qualities, and the few pods we got were there only because we had such a long, mild fall. Nothing reached their full potential in flavour. Hopefully, this year will be different, and we will get lots of delicious fresh peas!
Once I got home, I placed an order with T&T Seeds.
I just ordered the smallest size; a 10 pack. A friend on a neighbouring farm successfully grows them, so I know they will grow here.
We’re sort of taking a chance on these ones. We’ve never tasted them before. I’ve never even seen one in real life before. However, these are something that can easily be propagated from year to year, and are supposed to be quite delicious. If we like them, we have another good storage food to add to our inventory of foods for self-sufficiency.
If not, well, they are in the sunflower family and have pretty flowers.
We will be planting them in a location that can be permanent, so not anywhere in our main garden areas.
This one is pretty much just for me, as I seem to be the only person in the family that actually likes sweet potato, so I got the smallest option; five slips.
This variety is the only short season variety of sweet potato that can grow in our zone that I have found. I think I will make a grow bag or two from our feed bags, and set these up somewhere near the south facing side of the house, just to hedge my bets, though I would need to make sure there is space for the vines.
The girls and I debated whether to get Highbush Cranberry, or more raspberry bushes. We decided to work with the raspberries we already have, and go for the Cranberry. I ordered two.
In cleaning up along the east fence line in the spruce grove, I actually found an American cranberry (at least that’s what Google Snap told me it was). It now gets light and everything, but I would like to transplant it, eventually, to a better location. Not sure where, yet.
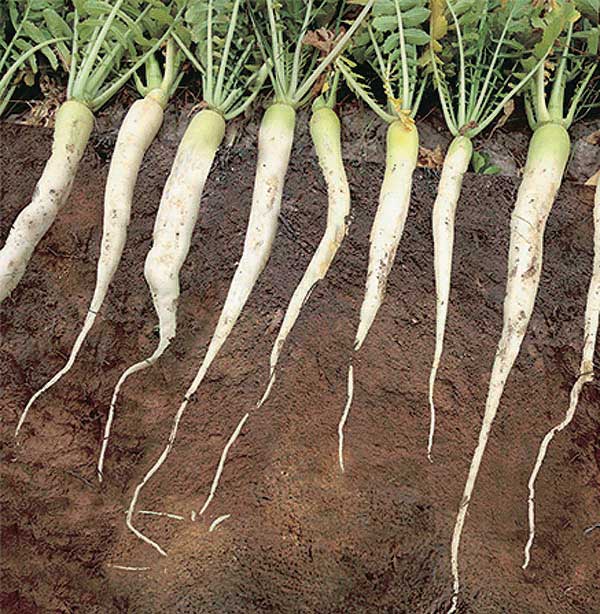
We had tried to plant a daikon type radish to help break up the soil in the corn blocks last year, but I think something ate them shortly after they sprouted, because they all just disappeared. So I was quite excited to find these forage radishes.
They are sold as a green manure and a type of cover crop. They get planted, then left to die off. Their roots can reach up to 6 feet in depth, boring into the soil as they grow. After they die off and decompose, they leave behind root channels that other plants can take advantage of.
With our concrete-like soil, filled with rocks, the plan is to basically just scatter these in strategic areas, so we got the 500 gram/1 pound size, which can cover 5,500 square feet. I don’t expect to use it all this year, but who knows.
So that is it for this year’s seeds and trees, though it’s entirely possible we might still order more. I forgot to order more alternative lawn and wildflower seed mixes from Veseys, but those would be sown in the fall, anyhow. We shall see how the ones I sowed this past fall turn out, this spring.
We still have a monthly “seed” budget, though, and now it will go to other things we need. I did pick up more potting soil today, as we will be starting onion seeds and luffa soon, and have lots more seeds to start over the next few months. After much searching, the girls and I found some netting online that we will be using to help protect our garden from critters. It’s a netting that is 14 x 200 feet. We can get one roll this month, and another roll later. Some of it will be used for the temporary fencing we will need to build around larger blocks, such as the corn. We can also cut it to the sizes needed to cover individual beds. We simply have too much ground to cover, and beds spread out in too many places, to fence it all in from both deer and smaller critters. Particularly since so much of it is still temporary. We’ll also have to figure out what best to use to support the netting, in the different ways we plan to use it, and get what we need for that. We are shooting to have consistent sizes on the permanent raised beds, so that any protective covers we build will fit any raised bed. The low box raised beds are 3 feet by 9 feet (because that’s the size the boards I found resulted in). The high raised beds will all be 4 feet by 9 feet, but with the thickness of the logs we are using, the planting area inside will be smaller, and the 3×9 covers should still fit. Other beds, such as in the old kitchen garden, are oddly shaped, so they will need completely different ways to protect them from critters.
I was inspired by WolfSong to try something new – and help with that urge to be planting something already! Winter sowing.
Today, I finally got some seeds started.
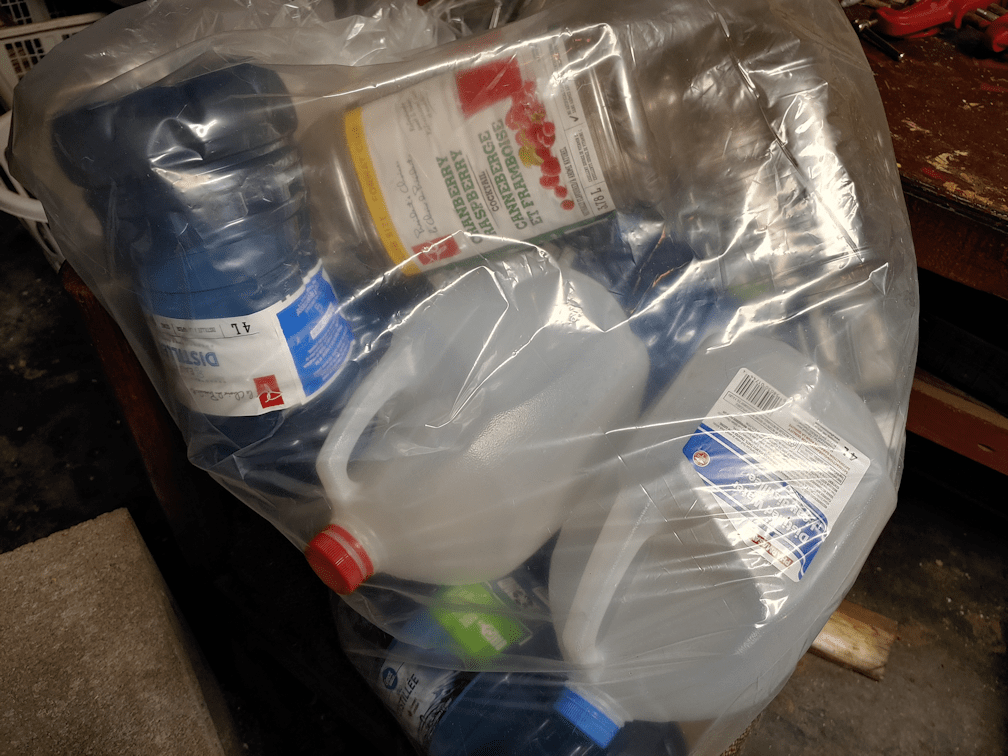
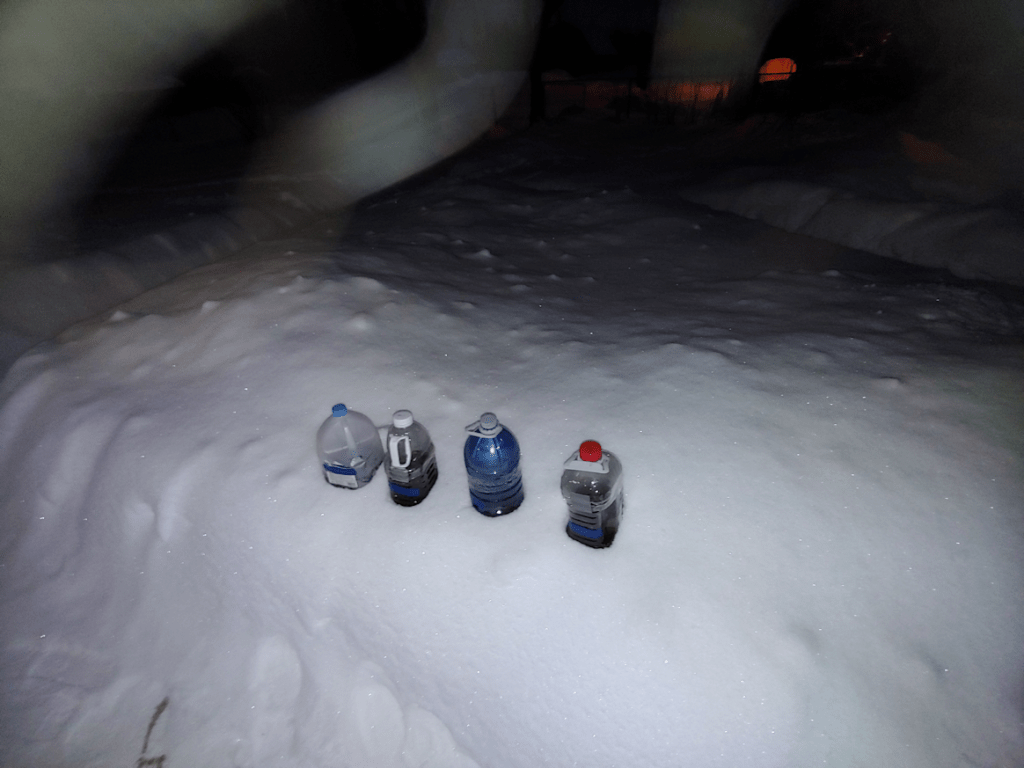
We’ve been keeping a variety of plastic bottles and jugs for potential garden use. We’ve got mostly the blue water bottles. The distilled water we get for my husband’s CPAP used to come in the same type of jug as milk does, but suddenly all the brands seemed to switch to those blue bottles, all at once. Which was a problem, at first, because many of them no longer had handles of any kind. It made it very awkward for my husband to fill his CPAP humidifier, as the sides would collapse inwards as he poured. He ended up transferring the water to an empty jug with a handle, to keep from splashing water all over his CPAP!
People must have complained, because the next time I had to buy distilled water, the bottles had handles attached to their tops.
We have 4 different types of jugs, including two styles of juice bottles. I decided to try one of each.
I’ve been cutting plastic containers to use in the garden for some time, and it’s a real pain, so today, I took the easy route.
My wood burning kit includes a knife tip. The heated tip makes it SO much easier!
I started by cutting drainage holes in the bottoms, and air circulation holes at the tops, by inserting the knife through the plastic, then giving it a bit of a twist to widen the hole.
Then the jugs were cut most of the way around. With each jug having a different design, they each were cut at different spots.
How much was left uncut to create a hinge depended on how much of a flat area there was. Which, in the case of the blue jug, meant none at all, but that plastic was soft enough that it could still work. The juice jugs are a heavy plastic, making them the most difficult to cut, while the water jug that is the same as milk jugs is such a soft plastic, the melted plastic of the cut edges actually stuck together again in places, and they had to be recut!
I’m hoping the blue bottles work the best, because we’re going to have so many of them.
Just to be on the safe side, the hinges were reinforced with strips of duct tape. For the jugs with distinct handles, the hinge was placed just under them, while the one with indentations to create a handle had the hinge placed above, so the container wouldn’t squish into itself if grabbed by the handle.
The handle of the blue jug is at the cap, so it didn’t matter on that one. I just followed one of the lines, just above the middle.
That done, it was time to put some soil in them.
They all fit in one of the baking trays we got last year, to make it easier to carry seedlings around. Especially the ones in the red Solo cups. Those have come in very handy. I plan to get more They are very inexpensive at Costco.
I had the seedling mix potting soil recently picked up to use for this. Once the soil was in, it all got thoroughly watered.
The water almost immediately all drained into the tray.
I watered them more, drained the water out of the tray and used it to water the soil again. After doing that a few times, I used a spray bottle on the soil surface, while leaving the bottoms to sit in water.
Even then, only the surface became moist. The soil mix was still bone try below.
I spent a bit of time, working on moistening the soil before leaving it to sit while preparing the seeds.
I had already decided to try starting kohl rabi indoors, as our attempts to direct sow them outdoors last spring failed completely. It was the same with the kale. All I can think is that something ate the sprouts as soon as they emerged. It was the second year I’d tried kohl rabi, and the first year’s attempt also failed, with only a few plants surviving, only to be decimated by cabbage moths and flea beetles.
So this time, we’ll go with transplants and, if it works, we’ll be making sure to protect them from both critters and creepy crawlies!
Bahahahahahaha!!!!
Okay, I do remember, while going through our seed inventory, looking into the packet for Early White Vienna kohl rabi, seeing a few seeds, and deciding to keep them. Until today, I didn’t realize where was only five seeds left!
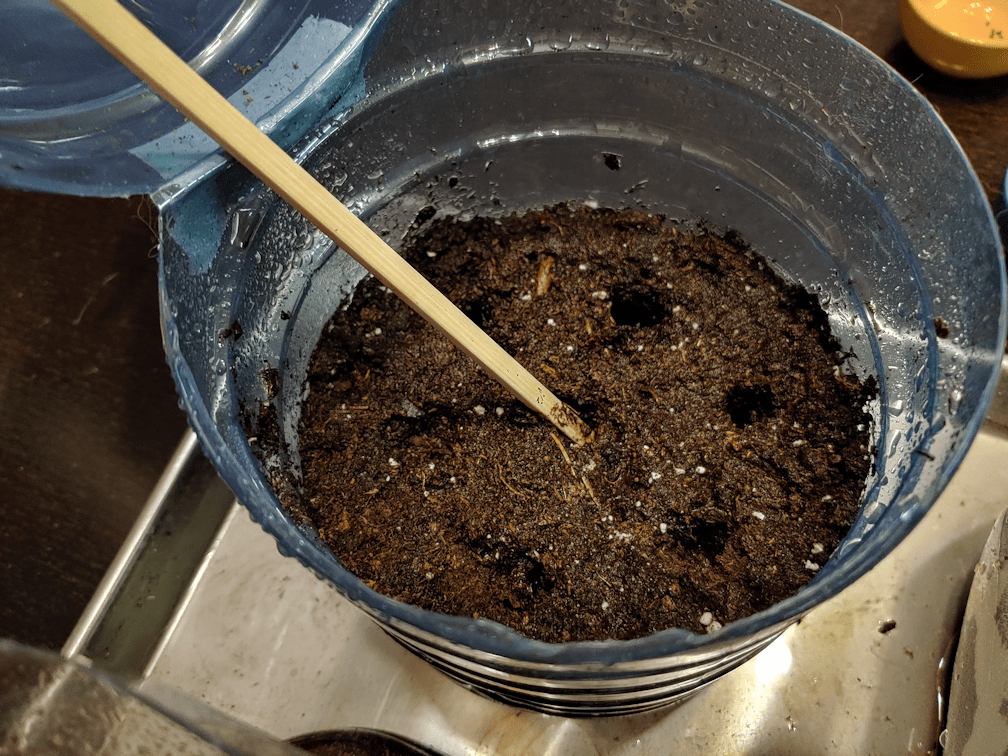
Once the seeds and their labels (strips of masking tape) were ready, I used a chopstick to make evenly spaced holes in the soil for the seeds.
Then I used the spray bottle to water into the holes, because it was still so dry under the top layer!
Because of the different shapes, they each fit a different number of holes in the soil for seeds. The jug with the indented sides for a handle meant it had space for only five holes, so that’s where I planted those five, lonely White Vienna Kohl rabi seeds. Being 2 years old, we may well have none at all germinate, but who knows? The white jug had room for the most seed holes, so that’s where the Russian Red kale went. The last two got the Early Purple kohl rabi seeds.
Once the seeds were in, covered, watered with a spray bottle, labels affixed, it was time to close the containers.
I used packing tape to close up the jubs. The tape is enough to hold them together while the jugs are being carried, but to also be easy to remove, later on.
At least I hope they’ll be easy to remove!
The tray was drained again, then it was time to take them outside.
There we have it. Four different jugs, sown with kale and kohl rabi.
I’m leaving the caps on, since they have air circulation holes, but if the holes turn out to be too small, I might still take them off. We shall see.
I had originally planned to leave the jugs somewhere else, but decided that first spot was not visible enough. I had to consider things like cat and deer traffic, as well as where we shovel the snow from the paths. Hopefully, this spot will be easy to monitor, and they won’t get knocked about by critters. They will also get lots of sunlight, too.
Not that you can tell in the above photos. It wasn’t even 6pm yet, but it was full dark when I set these out!
I still have kale and purple kohl rabi seeds left. I might try starting some indoors, when we start other seeds, then direct sowing the last of seeds. That would give us a chance to compare all three methods.
With all the crazy stuff going on these days, the price of food skyrocketing, and so many people losing their sources of income, all those “crazy preppers” out there are looking pretty vindicated!
There was a time, not all that long ago, when everyone was encouraged to be prepared for emergencies – usually around the time when whichever city we were living in at the time was faced with flooding or wildfires or some other natural disaster. I don’t know when reasonable prudence started being viewed as “crazy prepper” (and no, I’m not talking about the super paranoid doomsday types that have always been around). You know things have really gone bizarre when people on canning groups on Facebook start getting pop ups advising to report people who looked like they are becoming too prepared. !!
Going into our fifth year living here on my childhood farm, a lot of things now being recommended as preparedness was basically how I grew up, and not much different from how we live now. I mean, we’re already doing bulk shopping once or twice a month, with modest local shopping in between, so stocking up for at least a month is our normal. Stocking up for 2 or 3 months over the winter is also a necessary part of living here. We are nowhere near where we want to be, yet, but that’s where all the gardening and other plans are fitting in!
While the needs of living here hasn’t changed much since I was a kid, the resources and technology available sure has! I’m just loving the various groups I’m on for leading me to some excellent sites. Recently, someone shared a link to this Food Storage Calculator. It’s a really awesome tool for figuring out how much shelf stable foods you would need, for various lengths of time. This is for the absolute, minimum essentials recommended. I found this bit at the beginning interesting;
The below calculator is based on estimates from organizations like the CDC and recommendations from the Church of Jesus Christ of Latter-Day Saints Home Production and Storage manual.
Years ago, in an early email support group for homeschoolers, the topic of emergency preparedness had come up. One of the members had been a Mormon, and said that they were encouraged to have at least a year’s worth of food stored up. Though she had left the church, that was a habit she kept up. It came in very handy when her husband suddenly lost his job and was unable to find a new one for months. The one thing they did not have to worry about was how to feed themselves and their kids, and she talked about what a boost to morale it was to be able to whip up a pan of brownies, while in the middle of such hard times. Her story really stuck with me. Seeing that the Latter-Day Saints manual was used for this was a huge plus, to me.
In the end, though, it’s still just a guide. Something to use as a starting off point, when planning one’s own supplies. (Also, it’s a fantastic site, and I encourage checking out the many useful and informative posts in there!)
So I figured it would be a good idea to go through the calculator results for ourselves, and talk about how I would modify it to our own particular circumstances and why. Hopefully, this will give you an idea on how you might modify your own results to your own situation.
Let’s start with the demographics. We are a household with 4 adults, and no very young children. I chose 3 months as the time frame, as we could potentially be stuck here for that long, if we had a particularly bad winter. Here is what the calculator came up with, and how I might modify the results.
The first section is for grains: a total of 390 pounds.
For us, 200 pounds of wheat just isn’t going to happen! While it might be worthwhile to have some wheat berries to cook as a cereal, this is an amount intended for grinding into flour. We don’t have a flour mill. We do intend to get one, but for now, it would be a waste for us to have that much wheat. It’s the same with 30 pounds of oats. At the same time, 30 pounds of flour is laughably low, since we do quite a bit of baking. A lot of that wheat weight would get transferred to flour. I might get 15 pounds of rolled oats, then otherwise transfer the weights to rice and pasta. Both of which come in quite a few varieties, so there’s no need to be bored with just white rice and spaghetti. For our uses, I’d probably either stay the same with corn meal, or even reduce it.
That, of course, would change once we do get a mill. As losing power is something that is likely to happen, I would go with a hand crank mill, and since we are working towards growing flour corn, it has to be something strong enough to handle such a hard grain. Also, manual mills would be quieter than electric ones.
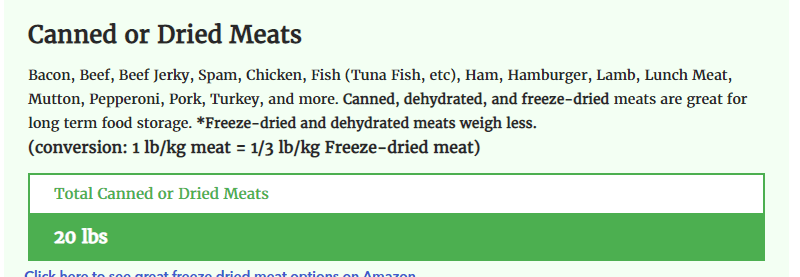
The next section is canned or dried meats.
Twenty pounds for three months? That seems so very low! Especially for 4 adults.
As we do have a chest freezer and I’m finding local sources for meat, we’re moving towards buying in bulk until we are able to start raising meat animals ourselves, so this is a flexible area for us. For now, we actually should be buying more canned meats for those “just in case” times, and we do need to take into account that if the electricity goes out for too long, we risk losing whatever is in our freezer. Hence the need for shelf stable supplies. Canning meat ourselves is something we are working towards.
So for our needs, I would increase this amount substantially, but not until we are at a point where we are canning our own meat.
Twenty five pound of fats and oils. Hmmm. Interesting that it lists more fats and oils than canned or dried meats!
The two gallons of vegetable oil would, for us, become a gallon of vegetable oil, another of olive oil, and probably a mix of other oils in smaller quantities. For a 3 month period, I would probably add in another gallon of vegetable oil. We don’t buy salad dressing. It’s an easy thing to make an oil and vinegar dressing. We do buy mayonnaise, but it is also easy to make, and can be a base for dressings, too. That’s where the “extra” oil would be used. Oil and fat can also be used for emergency fuel and lighting, so more would never go to waste.
We don’t buy shortening. Or margarine, for that matter. Just butter. We buy 8-10 pounds of butter for 1 month. More if we plan to do a lot of extra baking, like before certain holidays. For our usage, a 3 month supply would mean 24-30 pounds of butter. Not realistic! Butter is not shelf stable, so it would probably be a good idea to have a few pounds of shortening. If we were unable to get out, we could probably get away with using oil in place of where we might normally use butter, so we could play with the quantities and ratios a bit. The quantity of peanut butter could stay the same.
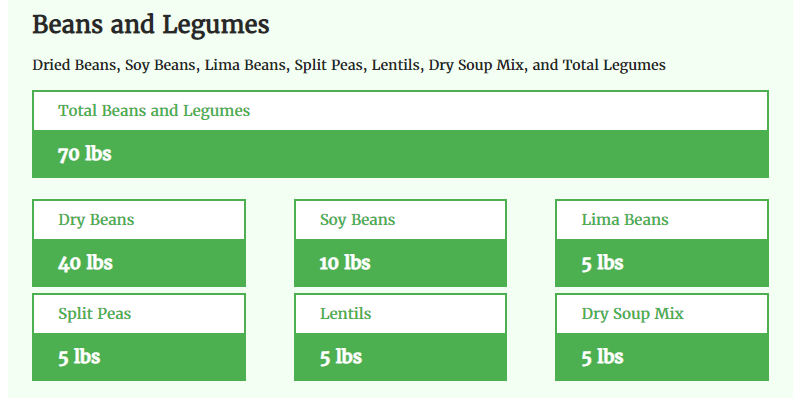
Beans and legumes: 70 pounds total.
That’s probably more than we would need, for how much we eat them. Soy beans and lima beans would be dropped completely. We don’t eat them. Also, I’d probably make my own dried soup mixes. It’s something I’ve done before, in quart jars, including things like dehydrated vegetables, mushrooms and bouillon cubes. They worked our very well, though I would do them in smaller jars in the future. Also, no black beans. They turn the end result a very unappetizing grey! :-D
One of the things I have been picking up at Costco is cases of baked beans. The prices of those has pretty much doubled recently. It would be cheaper to buy dry beans and cook them ourselves. Among our gardening plans is to grow beans for drying as well as fresh eating. Along with just keeping dry beans, I hope to can plain beans, as well as making baked beans for canning, too. I would add chickpeas to this list, canned or dried. There are chickpea varieties that grow in our zone, so that’s something else we could someday, potentially, supply ourselves.
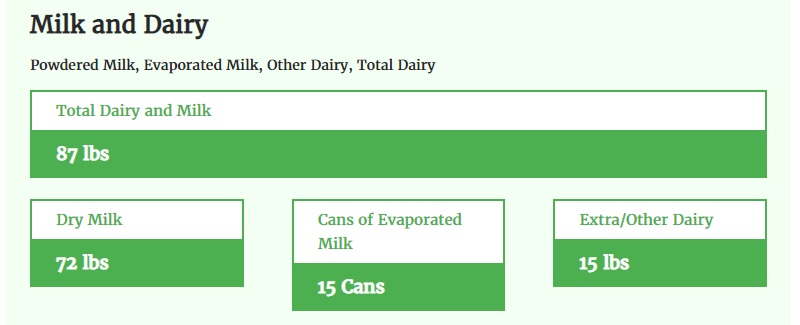
Milk and Dairy: 87 pounds
Shelf stable dairy products are a huge gap in our pantry. We should at least have some powdered milk. I don’t even know what to do with evaporated milk. And what does “other dairy” mean, in the context of shelf stable products? We don’t drink a lot of milk; it’s mostly used in cooking. What we do use a lot of is dairy products, such as cheese, sour cream, yogurt, more cheese, whipping cream… and more cheese. None of which is shelf stable. Well. I guess the cheese is, if stored properly. And we do love our cheese!
Sugars: 60 pounds.
I did not expect to see jams, powdered juice mixes or Jello in the sugars list.
White sugar and brown sugar are things we use quite a lot, since we do so much of our own baking. For honey, the 1kg (2.2 pounds) container we last bought from my bee-keeping cousin disappeared fast, so if we were to stock up on honey, we’d be getting more than what’s listed. Probably a 5kg (11 pounds) bucket, which is the largest my cousin sells. We’d probably get more molasses, too, though we don’t really use it all that much. Corn syrup would be off the list. We don’t use it. That amount of jam is probably more than we would need. I don’t know that we would include the Jello at all.
I wouldn’t not have thought of powdered juice mixes. Now that I think about it, though, it would be a good idea to have a supply of drink mixes, as their own category; juices, iced tea, lemonade, hot chocolate, coffee and tea would all be good things to have in the pantry. Plain water gets tiresome, fast!
Cooking essentials! Gotta have these.
For the amount of baking we already do, I’d probably increase all of these. The vinegar would be used along with the fats and oils for those salad dressings we would be making ourselves. For salt, I’d want to have a variety, but if I had to choose just one type of salt, it would be course salt. We have salt grinders for seasoning meals, but I like to use course salt for a lot of things. If space allowed, I’d include a variety of vinegars, too. Salt, vinegar and baking soda can all double as cleaners, too, so extra of those would never go wrong.
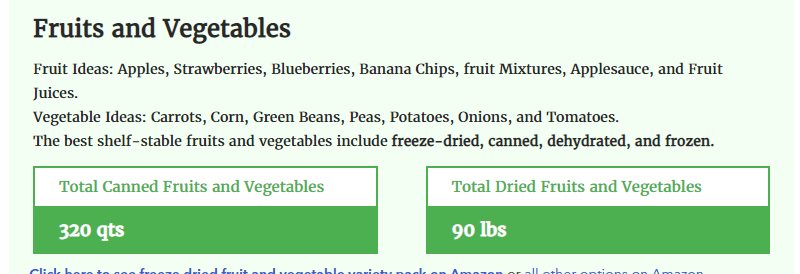
Canned fruits and vegetables: 320 quarts, plus 90 pounds of dried.
This is another area where we tend to be too dependent on our freezer, and why we want to move towards canning our produce. We do have a root cellar, so that helps. Almost all the fruits and vegetables we eat are fresh, with a small amount of frozen. We pretty much never buy canned, but once we’re growing enough to make it worthwhile to can them ourselves, it would make a big difference in the winter months. Before we moved out here, I had a dehydrator and used it to dehydrate purchased frozen vegetables. It works really well; the vegetables are already blanched and most are cut to size, so they can be laid out on the trays while still frozen, with no extra work needed. They were great in our jar meals.
While I’ve bought dehydrated vegetable mixes once in a while (they always include peppers in them, which is irritating for me), we’ve never really bought dried fruit. Sometimes I’d get dates, with their pits still in them, for snacking, but they’re quite expensive. We hardly even bought fruit leathers for the girls when they were little. We don’t buy raisins. Dried fruit in particular is something I would forget about when it comes to emergency supplies, but they would be good to have on hand. Ninety pounds, however, would be way more than our family would use.
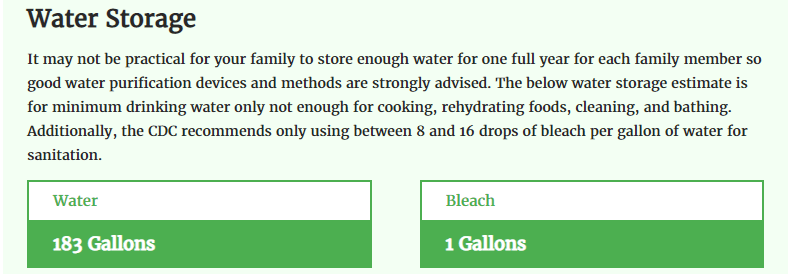
Water storage. This is our weak spot! We are already buying drinking water, so at least we do have the big water jugs. Storing 183 gallons, just for drinking, simply is not an option. This is a big part of why we want to get that old well repaired, so that we have access to water even if the power goes out. The bleach is something we don’t buy. We found a half empty bottle of bleach among the laundry supplies while cleaning up the old basement, and for the amount we use bleach, we’re still using that bottle we found! Still, it would be good to have bleach on hand. It’s something I would have forgotten about, so I appreciate it’s in the calculator.
That 183 gallons is the minimum water required for drinking. Much more would be needed for everything else. A safe supply of water is, typically, the biggest and most common hurdle in emergency situations for most people, I’m sure. At least for us, we have the possibility of getting the original well working again. Even here in the boonies, most people have wells that rely entirely on an electric pump.
Of course, in our situation, we would also have to add in wet and dry cat food. Since switching to the wood pellets for litter, we’ve been going through that a lot more slowly – and it’s a product that is actually a fuel, so it can do double duty. A single 40 pound bag goes a long way.
This calculator makes for a very interesting tool. I like that it’s just the shelf-stable essentials. There are so many lists out there that include everything but the kitchen sink – and then tell you what to use for a kitchen sink. Even just this list, for a 3 month period, can look overwhelming. However, it’s a place to start, to modify for our own circumstances, and the sort of thing that can be achieved, little by little, without taxing the budget too much.
It’s good to be prepared.
Even if Facebook thinks your a scary extremist for putting up a bit of extra food!
I wasn’t going to be able to place another order for our garden until next month’s budget, but thanks to my daughter, we now have our potatoes ordered!
While I was very happy with the potatoes we ordered from Vesey’s, we went with a new company this time – one that I have added to our Cold Climate Seed Sources list.
Eagle Creek Seed Potatoes is in Red Deer County, Alberta, so we can be pretty sure that anything we order from there will grow in our Zone 3 area. It was a company recommended in one of the cold climate gardening groups I’m on, and I really wish I’d discovered them earlier! Not only to they provide a lot of information on each variety of potato they carry, they even have a container and tower pack. That would have been very handy, for when we grew potatoes in feed bags, before we knew that potatoes came in determinate and indeterminate varieties!
This year, however, we are going to use our potato plantings to reclaim more garden space, and will be using the Ruth Stout method again.
These are the potatoes we ordered, to be delivered in May (they let you choose your delivery date range), since our last frost date is early June. They can be ordered as 4 packs, 1 kg or 5 kg sizes (1 kg = 2.2 pounds), and some are available in 14 kg bags.
All images belong to Eagle Creek. All links will open in new tabs.
This is an early maturing variety, though it’s said that they can get quite large if left until late in the season. We ordered these in a smaller, 1kg (2.2 pound) package, to stay under budget. They are listed as having excellent winter storage, and described as making the fluffiest mashed potatoes ever! :-D
This is a medium maturing variety (though the description also lists it as early maturing) with good yields in most soil types, good winter storage and good disease resistance. They are noted as being particularly good for making French fries, though that’s not something we normally do. They are also a good baking or mashing potato. We ordered this in the 5kg size.
Well, we just had to include a purple potato!!! This is a late maturing variety with great winter storage, and is good with pretty much any cooking method. We ordered this in the 5kg size.
Last year, we ordered 4 varieties in 6 pound packs, for 24 pounds of seed potatoes. We got a pretty good return on them, though nowhere near enough to store any for winter. This time, we’re getting about the same weight in 3 varieties.
As we are planning to use the Ruth Stout method again, we’ll have to be pro-active in combating snails. Our first year growing potatoes left us with soil that was much more workable when we converted the space into beds for onions and carrots. We pretty much doubled the length of the beds, and when we were harvesting and preparing the beds for the fall, we could really tell the difference in the soil between the two halves! Where the potatoes were grown previously, the garden fork easily sunk deep into the soil, but in the extended portion, once the fork got through the new soil we added on top of the beds, it was like hitting a hard floor beneath.
When we grew potatoes that first year, the only thing we had available for mulch was straw. It’s what we can get, so that’s what we will be using again this year. This time we can run the straw through the shredder chute on our wood chipper, first, so it will cover better and break down faster.
As far as quantities go, unless these all turn out to have amazingly high yields, this is not going to be enough to last us into the winter. Which is okay, because these are new varieties we are trying out. Over time, once we’ve worked out what grows best here, and which ones we like the most, we will get larger quantities of seed potatoes and, hopefully, be able to have enough to plant our own potatoes every year, instead of having to buy seed potatoes. At least, that’s the long term goal for the bulk of our potato growing. I suspect we will continue to try new and different varieties regularly, simply because we like trying new things!
One more item for our 2022 garden to check off our list!
After much discussion with my daughters, we have made our “seed budget” purchase for this month, and it is trees.
We’ve been going through a number of websites for nurseries that supply cold hardy trees. Among the ones we want to get is a nut orchard collection, and the nursery that sells the one we’re looking at has scaled down the package deal, making it much more affordable. The collection, if planted spaced out as recommended, would cover 1 acre. However, some of the trees in the collection have the potential to reach 100 ft tall. That’s almost 40 feet taller than the tallest trees in our spruce grove! Which means we have to plant them in the outer yard, or even beyond, where the renter’s cows pasture, and we are just not going to be ready for that this year.
Beyond that, some of the sources we have been looking at just don’t have new stock listed yet. Among the things we are eyeballing are fruit trees, such as apple trees to replace the diseased crab apple trees we will have to cut down, pears, plums, Saskatoons, highbush cranberry, as well as different types of raspberries, etc. There’s only so much we can do in a year, though, and only so much space we are ready to plant into.
For this year, then, we settled on buying from Tree Time. They do a lot of shelterbelt trees, but also have fruit, nuts, berries, etc. They also come highly recommended. They are a reforestation nursery, which you can read about in their “how to order” page. Right from the start, they say:
We are a reforestation nursery that makes it easy for Canadians to purchase large quantities of tree, shrub, and berry seedlings at low prices.
Shop with us if you want convenience, selection, low prices, outstanding service, a guaranteed ship date, and high quality stock. Our customers tend to enjoy doing things themselves and watching their trees grow.
We grow our trees for maximum survival, not height or aesthetics. We mostly grow 1-2 year old trees because they have the best survival rates and are easier to ship in the mail.
We decided to focus on two areas. First, creating our privacy barrier/living fence, and second, our first nut trees. Because of how they bundle their trees, the numbers we are getting are quite different than they would have been, elsewhere.
This is what we are getting (all images belong to Tree Time nursery).
When talking about what to get as barrier trees, we were thinking of setting these aside for another year, but the way various things have changed since then, we’re going for it.
This is a zone 2b tree, so well suited to our zone 3. They are good in poor soil, are nitrogen fixers, and their berries are edible and healthy. They can grow up to 15 ft in height, with a 12 foot spread, and should be planted at 3-4 ft spacing, so they will do very well as a living fence/privacy screen, as well as a deer barrier, once they grow big enough. Plus, they will provide food for birds.
These will come as year old, bare root trees. We will be getting their smallest bundle, which is five trees. Sea buckthorn requires 1 male tree to 4 females to produce berries, but at only 1 year old, there is no way to know what sex the trees are. It may be a few years before we can tell! The males do not produce berries, but hopefully, there will be at least one male in the bundle.
Where we plant these will be partially dependent on how far we go with this next batch.
This is one that disappeared from other sites we were looking at, so we were very happy to find them at Tree Time.
These are a super hardy, Zone 2a tree. Like the Sea Buckthorn, they can also handle poor soil and are excellent for attracting birds. They can grow to 18 ft in height, with a 10 ft spread, and should be planted 3-4 ft apart, so they should also make a good barrier and privacy screen. These will come as 1 yr old bare root stock.
We also got them in the smallest bundle of 30.
Which is triple what we expected to buy, when we first found these.
The area we planted the corn and sunflower blocks is where we intend to plant these. Right at the corner, along the north fence, the lilac hedge my mother slowly extended over many years, peters out. There is a gap there that the deer jump through. I am thinking that section would be a good place to plant the 5 Sea Buckthorn. Then, the Silver Buffalo Berry can be planted all along the east line, leaving a “lane” behind them to access the trees along the fence line itself, and also leaving a gap where the telephone line is buried.
With 30 of them, planted 3-4 feet apart, however, we will have WAY more than will fit in a row in that area. Since we will be slowly planting more food trees further west, we will be planting just the one row of them. Which means we’ll need to find another location to plant the remaining trees! I am thinking of the area we had originally considered planting the Sea Buckthorn later on, which is in along the north fence line in the outer yard. Or even filling in gaps west of the lilac hedge. This would go a long way to help reduce the road dust that drifts into our yard in those areas, every time a vehicle drives past on the gravel road.
Before the trees arrive, we will have to measure and mark out where we want to plant in that north east corner. Once we know how many we can fit into there, we’ll know how many we have to plant somewhere else. That is a lot of trees for how we want to use the spaces.
Now that I think of it, we could also gift some to my older brother, for the forest he’s been working on for the past couple of decades. :-)
Then there are our first nut trees. Pine nuts, to be more specific!
In other sources, we have seen these as being a Zone 2 tree, and some listing them as reaching up to 100 feet in height. !!! Considering where we intended to plant them, that was just not good.
These, however, are listed as Zone 3a, and reach “only” 60 ft in height – about as high as the spruces in the spruce grove. Which is about where we intend to plant these.
These also have a spread of up to 30 feet, but the website doesn’t list how far apart to plant them. We’ll get that information later.
We ordered two bundles of three, 2 yr old seedlings as plugs, not bare root. They have special requirements. For the first five years, they grow very slowly and need to be kept shaded, because their bark can be easily burned by the sun. This is why we want to plant them along the north side of the spruce grove, between the grove and the row of crab apple trees, where it is shaded for most of the day. At 5 years, they suddenly shoot up in height, and no longer need to be protected with shade. Since we’ll be getting 2 yr old seedlings, that should happen in three years.
I have some concerns.
The nursery we first found these at sells them with their roots in a plastic wrapped ball of soil – the only tree they don’t sell as bare roots – because they require a particular fungi at their roots for optimum growth. We may be able to buy the fungi to inoculate the soil, though. At least that’s what I learned from this other nursery. According to the Tree Time website, however, there is no mention of the fungi needs, plus it says they should be planted in full sun, not shade.
We’ll have to do more research on them, because this might be due to differences in varieties. We might end up having to plant these somewhere else. They would make a good shelter belt tree, and at 60 feet high, that would mean either along the north property line, or further out in the south, where we get hit with winds because there is a gap in the sheltering trees. Since we intend to plant permanent garden beds in the outer yard, anything we plant there has to be carefully placed so as not to create the very shade we are trying to get away from!
It’ll take about 7 years before these start producing pine nut containing cones. I don’t think I’ve ever bought pine nuts before, as much as I’d like to be able to use them for making pesto, etc. I enjoy them, but they are just too expensive. These trees have the potential to be a cash crop.
When placing our order, I chose a shipping date of May 30. Since our last frost date is June 2, I thought that would make the most sense. It also means that, in the week or so before they are shipped, we can get out and measure where they will be planted, and even pre-dig the holes (the ground should be thawed out enough), as well as making sure we have everything we need for planting, then protecting, the 41 seedlings we will be getting!
There we have it. After 4 years of living here, we are finally at the stage where we are starting to plant trees and shrubs in bulk. The first stage of a multi-year plan in planting food trees and reach our self-sufficiency goals. Given how long it takes for trees to start producing fruits or nuts, it would have been better if we’d started this years ago, but when we first moved here, we didn’t even know what we wanted, or how to get them. There is a big difference between planning for things that will live for decades, and can potentially become very large, and planning vegetable beds!
Placing this order really feels like a milestone for us!
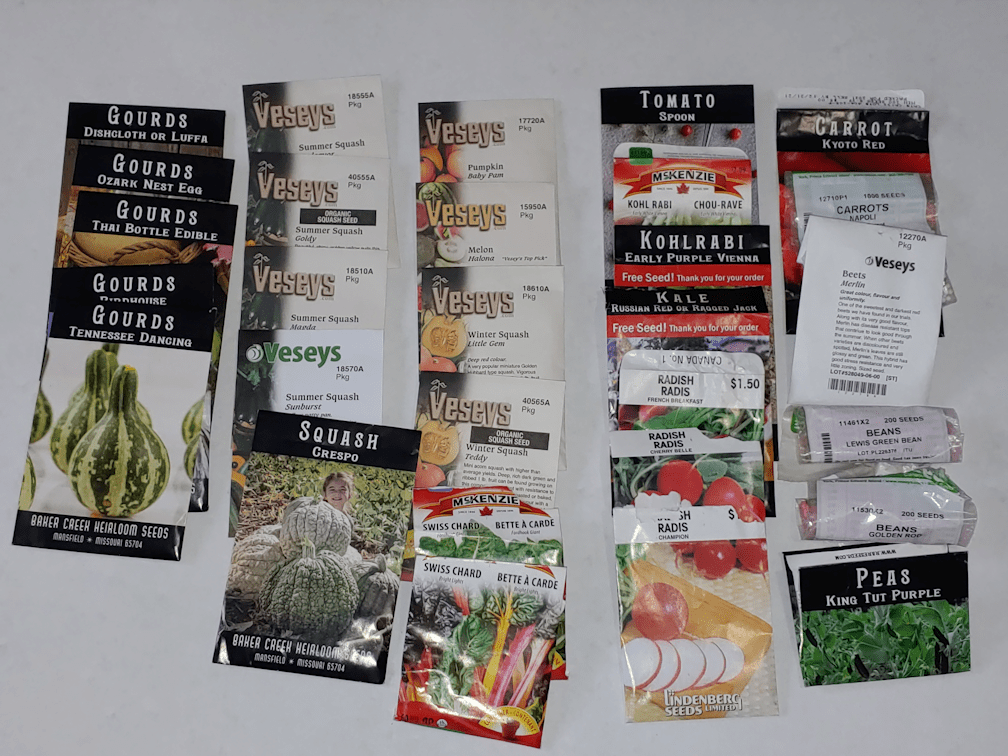
With all but one order of seeds having arrived, I decided to do an inventory of what we have, including what we have left over from this past year’s garden.
I was a bit surprised by some of them.
One surprise was the Spoon tomatoes. We had two packets of those, and while I thought we had planted all the seeds, I found a surprising number of seeds at the bottom of each packet. So I combined them into one. There isn’t a huge amount, but it does mean we could start some indoors, if we felt like it. I don’t think we will, since we have so many other tomatoes. Plus, I wouldn’t be surprised if a bunch showed up on their own in the bed we grew them in this past summer!
I didn’t think we had any kohl rabi left, either. One of my daughters had done a second planting of those, and I thought she’d used the last of the seeds. The White Vienna is actually from the year before. We got two free packets of the Early Purple Vienne, and both got opened for some reason; my daughter probably missed the one I’d opened to do an early planting. We had no luck at all with kohl rabi this year and I plan on starting them indoors instead of direct sowing.
For the gourds, I want to do the Tennessee Dancing Gourds again. They did really well. I want to try the Ozark Nest Egg again; were it not for the drought delaying their development, we would have had lots of those. I also want to try the luffa again, because I’m a sucker for punishment, but will probably skip the Birdhouse and Thai Bottle gourds.
Though we still have seeds left from the summer squash collection, we also still have the other two collections I’d ordered by accident. I like having a good variety, and this year we’ll have green patty pan squash, too, so we’ll start just a few seeds of each. The Baby Pam pumpkin never germinated at all, but I think that had more to do with growing conditions. We have so many others, I don’t know that we’ll try them again. There are still Halona melon seeds left, but I also saved seeds from both the Halona and the Pixie, both of which did very well, plus some other seeds I saved from other melons we enjoyed.
I will happily grow more of the Teddy and Red Kuri (Little Gem) winter squash again, along with the new varieties we ordered. They may have had a hard time with the drought, but they were quite good, and they are much smaller varieties that – in more ideal conditions – are supposed to be prolific producers.
Not in the photo are the varieties of spinach and lettuce we still have lots of. They, and the chard, are for spring and fall planting, so we’ll have to plan those out – if we try growing chard again. We didn’t really eat them much. As for the radishes, I want to plant a just a few of each, much earlier, and leave them, as it’s the pods I’m after, not the root.
The carrots here are pelleted seeds, and there are still quite a lot. It’s easier to space the pelleted seeds when planting. With thinning not as much of a concern, I don’t think I used even half of each variety this past year. I will happily plant them again, along with the new varieties we got.
I was surprised to find the Merlin beets. I thought I’d mixed all the remaining beet seeds together to plant into the L shaped bed, but I guess I missed these. We were planning to plant only one variety next year, but it won’t hurt to have two. :-)
We have quite a bit of the green and gold bush beans left, but that packet of King Tut purple peas only has about 5 seeds in it, and those are seeds I’d saved myself. If I do plant those, they will be only for seed saving. I didn’t order any other peas this time, but those are something I can easily buy locally in the spring. As for the beans, we do have several varieties of pole beans, but bush beans tend to mature faster, so I might go ahead and do both.
These are all our new seeds, except for the Kulli corn that is still on the way. It seems like a lot, but for things like the squash and gourds in particular, we will only be starting a few seeds indoors for each. I would rather plant fewer of many varieties and see how they do, than have lots of one variety then discover it doesn’t like growing here. That, and it would get pretty boring eating the same variety of vegetable all year! For things like the onions… well, I’m finding we just can’t have too many of those!
The beginnings of our culinary herb garden is something I need to think about. We already have a mint that we found in the old kitchen garden, but I don’t know what kind they are. Not spearmint, is the most I can say for sure. Probably peppermint. I want to have permanent places for our culinary herbs, and the old kitchen garden makes the most sense, since it’s right at the house, but unless we start taking out the ornamental crab apple trees, and the double lilacs, roses and honeysuckles – which I have no intention of doing – there’s not a lot of well lit space left in there. I might try growing them in buried pots at first, so that as we build raised beds in there, they will be easy to transplant, and things like the mint will be contained.
One of the things about the squash is that, with their spreading habit, we can use them to reclaim more garden area. We’ll be growing potatoes using the Ruth Stout heavy mulching method again, for much the same reason. With so many climbers this year, we’ll need to build more trellises, too.
I’ve been talking to quite a few people who are looking to start gardening for the first time, out of necessity. There is a lot to consider. Especially in our Zone 3 growing zone. So if it seems like I’m spending an inordinate amount of time talking about gardening of late, that is partly way. I’ll be writing a post specifically for those who are suddenly finding themselves having to grow their own food, so if you have something specific you’d like me to include on that, or experiences you’d like to share, please feel free to mention it in the comments.
Well, I just couldn’t resist. After looking over the Heritage Harvest site, then going over my budget, I went ahead and placed another seed order. We may not be able to plant them all, but we’ll at least have a good start on our own seed bank, if we don’t!
I am absolutely determined to grow gourds for crafting purposes. This company is in Fisher Branch, Manitoba, which is in the same zone, or colder, than we are, so we should be able to grow these here, too!
The first two, Apple and Canteen, were gourds I already had on my favorites list (a function the updated website doesn’t seem to have now), and had been out of stock, so I wanted to snag them while I could!
The third gourd, Yakteen, is a new variety for 2022. It is a type that can be eaten when young (which is supposed to be true of all varieties of gourds, but I don’t think they all taste good), or left to mature and be used for crafting, which is what I plan to use it for. It’s also listed as very rare, so saving seeds will be an important part of growing these.
The rest that I ordered are all on their new-for-22 list. It was really hard not to order more from my old favorites list! I already have other varieties of most of those, so I didn’t. The only exception is…
… the Red Noodle bean. I have two other varieties of pole beans, in different colours. None are as long as these get, though – they can reach 16-20 inches in length! There’s only 25 seeds in a packet, and I was already planning to get a third variety of pole bean, so this fits in.
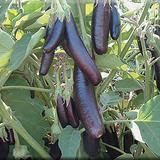
These are Little Finger eggplants. We are not big eggplant eaters, but it’s not because we don’t like them. It’s just that, with X amount in the grocery budget, they tend to get passed over. I don’t know if we’ll be up to growing eggplants this year, but these are supposed to be good container plants, so they would be a nice thing to have tucked somewhere on the south side of the house. In the end, it will probably depend on how much space I have to start things indoors.
These are Purple Beauty peppers. My husband and older daughter are the ones that like peppers, so having a few plants for them would be nice. And if we’re going to grow peppers, why not a variety that isn’t available in stores? :-)
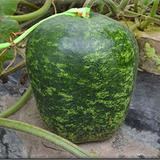
Here we have the Kaho watermelon. They are an early variety that grow to only 2 – 4 pounds. Watermelons were not something I was planning to try, yet, but with an early variety, it might be worth starting a couple of plants indoors, if we can fit them.
Finally, we have the Wonderberry. Something I have never heard of before. These fall into the category of permanent plants, as they are supposed to self-seed prolifically. We will have to plan out where we grow them, but once we do, we should have berries, year after year. That makes them worth trying, in my view! Plus, they are drought tolerant. Bonus points on that one!
So this is my second order from Heritage Harvest Seed. I look forward to seeing how the seeds we get from them do in our zone, compared to ones we have ordered from other seed companies that are not as far north as this one.