Yesterday, we never reached the predicted high of the day, though we did come close. Today, it looks to be much the same.
So much for starting to warm up!
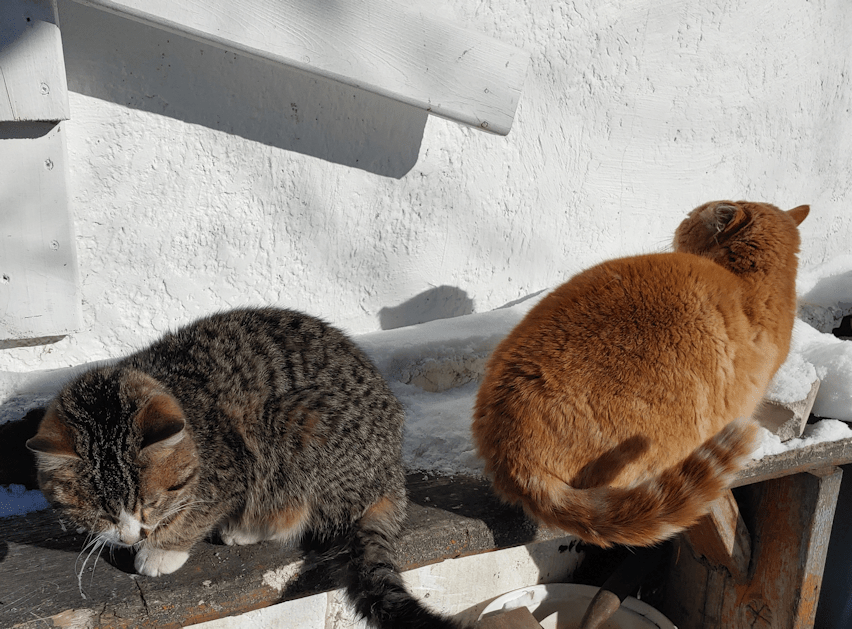
It was -33C, with a wind chill of -39C (-27F and -38F) when I headed out. That didn’t stop the cats from being out and about! Even before I headed out, I saw Rolando Moon in a tree branch outside my window. It was good to see her today. She hasn’t been around for a while, so I was a bit concerned. When she joined me and the other cats, her only interest was in the fresh, warm water! She did, however, allow me to pet her briefly. She is such a snob! :-D
Poor Nosy is just miserable! After I finished with the food and water – which he had no interest in – he let me pick him up and snuggle him for a bit, then I put him on the warm(ish) wooden bench in a sun spot before going back inside.
Just as I started writing this (after many failed attempts, due to our internet still flicking out repeatedly), the weather icon on my task bar refreshed to -29C with a wind chill of -36C (-20F and -33F). The high forecast for this afternoon is now a couple of degrees lower than had been forecast yesterday.
Even the long range forecast has been modified overnight. They’re still saying we’ll reach 0C (32F) by the 22nd, but the rise to that temperature is no longer expected to be as quick and smooth. We’ll be chilly for a little bit longer.
This polar vortex just does NOT want to move or dissipate!
While I will probably go out later this afternoon to run the vehicles for a while, I no longer expect to go into town at all. It isn’t a necessity, but was more about running at least my mother’s car for a while.
I am glad we will be getting my husband’s prescriptions delivered, though it will be on Tuesday instead of tomorrow, because of the holiday (February’s statutory has different names in different provinces). My husband is trying to stretch his painkillers out to last until it comes in. The refills will have his updated and changed prescriptions. Hopefully, that will help him manage the pain better. He’s really struggling right now, and the cold – even though he is set up in the warmest room of the house – is making it much harder to cope. :-(
On the plus side – and I’ll take any positives I can get right now – I have an announcement to make.
Drumroll, please!
We have onion sprouts!
Little bitty sprrrroooooooots!!
I found 2, yesterday afternoon, and a third one showed up by evening. They are so tiny, I didn’t even try to take a photo. They are all in the peat pellets, not the K-cups, which we have had to spray daily, because they’re drying out on the tops. I will be working on the shallots today, starting by saturating the peat completely, before I put it into the starter trays. Which will be the cardboard trays from flats of eggs. I just have to make sure they are on something that will allow me to lift them later on, when the cardboard will be soft and damp. Depending on how long it takes the peat to get saturated, the actual planting of seeds might not happen until tomorrow.
Meanwhile.
We have sprrrrrooooooootttsss!!!
Yes. I am a silly child at times! :-D
So that’s a bit of cheer on another bitterly cold day.
After having to get creative to prepare our first tray of seed starts, we left the tray overnight to give the peat in the K-cups more time to absorb the water.
I didn’t check it until late morning, and the peat was still dry in the middle! The water was basically staying on top. It was better than before, though, so I went ahead and planted our first seeds of the year!
I used a skewer to make holes for the seeds and sprayed more water into the holes in the K-cups (the peat pellets were fully saturated). Then I poured some of the seeds into a small dish and used the dampened, flat end of the skewer to pick up seeds and transfer them into the pots and lightly cover them. Using the skewer works really well! I ended up using only about half the seeds in the package to fill the tray, and that’s with 2 or 3 seeds each! Then I sprayed the tops with more water – especially the K-cups – before getting a daughter to help me transfer it into the big aquarium.
I am not going to use the tray’s dome to cover them, as the high humidity can promote mold growth. Instead, we will be checking them every day, and probably spraying them daily. The tray is designed to water from below, to encourage the roots to grow downward, so we won’t keep up the spraying for too long. It’s mostly the dry peat in the K-cups that concerns me. I will also be leaving the light on all the time until the sprouts are emerged for a few days, then reduce it to about 16 hours a day. Hopefully, we will soon have a tray of shallots in here, too! Before filling any pots (if I can’t get more pellets), I’ll have to make sure to use a container to saturate the peat in, first, then fill the pots.
Meanwhile…
I’m a suck.
I’ve mentioned that a few times, usually in the context of cats, but it turns out I’m a gardening suck, too.
Last night, the girls and I were pouring over a satellite image of the property. We marked out the current garden beds, and we have been using it to figure out where we are going to plant various things.
One thing is for sure. If we aren’t able to get a load of soil this spring, we’re lining ourselves up for some back breaking labour, and probably a lot of failed growth. Last year, we basically dug small holes for everything we planted, filled the holes with a soil mix, then planted or transplanted into these in-ground “pots” we created. That’s fine for the small garden we had last year, but not so much for this year! The soil is so hard and filled with rocks, it’s difficult to use a spade or hoe. Even sticking wire flags into the ground left me with several bent flags from hitting rocks. We have so few tools here, we don’t want to break what’s left of what we’ve found! My mother still goes on about how we could get one of the tillers fixed and using it, but I’m pretty sure we’d just break a tiller, trying to use it! I couldn’t even use the soil auger drill attachment when we planted all those bulbs in the maple grove last fall. The original plan had been to slowly build up areas and increase our garden size over several years, but… well, then the world went crazy.
We have so many more things we’re planning to grow compared to last year, it’s going to be a huge job. Especially the area where we want to plant the tallest things – 3 of our corn varieties, and the giant sunflowers. We’re wanting to start going into an area that has never been part of the garden before, and has only had grass on it. Two of the reason we grew giant sunflowers last year was for a privacy screen and wind break. We’re still keeping that in mind for this year. Between tall plants, using trellises, and whatever we come up with to keep the deer out, we should be able to make a pretty decent privacy screen. We may be in the boonies, but the main road goes right by the garden. Aside from vehicles slowing down to watch the deer at the feeding station, through the lilac hedge, we’ve got our vandal and his creeping about to contend with. :-/
As we talked about what seeds we have now, and what will be shipped in time for spring planting, we ended up talking about other things we’d like to plant, and I showed the girls some things I’d found on the Baker Creek website. We have a lot of things that are purple (corn, potatoes, sunflowers, beans, carrots…). We had a blast looking up other purple things, and talked about having a purple themed garden. So, of course, I was adding all sorts of things to my wish list.
I really ought to know better. :-D
Yeah, you guessed it.
I made another order this morning!
Thankfully, seeds are still cheap.
When I placed the order, there was a highlighted note telling people that, because there are so many more orders this year, things are taking longer to process. For us in Canada, that means it could take up to 3 months for our seeds to arrive. That would be too late for anything that would require starting indoors, but that’s okay. I’d rather order them now, while they are still available.
So, this is what we’ve ordered (all links will open in a new tab, so you don’t lose your place. :-) ).
Spoon Tomato: this is the one that I really wanted to show the girls – and then we got sucked into the vortex! We are not big tomato eaters; my older daughter enjoys eating them, and we have ordered a mix of cherry and grape tomatoes for her, but when I saw these “micro mini” tomatoes, I just had to show them to her. While they are incredibly small (possibly the world’s tiniest tomato), they’re supposed to be big on flavour. They’re adorable!
Chinese Pink Celery: this is a new variety for Baker Creek, and one that was already on my wish list. I was thinking for next year, but I went for it. These are supposed to be easier to grow than other types of celery, and seem to be well suited for our climate. Hopefully, we’ll get them early enough to plant them this year.
King Tut Purple Pea: This was another one already on my wish list, and since we’re going with a purple/pink theme, I included them. We only have 1 variety of peas right now, anyhow, and I felt it wasn’t enough. I’d resisted ordering more, since we already have so many other things, but… it’s peas. Can you have too many peas? I don’t think so. I highly recommend checking out the link and reading the story included about them. :-D
Merlot Lettuce: lettuce is one thing I had not included in previous orders for various reasons. We’ve tried growing lettuce before, in our balcony gardens, and never had much luck with them. Plus, they just seem to go bad quickly. But as we were looking at the purples and dark reds, these stood out. Not only do they have an amazing colour (they are well named!), but they are bolt resistance and cold tolerant.
Lunix Lettuce: Every time I see the name, I want to say “Linux” instead of “Lunix”. LOL These have such deep, dark red leaves! Bolt resistant, and apparently great for hydroponics and off season low tunnel growing. We’ve been looking at ways to use poly-tunnels to extend our growing season, so it would be good to test these out.
Lollo Rossa Lettuce: This is a very dramatic looking head lettuce! Also noted for its great flavour. I’ve had no luck growing head lettuce before, but maybe now that we have the spaces that we do, we can make it work.
Dishcloth or Luffa Gourd: this one’s for me! We have so many squash already, the last thing we needed was one more but, like I said, I’m a suck! Chances are, we won’t be able to start them this year, but they seem to be having a surge in popularity, so I figured I should get the seeds now, while I can. Young squash are edible and tasty. Left to fully mature, the gourds are dried, peeled, the seeds shaken out, and the remaining sponge is great for washing with. I don’t think I’d use something that size as a dishcloth, but in the shower, they are great for exfoliating the skin. You’ve probably seen them in stores, along with the back scrubbers and such.
Along with these, we will also be getting some free mystery seeds that Baker Creek always includes with their orders.
This really should be the last of the seeds we order, but I’m pretty sure I said that after our first two orders for this season! :-D
For our Zone 3 area, quite a lot of things will need to be started indoors. While most things won’t need to be started until April, onion seeds are supposed to be started up to 10 weeks before the last frost date. For us, that means late March.
However, all the experienced Zone 3 gardeners that grow onion from seed have been saying onion seeds MUST be started much earlier. They started theirs in January!
Do I go by the seed packet, or by these gardeners?
I have decided to listen to the gardeners, at least as much as I can.
The problem is we don’t really have supplies, and with the polar vortex we’re under right now, I do not consider it safe to drive. I just don’t trust that our van, or even my mother’s car, can handle it. In these temperatures, breaking down on the road is life threatening.
So, I can only start with what I have.
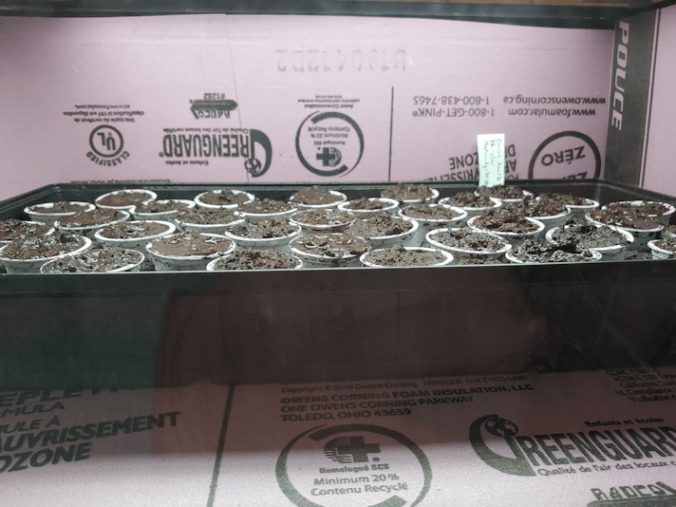
We have two seed starting trays that fit the Jiffy Pellets. We found a box of Jiffy Pellets while cleaning up the house. Unfortunately, there were enough pellets to fill only half of one tray.
K-cups to the rescue!
We used to have a Keurig, but when it finally died, we found ourselves left with boxes of product that expired. Rather than throw them all out, I emptied the contents into the compost and kept the cups, specifically to use them for starting seeds. :-)
Their bottoms fit in the trays, but the flared tops needed more space, so I put the pellets in alternating spaces, then punched drainage holes in all the K-cups with an awl.
We’ve still got peat from last year, so that was used to fill the cups.
They fit rather well, this way.
I have enough K-cups to fill another half tray, with a few left over, but no more peat pellets to fill the spaces in between.
We’ll figure it out.
The tray went into a shallow storage bin, where I filled the bottom of the tray with water. Then, to keep it safe from cats, I put both the dome and the other tray, upside down, over it, then put more stuff on and around it. The cats really wanted to get at that peat!
Remembering how difficult it was to fully dampen loose peat last year, I added more water to the top, the left it sit for a while. I used that time to cut label markers out of a 500g size plastic container.
We have three different types of seeds; bulb and bunching onions, and shallots. I can only start one variety right now, so I decided on the bulb onions. The shallots will be next, and I figure the bunching onions can wait until we can figure things out and maybe get more supplies.
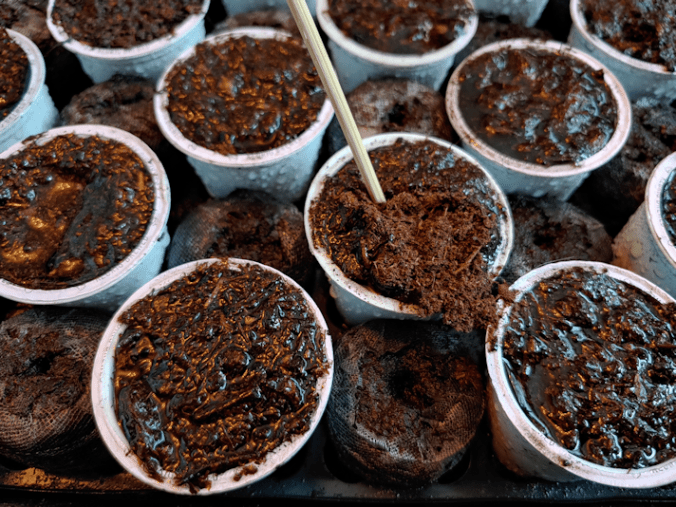
The tray got checked several times, more water was sprayed onto the top, and I finally ended up leaving it overnight. The above photo was after soaking for several hours, and I’d just sprayed more water to the top.
This morning, I took a skewer and checked the status.
The centres of the K-Cups were still dry!
I ended up using the skewer to make holes in the peat of each cup, then used the stream setting on my spray bottle to direct water directly into each hole.
Before anyone suggests that I should be using a potting mix, or a seed starter mix, there are two reason why I’m using straight peat. One: one of my information sources is a soil scientist living in the same zone was we are, and she recently did a video on exactly this. Since every seed has all the nutrition it needs to support itself until the true leaf stage, sterile peat and water are all they need. I would have preferred coconut coir over peat, but we don’t have any. Two: we don’t have any seed starter mixes, nor the supplies to make our own. Some stores are starting to have them in stock, however many of these places do not accept medical exemptions to mask wearing, so I am essentially banned from them. Of those that don’t discriminate against people with medical mask exemptions, they’re a long drive away and I won’t be going to any of them until this polar vortex passes and it isn’t so dangerous to go out. Even curbside pickup is not an option; I’ve already heard from many people who can’t wear masks and have tried to do curbside pick up, only to be refused service because the staff refused to bring their orders to them, outside, unless they wore a mask. Not even shields are being accepted. As for ordering online, shipping costs rule out that option, as well as the current delays in shipping. They’d never get to us in time to use them, assuming they even find us. Which reminds me. We never did get my husband’s FedEx delivery (for something he ordered online in November). As far as we know, the package is still somewhere in the city. We can’t get it ourselves, and they won’t deliver it to us, even with detailed instructions on how to find us. So… yeah. Ordering online is not an option, either.
So we make do with what we have. It will work out.
At this point, I’m just hoping to be able to get the one variety of seeds in today!
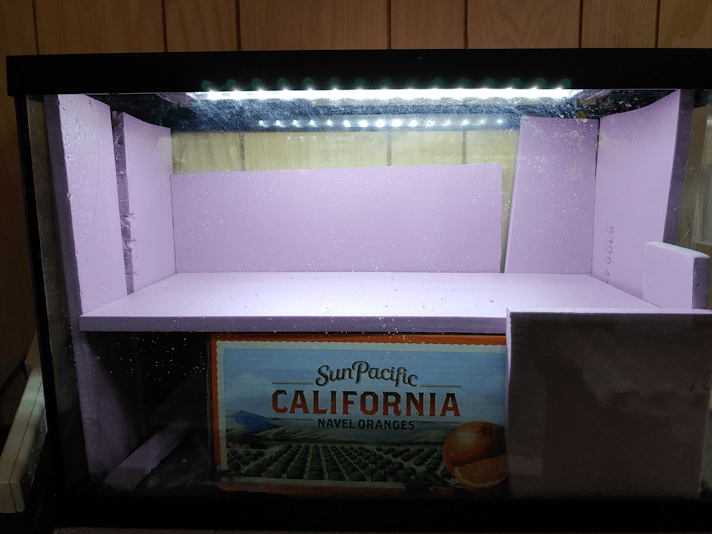
Today, I was finally able to continue setting up cat proof greenhouses in our unused fish tanks, to start seeds.
What I wanted to do was line the tanks with rigid insulation where they were near walls. Since there is no way to lower the lights to be closer to the seed starts, I was going to line the insides with foil for reflective light.
I may not need to do that.
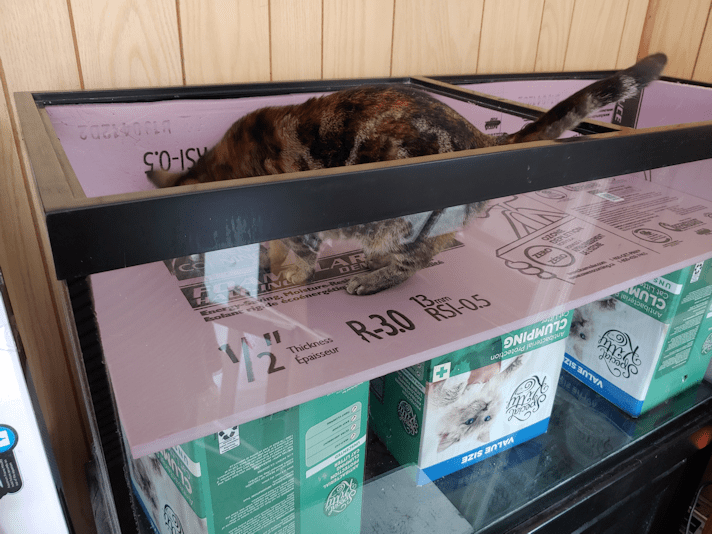
Here is the big tank.
I got photo bombed by a Susan.
I had three boxes with identical dimensions, which allow me to raise the rigid insulation floor high. As the seedlings get bigger, I can change the positions of the boxes to get different heights. I’ve got 3 boxes in there, but I might try to squeeze a 4th one in, to stabilize the floor better.
Because of how the top of the tank is designed, to hold glass covers that broke long ago, I had to cut the insulation to fit the opening, rather than the space I wanted them in. That meant the floor piece has quite a gap around it. The sheet of insulation I cut to size for the long, back wall had to be cut into thirds to get it in. Plus, there is a sheet at the end. The wall in the back of the picture is one of the original log walls. The wall at the left is an exterior wall. Yes, it has more modern (almost 50 years old) insulation, but it’s still pretty cold!
The insulation on the sides helps to fill the gaps around the floor piece, which stabilizes it as well.
At these dimensions, I can only fit two seed trays in here, which means there is a fair amount of space around them to add more containers with seed starts. I just have to figure out what waterproof surface I can fit in there to put them on.
I think I can get away with not adding foil, though. What do you think?
The second tank was much easier and faster.
Once again, I had to cut pieces smaller, to be able to fit them through the top. I only needed to add insulation to the back, which is against the exterior wall, but I added more to the sides to help fill in gaps around the floor piece.
I’m going to have to find something better to raise the floor. The orange box is a bit too small.
Photo bomb, courtesy of Saffron!
As you can tell by the dusty footprints, the cats like the lid of this tank!
At this point, I should be ready to start seeds in here. According to the package instructions, I don’t need to start my onion seeds – the ones that need to be started the earliest – until the end of March, but experienced zone 3 gardeners in groups that I’m on have already started theirs, and say they should be started now. The seed trays I have are too big to fit into the smaller tank, so I will have to find something else waterproof to hold seed starts in the little tank. I want to buy more seed trays, anyhow; I’ll have to take a good look at what dimensions are available.
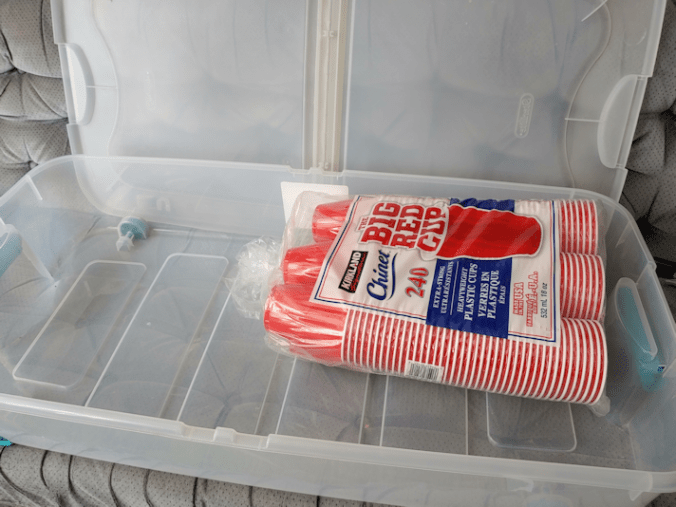
There is only so much I’ll be able to fit in these, even if I’ll later be able to move the onions into the sun room and make room for something else. I did find something that I might be able to use, for when I’m starting the squash and gourd seeds.
The squash and gourds need more space to grow, and they are the things that need to be started soonest, after the onions. I’ll be using these cups, with drainage holes punched into their bottoms, as pots. The storage container is designed to fit under a bed, but the hinge on the lid is broken, so it has been languishing in the basement until now. I have a second one. Once I figure out what to do with the stuff stored inside it, I’ll be using that as well.
We have so many varieties of summer and winter squash, as well as gourds, to try. Depending on how many seeds are in each package, I may not plant them all. Some are packed by weight rather than number of seeds. I figure, at most, I’ll start 10 seeds each of the summer and winter squash. Whatever the germination rate turns out to be, that’s what I’ll be planting. If I get just a 50% germination rate, we will still have lots of each variety, and with the number of varieties, we should have plenty for both fresh eating, and preserving and storage. For the gourds, I’ve decided to start 5 seeds of each, and see how they do. One of them is an eating variety, but the others are to dry and use for crafting purposes. Curing them takes about a year, so the sooner I can get some grown, the sooner I’ll have materials to work with! If space in an issue, though, I’ll drop the gourds for this year.
I still have the mini greenhouse that my daughter bought for me last year, which can hold three of the trays that are in the big tank. The cats still managed to get into the closed plastic cover, and it gets knocked over easily, so anything we start in there will be done later in the season, and in the sun room!
With the trays I have now, all I need to figure out is what to use in the small tank, and I should be able to start the onion seeds very soon!
I found them while looking for something else, of course. :-D
Here is where, on the tank, I want them to sit.
The bar across the middle has extra surface area in the corners of the ledge the covers rest on. There’s lots of room, here.
The outer corners, however, don’t have that, so there’s a lot less margin for error in positioning the pads well.
The first step was to clean off the ledge the frame rests on. An old toothbrush worked very well for that!
Since the cross pieces of the frames have an angled edge, to better fit into the space, I figured it would be easier to place the felt pads in position on the ledge first, adhesive side up, then placing the frame on top.
The felted pads I have were from a larger package with mixed sizes of circles, plus long, narrow ovals. The larger circles were used up, and all I had left were smaller ones, and some of the long ovals. I’d hoped I still had some larger circles left. If I had, I would have cut them in quarters, and fit them right in the corners, but half circles would have to do!
Once they were in position, I lined up the cover and dropped it down, pressing just enough to make sure the adhesive stuck, then removed it to press the adhesive in more thoroughly.
In this corner, you can see the pad will protect the tank’s frame from the wire. This was the edge of the roll, so no sharp bits sticking out, like the edges I had to cut, so I didn’t trim it.
And this is why I lined the pads up to the corners of the tank, rather than the frame. Yes, there’s a likelihood that the pad will get pulled off where it’s overhanging, if I leave it like that (I will trim it later), but it also isn’t sitting on the screw head. It was supposed to be countersunk, but some of the screws simply stopped and would not screw in any further. I am not sure what was stopping them but, whatever it was, I was wrecking my screwdriver’s tip, trying to get them to go in further, so I stopped. The others were just fine.
So the corners are padded now, protecting the tank’s frame from being scratched up, should a cat decide to jump onto the cover.
When I was fussing with everything to prepare for this, I did have a kitten not only jump onto one of the covers while I was there, but also walk across on the light fixture! Not a problem for a light kitten, but a potential problem, if one of the heavy adults tries to do it. Thankfully, they seem to not like the new covers and are staying off. At least while we’re around to see! The few times I’ve seen one of the adult cats up there, they have stuck to walking on the wood and stayed off the wire and away from the light fixture.
Meanwhile, the baskets and other items stored in the tank have been removed. I’ll need to take a vacuum to the bottom to clean it, then see how my seed trays fit on the bottom. That will help me decide whether the rigid insulation will be lining the inside, or the outside, of the tank. Whatever I do with the sides, the bottom will have its own layer of insulation lining it, too.
It’s remarkable how handy that insulation has been. I’m glad my daughter bought so much extra!
I’m going to need the little step ladder to be able to access the bottom of the tank. I could barely reach to get the smaller baskets out!
The joys of being short! LOL
Another little bit of progress made! :-) I can hardly wait to see how this works for starting seeds!
The second one was much faster to build than the first. :-D
For those who are new to this blog *waves hello* you can catch up on the project with part one and part two. Links will open in new tabs, so you don’t lose your place here. :-)
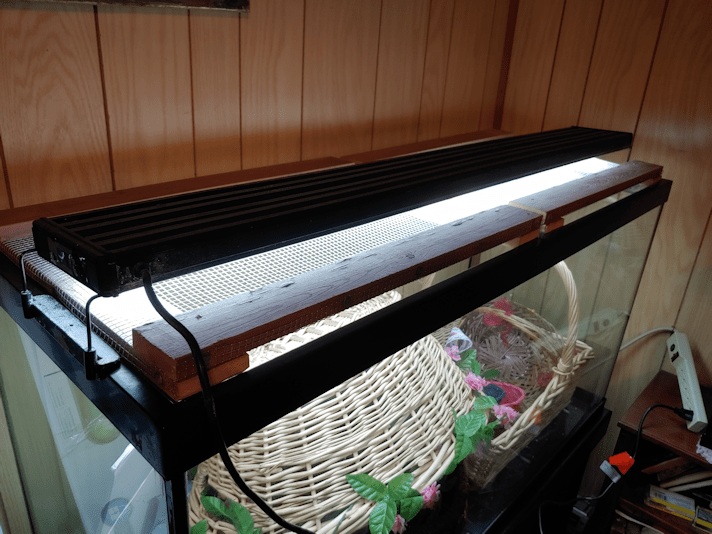
Once the second cover was done, I unpacked the light fixture, which has been sitting in its box next to the tank since the move, and tested it out. Considering what a disaster the movers were, I would not have been surprised to find the bulbs shattered or something.
It worked just fine! :-)
Of course, as soon the covers were on, cats were on it! So far, they have not tried to climb on the light fixture, but there is no doubt that they will, at some point. Hopefully, it will hold up okay.
I was concerned that the frame would create shadows in the tank, but that does not seem to be an issue at all!
Now I have to figure out how to set the time and program it to turn on and off. It’s been years since it was last done! There is time to look that up, though.
We still need to cover the sharp edges of the wire mesh, and I still want to put felt pads in the corners to protect the tank a bit, but other than that, the covers are done.
We still have the original light that came with the tank, which rested right on top of the original covers. The tanks will only hold so many seed trays. With things like the onion seeds needing to be started so much earlier than anything else, I can see us rotating trays out from the tanks and into the sun room (which should be warm enough, by the time the next groups of seeds need to be started), and using the second light there.
Now I need to figure out where to store my baskets, then line the inside of the tank with foil to reflect more light. Since this room is rather chilly, I plan to use pieces of rigid insulation on the bottom and around the sides, too. We will likely cover the insulation with foil on one side to make it easier to take it in and out, but I will see how the seed trays fit inside, first. If the insulation takes up too much space, I’ll put them on the outside of the tank.
Progress has been made! :-)
I am so looking forward to gardening this year! :-)
Yesterday, I got started on making covers for our big fish tank, to keep the cats out. Today, I assembled the first one.
Of course, things did not go to plan.
Does anything ever? :-D
One of the things I needed to figure out was how to secure the hardware cloth to the frame pieces, for those inevitable times when a cat jumps on them. All I’ve got for materials is whatever we can find lying around the farm. While doing my rounds this morning, I went digging in the side of the garage where we store the lawnmowers and snow blowers. I knew there were some roofing nails in there, so I grabbed a while bunch and brought them inside.
Here is the first problem.
All of the nails were huge. There was only a single smaller size, and it was still too large. What I wanted to do was secure the mesh to the tops/bottoms of the boards making up the frame. Previously, we’ve used a staple gun to do that, but these were not for things where the wire mesh was expected to hold weight. Particularly not the sudden weight of a cat leaping onto it from above.
The mesh was going to have to be secured along the sides.
That meant cutting it with a half inch overlap on all sides.
I’m getting closer to the end of my roll of 1/8 inch mesh, and it really does not want to unroll at this stage! :-D I had all the boards on there to hold it down, and it still kept rolling itself back up again!
Once the mesh was cut to side and flattened, I affixed it to one side.
Normally, I would have used the staple gun to tack it in place, but I couldn’t find it anywhere. Which is really weird, because I’m the only person who uses it!
So it had to be tacked in place by screwing in the cross piece, holding the wire as taught as I could in the process.
Then I took out one of the screws in each corner.
I had placed the wood in place on the tank and marked each one with pencil, but once the hardware cloth was in place, I couldn’t really see my marks anymore. Plus, with the cross pieces a fraction too long, I had to make sure I didn’t line the side pieces up to the other end, or the while thing would be to big.
So I quickly drilled a pilot hole in each of the other corners of the cross pieces, then went back to the tank.
This way, I could place the long pieces where they were meant to sit, line everything up, then add a couple of screws through the pilot holes to hold them in place.
Then it was back to the basement to continue.
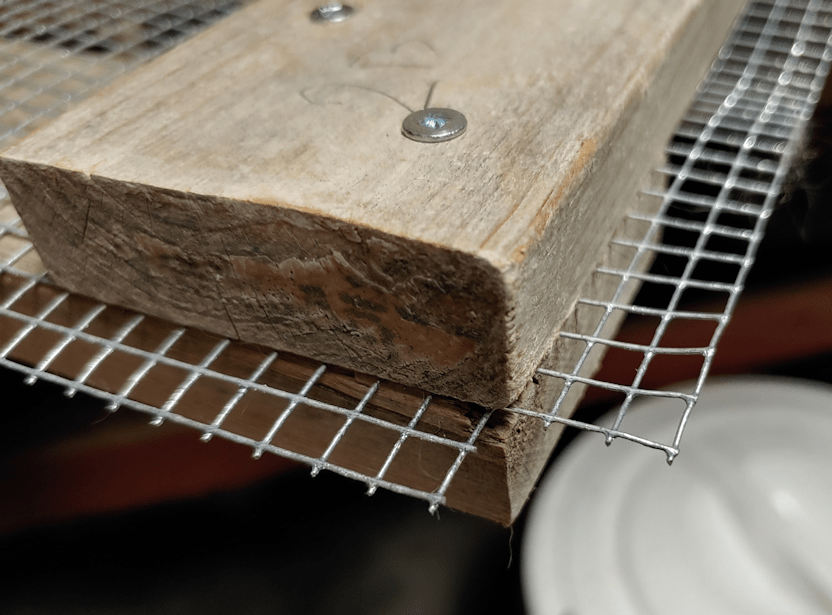
Once each corner was secured with a pair of screws, it was time to bend the wire mesh. Since the sides would be bent in one direction, and the ends in the other direction, I first cut out the corners.
The wood pieces may have been lined up to the tank, but no matter how careful I tried to be, the wire mesh ended up uneven.
Ah, well.
Once the mesh was bent, I drilled pilot holes for each nail (to prevent the wood from splitting) and hammered them in. The flat tops of the roofing nails were perfect for securing the mesh. Very different from how I had to do it with the larger mesh on the screen “door” we made to keep the cats out of the old basement.
Time to test it out again!
Oh, dear.
The addition of mesh and nails – especially the nails – made it wider. It wasn’t so much that it no longer fit. I could have let it just rest on the nail heads, I suppose. They would, however, damage the tank’s frame.
There was a very easy solution to this problem.
Flip it upside down.
With the cross pieces being every so slight too long, I used my Dremel to take off the corners at roughly a 45 degree angle.
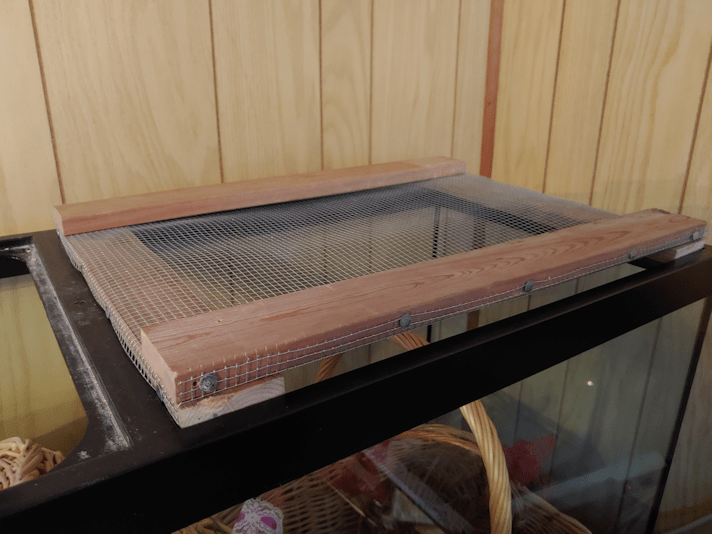
It now fits!
Unfortunately, the wood is a bit warped, so it doesn’t sit flat, but it should still do the job.
There are still a couple of things I need to do. One is to find some way to cover the edges of the hardware cloth, for safety reasons. I’ll probably just use Gorilla Tape, if we still have some.
The other is to find my self-adhesive felt pads. The kind that’s meant to go on the bottoms of chair legs or the like, to protect floors. Since the bottom is now the top, the screw heads are facing down, and each corner screw is sitting on the plastic ledge in the corners of the tank. It wouldn’t be an issue, if I weren’t expecting cats to jump on it, so a bit of padding would be a good thing. I haven’t seen them since we packed for the move, though. :-/
Aside from those 2 things, this cover is done.
The other one will wait for another day! :-D The earliest we should be starting any seeds is in late March, so we have time! :-)
I have spent some time thinking about how we can convert our big fish tank into a greenhouse to start seeds in, while also making sure the cats couldn’t jump in.
The original covers the tank came with would have been ideal, but the hinges on those broke long ago.
Since a piece of the filtration system broke during the move, it’s just been sitting in a corner. To keep the cats out, we cut pieces of foam core to fit across the top, then covered the whole thing with a huge table cloth. It turned out to be a great place to store baskets in, and the top became a favorite place for the cats to hang out.
Until they broke through.
We ended up cutting some rigid insulation to fit and taping it in place, which worked much better. With their jumping from the piano onto the top of the tank, though, they’ve knocked even that right off!
What this means is that the cats are used to having access to the top of this tank. If I set it up as a greenhouse to start seeds, they’re just going to jump in, unless I find a way to cover it.
The tank has a bar across the centre and, after thinking about it for a while, I decided to make a pair of wood frames with hardware cloth, that will fit on each side of that centre bar. That way, if I need to get at the seed trays inside, I just need to lift one smaller cover at a time, rather than struggling with one large cover.
I fully expect the cats to jump on while I try to do anything in there!
Today, I got started.
The first thing was to take a tape measure to the inside of each half of the top, as well as the lip the original covers used to sit on. Each side is 16 3/4 inches by 22 3/4 inches. The ends and centre bar have a 1/2 inch lip, while the sides have a 1/4 inch lip.
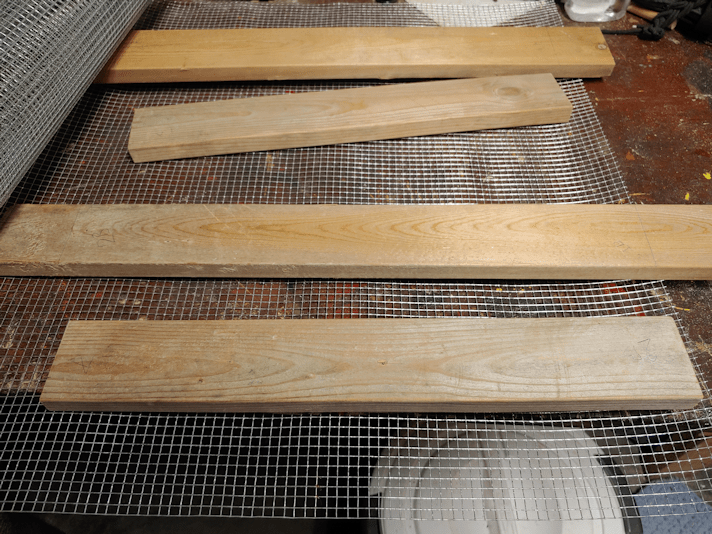
I then grabbed a couple of pieces of wood I’d salvaged from a shed and started by cutting the long sides. Once I had 4 of them cut, I double checked that they fit properly.
They fit just fine, with a little bit of play that will make putting them in and taking them out easier.
While I was checking the fit, my daughter came by. As we were talking, she reminded me of one of her Christmas gifts to me.
I wish I’d remembered them before I took the measurements! This thing is MUCH easier for me to read than the tiny lines and numbers on my tape measure. It made marking the distance to cut the short pieces a lot easier, too.
Another reason I wish I’d remembered them before I took the measurements.
When I checked the short pieces, they were just a hair too long! The difference is so slight, I could probably sand it to size.
But I shouldn’t need to.
This is how the frame will be laid out. The hardware cloth will be sandwiched between the top and bottom pieces at the corners. I haven’t figure out what I can use to secure the hardware cloth best. Ideally, the wire mesh would be sandwiched between wood all the way around, not just at the corners, but I just don’t have the wood to do that. Nor can I think of anything we have that could be used in a similar way. Whatever I come up with will have to not just support the weight of a cat that’s decided to lie on it, but the force of a cat jumping onto it from the top of the piano. All sorts of ideas some to mind, and get discarded just as quickly. :-/
The thing I’m holding in place in the photo is one of the supports for the light fixture. The L bars insert into ports at the bottom of the light’s frame, so where they are is where the bottom of the light fixture will be.
Once I double checked how everything was going to fit together, I moved on to the next step.
Washing the pieces of wood.
They were probably sitting in the shed I found them in for more than 10 years. My mother tells me that shed was full of lumber when she moved off the farm, some 7 years ago, so what little we found in there was the junk that wasn’t worth stealing, I guess. :-/ Still better than nothing, I suppose. Anyhow. There was a whole lot of grime on them, so I gave the pieces of wood a quick scrub. They don’t need to be really clean. I just need to be able to handle them without getting filthy, and trying to scrub them after the hardware cloth is in place is just not a good idea! :-D
So they are now all laid out in the basement with a fan on them, do dry. I will continue to work on the frames tomorrow!
One of the recommendations for using grow lights to start seeds is to have the lights very close to the soil, and gradually increase the distance as the seedlings grow.
That won’t be an option with this set up.
I’m thinking of lining the inside of the tank with aluminum foil to reflect more light onto the seedlings. It doesn’t need to be from top to bottom; just at seed tray height. Which means I could probably get away with lining all 4 sides with foil in the big tank. I will probably line 3 sides of the 20 gallon tank, too.
The other thing to consider is warmth. We don’t have grow mats, and it’s unlikely we will be able to get any. We do, however, have more pieces of rigid insulation that we can put under the trays, or even along the sides closest to the walls. The LED lights won’t generate heat, but I’m sure we could find some way to warm up the tanks enough for seeds to germinate.
Progress on the set up has, at least, finally begun!
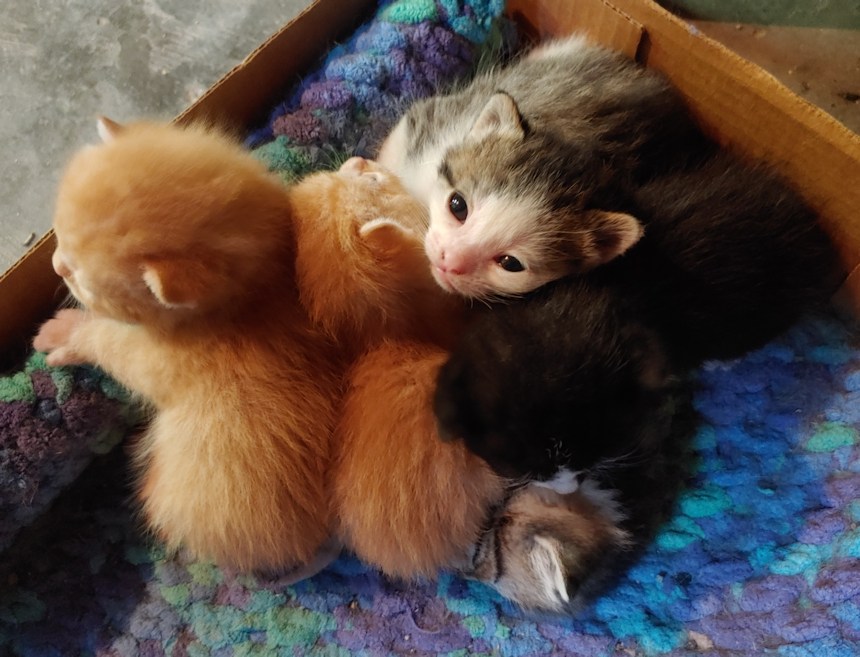
When I opened the door to the basement to check on Beep Beep and the kitties, I found Beep Beep sitting in the basement window at the stairs.
She immediately bolted through the door.
She had to go through the several cats that were trying to bolt down the stairs at the same time! :-D
It’s a good think I was intending to leave the door open for a while, anyhow.
The babies are definitely getting more curious and mobile! Beep Beep is getting more comfortable with leaving them for longer periods, too.
The girls are calling Butterscotch’s baby “Nickypants” because his fur pattern makes him look like he has white pants, just like Nicky the Nose. :-D
After a while, I had to go hunting for Beep Beep to bring her back down, so I could close up the basement again. I found her on the kitchen counter! Bad Beep Beep! ;-)
We’ve been having some very chilly nights lately, so I’ve been keeping a close eye on the seed trays. I was happy to see some new growth.
More pattypans/sunbrust squash are emerging, a few more of the zucchini surprise mix are showing, too.
It’s funny how there is this one large sunburst squash that showed up next to the zucchini mix. If I hadn’t put those straws in to mark the different groups, I would have thought it was part of the mix!
Still no sign of gourds, though. There were no new seedlings emerging in the other tray.
I was supposed to presoak the carrot seeds a while ago, but things got busy and it just didn’t happen. Now I’m glad it got delayed, and I think I will delay a few more days. We’re supposed to get a couple of centimeters of snow tomorrow evening! It looks like things will warm up and stay above freezing, even overnight, by Tuesday, so I will aim to start the seeds soaking on Saturday. The video I’m using said it should take 3 or 4 days for roots to show, so we’ll see how that goes.
The chain link fence in front of the house has two gates in it. One smaller, people-sized gate, and a larger vehicle-sized gate.
Both are broken at the hinges.
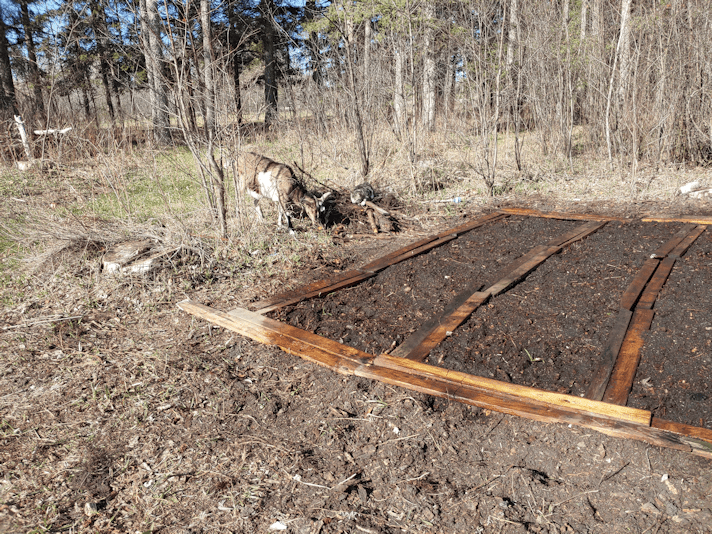
I had been leaving both gates open; we only ever needed to close them when the renter’s cows got into the outer yard, when his electric fence failed. With the people gate, when we closed it to keep the goat in the inner yard, the top hinge came completely loose from the pin. It still was doing the job, though – until today!
While I was working on the new garden plot, I heard a commotion. I don’t know how she did it, but the goat knocked the gate off its hinges, and got a hoof caught in the chain link!
She was able to get herself out without any help, but I had to just set the gate aside until later.
In the early evening, while I was in the pen, trying to get the goat comfortable with the idea of being in there with me, the girls were kind enough to fix the gate. Well. As much as it can be fixed, for now.
The ring around the post ended up needing to be lowered. The clasp on the gate side was twisted open, and has been closed up again around the pin, as much as we can. The bottom one, at least, just needed the pin straightened out, then it could be slipped right into the clasp.
Unfortunately, the other post has shifted, so while the latch parts now line up again (with a bit of adjusting), the post is leaning too far away for the latch to catch. So we’ll just use the rubber cord that was already on the fence when we moved here. :-D
The vehicle gate has been left as is. I don’t know if we’ll even bother trying to fix the hinges on that one. They are pretty twisted up, but at least they can’t be knocked to the ground, as they currently are.
We partially succeeded in getting the goat to go into the pen, then let her be, so as not to create bad associations with the pen. We still wanted to be out and around her, though, so it was a good time to start soaking the new garden plot.
She and Potato Beetle kept us company!
The cats are still intimidated by her, but their curiosity seems to be slowly overcoming their nervousness!
Also, we need to pick up a new 100 ft hose. The old ones, in spite of my repairs last year, are not holding out well! The only good hose we have right now is the new 50 ft hose we picked up last fall. With two hoses together to make 100 ft, it doesn’t reach the plot, so we can’t set up a sprinkler. We just have to spray it from a short distance away.
We will be giving the garden plot thorough waterings over the next few days, while I start the carrot seeds germinating indoors. According to the video, it should take up to 4 days. We’re not expecting any rain in that time, so it’s up to us to get the soil watered deeply.
As for the seeds I started in trays…
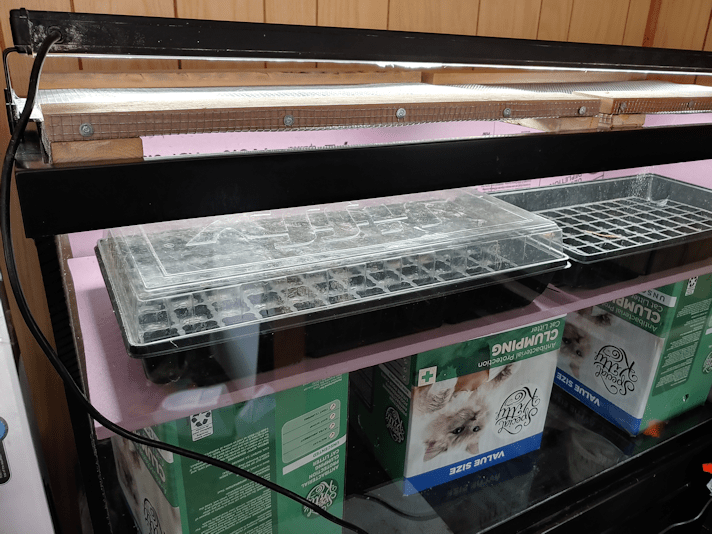
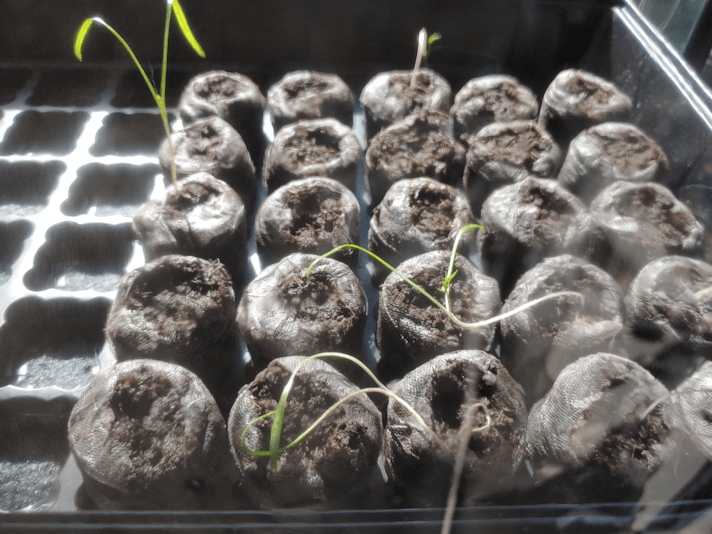
This is the tray with all squash seeds. No gourds have come up at all, yet. The middle is the “summer surprise” mix and, so far, I’m thinking only one variety as started growing. On the right are the patty pans, and only a couple have showed up, there.
These are the cucamelons, and I’m actually rather pleased with how many have sprouted, so far.
Once I see how many have successfully sprouted for transplants, I’ll have a better idea of how I need to prep the garden area, and what I need for trellises. I was going to build those in advance, but I decided to see how many sprout, first, so I know how many I’ll need. From the looks of it, that was a good decision.
Then there is the fennel.
I’m rather disappointed with these. The only ones that have sprouted where the ones that showed up while it was still set up in the living room. They got really leggy, immediately, and no other seeds have sprouted! We might not have any fennel at all this year, if this doesn’t improve.
Meanwhile, I got notified by Veseys, with a tracker number, that our Yukon Gem potatoes have been shipped. They are expected to arrive in 8 days, so we have time to prepare where we want to plant them.
Thankfully, the weather is pleasant during the day, though temperatures are still dipping below freezing overnight.
There is lots to get done outside in the next little while!