Working on the sun room

There are a lot of jobs that need to be done before the snow flies, but some of them are more weather dependent than others.

Working on the sun room is one of them, because we basically have to empty it in the process.

So instead of working on winterizing the garden beds and yard, as I’d originally intended, I started on the sun room.

Well. Half of it.

The main thing was to clear the area in front of the pair of windows on the east side of the door, so that I could clear away as much broken glass from the inner pane as possible.

My daughter had already cleared the big pieces of broken glass from the bottom window – the top one has cracks, but hasn’t broken apart, yet. There were many jagged pieces left that she couldn’t get out. I tried using the glass cutter, but it really didn’t do much of anything. I ended up breaking most of the pieces off with a pair of pliers. Some pieces came out entirely, others broke away closer and closer to the frame, while still others just got crushed by the pliers.

After sweeping as much of the glass as I could, I used a vacuum to get the rest.

While doing the concrete floor, I spotted something that either I completely forgot about, or somehow managed to miss when we first cleaned out the sun room of my parents’ stuff.

Right in the corner, there are foot prints in the concrete. You can see one hand print as well, and there are just barely signs of a second hand print.

My late brother poured this concrete. My guess is, these are his son’s prints.

Awww…

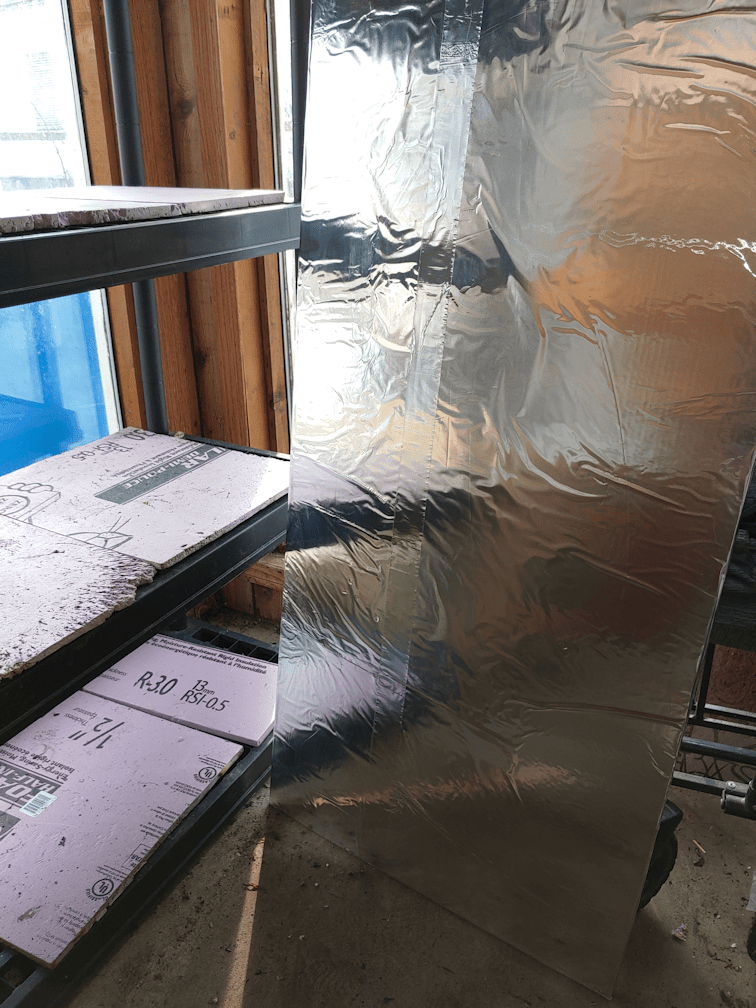
Once the glass was cleaned up as much as possible, it was time to put insulation in place.

I covered both windows, as I’m hoping the insulation will prevent the top window from cracking even more. Unfortunately, I don’t think it’s temperatures that are causing the cracks, though they certainly are a factor. The entire sun room is shifting, and sinking slightly, at the corner by the rain barrel. Likely because the barrel was allowed to overflow and, before winter, simply tipped over on the spot to be emptied.

I decided to rearrange this side of the sun room to something I hope is more functional.

The shelf I had the kibble bin stored in used to be in this corner, and the counter shelf you see now was in the opposite corner. It’s on bricks, in case the floor gets wet. The roof leaks above this corner – which will hopefully no longer be a problem soon! We still don’t have a date for the roofers to come int.

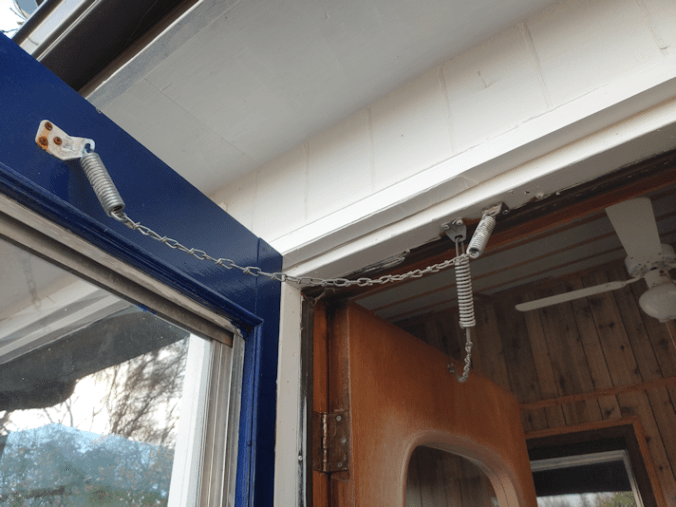
The hanger on the wall was on the wall beside the door to the old kitchen, but it was too long, so it was mounted diagonally. It partly worked, but it’s in a more useful spot, now.

Then it was time to clean out this corner, by the bathroom window. That space on the left is where the hanger had been. The counter shelf was in the corner, with all sorts of stuff, including my husband’s walker and my crossbow target, blocking the front of it. The top had become a mess of tools and containers.

Unfortunately, by this time, it was getting late. The shelf went into the corner and I started out organizing things as I brought them back in. After a while, though, I got a daughter to help, and we just shoved everything into this corner, to be finished another time.

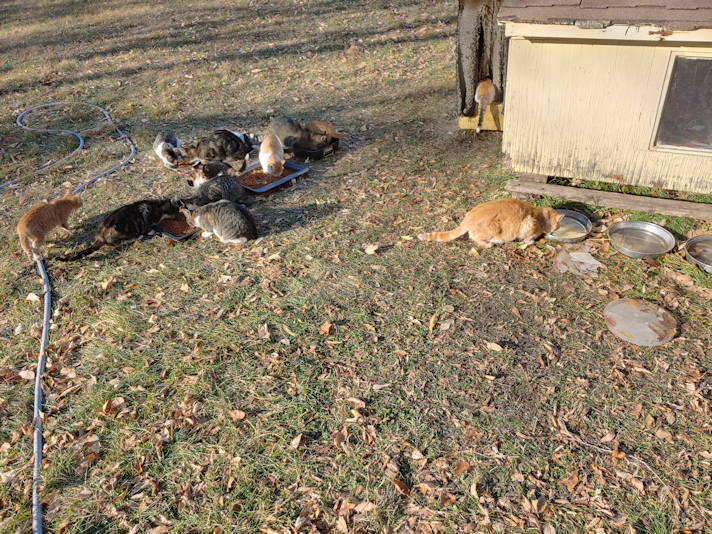
The other half is going to take more work. Aside from having to wrestle the swing bench out the door, that side is where the cats – and sometimes skunks – would leave messes in inaccessible corners.

Thankfully, we’ve got a couple more warm, dry days before the temperatures start to drop, and we have the possibility of rain. We won’t be able to get back at it tomorrow. In the morning, we’ve got the cat lady coming to pick up the bitty babies, then in the afternoon, the girls and I are heading out to pick up my mother, then going to the marsh to see the migrating birds, while we still can this year. So after tomorrow, we can get back to work!

Speaking of which, one of the things the girls did while I started on the sun room was head out to a stand of willows behind the barn, with the loppers. They were looking for branches appropriate to use on the wattle wall I’m building in the old kitchen garden. Unfortunately, the only long, straight ones they found were branches that died long ago, and were in no condition for use. The live branches were not suitable for wattle weaving. The best they were able to do was prune some small but straight maple suckers that can be used as space fillers. I’d already gathered some last night from the maples now clear of the branch piles that got chipped, that I hope can be used. I did not expect it to be this difficult to find suitable materials for that project!

Well, that last paragraph took a lot longer to write compared to the rest of this post. The bitties needed attention, and are now back on me. The black and white is content to curl up on my chest, but the grey and white tabby wants to explore!

Time to get off the computer and

Ow! The little bugger just bit my thumb!!!

Time to ten

3d o 7bia

bie7sl7

77777777777777777777777777777777777777777777777777774

get a kitten off the keyboard.

The Re-Farmer

Our 2022 garden: potting up, moving things – and good news!

First, I’ll start with the good news.

While I was working on the transplants, we got a call from the pharmacy delivery driver. I headed out to meet him at the washed out road, opening the gate before starting the van and heading out.

I was backing out of the garage, when a car pulled into our driveway!

He not only got through, he had no issues at all. The washed out road has been repaired! That means we can now reach the highway and go wherever we need.

I was very happy to hear this. Tomorrow, I’m going to go get the mail! LOL

Oh, the things that are exciting when you’re old and boring. ;-)

My main goal for today was to pot up the newest tomatoes, and move things to the sun room.

I started with the Yellow Pear tomatoes, which are in the image on the left. Of those, there was one seedling that I pulled out, as it was not suitable for transplanting. The Chocolate Cherry (on the right) got all seedlings potted up.

By the time it was done, we had 13 Yellow Pear tomatoes, and 12 Chocolate Cherry, ready to go to the sun room.

Before that could be done, though, the rest of the pots in the mini-greenhouse had to be taken out, and the mini-greenhouse prepped to be moved. The vinyl cover finally got removed, as did the aluminum foil lining it on three sides, to reflect as much light as possible. The foil has been saved for some other future use.

One of the sawhorses supporting the platform holding plants had to be carefully shifted over to make room for the mini-greenhouse frame.

Things got shifted around in the sun room, too. The older tomatoes were getting too tall for the plant shelf, so they got moved to the platform, as did the large bin with the kulli corn. The tomatoes were so tall, I had to adjust the shop light higher, to fit.

Once the newly transplanted tomatoes and seedlings that were in the mini-greenhouse in the living room got oved over, I filled another bin with the seedlings from the large aquarium greenhouse and brought those over, too. Everything fit, with room to spare!

I did change a couple of things after this photo was taken. That terracotta pot was put by the lamp on the bottom shelf, just to get it out of the way. It got moved out, as did the lamp, and the bin at the bottom of the mini-greenhouse was moved to where the lamp had been, so it could get more light.

The seed trays on the bottom right of the above picture are starting to explode. More cucumbers are coming up, and all four of the King Tut Purple Pea seeds that we managed to save are germinating. There is even a Red Kuri/Little Gem squash making an appearance.

These are now the only things left in the big aquarium greenhouse.

There’s still no sign of any Yakteen gourds. As for the Kakai pumpkin that looks like there is a seedling popping up, that’s actually a stem. I was watching it for a few days before I finally took a closer look. It seems it started to germinate – but then the leaves broke off the stem. The stem end is what you’re seeing in that pot! There were more planted in the pot, so I’m hoping that a bit more time on the warming mat will result in germination.

The LED shop light that was used at the mini-greenhouse is now available to be moved to the sun room, but I haven’t figure out how I want it set up yet.

Funny. The living room suddenly feels much bigger, without the mini-greenhouse tied to a chair in front of the couch, anymore. :-D

The Re-Farmer

Our 2022 garden: sun room mods, and old kitchen garden prep

I am really loving the longer days. I was able to get all sorts done this evening, while it was still light out!

The first job was to make some changes in the sun room.

A few things needed to be reorganized, which I worked on while the girls got the new metal sawhorses out of their packaging and set them up. There was no place to move the table saw, so one of them sticks out further than is convenient, but we can still get around it.

I suppose we could have laid out the closet door with the hinges down, but that happened to be the way my daughter and I grabbed it and laid it out. I don’t expect it to be a problem.

That done, I wanted to get those tall tomato plants out of the shelf, where they just barely fit.

Oh, oh.

Looks like Potato Beetle tried to jump into the bin that was in his favourite spot!

I do wish I’d caught this earlier. It’s pretty wilted. Still, tomatoes being how they are, I tried to salvage it.

I just buried the stem on the soil. Hopefully, those hair roots on the stem will do their job, and it will recover. If it doesn’t, we still have quite a lot of Cup of Moldova tomatoes.

That done, I brought the onions out of the shelf to give them a “haircut”, then switched them around when putting them back on the shelf.

The new set up is the perfect height to work at!

Next, I brought out the tallest plants that were in the mini-greenhouse.

I moved the two Canteen gourds out of the bin in the shelf and in with the larger tomatoes, then added laughably large poles for them to climb on. The poles look too big now, only in relation to the size of the plants, but those plants are going to get much, much larger!

More tomatoes went into the bin the gourds were removed from, another gourd that had still been in the mini-greenhouse joined the other two in the larger bin. The small bin of kulli corn got moved over. Hopefully, this will be a better spot for them. I also brought over a couple of pepper pots. They each had a pair of peppers in them, so I thinned out the smaller ones and repotted them. We’ll see if they will survive. Two more tomato plants joined them, as there wasn’t room for them in any of the bins in the window shelf. With the changes, though, there is now more room on the shelf for a couple more bins of seedlings, once we’re ready to move them over.

That done, I took advantage of the daylight, grabbed a hoe and went into the old kitchen garden.

I was able to prep three beds, including the one alongside the retaining wall blocks. There’s another bed on the left, in between where you can see stone and brick stepping stones. I won’t be touching that, as it was fall seeded with the bread seed poppies that grew there last year. We still have some of the seed pods, and I’ll be adding more seeds to that bed later on, just to make sure we get at least something. We did get another variety of bread seed poppies, but those will be planted in a completely different area, to avoid cross pollination.

The soil in these beds is not at all frozen – what a difference location makes! We’ll look through the seeds for direct sowing and make some decisions on what to plant here. We already sort of mapped things out, but things are flexible. This is a good location for root crops, be we already grew carrots and beets here last year.

Whatever we do, we’ll have to be prepared to cover the beds, so we don’t get a repeat of last year’s critter damage!

There are still the retaining wall blocks at the end. I transplanted mint that was growing where the log framed bed is, into alternating blocks. We’ll soon find out of they survived the winter. They’re mint, though, so it’s highly likely they did. We haven’t decided what to plant in the empty blocks. Perhaps some of the herb seeds we have.

There is another bed that should be quite workable now; the bed along the chain link fence where we planted tomatoes last year. We’re actually intending to put tomatoes there again this year, as they did so well in that location. The soil was very thoroughly reworked when a border of bricks was placed around it, so using it for the same type of plant again shouldn’t be a problem. Since it’s going to have things transplanted into it, and got well mulched in the fall with leaves, it’ll be left alone until planting time.

Gosh, it felt so good to be working in the dirt again! Though it was funny when I got my hands muddy, pulling out roots and weeds as I found them, and was able to go “wash” them off in snow.

:-D

The Re-Farmer

Our 2022 garden: potting up, and new sprouts!

After checking on the plants last night, I ended up shifting things around earlier than expected. Some of the Cup of Moldova tomatoes at the top of the mini-greenhouse were getting too big! With not being able to remove the cover, it was actually a bit difficult to get them out. The door flap doesn’t open all the way to the top of the cover, so I only had a few inches to get them through.

I was going to just take them to the sun room, but they were so tall, I decided to pot them up, using some pots we found when cleaning up the old basement.

I had to commandeer a larger bin being used for something else, to fit them! The plants were potted with about 3 inches of their stems buries. If I’d had deeper pots, I could easily have buries another 3 inches.

There were also some new seedlings I finally was able to get pictures of.

These were taken last night. The Yellow Pear tomatoes had started to come up earlier, and there were finally some Chocolate Cherry sprouts showing. Among the squash and gourds, there was that one Giant Pumpkin pushing it’s way through – then a Tennessee Dancing Gourd suddenly popped up!

This is how they looked this morning. It’s always so exciting to see how fast they grow, once they germinate! That Giant Pumpkin looks like a tiny Audrey II, about to sing “Feed me, Seymore!”. :-D Since this picture was taken, the leaves have already opened.

The tomatoes handled their first night in the sun room quite well. The only place there was room to put them and still get light was at the bottom shelf. The shop light we’re using to give light from the inside isn’t long enough to light up all the shelves we’re using. The highest shelf we’re using only gets light during the day, so that’s where we’ve got smaller bins of toilet paper tube pots seeded with the tulip trees, paw paws, and some of the kulli corn. Until they germinate, low light is not an issue for them.

These tomatoes are the same age as the ones we’d brought to the sun room earlier; they’d been left in the mini-greenhouse because they were smaller. Now, they’re bigger than the ones that have been in the sun room for a while, but the sun room ones looks sturdier, though they also still have a bit of cold damage on their leaves from their first night in the room. The greater temperature swings make for stronger plants plants, almost like hardening them off.

One of the things I did before coming in from my rounds was got into the garage and grab the folding closet doors we found in the outhouse when we cleaned it up. We’ll need more space for plant pots in the sun room, and we’re going to use it, probably with the new saw horses I bought, to set up a “table” over the swing bench. Depending on the height, there should still be room for Potato Beetle to curl up on the swing bench when he wants to be in the sun room again. :-) He, I’m happy to say, leaves the plants completely alone.

Unlike Susan, who desperately wants to eat them all.

Or Beep Beep, who wants to sleep on them.

Or Tissue, who wants to dig them all up.

They do make this whole “starting seeds indoors” thing much more difficult that it should be!

These tomatoes, however, are now safe in their new pots and new location. :-)

The Re-Farmer

Our 2022 garden: sun room follow up

This morning, as I headed out to do my rounds, the sun room thermometer was at about 10C/50F. During the night, I saw it dip as low as about 5C/41F.

I moved away the reflect to get some photos of the new bins with the kulli corn. The picture of the smaller bin didn’t turn out, though.

Here is the larger bin with 80 toilet tube pots in it. That white plastic is marking off the pots that are empty. When one daughter finished the smaller bin, she started helping her sister from the other side, so the empty pots ended up in a really weird place. :-D

They planted all the seeds, including the little, bitty extras. I don’t expect those to germinate, but who knows? Even without the extras, I don’t expect 100% germination. It should be interesting to see what we get.

The three trays of bulb onions are doing better in the sun room than they were in the mini-greenhouse, but that tray of shallots is really struggling. :-(

The Cup of Moldova tomatoes have recovered from their first night in the sun room rather well. You can see leaves with cold damage on them, but the remaining leaves are looking quite strong. Even the Crespo squash and Canteen gourds seem to be doing just fine.

Likewise with the Wonderberry.

There are some seedlings in the mini-greenhouse that are starting to look like they can be moved to the sun room, as does the tray of bunching onions. We’ll have to do a bit of re-arranging, since the sun room ended up being a feline recovery room again, to make space for everything.

It will be good when we finally have a small greenhouse or polytunnel. Hopefully, we’ll have something in time for next year.

The Re-Farmer

Our 2022 garden: moving into the sun room

You know how it gets, when you start one thing, then end up doing more, or go to check on something only to find yourself doing a bunch of other things, just because you’re there, anyway?

Yeah. That was most of my day. :-D

One of those things happened while preparing to write my previous post, and I noticed some deer on the security camera, running up the driveway. I went to check on where they were going and, sure enough, one headed for the kibble house.

The sun was blinding me while trying to take the photo, so it wasn’t until I went out to chase off the deer from eating the kibble, that I finally saw the skunk!

The skunk quickly ran off and, within moments, the cats were back in the kibble house, eating.

Then Potato Beetle politely asked for cuddles, so I stayed in the sun room holding him, which is why I was there to see the deer try and return, several times!

This deer was going for the kibble house because it had been chased away from the feeding station by the three deer I’d seen running up the driveway!

Then, since I was in the sun room anyhow, I started working on the shelf we’ll be moving seedlings onto. With Potato Beetle still being kept in there, I moved the warming lamp to the bottom shelf, which we will leave clear for him, then emptied and set up a higher shelf. That shelf doesn’t get as much light, so the little bins with the tulip tree and paw paw seeds in them got moved up (still no idea if those will ever germinate).

Once that was ready, it was time to go through the big aquarium greenhouse and the mini-greenhouse to collect the largest seedlings and transfer them to the sun room, using some of the bins I picked up.

The two Wonderberries turned out to be too tall for the shelf!! so they got put into buckets and joined the first one on the shelf. They are in biodegradable pots, and I didn’t feel like fussing with aluminum foil, like we did for the first one.

I also had to prune flower buds off the little Wonderberry plants!

It’s not in the photo, but while clearing the extra shelf, I brought down the pot that my daughter buried the cucamelon tubers in. I set it up in the window with the Wonderberry and watered it. Who knows. We might have some cucamelons this year, after all!

Here, the Canteen gourds, two of the Crespo squash, and three of the Cup of Moldova tomatoes got set up next to the trays with the onion seedlings.

A bin with all Cup of Moldova tomatoes got set up on the next shelf down. If they look all bent over, that’s because they were starting to get crowded in their shelves in the mini-greenhouse! A piece of rigid insulation that had been laying on the shelf next to where the bin was placed, got set up to create a wall.

Just in case Potato Beetle manages to get onto the other half of the shelf and decides to do a Susan on the seedlings, and try to eat them.

Hopefully, Potato Beetle won’t be in the sun room for much longer, and we’ll be able to use that bottom shelf, too.

This afternoon, however, he was quite content to watch the activity from the comfort of my husband’s walker!

Once everything was set up, the bins and trays got watered, the reflector was put back in position, and I turned on the shop light that’s hanging on the inside of the shelf, where things are in shadow. It was 20C/68F in there, so I left the warming lamp off. It’ll get turned on again when things start cooling down.

Hopefully, the seedlings will do well in the sun room. I’m still concerned about those overnight temperatures. There’s only so much that little light we’re using for its warmth (as is Potato Beetle!) can do, and there’s no safe way to set up the ceramic heat bulb without some sort of metal frame, since the frame of the mini-greenhouse we used before is being actively used as… you know… a greenhouse.

The mini-greenhouse now has two completely empty shelves and, after re-arranging things, there’s even room in one of the trays for more pots. There will be room for the next seeds we will be starting this week, though I think the Kulli corn, which will be in bins, will be going straight into the sun room. We’ll see how whether the bins can fit in the big aquarium greenhouse or not. There is also still the small aquarium greenhouse. Seedlings don’t thrive in it, but it should still be suitable to keep pots until their seeds germinate and, hopefully, we’ll be able to move any seedlings out to a better spot soon after.

It feels like we’re juggling pots and seedlings! Which I guess we are.

The Re-Farmer

Setting up the sun room, and those are probably a total loss

Well, I hope this works.

The girls and I had to do a fair bit of clean up and pick up from what the cats and skunks knocked about while we had the run room doors propped open. Then one of them stayed out to tend the burn barrel. I’d gotten it going this morning, then covered it to smolder, but the cat litter sawdust just can’t dry out enough for that to work very well.

It’s just too wet out there for anything to dry, even in the burn barrel!

We got the shelf in the corner of the sun room ready to hold seedlings. Only the bottom three shelves will get used, because the eaves shade the top shelves too much. We’re going to see how using the scrap pieces of insulation on the shelves will help.

I cut another piece of rigid insulation to cover the three shelves we’ll be using, then covered one side with heavy duty aluminum foil. The foil is adhered with ordinary white glue, watered down enough that I could apply it with a cheap, dollar store paint brush. It took two overlapping lengths of foil to cover it and, just to be on the safe side, the overlap has a strip of aluminum tape over it as well. Much to my surprise, I found that at the dollar store, too! The back just has strips of duct tape holding the foil edges.

I found a way to hang up the new shop light I picked up at Costco. If we needed to, we could set up the second one on the other side of the foil covered sheet as well. These lights are designed to be hooked together, too, so one can be plugged into the other.

The problem is, we don’t have any way to safely set up the ceramic heater bulb overnight. When we used it before, we used the frame of the mini-greenhouse to hold it securely away from any potential fire hazards, but that’s being used for seedlings in the living room right now.

The aluminum foil will help reflect light from the window, but we will have to be careful during the day, to makes sure it doesn’t reflect too much heat, too. We want a solar reflector, not a solar oven. I’m hoping, however, that it will help keep the shelves warmer than the rest of the room during the night.

We’ll be testing it tonight, with the tree seeds.

Which I am sure are a total loss.

After transferring the seeds from the slide lock baggies into the toilet tube pots, they went into the mini-greenhouse. There is a little fan in there to keep air circulating but, because of the cats, we can’t open it up like it really should be.

Which is probably why this happened.

*sigh*

It’s a good thing these are a total experiment. It is possible the seeds are still viable and may actually germinate, but my goodness!

Now that they’re in the sun room, and not enclosed in the mini-greenhouse, the mold might dry up and die off. The seeds themselves are supposed to develop a tap root long before the leaves break ground, so I was still not expecting anything to be sprouted. Who knows? Some might still survive. There is that one slender bit of green growth in the tulip tree bin, after all. No idea if that’s a tree seedling, or some weed that managed to get into the seed starting mix.

We’ll monitor things for a day or two, then will probably move the onion and shallot starts into here, as they can handle cooler temperatures better than anything else we’ve got sprouting right now. Even just moving these two little bins has freed up a fair bit of space. After that, we’ll have room to move things out of the big aquarium greenhouse, and use that for the next batch of seed starts.

Little by little, it’ll get done.

The Re-Farmer

As set up as can be, and fundraiser update

Well, we’ve been doing as much as we can in the sun room for now. It’s as ready as we’ll be able to get it, for Butterscotch and Nosencrantz’s recovery period.

We were able to tape up the wire on the old heated water bowl, so it can now be safely used again. The wire itself is not damaged; just the outside was cracked, right at the bowl. Thankfully, we’ve got a tape that can handle that tight of an area. If it hadn’t worked, we have a silicon sealant we would have used.

The main concern we have is with Butterscotch. We’ve used the sun room as a maternity ward before, for Butterscotch and Beep Beep to give birth in. Beep Beep handled it well, but Butterscotch tore her way through the old door’s screen to escape, no matter how many times we patched it up. She was more than content to leave Beep Beep to take care of both litters and probably wouldn’t have come back, if she hadn’t needed to nurse. She is not going to be happy in here. I do hope that, at least for the first day or two after surgery, she will be too drugged up to go too wild. It’s certainly going to make it interesting to go through here to get kibble and seed. Most likely, we’ll put a carrier in with her, and close her up until I’m done going in and out.

As we expect Butterscotch to basically tear the place apart while in there, my daughter and I bagged up the sunflowers heads, and they are now stored in the old kitchen. We’ve packed the top shelves against the window with as much gardening supplies as we could jam in, then made beds on the two bottom shelves. Then we tried to make the rest of the shelves and surfaces as impervious to destruction as we could.

I picked up a new litter pan for the sun room, since we’re using it for yard cat recovery so often. It’s set up under the swing bench. The heat bulb is ready to go, with scrap pieces of rigid insulation as walls, because there will be a cold draft from those windows, and more on the floor so they can eat and drink with their little toe beans kept off the cold concrete.

The plan is for Butterscotch and Nosencrantz to be brought in tomorrow, after we do the morning rounds. They have even been staying together when I put the kibble out, so they will be easy to catch at that time. They will have their own food and water until evening, at which point they will be put on a fast until after their surgery.

While organizing the space as best we could, one of the concerns is that, in her displeasure of being trapped in the sun room, Butterscotch might start attacking Nosencrantz. Since Butterscotch is not ever going to be an indoor cat and is not up for adoption, she has to stay in the sun room during recovery.

There is no such requirement for Nosencrantz. She will be adopted out. After they are fixed, vaccinated and de-wormed, and the non-adoptable indoor cats are done, we will start getting the adoptable indoor cats done near the end of February. We will bring them in to the vet in the morning, then the cat lady will pick them up in the evening and take them to the fosters for recovery before going to their forever homes. Then we will start working on getting the outside cats caught and done. They, too, will be taken to the vet in the morning, then the cat lady will pick them up in the evening.

It just doesn’t make sense to send Nosencrantz back outdoors after recovery, if we’re going to have to catch her again for the cat lady to take. Plus, if we bring her inside right after the surgery, there is no chance of Butterscotch going after her. This will also give us a chance to socialise her more, before the cat lady is ready to pick her up.

The next few months are going to be pretty cat crazy!

Speaking of the cat lady, I am incredibly thankful that there are already some fundraiser donations!! You can read about the fundraiser here or, if you wish, go directly to the donation page here. It just blows me away that she has been so willing to take on the expenses for Cabbages vet care, and going above and beyond in treating her. She even sent pictures (which I won’t ask permission to share right now; this fundraiser is a surprise, and I don’t want her to know about this blog, yet. :-D ), and Cabbages was eating out of a bowl and looking so much more alert.

I have not heard any news today, yet, which tells me that the recovery continues. It’s still “no news is good news” right now. Cabbages is being lavished with care and attention, and I have full confidence and trust in the cat lady, to do what’s right by her, however things go.

I am so thankful that we were connected with her when we did. The timing was downright providential!

The Re-Farmer

Progress: sun room door and cat kibble shelter

There was quite a crowd of kitties this morning!

There are 12 cats in this picture. Happily, Rolando Moon is still hanging around, busily hissing at any cat that comes near. We haven’t seen Creamsicle in a while, though. I hope he is all right.

The cat butt sticking out of the entry is a hoot. That is Rosencrantz’s baby, and she seems to be the shiest of the bunch.

As you can see by the frozen blocks of ice, artistically embedded with leaves, it’s been getting a bit cold out at night! It did warm up a few degrees above freezing. Not good for paint, but it had to be done.

I can now officially say that replacing the door on the sun room is DONE!! I just came in from outside a little while ago, and the paint was dry enough I could close the door. What’s supposed to be blue is now blue, what’s supposed to be white is now white, and nary the twain shall have contact with each other!

Yaaah!!

No, I didn’t take pictures. I’m am tired of taking pictures of that door! :-D

The next project is the shelter for the cat food. It will be placed about where the kibble containers currently are. I want to position it so that it will also provide extra shelter for the entrance to the cat house. The heated water bowl can be plugged in, inside, but the bowl has to be outside, since there’s no way I’m going to be lifting that roof every morning to refill their water. ;-) The shelter for the food containers will help keep the snow off the water bowl, too.

It took a couple of hours, but I got the end pieces of the frame done.

Working with this wood we salvaged from the barn has been a challenge. Nothing is even, so about the only thing I can measure is length. After that, I basically just made sure all the pieces matched and lined up. Not being able to just take measurements meant I had to get creative in lining up the pilot holes. Just making the pilot holes was an issue! My drill bits that were the right diameter for the pilot holes are just barely long enough to drill through the wood. I went hunting in the basement and the garage and, while I did find longer drill bits, they were all too large.

Thankfully, the bits I did have were long enough that, after drilling the pilot holes in one piece, I could position them on the other piece, “drill” though the pilot holes again, and make a mark on the other piece.

It worked most of the time. With the uneven wood, there were a couple of spots where the bit just wasn’t long enough to leave a mark.

Once I’d marked the pieces, I could drill more pilot holes, then screw them together.

When we used this wood to make the goat catcher, I had 3 inch screws, and only used two per corner. This was meant to be temporary, but I still didn’t expect it to be so wonky, it would end up bending and breaking the screws! So this time, I got 3 1/3 inch screws, and there’s 4 in each corner.

That thing is solid!

I started by attaching the 2 ft cross piece on the bottoms. The first corner was screwed together manually. Even with the pilot holes, it was not easy – and with arthritis in my wrists and fingers, rather painful. Our new drill isn’t a quick release type, and I didn’t want to be switching from drill bit to screwdriver tip, over and over, so I decided to use an old drill that we “inherited” to put in the screws.

That worked much faster!

Once the cross pieces were in, I got out a tape measure and figured out how much of an overhang I wanted on the roof supports. I decided to make the roof supports 3 1/2 feet long.

Lining those up at an angle was a pain in the butt! Once again, it was more about making sure the pieces matched, because there was no way I was going to be able to take usable measurements. I managed to get them lined up and the pilot holes done. By the time I was putting in the last set of screws, though, the drill was starting to complain, so I set them as far as I could before the drill started having a hard time, planning to screw them the rest of the way by hand.

When I took the screw driver tip off the drill, I realized I was seeing smoke coming out of the drill!! I remember that happening when we used it before. This old thing overheats very quickly!

By then, it was getting too cold to keep working outside, so I will continue the rest tomorrow. Once I have the 6 foot horizontal supports in place, we can take some measurements for the floor and wall boards.

The good thing is, we’ll be using the scrap wood in the junk pile. They are a lot thinner. That means I can finally use the table saw, and do all the cutting at once. :-) Those will be nailed into place; in cleaning up the basement, we found an old ice cream bucket full of nails that are just the right size for this job.

We can also go hunting in the barn or sheds for something to use as a roof. The roof supports are 3 1/2 feet long, but I hope to be able to have a sheet that’s 4 ft. The roof will be the last thing put in place.

After that, it’ll be done for this year. It’ll need to be painted, but we’ll be using it right away, so that will wait until spring. The one exception might be the roof, depending on what we find to use for that.

I hope to get a lot more done tomorrow, but that will really depend on the weather! At least they’re no longer predicting snow flurries, but who knows what the day will actually bring!

That reminds me. We need to bring the sheets of rigid insulation stored in the garage, back to the house. We’ll have to find a better way to get the sheets for the sun room windows to stay in place, though. At least this winter, we won’t be keeping the doors to outside propped open for the cats to go in and out, now that they have their own heated house! :-)

Lots to do before winter sets in, that’s for sure! :-)

The Re-Farmer

Progress: the sun room door is don… AAAAAAaaahhh!!!

This afternoon, with the help of a daughter, we hung the replacement door back up onto the newly painted frame.

We lined the hinges up with where they were before, except further in as far as we could go. Just to be on the safe side, my daughter held the door in place while I marked the holes for the screws, then I drilled pilot holes for just the top hinge. We screwed in the top hinge, then double checked the locations for the other pilot holes and re-marked accordingly.

As you can see in one of the photos, the entire frame looks like it’s pulling away from the wall! It was like this when we moved here, and the gap doesn’t seem to be getting any bigger, so I don’t think it’ll be a problem. At least not any more than anything else is! :-D

Also, we only had the old screws available, since none of the new screws we have were the right size, and there were only 6 of the same type. So each hinge is missing 1 screw! I still drilled the pilot holes, though, for when I pick some up.

Of course, as soon as we got the top and bottom hinges secure, we tested the door, just in case.

Aaannndd…

Really???

The door was hitting the frame again! It had to be forced closed!

We decided to finish hanging the door, though. Once it was in, I tested it again, which is when I noticed this…

The door latch was now higher than it was before.

Keep in mind that we did NOT raise the door when we put it back. The hinges were lined up with where it was hung previously. The only change was mounting them further in the frame than it was before. Apparently, that was enough for the door latch to be about half an inch higher than it was before!

Using where the blue paint marked the frame as a guide, I went back to trying to reduce the wood in those spots. I used the shaver, a chisel, a rasp, and even some of my coarsest sandpaper. For some of the tools, it was hard to get right into the corner. Time and again, I tested the door, and it still was hitting.

Finally, I started shaving wood off the door itself. That wood is so much softer than the frame, I could do in moments what took several minutes, and a variety of tools, to take off the same amount of material.

I took these photos when I figured I was done, but then went ahead and took off more material. Just in case!

I also gouged out more of the hole for the latch. After testing the door again and again, I finally put the latch plate back on.

That mark on the inside of the frame by the latch plate?

It turned out part of the door handle assembly – I just looked it up and now know it’s called a “rose” – hits it. So I used sandpaper to gouge out a recess there. That wood is also very soft compared to the frame pieces I’ve been fighting with!

The door now closes, easily and properly!

In fact, it’s probably the smoothest working door in the entire house right now!

I had one last thing to attach.

The stop chain!

I started screwing it in where there were pre-existing holes, but realized the bent part of the plate was extending beyond the wood, and the door would be hitting it. While moving it over, I noticed the plate for the chain on the inner door had only one screw holding it in place, so I fixed that, too.

Now, there is no chance the door will bang open too far. It doesn’t even hit the shelf behind it anymore, which means no risk it’ll hit the window. I can now move that shelf to the other side of the door, in front of the cracked window.

Tomorrow morning, I’ll be touching up the paint that I scraped off, including the door; thankfully we still have some of that blue left.

Once I was done hanging the door, I just couldn’t help it.

I stood there, opening it and closing it again, and giggling to myself. :-D

I am easily entertained!

This door was so much more of a problem to replace than we could have imagined!

The Re-Farmer