Our 2023 garden: starting herbs and tomatoes, potting up and will it work?

For a while outside, the wind picked up and I could see the snow coming down horizontally out the window! From what I’m hearing the roads are in terrible condition, and quite a few people posted online that they started to go somewhere, only to turn around immediately. Everyone is being told to stay home. A number of roads have been closed, particularly in the South. For our area, it looks like the worst of it has passed by, and things should be getting better from now on, though there is a second system on the radar that might make it as far as us later. Maybe.

A good day to be inside and doing garden stuff!

The first thing I needed to do was start some new seeds.

There were only three things that need to be started in the 6-8 week range; spearmint, oregano and the Roma tomatoes.

The oregano and spearmint seeds are so miniscule! We don’t need a lot of either, so there was more than enough for our needs. There weren’t a lot of seed in the tomato packet, so I actually counted them to work out how to use the tray. There turned out to be 67 seeds in the packet. Usually, for “pots” the size of these toilet paper rolls, I would plant two seeds per pot, but with so few seeds, only one got two seeds and the other 65 got a single seed each. Romas are a tomato I want to have a lot of, so we can do tomato paste and sauces again at the end of the year.

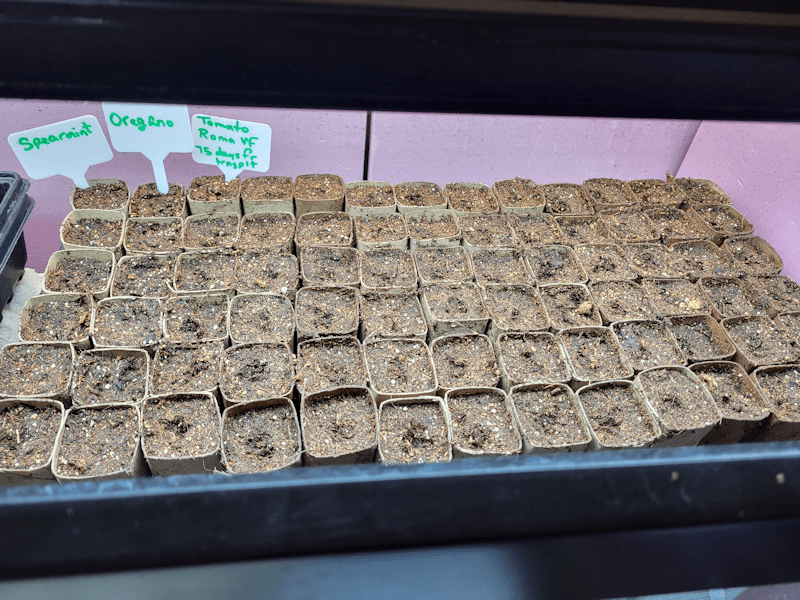
The herbs each gone one row in the tray. Here, the tray is on the heat mat, and it now has a dome over it, too.

This is the tray that had been on the heat mat. There are some cayenne, Dragonfly and Early Sensation peppers sprouting. And look at all those spoon tomatoes!

The strawberries and Classic eggplant got moved out entirely, and are now in the small aquarium greenhouse, still on the little bin to lift them closer to the light. The hardware cloth cover for the tank is no longer needed to keep the cats out, but it is still needed to hold the light fixture. We couple put the light back under the tank’s lid and use that, but this way, there is still plenty of air flow.

This done, I decided to do some potting up. First, I thinned by dividing the Crespo squash…

They are on the aluminum sheet in the photo. Of the two pots, one had all three seeds in it germinate, and they all have their own pot now. The second pot, I left for now. You can see a second seed did start to germinate, but it seems to have just stopped growing.

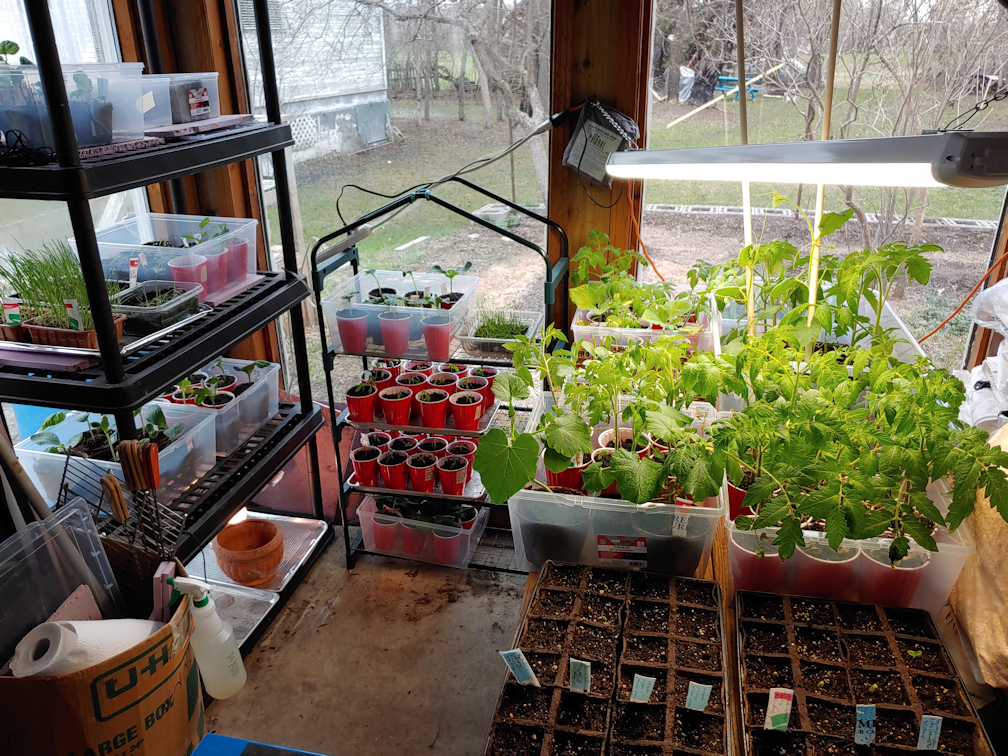
In the baking tray, you can see the Zucca melon, at the bottom right of the picture, are doing well! Those tendrils are reaching out to climb, and I’ve already had to unwrap the biggest one from the mini greenhouse frame. The drum gourds in the back are doing okay, but I think it’s just too cold for them to grow much right now.

I’d reseeded more Zuccz melon and drum gourd, but none have germinated yet. There was a drum gourd seedling that died after I’d put more seed in the empty pots, and I was considering adding more drum gourd seeds to it. Not anymore! That pot has now been “potted up” into the stronger, lighter coloured pot, and contains an experiment.

Last year, we had purchased seeds for Tulip trees and pawpaws. We had a single Tulip tree germinate, only to die soon after. Nothing else germinated. Their containers had been moved between the sun room and the shelf just outside the sun room. No surprise that cats would eventually knock them around, and that was it for any chance of germination. They were planted in a seed starting mix, which I ended up adding in to the big bowl I use to moisten the starting mix before putting it into pots to start new seeds. I ended up finding one of the pawpaw seeds that actually looked robust, so I stuck it into the available pot. Who knows? Maybe it’ll sprout!

Today, I had dumped our last bag of seed starting mix into the big bowl with what was left from before and was mixing water in with my hands when I found another pawpaw seed that looked like it was fresh out of the package we got them in. So I stuck that into the pot I’d put the first one in. The pot is damp, though, so it broke. I grabbed one of the new biodegradable pots I bought and the whole thing fit perfectly inside it. Cool! Now we have two pawpaw seeds to potentially sprout!

As I went back to mixing water into the seed starter mix, I found three more pawpaw seeds! None of them showed even the slighted bit of rot or damage!

They all went into the experiment pot.

I have no idea if they will germinate, but it would be awesome if they did!

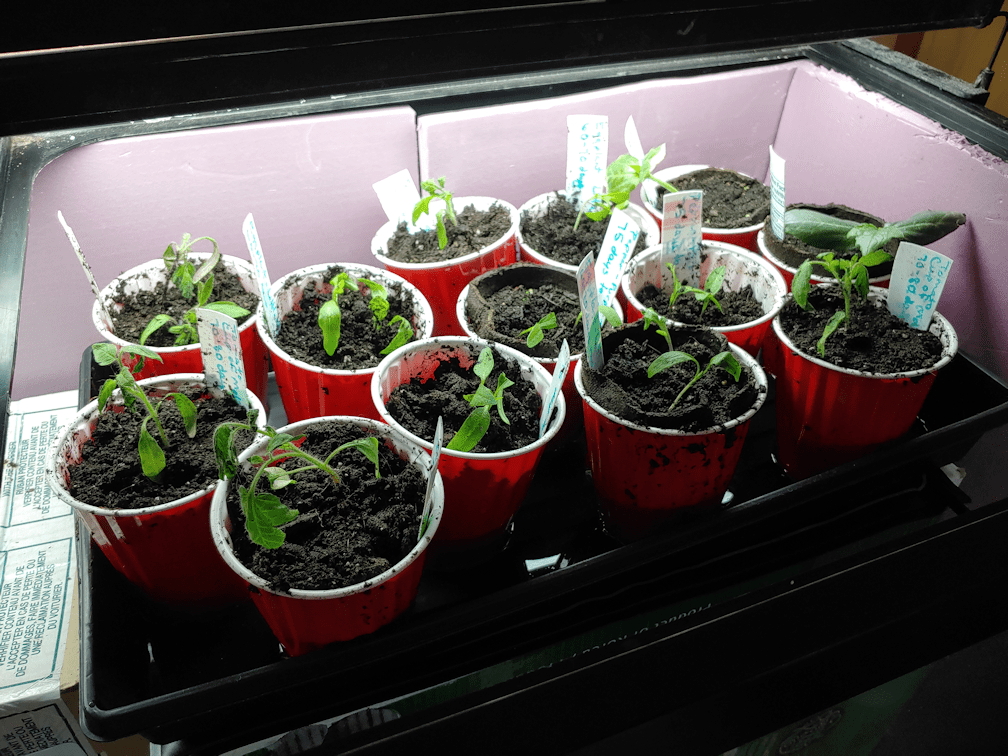
Once the herbs and tomato seeds were planted and things were shifted around, I decided it was time to pot up the Black Beauty tomato seedlings. The germination rate for those was really high, and they were starting to get too big for the square potting cells they were in. I had a bag of potting soil ready for potting up, and went with Red Solo cups to transplant them up into.

I filled them about half way with soil, and buried the stems of the seedlings about half way when transplanting. As they get bigger, we can keep filling the cups with soil, allowing for more roots to develop along the stems. The baking tray holds 12 cups, while the bin can only hold 9, which left 5 more to go back into the tray they had been in before. The smaller Indigo Blue tomatoes don’t need potting up yet. Sadly, there are still only three Little Finger eggplants; the pots I reseeded show no signs of germination yet. Again, I think it might just be too cold by the window, even though the whole thing is over a heat vent.

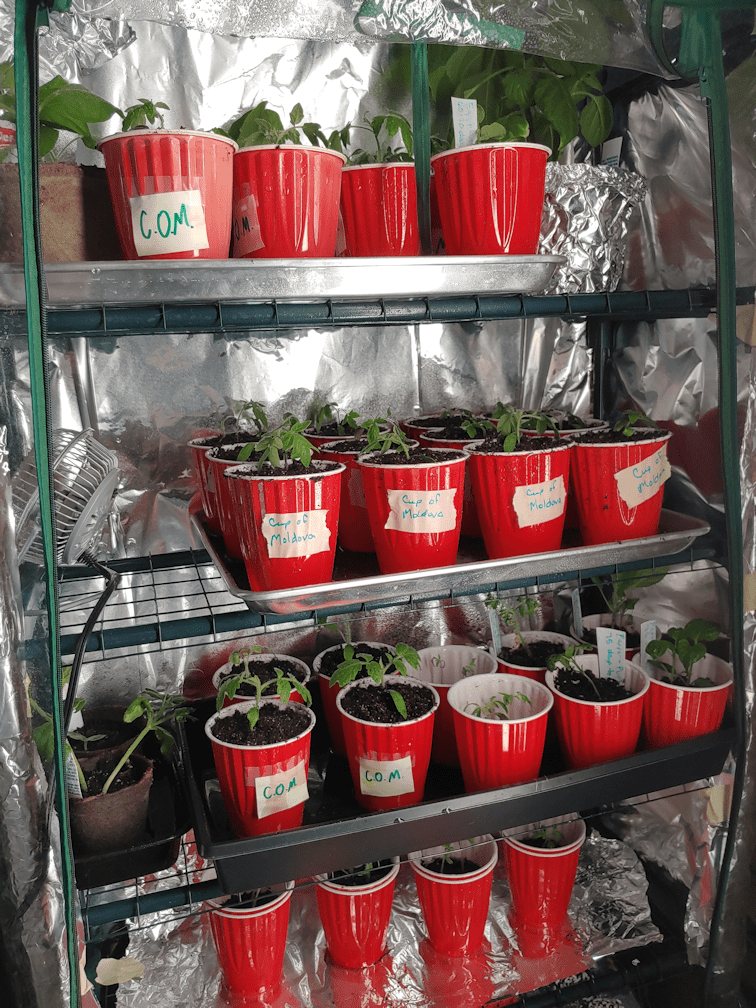
Lower down, you can see the tray that has the first peppers we planted, in the red cups they were potted up into, next to the German thyme and lemon grass. The yellow plant pot below has one of the pots of German thyme transplanted into it, which we will be keeping indoors. In the blue mushroom tray is the luffa. We still have just one plant. The other 3 pots were reseeded, but still nothing.

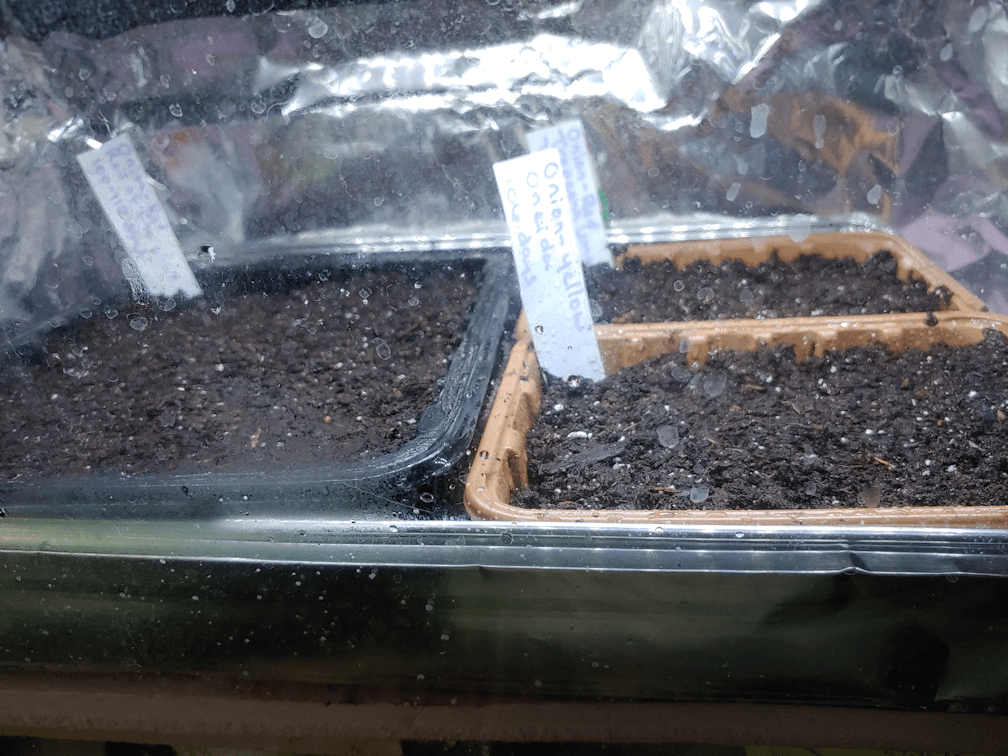
And finally, here are the onions and shallots! It’s been a while since I showed how they were doing. I suppose we could give them hair cuts, but that may not be beneficial. Gardening in Canada did a video about it, and I trust what she says.

My daughter’s orchids got moved to the shelf beside the onions. I hope they do okay, there. They’re pretty far from the heat vent.

That is it for now! The next seeds we will need to start are the 4-6 week seeds, and I think I have only 1 or 2 things that needs to be started in that range. After that, it’s all stuff that needs 3-4 weeks before last frost date. There are a few seeds in that range that I plan to experiment with, starting some indoors and direct seeding others, to compare how they do.

Being able to work on gardening stuff while it’s snowing outside feels really good!

The Re-Farmer

Our 2023 garden: Oops! starting classic eggplant

There’s a certain downside to ordering a lot of seeds. Namely, a tendency to forget what I already have, what I’ve ordered, or even what I wanted to order, but decided not to this time.

It helps to organize the packets at least a little. For me, the main thing is to have them divided into bins for what needs to be started indoors, and what can be started outdoors. I sort them more, within the bins, but those are my two most important distinctions.

As I worked on the seeds that needed to be started indoors the earliest, went through our garden plans, and even browsed the catalogs, online and off, every now and then I’d think… “huh. I thought I ordered another type of eggplant.” Specifically, the most common eggplant we see in the grocery stores. Then I figured I must have changed my mind and decided not to, this year.

Today, I got a shipping notification from Veseys, letting me know that my last packet of seeds, a purple bean variety, that was back ordered are on their way. After this, it’s just the live items that won’t be shipped until late May, before our last frost date.

Looking back at the original order confirmation to remind myself what would be coming in May, I noticed something else on the list.

Classic Eggplant.

I did order them.

They should have been started a week ago.

Where are they?

I went through all the Veseys packets in my “start indoors” bin. Nothing.

I got about half way through my “direct sowing” bin, when I found the packet, tucked in amongst the root vegetables.

Oops!

So, I quickly got them going!

There aren’t a lot of seeds, but we don’t need a lot of plants, since this is a “lets find out how they grow and if we like them” year. I had some 10 cell square peat trays, but only used half of one. If I’d found the seed packet earlier, they would have done in with the peppers and Spoon tomatoes that I started earlier in the week, instead of having 2 rows of tomatoes. Ideally, though, they would have been planted at the same time as the Little Finger eggplant.

Here they are, in the large aquarium greenhouse. They really ought to be on the heat mat, but there’s no room, so I added a small bin to raise them closer to the warm lights, and set it up with the strawberry tray. No sign of those, yet, but when I checked under the dome over the large tray, I think I actually saw some tomatoes elbowing their way to the surface!

It’s a bit late, but these only need 75-80 days, so we should still have time. I planted two seeds per cell, and still have some seeds left. If we get only 50% germination, that’s still enough for our needs for this year. We like eggplant, but we don’t buy it often.

Here’s hoping these work out!

The Re-Farmer

Our 2023 garden: newest sprouts!

I love it when seedlings suddenly burst out of the ground and grow so fast, things are different every time I check on them!

When I checked on them yesterday, I could just see one Crespo squash starting to shoulder its way through the soil. Near the end of the day, I could see two emerging and one more just visible. I also spotted one eggplant peaking through. By the time I shut down the lights for the night, the eggplant was up, with signs of more starting to emerge, plus signs of one Caveman’s club gourd.

This morning, two of the Crespo squash are fully up, with the third one almost there – and the soil in the other pot looks like something might be breaking through soon, too. There are still more tomatoes emerging, and more eggplant peeking through. Still just one Caveman’s club gourd visible, so far.

As for the older seedlings, it looks like all the ones that got potted up have survived, though one drum gourd that did not need potting up doesn’t look like it’s growing. There had been two in that pot and one died. I was hoping the second one would make it. We shall see. The other two that were thinned by division are growing, and the third pot was reseeded, so I hope there will be more to transplant once the garden is ready. The more there are to transplant, the better the chances that at least one will reach maturity!

I’m happy to see so many seedlings emerging now. Soon, these will be moved off the heat mat to make room for the next batch of seed starts.

So far, things are looking good!

The Re-Farmer

Our 2023 garden: onions update

Not a lot of garden related stuff going on, but I thought it was time to post another picture of how our onion seedlings are going.

They are really coming up well! So many, they’re actually lifting up the surface soil on one of the trays.

If anyone is wondering why I’m starting onions so densely like this, it’s based on how MI Gardener now does it.

We did this last year, and they did just fine!

I’m looking at the trays, though, and thinking…

We don’t have enough onions! 😄

As for the luffa, no sign of germination, yet. It might be a while for those, still.

The Re-Farmer

Our 2023 garden: getting started (video)

Yesterday, after many delays, I finally sorted through all our seeds, old and new. I was happy to find I still had luffa seeds left, so I got those started, along with our onions.

Since I’m running out of media storage space on my WordPress account (the down side of having such a photo heavy blog!), I took my photos and made them into a video, instead. I hope you enjoy it!

Please feel free to let me know what you think of it, either here or in the comments under the video at YouTube. If you watch the video on YouTube, you can subscribe to my channel there. I’ll be uploading it to my Rumble account, too.

I will probably be doing a lot more of these, since I’m not about to spend over $300 a year to upgrade my account, when all I want is more storage space! It takes a lot more time, and I borrow my daughter’s microphone for the voice overs, but it does allow me to use higher quality images, and more of them, than I would here. I’d call it an experiment, but it’s not like I have much choice!

On another note, I’m quite enjoying the Movavi Video Suite to make these videos. I’m just barely skimming the surface of what the software allows me to do, since my needs are really basic, but if I wanted to, I could create some pretty professional looking videos. The only complaint I have is how it keeps wanting me to buy into subscriptions to get more choices in media and effects, etc. But that’s pretty typical of most media software these days, I think.

Anyhow, I hope you enjoy the video!

The Re-Farmer

Our 2023 garden: Heritage Harvest and Baker Creek seeds have arrived!

Last I checked the tracking for my Baker Creek order, it was still hung up in Illinois, so it was a wonderful surprise to get it in, along with the Heritage Harvest order I knew had arrived in yesterday’s mail.

First, Baker Creek. You can read about what we ordered and why, with links, here.

The hulless seed pumpkins, carrots and onions are all repeat orders. The free Merlot lettuce seeds are a variety we’ve ordered before. We hadn’t planned to buy lettuce seeds for 2023, but there they are!

The Hedou Tiny Bok Choy is something I’d not heard of before! I don’t know if we’ll plant the lettuce for 2023, but I’d sure like to try this variety of Bok Choy! From the description, they are a cool weather crop, so we should be able to grow them all right, here.


Then there is our second order from Heritage Harvest. You can read about what we ordered, and why, with links, here.

Well, would you look at that! Thanks to the free seeds, we now have two types of lettuce! Jebousek lettuce. “A wonderful heirloom deer tongue lettuce from Czechoslovakia. Ella Jebousek of Brooks, Oregon received this variety from a descendant of the family who brought it from Czechoslovakia. Looseleaf type.”

We’ll see if we try them in 2023 or not.

What I’m looking forward to is going through that seed saving book!

I don’t think we’ll be ordering more seeds after this. We will be ordering other things, though, that will be shipped in the spring. Potatoes, for sure, and likely raspberry bushes or strawberries. That won’t happen until after the holidays, though.

At least, that’s the plan so far… 😉

The Re-Farmer

Analysing our 2022 garden: final thoughts

Okay, it’s that time! I’ll be working on a serious of posts, going over how our 2022 garden went, what worked, what didn’t, and what didn’t even happen at all. This is help give us an idea of what we want to do in the future, what we don’t want to do in the future, and what changes need to be made.

Okay, so I’ve gone over how things went for our 2022 gardening year. We expanded our garden so much this year – and it was still less than we intended – I decided I need to do one last post to wrap it all together.

In a nutshell, though, I could probably just say this.

It was a terrible growing year.

In 2021, we got hit with drought and heat waves. For the longest time, we were out there watering the garden twice a day, just to keep it alive. With all that, things produced way better than I excepted, even when much of it did not thrive, or got eaten by groundhogs repeatedly, or got chomped on by deer.

I never thought that this year would be worse!

A lot of the failures can be attributed to things outside of our control. Winter dragged on long, as we got walloped with blizzards and large amounts of snow. I couldn’t complain about the snow, since we needed that moisture badly. Unfortunately, snow melts faster than ground thaws, and when the temperatures rose, the ground just couldn’t absorb it fast enough.

Even growing up here as a kid, I don’t remember ever having standing water in these areas!

The sad thing is, even with all this water, it would not have been enough to replenish the water table after years of drought.

Where, last year, we had things produce far better than expected, this year, it was the other way around. It turns out our garden handles drought and heat waves better than flooding and average temperatures.

Gotta look for that silver lining, though. We’ve had the two extremes, which gave us a lot of information to help us decide on our next steps.

The goal is to grow and produce as much of our own food, and be as self sufficient as possible. When we get animals, we want to grow their food as much as possible, too. How we get to that point can be changed or modified as much as it needs to be!

A lot of what we grew this year will be grown again in 2023, though not necessarily the same varieties.

As we expand our main garden area, we’ll be moving away from the distant garden beds, where we are now starting to build up our food forest. That’s what those beds where there to help prepare the soil for.

Which means that 2023 will have pretty much all the garden beds closer to the house, and we will be building more permanent structures. The temporary trellises have come down and, in the spring, we will be taking down the trellis tunnel, saving the wire to be reused.

We plan to start building permanent trellis tunnels where some of the newest, deep mulched garden beds were started. We will also focus on building more high raised beds – the challenge is to safely harvest the dead spruces to build them with, since we don’t have the funds to hire a company to take them down for us. I don’t begrudge them the cost at all; it would be worth every penny. We just have too many other things pulling at those pennies that are a higher priority, when we can do most of this work ourselves.

The low raised beds were enough to keep some things from getting drowned out, but in other areas, it still wasn’t enough. So while I do want to keep some beds low, the majority of our beds will be high raised beds.

The one high raised bed that is complete, filled hügelkultur style, did very well. By the end of the season, it had settled quite a bit and needed a top up, which was to be expected. At this point, I think the bed’s “topsoil” is deep enough that it could be used to grow longer root vegetables now. This is definitely the way we will continue to build and fill our high raised beds, though we might tweak a few details, such as finding better ways to join the logs in the walls. We have a few more and better tools to help us now, and will continue to acquire more.

Since a major component of building our permanent beds is accessibility and mobility, as we build the permanent structures, we will make sure that the paths will be at minimum 4 ft wide – wide enough for a walker or wheelchair to turn around in. That will include the trellis tunnels we will be building. Now that we are aware of how much water can accumulate where we plan to build them, we intend to build probably middle height beds on the outside of the tunnels. Those beds will be 2 ft wide, since they will be accessible from only one side. I figure we should shoot for building at least three or four of these in the main garden area (not all in one year!), along with the 9′ x 4′ high raised beds we will be making. We will be sticking to 9′ x 4′ as much as possible, regardless of how tall the bed is, so that any covers we build for them can be interchangeable. Obviously, the narrower beds we plan to build at the trellis tunnels will be the exception, but the things planted in there would need different types of protection – if any at all.

Even aside from the trellis tunnels, we will want to built quite a few other trellises that can be moved around to wherever they are needed. Among the things that actually started to grow well (if too late), I noticed that the hulless pumpkins really, really wanted to climb. The melons we want to plant are also climbers, as are some of the gourds we want to grow. These would need support that can hold the weight of their fruit, so they will need the strength of the permanent tunnel trellises. Lighter climbers, like peas and pole beans, would be fine with portable trellises.

While we will be focusing on permanent structures in the main garden area, we are also needing to plan ahead to when we build permanent garden beds in the outer yard, where there is better sunlight. We are also working on plans for an outdoor, off-grid kitchen in that general area. That’s on top of the shed we need to dismantle, so that we can salvage the lumber for other projects, like the mobile chicken coop I want to build.

We’ve got a lot of building and heavy labour ahead of us, and none of us are quite able bodied, so it might take a while to get it done!

As terrible of a growing year it was in 2022, it provided us with much useful data, and will actually help us in planning our next steps.

Little by little, it’ll get done!

The Re-Farmer

Analysing our 2022 garden: starting seeds indoors, and other physical challenges

Okay, it’s that time! I’ll be working on a serious of posts, going over how our 2022 garden went, what worked, what didn’t, and what didn’t even happen at all. This is help give us an idea of what we want to do in the future, what we don’t want to do in the future, and what changes need to be made.

Our 2022 garden had a lot of challenges, and a lot of failures. Some of challenges and failures started well before we planted a single thing outdoors.

With our short growing season, we need to start a lot of things indoors. That, in itself, is expected and not a big deal. Our circumstances, however, have thrown in some major difficulties.

Fourteen of them, in fact.

Well. Sixteen, when we were trying to get them going this year.

Our indoor cats.

The other challenge is a combination of space and light. This house is oriented to the East. Our largest windows face the sunrise – with a grove of 60’+ spruces not far away. Our south facing windows are smaller and inaccessible for the purpose. The exception to that is the sun room, however the sun room is not warm enough to start seeds in when we need to. Plus, during colder weather, we allow the outside cats to use it for shelter.

Which means we need to figure out how to start seeds indoors, provide adequate artificial light, and protect the seedlings from cats that are determined to either roll on them, or eat them!

The first solution was one that we started doing last year. We have two aquariums that we have been able to convert into greenhouses, of a sort. When we moved out here, we brought our big tank, with a second light fixture to replace the kit light. Both work just fine, and provide adequate light for starting seeds.

The corner of the living room the tank sits in gets cold, so we added rigid insulation against two walls for extra protection. We were also able to get a warming mat to place under seed trays of things that needed extra heat. Since the lights can’t be raised or lowered, we used cardboard boxes under the seed trays to adjust the height, with new plantings closer to the lights, and larger ones lower down, rotating and adjusting as needed. We built frames with hardware cloth to cover the top of the tank, which both protected the seedlings from the cats, but also allowed more air flow.

This above picture was taken with the hardware cloth covers removed for access. As you can see from the bedraggled seedlings, we didn’t quite manage to protect them from the cats. More on that later.

The other tank is much smaller; just a 20 gallon tank. It, too, tended to get chilly, plus the light it came with was not as bright as having two lights, as with the large tank. It has insulation on three sides to protect from the chill walls, which also got covered in aluminum foil to reflect the light.

When we first started using this tank the previous year, we used the original lid it came with. The cats were incredibly determined to get at the trays below, and were able to reach through the opening for the filter, no matter what we used to block it, completely destroying the trays below. This year, we found some window screens in a shed, and used one of those as a lid, weighted down with hand weights. We removed the light from the bottom of the original lid and attached it to a foil lined piece of rigid insulation, and simply set it on top of the window screen. The cats still sometimes managed to knock the weights around and displace the screen but, over all, it did keep them out.

The problem with both tanks, but especially the little one, was air circulation. For that, we used a tiny fan we found in one of the basements while doing clean up. We could put it right into the big tank, or on top of the hardware cloth covers, aimed downwards. For the small tank, we could just set it on the screen, also aimed downwards. Ultimately, though, we used the small tank as little as possible.

We had an awful lot of seeds to start indoors, however. Way too many to fit in the tanks. Since the seeds needed to be started at different times, we could start the earliest ones in the tanks, then rotate them out when the next seeds needed to be started.

The question was, rotate them out where?

One of my daughters had bought a mini greenhouse for me the year before, so we brought that into the living room. We also bought a long, narrow, LED shop light to illuminate it better. That worked out well enough that we later bought a second one.

We set it up as close to the window as we could, on a chair to catch more light. The only way we could use the light, however, was to hang it from a plant hook in the ceiling above, so that it rested on the chair as well, oriented vertically.

The cats were absolutely determined to get into it!

They managed to squeeze in from under the chair, so we tried taping the plastic cover to the chair.

That wasn’t enough.

We added pieces of cardboard to block the spaces they were squeezing through.

It… mostly worked.

In the end, it was a combination of taping the bottom, the cardboard, and covering the back and sides of the frame with aluminum foil – which also helped reflect light onto the seedling better.

They still managed to get in.

I came out one morning and found cats had somehow squeezed through one of the zippers, pushing it open more, and rolled all over a couple of the trays.

It was such a disaster!

We did managed to save some of the seedlings, but not all. Thankfully, we had seeds left for some of them and were able to start over.

We were eventually able to keep the mini greenhouse sealed up well enough to keep the cats out, but it meant keeping the plastic cover on and closed up at a time when the seedlings didn’t need a cover. This meant no air circulation in there at all. Even so, there were times when a cat or two managed to get in, and try to eat some of the seedlings!

I was able to rig the little fan up inside the mini greenhouse, aimed at the walls in such a way that the air flow would be pushed upwards and around the whole space.

That little fan got one heck of a work out!

So we finally got that working, but there’s not a lot of space in between the shelves. Before long, some of the seedlings began to outgrow the mini greenhouse. They needed to be moved out, and the only place we could move them to was the sun room – but we had to wait until it was warm enough!

Eventually, we were able to move the largest seedlings onto shelves in the sun room, while other seedlings got rotated into the mini greenhouse, and newly sown trays were set up in the aquarium greenhouses. We had our seeds organized by when they needed to be started, with the earliest started 10 weeks before our average last frost date, then 8 weeks, 6 weeks and finally 4 weeks.

We still ran out of space.

In the end, we set up a surface to hold seedlings over the swing bench, and eventually we could move the mini greenhouse to the sun room – and finally take the cover off! The second shop light was hung above the plants over the swing bench, and we eventually hung the one from the living room on the inside of the shelf.

For a sun room, the sunlight doesn’t actually reach far into the room.

There were so many things that needed to be started indoors! In fact, most of what we were growing needed to be started indoors, with only a few things that needed to be direct sown.

That’s not really going to be changing, so we need to figure something better out. How do we provide the seed trays and seedlings with the light, air flow and space they need, while also protecting them from the cats?

Well, the girls and I have been talking about it, and the only real solution we have is to find a way to keep the cats out of the living room completely, and turn the living room into a plant room.

The question is, how?

There are floor to ceiling cabinets between the living room and dining room. On one set, the living room side is completely covered. On the other, there is a “window” at one shelf that allows access from both sides. It’s a favourite lounging place for David! Between the cabinets is an open space somewhat wider than a standard sized door for access between the two rooms.

The only way to prevent the cats from getting into the living room is to build a barrier in that space, with a door in it, plus another barrier to cover the “window” in one of the cabinets.

Barriers which need to be strong enough to withstand cats trying to get through, yet still be easily removeable.

One of my daughters has drawn up plans for a barrier with a doorway, while the “window” will just need a simple rectangular frame to fit the space. It’s basically going to be all wooden frames and hardware cloth.

Unfortunately, we’ll need to actually buy the lumber for this, and lumber is extremely expensive right now. There is nothing in the piles of salvaged lumber in the sheds and barn suitable for what we have in mind.

It’s something we’ll have to figure out soon. Some things, like onion seeds, could be started as early as January. February at the latest. Honestly, I just don’t see how we can get the materials and build the barriers that quickly. We could start off using the large aquarium, which might give us until March to get it done, but… I’m not very hopeful.

It would be a lot easier, if the cats weren’t so absolutely determined to destroy the seed trays!

The Re-Farmer

Analysing our 2022 garden: cucumbers, bell peppers and eggplants

Okay, it’s that time! I’ll be working on a serious of posts, going over how our 2022 garden went, what worked, what didn’t, and what didn’t even happen at all. This is help give us an idea of what we want to do in the future, what we don’t want to do in the future, and what changes need to be made.

Here, we are looking at growing stuff that was new to us. When I was a kid, my mother did grow cucumbers here, but she never grew peppers or eggplants. Our own experience with growing peppers goes back to before our move, when the co-op we lived in built accessible garden beds, and we signed up for one of them. We tried growing a hot variety of pepper, and we were getting one that was developing really well – then it got stolen. I don’t know if I feel sorry for whomever took it and tried to eat it, thinking it was a bell pepper, not a hot pepper! We ended up potting it up and bringing it inside for the winter, and got many peppers from it, that we dehydrated.

I am not able to eat fresh tomatoes. They make me gag, and I’ve since learned this is a thing similar to how some people find cilantro tastes like soap. There’s something in fresh tomatoes that I react to, but not when they are processed.

Peppers is a bit different. It doesn’t matter if they’re fresh or processed. They make me gag if I can taste them. I’ve eaten things with peppers in them as an ingredient, without reacting to it, so it’s not an allergy, but if there is enough that they can be tasted, I can’t eat it. Oddly, I can eat jalapeno stuffed peppers just fine! As for fresh peppers, I love how they smell, and the crispness as I cut them up, but when I try to eat them, I just want to puke! However, my husband and one of my daughters both love peppers, so we gave it a try.

Eggplant is something that most of us like, but we rarely buy, so we decided to try growing them to see if we liked them enough to make it worthwhile to grow them every year. Peppers and eggplant are both heat loving plants, but as long as their growing season is short enough and they are started indoors, they can be grown in our zone 3. Our summers can get extreme heat as much as our winters get extreme cold!

I’ll start with the cucumbers, though.

We chose a variety that was supposed to be good for both fresh eating and for pickling. They were started indoors, and were transplanted at one of the A frame trellises.

The Result:

In a word, frustrating.

As with so many other things, the cucumbers did not reach their full potential. However, they did grow and bloom and produce. We would even have had enough to do a few jars of pickles, but we mostly ate them fresh.

For the amount of cucumbers we planted, we had enough for our own use.

The frustrating thing?

My sister had a very productive year for cucumbers, and she dumped bags of them with us.

We made up a dozen jars of pickles, but she gave us so many, they started to mold before we could use them all, and ended up composting a lot of them. With so many cucumbers given to us, it made it harder to use up our own cucumbers, too.

As for the pickles we made, we used a garlic pickle recipe. They’re good, but we’ll have to try different recipes, and different varieties of pickling cucumbers, to find what we like best.

The Conclusion:

Yes, we will be growing cucumbers again. Hopefully, we’ll have a better growing year, with bigger, stronger and more productive plants. We’ll be trying different varieties and, as we grow more herbs and continue to grow garlic, we’ll hopefully be making tastier pickles, in the future.

I’m also going to have to tell my sister that, if she has another bumper crop of cucumbers, to please not pass on any to us! We like cucumbers and pickles, but we don’t like them that much!


With the peppers, we got one variety of purple bell peppers (Purple Beauty) that were supposed to be so dark, they were nearly black when ripe. They were started indoors and germinated quite well. They were transplanted into one of the low raised beds, surrounded by spinach on one side, turnips on the other (both of which failed) and onions (which did well). We also had them under netting for most of the growing year, to protect them from critters.

The Result:

These were definitely a fail.

We did get tiny little peppers that ripened to the dark colour they were supposed to become, but the plants never thrived. I think they would have benefited from being mulched properly earlier, but we just didn’t have the material to do it until it was probably too late. How much of a difference the mulch would have made, I can’t actually say, but I would guess it would have at least improved things a bit.

We simply had a really bad growing year, even aside from the flooding. The low raised beds were enough to protect what was in them, for the most part, even when there was standing water in the paths, but it’s likely the flooding was still too much for the roots. The peppers were in the bed under the mosquito netting, on the left of the above photo. It wouldn’t have taken much for the roots to be hitting saturated soil and starting to rot.

What’s amazing about that standing water is, our top soil is only about 6-8 inches deep in this area. Under that is rocks and gravel. Which would normally mean, really good drainage. We had so much water this spring, however, there was nowhere for the water to drain!

Conclusion:

While the peppers may have been a fail, we’re going to try again. Hopefully, we’ll have better conditions in 2023.

My daughter had mentioned she thought we’d be trying more than one variety of pepper in 2022, so for 2023, we’re going to try several different varieties, including one hot variety. We’ll be looking at what we can do to improve soil conditions – perhaps using a higher raised bed, and making plastic domes to cover them, for extra heat. And, of course, mulching them very well, much earlier!

In the process, if we have a good growing year, we’ll figure out what varieties are enjoyed the most, and eventually work our way down to just one or two varieties to grow every year.

Assuming we’re able to grow them at all! We shall see.


Last of all, are the eggplants.

We chose the Little Finger variety, because I liked their shape and, from all I’d been able to find, they were described as quite delicious. I got them from a seed source that is even further north than we are, so we could be quite sure that they would grow here.

Well, not quite.

In the above photo with the flooded paths, the eggplants were transplanted into the middle bed, where the front half is planted with garlic. The eggplants were planted in the middle, with spinach surrounding them (which failed) and onions around the outer edge (which did okay). We had hoops to hold up mosquito netting to protect them but, like many other things, we were not able to mulch them properly until late in the season.

As we were doing the last of the transplants, we found a couple of eggplants that were missed, so those got planted into a dollar store “raised bed garden” that was made of black felt. This was set up quite a ways away from the low raised bed, which turned out to be slightly elevated, and not affected by the flooding.

The Result:

These were mostly a fail.

The eggplants in the low raised bed did not thrive at all. It wasn’t until very late in the season that one of them finally started to bloom, and develop a tiny little eggplant. Covering them did not seem to help them at all. The lack of a good mulching for so long probably didn’t help, either.

The ones in the black felt bed did better. I suspect the black fabric warmed up the soil more, and that they preferred that. They still took a long time before starting to bloom and develop fruit, however. One plant did noticeably better than the other.

That handful was our entire harvest.

We left them to grow as long as possible. We didn’t get frost until quite a lot later than average and, when we did, we covered them to protect them and squeeze out as much growing time as we could.

The few eggplants we did get, however, where quite tasty!

Conclusion:

We are definitely going to grow the Little Finger variety again, plus we will be trying some “regular” eggplant – the size and shape we would typically find in any grocery store.

With what we learned in 2022, I think that we will perhaps try growing them in pots or grow bags, or higher beds. If we can do black fabric grow bags, that would be even better. With two varieties to try, we’ll see which ones we like better, and see if we use them enough to keep growing them, year after year.


In the future, we hope to have some sort of greenhouse or polytunnel to help extend our growing season, and provide better growing conditions for heat loving plants, such as peppers and eggplants. Once we have a really good growing season for them, we’ll finally be able to determine if we actually like them enough to be worth growing annually, or if these are things we would continue to buy only once in a while at the grocery store.

The Re-Farmer

Analysing our 2022 garden: peas and beans

Okay, it’s that time! I’ll be working on a serious of posts, going over how our 2022 garden went, what worked, what didn’t, and what didn’t even happen at all. This is help give us an idea of what we want to do in the future, what we don’t want to do in the future, and what changes need to be made.

It was a mixed bag when it came to growing legumes in 2022!

As with so many other areas in the gardens, we did have flooding around the pea and bean trellises, but that area is a bit more elevated, so it wasn’t much of an issue, compared to other garden areas.

The previous year, we’d grown three types of bush beans, and they did very well, in spite of drought conditions and heat waves. We were very happy with them.

For 2022, though, we decided to try growing pole beans, and shelling beans.

The previous year, we had little success with peas. For 2022, we decided to try an edible pod pea, as well as shelling beans. Plus, we had a whole four saved seeds from the King Tut Purple Peas we tried growing the year before.

Let’s start with the peas.

We used the same trellis we’d grown peas at, the year before, amending the soil a bit more. The trellises were all meant to be temporary, but we did get one more year out of them.

Don’t those peas look nice and healthy?

That was about the best they got.

The Results:

The sugar snap peas germinated, then almost disappeared. I think we got a whole two pea pods out of them. There weren’t a lot of those, however, and were planted in half of one side of the trellis. The shelling peas too up the rest of the trellis, which means some were planted across from the snap peas. Those pea plants also did not do well, which tells me that the soil on that end of the trellis was most likely the problem.

A couple of weeks later, we planted more of the shelling peas at an A frame trellis, shared with gourds and cucumbers. Those plants actually seemed to do better.

In general, though, the peas did not thrive. Even the healthiest, strongest plants only got to about half the size they should have. I did have shelling peas to harvest, but never more than a handful. Usually, it was just a few that I could eat right away.

Then there were the purple peas.

The Results:

As with the other peas the year before, the King Tut Purple Peas did not do well, but they kept trying to grow and bloom for a surprisingly long time. I decided to try starting the four seeds we’d managed to keep indoors. All four germinated and were looking quite healthy. They were transplanted in a south bed with the chain link fence to climb. Shortly after transplanting, I cut the top and bottom off some gallon water jugs and put them around the peas for extra protection from the wind until they could grow big enough to start vining into the fence.

They… grew. Like the other peas, they did not reach their potential at all. They grew tall and thin, without a lot of foliage. There were a few purple blooms and pea pods developed, but they were green instead of purple, except for one. I never tried harvesting them at all, but just left them to go to seed. There wasn’t a lot to collect at the end of the season, and I’m not even sure I want to try growing them again. They weren’t the tastiest of peas, but that could be because they just didn’t grow well.

The Conclusion:

While the peas did not do well, we will still be growing them again. For 2023, I’ve already ordered the variety of shelling peas we’d tried in 2020. The pea and bean trellises have been dismantled, and they will be grown in a completely different area, as we build up our permanent garden beds. Hopefully, that will make the difference. I really love fresh peas, and would love to have enough to freeze. I would love to have edible pod peas, too, but I’m not sure if we will try them again in 2023. I think it will depend on how far we get with the permanent gardening locations.


Then there were the beans.

While we bought pole beans, we also had green and yellow bush beans left over from the year before.

We planted a green and a purple variety at an A frame trellis. The shelling beans and the red noodle beans were planted at what had been a squash tunnel, the year before. The yellow beans were planted with the kulli corn to act as a nitrogen fixer, as well as to help shade out weeds.

The green beans from the year before were planted with our sweet corn as well, but that bed got flooded out. While most of the corn survived, not a single green bean germinated. We bought another variety of green bush bean and planted those, and they did grow.

The Results:

The purple Carminat and the green Seychelles pole beans did great, considering what a horrible growing year it was.! Both varieties were quite productive. I wasn’t picking beans every day, as I was with the bush beans the previous year, but I was at least picking some every couple of days. The purple beans seemed to do the best – even when a deer went by and nibbled on them all along the row!

The yellow bush beans planted with the kulli corn did quite well, too. The only downside was that we had a net around the bed to protect the corn from deer and racoons, which made harvesting the beans very inconvenient.

The green bush beans we planted with the sweet corn didn’t grow as large as they should have; it was a new bed and it had lots of issues, so I’m not surprised by that. Everything did a lot better when we were finally able to finish mulching it all. The bean plants were so small, however, that it was hard to harvest them with the mulch. They were there more for the corn than for us, so I decided to just leave them and hopefully have seeds, but I think they were planted just too late for the season, and none of the pods dried out.

Then there were the shelling beans and Red Noodle beans at the tunnel trellis.

The shelling beans (Blue Grey Speckled Tepary) were very small plants, just barely getting tall enough to start climbing the trellis, yet they produces so many pods! Still, there wasn’t much of a harvest of these very small beans. That photo is the entire harvest! I saved 100 seeds (we’d planted 50) to grow in 2023, and we ate the rest. It was the first time we’d tasted these beans, and they were barely enough for one meal! Still, we found them tasty, and I look forward to trying them again. I hope a better growing year will improve things.

As for the Red Noodle beans…

These are supposed to be a vining type bean, but it wasn’t until near the end of the season that they actually got large enough to start climbing the trellis. It took even longer before I finally saw blooms. We were starting to harvest and pull up the garden for the end of the year, when I found a single, solitary, baby red noodle bean pod, which you can see in the above photo.

I had been looking forward to trying these beans, and would like to try growing them again, just to find out if we like them! Not in 2023, though.

Conclusion:

Beans are such a staple crop, and we enjoy having a variety of types, we are definitely growing beans again in 2023. Along with the seeds we saved for shelling beans, my mother gave me a jar of white beans that are descendants of beans she used to grow here. She gave seeds to my sister to grow in her own garden, which she did for quite a few years. She’s not growing shelling beans anymore, though, so she gave her saved seeds to my mother, who passed them on to me. What a circle!

On top of that, we have ordered seeds for green, yellow, purple and red varieties of beans, including one that is supposed to be good as both a fresh bean and a shelling beans.

While we’ve had our failures this year, beans are one of the few crops that have produced really well for us, even in adverse growing conditions, making them a reliable food to grow.

The Re-Farmer