I have been having major issues with Nosencrantz in particular, trying to get at the north window in my room. My craft table is under half of the window, and that end of the table has my tea station and phone base/answering machine, among other things. They keep trying to get to the top of a set of shelves I have to hold supplies. The selves are repurposed wire shoe racks, so they can’t handle having cats jumping on and climbing them.
In trying to keep the cats out of my craft stuff, I’ve basically rendered my craft table useless, filling it with stuff to discourage them from jumping on it. Most cats have learned to stay off, but Nosencrantz won’t. She keeps digging into things, clambering over the stuff I’ve put on the table to block her, and basically driving me rather bonkers.
The thing is, I have no problem with them having access to the window. There just isn’t any way for them to get to it, without knocking things about or even collapsing my shelves of craft supplies.
Today, after repeatedly having to chase Nosencrantz off my craft table, I just got tired of it, went into the basement and scrounged together supplies to make her a shelf at the window, that will also protect my stuff on the table.
This is the result!
At some point, I’ll probably sand it some more, maybe paint it, and make a more padded cushion for the top, but for now, it does the job! The other cats are oblivious to it, but Nosencrantz has tentatively gone onto the table, which I’ve cleared enough for her to get to it. She has yet to jump onto it herself. Instead, she’s tried to get into a container behind my phone! I’ve figure out what she was after and have tucked them into a tin, so hopefully, she’ll stop doing that and just use the shelf to sit and watch things outside the window!
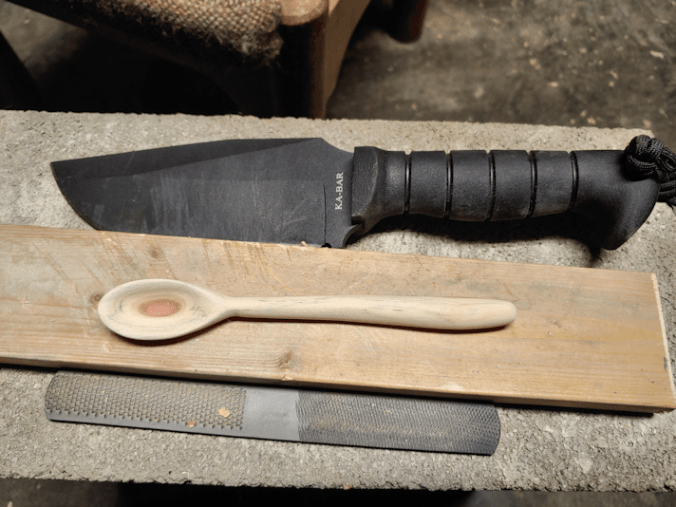
Having made an olive server, using my new gouge, I thought it would be good to use some of the remaining wood to make a spreader and olive fork.
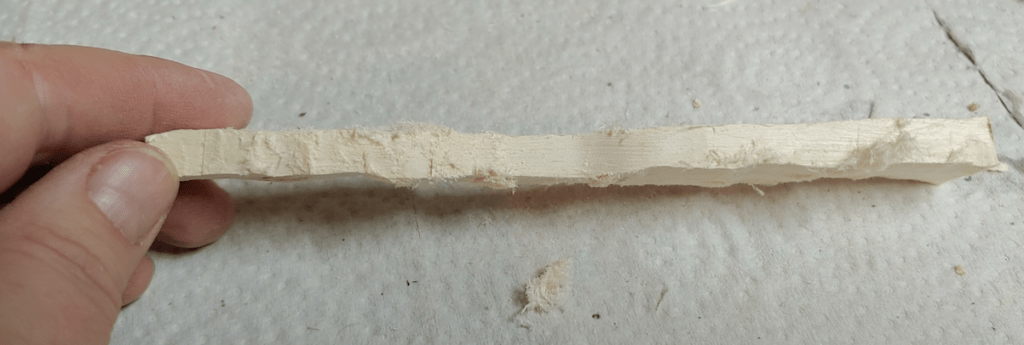
After cutting a length off, the first thing I did was split the wood down the middle.
Here, you can clearly see the rotted out core that I had to work around with the olive server.
The utensils I wanted to make would be well away from that core, though, so this was okay. I split off some excess wood from the opposite sides, then debarked the remains.
In sketching out the spreader and fork, I decided not to include the knot at one end. It may have added visual interest, but I just didn’t want to fight with it.
Once rough sketches were made, I rough cut away excess wood. A band saw would make the job easier, but I don’t have one that works, so I made do with a little Japanese pull saw that I got last summer, and a coping saw. The coping saw has been a problem, as it won’t lock at the handle end anymore, so it tries to rotate while I’m using it!
For the spreader, I added another rough sketch on what would become the top. I wanted a slightly wider bit at the start of the spreader blade as a sort of stopper, more for visual interest than anything else. I wasn’t too worried about matching the sketch closely, since it would depend more on how much I had to cut away from the core of the wood.
Next up was using carving blades to do more shaping and trim away excess wood at the core, to take out that rotten strip.
Then I broke out the Dremel.
After trying out different tips, I ended up just using the sanding tips. They are a course grit and did a good job of taking off the excess wood, grinding away the remaining saw cuts, and shaping it more.
Then it was back to the carving knives for more delicate clean up and shaping, then sanding.
Ready for oiling!
That knot in the blade was why I switched to the Dremel. I like how it looks in there, but my goodness, it was brutal to work around!
Next, the olive fork.
For this, I just went straight to the Dremel and used the sanding tips to rough shape it.
I then used carving knives to clean it up and work on the tines end to narrow it down even more. Once it reached the point where I would otherwise have started sanding, I made the tines.
My Dremel set includes tips for carving and engraving, and I used one of them to drill a hole where I wanted the tines to join. Then I used a cutting wheel down the length of it.
There was a knot right in the middle. The Dremel cutter did NOT like going through that knot!! :-D
After that, it was back to doing more detailed shaping until it was ready to sand.
Doing those tines was a real pain in the butt!
It actually worked out much better than I thought it would, though.
For both the spreader and the olive fork, I worked my way through increasingly fine grits of sandpaper, finishing with 220 grit. Because that’s the finest grit sandpaper I have.
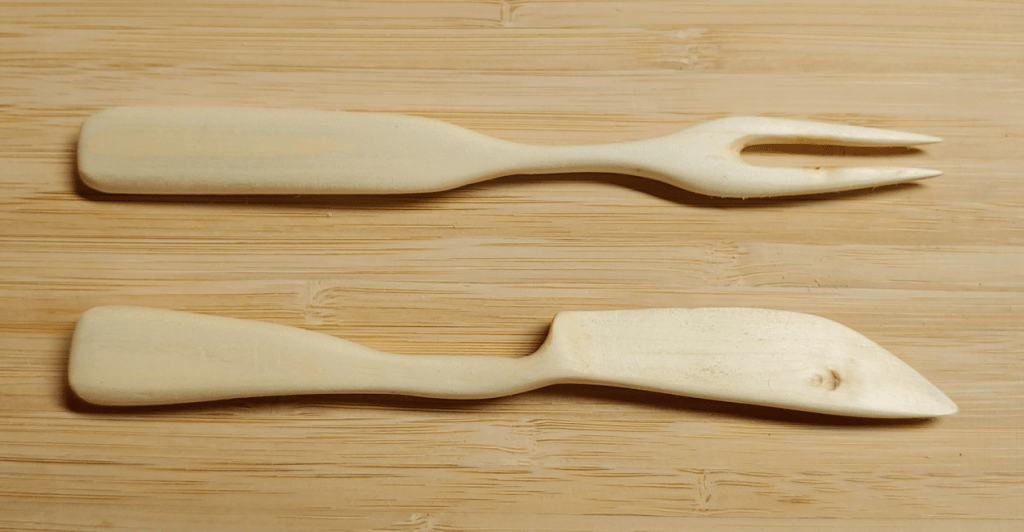
There they are, ready for oiling!
You can see the edges of the knot that was cut through to make the tines much more clearly, after oiling!
The slightly wider bit on the spreader turned out to be a perfect thumb rest!
When sanding the blade of the spreader, I actually had to be a careful not to make it too sharp. It’s meant for spreading, not cutting! It’s remarkable how sharp a wooden blade can get.
A closer look at the tines of the olive fork.
Then I wiped off all the sanding dust that got onto the oiled surface! :-D
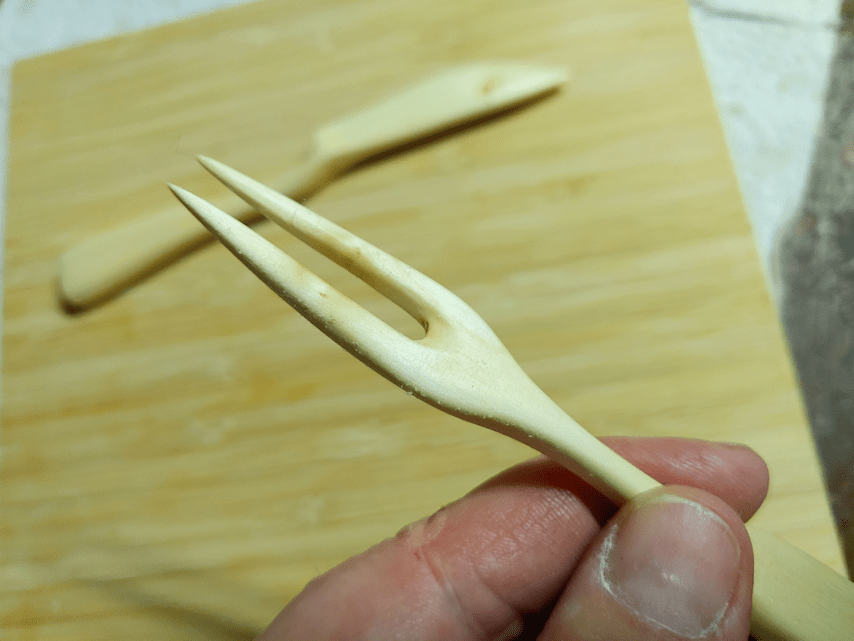
They fit! I had not actually planned this, but it makes sense, since they’re from the same piece of wood, but I’m really happy to discover they fit so perfectly inside the olive server.
I am quite pleased with these. Not only with how they turned out, but how quickly they worked up, too.
Today was another hot one, which made it a good day to finally go into the basement and see what I could do with the various pieces of wood I’ve brought down there.
Since getting my wood carving kit, I haven’t had much chance to make things with it. I used the spoon blank it came with for my first attempt. Then I used some of the lilac wood pieces to make a hair pin for my daughter. I have since made a longer, plainer lilac hair stick for my daughter, and tried to make one out of cherry for myself.
I say “tried” because when I got a bit decorative at the thick end, it ended up breaking, twice. The inner core of the piece of cherry I was using was rotted just enough that when I tried shaping the wood, it was just too weak. This was true of the lilac wood, too, but I hadn’t tried to carve anything that would affect the integrity as much, so they were fine.
Today, I wanted to make something with some of the maple pieces from the tree I had to cut part off, earlier this year, so it would be safer for my brother to move around on the shed roof he was patching.
I had a branch of it set aside, waiting for a day like today, and I cut a short piece to work on.
I was thinking of going very simple, and making a spreader or something like that.
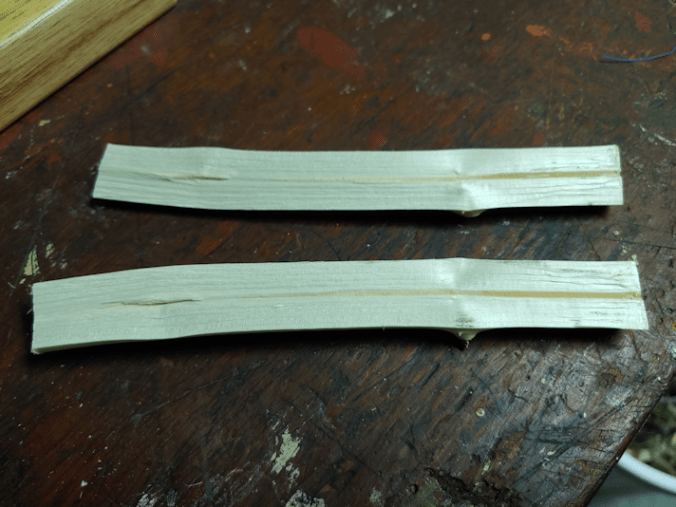
Thinking of the lilac and cherry wood, though, I decided to split the piece and see what it was like on the inside.
Well, crud.
I’m not going to be able to make a spreader out of that.
So I cut a piece from a larger branch I had set aside.
Dangit!
I really hope it isn’t all like this. The stuff I want to make uses the heartwood. For the larger pieces, I’m thinking of cups or bowls. Stuff I plan to actually use.
In fact, there was a particular piece of dead maple I’d found while cleaning up the maple grove, I think in our first summer here, that I was looking forward to using.
It doesn’t look like much on the outside, but when I cut it, this particular maple had red rings inside it.
I cut a piece off the end and took a look.
That does not bode well.
So I split it.
*sigh*
Yup. The middle is rotted.
However…
What about the edges? The parts with the red it in still looked solid.
So I split it again.
It did not split well, but the wood did seem pretty solid. Could I do something with this?
I wasn’t sure.
Over the next hour and a half or so, I hacked at it with a giant knife (which I’ve been using in lieu of a hatchet), decided to try the sloyd knife to carve out a spoon bowl, gave up on that and tried the Dremel (the two different tips I tried did the job, but the friction actually charred the wood!), finally broke open my new set of rasps and used a bar rasp with 4 different surfaces, and yes, even the carving knives.
Part way through, I dragged one of the chimney blocks from the old basement to use as a lower, solid surface. Especially for when I was hacking away with the big K-bar.
So that hunk of wood up there?
This is what I got out of it.
I didn’t stop to take any photos while I was working on it because, to be honest, I didn’t think it would work!
So here, I am at the stage of using my coarsest grit sand paper.
As I moved up to finer sandpaper, I would sometimes use my little vice.
You can really see the gouges left by the rasp. The vice made it much easier to just use a narrow strip of sandpaper around the handle and pulling back and forth.
Working my way through ever finer grits of sandpaper took probably another hour and a half.
Sanding the inside of the bowl was the most difficult. While I could use the curved sloyd knife a bit, the wood was really too small for the blade. What I really needed was a wood gouge, but I don’t have one. So that’s where the Dremel came in handy, to get the bulk of the wood out of the bowl, but I still had to cut out the bits that charred from the friction and shape it. I ended up using the other carving knives more than the sloyd knife, because of that.
Here it is, after final sanding.
You can see on the scrap wood, where the knife was hitting while I was chopping away the excess wood on the spoon. :-D
I also included the bar rasp, to show the different surfaces.
Of course, I just had to get a picture of it next to a piece of the wood it came from.
I still can’t believe I was able to get this out of that chunk of wood!
As I was sanding it, I noticed black showing up in the non-red parts of the wood.
Having done my research before I started with my first attempt at carving, I recognized it as spalting. There are people who go out of their way to use spalted wood. It’s basically a sign of the wood’s decomposition.
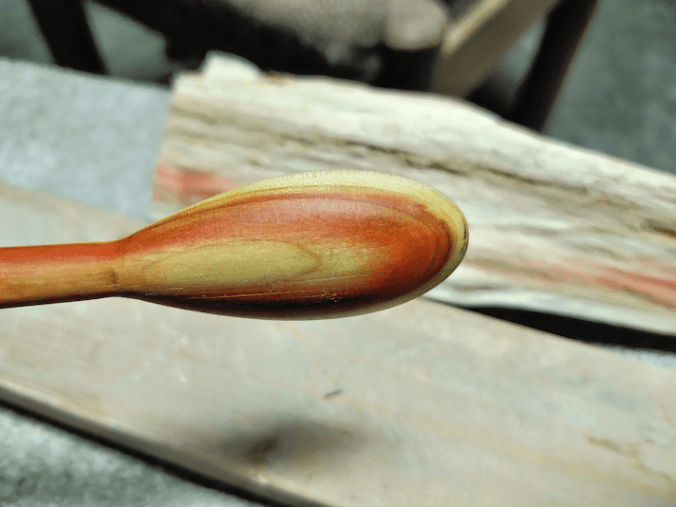
It was very faint as I sanded, but how would it look after being oiled?
And how would that red show up after being oiled?
Let’s find out!
Wow!! What a difference!
I could have cut this part out, but I kind of like it.
Unfortunately, I find the spalting makes it look like it’s dirty. :-(
On the back, you can still see some of the roughness of the would that I didn’t quite get rid of completely. They look a bit like scratches on the lower part of the spoon. The part that became the outside of the spoon bowl had some chunks missing from how the wood split. It meant less excess wood to remove in that area, at least.
So this experiment was a lot more successful than I had dared hope! Not only was I able to get something out of a partially rotted piece of wood, but I was able to start and finish a spoon in one sitting!
One of these days, I want to try making a fork. :-)
This evening, I headed back to the shed my brother and I patched up, so clean up the maple I had cut away to make it safer for him to get to the ladder.
Normally, I would have just dragged the whole thing over to the still growing pile of wood we plan to have chipped.
I do, however, now have carving tools, and I’ve been reading some articles about the difference in carving with green wood.
Now, when I looked at that tree coming down, I saw it in a completely different light!
I saw cups and small bowls, and spoons, and other such useful things.
So I went back to salvage as much as I could.
It also gave me the opportunity to finally test out my new long handled, ratchet pruners.
Oh, those things were a dream to work with! I easily cut through thicknesses I’d had to use a saw for, previously.
After trimming away and cleaning up, I brought the pieces I wanted to keep to the house.
I had one large piece, and a couple of smaller ones.
With the wood so fresh, I wanted to debark the pieces right away. I wanted to get that done right away, as I figured even waiting until tomorrow, they would be harder to debark At this point, the bark came off so easily, I used mostly just my fingers, with a knife to get the odd bits started.
When I got to the big piece, my daughters came out to give me a hand. :-)
That wood is just so beautiful!! It’s incredibly smooth, and such a lovely colour. I look forward to figuring out what to do with them.
The pieces will sit outside overnight, and then will be moved to the basement. On days when I can’t work outside, I’ll see what I can come up with!
I have an old friend that has been carving for 30 years. He carves things like faces onto walking sticks, and the most wonderful, life-like birds, he later paints. After he found out I got a carving kit, we talked shop for a while, and one of the things he recommended was to start with basswood.
That would be the smart thing to do.
Starting with a hard wood like maple is certainly not recommended!
Aside from the spoon blank that came with my kit, though, I have no basswood, and my reason for wanting to take up carving is to use the wood we have.
Right now, that’s maple!
My brother visited our mom on his way home, and filled her in on what we did here at the farm. She was quite excited about it and phoned me later on. As we were talking, I mentioned having to cut away part of a tree that’s growing out from under the shed, telling her that I hoped to use it for carving, rather than letting the wood go to waste. She asked what I planned to carve, and I told her maybe some small bowls or cups, etc.
She requested a mushroom! :-D
So when I next have a chance to practice carving, I will try and carve a morel mushroom for my mother. :-)
Our windy day continues! While we have a few millimeters of rain predicted for this evening, as I type this, I am hearing thunder rolling, and just saw a flash of lightning out my window!
Here’s hoping we don’t loose power while I’m working on this post! :-D
I have continued working on the section of lilac wood I’d experimented on earlier. I decided to try using the cutting tool on my Dremel to make the job go faster – if the Dremel was quiet enough not to disturb Beep Beep and her babies too much.
It was quiet enough, but… there were other issues.
The Dremel I have is not a particularly powerful one. Just a Walmart cheepie, really. Lilac is a surprisingly hard wood, and it was just too much for it!
I ended up stopping part way through my attempt to cut through the wood and finished with a hand saw.
You can see where the friction actually “burned” the wood as the blade ground to a halt!
So I did the rest using a carpenter’s saw, cutting the piece into slices. It took a while, but I eventually got into the rhythm of it, and things went fairly quickly. I cut slices off until I had exactly 3 1/2 inches left – the width of my miter box – to try something different.
It fit just right, and I was able to cut the piece into 4 lengthwise sections. Not as evenly as I would have liked, since it kept trying to roll on me, but that just adds to the interest!
Here are all the pieces I got out of the section of lilac wood.
I really like how the length wise cuts look.
Also… do you notice something about the pieces?
The next step was to take a wire brush to the edges to remove loose bits of bark and clean off any debris. As I worked, I kept noticing a soft spot in the middle of the slices. I finally stopped to take a closer look, and it turned out every round piece had it, as did the centre lengthwise cut.
I used a non-metal brush on them, and eventually decided to just poke at it with a very small screwdriver.
It was basically just wood dust and came right out.
So I cleaned out every disk. Some were small enough that I had to use a wire to clear them out, but every single disk now has a hole in the centre!
I was even able to use the wire to push through the centre cut piece, then use a brush to clean up the open section.
Oh! That was a quick little storm, and I noticed some crazy orange light outside. I just dashed out to see a gorgeous double rainbow!
Also, I got rained on. *shiver*
Now, where was I?
Oh, yes.
Tomorrow, I hope to be able to get back to these and start sanding them smooth and giving them a light coat of oil.
I’m still not sure what I’ll be doing with them, but they’re going to look very pretty when they’re done.
Since all of these had the holes in them, I double checked the first two I’d done, so see if they had that soft spot, too. They did. Barely big enough to use a sewing needle to clean them out. So those two pieces now have tiny holes through them, too. The colourful rings in one of them looks very much like an eye, and now the “pupil” has a tiny hole you can see though. It’s kinda like those “fairy stones” you find at the beach, with natural holes in them. :-)
I like it!
For the size if these, I’m thinking they might make nice pendants. The rings of colour are so dramatic, I feel doing anything more than sanding and oiling them is unnecessary. A possible exception would be to perhaps put a glass bead or something like that into the ones with the larger holes.
A storm last year damaged a lot of trees and bushes around the yard, including breaking off a large piece of a double lilac my mother planted in the little garden by the old kitchen. Noticing the beautiful pattern in the wood, I set the pieces aside for later.
Today was “later.” :-D
I brought one of the branches into the basement to work on it (I am really enjoying having this work space!!!) and started by cutting various sections off, then working on the thickest “trunk” part of it.
What striking colours!
The photo on the left is the base, where it had broken off in the storm, and I had cut off the split part. The one on the right is where I’d cut a pair of branches off.
That’s the end I decided to cut a couple of slices off.
With Beep Beep and the kittens nearby, I didn’t want to use any power tools, even though I now have a Dremel with steel cutting blades that would be perfect for the job. It’s way too loud.
Lilac wood, I am discovering, is a surprisingly hard wood! It may have been quieter, but it was a lot longer to do it by hand.
Since I’m just experimenting right now, I only cut two slices, then used a brush on the edges to take off any dirt or loose bits of bark.
Then I sanded them smooth. Here’s how they looked, after I finished with the finest grit of sandpaper I have.
Then I applied a light coat of mineral oil.
I am really happy with how these look! Those purple rings are really something.
So… I’m a suck. Especially when it comes to the cats.
But if you have been following this blog for a while, you knew that already. ;-)
While our basement maternity ward is certainly warmer than outside, when I checked on the mamas and babies earlier today, I noticed that the babies felt a bit chilly.
Therefore, on the principle of “put on a sweater, Mom is cold”, I decided to borrow and set up the upstairs heater at the end of the basement where the newborns are. Then, I had to stay in the basement, since it’s not supposed to be left on unattended.
Which gave me the opportunity to finish the hanging rig I’d whipped together when making cheese.
I had already done some basic sanding, as well as a bit of damage repair, a couple of days ago. Having picked up some more sandpaper yesterday, I could now finish the job.
The piece with the crack I’d glued was rough enough that I actually used a rasp we found while cleaning the basement, to get the roughest parts a bit smoother. I then spent the next couple of hours working my way through sandpaper grades until all the pieces were silky smooth.
The basement got nice and warm while I was doing that. The mamas and kitties seemed to be quite content with this. :-)
Then, because I had some, I rubbed the wood with mineral oil.
If I hadn’t had any, I would have eventually picked up some type of varnish, or maybe paint, to finish it with later.
In my rush to make the rig, I’d drilled a pilot hole in the cross piece a bit off. I was going to drill a new hole, lined up with the other side, but when I measured it, the new hole would have been just too close to the existing one. So I left it. I’ll just have one leg a bit off from the other.
The final step was to reassemble it, using wood glue at the ends of the side pieces to stabilize it.
Here are the before and after pictures.
It really doesn’t look a lot different, but trust me. It is! No possibility of getting splinters anymore, for starters. :-D I’m glad I happened to have the mineral oil to treat the wood. Once the glue has cured, it will be nice and solid, too.
We’re now all set for any future preserving we do that requires hanging a bag to drain. Plus, if we had to, we could even add a couple more cup hooks to hang up to three jelly bags or something, if needed.