I needed some garden therapy today, so I got some onion seeds started.
We have seeds for 3 types of bulb onions, 1 of shallots and 1 of bunching onions. Today, I focused on the bulb onions.
Last year, we planted our alliums in Jiffy Pellets, repurposed K-cups and cardboard flats from eggs (don’t use those. They suck. Literally. The cardboard sucked all the moisture out of the growing medium!) before finally using doubled Red Solo cups to try and make up for losses.
This year, we’re doing things very differently. I’m going to try bulk sowing. Here are a couple of videos about that.
This next video shows the transplanting.
Obviously, we are in a much colder zone than he is, so I’m adjusting accordingly.
We already had our small aquarium greenhouse prepped. The first thing I needed to do was see how many seeds we had of each type.
The Red of Florence had the most seeds in its packet. The grey seeds from Veseys are Oneida, a yellow onion. The fewest are the rarer Tropeana Lunga which, like the Red of Florence, are an elongated red onion.
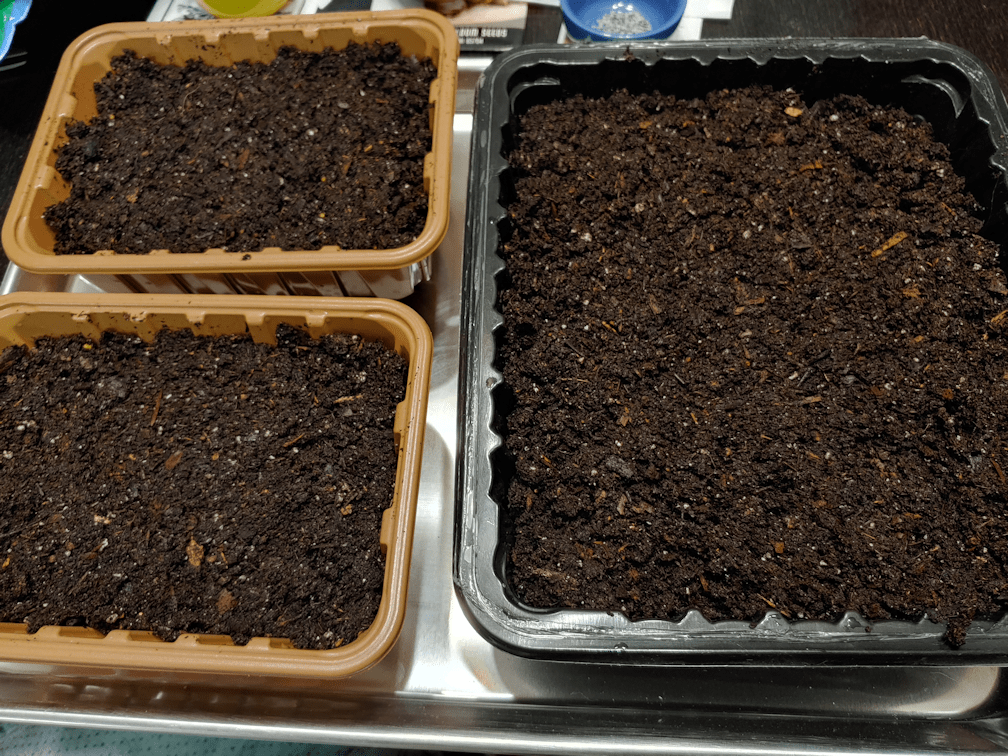
We are using re-purposed trays from the grocery store this year. The smaller ones were from mushrooms. I think the big one was from ground beef. We’ve had it for a while, so I can’t quite remember.
They got a good cleaning, and drainage holes were punched into the bottoms, then they were set into a baking pan.
They were filled with pre-moistened seed starting mix; I just dumped the remains of a bag into my largest mixing bowl and mixed in warmish water until it was evenly damp. Onions don’t need things as warm as other seeds, so no heat mat needed, but our house is on the cold side. I figured slightly warmer water would not go amiss.
The seed starting mix was pressed down just enough to make sure there would be no air pockets.
Then it was time to scatter the seeds.
Gosh, it feels so weird to sow them this densely!
I like that the grey seeds of the Oneida are so nice and visible. :-)
The seeds got a very fine misting at this point.
Then they were topped with about a quarter inch of seed starting mix, again gently pressing to get rid of air gaps. The tops got another misting, and water was added to the baking tray and left to be absorbed, while I cleaned up.
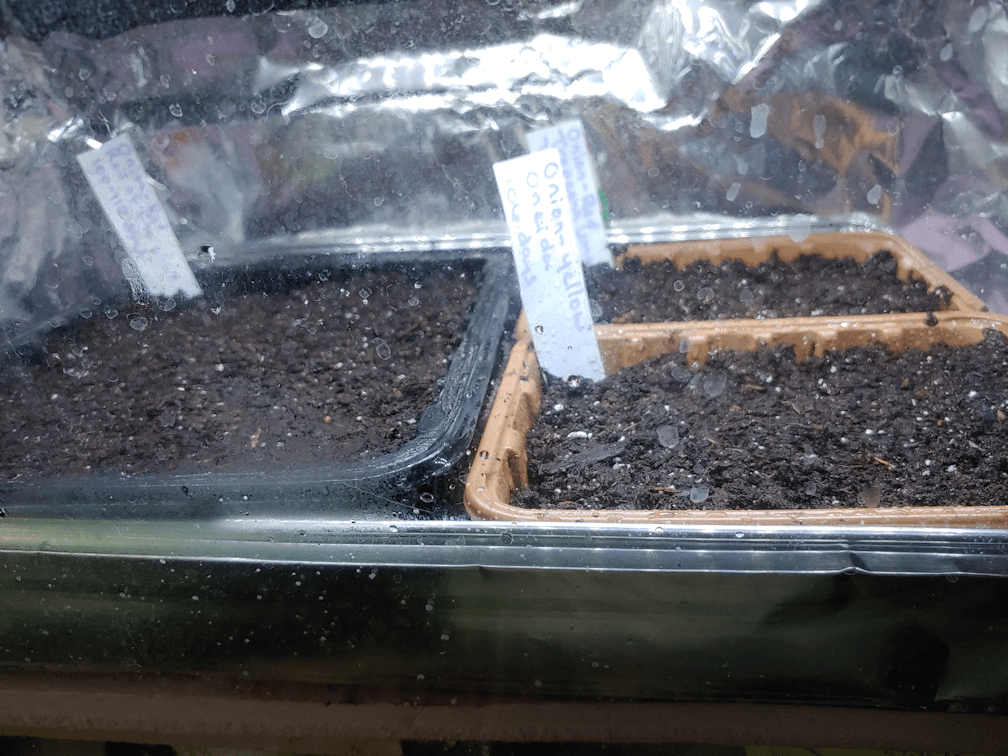
Finally, they went into the small aquarium greenhouse. The three trays fit perfectly in the oven liner tray folded into the bottom. More water was added to the oven liner tray, to water from below.
This tank has aluminum foil around the sides because the light we have for the tank is not as bright as on the big tank, and all that reflective light will help keep them from getting leggy. At least, that’s the theory!
This leaves the shallots to start next. Their days to maturity is a bit shorter than for the bulb onions. The Red Baron bunching onions need only 60-65 days to maturity, so they can be started much later.
I’m not sure how we’re going to be able to work it with the shallots, as far as space in the aquarium greenhouses goes. We’ve got some time to figure it out before they need to be started, but not much.
As for the other seeds we have in the big aquarium greenhouse, they seem to be doing fine, so far. Nothing has germinated yet, of course, so it’s too early to tell if the heat mat is making a difference. We just keep checking and adding water to the tray and misting the tops, as needed. The tray over the mat has been needing refills regularly, but today is the first time I added more water to the outer cups of the Wonderberry.
We need to get the rest of those Cup of Moldova tomato seeds started, since we want to grow a lot more of the paste tomatoes. I’ll likely start those using the doubled Red Solo cups, though we’d have to find a cat safe place to move the aloe vera pots, to make room for more seed starts. Which is a shame, because they are doing so well under the lights of the tank! So are my daughter’s orchids, one of which is blooming very enthusiastically right now, but we should be able to leave those in the tank until it gets warm enough to safely hand them in front of a window again. The aloe, however… the cats just love digging them up! :-(
Ah, well. We’ll figure it out. The main thing is that the bulb onions are started.
Plus, garden therapy was done its job. I’m feeling much more positive, now. :-)
Though it is very early in the year, we have our first seeds started indoors today. A lot of people in our zone have already got seedlings, while still others are saying, it’s way too early.
So which is it?
I happened on a video today, talking about planting peppers and eggplants, which we are doing for the first time this year. Both are plants we never grew when I was a kid, so I have zero familiarity with them.
This particular video mentioned something I’ve never heard before, yet had wondered about.
When reading the seed packets, they say things like “start indoors 4-6 weeks before last frost date”.
Last year, we had a lot of issues with some things not germinating. Some took forever to germinate. Others never did at all. This was particularly true of various squash, plus all the Hope Black Dye sunflowers – with did finally all germinate, when I started taking the trays outside, while hardening off other seedlings.
What got mentioned in this video, is that when they say “4-6 weeks before last frost,” it’s actually from germination, not from planting the seeds. So if you have something that needs to be started, say, 6 weeks before last frost, but the packet says the seeds take 7-10 days to terminated, then the time to start them indoors is 6 weeks, plus 7-10 days.
That actually makes so much more sense to me.
I’d already made a list of which seeds needed to be started when, and these were the ones that needed at least 8 weeks.
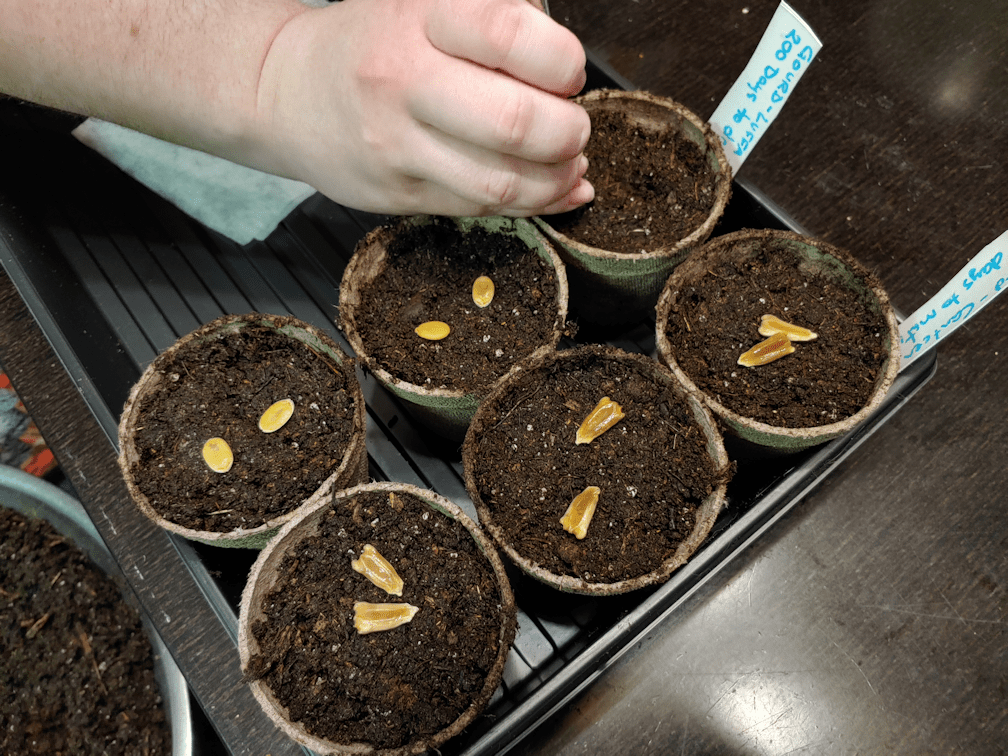
The gourds were started first, as they needed extra steps. Among the things recommended that I wanted to try was scarification and pre-soaking.
So that’s what I started this morning.
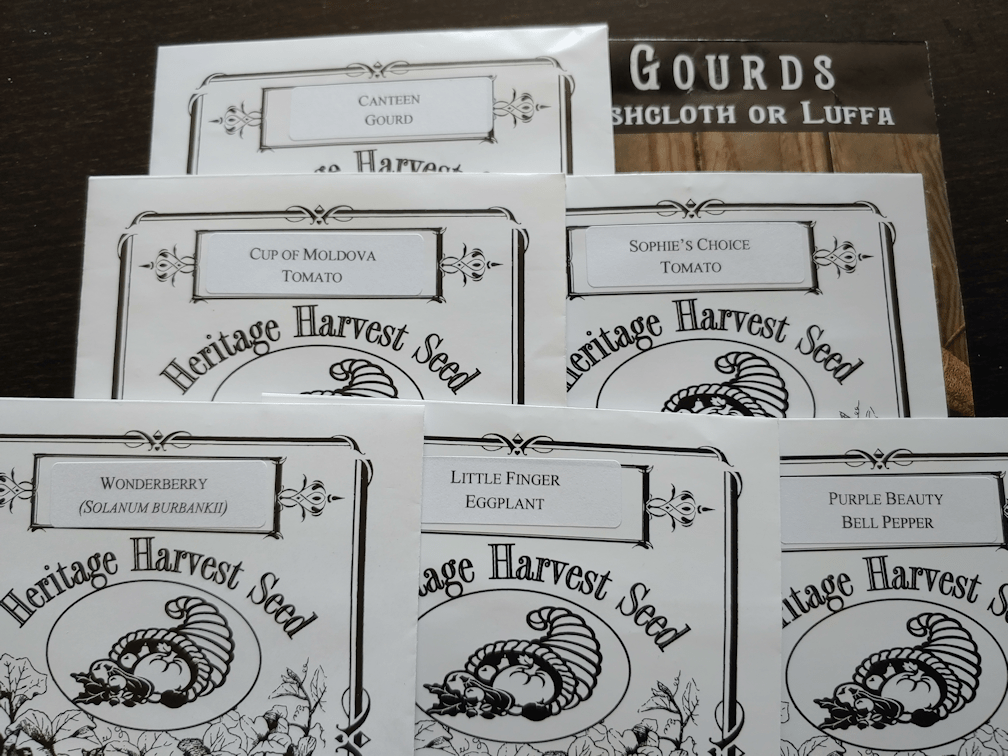
Of the gourds we will be trying to grow this year, I chose the Canteen gourd to start early, as the gourds are supposed to get quite large. The other gourds I want to grow are smaller at full maturity.
Which lead me to another thing. With the luffa, we’re not after “days to maturity”, which is 110 days, if I remember correctly. We’re after the sponges, so we need for those mature gourds to dry out. That puts them at 200 days. Even starting now, we might not have that long for them. It will depend on whether or not we get another really long summer again. Of course, in the end, everything depends on the weather.
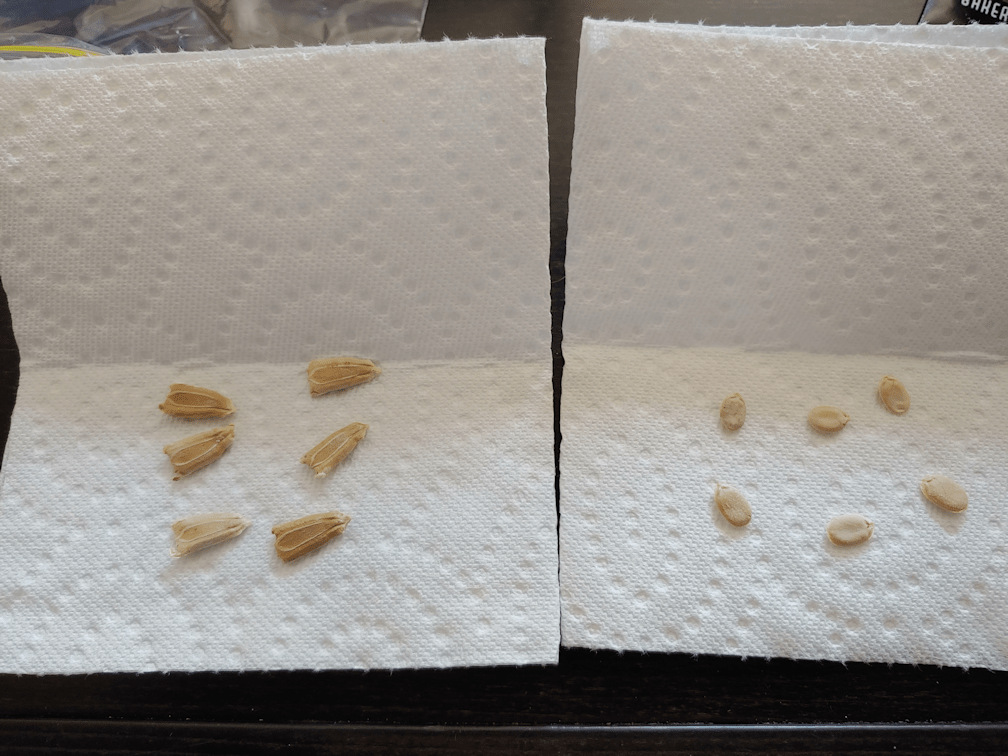
I chose 6 of the plumpest, healthiest looking seeds from each, then carefully snipped their outer shells with a nail clipper, before putting them inside the folds of a paper towel.
Then they went into sandwich baggies, and the insides were sprayed with water, before being sealed and left to sit. Most places recommended leaving them overnight, but I left them “overday” instead. ;-)
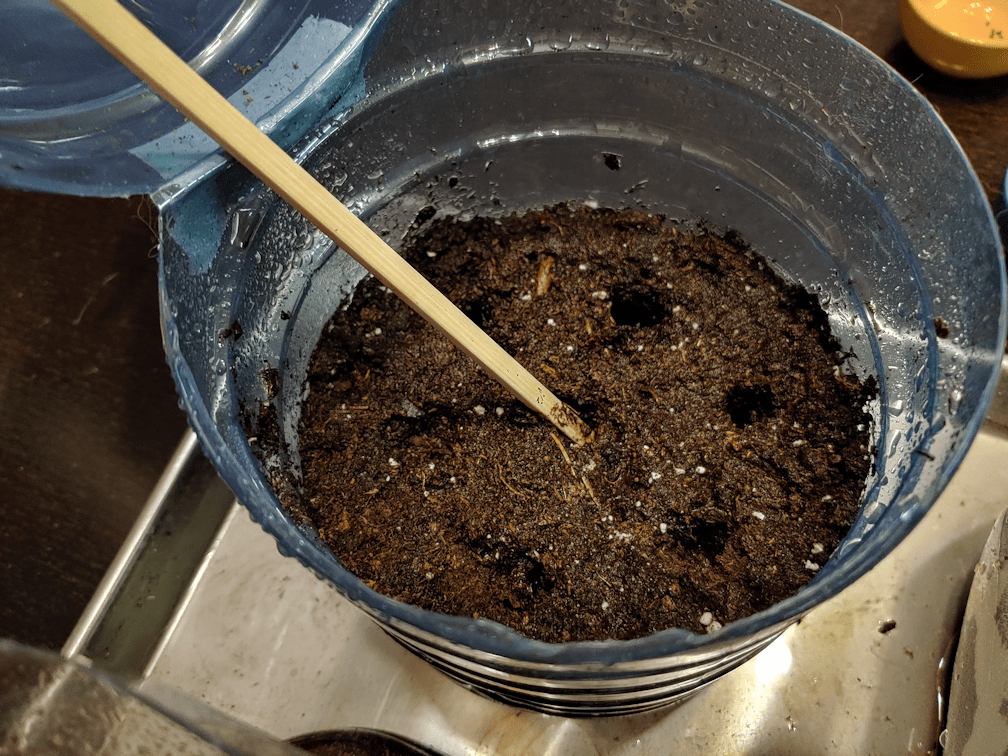
Then they went into planting pots filled with pre-moistened seed starting soil. My daughter used a chopstick to push them the inch into the soil they needed to go. Once covered, the tops of the soil got sprayed with water.
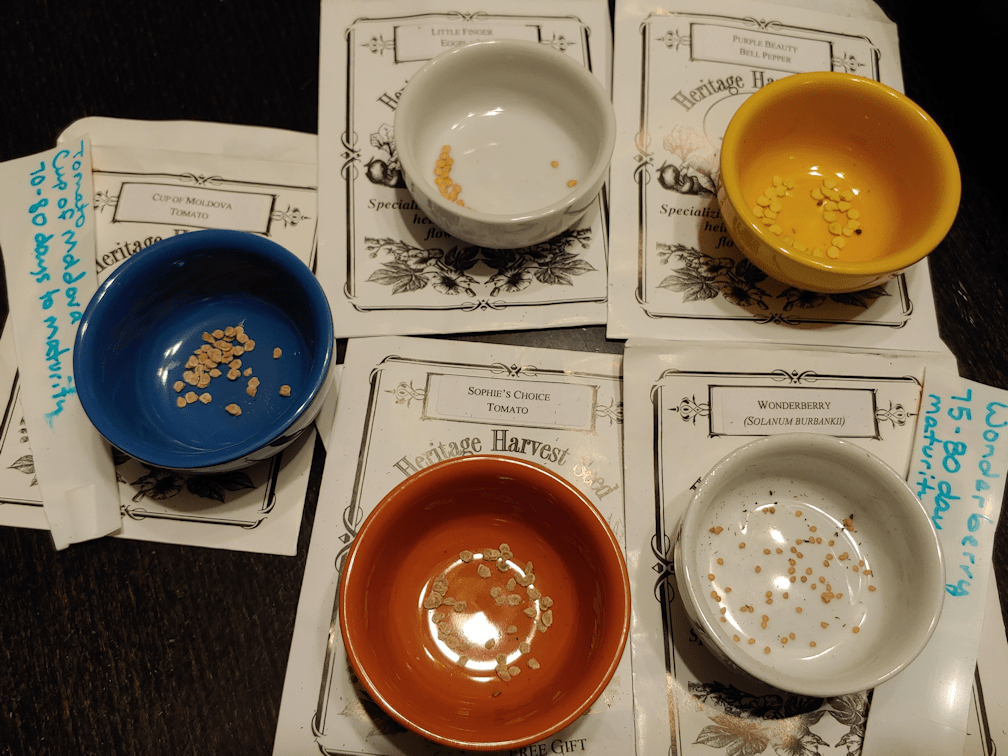
Then it was time to take a look at the rest of the seeds and see what we had to work with. None of the packets have a lot of seeds in them, but we are not after a lot of individual plants.
The Sophie’s Choice tomato was a conundrum for me. Everything I read about them said they needed to be started very early; a couple of weeks earlier than other tomatoes. Yet they are an early tomato, with only 55 days to maturity. At only 55 days, we could start them outdoors and they’d have plenty of time to mature. Odd.
For all but the Wonderberry, we decided to plant about 5 seeds per pot, and three pots each. With the gourds, that filled an entire tray.
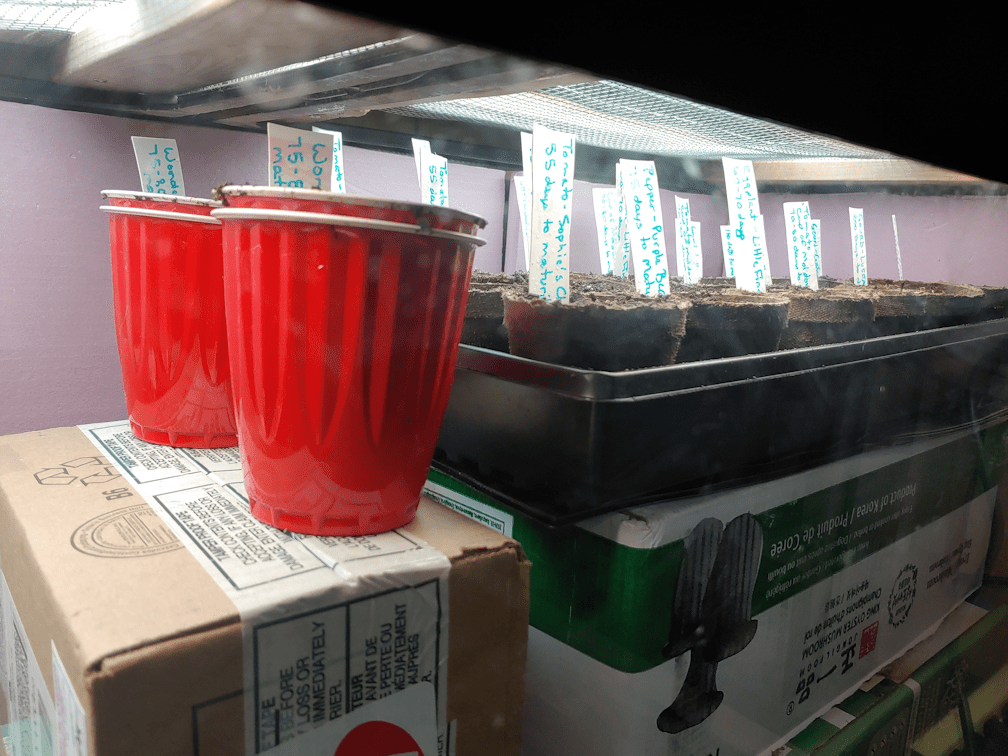
The Wonderberry got planted using the double cup method. I reused some of the Red Solo cups we used last year, with the inner cups having drainage holes in the bottom, so they can be watered from below, using the outer cup.
We still had seeds left over, even with how little was in each packet, so that’s nice.
We used more boxes to bring the tray and cups closer to the lights, inside the big aquarium greenhouse. The heat mat fits under the tray. I’m hoping that just being near the mat as well as close to the light fixtures, one of which does warm up, will be good enough to adequately warm the Wonderberry in their cups.
The double cups got water in their bottoms before they were put in place, and water was added to the tray once it was settled on the heat mat. We do still have a little fan blowing into the tank, though it’s over the orchids and aloe in the other corner. We won’t be able to cover these with a plastic dome, as typically recommended, so I’ll be making sure to use a spray bottle to keep the tops moistened, since the smaller seeds are so much closer to the surface. There’s quite a bit of water in the tray so, with the heat mat, that should help increase the humidity levels, with the fan hopefully keeping things from starting to mold.
The heat mat doesn’t have a thermometer, nor do we have a soil thermometer, so we’ll have to monitor these fairly closely. Everything is plugged into a power bar, which gets shut off every night, so there will at least be that break. If it seems to be getting too warm – unlikely, for what we’ve got planted in there – we can put something under the tray to elevate it. Once the seeds germinate, we can probably take the mat out entirely.
The next things we’ll be starting are the onions, which won’t need the heat mat, but when it comes time to start the rest of the tomatoes, and all the squash, we’ll need both the heat mat and space – and space is going to be harder to come by! We do have a mini greenhouse, the frame of which we are currently using in the sun room to hold the heater bulb for Butterscotch and Nosencratnz, as they recover. We did try to use it in the living room last year, as it does have a zippered cover, but the cats still managed to get into it. If we could find some way to keep the cats out of it, it would go a long way to helping with our space issues!
We’ll figure something out.
The main thing is, we’ve got stuff started that need that extra time indoors.
Well, the van did start this morning, so I went ahead and did our city shop without even coming inside from doing my morning rounds, other than to grab my purse. No morning kitty pictures, because I was wearing mitts. It was viciously cold out there! I can usually get away with just wearing fingerless gloves, or using my pockets, but not this morning!
Before heading to the city, I made a side track to check the mail and found a package waiting for me.
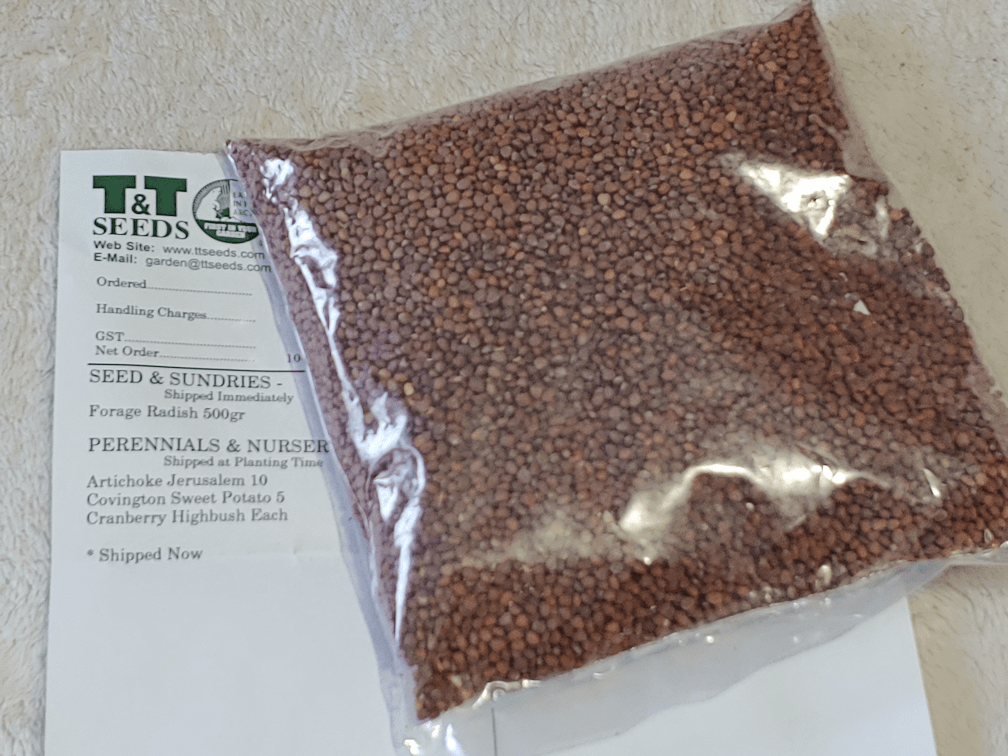
I’d completely forgotten that we’d be getting something in from T&T Seeds!
Most of what we ordered will be shipped in the spring. We’ll be getting a lot of stuff shipped at about the same time! All the companies we ordered from ship their perishable stock based on what zones the addresses are in, timed to arrive ready to be planted almost immediately. Last frost dates can still vary quite a bit within zones, though, so there’s a possibility some might arrive and need to wait a bit before planting. We shall see.
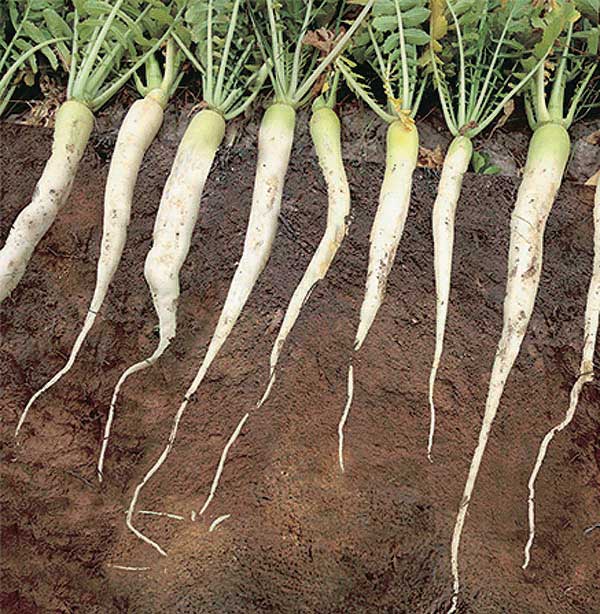
The Forage Radish seeds are a lot bigger than I expected, but then does grow into a big… well… long, radish. As this is a cover crop, it will be planted strategically in areas we want the soil to be broken up for planting next year, or in between things that might need some “tilling” around them, this year. I don’t expect we’ll use even half of this seed, this year. Unless we decide to start sowing in the outer yard, to lure the deer away! :-D
While in the city, one of my stops was at Canadian Tire, where we pick up the wood pellets we use as kitty litter. I hadn’t been able to get through to our mechanic to reschedule our oil change, so I took a chance and asked if they could book me in at the Canadian Tire, right away. Sure enough, they could fit me in, so I had about an hour to spend in the store.
It is very dangerous for me to be in a place like Canadian Tire. Especially since the oil change was going to be under budget, which meant I had wiggle room!
Along with the wood pellets, I snagged a small folding saw horse. The saw horses we have now are home built and very old, so they’re awfully wibbly. The one I found was on clearance, so I was happy to be able to take advantage of that. I also found some vegetable grow bags on clearance. I was going to make grow bags for the sweet potatoes, using feed bags like we did with potatoes last year, but these bags were so cheap, I went ahead and bought two. It will at least give us something to compare.
I also picked up a couple more trays for seed pots, to allow watering from below, plus one that had square Jiffy Pot type cups in it, for those smaller things we want to start indoors, and will do better if they’re transplanted with their pots, to avoid root disruption. So the extra time I had to spend in the store was productive.
Once the van was ready (complete with a printout of little things they found that I’ll take to our local mechanic to check), I headed to Costco to do the main shopping.
It’s very weird to shop at Costco and buy no meat. I just picked up some fish for my daughters. I didn’t need anything else. I love having such a well stocked freezer!
While there, I picked up a couple more small, plain aluminum baking sheets. I got some last spring, and they came in very handy for moving seedlings in and out of the sun room to harden off.
They also come in very handy as kibble trays for the outside cats, so I was down a couple! :-D
When I got home, the girls made sure to put Butterscotch and Nosencrantz into the carriers while we hauled things through the sun room, into the old kitchen. They even set the carriers up, so the cats could see and watch us. :-D
Then, while the girls put away the groceries, I loaded the van back up with garage for the dump. It’s open this evening, but I was done with driving. It can stay frozen in the van until the dump is open next, two days from now. That’ll give us a chance to gather the recycling together, too.
I’m thinking that tomorrow, we should start getting the luffa, and at least some of the onion seeds, started. I’ve been researching and will try something different with the gourds this time, to help improve germination rates. Of all the gourds we have, the luffa needs the longest growing time.
From the zone 3 garden groups I’m on, we should be starting the eggplant and peppers now, too. Our last frost date is a lot later than the people posting that, though, so holding off at least a bit longer would probably be a good thing.
When it comes to planting our garden this year, we haven’t quite planned locations all out, yet. The existing beds will be easy enough to work with, but we will also be building new – mostly temporary – beds, too, as we slowly reclaim more and more of the old garden area, and work our way closer to the house.
It was a bit funny when I was telling my mother about what we’ll be doing this year. She was having a hard time picturing where we are intending to plant the sea buckthorn and silver buffalo berry, as much as a living fence as for their berries, where we will be planting the Korean Pine, as well as how we haven’t quite decided on where to plant the Highbush Cranberry. She knows we plan to plant more fruit and nut trees, and made this surprising comment about how, if we plant all these trees, we won’t have any garden left. Not just because of the trees taking up the space, but their shade, as well.
There’s two reasons her comment was a surprise. The first is that she had already said to me before that, if it were up to her, she would have filled that entire area with trees by now. She did have a habit of sticking trees in, anywhere, without much thought to whether it would be a good place for them! The other reason is that my parents planted so many trees on the south side of the garden, closest to the house, that there’s not a lot that can grow there anymore. Too much shade! I know they planted these for protection from the wind, but if they’d planted them on the north side of the garden, it would have been just as effective, and wouldn’t have taken away so much prime garden location. It’s one of the main reasons we’re going to build permanent garden beds in the outer yard, where they will get full sun.
My mother and I talked a bit about our wanting to plant a southern shelter belt, because we have a gap that needs to be filled. I told her about the renter wanting to replace the fences (he’s responsible for the fencing, as part of the rental agreement), and that I’d suggested making a new, straight fence line from the barn to the road, rather than going around the old hay yard. It’ll mean a lot less fence to put in, though they’ll loose a small amount of pasture. If they do that, we’ll be able to plant shelter belt trees near it, and not have to worry about having to protect saplings from cows. My mother suggested planting lilacs as a hedge, but I told her that we need to start with something taller, first. Not too tall, though, or we’ll just end up with more shade problems. Many of the farms in the area are completely open, with just a block of shelter belt trees around the house and outbuildings – and their gardens are outside the shelterbelt, far from their houses. There just isn’t anywhere near their houses that gets enough sunlight for the size of gardens they are growing. Whatever trees w decide to plant on the south, I don’t want anything that will get as tall as the spruces we have by the house. They’re about 65ft high, and we’ve been watching how far their shadows are cast, at different times of the year. Since we will be planting permanent garden beds out that way, the last thing we want to do is plant trees that will get so tall, they’ll end up shading the garden beds. I figure we can plant trees that grow no taller than 30 feet and still get the shelter from the wind that we need. Especially if we also plant shrubs along the line, too.
But maybe not more lilacs. I’m thinking more along the lines of hazelnuts and berry bushes! :-D
No decisions can be made until there’s a fence, though!
Last year, we converted two unused aquariums into greenhouses, where we hoped to protect our seed starts from the cats.
It mostly succeeded.
Today, I prepped the tanks for this year’s seeds.
The small tank – a 20 gallon tank – was a real problem with the cats last year.
Even when we pur the original hard cover back on at the end of the season, using the space inside to store the light, etc., the cats still got into it!
The foil around the back and sides were to provide reflective light for the seedlings. As you can see, the cats have torn up the foil, and even left scratches in the rigid insulation at the back!
Last year, we had tried using the lid that came with the tank at first, but the cats would reach through the opening for the water filter in the back, even if it meant fighting past whatever we put to block the opening. They managed to reach in and pull up the seed trays, anyhow. Having to block everything meant no air circulation, so what the cats didn’t destroy, mold did it’s damage. I finally rigged a window screen and that worked, though it was far too late to save the onions we’d tried to start in there at the time.
This tank will be for onions again. After seeing that onion seeds can be planted very close together, and they don’t really get transplant shock, I’m hoping to be able to get all 5 varieties of onions we have in hear.
The problem is the size and shape of the tank is too small to fit any of the commercial seed starting trays we’ve been using. I want to be able to water the planting trays from below, which meant having to find something to use as a tray for the water.
I decided to try aluminum oven lines. They are pliable enough to bend to size, and strong enough that I could fold corners without it tearing. It’s not deep, but it doesn’t need to be.
There’s still quite a bit of space left. If needed, I can fold up another tray and overlap them. I’ll just have to make sure they are attached to each other with a water tight seal. Or we can just use the doubled Red Solo cups again, and not need to have a tray under them at all.
Then the screen window was brought back into action as a cover. A pair of 5 pound hand weights get added to the back, in case a cat walks onto the overhang in front. The metal screen is strong enough to hold their weights. The heavier cats don’t try to go up there, just the tiny ones, so that has worked out. If necessary, we have more weight we can put on it. At some point, I want to build a screened cover to fit, but that’s not an urgent thing.
Since we can’t change the height of the light fixture, the egg cartons are being used to bring the seedling trays closer to the light, and can be taken out to lower the base as needed.
One thing we found last year is that this room is pretty cold, which is why we added the insulation around the back and sides. It was still difficult to keep it warm enough for the squash and gourds we had in there. Onions are a cool weather crop, so they should be fine in here, as far as the temperature goes.
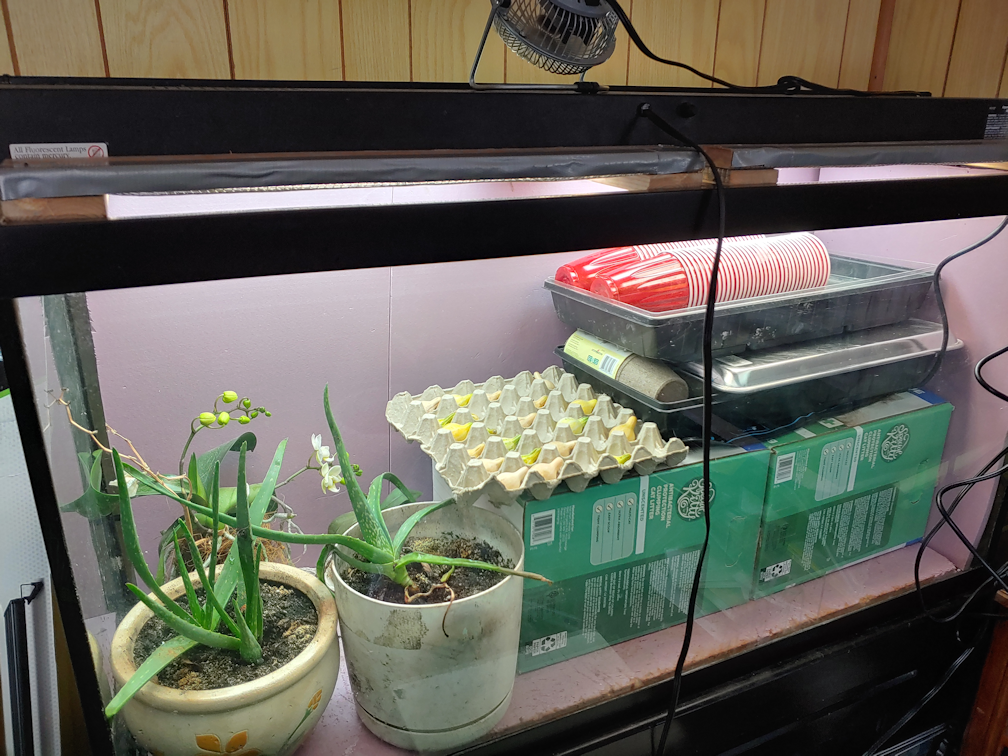
Then there was the big tank to do.
I had to take out the biggest pot with an aloe vera in it to make space for the boxes that are being used to raise the seedling tray closer to the light. Previously, the boxes were under that sheet of insulation at the base to create a raised floor, but with the plants still in there, we can’t do that this time.
This is where we will be starting the luffa, and probably a few other gourds, at the same time as the onions. They will need the heat mat we got for under the seed trays, which is why they have to go in this tank. The mat won’t fit in the small tank. Right now, the mat is under all the trays and pots, so the weight can flatten it out a bit. There’s just enough room left to hold the curing Tennessee Dancing gourds.
At some point, we’re going to have to take the other aloe vera and my daughter’s orchids out. We’ll need the space for the tomatoes, eggplant and peppers, which are the next earliest seeds we need to start. After that, we will need space for the winter and summer squash. Hopefully, by the time they need to be started, we can start moving the onions into the sun room. The orchids (you can see one has started to bloom again!) are here because it was too cold for them to hang at the window in winter. The aloe is there to keep the cats from digging in the pots.
Which happened with the one pot I did take out, while I was setting things up in here! I caught Nicco, inside the barriers I put around the aloe vera. She’s so long and skinny, she snaked her way through the gaps! The little beast!
We had another, larger pot with an aloe vera in it in. It had been okay for months but, a few days ago, we came out to find the pot all dug up, and the only remains of the plant in it were a couple of leaf tips. We never found the rest of the aloe, and have no idea what happened to it! I’m sure we’ll find it, desiccated, under the couch or in a corner somewhere, months from now. :-D
As you can imagine, I’m not too keen on taking the plants out of the tank. They’re doing very well in there! But we won’t have a choice.
We have many things we need to start indoors, but a lot of them will have only a few seeds per packet used. Particularly with the squash and gourds. For the tomatoes, the paste tomatoes are the only ones we will be planting a lot of, since those are determinates being grown specifically for canning. The others are indeterminates and will be more for fresh eating, so we won’t need more than a few plants of each. We have enough varieties that, in the end, there should still be quite a few to transplant in the spring.
The other major thing we will need to start indoors will be the kulli corn, but those won’t need to be started until about the middle of May, at which point the sun room will be warm enough to use.
We are expanding the garden a lot this year, and will be expanding it more again, next year. I expect to be expanding it every year for quite some time. Which means that we will be needing lots of room to start seeds indoors every year. Until we are at a point when we can get a greenhouse or polytunnel, a goal of mine is to set up a corner in the sun room for starting seeds. We’d need grow lights, so that we wouldn’t have to constantly turn the trays for even sunlight, and we would need a heater sufficient to keep the room – or at least that corner – warm enough for germination. Or use more heat mats, but there is no outlet in that room. We are using an outlet in the old kitchen, with an extension cord running through a window to a power bar, right now. So warming the room would be more practical than using heat mats.
It’s funny. As we work on what we are doing this year, my mind is already on what will need to be done next year.
And the year after.
And the year after that…
As we work on things, we get a better idea of what plans we have will work, what needs to be modified, what needs to be re-priorities, or dropped entirely.
I don’t think we’ll ever reach the end of that process. Which is good, because figuring it all out is a bit part of the fun!
Well, this is it. Today, I placed my last order for our 2022 garden. While I was doing the first half of our monthly shop, I also picked up some pea seeds. I am now done ordering things we are planning to grow this year.
First, the peas.
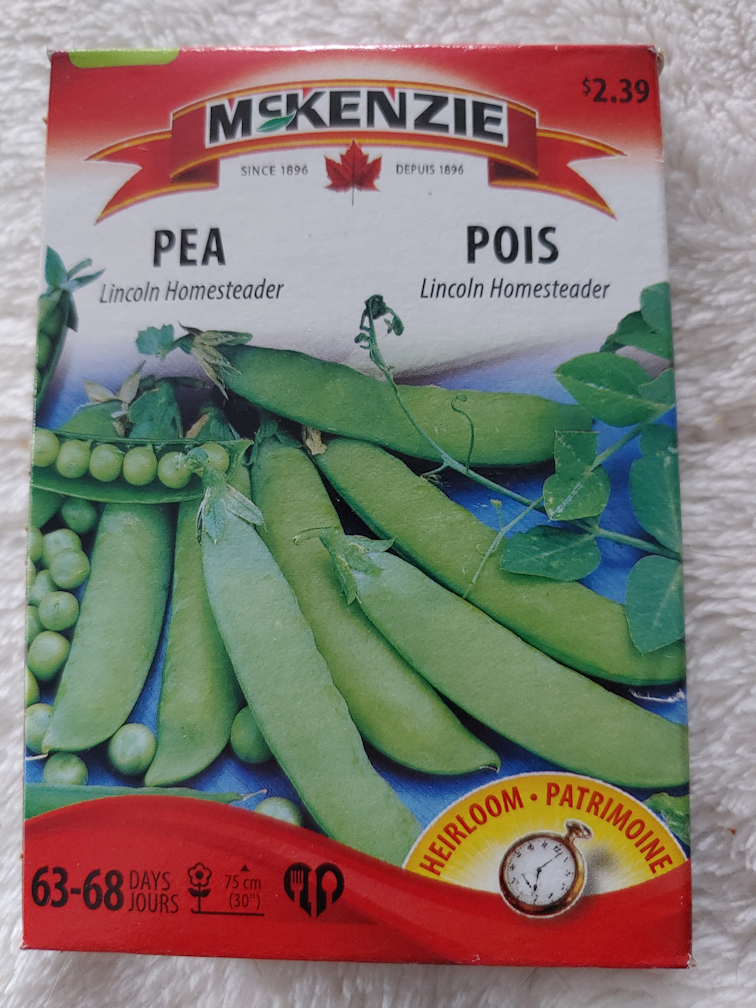
There are so many varieties of peas, I have been struggling on which ones to pick. While at the Walmart, I saw a new McKenzie Seeds display, and finally settled on one. As much as I love edible pod peas, I decided to go with shelling peas.
Some selling points on these: very productive, heat tolerant and disease resistant. Plus, of course, they’re supposed to be tasty. While I hope we don’t get another drought this year, our summers to get as hot as our winters get cold, so heat tolerant peas are a good thing.
My daughters are not big on peas, but they have never had peas, fresh from the garden. The ones we grew last year did not really produce, due to the heat (just the odd pod, here and there), then the green peas got eaten by a groundhog! The peas sown late in the season, in with the corn, were planted for their nitrogen fixing qualities, and the few pods we got were there only because we had such a long, mild fall. Nothing reached their full potential in flavour. Hopefully, this year will be different, and we will get lots of delicious fresh peas!
Once I got home, I placed an order with T&T Seeds.
I just ordered the smallest size; a 10 pack. A friend on a neighbouring farm successfully grows them, so I know they will grow here.
We’re sort of taking a chance on these ones. We’ve never tasted them before. I’ve never even seen one in real life before. However, these are something that can easily be propagated from year to year, and are supposed to be quite delicious. If we like them, we have another good storage food to add to our inventory of foods for self-sufficiency.
If not, well, they are in the sunflower family and have pretty flowers.
We will be planting them in a location that can be permanent, so not anywhere in our main garden areas.
This one is pretty much just for me, as I seem to be the only person in the family that actually likes sweet potato, so I got the smallest option; five slips.
This variety is the only short season variety of sweet potato that can grow in our zone that I have found. I think I will make a grow bag or two from our feed bags, and set these up somewhere near the south facing side of the house, just to hedge my bets, though I would need to make sure there is space for the vines.
The girls and I debated whether to get Highbush Cranberry, or more raspberry bushes. We decided to work with the raspberries we already have, and go for the Cranberry. I ordered two.
In cleaning up along the east fence line in the spruce grove, I actually found an American cranberry (at least that’s what Google Snap told me it was). It now gets light and everything, but I would like to transplant it, eventually, to a better location. Not sure where, yet.
We had tried to plant a daikon type radish to help break up the soil in the corn blocks last year, but I think something ate them shortly after they sprouted, because they all just disappeared. So I was quite excited to find these forage radishes.
They are sold as a green manure and a type of cover crop. They get planted, then left to die off. Their roots can reach up to 6 feet in depth, boring into the soil as they grow. After they die off and decompose, they leave behind root channels that other plants can take advantage of.
With our concrete-like soil, filled with rocks, the plan is to basically just scatter these in strategic areas, so we got the 500 gram/1 pound size, which can cover 5,500 square feet. I don’t expect to use it all this year, but who knows.
So that is it for this year’s seeds and trees, though it’s entirely possible we might still order more. I forgot to order more alternative lawn and wildflower seed mixes from Veseys, but those would be sown in the fall, anyhow. We shall see how the ones I sowed this past fall turn out, this spring.
We still have a monthly “seed” budget, though, and now it will go to other things we need. I did pick up more potting soil today, as we will be starting onion seeds and luffa soon, and have lots more seeds to start over the next few months. After much searching, the girls and I found some netting online that we will be using to help protect our garden from critters. It’s a netting that is 14 x 200 feet. We can get one roll this month, and another roll later. Some of it will be used for the temporary fencing we will need to build around larger blocks, such as the corn. We can also cut it to the sizes needed to cover individual beds. We simply have too much ground to cover, and beds spread out in too many places, to fence it all in from both deer and smaller critters. Particularly since so much of it is still temporary. We’ll also have to figure out what best to use to support the netting, in the different ways we plan to use it, and get what we need for that. We are shooting to have consistent sizes on the permanent raised beds, so that any protective covers we build will fit any raised bed. The low box raised beds are 3 feet by 9 feet (because that’s the size the boards I found resulted in). The high raised beds will all be 4 feet by 9 feet, but with the thickness of the logs we are using, the planting area inside will be smaller, and the 3×9 covers should still fit. Other beds, such as in the old kitchen garden, are oddly shaped, so they will need completely different ways to protect them from critters.
This afternoon, I headed into the roots cellar and grabbed the last of our yellow onions that we had hanging down there. These are the Norstar we grew from seed. We finished the ones we grew from sets a while ago.
And these are the last of the Red Karmen onions we grew. There’s one more, hidden from view.
All the onions we grew and harvested back in August have lasted us more than half way through January. Adjusting for the time then needed to cure, that’s about 5 1/2 months.
Not too bad, considering they didn’t get very big. We did try to be a bit frugal with them, though.
They also stored really well in the root cellar. We had the fewest shallots (what are not in the photos above), and they were gone in less than two months, so we never found out how well they stored. ;-D
We will be growing a lot more onions this year, all from seed. The goal is to not have to buy onions from a store at all, anymore.
I am just itching to start the onions indoors, but I have decided to wait until the middle of February to start them, at about 15 weeks before last frost. The only other thing we would start that early are the luffa gourds.
I’m actually sad that we’ll have to start buying onions again. The ones we grew were so much better! I don’t know what varieties the stores carry. They usually have labels like “yellow” or “medium cooking onion”. LOL They’re good, but the varieties we grew were tastier. That’s the main benefit, in my view, about growing onions from seed. Buying sets is easier, but there are a lot more varieties to choose from with seeds.
I was inspired by WolfSong to try something new – and help with that urge to be planting something already! Winter sowing.
Today, I finally got some seeds started.
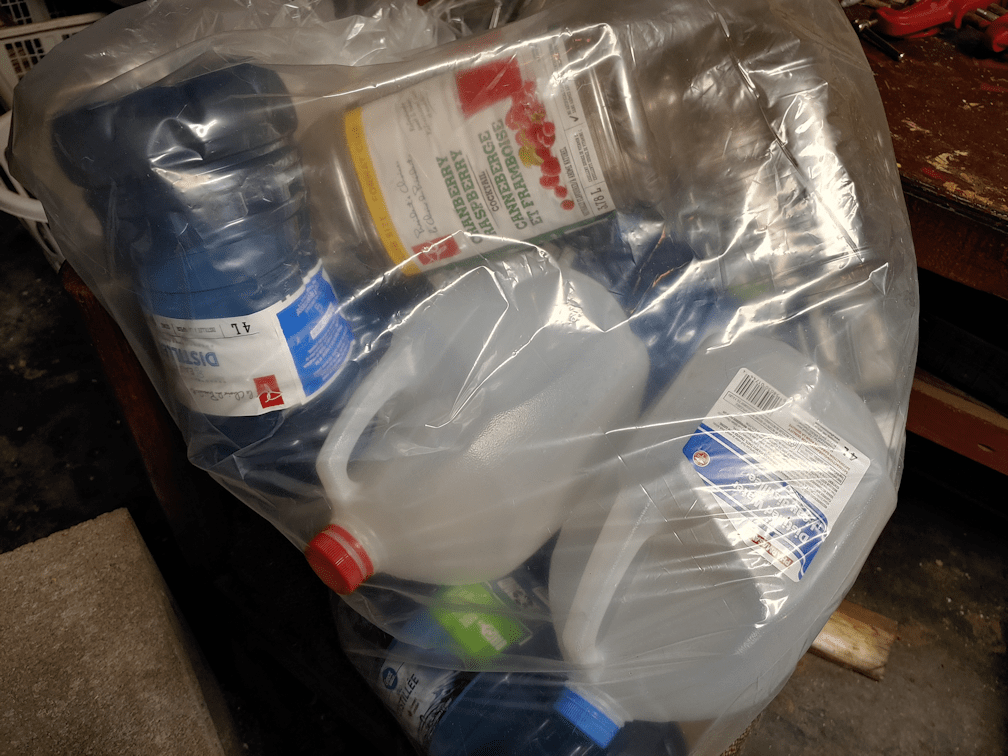
We’ve been keeping a variety of plastic bottles and jugs for potential garden use. We’ve got mostly the blue water bottles. The distilled water we get for my husband’s CPAP used to come in the same type of jug as milk does, but suddenly all the brands seemed to switch to those blue bottles, all at once. Which was a problem, at first, because many of them no longer had handles of any kind. It made it very awkward for my husband to fill his CPAP humidifier, as the sides would collapse inwards as he poured. He ended up transferring the water to an empty jug with a handle, to keep from splashing water all over his CPAP!
People must have complained, because the next time I had to buy distilled water, the bottles had handles attached to their tops.
We have 4 different types of jugs, including two styles of juice bottles. I decided to try one of each.
I’ve been cutting plastic containers to use in the garden for some time, and it’s a real pain, so today, I took the easy route.
My wood burning kit includes a knife tip. The heated tip makes it SO much easier!
I started by cutting drainage holes in the bottoms, and air circulation holes at the tops, by inserting the knife through the plastic, then giving it a bit of a twist to widen the hole.
Then the jugs were cut most of the way around. With each jug having a different design, they each were cut at different spots.
How much was left uncut to create a hinge depended on how much of a flat area there was. Which, in the case of the blue jug, meant none at all, but that plastic was soft enough that it could still work. The juice jugs are a heavy plastic, making them the most difficult to cut, while the water jug that is the same as milk jugs is such a soft plastic, the melted plastic of the cut edges actually stuck together again in places, and they had to be recut!
I’m hoping the blue bottles work the best, because we’re going to have so many of them.
Just to be on the safe side, the hinges were reinforced with strips of duct tape. For the jugs with distinct handles, the hinge was placed just under them, while the one with indentations to create a handle had the hinge placed above, so the container wouldn’t squish into itself if grabbed by the handle.
The handle of the blue jug is at the cap, so it didn’t matter on that one. I just followed one of the lines, just above the middle.
That done, it was time to put some soil in them.
They all fit in one of the baking trays we got last year, to make it easier to carry seedlings around. Especially the ones in the red Solo cups. Those have come in very handy. I plan to get more They are very inexpensive at Costco.
I had the seedling mix potting soil recently picked up to use for this. Once the soil was in, it all got thoroughly watered.
The water almost immediately all drained into the tray.
I watered them more, drained the water out of the tray and used it to water the soil again. After doing that a few times, I used a spray bottle on the soil surface, while leaving the bottoms to sit in water.
Even then, only the surface became moist. The soil mix was still bone try below.
I spent a bit of time, working on moistening the soil before leaving it to sit while preparing the seeds.
I had already decided to try starting kohl rabi indoors, as our attempts to direct sow them outdoors last spring failed completely. It was the same with the kale. All I can think is that something ate the sprouts as soon as they emerged. It was the second year I’d tried kohl rabi, and the first year’s attempt also failed, with only a few plants surviving, only to be decimated by cabbage moths and flea beetles.
So this time, we’ll go with transplants and, if it works, we’ll be making sure to protect them from both critters and creepy crawlies!
Bahahahahahaha!!!!
Okay, I do remember, while going through our seed inventory, looking into the packet for Early White Vienna kohl rabi, seeing a few seeds, and deciding to keep them. Until today, I didn’t realize where was only five seeds left!
Once the seeds and their labels (strips of masking tape) were ready, I used a chopstick to make evenly spaced holes in the soil for the seeds.
Then I used the spray bottle to water into the holes, because it was still so dry under the top layer!
Because of the different shapes, they each fit a different number of holes in the soil for seeds. The jug with the indented sides for a handle meant it had space for only five holes, so that’s where I planted those five, lonely White Vienna Kohl rabi seeds. Being 2 years old, we may well have none at all germinate, but who knows? The white jug had room for the most seed holes, so that’s where the Russian Red kale went. The last two got the Early Purple kohl rabi seeds.
Once the seeds were in, covered, watered with a spray bottle, labels affixed, it was time to close the containers.
I used packing tape to close up the jubs. The tape is enough to hold them together while the jugs are being carried, but to also be easy to remove, later on.
At least I hope they’ll be easy to remove!
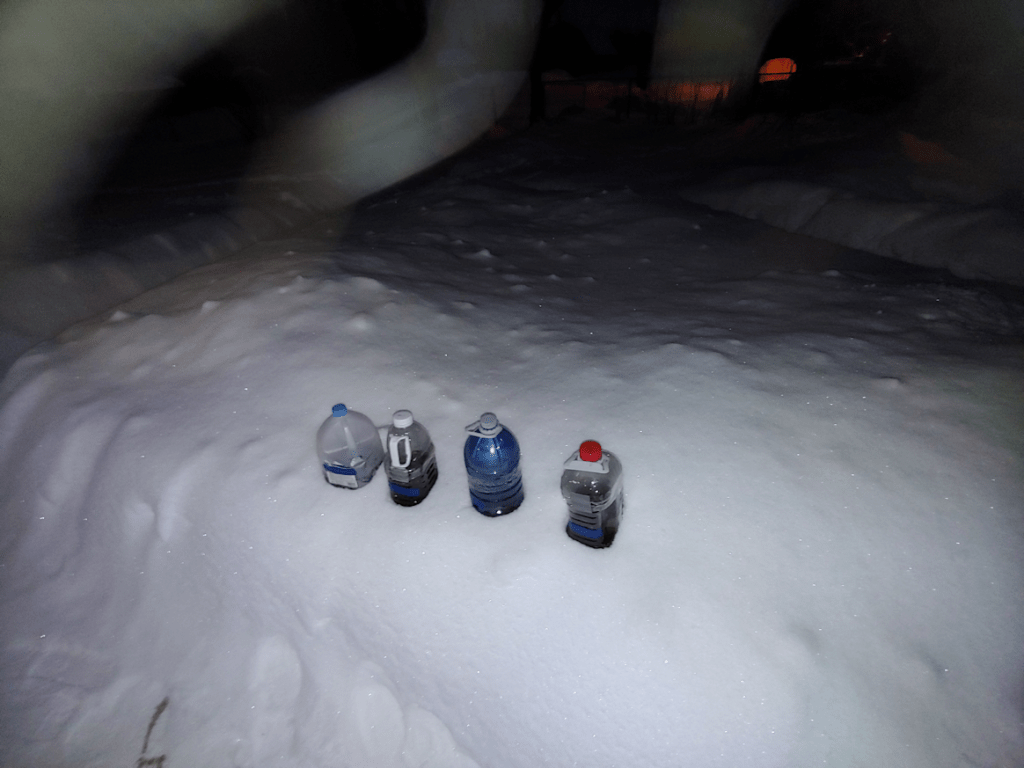
The tray was drained again, then it was time to take them outside.
There we have it. Four different jugs, sown with kale and kohl rabi.
I’m leaving the caps on, since they have air circulation holes, but if the holes turn out to be too small, I might still take them off. We shall see.
I had originally planned to leave the jugs somewhere else, but decided that first spot was not visible enough. I had to consider things like cat and deer traffic, as well as where we shovel the snow from the paths. Hopefully, this spot will be easy to monitor, and they won’t get knocked about by critters. They will also get lots of sunlight, too.
Not that you can tell in the above photos. It wasn’t even 6pm yet, but it was full dark when I set these out!
I still have kale and purple kohl rabi seeds left. I might try starting some indoors, when we start other seeds, then direct sowing the last of seeds. That would give us a chance to compare all three methods.
I wasn’t going to be able to place another order for our garden until next month’s budget, but thanks to my daughter, we now have our potatoes ordered!
While I was very happy with the potatoes we ordered from Vesey’s, we went with a new company this time – one that I have added to our Cold Climate Seed Sources list.
Eagle Creek Seed Potatoes is in Red Deer County, Alberta, so we can be pretty sure that anything we order from there will grow in our Zone 3 area. It was a company recommended in one of the cold climate gardening groups I’m on, and I really wish I’d discovered them earlier! Not only to they provide a lot of information on each variety of potato they carry, they even have a container and tower pack. That would have been very handy, for when we grew potatoes in feed bags, before we knew that potatoes came in determinate and indeterminate varieties!
This year, however, we are going to use our potato plantings to reclaim more garden space, and will be using the Ruth Stout method again.
These are the potatoes we ordered, to be delivered in May (they let you choose your delivery date range), since our last frost date is early June. They can be ordered as 4 packs, 1 kg or 5 kg sizes (1 kg = 2.2 pounds), and some are available in 14 kg bags.
All images belong to Eagle Creek. All links will open in new tabs.
This is an early maturing variety, though it’s said that they can get quite large if left until late in the season. We ordered these in a smaller, 1kg (2.2 pound) package, to stay under budget. They are listed as having excellent winter storage, and described as making the fluffiest mashed potatoes ever! :-D
This is a medium maturing variety (though the description also lists it as early maturing) with good yields in most soil types, good winter storage and good disease resistance. They are noted as being particularly good for making French fries, though that’s not something we normally do. They are also a good baking or mashing potato. We ordered this in the 5kg size.
Well, we just had to include a purple potato!!! This is a late maturing variety with great winter storage, and is good with pretty much any cooking method. We ordered this in the 5kg size.
Last year, we ordered 4 varieties in 6 pound packs, for 24 pounds of seed potatoes. We got a pretty good return on them, though nowhere near enough to store any for winter. This time, we’re getting about the same weight in 3 varieties.
As we are planning to use the Ruth Stout method again, we’ll have to be pro-active in combating snails. Our first year growing potatoes left us with soil that was much more workable when we converted the space into beds for onions and carrots. We pretty much doubled the length of the beds, and when we were harvesting and preparing the beds for the fall, we could really tell the difference in the soil between the two halves! Where the potatoes were grown previously, the garden fork easily sunk deep into the soil, but in the extended portion, once the fork got through the new soil we added on top of the beds, it was like hitting a hard floor beneath.
When we grew potatoes that first year, the only thing we had available for mulch was straw. It’s what we can get, so that’s what we will be using again this year. This time we can run the straw through the shredder chute on our wood chipper, first, so it will cover better and break down faster.
As far as quantities go, unless these all turn out to have amazingly high yields, this is not going to be enough to last us into the winter. Which is okay, because these are new varieties we are trying out. Over time, once we’ve worked out what grows best here, and which ones we like the most, we will get larger quantities of seed potatoes and, hopefully, be able to have enough to plant our own potatoes every year, instead of having to buy seed potatoes. At least, that’s the long term goal for the bulk of our potato growing. I suspect we will continue to try new and different varieties regularly, simply because we like trying new things!
One more item for our 2022 garden to check off our list!
After much discussion with my daughters, we have made our “seed budget” purchase for this month, and it is trees.
We’ve been going through a number of websites for nurseries that supply cold hardy trees. Among the ones we want to get is a nut orchard collection, and the nursery that sells the one we’re looking at has scaled down the package deal, making it much more affordable. The collection, if planted spaced out as recommended, would cover 1 acre. However, some of the trees in the collection have the potential to reach 100 ft tall. That’s almost 40 feet taller than the tallest trees in our spruce grove! Which means we have to plant them in the outer yard, or even beyond, where the renter’s cows pasture, and we are just not going to be ready for that this year.
Beyond that, some of the sources we have been looking at just don’t have new stock listed yet. Among the things we are eyeballing are fruit trees, such as apple trees to replace the diseased crab apple trees we will have to cut down, pears, plums, Saskatoons, highbush cranberry, as well as different types of raspberries, etc. There’s only so much we can do in a year, though, and only so much space we are ready to plant into.
For this year, then, we settled on buying from Tree Time. They do a lot of shelterbelt trees, but also have fruit, nuts, berries, etc. They also come highly recommended. They are a reforestation nursery, which you can read about in their “how to order” page. Right from the start, they say:
We are a reforestation nursery that makes it easy for Canadians to purchase large quantities of tree, shrub, and berry seedlings at low prices.
Shop with us if you want convenience, selection, low prices, outstanding service, a guaranteed ship date, and high quality stock. Our customers tend to enjoy doing things themselves and watching their trees grow.
We grow our trees for maximum survival, not height or aesthetics. We mostly grow 1-2 year old trees because they have the best survival rates and are easier to ship in the mail.
We decided to focus on two areas. First, creating our privacy barrier/living fence, and second, our first nut trees. Because of how they bundle their trees, the numbers we are getting are quite different than they would have been, elsewhere.
This is what we are getting (all images belong to Tree Time nursery).
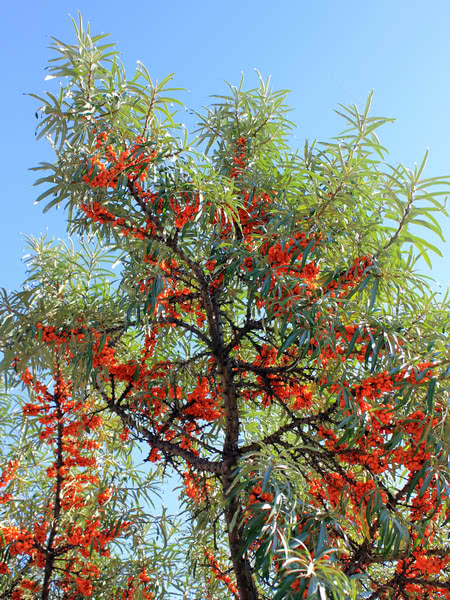
When talking about what to get as barrier trees, we were thinking of setting these aside for another year, but the way various things have changed since then, we’re going for it.
This is a zone 2b tree, so well suited to our zone 3. They are good in poor soil, are nitrogen fixers, and their berries are edible and healthy. They can grow up to 15 ft in height, with a 12 foot spread, and should be planted at 3-4 ft spacing, so they will do very well as a living fence/privacy screen, as well as a deer barrier, once they grow big enough. Plus, they will provide food for birds.
These will come as year old, bare root trees. We will be getting their smallest bundle, which is five trees. Sea buckthorn requires 1 male tree to 4 females to produce berries, but at only 1 year old, there is no way to know what sex the trees are. It may be a few years before we can tell! The males do not produce berries, but hopefully, there will be at least one male in the bundle.
Where we plant these will be partially dependent on how far we go with this next batch.
This is one that disappeared from other sites we were looking at, so we were very happy to find them at Tree Time.
These are a super hardy, Zone 2a tree. Like the Sea Buckthorn, they can also handle poor soil and are excellent for attracting birds. They can grow to 18 ft in height, with a 10 ft spread, and should be planted 3-4 ft apart, so they should also make a good barrier and privacy screen. These will come as 1 yr old bare root stock.
We also got them in the smallest bundle of 30.
Which is triple what we expected to buy, when we first found these.
The area we planted the corn and sunflower blocks is where we intend to plant these. Right at the corner, along the north fence, the lilac hedge my mother slowly extended over many years, peters out. There is a gap there that the deer jump through. I am thinking that section would be a good place to plant the 5 Sea Buckthorn. Then, the Silver Buffalo Berry can be planted all along the east line, leaving a “lane” behind them to access the trees along the fence line itself, and also leaving a gap where the telephone line is buried.
With 30 of them, planted 3-4 feet apart, however, we will have WAY more than will fit in a row in that area. Since we will be slowly planting more food trees further west, we will be planting just the one row of them. Which means we’ll need to find another location to plant the remaining trees! I am thinking of the area we had originally considered planting the Sea Buckthorn later on, which is in along the north fence line in the outer yard. Or even filling in gaps west of the lilac hedge. This would go a long way to help reduce the road dust that drifts into our yard in those areas, every time a vehicle drives past on the gravel road.
Before the trees arrive, we will have to measure and mark out where we want to plant in that north east corner. Once we know how many we can fit into there, we’ll know how many we have to plant somewhere else. That is a lot of trees for how we want to use the spaces.
Now that I think of it, we could also gift some to my older brother, for the forest he’s been working on for the past couple of decades. :-)
Then there are our first nut trees. Pine nuts, to be more specific!
In other sources, we have seen these as being a Zone 2 tree, and some listing them as reaching up to 100 feet in height. !!! Considering where we intended to plant them, that was just not good.
These, however, are listed as Zone 3a, and reach “only” 60 ft in height – about as high as the spruces in the spruce grove. Which is about where we intend to plant these.
These also have a spread of up to 30 feet, but the website doesn’t list how far apart to plant them. We’ll get that information later.
We ordered two bundles of three, 2 yr old seedlings as plugs, not bare root. They have special requirements. For the first five years, they grow very slowly and need to be kept shaded, because their bark can be easily burned by the sun. This is why we want to plant them along the north side of the spruce grove, between the grove and the row of crab apple trees, where it is shaded for most of the day. At 5 years, they suddenly shoot up in height, and no longer need to be protected with shade. Since we’ll be getting 2 yr old seedlings, that should happen in three years.
I have some concerns.
The nursery we first found these at sells them with their roots in a plastic wrapped ball of soil – the only tree they don’t sell as bare roots – because they require a particular fungi at their roots for optimum growth. We may be able to buy the fungi to inoculate the soil, though. At least that’s what I learned from this other nursery. According to the Tree Time website, however, there is no mention of the fungi needs, plus it says they should be planted in full sun, not shade.
We’ll have to do more research on them, because this might be due to differences in varieties. We might end up having to plant these somewhere else. They would make a good shelter belt tree, and at 60 feet high, that would mean either along the north property line, or further out in the south, where we get hit with winds because there is a gap in the sheltering trees. Since we intend to plant permanent garden beds in the outer yard, anything we plant there has to be carefully placed so as not to create the very shade we are trying to get away from!
It’ll take about 7 years before these start producing pine nut containing cones. I don’t think I’ve ever bought pine nuts before, as much as I’d like to be able to use them for making pesto, etc. I enjoy them, but they are just too expensive. These trees have the potential to be a cash crop.
When placing our order, I chose a shipping date of May 30. Since our last frost date is June 2, I thought that would make the most sense. It also means that, in the week or so before they are shipped, we can get out and measure where they will be planted, and even pre-dig the holes (the ground should be thawed out enough), as well as making sure we have everything we need for planting, then protecting, the 41 seedlings we will be getting!
There we have it. After 4 years of living here, we are finally at the stage where we are starting to plant trees and shrubs in bulk. The first stage of a multi-year plan in planting food trees and reach our self-sufficiency goals. Given how long it takes for trees to start producing fruits or nuts, it would have been better if we’d started this years ago, but when we first moved here, we didn’t even know what we wanted, or how to get them. There is a big difference between planning for things that will live for decades, and can potentially become very large, and planning vegetable beds!
Placing this order really feels like a milestone for us!
Yes!!! I now have the maize morado corn I thought I was getting from Baker Creek, based on the description and video they had at the time. Their name for the corn even changed at some point. It took quite a bit of searching, and I was very happy to find a source for these seeds. Since there were only 25 seeds per pack, I ordered four of them. For our purposes, planting only 25 seeds seems almost pointless. ;-) Plus, it was the only thing I was ordering from them, and with the cost of shipping, adding a few extra packets made it more worthwhile. Especially with ordering from the US and the dollar difference. I’m trying to focus more on Canadian sources, but none of them carry these seeds.
Last year, we started the Montana Morado/Mountain Morado corn indoors, then transplanting, and that ended up working very well. We will be doing that again. This year, however, we will work in making sure they are protected from critters, as much as we can, right from the start! I hope to be able to save seeds and, over time, acclimate them to our growing zone. This might take a few years, but I am determined! :-D
The corn was not the only thing in the package, though.
They also included some free seeds! :-) Dill Dukat. It’s not a variety I’ve heard of before. We’ve got dill seeds from plants my SIL gave us, but I’m more than happy to have another variety! From the description, these look like a good variety for harvesting more greens than the flowers or seeds, and I love dill greens!
I also really appreciate that they included the information insert for starting seeds. That was going the extra mile. :-)
While I am working towards ordering seeds from within Canada more, if I do need to order from the US for something, this company is definitely staying at the top of my list. I’m quite happy with them!
The US postal service, on the other hand, seemed to be having difficulties. :-D