Analyzing our 2023 garden: peppers, herbs and greens

We tried a whole bunch of new things in this category, this year! It was the peppers that we were particularly interested in getting going.

Peppers are something I’m growing for the rest of the family – I can’t eat peppers myself, much like I can’t eat fresh tomatoes. Which is unfortunate. I love the shape and smell of them, and when I’m prepping them for the family, they look so fresh, crisp and delicious! Yet every time I’ve tried to eat a pepper, it makes me gag. Even when they’re cooked, I still find myself wanting to gag, which is not a problem with cooked tomatoes. Oddly, though, I can eat jalapeno poppers, and quite love them. How does that make sense? My husband and daughters, meanwhile, love their fresh, raw peppers. So I wanted to try a variety of bell peppers this year, plus my daughter specifically requested hot peppers.

We did try to grow peppers last year – our terrible, no good, growing year! – and almost got some purple peppers. Just a few tiny, misshapen ones off of plants that did not thrive in a bed where nothing really grew well. They pretty much did the best of all the stuff we planted in that bed.

We did still have some of last year’s seeds left, but this year we went with new varieties.

One was the Sweet Chocolate bell pepper. I also ordered a collection of early sweet peppers, for their short growing season – Early Sunsation, Early Summer, and Dragonfly, all of which are different colours. For the hot pepper, we got a variety called Cheyenne.

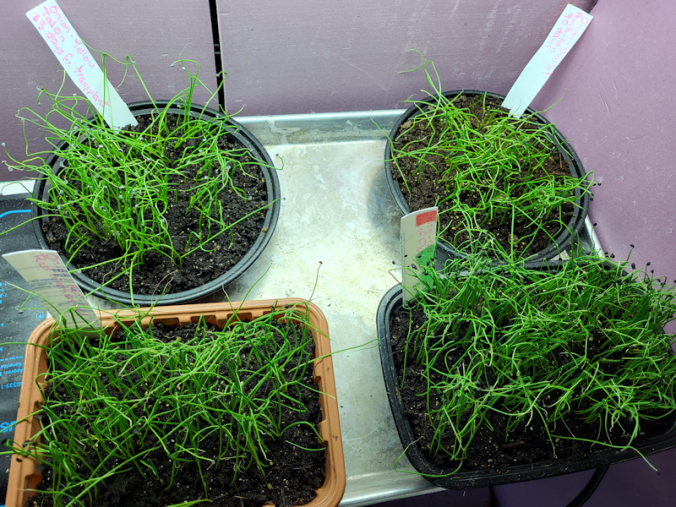
With our short growing season, the Sweet Chocolates got started indoors quite early, along with some gourds and herbs.

The German Winter Thyme and the Lemon grass both needed an early start, too. Lemon grass is a zone 8, heat loving plant, so those were going to go into a pot in a sunny and sheltered location, when it was time to transplant.

With our short growing season, these were all started in early February. A lot of people on my local gardening groups started their peppers in January! The other varieties we had were specifically for our short season, and I must say, I had to really fight with myself to not start them until much later! Those got started in late March. In theory, I could have direct seeded them.

After filling 4 rows, I filled the last two rows with Spoon tomatoes.

We started a lot more seeds than we needed, on the assumption that they wouldn’t all germinate.

Well, we had pretty much a 100% germination rate!

As for other herbs, in early April we started oregano, spearmint and the Roma VF tomatoes.

We tried these in toilet paper tube pots, which we hoped would allow us to pot them up/transplant them still in the biodegradable tubes, without disturbing the roots.

Finally, we started chamomile seeds and a nameless variety of thyme, towards the end of April.

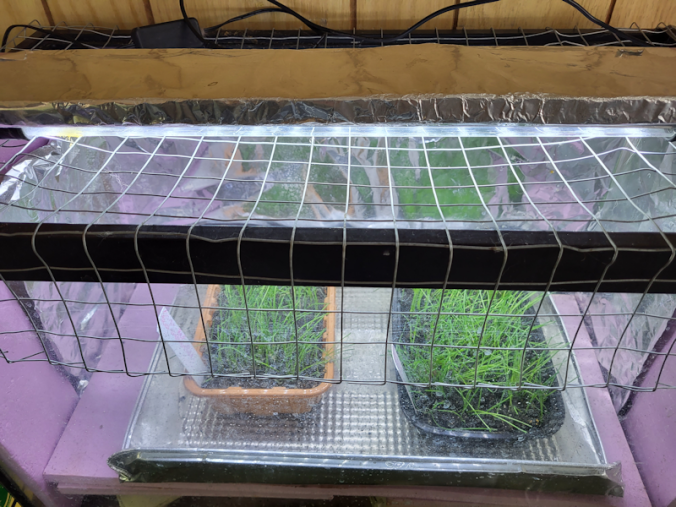
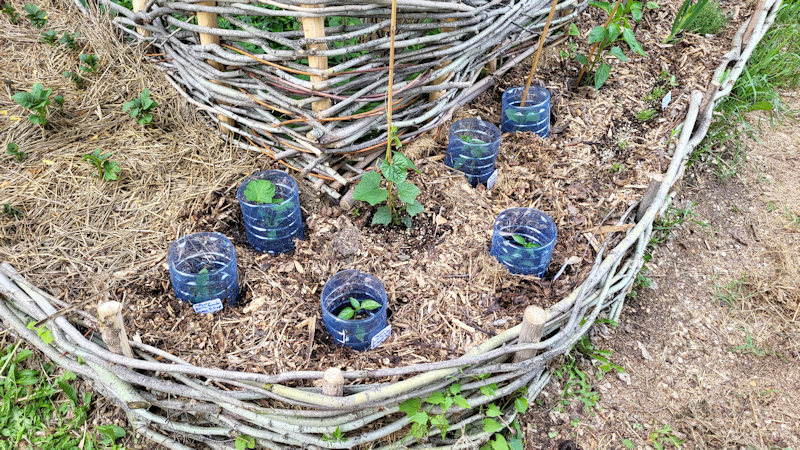
The first ones to be transplanted outside were the Sweet Chocolates, into the new wattle weave bed.

The peppers got protective plastic rings around them, as this was well before our last average frost date. I eventually needed to add sticks to keep the wind from blowing them askew, later adding supports for the peppers as well.

In front of the peppers, you can see where the German Winter Thyme was planted. At the end of the bed are the last spindly shallots. Beyond the thyme is an onion that came up on its own! Later, the chamomile would be transplanted near where the single onion is, as well as the strawberries from seed planted in between things all along the front of the bed.

As the days flew by and we weren’t getting other things ready as quickly as planned, I ended up planting more peppers in the wattle weave bed, just in case.

I chose one each of the early bell peppers, and one hot pepper. They got plastic rings to protect them, along with a couple other things I will cover in a different post.

We did eventually transplant more of the peppers in grow bags, together with Red of Florence onion, but we had so many seedlings, they were included in the Great Transplant Giveaway!

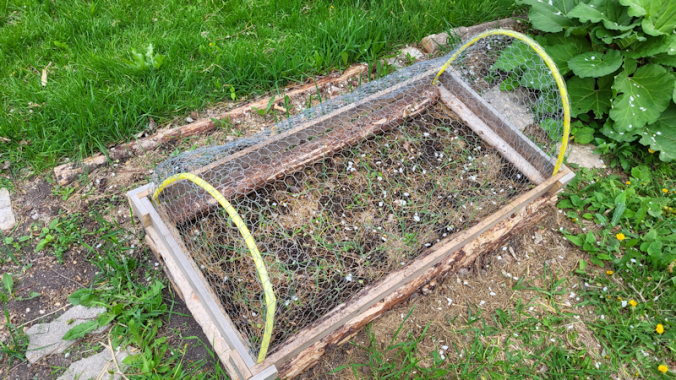
Some things, however, did not need to be transplanted at all, and could be direct sown. When it came to greens, we were actually going to skip trying to grow lettuce this year, and just grow spinach.

Spinach can be sown before last frost, so they went in, in late April.

After the seeds were sown, the bed got a floating row cover, to protect them from critters. This was just a dollar store row cover, and it tore astonishingly easy!

We did enjoy some nice harvests of the spinach, too. At least, with these first ones. After the garlic was harvested, spinach was one of the things we planted for a fall crop, and we got nothing. I think something ate the seedlings!

We found ourselves with some free seeds that we decided to try. One of them was a tiny variety of Bok Choy called Hedou. The other was a Czech variety or lettuce called Jebousek.

So how did it all work out?

It was a mixed bag!

The Peppers

The Sweet Chocolates, having been started indoors the earlier, had a head start, grew quite large and were the first to have mature peppers we could harvest.

The first ones we harvested were in August. They can be eaten while still green, but we waited until they turned the chocolate brown they were supposed to, when mature. They bloomed continuously, right up until the first frosts started to hit. We did try to cover the peppers on chillier nights, and that helped. Their location in the wattle weave bed was also much more protected than the grow bags in the garden.

As for the short season varieties, they did not do as well. The ones in the grow bags started off all right, but then sort of stagnated. We did get a few Dragonfly peppers to harvest, and there were other peppers developing when the first frosts hit.

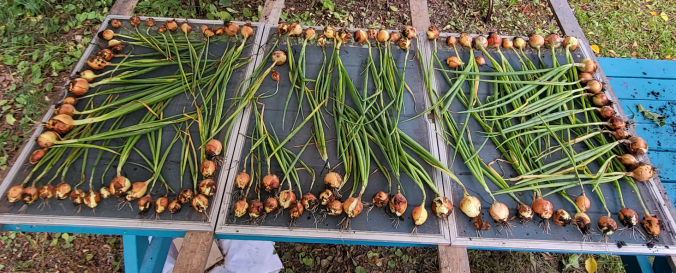
The hot peppers had the most fruit developing, but all of the peppers planted later were slow in maturing. In the end, we harvested everything unripe and set them to finish maturing indoors.

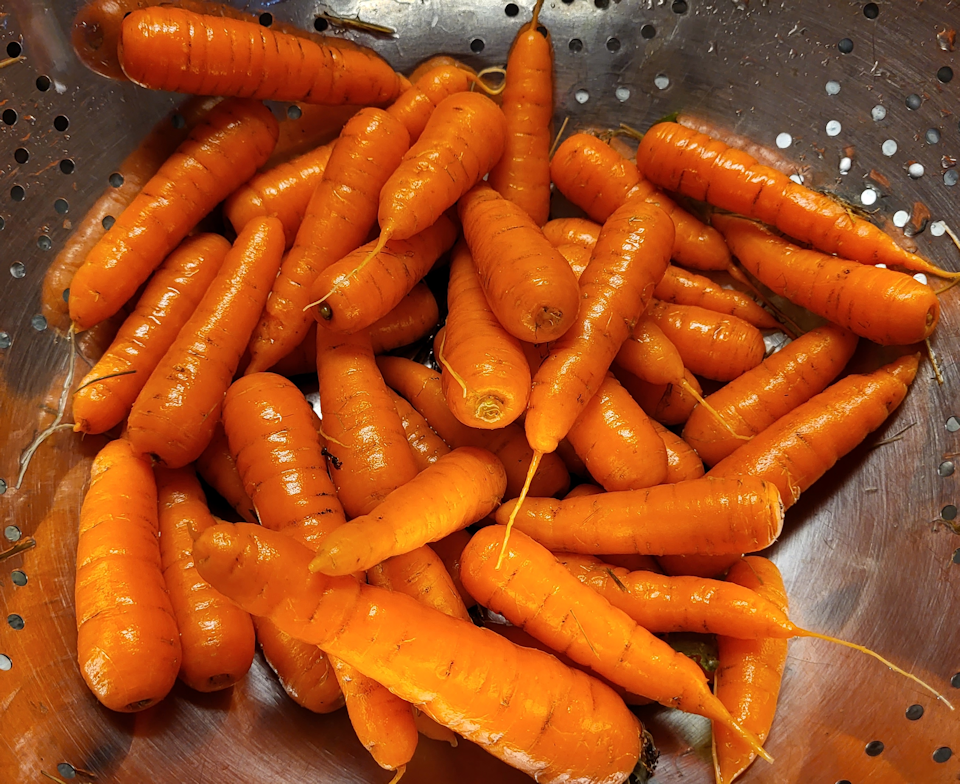
We had mild temperatures extending for quite a long time, though, and the final harvest was in October! In the photo, you can see a couple of purple Dragonfly peppers, and the rest that are visible are the Sweet Chocolate. There were hot peppers under there, too. Unfortunately, we covered grow bags too late one night, and the frost caused too much damage.

Once indoors, the green peppers that were not frost damaged did continue to mature. As I write this, we have a few hot peppers left that have turned red. The Sweet Chocolates are the only remaining bell peppers, they’ve all matured, and are currently strung up to dry. The rest were either already eaten, or had to be tossed due to frost damage causing them to start molding.

When cleaning up the garden beds for the winter, I discovered what I think may have been the reason the grow bag peppers and onions failed to thrive. I discovered the soil was filled with tiny tree roots that had grown in from below!

They were all like this grow bag, turned inside out.

No wonder they didn’t thrive!

As for the ones in the wattle weave bed, the hot pepper seemed to do fine, though late in developing, but the others seems to stagnate, too, and I’m not sure why!

Final thoughts on peppers

When it comes to the bell peppers, the family isn’t really finding enough difference in flavour to say they like one variety over another. They all just sort of taste the same, so they don’t really care what variety we grow next! I do have a request for hot peppers again. We still have seeds for all of these, so we don’t need to buy more, if we don’t want to. If we do grow the short season varieties again, I will most definitely start them indoors earlier. We’ll also have to be more thoughtful on where to plant them, to ensure they get shelter and a warmer microclimate. We might use grow bags again, but if we do, it won’t be anywhere near those trees again!

The Herbs

Our eventual goal is to turn the old kitchen garden into mostly an herb garden, along with other things that we might use in the kitchen frequently. This garden is right next to the house and sheltered, and gets lots of sun, except where the ornamental crab apple trees are an issue. Those will be pruned back more, over time. It also now has all low to mid height raised beds, with the possibility to add height to some of them, as needed.

The German Winter Thyme did quite well in the wattle weave bed, except for one transplanted group that suddenly died part way through the summer. The Chamomile also did well, and was blooming enthusiastically.

The spearmint got its own pot. We had only one oregano seedling survive – barely – so it was planted in the middle of a pot and surrounded by the other variety of thyme. The Lemon grass got its own pot, too. Everything in the pots seemed to do surprisingly well, though the Lemon grass didn’t get anywhere near as large as they should have.

Final thoughts on herbs

There’s really been just one problem with the herbs we grew.

We keep forgetting about them.

Which means, we weren’t using them.

Oh, we did use some thyme, oregano and a bit of spearmint, during the few times we remembered them. We didn’t use the chamomile or lemon grass at all. We weren’t sure when to best harvest the chamomile, which we wanted to dry for tea, and I never got around to looking it up, because I kept forgetting they existed. My daughter were wanting to try the lemon grass, but weren’t sure how to use it with the type of cooking we tend to do.

I don’t know about the chamomile, but with mulching the wattle weave bed like we did for this winter, it’s possible the German winter thyme will come back. The chamomile may have reseeded itself.

We never bothered doing anything to the pots. I suppose it’s possible the spearmint and thyme will come back in the spring; we’re having a very mild El Niño winter, so the pots shouldn’t freeze solid. I doubt the oregano will survive, though being in the middle of the pot, it’s more protected than the thyme around it.

These are all herbs I want to continue to grow, though, and as we further develop the old kitchen garden, I think we’ll get into the habit of using fresh herbs and not forget that they exist!

The Greens

With the spinach, they did better after we gave up on the floating row cover. Thankfully, no critters seemed interested in them! We’ve had spinach do both really well, and really poorly, and that happened again this year. The spring sowing was fine. The fall sowing was a complete fail.

We’ll definitely keep growing spinach, though. It’s just a matter of where, and making sure critters don’t get to it!

As for the lettuce and baby Bok Choi…

What a disaster!

Oh, they started sprouting just fine.

Then the Chinese elm started dropping their seeds.

There are four of them along the chain link fence, plus one by the house, plus more past the garage.

When those seeds start falling, everything is covered. The emerging seedlings were buried and choked out, and there was nothing we could do about it!

Those trees have got to go. They are causing all kinds of damage, with their billions of seeds and their sidewalk heaving, basement wall cracking roots.

Much to my surprise, however, a couple of baby Bok Choy actually survived and promptly bolted.

I left them be as they developed seed pods that managed to dry before the first frost hit. I was able to save some seeds!

There was a surprising number of Jabousek seedlings that survived! Enough that we even used some of the leaves in sandwiches. They didn’t seem to get bitter, even after bolting.

Once they started blooming, I left them be. Unfortunately, it took such a long time for their seeds to develop, they got hit with frost, first. I suppose it’s possible the earliest bloomers dropped seeds, but that bed is going to be reworked in the spring (I held off to let them finish producing seeds) to make it narrower, so it’s unlikely that any seeds dropped will germinate. We probably won’t grow any lettuces next year, but I certainly won’t complain if this variety shows up on its own!

I most definitely want to try growing the Bok Choy seeds we kept. We never got to try them, and I’m very curious! We do like Bok Choy, but very rarely buy it.

So that’s it for peppers, herbs and greens and, I must say, getting this written was brutal! It took me all day, just to get started, as so many things kept popping up that needed to be done. Then, once I did finally get started… I swear, I’ve never been interrupted while writing so many times in my life! Most of which was because I saw on the critter cam that racoons were in the sun room. !!! I did try using the talk feature to yell at them, and they did leave at first, but after a while, they’d just look towards the camera, then ignore my voice!

If anything I’ve written here seems at all disjointed or not to my usual standard of writing or its full of typos that I’ve missed, that would be why! 😄😄😄

The Re-Farmer

Analyzing our 2023 garden: corn, peas and beans

Corn and beans, in particular, were things we had so many seeds for, in so many varieties. Especially the Red Swan beans, though that was a mistake. I’d ordered a different, purple variety, because purple everything seemed to do quite well here. When I got Red Swan, instead, I contacted Veseys and they sent me another package.

Of Red Swan.

That happened a couple of times before I finally read on the website somewhere that they were out of the purple variety, and Red Swan as what they were sending out instead!

Oops.

When it came to beans, I’d hope to plant both bush and pole beans, in a variety of colours. I also wanted to try the beans my mother gave me, that trace back to what she used to grow here, when I was a child.

That didn’t happen. We simply didn’t have the space to plant many beans at all this year.

It was much the same with corn. We had many varieties to choose from. Mostly, I just wanted to have three types. The purple Montana Morado, the Tom Thumb popcorn, and one of the short season sweet varieties for fresh eating.

Well… two out of three is pretty good.

The purple corn.

As much as I’d like to grow the kulli corn, the seed source I’d found was out of stock. We’d grown the Montana Morado before a couple of years back (though we though we were getting an acclimated variety of kulli at the time), and they did well until something destroyed them.

This was all that survived from our 2021 garden.

The kulli corn we’d grown last year did absolutely amazing, growing into massive tall stalked that looked so strong an healthy – though high winds did try to take them down!

We had to add a lot of supports to the kulli corn and yellow pear tomatoes, after strong winds.

What they didn’t develop, however, was corn! Not a single tassel or cob!

So we went with the Montana Morado instead.

The Montana Morado got their own bed in the main garden area. I ordered a couple of packets of seeds, because there weren’t many per packet. It still wasn’t a lot, as far as corn goes, but this is an experiment for us. While the plants certainly didn’t thrive like the kulli stalks did last year, they at least produced cobs that we could harvest!

I waffled back and forth about interplanting beans with the corn as a nitrogen fixer, and did end up planting some Red Swan with them, late in the season, but more on that later.

Bonus for wanting the corn to use for flour is, no harvesting until the very end of the season.

There are a couple of things I wanted to do with purple corn. One was to make and try chicha morado, as the very concept of a drink made out of corn fascinated me. The other is to try making corn flour. For this year, the goal was just to have corn to try making flower, though we did try a few cobs for fresh eating.

So after the harvested cobs were left to dry even longer, the kernels were finally removed.

We got almost exactly 1 cup of kernels. Just enough to try to make into flour, though we don’t have a mill. We were debating where to try the spice grinder in small batches, or the Bullet processor we’d been given, but were concerned the hard kernels would break them.

Then, one night, I heard a terrible crashing noise and went to investigate.

I found the container of kernels on the floor. A cat had somehow knocked it down.

We lost them all.

Every. Single. One.

*sigh*

Final thoughts on Montana Morado/purple corn:

Yes, we plan to try again but, gosh, that was disappointing to lose them all like that! We might wait another year or two before trying again. My source for the kulli seeds has them again, but they are insanely expensive – and in US prices, so quite a bit more, plus shipping, in Canadian dollars.

So that will wait.

The popcorn.

We got the Tom Thumb variety, which only gets a couple of feet tall. This is actually the second year we tried to grow them, but the location we grew them in last year, flooded. This year we planted them in a completely different area, both from the flooding and the purple corn. The two types of corn pollinate at different times, but the extra space reduced the chances of cross pollination, should we want to keep seeds.

When it came time to build frames to cover the raised beds, a priority was put on one that could go over the Tom Thumb corn, to protect it from deer or racoons. I’m rather happy with how it turned out, though I do want to stabilize the corners better.

As with the Montana Morado, these were grown to be harvested after they’d dried on the cob. These didn’t even get taste tested for fresh eating, so it was a very low maintenance crop! One we got a surprising number of cobs out of.

After they had their chance to dry on the cob indoors some more, we got a surprising amount of kernels.

We got almost exactly 6 cups out of them!

Final thoughts on Tom Thumb popcorn

We did a test pop, of course.

They didn’t pop. They just burned.

So we left them to dry longer, and stored them with a desiccant, before doing another test pop.

They still wouldn’t pop.

They’ve had more time to dry out and I’ll try again, but they should be dry enough. I’ve looked up about how to harvest and process kernels for popcorn, and we’ve done all that. The only thing I can see that might be the problem is that they still have too much moisture in them. Yet, they do need to have a bit of moisture in them, as that’s basically what makes popcorn pop.

I don’t know what to make of it!

I think we still have seeds left, but I don’t think we’ll try them again. In a way, it was a waste of space to grow these two varieties of corn, instead of a sweet corn that we could eat, freeze or can. We just didn’t have the space available to grow a third variety.

In the future, I think we’ll try a flour corn again when we have more prepared spaces. If we do find that we like having flour corn and actually use it, we would need to have a much larger space available to grow in, to make enough flour to be useful. That is still years in the future. Until then, we will continue to try small amounts as testers.

Next year, I want to focus more on growing a good, short season variety of corn, and we have seeds for at least two different varieties that fit that bill, ready and waiting to be planted.

Bush beans

In previous years, we have had great success with beans. The first year, we grew three types – yellow, green and purple – in rows about 25 feet long. The purple beans did especially well!

Last year, we grew pole beans and shelling beans.

This year, I wanted to grow some bush beans, for their earlier harvest, pole beans for their later harvest, and shelling beans for dry storage.

Once again, we just didn’t have the prepared space for them.

In the end, we planted yellow and green beans in the high raised bed, which is only 9 feet long.

The yellow beans did okay, though a lot of the green beans in particular did not germinate. Most seeds were planted to fill the gabs, they they grew all right this time.

Then… this happened.

Turns out this bed is the perfect height for a hungry deer’s buffet!

We rigged a cover for the bed with poles and netting. Amazingly, the beans recovered, and we actually got some harvests!

Not a lot, but enough to include in our meals. Nowhere near enough for freezing.

Eventually, we were able to cover the bed with one of the garden bed covers we build this summer.

This worked out really well, as the netting could be lifted, and the openings of the fence wire used in the cover were wide enough to fit our arms through, so we didn’t have to remove the cover to harvest the beans. The only down side is that this netting is insane for catching on things!

One thing I found was that the slugs managed to get up into that bed!

This was a very bag year for slugs, but that will be covered more when we talk about the squash.

Still the beans did remarkably well under the circumstances!

Final thoughts on bush beans

While we will probably continue to experiment with varieties until we find ones we really like and can save seeds for, bush beans will probably be a staple crop for us. Especially purple ones, which seem to do best for some reason. Bush beans don’t need much done for them, and they are ready to harvest earlier than pole beans. Since we planted so few of them this year, we may not buy more for next year at all, and just go with what we already have.

The Red Swan beans.

There was some confusion when we got these, as I’d forgotten what I’d ordered, then realized what I ordered didn’t come in, and then… well…

I think we ended up with three bags of them, in total, by the time it was figured out!

These are a variety of bean that can be used for both fresh eating, and as a dried bean. They are also climbers. Since we had so many, when I decided to go ahead and interplant beans with the purple corn as nitrogen fixers, this was the variety I planted. I honestly did not expect them to have enough season left to produce edible beans, so it was a real surprise when they did!

They even got big enough to harvest!

They do turn green when cooked, rather than keep their red colour.

While they managed to grow pods, there was no chance they’d reach full maturity for harvesting dried seed pods. Which is okay. Having any pods at all from these was unexpected! They never even got big enough to climb the corn stalks.

Final thoughts on Red Swan beans, pole beans and dry beans

We will definitely be planting these again, with some left to mature for dry bean collection, and some for fresh eating, so we can figure out if we like them enough to keep growing. After all, there’s no point in letting all those extra seeds go to waste!

As for pole beans in general, we still want to try other varieties to see what we like, though for next year, we’ll probably go with the ones we got for this year, that never made it into the ground! Pole beans start to reach fresh eating maturity about the time bush beans are done, so having both will keep the harvests coming.

I also want to plant dry bean seeds we saved from last year that we didn’t have the space to plant this year, as well as experimenting with other varieties. We won’t go in that direction too far, though, as none of us enjoy dry beans quite enough to warrant having a lot of them. Mostly, having them will be part of our food storage and self sufficiency goals.

Peas.

Finally, we get to the peas!

This year, we planted a variety of pod peas we’ve grown somewhat successfully before, Dalvay. Previously, we’d grown them on trellises near the pole beans, way off in what will be our food forest area, as part of our efforts to amend the soil. Peas have yet to do very well for us, though they were growing in far from ideal conditions in that location. We didn’t plant in that area this year. Unfortunately, we didn’t have an alternate location ready for this year, either.

For the peas, though, I decided to plant them along the chain link fence this year, so they already had something to climb.

This area had had tomatoes growing in it for two years previously, and I felt it was time to switch up to a nitrogen fixer.

They did… okay. They certainly didn’t thrive in this location, which I found a bit strange. In fact, nothing did really well in this bed this year.

The peas did start climbing the fence, and we even got a few pods to harvest. Mostly, though, there were just a few pods I could snack on while outside.

Then one morning, I came out to do my rounds and discovered all parts of the pea plants that grew through to the other side of the fence, were gone. They all got eaten down to the same height, for the entire length of the fence!

Yup. It was the deer, again.

They did somewhat recover, only to get nibbled on again later on. We aren’t feeding the deer anymore – it’s just too expensive – so we don’t get the number we used to, but there are still a few that regularly come by. Usually, they just raid the compost pile, but every now and then, they help themselves to our garden.

*sigh*

So not only did they struggle in the new location, but with being eaten by wildlife, too!

Final thoughts on peas.

I like this variety of peas – the few times we were able to harvest them. At some point, I’d like to have enough pod peas to be able to can or freeze them!

As for why they didn’t do well in this location, when things had done well there before, I think the answer is above them.

We’ve been trying to cut back the branches on the Chinese Elm inside the fence, but in some places, that just resulted in new branches growing back even bushier. They are also too high to reach with our extended pole pruning saw.

Basically, that bed no longer gets as much light as it did over the past couple of years and, for the peas, that was a problem.

Since these trees also drop damaging amounts of seeds every spring, they are on the hit list. At some point, they are going to be taken down completely. They do, however, shade the yard and are among the few trees that are a partial wind break for winds from the south. I would rather not take them down until we have something to compensate for what we would lose when they’re gone.

However, given how much damage they are doing, we might just get rid of them and deal with the other issues later.

As for peas, I hope to plant them in different beds next year, and I’d like to try edible pod peas again. Eventually, I’d like to have both as staples in the garden.

In the end, when it comes to peas, beans and corn, the main hurdle we have is prepared beds to plant them in. We need to build a lot more raised beds of varying heights. We do have plans to build pairs of raised beds joined by trellis tunnels that has been started, and will continue to add more as we are able.

It’s the “as we are able” part that’s the problem.

Well, we do what we can with what we have available.

Little by little, it’ll get done!

Eventually.

The Re-Farmer

Analyzing our 2023 garden: four kinds of tomatoes

Last year, we grew tomatoes that were processed into tomato paste, rather than sauce. Cooking them down to a paste took many hours, and we filled a case of 125ml jars that got used up nice and fast! So this was something we were quite interested in doing again.

The variety of paste tomatoes we grew – Sophie’s Choice – was chosen partly because it was a rare variety. Yes, we saved seeds. The flavour was a bit on the bland side, so we wanted to try something different this year. So for paste tomatoes, we chose Roma VF.

We also wanted to have tomatoes that were good for fresh eating. I’m the only one in the family that can’t do fresh tomatoes. For these, we went a completely different direction and chose black tomatoes. Indigo Blue Chocolates for an indeterminate variety, and Black Beauty for a determinate variety.

Then, because they did so well a couple of years ago, I went ahead and got more Spoon tomato seeds. We did have a few seeds left, but when I saw the price per packet, and the number of seeds in them, drop to reasonable levels again, I ordered some.

Since then, I’ve started to see people and seed companies talking about Spoon tomatoes, so these miniscule tomatoes seemed to have found a following! These are also the only tomatoes that I can eat fresh, without gagging.

With wanting to have plenty of tomatoes to process into pastes and sauces, the original plan was to grow quite a lot of them. The first seeds we started indoors were the Indigo Blue Chocolate and Black Beauty, in March.

The black beauty sure started sprouting fast!

Towards the end of March, we had space in a tray and planted the Spoon tomatoes.

By this time, we had built the cat barrier, which allowed us to set trays on shelves, at least temporarily, and not have to worry about them getting destroyed.

We had a very high germination rate, which meant that when it was time to pot them up, we needed a lot of space!

With the red solo cups, they were first potted up with the soil only half way up. Once they grew big enough to need “potting up” again, we simply added more toil to the top of the cups, burying the stems so they could form more roots.

With our new indoor set up, we were able to start quite a lot of things indoors, but none thrived as well as the tomatoes! Not only did we have a very high germination rate, but we had almost no losses as they were potted up!

Eventually, when things were warm enough, the seedlings were transferred to the sun room, and then hardened off outside, before transplanting into the garden.

We soon found ourselves with a problem.

We were not able to get enough garden beds ready, before all those seedlings needed to be transplanted! The tomatoes got much bigger, faster, than we were ready for.

In the end, we got them into three of our long, low raised beds in the main garden area. One bed was filled with the Roma VF, with only a border of onions around them. We wanted to make sure to have the most of those, for processing later.

With the other two, they were each planted in a single row in the beds they were in, filling the beds half way, length wise, so that the other half could be used for the root vegetables we would plant later and, of course, room for the onions planted as a border around them.

That left the Spoon tomatoes, and at that point, I really didn’t know where to put them. In the end, I stuck a few of them into the retaining wall blocks in the Old Kitchen garden.

There wasn’t a lot of free space for them, but we got a half dozen in. Later on, a last Jiffy Pellet that had Spoon tomatoes in it finally germinated, so I stuck it at the end of the retaining wall, with a tomato plant that had broken in the wind.

That still left us with large numbers of tomato seedlings of all varieties – and nowhere to plant them!

I did find someone we could give a bunch of them to, but there were far more than they needed. In the end, I got permission to leave them outside the general store and post office for our little hamlet, with signs saying what they were, and recommending that seeds be saved. We had lots of peppers to give away, too!

I’m happy to say, they were all taken. I hope they grew well for people!

With the tomato beds, we were able to wind a soaker hose and sprinkler hoses throughout the beds so that they could be watered from below, which did free up quite a bit of time! I could just hook up the hose and go do something else, for most of the beds.

As for how ours did, I’ll talk about each variety.

The first that we were able to start harvesting from were the Roma VF. While they did start out rather well, they did get hit with tomato blight, and we ended up harvesting all the tomatoes, then pulling the plants for burning, rather than composting.

If you go through the Instagram slideshow of photos, you’ll see we were also able to harvest some Indigo Blue and Black Beauty tomatoes, too.

Both varieties of black tomatoes took a long time to ripen. Because of their colour, it was really hard to tell when they were ready to pick! Both were supposed to get a red blush on their bottoms, but ultimately, we had to go by the squeeze test to see if they were ready.

Indigo Blue Chocolate tomatoes

The Indigo Blue started to ripen first. These are a smaller tomato which, unfortunately, did have a tendency to split rather quickly, once they ripened. They have a nice, smooth shape to them, and their colours are lovely.

The Black Beauties, on the other hand, took a lot longer to ripen. They got so huge, so fast, and then… nothing. We kept checking them and they were rock hard for the longest time. They also had a tendency to split, more than the Indigo Blues did. Then, when we could finally pick some, their uneven shapes made them harder to work with. As for the flavour, my family was unimpressed. They did not live up to their descriptions on the website.

Then there were the Spoon tomatoes!

Where they were planted was not an ideal spot at all. It’s shaded by one of the ornamental apple trees, on the south corner. While they did grow quite tall on their bamboo stake supports, they did not get as lush and healthy as they did the first time we grew them, against the chain link fence. They were transplanted a bit late, too, so they took longer to ripen than before. As a result, we didn’t get a lot of them, relatively speaking, but there were certainly enough to snack on while we were out and about in the yard.

At the end of the season, when we got hit by our first frost, we harvested all the tomatoes left (except the Spoon tomatoes; we left them alone), bringing in the ripest ones, then spreading the greenest ones out on screens under the market tent to ripen.

Here, you can see the last of the Black Beauty and Indigo Blue Chocolate tomatoes set out in the sun, before they got transferred to screens.

We were able to process a sink full of Roma VF tomatoes into sauce for the freezer.

Those are already gone!

We had too many other things going on, though, and ended up freezing a lot of the tomatoes whole, to either cook as they are, process into more sauce, or into tomato paste. These can wait until slower, winter days.

The frustrating thing was all the left over, slowly ripening tomatoes. We just didn’t have the space to store them and keep them handy. Last year, we had a bin full in the dining room that the family snacked out of regularly, We weren’t able to do that this year. The end result was that many tomatoes started going bad before they could be eaten. Ultimately, way too many of them ended up in the compost heap, simply because they were forgotten.

Surprise tomatoes!

The last two years, we grew tomatoes in a bed along the chain link fence. This year, we grew other tings in there, but several self seeded tomatoes showed up, too!

I decided to transplant them into the empty bed the Irish Cobbler potatoes had been in.

It was September 8 when I transplanted them, and our average first frost date is September 10, so there was no way they’d have time to mature, but I figured I’d give them a chance! They did actually start to bloom. Even when the first mild frosts did, they were protected by the plastic rings I’d put around them and survived.

Final Thoughts on Tomatoes

As far as starting the seeds goes, they did amazingly well! I’m still blown away by the almost 100% germination rate. The transplants did really well, and I’m glad we were able to give the last ones away. Once they were in the ground, they all did mostly good, but I think our growing conditions and soil issues prevented them from doing as well as they should have.

Roma VF

As these ended up being harvested early due to tomato blight, I don’t know that they reached their full flavour potential. The family enjoyed them, but didn’t find the flavour exceptional. The tomato sauce we made was good but, again, the tomato flavour was nothing to write home about. We will try a different variety of paste tomato, next year.

Black Beauty

These are a pretty tomato, for sure, but they took so much longer to ripen, and had a real problem with splitting easily. My family was unimpressed with the flavour, and didn’t like working with the lumpy, bumpy shapes. I’m glad we tried them, but we will not be growing them again.

Indigo Blue Chocolate

These went over much better. They’re a smaller tomato, but still adequate for slicing and using in sandwiches. My husband likes to just eat the tomatoes with some salt, and quite enjoyed these that way. They were nicely productive, too. We will be growing these again.

Spoon

For all the set backs these had, they did surprisingly well. They’re also just a really fun tomato. I look forward to growing them again, just for the fun of them. Plus, they are the only ones I can actually eat, and it’s fun to have these tiny little tomatoes to snack on while working in the garden. Plus, being a rarer variety, I like the idea of keeping them going.

The challenge is going to be having enough space to grow the amount of tomatoes we would need for our long term goals. At some point, we want to be able to can and freeze sauces and pastes sufficient to last a year – basically, from harvest to harvest. For that, we’ll need to grow more tomatoes, which means we need to have more space to grow them in.

Which means we need to get our butts in gear to have enough raised beds for everything we want to grow. Even the low raised beds we have now, which have been amended for several years, will need to be made at least a little higher, with more amending.

All in good time. Little by little, it’ll get done!

The Re-Farmer

Analyzing our 2023 garden: onions and shallots

Onions are something we use a lot of. I once took the time to estimate how many onions we go through in a month when buying them from a store, and calculated an estimate of how many we would need to plant to meet our needs. I think it came out to something like 200 yellow onions. That did not include red onions, which we bought less frequently. It also didn’t include shallots, which we rarely bought, because they are so expensive.

Which meant that, if we wanted to grow enough onions for the four of us for one year, we’d need to plant more than 200 yellow onions because, once we have them handy, we would probably be using them even more often than we normally do.

Plus the red onions.

Plus we wanted to plant shallots, because they are so expensive, but we like them.

With onions, we could buy sets for easier planting. A lot of sets. Or, we could start them from seed. Seeds would cost less than sets, plus we would have more varieties to choose from.

For our geographical area in Canada, we need to choose long day onions. Until I started growing them myself, I didn’t even know there were such things as long day, short day and day neutral onions!

As shown in a video in the Best Laid Plans post, we also need to start seeds indoors very early. Onions need a much longer growing season than we have.

We chose two red varieties, one yellow, plus shallots for this year. In the red onions, we’d grown Red of Florence successfully before. We like the taste of them, and their elongated bulb shape makes them easier to cut up compared to round bulbs. I also bought some Red Whethersfield to try, choosing them for their purported storability, as well as their flattened shape. With the yellow onion, we tried a new variety called Talon. The shallots variety we tried before wasn’t available, so we got the Ambition shallot to try.

All of these were started in January, and they sprouted very quickly in our large aquarium greenhouse!

Over time, we shifted some into them small aquarium greenhouse, because we needed the space.

With the issues we had starting seeds indoors and destructive cats, we also began our plans to turn the living room into a cat free zone. This required not only making a door that would keep the cats out while not being a permanent addition, but also a sort of window to block an opening in one of the shelves that act as room dividers. Protecting the seedlings in the aquarium greenhouses and the covered mini greenhouse we have was not good for the seedlings, as it was hard to give them the air circulation they need. By the time we had to move the first batch of seedlings out of the aquarium greenhouses and start other seeds, the barrier was built, and we now have a cat free zone!

With so many onion seeds to start, we went with densely sowing them, which I talk about in this post, including videos from MI Gardener explaining the technique. All the varieties grew very well, very quickly!

Since we had so many onions to transplant, we didn’t plan on dedicating entire beds to them. Instead, they were mostly planted as borders, where we hoped they would also do double duty as insect and deer repellers.

There was just enough Red Whethersfield onions to encircle the Roma VF tomato bed.

The Talon onions encircled the other two beds with tomatoes, with the last few going into the ends of the high raised bed.

In the above Instragram slideshow, you can see the Red Whethersfied and Talon onions around each of the tomato beds.

With the Red of Florence, they ended up all over the place! Some shared grow bags with peppers.

Others got planted between rows of spinach.

There were so many Red of Florence seedlings, it was hard to find space for them. After the spinach was harvested for the season, we still had seedlings left, and most of them went in where the spinach had been, leaving us with one bed dedicated to just those onions. We still had onion seedlings left over, including some of the yellow onions . By this point, they were the last little, spindly seedlings that we probably shouldn’t have bothered transplanting. Those ended up getting transplanted into the bed where we had peas and greens at the chain link fence.

Then there were the shallots. They got their own little bed, with a few last ones tucked into the end of the wattle weave bed.

That bed ended up needing extra protection! The cats just wouldn’t stay out of it.

Once the open ends of the cover got chicken wire over them, we could finally keep the cats out of there!

So, how did the onions and shallots turn out?

With the Red Whethersfield, not at all.

I have no idea what happened to them. They were there and growing, and then just basically disappeared. Not a single transplant made it. It was really quite strange!

The seedlings planted in the bed along the chain link fence never really grew at all, with most of them dying off. That was not a surprise, really, considering how small those seedlings were.

The Talon onions around the tomato beds and in the high raised bed did better.

This picture is of the last of the yellow onions that got harvested, being left to cure. They were later braided to hang in the house. As I write this, there’s still a few left. Oh, there were a few other yellow onions in the high raised bed that were harvested later. They were still growing so well, we left them as long as possible before harvesting them.

The Red of Florence did a lot better, in most places. The ones in the grow bags were smaller, but those were where we turned out to have issues with fine tree roots making their way into the soil from below. The ones planted in between the spinach got quite large, with the ones transplanted after the spinach was harvested only somewhat smaller. We got a lot of onions out of that bed!

That bed was left until after the first few frosts before it was harvested completely. We already had some cured and braided indoors, but these last ones were still actively growing and would not have cured properly, so most of them ended up chopped up and in the freezer, with some set up to dehydrate in the oven.

Now, every time we open up the chest freezer, we get a strong smell of onions!

With the dehydrated onions, I ended up using our spice grinder and powdering about half. I think I like the onion powder more than the dehydrated pieces.

As for the shallots, they turned out to have self seeded company! Even though the soil in that bed was completely reworked, with fresh garden soil added, they still had seeds from years gone by in them. Specifically, dill and poppies. We’d planted Giant Rattle Poppies in this space before the little raised bed was built, so I left the poppies to grow. The self seeded dill keeps coming up every years, but never gets particularly large, but we still like to harvest the leaves for cooking, so I left those, too. The poppies grew so tall they started growing through the chicken wire of the cover, making moving it for weeding pretty much impossible. When they started blooming, we realized they were a completely different type of poppy, that my mother grew at some point! No Giant Rattle Poppy seeds seemed to have survived. 😄

When it came time to harvest the shallots, I actually left them be until the poppy pods were dried out. Once I could harvest the pods, the cover could be removed and the shallots finally harvested. They were smaller than they should have been, likely because they had so much competition for water and nutrients, but still pretty good. We got a decent amount to harvest and, as I write this, we still have some left.

Final thoughts on onions and shallots

It’s a given that we will be planting onions again next year. We will probably get more Red of Florence seeds again, as they do so very well.

I want to try the Red Whethersfield again and hopefully actually get some to taste! I’m still somewhat perplexed as to why they to utterly failed, but I suspect it has more to do with the growing conditions in that bed, then anything else.

We definitely need to plant more yellow onions, though. There turned out to be fewer seeds in the package than I expected. I need to pay more attention to seed counts! The Talon onions did all right, but they did not reach their full size potential. In fact, we only got a couple among the tiny ones planted in the high raised bed that got really big. This would be due to growing conditions and compacted soil, which we have issues with.

I want to do shallots again, though I might try a different variety, as we’re still in the “what kind do we like?” stage.

Which means I need to choose and order seeds soon, because we’re coming up on December in a few days, and we need to get seeds started in January! In fact, we could actually get them started in December and not go wrong.

At some point, we will try growing green bunching onions again, and I want to grow leeks, but those will wait until we’ve had more time to improve and amend our soil, and build more higher raised beds. Soil compaction is one of the major obstacles we have to deal with before we can grow those successfully.

All in all, onions, shallots and garlic will probably remain a staple in our garden, every year.

The Re-Farmer

Our 2024 garden: first seed order in! Veseys

Yes, I just place our first order of seeds for next year’s garden. We might not need to order many seeds this year, considering how many we have left, but one thing we were out of completely was onions. Onions seeds only last one year, anyhow. Plus, today is the last day I can use the promo code from Maritime Gardening to get free shipping. 😁

This is what I ordered today.

I’m trying a new variety of yellow onion this year. Frontier. From the Veseys website:

Incredibly strong necks and consistent size! Frontier is a standout variety with our trial staff. Bulbs are golden, large and uniform with small necks that cure quickly. Ideal for fresh and storage markets, Frontier is long day hybrid onion with superb disease resistance. Matures in 100 days from transplant. Approx. 200 seeds/pkg.

(image belongs to Veseys)

I’m also trying a new type of shallot this year. Creme Brulee. From the website:

First Shallot AAS winner! An elongated shallot, Creme Brule has a citrusy flavour when eaten raw but when cooked, sugars are enhanced and do not leave an overpowering aftertaste. Bulbs are 4-5″ with a coppery pink skin. An attractive, easy to peel echalion, perfect for the home gardener or market grower! Matures in 95-100 days from transplant. Approx. 150 seeds/pkg.

(image belongs to Veseys)

I do still plan to try the Red Whethersfield onions again, and will probably get Red of Florence again, but those are from a different source.

Of course, I didn’t get just onions! I also got:

Yes, we will be trying to grow melons again (I’ll have a garden analysis post about this year’s melons coming up soon). We still have seeds, but I decided to get the Summer of Melons Blend. From the website:

Veseys exclusive! Best for the home gardener. This blend is the ideal solution to stretch out these beautiful summer flavours. It begins with sweet, early maturing hybrid varieties then keeps going through summer and into early fall. Maturity ranges from 75-85 days from transplant. Approx. 20 seeds/pkg.

(image belongs to Veseys)

I like having a variety, and having melons that mature at different rates – while still within our short growing season! – is bonus. It’ll also be a surprise, since the varieties included aren’t mentioned!

Finally, I got one more mix of seeds.

Yeah, me and my winter squash obsession! This is the Wild Bunch Mix Winter Squash. From the website:

Veseys exclusive! Great range of colours and sizes. This exclusive Veseys blend contains a riot of shapes, sizes and colours that will bring your fall display to the next level. Some of the weirdest and wildest looking squash that we have seen in our trials. Ideal for both home and market gardeners looking for a great display without having to buy separate varieties. All are edible, and are strong vining types so they grow well together. Approx. 20-25 seeds/pkg.

(image belongs to Veseys)

I’ll have a garden analysis about our winter and summer squash, too, which was a real hit and miss situation. We do still have lots seeds from what we grew (or tried to grow) this past year. I have zero interest in having a “fall display” (who would we be displaying it for, anyhow? 😄). I like to try new varieties, but am hesitant to buy an entire package of seeds for something I’m not sure of. This way, we get just a few seeds of different varieties to try and – if they make it! – see if we like them enough to order more in the future. At some point, we’ll settle on one or two favourites and save our own seeds. Until we get to that point, we would be dealing with cross pollination, so any seeds we save as we’re experimenting would give us different results that may not be as good.

Just a small order for now. Soon, I’ll place another order for the red onions, so that we’ll have all the seeds ready to start them in January. Because, where we live, gardening starts in winter!

Oh, wait.

It’s not even officially winter, yet!

The Re-Farmer

Analyzing our 2023 garden: root vegetables

Our root vegetables this year were a mix of successes and failures!

First up, the successes.

Potatoes

We had three varieties of potatoes this year. We chose the varieties based on things like their storability, and their resistance to disease, as well as their flavour profiles. One time, the Purple Peruvian Fingerlings, were a potato we’d grown a couple of years ago and quite enjoyed. The other two were new to us: Irish Cobbler, a white potato, and Red Thumb Fingerling, a potato with both red skin and red flesh.

The original plan had been to plant them all in grow bags this year. We’d tried the Ruth Stout method last year, and both beds got flooded out, and there was very little left to harvest. We were going to repurpose old bird seed and deer feed bags for this. We have stopped buying both – we just can’t afford it anymore, with how much cat kibble we’re buying now – so it turned out we didn’t have enough for all three varieties.

This required a change in plans and, that early in the season, there were only a few places we could plant potatoes directly into the soil. So, the red and white potatoes went into low raised beds in the Old Kitchen garden.

The red potatoes went into the long, thin bed next to the retaining wall block, which got redone this spring, and when I ran out of room, into the short end of the L shaped wattle weave bed.

You can see how the Old Kitchen Garden beds the potatoes were planted into progressed over the years in this video.

The Purple Peruvians went into the grow bags.

So, how did the potatoes do this year?

Pretty darn good.

We harvested baby potatoes from the Old Kitchen Garden only a couple of times, since we didn’t really have a lot of any variety. The Irish Cobbler were the first to be ready to harvest, then the Red Thumb.

The Purple Peruvians, on the other hand, took an incredibly long time to mature, and did not get harvested until mid October. I’ve been going through my files to find photos of them – they were our biggest harvest – but it turns seems that by the time I was done harvesting them, it was too dark for photos!

As I write this, we have finished off our Irish Cobbler potatoes, but still have Red Thumb and Purple Peruvian Fingerling potatoes in storage.

Final thoughts on potatoes

I would consider all three varieties a success, this year. Especially the Purple Peruvians.

The smallest harvest we got was the Irish Cobblers. They were also the earliest maturing variety. They did seem to have issues with scab, however. They tasted good, however, and were a good potato for a variety of preparation methods.

The Red Thumb did quite well, and were also tasty. When cooked, they practically mashed themselves, so not a good variety if we wanted to do a hash or in a soup or stew. Having pink mashed potatoes as a side for Thanksgiving dinner was rather fun!

The Purple Peruvians seemed to take a lot longer to mature compared to the first year we grew them, with robust plants right up until the frost hit them. They are nicely prolific. The only “down” side is one of aesthetics. They do bleed their colour quite a bit, leaving fingers purple can changing the colour of any soups or stews they are cooked in!

When it comes to growing potatoes for our general needs and use, we will need to grow a lot more, but we are still figuring out what varieties we want to grow. As much as we like the Purple Peruvians and Red Thumb potatoes, I think we might want to move away from fingerling potatoes in general, other than perhaps as a side crop. Their smaller sizes and, in the case of the Purple Peruvians, uneven shapes, make them harder to handle, clean and peel. In the future, I think we will try varieties that have more even shapes and larger sizes, as well as being good for long term storage.

One last surprise

As I mentioned, we grew potatoes last year using the Ruth Stout, deep mulch method. Not only did the potato patches get flooded out, but they also got hit with slugs quite badly.

It seems, however, that we missed a few potatoes when we harvested them, and they showed up this year!

One of them, from the All Blue patch, got quite large and began producing seeds!

I didn’t try digging up the potatoes in the fall, but I did collect the seed balls. I haven’t tried opening any yet. From what I’ve read, these can be opened and the seeds inside processed much like tomato seeds. Seeds from potatoes will not be clones, as they are when the tubers are planted. I believe there are some rare exceptions, but the seeds each typically produce a new variety, like apple seeds do. I think that if we planted them, we’d still get something similar to the All Blue potato they came from, but the only way to find that out is to plant them and find out! I’ve read that, in the first year, potatoes planted from seed will only produce a single potato that can then be planted like any other potato and produce clones of itself. I don’t know if we’ll be able to experiment with this next year. It will depend on how much space we have. Still, I’d like to try it!

Carrots

We has several varieties of carrot seeds this year, and I’d intended to plant more. In the end, we only had space to plant two.

One variety was new to us; the orange Naval carrot. With those ones, we tried something else new: making seed tape.

The other variety was the Uzbek Golden carrot. We’d grown them last year and, while they did not get a chance to reach their full potential, it being such a bad growing year overall, we did enjoy them. This year, they did even better!

With these ones, we harvested them throughout the summer, as needed, then harvested the last of them after we had our first frosts.

Uzbek Golden Carrots, Gold Ball turnips, a couple of radishes and some onions that got missed.

There was some slug damage, and a few of them split, but overall they did very well.

These carrots are lightly sweet, crispy and delicious. They were a great carrot to eat raw, and also held up to cooking very well. This is definitely a variety we would enjoy growing again. I would like to find a Canadian supplier of seeds, though. It’s getting too expensive to order seeds in from the US.

As for the Naval carrots, we planted devoted an entire bed to them.

I definitely liked how the seed tape worked out. We planted an entire package of seeds, didn’t need to thin any of them, and got a very high germination rate.

We didn’t harvest many of them through the summer, though. Instead, we left them in the ground to try out a different method of storing them for the winter: in ground and under a heavy mulch. The idea is to be able to harvest fresh carrots during the winter.

This is our first “winter” harvest.

The carrots were noticeably smaller at one end of the bed, likely because that end gets less light, so that’s the end I harvested these from. Under the thick mulch, the ground was cold and did have ice shards in some places, but the ground was workable and the carrots could be dug out fairly easily. They were wonderfully crisp and fresh and very tasty! The ultimate test for this method of storage is yet to come, as winter isn’t even officially here yet, and things have still been pretty mild, compared to how our winters usually tend to be.

Final thoughts on carrots

I do wish we’d had the space to plant more varieties, but I’m happy with what we did plant. Both varieties are tasty. If I have anything to complain about, I’d say it’s that they are a bit harder to pull, as their greens come off easily. These need to be dug loose, first. I’d be doing that anyhow, so that’s not really an issue. These are definite winners.

Now for the losers. Mostly.

Turnips and Beets

This year, we planted varieties of turnips and beets we have tried before.

Last year, we got Gold Ball turnips as a freebie with a seed order. We tried growing them, but something ate the seed leaves as fast as they came up. So, we bought more seeds to try them again.

For the beets, we planted a variety called Merlin.

There were planted in the same bed, next to the Indigo Blue tomatoes, and bordered with yellow onions. I hoped that the onions would help deter any critters or insects that would want to eat the turnip and beet greens.

The turnips did seem to do rather well. They got quite leafy, enough though something was most definitely eating them. The leaves were filled with holes.

While we did harvest a few larger turnips, ultimately, they never reached their full potential. You can see in the photo with the Uzbek carrots above, how few there were, that were worth harvesting, by the end of the season. All bug eaten greens, almost no turnips. I think they tasted okay, but they probably didn’t taste the same as they would have, if they’d reached their full potential.

In the photo above, you can see where we planted the Uzbek Golden carrots, sharing a bed with the Black Beauty Tomato transplants in the foreground. The carrot seeds are covered by boards to protect them until they sprouted. In the bed on the left of the photo, the half on the lower left got the turnips, while the half on the upper left got the beets. You can see the labels marking where they are in there. (The white boards on either side of the tomatoes are there to protect the new transplants from high winds.)

The beets barely came up at all.

The first year we grew beets, they did rather well, but pretty much every time we’ve planted them since, they’ve been doing worse and worse. This year was, to be honest, pathetic.

In the case of this bed, however, I think there was something odd about the soil. Even the turnips grew stronger and healthier on the south end of the bed, but by the middle of the bed, they were smaller and sicklier. Then there were a few little beet seedlings that started to emerge, but by the north end of the bed, there was nothing. No germination at all. Even the tomato plants at that end seemed to be smaller and less healthy looking.

The entire bed got the same amount of sunlight and water. This was one of the beds that had a sprinkler hose wound throughout. The problem could be in the soil itself, but after harvesting the grow bags at the end of the season, I think the problem may actually be that row of self seeded trees my mother allowed to stay. She’d had a row of raspberries there and, after transplanting the raspberries, she left the saplings to grow to be a wind break. In trying to clean up around there, I can see that attempts have been made to remove these trees in the past, and they’ve just grown back. It’s a mix of maple and Chinese elm, which means they are not only taking up space that used to be productive garden space, but are spreading seeds. Those Chinese elm seeds are the worst, and have been causing all sorts of problems. However, when working on the soil in these beds, pulling up roots and amending it, we find a lot of roots at the north ends of them. The bottoms of many of the grow bags the peppers were in were absolutely crowded out by tree roots that had grown in from below. Because of how these trees growing, I suspect that it’s the Chinese elm roots that are depleting spreading the most and winning the competition for nutrients.

Final thoughts on turnips and beets

We’ve had such poor results growing turnips and beets, I don’t know that we will try to grow them again, until we can plant them in higher raised beds. The one area we’ve grown beets in semi successfully, was in the East yard, near the spruce grove. When we cleared out where the old wood pile used to be, we found the best and softest soil of all under there. While my daughters have enjoyed what beets we’ve managed to grow in the past, with the Merlin variety being a favourite of theirs, I honestly don’t know if we like any of the turnips. I’ve selected turnips to grow as a good storage crop for food security, but it’s not much good for that, if we don’t actually like eating them. With the small turnips we’ve managed to harvest so far, we’re not getting their full flavour.

Which means we will likely skip trying to grow turnips and beets again for at least a couple of years. Once we have more, and more established, raised beds, we can try again.

Extras: more beets, plus radishes

After we harvested the garlic, we had an empty bed suitable for a fall crop. In it, we decided to plant spinach, beet and radishes.

We planted the Cherry Belle radishes, Lakeside spinach and Bresko beets.

I’ll cover spinach in another post, but in this bed, they started to germinate, then promptly disappeared. A couple of seedlings did survive, but didn’t grow much at all. The beets barely germinated, and what did germinate, soon disappeared. Only the radishes grew, and while we got decent looking plants, and a couple that shot up and started to bloom, there were almost no radishes worth harvesting. While I think insects or slugs got the beets and spinach, I suspect it was the nearby trees that did in the radishes.

Only one of us in our household actually likes radishes, however I’ve been curious to try radish pods. So far, we’ve never had radishes get to the point of producing any! Even though these ones were planted so late (my daughter that likes them ended up house sitting for a month, so she wasn’t here to eat what few we got!), the ones that started blooming are the furthest along we’ve had them grow.

As with the beets and turnips, I think radishes are something that we won’t grow again for a while. They do produce very quickly, if eating the roots is what we’re after, so we might tuck them in between other things as a sort of ground cover, but that’s about it. I do still want to grow some for their pods to try. Perhaps we’ll have an empty corner in a higher raised bed to tuck a few seeds in, and just let them be until the end of the season. That will be a last minute decision, depending on what space we have to work with, next year.

Which means that, for root vegetables, we’re basically down to potatoes and carrots!

Well. I guess that’ll make things easier to plan out next year! 😄

The Re-Farmer

Analyzing our 2023 garden: fall garlic, perennials and food forest items

Okay, let’s get into our longer term planting!

First, the garlic, which was planted in the fall of 2022.

We planted garlic in one low raised bed, starting with cloves we’d saved from the one successful bed of garlic planted the previous year.

First, we had to reclaim and prepare the bed from the summer’s crop. Of our saved garlic, we got only 24 big cloves out of the six bulbs we kept! We then bought more garlic locally, rather than ordering it in, this time trying a soft neck garlic for the first time.

So how did they turn out in the summer?

Apparently, not good enough to warrant getting pictures of the bed as it grew. At least not any I uploaded into my dwindling WordPress media storage.

We seemed to have lost quite a few to the winter cold. I’d say we had almost a 40% loss on our saved garlic, which was hit the hardest. Interestingly, it was the soft neck garlic that did the best, as far as survival. We harvested all the scapes from both the hard neck varieties well before soft neck variety produced scapes. All produced decent, if not particularly large, bulbs at harvest time. As I write this, we still have some left to use for cooking. We did not save any for replanting. We just didn’t have enough to make it worthwhile.

Final thoughts on garlic.

We seem to have a problem with losing our garlic to the cold over the winter. For this fall’s planting, we got just one variety. They were all planted in the Old Kitchen garden, closer to the house. We made efforts to plant them more in the middle of the beds, as the outer edges of raised beds will freeze faster. That resulted in the 3 pounds of garlic we ordered being spread out over 4 raised beds. They also got a deep mulch. This winter should be a mild one, though, so the risk of loss due to cold will be reduced, too.

Also, we need to plant a lot more garlic. That one bed, even if we hadn’t lost as many as we did, was not enough to meet our usage needs. We could easily plant two or three times as many garlic. This fall, we planted 3 pounds of seed garlic, and while it’s more than what we planted last year, more would never be a bad thing!

Raspberries

This spring, we planted three Royalty Raspberry plants.

We do have raspberries here that my mother has been growing for decades, descended from plants I used to pick from as a child. They are almost a wild variety. For our food forest, we want to include different varieties that mature at different times of the year. We’d purchased a red variety of raspberries a couple of years ago, but the deer kept eating them. They are protected now, but are not recovering well. So when these purple raspberries were planted, in an area we’d planted peas and beans in previous years, we made sure they were protected from deer.

They did rather well, too. These were supposed to be first year canes, so it was a surprise when we saw them starting to bloom. Yes, they actually produced fruit!

No new canes that would produce fruit next year emerged, though. Which means that when they died back after fruiting… well, it looks like they’ve just died.

I keep forgetting to contact Veseys about them.

[Edit: I have since remembered to contact them, and have been told this is normal, and they should start growing in the spring.]

Final thoughts of raspberries

We all love raspberries. This was actually a pretty good year for them, and the old raspberry bushes produced quite well. Especially since we cut away the crab apple tree that suddenly died of a fungal disease last year. It had been shading the patch quite a lot. This year, that end of the patch got a lot more sun, and they clearly thrived.

As for the purple Royalty raspberries, we did get enough to taste, and do like them. We will look to replacing the dead ones, while also planning to get a gold variety, plus another red variety. The long term goal is to have lots of raspberries from June through to August.

Our first apple tree

We have plenty of crab apple trees, most of which are dying of a fungal disease, so we have to be really careful about getting new apples. This spring, we got our first eating apple tree; a Liberty apple. It’s actually a zone 4 variety, so we needed to also give thought on where to plant it. It needed to get the full warmth of the sun, while also being sheltered from the cold winds. In winter, it will need extra protection to keep it from freezing.

For this, we chose an area in the west yard, closer to the house. There are ornamental crab apples nearby for cross pollination. We’ve got tulips planted here, which need protecting from the deer, with dead and dying trees that needed clearing away. So that all got taken care of, and the apple tree was planted closer to a hedge of lilacs for extra protection from the elements, while still getting that full sun.

We also got a pair of mulberry trees that are rated to zone 3. When we ordered one tree from Veseys, they did not have the size available for 2023, so we got two smaller ones, instead. They were so tiny, we ended up not transplanting them. Instead, they got potted up and kept indoors. As I write this, they are much, much larger, and their leaves have turned yellow and are dropping for the winter. If all goes well, they will come out of dormancy in the spring, we’ll harden them off and plant them in our food forest area when we are past our last frost date, in June, next year.

Final thoughts on apples (and mulberries)

Finding apples that are good for fresh eating, that are also hardy to our zone, is a challenge, but they are out there. So why did we get a variety that’s zone 4?

I’m a sucker for punishment?

The variety had qualities we were looking for, from flavour to storability. Hopefully, it will work out, and acclimate to our winters over time.

When it comes to apples, one tree should produce enough for a family, but they also often need another variety for cross pollination. So we might pick up one more variety of apple in the near future. What we really need to watch out for, though, is that fungal disease that’s killing off our crab apples. I’ve been researching about it, and there’s nothing we can do about it. Once it’s in the soil, it doesn’t go away. So if an area is badly infected, like where the row of crab apples are now, we would not be able to plant apples there again and expect healthy trees. Yes, there are ways to treat the tree, but it’s not really an option for us right now.

As for the mulberry trees, I’m pretty excited about those. I’ve never had mulberry before, but my mother remembers they had a huge mulberry tree behind their barn, when she was a child in Poland. As a food tree, they are known to be productive to the point of nuisance, so they will be planted well away from the house. There’s a gap in the lilac hedge on the north side of the property that needs to be filled in. That would be a good place to transplant these. Eventually, they should grow into towering shade trees, so we need to make sure they’re not going to cause problems for other things we want to plant around there.

Last minute addition: saffron crocus!

This year, I was really excited to find out Veseys got a Canadian supplier for saffron crocuses, acclimated to zone 4! So we took a chance and ordered some.

These were planted in a trench in the fenced off area about the tulips and the Liberty apple tree this fall. For the winter, they got a deep mulch to protect them. If they survive, they can be expected to produce flowers with harvestable stamens in the fall of 2024, and each year, they can potentially triple as they expand.

If they survive!

Of course, every year, they will acclimate more to our climate zone, too.

Final thoughts on saffron crocuses

We don’t really use a lot of saffron, so if even a few survive to produce next year, that will be enough for our needs. Long term, if they do well, who knows. We might eventually have enough saffron to be worth selling at the local markets or something. If not… well, it was worth a try!

Recovering Strawberries and Asparagus

Last year, our purple asparagus bed was flooded out. It didn’t really affect the strawberries that were interplanted with them, but the asparagus crowns were buried 2 ft deep. I wasn’t sure any survived. In the end, we did get some asparagus plants growing, but they have been set back, at least a year. This should have been the first year we could harvest any, but that just wasn’t going to happen.

As for the strawberries, they recovered quite nicely after the winter and were soon producing.

We even got a few small crops.

Then the deer got to them.

We ended up rigging up protection around the bed, and the strawberries did recover. In fact, they began producing again, quite late in the season, because of the deer damage, and were still trying to produce, right up until the first frost hit them!

Final thoughts on strawberries and asparagus

We planted a purple variety of asparagus, and the plan had been to plant a green variety the next year, and to keep adding more every year until we had enough for our family to enjoy regularly. Well, that didn’t happen. The challenge is, asparagus is a 20 year commitment. We have to find places to plant them that will not be used for anything else for 20 years, because I sure don’t want to be transplanting them in the future. Since we’re still struggling to clear up certain areas, we just don’t have the space that can be used that way.

After last year’s flooding, we now have an idea of where the more susceptible areas are that we either have to avoid, or where we’d have to make a bed raised high enough that flooding won’t be an issue.

So, yes, we do still intend to increase our asparagus beds, with both green and purple varieties. It’s just been delayed. As for the asparagus we have right now, I’m hoping they recovered enough that they will do better next year. I don’t expect we’ll have enough to harvest next year, though. Maybe in 2025.

Asparagus is definitely a long term planning sort of thing!

As for the strawberries, these were purchased transplants that were interplanted with the asparagus because I’d read they do well together. Over time, however, I am now thinking to get more strawberries to interplant around the food forest area, as a sort of ground cover, rather than having dedicated beds to just strawberries.

Strawberries from seed

Now we move on to an impulse purchase that did surprisingly well. I got a kit to grow strawberries from seed. It was marketed for kids, but strawberries are strawberries, and we just can’t get enough strawberries in this household!

What started out as this…

… became this.

Yes, we actually got a few mature strawberries!

These got transplanted in the wattle weave bed along with some herbs, peppers, eggplant and luffa. Eventually, the Old Kitchen garden will be mostly an herb garden. I honestly didn’t know if they’d make it, or if they’d produce this year at all, they were so tiny.

The kit did not say what variety the strawberries were and, from the looks of the berries, they seem to be a type of wild strawberry. We only got maybe 4 or 5 ripe berries to try, and they were tasty, but not as tasty as the variety that were bought as transplants.

Final thoughts on strawberries from seed

Since this was a spur of the moment experiment, my expectations were not high, so it doesn’t mean much to say they exceeded expectations! Once transplanted, they did really well. I don’t think I’ll grow strawberries from seed again, though. The ones purchased as transplants were more productive (even after the deer got to them) and much tastier. We’ll see if these survive the winter. They are mulched, but they were planted along the edge of the bed, so are still susceptible to freezing. For all I know, they will produce larger berries once firmly established. We shall see.

Sunchokes

I kept forgetting about the Sunchokes, aka: Jerusalem Artichokes, this year! They are in a permanent bed next to the asparagus, and this is their second year. Last year, we’d planted 10 tubers in two rows. In the fall, I harvested half the bed, replanted 5 of the largest tubers, leaving the other half of the bed untouched. The sunchokes came up quite well from both halves. They grew nice and tall and…

That’s it.

Like last year, they never boomed. I never even saw any buds forming.

This was all we harvested last year.

I was going to harvest some this fall but, in the end, I just left them. We should have more to harvest, next fall. Instead, we cut the stalks and lay them down on the bed and covered them with a grass clipping mulch. As Sunchokes are native to Canada, they probably don’t need a mulch at all, but it won’t hurt.

There are people on some of the local gardening groups on Facebook I’m part of that also grow sunchokes. I saw several people talking about how they’ve been growing them for years, and they have never bloomed, wondering what they were doing wrong. Some old time gardeners have said theirs have never boomed, either, but they still get a good harvest every year. At least I know it’s not just here!

Final thought on Sunchokes

So, obviously, I don’t have much to say about the for this year, since we skipped harvesting them. When we did try them, we liked them, so I do want to let them grow and multiply, so that we can have larger harvests. After learning that other people in our zone that have grown them for years and never had them bloom, I guess that means we don’t have to transplant them somewhere else or something. We can just leave them were they are. Hopefully, next fall, we’ll be able to get a good harvest out of them.

Everything else

This is a follow up on the things we planted the year before.

We planted a bundle of 5 sea buckthorn. Two survived. They are still surviving and growing bigger. Eventually, we will get more to add to the privacy hedge. If all goes well, we’ll have at least one male sea buckthorn, and will eventually get berries.

We planted two highbush cranberry. Last year, the deer ate one of them, it recovered, and they at it again. I put an old saw horse of that one to protect it as it recovered again. This year, it was growing well, as was the other one, which is still unprotected. Amazingly, towards the end of the season, the one with the saw horse over it to protect it got eaten again! Given how late in the season this happened, I don’t know if it will recover.

Deer chewed Highbush Cranberry.

We planted 30 silver buffalo berry in two curving rows, to eventually act as a privacy screen. It looks like we’ve lost 2 of them, possibly 3. One, I expected, as I’d accidentally pulled it up last year while weeding, but one or two may have died before fall, too. Some of them are getting pretty big, while others are still quite small. With last spring’s flooding, one end of the rows was completely underwater, and they handled it just fine. It will be a few years, yet, before they get large enough to start producing berries.

We had planted 6 Korean pine in the outer yard. We have 4 survivors. This year, they were still quite tiny, and are still covered in their chicken wire cages for protection.

From what I’ve read, they grow very slowly for the first 5 years, then start to really shoot up, and eventually become very large trees. We got 3 yr old seedlings, which means this was year 5 for them. We shall see if they get their first growth spurt next year!

Final thoughts on our food forest.

Our long term goal is to have as many perennial food plants as we can manage. Fruits, nuts, berries, tubers, whatever. We’ve got a good start on it, and hope to add more to it every year. For some things, like the sea buckthorn and silver buffalo berry, these are multipurpose plantings. They should be prolific enough – eventually – to provide winter food for the birds, while the bushes themselves will be privacy screens and living fences. The far flung areas we’d planted corn, beans, squash, etc. last year were done to help prepare and amend the soil for permanent planting, and this year, only one small area was used to grow squash in. Next year, we hope to plant a fruit tree or something in that spot.

We are trying to be very selective on what we plant and where. We need to leave lanes open, wide enough to drive through, to be able to get at fences, etc. There is also the lane we will keep open because there is a telephone line buried under it. That means we need to consider root systems, as well, when locations are decided on.

The one thing we planted out there this year – the Royalty raspberries – appears to ultimately be a failure, since they produced this year, instead of next year, and died back. So very little progress was made in that area this year. We do have some black currant bushes that I am thinking of transplanting out there. They are closer to the house, but under trees. They bloom in the spring, but have almost no berries. They simply don’t get enough sunlight.

Over time, we will keep adding more to the area, as the budget allows. Pears, plums and gooseberries are on the list, and I’m seriously considering transplanting our haskap bushes. The “male” haskap, which is supposed to be the right variety to cross pollinate the two “female” varieties, is done blooming before the two other even start. I think they’re just planted in a bad spot. Too many tree roots, and too many of those perennial flowers that my mother planted there. Even though I’ve cleared them away from around the haskaps, they get so big, they still cover the bushes – and the haskaps are supposed to get big enough that it shouldn’t be an issue! We shall see.

The experiments.

Last year, there were two things we planted that, while annuals, could be treated as perennials, because they self seed so easily. Wonderberry and Aunt Molly Ground Cherries. With those, I let them drop fruit to see if they would come back this year.

They did not.

We might still get some ground cherries in the future, but they were much more fragile a plant than I expected. They broke easily, as I reached under to find and pick ripe berries, and the patch itself got flattened by wind and had to be supported. If I do plant them in the future, I’d want to have some sort of supports for them, and I don’t know if they’re worth the extra effort!

That is where we are at now, with our fall plantings and perennials. Not a lot of progress there, this year, unfortunately. When it comes to perennials – especially trees – it can take years before they start producing, so delays in progress add years, rather than months, to having food production! At least things like berries produce faster and fill the time gap a bit.

Little by little, it’ll get done!

The Re-Farmer

Analyzing our 2023 garden: the best laid plans!

Since moving out here, our gardening plans have changed a few times. Our original 5 year plan had us starting to garden around year 5, after focusing on cleaning and clearing first the inner yard in the first two years, then the outer yard over the next 2 or 3 years, before eventually moving beyond the outer yard, which is rented out.

It’s now been 6 years. The inner yard – specifically the spruce grove – is still not cleared and cleaned up. We had to start on parts of the outer yard earlier. Some things had to be dropped completely.

Gardening, however, started early, and I’m glad it did. We started off with a couple of reclaimed patches of ground. Each year, the garden beds were expanded and we grew more things.

Until this year.

All the best laid plans, indeed! We ended up with a garden perhaps half the size of the previous year.

Early in 2023, though, we still thought we’d be able to do a larger garden. Many seeds were purchased, and orders were placed for things that would be delivered in time for spring planting. Here is a video I did, going through our seeds – old and new – and starting our onions and luffa.

Even in April, I still thought we’d be able to meet most of our goals, and was able to get started preparing a couple of low raised beds.

I also did a spring garden tour in April, where I talked about our plans.

Among the things that changed was the shed we were supposed to get, that would have been fixed up to be a chicken coop. The person that had the shed to get rid of ended up throwing it away. It did not survive the winter.

Getting the dead trees to build more raised beds didn’t work out as planned. Slowly over the summer, we did get wood harvested, but felling dead spruces resulted in trees getting hung up and stuck on other trees.

That was just the beginning of plans that fell through.

All was not a loss, though. For what we did manage to get, there were some successes and failures, as there are every year, and that’s what I’ll be going through in this series of blog posts analyzing our 2023 garden. With what we’ve learned in the past few years, we should be able to make adjustments and do better next year.

The Re-Farmer

Our 2023 garden: harvesting carrots

It’s been a gorgeous day today! We’ve hit 8C/46F today; warmer than forecast. I took advantage of it, and made our first “winter” harvest from the carrot bed. This bed has a deep mulch of grass clippings on it, plus one of the covers we made for the raised beds is being stored on it for extra protection.

I found Rolando Moon curled up on the mulch, under the cover, enjoying a nap in the sun!

I harvested from the far end of the bed, where it gets more shade and the carrots are smaller. There were some icy shards in the soil and under the mulch, but the ground was not at all frozen. It’s been so mild, though, it probably wouldn’t have been, even without the mulch!

This is today’s harvest of naval carrots, after washing the big dirt off. They just need to be scrubbed individually before eating.

I did, of course, have to try one out. It was incredibly fresh and crisp, and quite tasty.

It’s too early in the season to make conclusions, but so far, storing them in ground looks like it’s going to work out just fine. I don’t know how it’ll do if we start hitting -20C/-4F or colder, but with this being a strong El Niño year, we may only hit those temperatures as overnight lows.

Harvesting these reminded me; I want to do a series of 2023 garden analysis posts, like I did last year. This year’s garden was very different from what was planned or expected! We will have much to think about, for next year’s garden!

The Re-Farmer

Red of Florence onions, finally processed!

Yes, all this time, the Red of Florence onions we harvested awhile back have been sitting on a screen in the old kitchen. With how cold it gets in there, they’ve been fine, and we’ve been using them as needed, but it’s starting to get too cold. Today, I was finally able to finish processing the last of them.

You should be able to go through the slide show of images above.

The first step was to cut away the shriveling green parts and the roots. When I was done, the bulbs filled my giant colander in a heap!

While I was working, the cats in the sun room were going nuts, trying to see what I was doing, so I opened the door and let them in with me. Quite a few came in to explore! One of the males is aggressively friendly. I was using the top of the chest freezer as a table. He jumped up onto it and was eager for pets. Thankfully, he was okay with head boops and arm rubs, because my hands were busy. If, however, I reached for the kitchen shears beside him instead of petting him, he would attack my arm! He even started biting, so I had to take him off the freezer repeatedly before he finally stopped.

Once the screen was clear, I had to figure out what to do with it. We made this as a barrier for the old basement door, so we could keep it open and allow cool air to circulate, while also keeping the cats out. It’s made with 1 inch wire mesh. I took it into the sun room and figured out a way to use it for the cats. It is now resting on one level of the shelf in front of the window on one side, and the cat cage on the other – though it did need propping up on the cat cage to make it level. Hopefully, it’ll stay. I then took a spare sheet of rigid insulation and cut it slightly longer than the screen. With how the frame and centre support is, I was able to fit the insulation under the screen, in between the long sides. The sheet was just narrow enough for that. Without support, of course, it started to sag, but this sheet had been used for something else and already had some holes in it. I was able to use one near the side and zip tie it to the screen, then made a couple more holes as far as I could reach on the other side and added another zip tie. Not that the cats’ weight would be on it, as the screen would hold them. It was just to keep it from sagging. The cats can walk on the wire, but there was another chunk of the insulation that I put on top, so it would be more comfortable. They’re probably scratch the heck out of it. They just love scratching at that insulation!

Before I set that up, though, I put the remains of another sheet against the window that’s missing the inner pane. It doesn’t fill it – we tried cutting pieces to fit before, but the insulation kept wanting to fall away, no matter how we tried to secure it – but it’s enough to reduce the chill from that window where it counts.

So now the cats have a sort of “cave” against that wall, covering the space we set up for them. It gives them another level to climb on that is under the shop lights. I have those set to turn on with the motion sensors, after dusk, and the insulation under the screen will help keep some of their own body heat in, underneath. Also, they won’t get blinded every time one of them moves. Yes, I have the lights set at their lowest level of brightness, but when it’s night, it still seems really bright!

Hopefully, the racoons won’t knock it off or something.

Once that was done, it was back to the onions.

The first batch of onions I cleaned up was for dehydrating in the oven. I have four baking sheets, but they are too big to fit side by side in my oven. This oven does not have an element on the bottom, though, so I was able to put a baking dish on the bottom for elevation, and that allowed me to fit three trays in.

For the first tray, I tried slicing the onions long ways and laying them out on a cooling rack in the baking tray. I could only fit about 1 1/2 larger onions on the tray that way. For the second one, I tried cutting them on the round and laying them out on another cooling rack, but they just fell through the openings. I ended up putting parchment paper down instead, the laid out the slices. The rings didn’t want to separate, so I cut the rest in half lengthwise, first, then sliced them. They still needed to be broken apart aggressively before the pieces could be spread out evenly. Still, I was able to fit about 3 larger onions on, that way. For the third tray (I didn’t bother taking a picture of that one), I just chopped the onions and spread them out. That was another 3 or 4 larger onions.

Those will take a while to dry, so the rest of the onions got chopped up for freezing. I would have wanted to dehydrate more, but chopping and freezing is a lot faster!

For that part, I tried out a trick I think I saw on Pinterest. Loading into freezer bags is a real pain. I’ve tried several different ways to support the bag, but the best I could come up with was to put it in a large measuring cup. It would still be floppy, but not as much.

This time, I got out our canning jar lifter. The slide lock part of the bags gets turned inside out, as I usually do to keep the locking parts clean. This lip then fits over the curved jar lifting end, while the flat handles act as a stand. The lifter can be opened as wide as the folded over part of the bag allows, and holds it tight. After filling the bag with the chopped onions – I fit 2 1/2 cups per size medium bag – the lifter can be squeezed together to free the top. After the flipped over part is flipped back again, the lifter can be opened wide, allowing plenty of room for the filled bag to be removed.

My goodness, I wish I’d known about this trick long ago! This was the easiest, fastest filling of freezer bags I’ve ever done!

I had to stop chopping part way through, as my back was starting to give out (yes, I even used a stool to raised one leg while I worked), which was a good time to have the supper my daughter made for me. Then it was back at it.

In the end, there were 14 freezer bags filled. All but one of them went into the big freezer. Before sealing the bags, I would close it most of the way, then stick in the short end of an elbow straw in the last gap and suck out the air to vacuum seal it. One of the bags lost its vacuum. I couldn’t see a hole, but there had to be one, somewhere. So that bag went into the fridge to use right away.

I’m quite happy with our onion haul this year. Even though one variety failed completely for some reason, we still have plenty of cured and braided onions, both yellow and red, to use throughout the winter, as well as some shallots, and now we have 13 bags of chopped onions in the freezer, 1 in the fridge, plus more dehydrating in the oven. It should be interesting to see how long this supply lasts us through the winter.

One thing about these Red of Florence onions; their shape makes them SO much easier to cut up! Plus, they taste good, so win-win!

The Re-Farmer