Today, one of my daughters and I headed out to do more of our monthly stock up that I wasn’t able to do when I did our Costco run. It was a good opportunity to also order and pick up my husband’s birthday pizza. :-) It’s not his birthday today, but we tend to spread out our celebrations over several days.
Before we got to indulge, though, we had some green gold to gather.
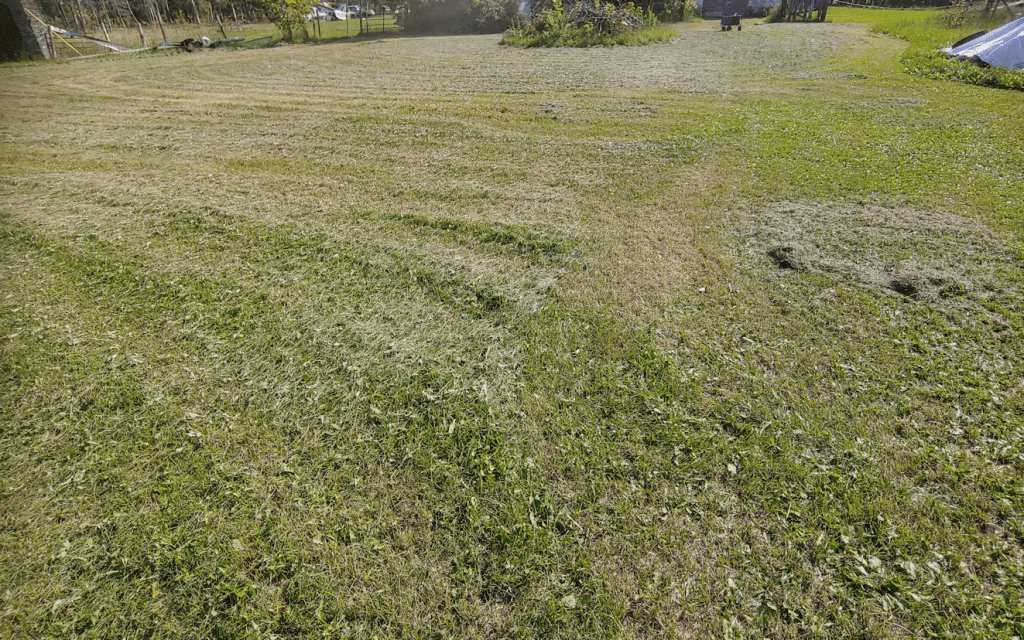
Today we hit 23C/73F with the humidex at 25C/77F, and full sun. That gave the grass clippings from yesterday’s mowing in the outer yard a chance to dry. My other daughter helped me rake it up and haul it over.
We now have a nice little haystack next to the compost pile, ready to be used in the low raised beds. This is from the two areas of the outer yard pictures, plus one more wheelbarrow full from the overgrown lane between them.
It would have been nice to have clippings like this throughout the summer; they would have been a huge help in keeping the garden beds mulched when it was needed most! Ah, well. Now that we have it, it will help us prepare our garden beds for next year! :-)
I never thought I would get all excited about having and collecting grass clippings. :-D
We’re having some pretty hot and humid days of late. Not heat like we’ve been having all summer, thankfully, but more “average for August” hot. Though it didn’t rain last night, when I came out to do my morning rounds, the dew was so heavy, I would have though we’d had some, had everything else not been completely dry.
The squash and gourds are certainly enjoying the moist heat!
The Ozark Nest Egg gourd plants are busily climbing the fence and blooming – and completely dwarfing the Thai Bottle gourd plants (on the left).
One of the flowers even made its way through the chicken wire critter barrier! :-D
So far, they all appear to be male flowers. No gourds forming, though it’s possible there are some hidden under the leaves. I won’t mess with the chicken wire to look.
Thanks to all the wonderful rain we’ve had, the grass is actually green and growing again, and in need of a mow. It took hours for the grass to dry enough for that to be an option, which meant mowing during the hottest part of the day.
Or it would have been, had the battery on the riding mower not been dead! It’s only been used once this year, and I had to charge it then, too.
With the time it took to charge the battery, it was actually starting to cool down, so I guess that was a good thing! I took advantage of it and was able to do both the inner and outer yards, including areas I did not more the one other time this year we mowed. I kept doing as long as the light held, and managed to get it done just before it was full dark, though the yard light had turned on well before I finished. I was even able to mow in front of the storage shed. Which means that, weather willing, in the next day or two, we’ll have lots of grass clippings to rake up and set aside for the garden.
By the time I finally came inside, it was 9pm, but it was worth it! :-)
After all the wonderful rain we’ve been having, I just had to go and check out some areas beyond the outer yard.
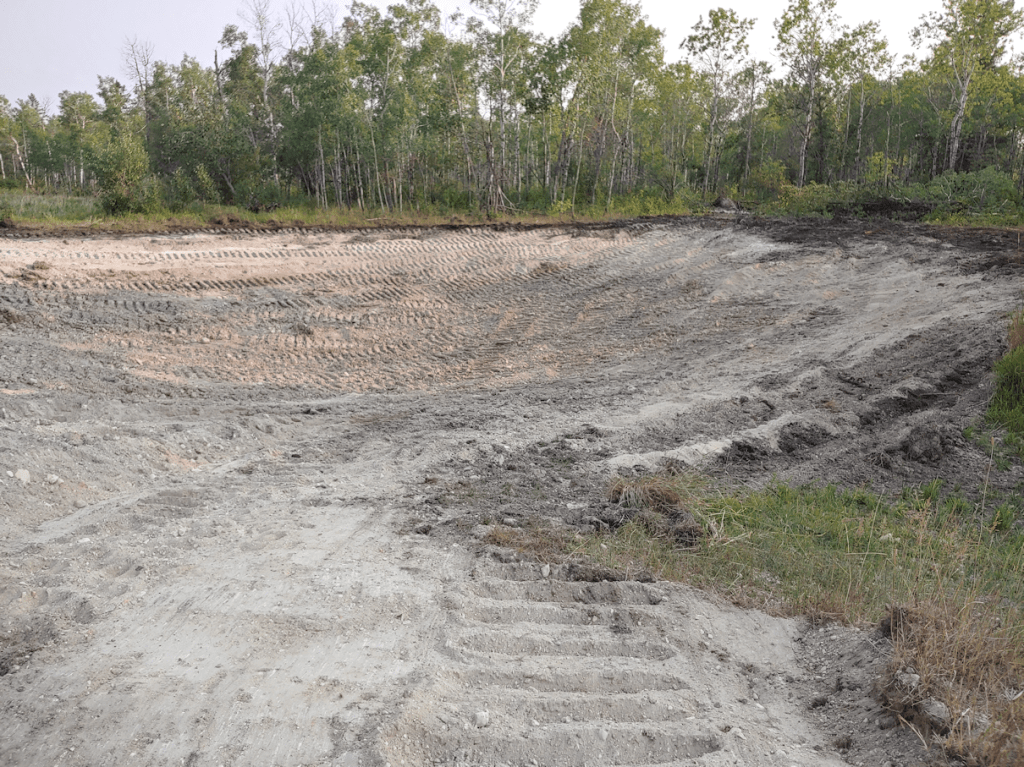
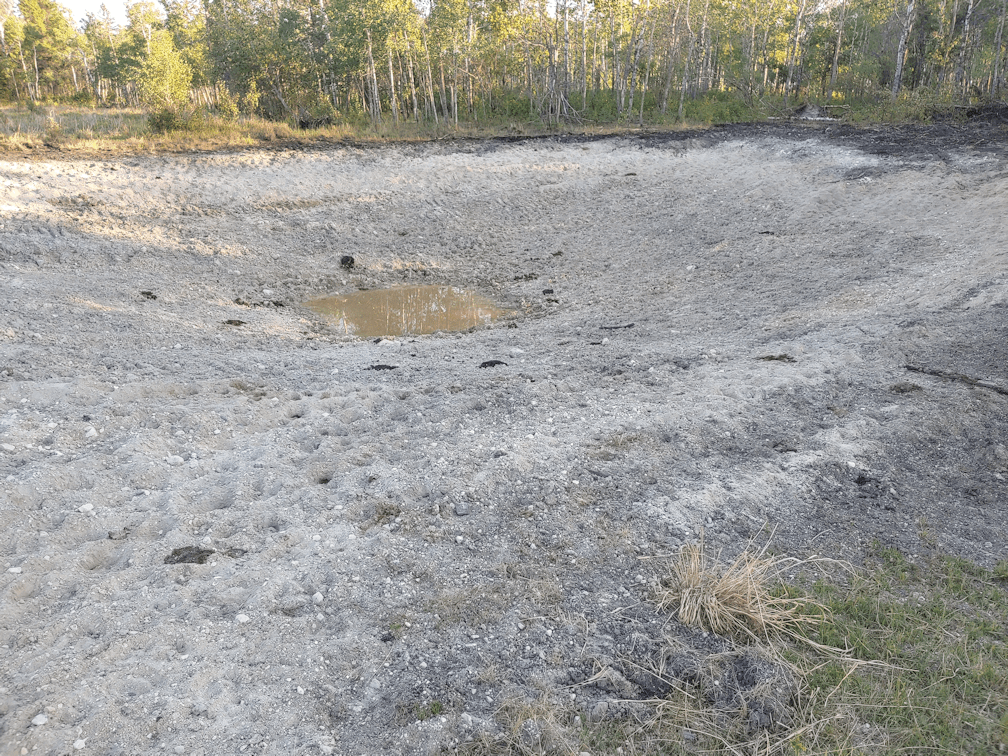
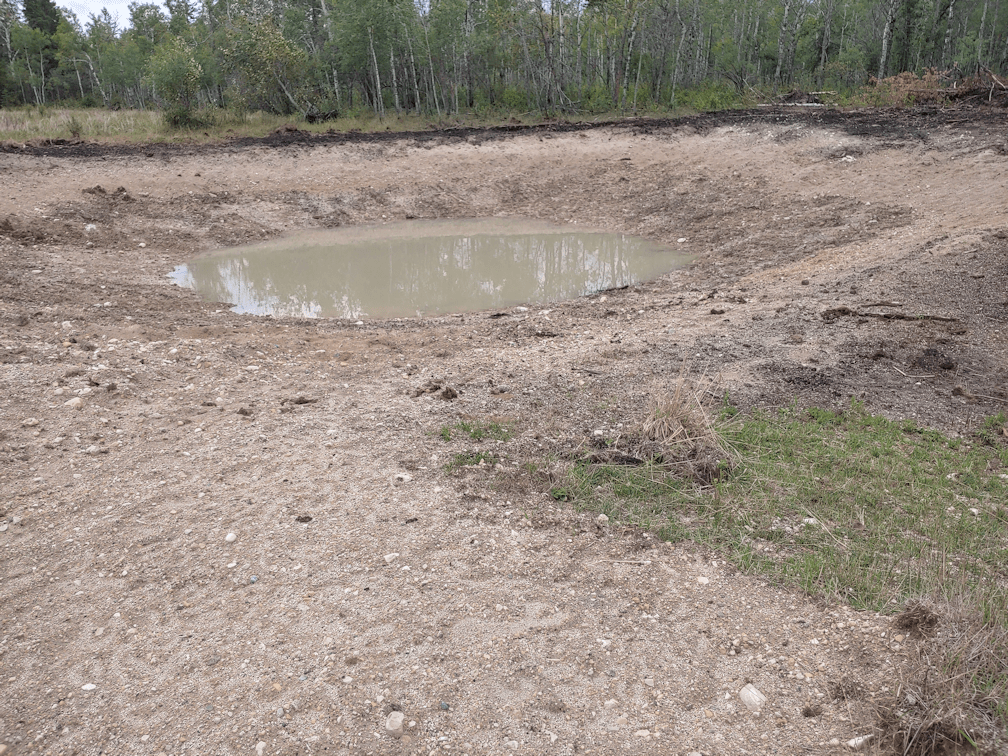
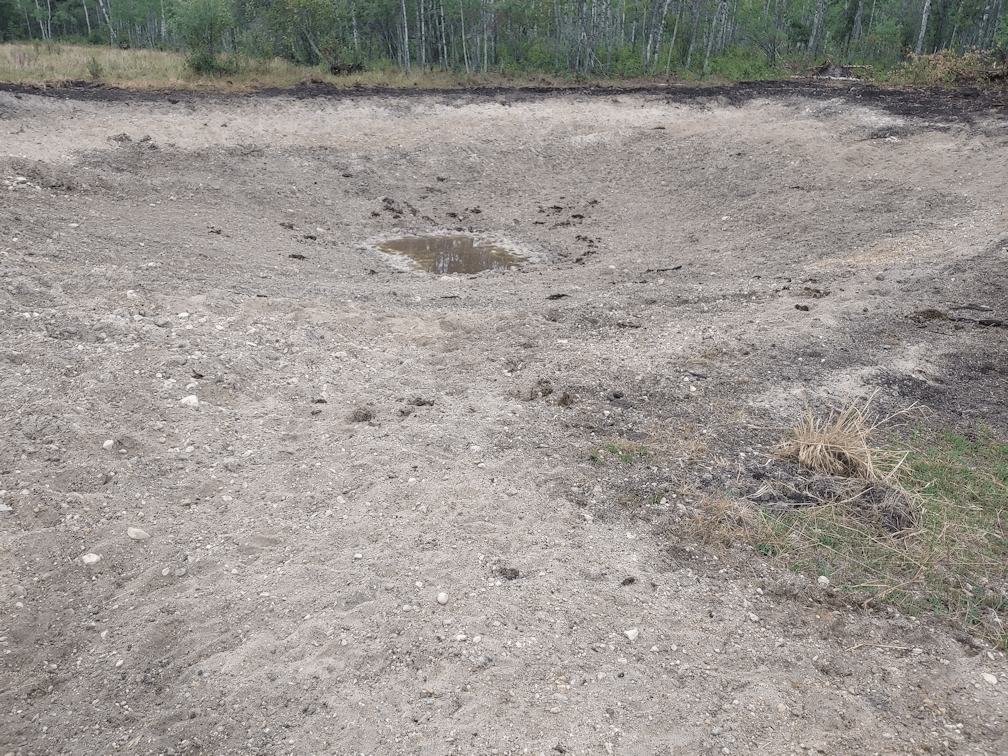
Of course, that included the old gravel pit! Here’s a slideshow, covering just over 3 weeks, from being newly dug out to today.
The first photo was taken the day the pit was dug, on the 7th, though it was deepened slightly a couple of days later. The next photo of the first puddle of water was taken on the 10th. By the 14th, it was noticeably lower, and by the 20th, looking almost gone. The next photo was taken on the 21st, and the last was taken today, the 23rd.
There’s a nice little pond started in there, thanks to the wonderful rains we have been having. Had the renter not had this dug deeper, there would have been little more than a muddy puddle, only slightly larger than the pond not far away. I checked that out, too, and for all the additional rain we’ve had, there really isn’t much more water visible there than the last time I checked it out.
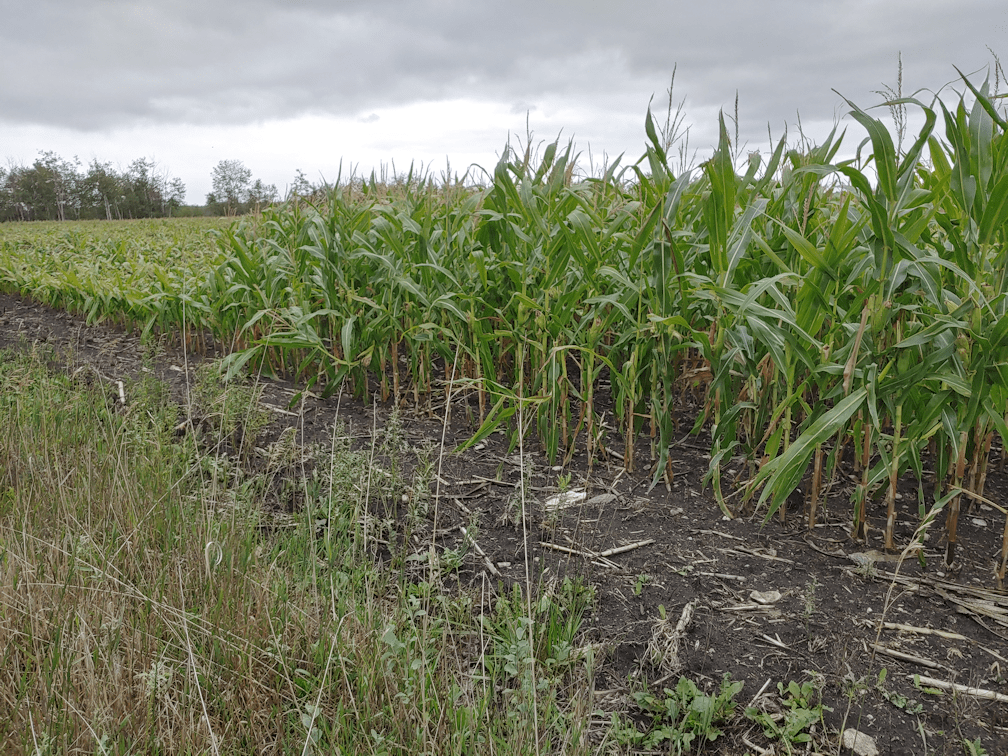
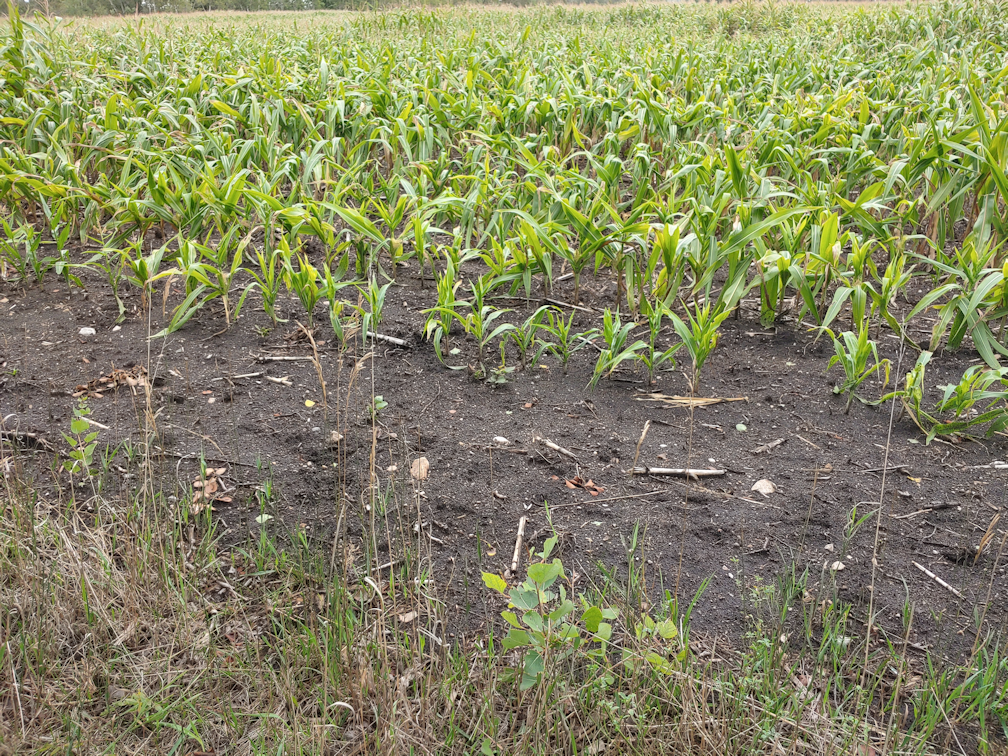
Since I was in the area, anyhow, I decided to check out another low, almost marshy, area close to the road that is partly in where the renter has his corn. Driving past, the feed corn looked pretty good, but this was the first time I got a real look at how it was doing.
What a mix! In some areas, the corn was taller – though still only about 4 feet high – with swaths of shorter corner, here and there.
This spot was the most extreme in corn shortness! Not far past this, it started getting tall again. Especially right in the corner, near where the low area I wanted to check out was. While walking along the fence line, I could see where deer had chomped off the tops of some of the developing corn cobs.
Our views while driving by on the road was deceptive. While most of it seems to be doing okay, if shorter than normal, there is a lot where the feed corn isn’t much better than our own sweet corn! Though even the smallest of the feed corn is sturdier than ours. That would be the difference in soil nutrients. The renter has been good about amending the soil with manure, composting in old hay and straw – even the stalks from last year’s crop – and keeping up the nitrogen.
Last year had been such a bad year for crops, and this one has been even worse. Depending on the next few weeks, though, it does look like the renter will have something to harvest, at least.
As for the low area I had gone to check out, there was no sign of water there at all. Not even where it merged with the ditch along the road. It was, at least, looking a big greener than the surrounding areas, but that was pretty much it.
Well, it looks like we’re down another bird feeder.
This is all I could find this morning. The top cap and the base.
There is no sign of the seed canister and the frame.
The canister is somewhat understandable. It’s just clear plastic, so it would be harder to see if it ended up under the lilacs or something. The frame, however, is red. It should be easily visible.
There is no sign of either.
I’m sure we’ll find them eventually, but I am curious what happened to them. With the winds we’ve been having, I’m almost willing to accept that the feeder was blown apart in the wind. On the one hand, that doesn’t make too much sense, since at least the top would still be on the hanger, and the pieces would be nearby. On the other hand, it seems very unlikely that critters did the damage, because of the weather conditions we had last night. Critters would have been taking shelter, not climbing posts for bird seed. Especially since there are still piles of sunflower seeds on the ground from when the big feeder fell down and broke apart.
This morning, I woke to the sound of a light rain. I was so excited! I honestly didn’t expect the predicted rain to hit us.
Of course, by the time I went out to do my morning rounds, it had pretty much stopped. Which I suppose was good, since switching out memory cards on the trail cams in the rain isn’t really a good thing. :-D
While checking on the garden beds, I was quite thrilled to see this.
The baby luffa gourd’s blossom is opening!
So far, it’s still the only gourd I’m seeing developing.
Check out that orange colour in the background. The Red Kuri squash is ripening up nicely!
While I was out and about, it did start to rain a bit, and I decided to do a quick check of the gravel pit dugout.
There is so little water left in there, form the last time it rained. No doubt, the renter is still needing to bring water to his cattle here.
The rain has continued, and even gotten heavier, throughout the day. If the forecasts are accurate, it will continue to rain all through tomorrow, too, with a 100% chance of thunderstorms overnight. I’m even getting a weather warning on my desktop app I’ve never seen before. “Overland Flow Flood.” It’s for our region, but at rivers that are not anywhere near us. We have no rivers near us. Not even creeks.
The rain is still desperately needed, and it looks like even the areas where the most wildfires are will finally get some rain.
That feeder was almost completely full, as of last night.
I’m actually surprised it took until now for the hinged lid to break apart, considering how many times it’s landed upside down and open.
At least I can say the base finally held!
The screws tore right through the old wood of the feeder’s platform.
I don’t see any point in repairing it at this time, but I’ll be keeping some of the parts and pieces, should we find ourselves with the materials to build a new one.
As for the base still on the post, it’s so secure, I’m leaving it for now. Who knows. I might just make a quick platform to put on there for a simple feeder.
Frustrating, but considering the condition the feeder was in when we moved here, it really is amazing it didn’t happen earlier.
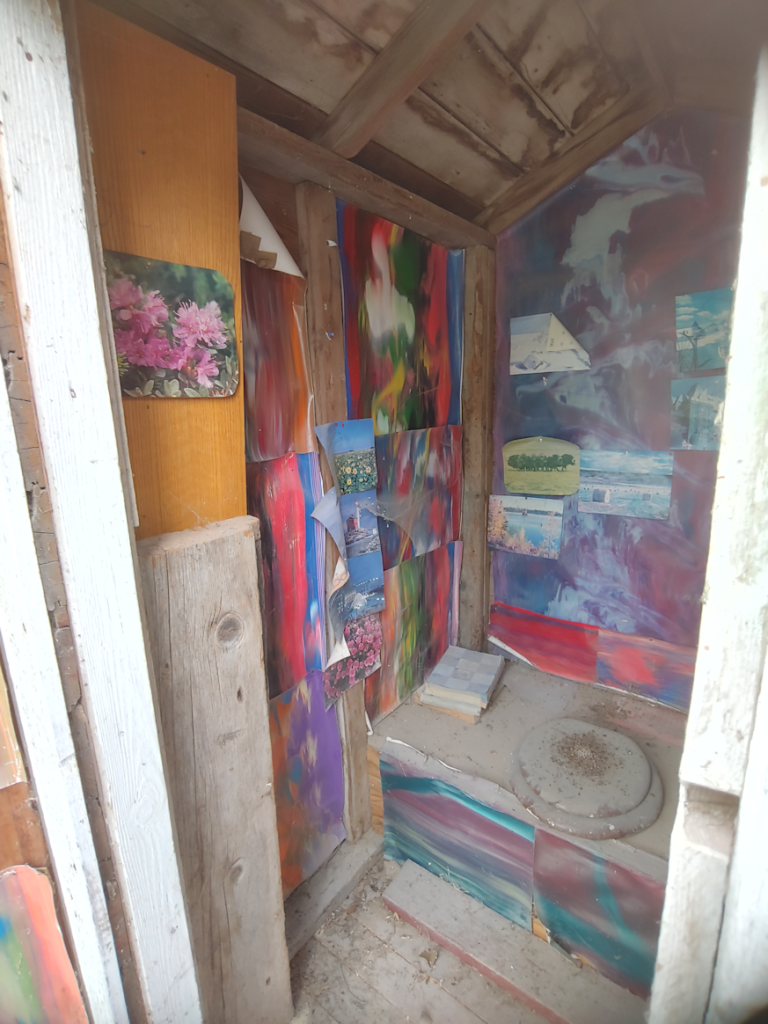
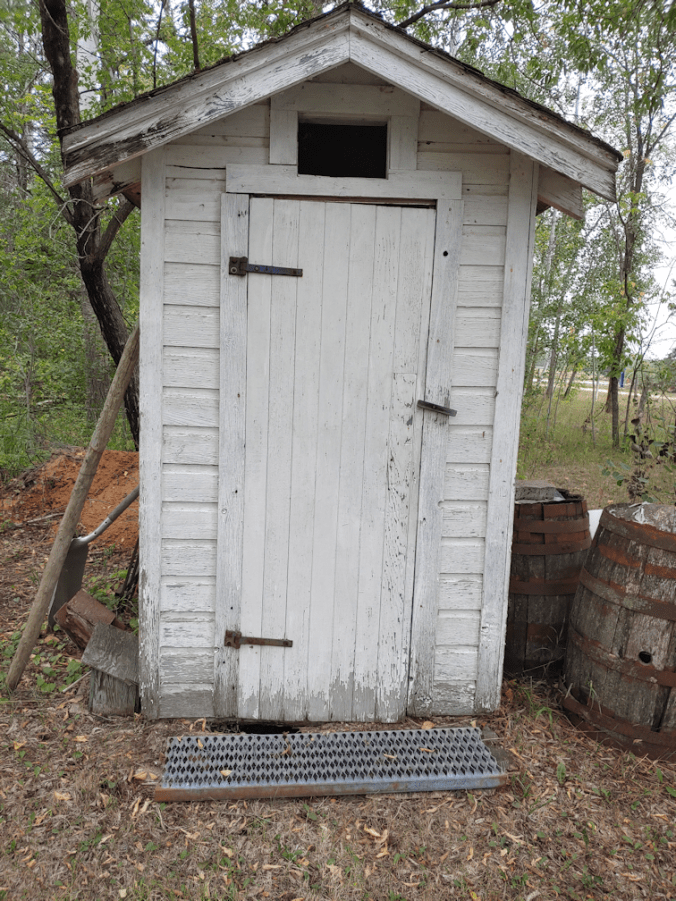
Okay, so the area in front of the outhouse is now safe to walk on.
What about the inside?
The very… colourful… inside.
I’d asked my mother about all the paper in there. She told me she put them there to make it pretty.
…
I… just don’t know what to say about that.
Like pretty much everything else around here, the outhouse was being used for storage.
The first thing I had to do, though, was check out the floor. Much to my surprise, it’s solid. I still plan to reinforce it, but there is nothing wrong with the floor boards.
Other than being really, really disgusting.
And that toilet seat…
*shudder*
This outhouse has actually been used a couple of times since we’ve moved here. Once or twice by my brother, who insisted on using it rather than going inside. Once by a poor guy who came out to service our internet that suddenly needed to go to the bathroom, but my daughter had just gone into the shower. He couldn’t wait for the bathroom to be available, and was actually willing to use this outhouse.
I still feel so bad about that. The poor guy!
The first order of business was to take everything out that was leaning in the corners.
Which included a folding closet door (minus one hinge), a length of copper pipe, a fluorescent light fixture, which I think still have bulbs in it, and several pieces of wood.
I might be able to use the bigger ones to reinforce the floor.
Oh, and more of that colourful paper that is all over the walls.
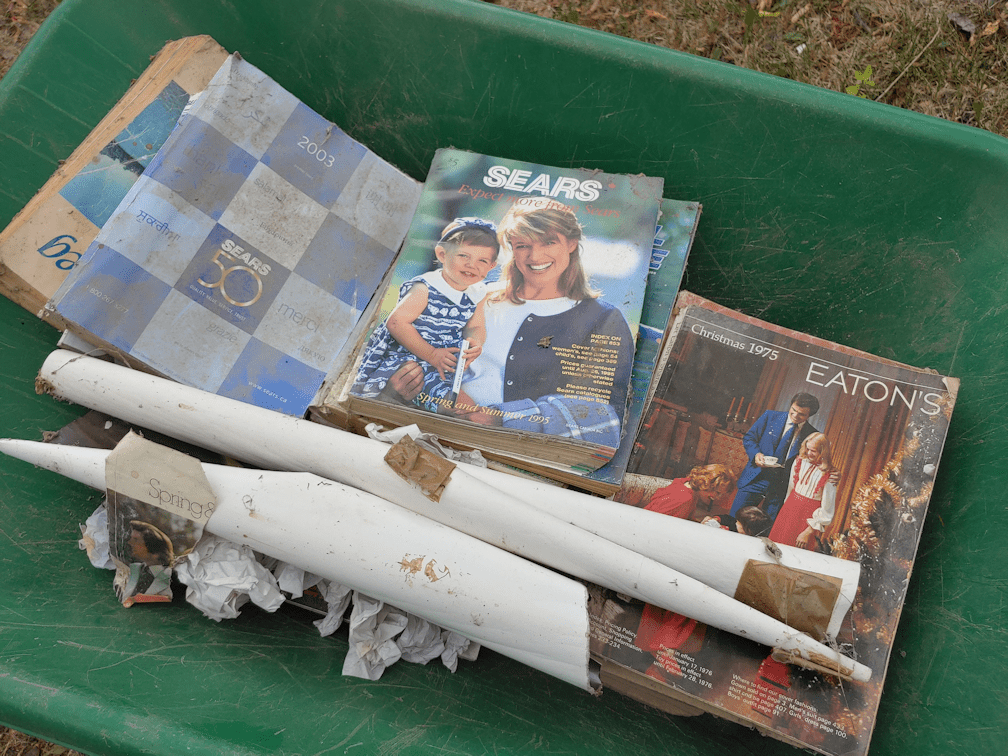
Then it was time to move the toilet paper.
Yes. I’m serious. That’s the toilet paper.
Well, not the rolled up paper with the tape on it. That was with the stuff stored in the corners.
When I was a kid, before we had an indoor bathroom, we used old catalogs, fliers, phone books, etc. as toilet paper. I didn’t think it was strange, since I knew nothing else. We didn’t buy toilet paper until we got an indoor bathroom, because this stuff couldn’t be flushed down the toilet.
While clearing things out, I emptied the medicine cabinet on the wall, too.
A 30 year old calendar page isn’t quite so strange when compared to a 46 year old Eaton’s Christmas catalog.
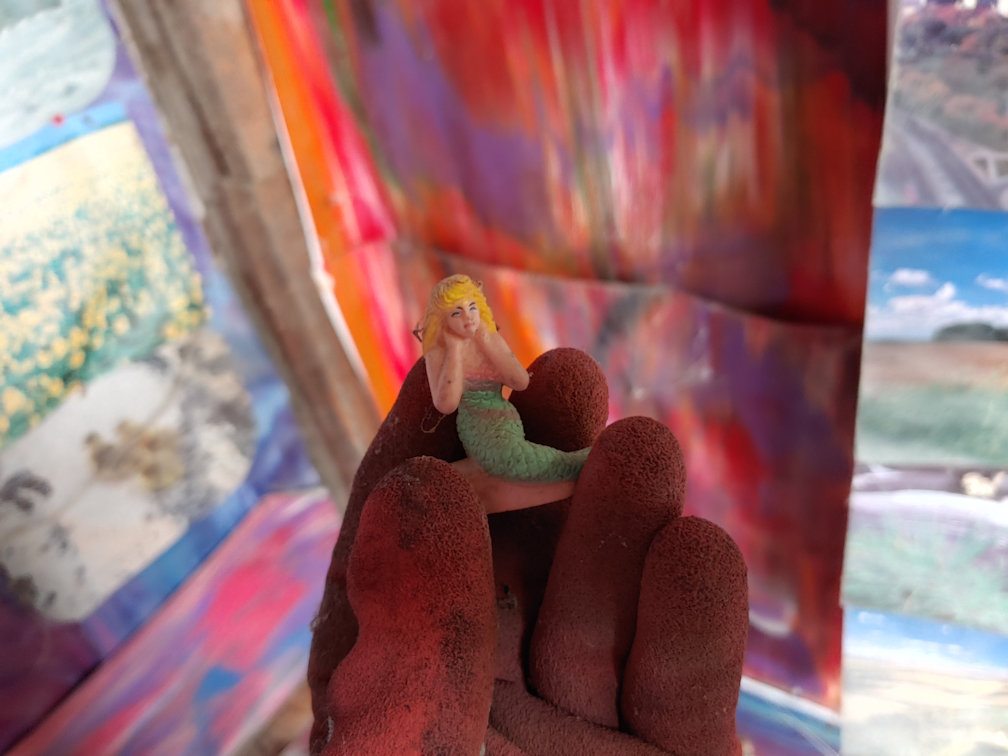
After moving the catalogs and whatnot away, I found this in the corner.
A pile of pine cones!
Also, my mother even covered the top of the toilet seat box with colourful paper!
When I saw the pine cones, my first through was that squirrels had got in and were starting to make a winter stash. Which was a surprise, since this outhouse is actually pretty animal proof. I don’t know where squirrels would have got in.
There was something I missed, however.
Do you see that tiny little something in the corner, a different colour from the pine cones?
When I started sweeping the cones away, I found this.
A mermaid!
I now think that perhaps my late brother’s kids may have played in here and left the pile of cones and mermaid behind, forgotten. If true, then this may have been here for more than 10 years. Probably quite a bit more! However it got here, when we are done with cleaning up and setting up the outhouse, this is going to get a place of honour for display! :-D More “found object” art… ;-)
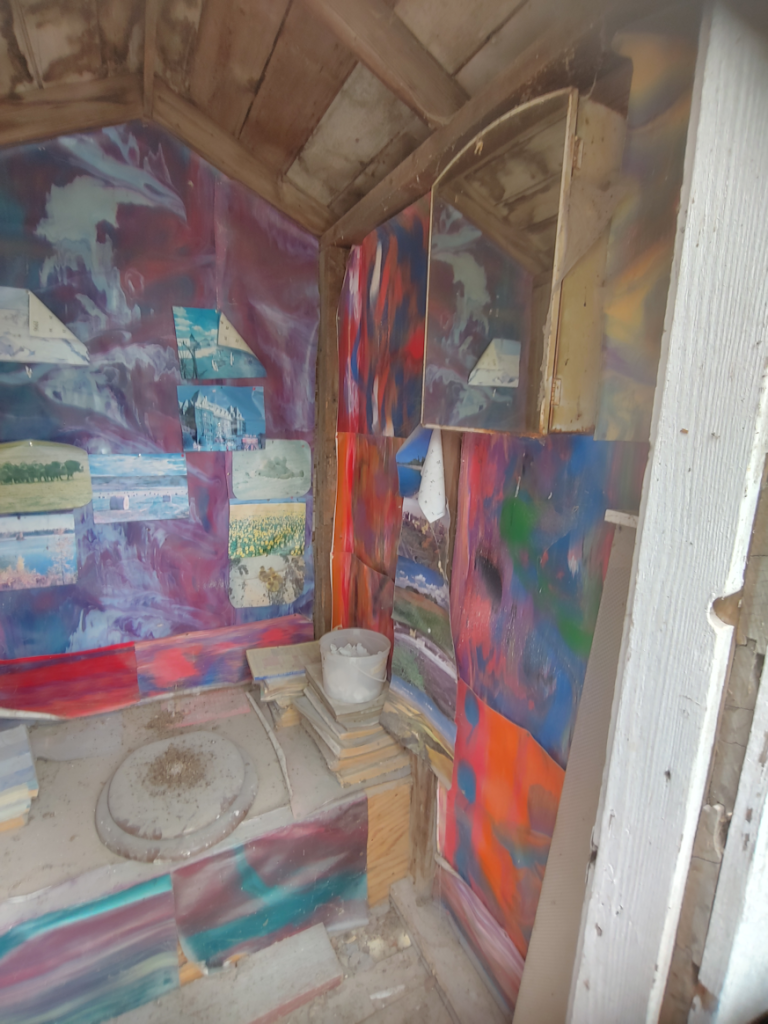
Once everything was cleared out, it was time to take all the paper off the walls.
At that point, I was starting to really wish I could wear a mask. I tried to be careful not to kick up much dust, but there was no way to completely avoid it.
The outhouse might have been critter proof, but it was not moth proof! As I pulled sheets of paper off, I kept finding moths hiding behind them. Dozens of them.
They did not appreciate being woken up!
Moths were not the only surprise I found behind the paper.
I suspect this was the first attempt at “beautifying” the outhouse. This was right in the middle of the back wall, and would have been the first thing a person saw on opening the door. Then it got covered over with the colourful paper.
I … don’t know what to say. :-D
Yay!! It’s all done! All the paper is gone!
I was going to say, it already looks a lot better, but… no. It still looks disgusting.
Time to break out the big guns.
It’s power washing time!
I hosed down the entire inside, trying to get into every crevice. Which is not easy to do when trying to get the front, on either side of the doorway, while standing outside.
I sure as heck wasn’t going to be hosing it down while standing inside!!
That part took a while.
Okay, NOW I can say, it looks a lot better!
Also, that toilet seat is actually white. It’s been painted brown.
I… don’t know what to say.
Now that it’s have it’s initial cleaning done, I’m actually impressed with how sound this is. Ideally, we would jack it up higher and put it on blocks, rather than leave it on the beams that it’s on, but this is not meant to stay.
The next thing that needs to be done is to scrub the inside. That will be the time to get rid of all the bits of paper and packing tape stuck to the tacks and staples used to tack them to the walls. I forgot to hose down the inside of the medicine cabinet, but that’s okay. We will likely take that down for a while.
While the whole thing needs a paint job, the plan is to use a highly durable paint on the inside, that can handle scrubbing.
In a LIGHT colour! My daughter was suggesting a robin’s egg blue, but I’d be happy with anything that makes it brighter in there. Also, a new toilet seat. There’s nothing “wrong” with this one, except… ew.
I checked the pit, of course. It does need to be emptied. It’s also completely composted and level – being flooded out with melted snow for years did have a plus side. The cat litter compost is behind the outhouse, so it can be added to that. There are those that recommend using human waste as garden compost, but that is something we will never do. Who knows what medications a person might have been on when they left their “deposits”. While it is not urgent to empty the pit, it is definitely something I want to do before anyone actually uses it again.
Oh, we also have to do a bit of work on the door. It needs new hingles, as the current ones are sagging. It would probably be a good idea to calk around some areas, so no more moths will get in. Particularly around the screen covered opening at the top. I actually saw a moth squeezing through the wood around there!
The biggest job that needs to be done is the roof. The shingles have moss growing on them. Given the small size of the roof, however, I think we have options to modify. There are some scrap pieces of plywood in the barn that should be big enough. After removing the old shingles, I am thinking of adding some plywood that is longer than the current roof size, to make an overhang above the door. We also have lots of leftover pieces of metal roofing material that can be cut to size and used instead of using shingles.
The final touch I’d like to add is a solar powered light. I’ve been eyeballing some solar powered hanging light fixtures, thinking of the cordwood building we plan to make, and that can be used here just as well. That would be a huge improvement over using candles or flashlights, like we did when I was a child! :-D
If we do this right, this outhouse should not only last for years, but actually be pleasant to use.
Today turned out to be a very pleasant day, weather wise, so I used it to do a job that I’ve been avoiding for a long time.
I started cleaning up our “second bathroom.”
Yup.
The outhouse.
Now, we do have plans to build an outdoor bathroom that can be used should we ever lose power or water. We are wanting to build a cordwood practice building, with the intention that it will have a composting toilet in it, and no pit under it. That way, in the future, it could be converted to something else without too much difficulty. We were supposed to at least start preparing the base last year, but that didn’t work out, and now I’m glad it didn’t. We have a whole lot of dead trees to cut down not far from the location we chose for it. A location that is the most open space that we would want to fell the trees towards.
Meanwhile, we have this old thing.
This post will be about working on the outside. Part two will be about working on the inside.
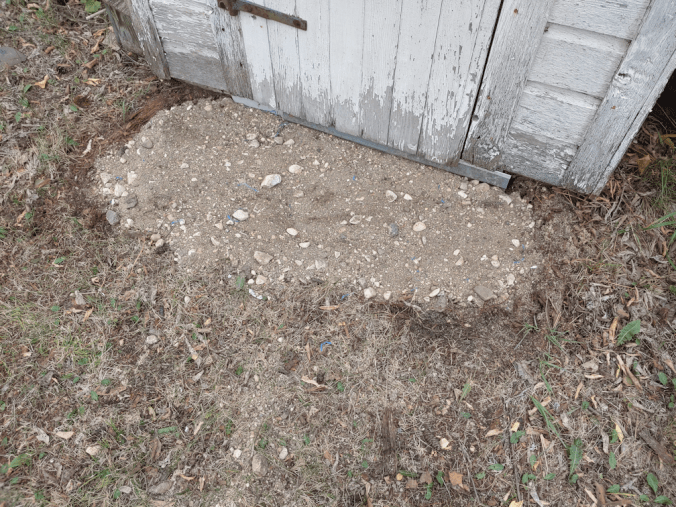
This right here is the main issue with the outhouse. I placed the metal (I can never remember what those area called!) in front of the door because it would sometimes open in severe winds, but also because of that hole.
Our first two springs after we moved here, we discovered that when the snow melted, it would pool in front of the outhouse. I was able to see through that hole that the pit would fill with water. Another reason why we want to have an outdoor bathroom elsewhere, and no pit!
One of the delays in getting this done was trying to figure out what to replace this with! I didn’t want it to be an issue again in the future, so not wood, for starters. But what could I use that would be big enough to cover the front, solid enough to walk on, yet thin enough not to block the door from opening?
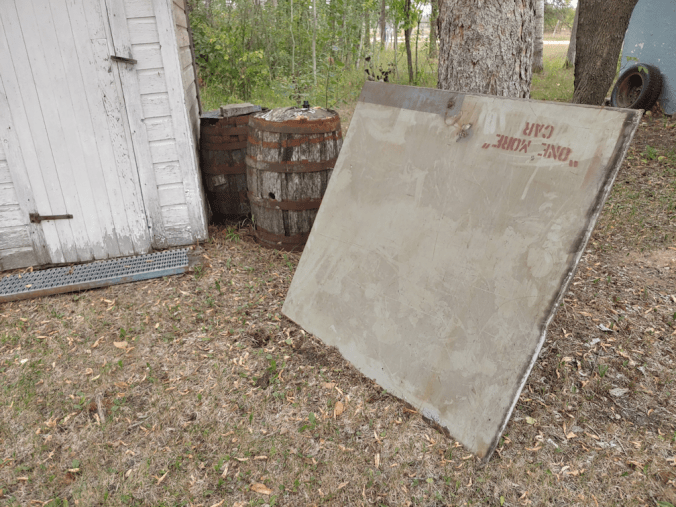
Barn salvage to the rescue.
There were several large sheets of steel in the barn and, tucked in between, was this smaller piece.
Yeah. That’s the smaller piece.
Now, when I was looking at the sheets, all I saw was rust. They’re heavy, so I hadn’t moved them enough to see their other sides. It wasn’t until I was bringing this over, turning it end over end, that I realized the other side had no rust on it.
Also, it had writing on it.
What a curious thing!
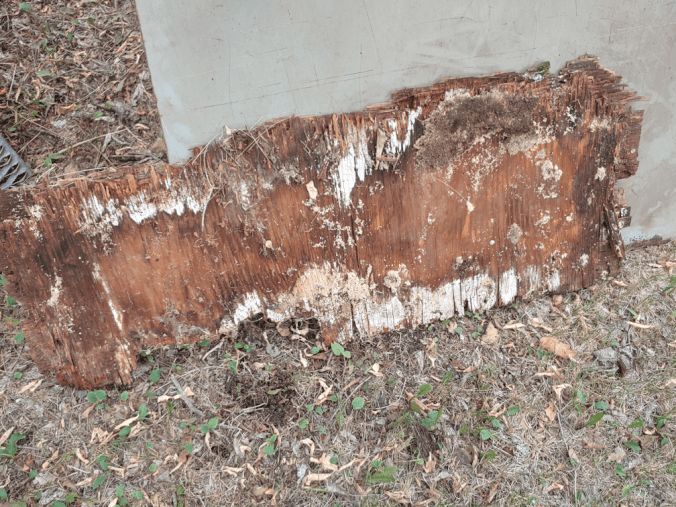
Once the steel sheet was brought over, I removed the top piece that was in front of the door.
So… that’s disgusting. !!!
The outhouse is sitting on top of two large beams, which extend in front. The piece I’d removed was nailed to those beams, but everything was so rotted, there was nothing holding anything anymore.
Also, that sawdust is from ants.
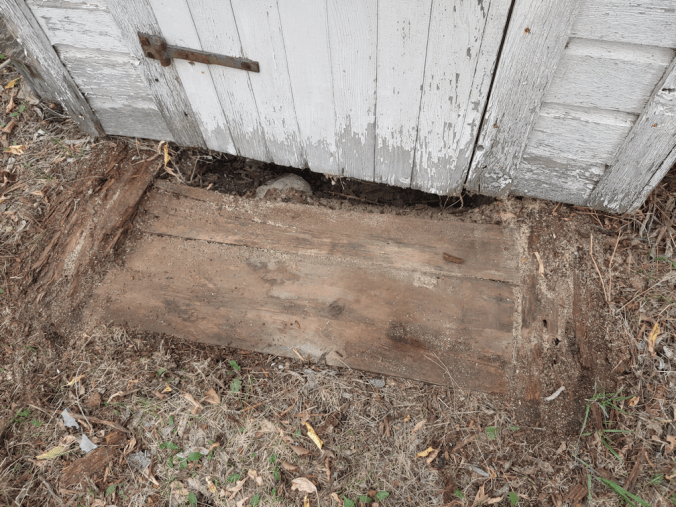
Time to clean up and assess what’s underneath.
The boards I uncovered felt surprisingly solid. They were also quite thick.
And very rotten. They only felt solid because they were supported by the soil beneath.
Also, that’s a very large opening under the door! It seems the edge of the pit had started to collapse. No surprise, since the pit was filling with water in the spring.
The first order of business, then, was to block that opening.
The garage is nearby, and there were some pieces of metal roofing leaning against the side. There was also a strip of what I think was the top cap for the metal roof. I’m not 100% sure, only because I’ve never seen one up close. I just see them at the top of the outbuildings we have with metal roofs.
Thankfully, we have some really heavy duty metal cutting sheers. I used them to cut the piece to fit under the door, between the two beams. The metal was already bent slightly in the middle, which made it easy to bend it to a 90 degree angle. It turned out to be the perfect width, as the top of the metal is flush with the floor of the outhouse. It will not get in the way of the door, nor be a tripping hazard.
It is also supported by that rock, so it’s not going anywhere.
There is, however, still a gap under it. Which is where the rest of the metal piece got used.
After bending it to a 90 degree angle, it also fit perfectly flush with the floor, and covered the largest part of the gap. The little bit of space under the door hinge is mostly filled with that big rock.
Now it’s time to fill the space.
This is where I got to take advantage of the hard work the groundhogs have been doing, building their den under the junk pile, leaving some beautiful rocks and gravel for me to use!
First, I collected the biggest rocks that were visible. I also grabbed one of the flat rocks I’d found under the old half wine barrel planter I’d cleaned up from near the junk pile. That was used to cover the small gap near the big rock under the metal pieces. Then the rocks were added to keep everything in place.
Then I brought over a load of sand and gravel – and a few more larger rocks – from the groundhog den.
Most of it went to filling in the space left behind from removing the rotted wood and tamping it down.
The rest was spread out to go under the metal sheet. At this point, the sheet was laid down and removed a few times, until I got it fully supported by gravel and rocks, and level. I did end up having to get a bit more sand and gravel before I was done.
And there we have it! We can now to into the outhouse, and not worry about anything collapsing under our feet and getting hurt.
I just had to make sure the text on the metal sheet was facing so that it could be easily seen and read. I am curious as to why it says “one more” car, and why the words “one more” are in quotes, but the word “car” is not. :-D
Now that it’s safe on the outside, time to see if it’s safe on the inside!
Starting today (Sunday), we’re supposed to get hit with high temperatures again, and the thunderstorms that were predicted for Tuesday are now forecast for Wednesday or Thursday, depending on which app I check.
Yesterday evening, I decided to check on the gravel pit and see if there was still water from our last rainfalls.
The water level is definitely lower. Between the cows drinking from it, and the return to hot and dry conditions, I’m almost surprised there’s water left at all. There may even be groundwater seeping into it by now, too.
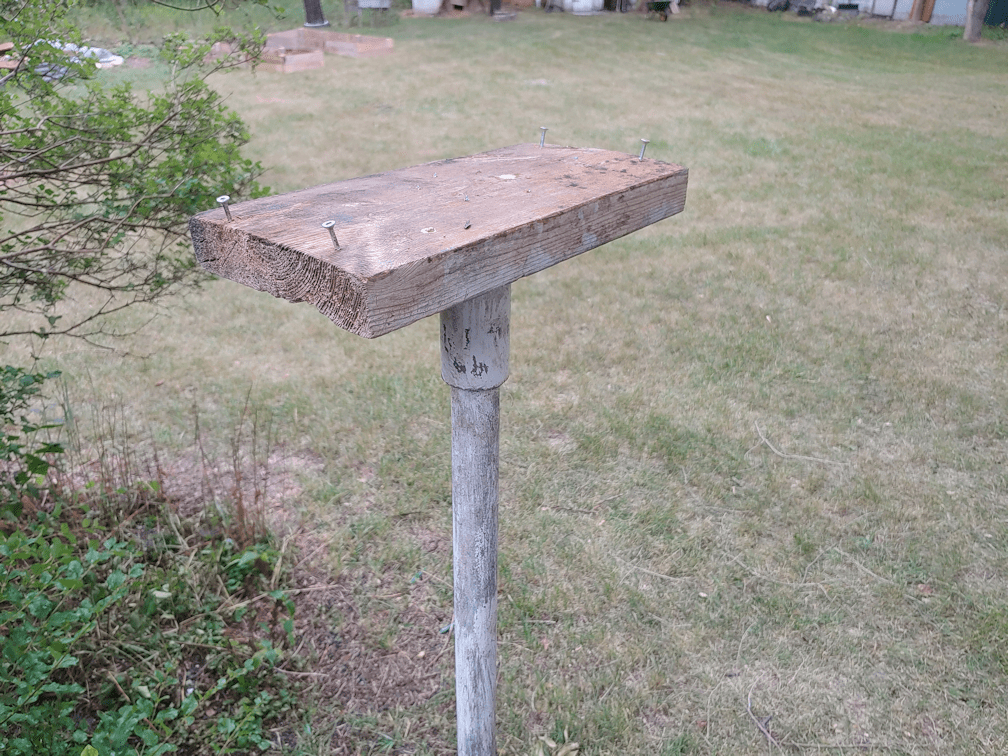
I found the big feeder on the ground again, the screws yet again ripped right out of the base. This, even after adding newer, stronger wood to the bottom, and using more and longer screws!
Then I found the other feeder.
Well, parts of it, anyhow.
Thankfully, this feeder is actually designed to come apart, so this is not broken. Just in pieces.
But one piece was missing! The part with the cable it hangs from.
I finally found it, some distance away, under a lilac bush.
The parts and pieces were all wet and splashed with mud and dirt, so it got a cleaning and is now sitting to dry before I refill it and hang it back up.
Then I turned my attention to the big feeder.
Part of the problem with it is how much it wobbles on the top of the post. I’d added foam covered wire, wrapped around the top of the post, to reduce the wobbling. This reduced the wobble, but it was still there. The raccoons are rather large, weighty critters, so if they’re climbing the post to get onto the bird feeder, they would be causing it to tip quite a bit. That is likely what is putting so much stress on the screws and the wood. Of the six screws holding the base, which had slid to the bottom of the post again, to the underside of the feeder, pieces of wood were still stuck to a couple of them, while one of the screws was gone completely. I found half of it in the ground. It had snapped right off!
So along with putting the base back on using even longer screws, which are now long enough to be going right through the added wood and into the bottom of the feeder itself, I had to do something about that wobble. Something that wouldn’t slide out of position, thicker and with less give than what I used before.
I found a solution.
I use twine, and some of my husband’s navy rope work that he taught me, years ago, that secures the ends in a way that they cannot come loose and unravel.
It took wrapping three layers of twine to get the thickness needed. The base is now solid on the post, with no wiggle, and I can still slide it on and off the post as needed.
This, together with the even longer screws, should prevent the base from being torn off the feeder again.
Of course, that leaves us with the problem of the raccoons getting into the feeders in the first place.