Hearing

Well, it’s done. I had my teleconference court date this morning.

What a waste of time.

I figured we would have one of two results. Either the judge would look at our vandal’s claims against me and my defense, and throw the whole thing out, or we would get another court date.

I don’t think a judge was even on the call. Just a moderator, going through the docket. She first went through those files that had lawyers, then the employer related ones, then finally the rest. Our vandal’s suit against us was top of the third list, so we were done relatively quickly.

We have a hearing date in July, in person.

Well, at least they think we won’t be locked down anymore by next summer, but who knows if that will change before then.

Among the things the moderator told counsel for the previous files, that applied to everyone else as well, was instructions on what to bring for the in person court dates. This included all documentation, including printed out photographs (no bringing a laptop for a photographic slide show), in triplicate – one copy each for themselves, the judge and the opposing party. Which means nothing gets filed in advance, as would normally be the case. Which means no one gets to see the documentation in advance and respond, or prepare, appropriately. Even the judge will be seeing this documentation for the first time, in session. For those with audio or visual presentations, they were asked to bring the equipment necessary to play or display the files.

As for the hearing date, our vandal was asked if he would have witnesses, and he said he would have two. ??? When I was asked, I said I had no idea that was an option, but that I could bring up to two witnesses. I probably could bring three, but that would include my mother, and it would be just too much for her.

And that was it. Our part of the call was done.

Once I finished with the call, typed up my notes and printed them off for my files, I sent an email to update my siblings, then phoned my mother to update her. She was frustrated, too. She also asked if she could be there in July. !!! I told her that yes, she could be present as an observer if she wanted, but that would depend on what restrictions are still in place. It would also depend on her own health and mobility, and if she physically feels up to making the trip, but she acknowledged that from the start.

Then I made a call to my LegalShield office and am expecting a return call from my lawyer either today or tomorrow. Unfortunately, the office is not in this province. If I did want to have a lawyer representing me in court, they would find a local one for me, but we don’t have the money for a lawyer. All of our “un-allocated funds” in our budget has been going into improving things around here (including trying to set aside funds for a new roof), or fixing vehicles!

It blows me away that our vandal is going through with this, and has found people willing to go along with it. I can make a pretty good guess as to who his witnesses are, and I am guessing that it has to do with my defense that included a list of all the things we know (or that my brother could remember) he’s taken from the farm, totaling over $45,000 in estimated value. Which is fine. I’m not counter suing him, since he didn’t take those from me. He took them from my mother. If he wants to waste his time trying to prove any of it belonged to him, all that does is bolster my own defense. Which, simply put, is that I don’t own, nor claim to own, anything here, and that I had already told him that he could take what was his, if he could prove ownership. Of the stuff he listed that he claims are his, which he thinks is worth $13,000, he’s claiming things that aren’t his, and of the stuff that he actually does have some claim to was abandoned here so long ago, they have rotted away to the point that they’re barely worth anything even as scrap metal. Especially right now, when the scrap metal prices are so horrible. Other things he’s claiming are his (they aren’t) are just plain petty squabbling. He was also claiming things that he’d never claimed were his until I saw them on his list.

All this because I filed a restraining order against him after catching him trying to break the gate again.

I look forward to any advice my lawyer gives me.

With the cold we’ve been having, I have been negligent in switching out the memory cards on the trail cams, but after this call, I figured it needed to be done.

Though it was later than usual, it was still about -32C with a wind chill of about -42C (-25.6F/-43.6F).

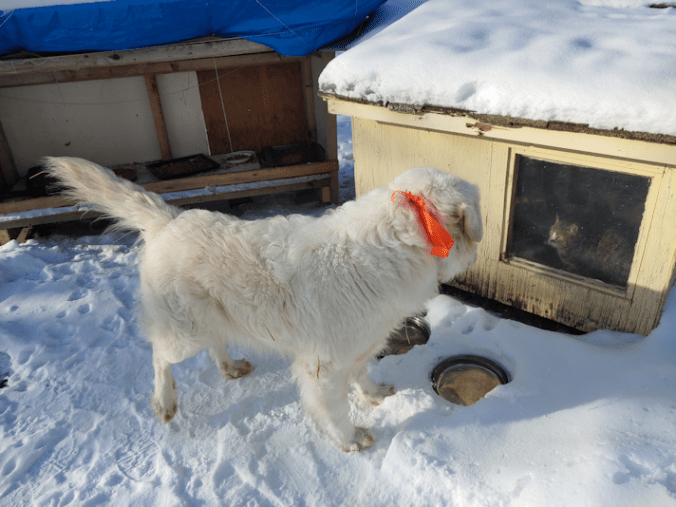
The heated water bowl had a thick layer of frost and ice on top!

The kitties were out and about, including Creamsicle Jr., but I was unable to get a look at his face to see how his eye was doing.

I very quickly realized that, in my rush to get outside, I forgot to wear two pairs of pants. There wasn’t much of a wind, but at these temperatures, it was still brutal!

I brought the cameras inside, one at a time, to change out their batteries and switch the memory cards. I knew the old camera’s batteries were already getting low, so they were due. The status bar on the new camera had showed full, the last time I switched out the memory cards and had to use my hands to warm it up so I could see the screen inside. With this cold, however, I decided to switch the batteries, anyhow, and just hang on to the used ones to switch back again the next time I have to do this.

Even with being able to warm up by bringing each camera inside, by the time I finished putting the new camera back up, the cold was really hitting me! Butterscotch had joined me while I was putting the new camera back, and was just begging to be picked up! I carried her back to the house and she was just rubbing her face all over my chin, loving the ride! The poor things are so chilled – and yet, they’re still going out in the cold, and not just for food and water!

Though the temperatures are still expected to be extremely cold for a few more days, after the call this morning, I would not be surprised if our vandal still decided to show up and cause problems, so I felt it was really important to have the cameras in good working order.

I had a surprise when checking the files, in that there actually were files! :-D The old camera died after a day, which I expected, considering the batteries were already so low. Much to my shock, the new camera, which has stopped working outright in colder temperatures before, actually kept on going and even recorded files while I was carrying it to the house! All in hues of pink. When the camera gets cold, all the files are overcast in pink! :-D It even got some night shots, though with a bright red low battery warning. Stills only, no video. Which is better than nothing, that’s for sure!

So I’m increasingly happy with the new camera again. Some of the files showed an internal temperature of -25C/-11F which is well below when the camera stopped working completely, before. Interestingly, when I switched memory cards, this time it did NOT ask me to reformat the new card. Which makes me suspect that it might have nothing to do with the card needing formatting (I’ve tried using different settings when formatting the cards on the desktop, to no avail) and more to do with the cold making it harder for the camera to read the card. Once inside and starting to warm up, it could read the card fine.

We shall see how things go. Hopefully, the cold will keep our vandal indoors. I would not be surprised if he starts calling my mother and siblings again, like he did after he saw the defense I’d filed.

As my mother put it when I talked to her this morning, “we need this like a whole in a bridge” (translated from Polish). At least we could get a laugh over the Polish and English versions of conveying the same frustration!

For now, it’s time to move on to more pleasant things. Which my next post will be about!

The Re-Farmer

I am so ready for spring

This has been a mild winter, overall.

Honest. It really has.

Then there are days like today.

I was once again up way too late, and took this screen shot just before 1:30am.

We had reached -27F with a wind chill of -42C.

For my visitors in the US, that’s -16.6F and -43.6F

I think this is the first time I’ve seen the “dust & dander” part not say “extreme”. LOL

Of course, before heading outside to do my rounds, I checked the temperatures again.

This was screen capped just after 8am.

“Extreme Cold Warning” Yeah. No s***, Sherlock! LOL

At -30C and a wind chill of -46C (-22F/-50.8F), I waited a couple of hours before heading out.

The windchill had dropped to -45C by then. That was it.

This was a day to layer up – and skip most of my rounds, including switching out the memory cards on the trail cams. I fed the critters and that was basically it.

When I opened the door, I found a very friendly face waiting for me!

My brother’s dog just loves these temperatures!

He was also really, really hoping the kitties would come out to play!

They did not. :-D

This old doghouse was built for dogs as big as him – and even bigger – so he could go inside, if he really wanted to. Thankfully, he’s done no more than sniff at the entry and pine over the cats through the windows, tail wagging furiously! If he tried to go in, I think the cats would explode! :-D

windchill

As I write this, we’ve “warmed up” to -29C/-44C (-20.2F/-47.2F). Our high of the day is forecast to be only a few degrees warmer.

We’re supposed to stay cold like this for about a week. Two days from now is supposed to be the coldest day before it starts warming up again, but the warm up is going to be very slow.

Polar vortexes suck.

Image source

Thankfully, we are stocked up well enough, even though we haven’t done our monthly shop. The only thing we’re going to run out of is wet cat food for the inside cats, and they can make do with dry kibble for a few days!

I have to add, I’m not really complaining. We’re warm inside, the hot water tank is still working, as are the well and septic pumps. Our internet may be ridiculously unstable, but we’ve got electricity. When I was a child growing up here, we didn’t have running water or an indoor bathroom until the mid 1970’s, which is when the new part of the house was added on, so there was 7 of us squeezed into the original part of the house. We had electricity, but power outages were common until about the 80’s. Even in winter, we used the outhouse by the garage (though my parents did set up a bucket in the basement to use at night) and a bathtub in the pump shack, where there was a wood burning cook stove to heat the water (and the uninsulated shack!).

We’ve got it pretty good, here! :-)

The Re-Farmer

Trending down

It’s getting chilly again!

When I headed out this morning, we were at -21C/-5.8F with a windchill of -33C/-27.4F

We’ll be getting colder over the next week, before we start going back to normal temperatures again.

It’s going to be a good time to stay indoors, drink lots of tea, and catch up on my crochet… :-D

Who am I kidding? The girls and I will probably be putting our heads together to figure out a gardening map. We’re dedicating a lot of planning for what will be temporary locations for almost everything, but we’re using our garden plots this year to help prepare the soil for when we plant fruit and nut trees in some of these areas.

Also, it’s a lot of fun. :-D

The Re-Farmer

Hinge fix done! And so is the van. :-)

This morning, I was off to the garage to get the EGR valve replaced. I dropped it off for 10 and had thought it might take an hour or so. He told me it would take two hours, which is a lot of time to fill, when there is nowhere to go to just sit. I ended up walking across town towards the lake – with high winds and blowing snow, I wasn’t going to go right to the beach! – and back again. Then I very, very slowly did some grocery shopping. We have yet to do our big monthly shop in the city, but with having to buy locally so often, it’s messed our budget up quite a bit. :-( Ah, well.

By the time I was in line to pay, I’d only managed to kill 1 hour. Thankfully, the line was slow, but I still ended up done very early. I was able to leave the cart by the exit and walking over to the garage to see how things where, stayed there a while (they let me wait in the office, alone, even though they’re not really supposed to do that anymore. I didn’t stay long, though, went back to claim my cart of groceries, then waited in one of the corners the grocery store has with picnic tables.

It was only somewhat sheltered from the wind. :-/

I went back and forth a couple of times before finally moving the cart to a different corner around the entry, where it was slightly more sheltered from the wind. I knew the garage was close to done with the van, so I walked into the parking lot every now and then to see if it was outside yet.

Two hours passed, and still no van!

After walking out to the parking lot to check again, I came back to a cashier coming outside to talk to me. She could see me through the window and was worried about me being in the cold! She told me I could take my cart inside the vestibule. There isn’t a lot of space there, with how traffic is blocked and redirected now, but she told me it was okay. So I got to be indoors for the last 25 minutes or so! The only downside was that I had to wear my Mingle Mask, which would fog up while I was inside, then when I stepped out to see if the van was outside, the condensation would freeze! LOL

Of course, I could have just waited for the garage to call me on my cell phone, but the last time they did that, I never heard my phone ringing in my pocket. I happened to have it in my hand this time, though. :-D

It turns out the van was not very co-operative for them! I can’t say I’m surprised to hear that. ;-) As I was paying, he made sure to tell me to not buy gas at the co-op from now one. I told him I’d already stopped! He also warned me that, while he cleaned the lines out as far as he could, I might still feel some stutters or hiccups as bits of carbon breaks loose. He recommended that, when the opportunity arises, such as when leaving a stop sign, to floor it. That is something I normally avoid! LOL It’ll help clear the carbon out faster, though. So I’ll do it. Just not today! It was just too icy out there.

Once the van was paid for, I drove to the grocery store. The staff in the vestibule, there to sanitize the carts, recognized me as I drove up. By the time I stopped at the doors, she had the cart out and helped me load it into the van!

We had issues with this place when we first moved out here, but since then, they have really improved, and these days have been going above and beyond. It is much appreciated!

Once at home, I pulled into the yard to unload. The girls very carefully opened the main door and propped it up, so it was all ready and waiting to be finished while the girls put away the groceries.

Drilling the pilot holes was a pain. I’d hoped not to need to, with the lilac wood I used already having soft spots in the middle; I could easily push a nail through the middles. I was only able to get one of the original screws in, though. Even with using the Dremel and a carving tip to enlarge the pilot holes, the last 2 screws would go only so far before I found myself stripping the heads instead of going further. The lilac is a surprisingly hard wood.

In the end, I replaced the original screws.

So now I have two Robbies and and Phillips. :-D I really should have replaced the third one, but the new screws are slightly shorter, so I left the longer screw in place. The new screws were still pretty hard to get all the way in, but the square tips handle the strain a lot better than star tips.

Then came the litmus test: removing the supports under the door and seeing if the hinge would hold!

It held. :-)

The door now opens and closes smoothly! I was going to say “again”, but honestly, it’s been a problem since before we moved here. Which makes me wonder, how many years was the door just getting noisier and noisier, and being more and more of a problem to open and close, and no one thought to look at the hinges? There are other problems with the door that we identified since moving here – which is why the goal is to replace the doors and frame completely – and I even remember checking the hinges in the frame myself, but somehow, no one thought to squeeze their heads in to see the hinges on the door side.

The centre hinge has not been done, and with the weather forecasts right now, it’s going to wait until things warm up again. If we even bother to do it at all. Not being able to open the door any wider makes getting into the space a real pain!

There are other things that are a much higher priority!

Which means we can take this down, now!

The Re-Farmer

Hinge fix, continued

It looks like we’re being hit by the edge of a storm passing to the south of us, so we wanted to make sure we could close the inner door overnight.

All I wanted to do was trim the pegs and get them flush to the surface, first.

You’d think that would be easy, right? Ha! Of course not!

I first tried using a small cutting wheel on the Dremel.

I went through two of them before I gave up. The space was just too tight, and the cutting wheels shattered!

I did have a small saw that I brought, just in case. I just couldn’t cut flush to the surface (may apologies for the crappy photos; the light sucked, too!

Unfortunately, that left me with quite a bit of wood to get rid of. For this, I switched to small sanding disks.

I don’t know how I would have done this without my Dremel tool. We probably would have had to take the door off completely, which would haven us a whole new set of problems!

It’s really hard to see, but the wood plugs are now flush with the surface.

This was enough to let us close the door, and that was the main thing!

Tomorrow, I’m taking the van in to the garage earlier in the morning, so we’ll finish the rest after I get home. We’re expecting snow all day tomorrow, and through to Friday morning, but the temperatures aren’t expected to take another deep dive until the weekend. That gives us time to get it done, without getting things too cold in the entry.

I’m glad we have a storm door, of this would be waiting until spring!

The Re-Farmer

Starting on the hinge fix

Well, for better or for worse, I’ve started working on the door hinges.

This is intended to be a temporary fix, until we can replace the door and frame completely, but I have no idea when we’ll be able to do that, so this patch job may need to last a while.

The first thing to do was to open the door as wide as possible (with a built in closet in the way, that isn’t as far as I’d like!) and place supports under it to hold the weight.

One of the things we’ve been finding lots of, while cleaning this place up, is laminate floor tiles. It’s amazing, how handy these have become. A couple of pieces of wood under the door made up most of the height, then it took 3 of these tiles to get it fully supported where it needed to be. We’ve also used them to put under bench legs and wooden shelves in the basement, to get them off the damp concrete, and so on. I’ve found a couple of cases of these tiles, just in the basement – there are more in the barn. Definitely things to keep, even though they’ll never be used as flooring! :-D

Once propped up, I could remove the screws which, I’m happy to say, were not damaged as I had thought they were. I do not have to replace the screws. I was able to remove 2 of them with just my fingers, and the only reason I had to use a screwdriver for the 3rd one was because it was the offset middle one, where the hinge wasn’t pulling away from the door as much.

The hinge still needed to be pried loose before I could take a good look at the damage. It fits perfectly in that recess.

Because of how close this is to the frame and storm door , I actually got a better look by taking a picture, then with my own eyes!

The damage isn’t actually as bad as I feared it would be.

The next step was to bring out the Dremel to clean out and enlarge the screw holes.

The Dremel just barely fit in the space available, but it worked. I used a couple of grinding and engraving tips; first a small cone shaped one to clear out the holes, then a metal tip to clean out further into the openings than the cone could go.

The wood is so dry, there was smoke coming out of the holes from the friction!

For the wood plugs, I ended up choosing some pieces of lilac branches I’ve still got hanging around. They were already the size and shape I needed; I only had to strip bark off the pieces, then make one end slightly narrower. Also, I will need to pre-drill holes before putting the screws back in, to prevent cracking, and the core of the lilac is already little more than sawdust that can easily be removed. They’re basically already pre-drilled. :-D

I was going to use wood glue to put the pegs in, only to discover it had dried out, so I went with all-purpose glue that I happened to have.

After making sure the pegs fit into the holes, I applied a bit of glue to their ends, then gently tapped them into place with a little bitty hammer I happened to have. With a normal sized hammer, I wouldn’t have had the space to swing, without hitting the window of the storm door.

The pegs will now sit for a few hours before I check the glue and decide to cut the pegs flush tonight, or wait until tomorrow morning. If I can cut the pegs, we’ll be able to close the door most of the way as the glue finishes setting overnight. If not, we’ll be stuck with this all night…

These are the pieces of insulation we’d cut last year, to fit over the inner door, held in place with Velcro strips, to keep frost from forming on the bottom of the door, and ice on the windows. It worked well, but there were some issues with the strips, and we haven’t found a workable alternative, yet. Thankfully, this winter has had only a few days cold enough for the ice and frost to form.

The arm bar is coming handy for holding the pieces in place!

If this works out, we’ll do it again for the middle hinge. That should tide us over until we can replace it all with an insulated steel door and a steel frame.

Hopefully.

The Re-Farmer

Not a day to go out!

Well, I’m certainly glad my daughter and I have telephone medical appointments this afternoon, and don’t have to actually go anywhere.

As I write this, we are at -34C/-29.2F, with a wind chill of -39C/-38.2F

It has actually warmed up a bit.

The heated water bowl is almost completely frosted over! Only a couple of cats came out into the cold. Their food bowls are still pretty full – even the one inside the cat house – but I added some fresh kibble, anyhow. The sun room is at -12C/10.4F, so it’s still frozen. They like the fresh kibble better; I think it’s easier on their teeth.

At these temperatures, I didn’t even try to switch out the trail cam memory cards. I doubt our vandal would be engaging in nefarious things in this weather. Plus, we still have the hard wired security camera to keep an eye on things.

Meanwhile, I’ve made the call to the number on our leaking hot water tank. I now have an authorization number and need only to go to the store it was purchased at, with the sticker from the tank, to get a replacement. He even saw on the file that this was already a warranty replacement tank, but he asked no questions.

At these temperatures, however, I am not going anywhere. Even if we lost hot water completely, we’d just go back to heating water on the stove as needed. I suspect it’s actually a good thing the tank is leaking the way it is, instead of water pooling on the bottom as it did, last time. That is probably the only reason why it’s not doing the weird things the other one started to do, since the water isn’t reaching anything sensitive; just making the insulation damp. Just a guess on my part.

Thankfully, this polar vortex that’s hitting us should last only a few days. By Wednesday, we should be back up to a more typical -21C/-5.8F. By Friday – which is when the van is going in to be checked – it is forecast to reach a balmy -10C/14F.

It’s going to feel like spring! :-D

The Re-Farmer

Are you kidding me??

It’s past 1 am as I write this, but I just had to.

I went down into the old basement to treat the hot water tank with hydrogen peroxide before going to bed. This is what I found.

It’s leaking!

(That ring of minerals on the concrete is not new; it’s been there since the last time we had issues.)

We don’t go into the old basement often (and with the cats, we’ve put all the most breakable stuff into the old basement and blocked off the opening between the two basements, so there was no chance of kittens falling into the sump pump reservoir or otherwise hurting themselves). The last time anyone went down there, that I can remember, was my daughter, the last time the tank was treated. I called her over to see, and confirmed it wasn’t leaking the last time she was down there.

In trying to see where it was leaking it appeared to be coming from the bottom access panel, too. So we opened it up.

Yup. It’s been reaching that high!!

We’ve left the panel off. Tomorrow, I will call the number on the tank to talk about getting a replacement under warranty.

Again.

For those who are new to the blog, when we first moved here, this place still had the tank that was installed when my dad got the well dug near the house and installed running water. He got the tank second hand. When cleaning up the basements, I found the old warranty certificate and bill of sale for it, dated 1963, if I remember correctly.

It died shortly after we moved in.

Long story short, we went without hot water until we could afford to get a plumber to replace the tank for us.

That worked out well for a while, until the water started to get hotter and hotter, all on its own. We called the plumber and he changed the thermostat, but that’s when we discovered that it had started leaking at the bottom. When he opened the bottom panel, he found the insulation saturated with water.

Not long after that, we lost hot water completely.

We then had issues with discovering the local hardware store it was purchased at, not doing warranty replacements. I tried working with the company directly before finally finding a branch someplace else that had would honor the warranty. We then had to get the plumber back to install it for us, and it’s been working fine ever since. The only issue is one we’ve had since replacing the original tank; the hot water would start to get a sulfur smell. Every month or so, we would drain the tank a bit, then use the vacuum created to suction hydrogen peroxide through a hot water tap in what used to be the laundry sink. It needs to sit for at least 4 hours, so we would do it before bed, so the water could be used in the morning.

It’s been about 1 1/2 years since that tank was replaced under warranty. And not it’s happening again.

What the heck is going on? How does a second hand tank last for nearly 40 years, but new tanks aren’t even making it 2 years?

But at least we still have hot water. I guess it’s a good thing it started visibly leaking this time, before we started having problems. We don’t have the water getting super hot, like the tank started having issues last time. It’s “just” leaking.

This is ridiculous!

The Re-Farmer

Converting the fish tank to a cat proof greenhouse, part 4: padded

Today, I found the self adhesive felted pads that I wanted to use on the covers for the fish tank.

I found them while looking for something else, of course. :-D

Here is where, on the tank, I want them to sit.

The bar across the middle has extra surface area in the corners of the ledge the covers rest on. There’s lots of room, here.

The outer corners, however, don’t have that, so there’s a lot less margin for error in positioning the pads well.

The first step was to clean off the ledge the frame rests on. An old toothbrush worked very well for that!

Since the cross pieces of the frames have an angled edge, to better fit into the space, I figured it would be easier to place the felt pads in position on the ledge first, adhesive side up, then placing the frame on top.

The felted pads I have were from a larger package with mixed sizes of circles, plus long, narrow ovals. The larger circles were used up, and all I had left were smaller ones, and some of the long ovals. I’d hoped I still had some larger circles left. If I had, I would have cut them in quarters, and fit them right in the corners, but half circles would have to do!

Once they were in position, I lined up the cover and dropped it down, pressing just enough to make sure the adhesive stuck, then removed it to press the adhesive in more thoroughly.

In this corner, you can see the pad will protect the tank’s frame from the wire. This was the edge of the roll, so no sharp bits sticking out, like the edges I had to cut, so I didn’t trim it.

And this is why I lined the pads up to the corners of the tank, rather than the frame. Yes, there’s a likelihood that the pad will get pulled off where it’s overhanging, if I leave it like that (I will trim it later), but it also isn’t sitting on the screw head. It was supposed to be countersunk, but some of the screws simply stopped and would not screw in any further. I am not sure what was stopping them but, whatever it was, I was wrecking my screwdriver’s tip, trying to get them to go in further, so I stopped. The others were just fine.

So the corners are padded now, protecting the tank’s frame from being scratched up, should a cat decide to jump onto the cover.

When I was fussing with everything to prepare for this, I did have a kitten not only jump onto one of the covers while I was there, but also walk across on the light fixture! Not a problem for a light kitten, but a potential problem, if one of the heavy adults tries to do it. Thankfully, they seem to not like the new covers and are staying off. At least while we’re around to see! The few times I’ve seen one of the adult cats up there, they have stuck to walking on the wood and stayed off the wire and away from the light fixture.

Meanwhile, the baskets and other items stored in the tank have been removed. I’ll need to take a vacuum to the bottom to clean it, then see how my seed trays fit on the bottom. That will help me decide whether the rigid insulation will be lining the inside, or the outside, of the tank. Whatever I do with the sides, the bottom will have its own layer of insulation lining it, too.

It’s remarkable how handy that insulation has been. I’m glad my daughter bought so much extra!

I’m going to need the little step ladder to be able to access the bottom of the tank. I could barely reach to get the smaller baskets out!

The joys of being short! LOL

Another little bit of progress made! :-) I can hardly wait to see how this works for starting seeds!

The Re-Farmer

Converting the fish tank to a cat proof greenhouse, part 2: changed plans

Yesterday, I got started on making covers for our big fish tank, to keep the cats out. Today, I assembled the first one.

Of course, things did not go to plan.

Does anything ever? :-D

One of the things I needed to figure out was how to secure the hardware cloth to the frame pieces, for those inevitable times when a cat jumps on them. All I’ve got for materials is whatever we can find lying around the farm. While doing my rounds this morning, I went digging in the side of the garage where we store the lawnmowers and snow blowers. I knew there were some roofing nails in there, so I grabbed a while bunch and brought them inside.

Here is the first problem.

All of the nails were huge. There was only a single smaller size, and it was still too large. What I wanted to do was secure the mesh to the tops/bottoms of the boards making up the frame. Previously, we’ve used a staple gun to do that, but these were not for things where the wire mesh was expected to hold weight. Particularly not the sudden weight of a cat leaping onto it from above.

The mesh was going to have to be secured along the sides.

That meant cutting it with a half inch overlap on all sides.

I’m getting closer to the end of my roll of 1/8 inch mesh, and it really does not want to unroll at this stage! :-D I had all the boards on there to hold it down, and it still kept rolling itself back up again!

Once the mesh was cut to side and flattened, I affixed it to one side.

Normally, I would have used the staple gun to tack it in place, but I couldn’t find it anywhere. Which is really weird, because I’m the only person who uses it!

So it had to be tacked in place by screwing in the cross piece, holding the wire as taught as I could in the process.

Then I took out one of the screws in each corner.

I had placed the wood in place on the tank and marked each one with pencil, but once the hardware cloth was in place, I couldn’t really see my marks anymore. Plus, with the cross pieces a fraction too long, I had to make sure I didn’t line the side pieces up to the other end, or the while thing would be to big.

So I quickly drilled a pilot hole in each of the other corners of the cross pieces, then went back to the tank.

This way, I could place the long pieces where they were meant to sit, line everything up, then add a couple of screws through the pilot holes to hold them in place.

Then it was back to the basement to continue.

Once each corner was secured with a pair of screws, it was time to bend the wire mesh. Since the sides would be bent in one direction, and the ends in the other direction, I first cut out the corners.

The wood pieces may have been lined up to the tank, but no matter how careful I tried to be, the wire mesh ended up uneven.

Ah, well.

Once the mesh was bent, I drilled pilot holes for each nail (to prevent the wood from splitting) and hammered them in. The flat tops of the roofing nails were perfect for securing the mesh. Very different from how I had to do it with the larger mesh on the screen “door” we made to keep the cats out of the old basement.

Time to test it out again!

Oh, dear.

The addition of mesh and nails – especially the nails – made it wider. It wasn’t so much that it no longer fit. I could have let it just rest on the nail heads, I suppose. They would, however, damage the tank’s frame.

There was a very easy solution to this problem.

Flip it upside down.

With the cross pieces being every so slight too long, I used my Dremel to take off the corners at roughly a 45 degree angle.

It now fits!

Unfortunately, the wood is a bit warped, so it doesn’t sit flat, but it should still do the job.

There are still a couple of things I need to do. One is to find some way to cover the edges of the hardware cloth, for safety reasons. I’ll probably just use Gorilla Tape, if we still have some.

The other is to find my self-adhesive felt pads. The kind that’s meant to go on the bottoms of chair legs or the like, to protect floors. Since the bottom is now the top, the screw heads are facing down, and each corner screw is sitting on the plastic ledge in the corners of the tank. It wouldn’t be an issue, if I weren’t expecting cats to jump on it, so a bit of padding would be a good thing. I haven’t seen them since we packed for the move, though. :-/

Aside from those 2 things, this cover is done.

The other one will wait for another day! :-D The earliest we should be starting any seeds is in late March, so we have time! :-)

The Re-Farmer