Instead, I’ve just spent roughly 6 hours, going through old emails, video and image files, and transcribing voice mail messages.
I’m not quite done, but that’s it for digging through old stuff.
If all goes well with my mom’s car tomorrow, I’ll be heading to court to file for a restraining order right after, and hopefully the psychiatric evaluation, too.
Transcribing the audio files was the most draining. I’d forgotten about some of the horrible things our vandal had said about us. Worse was having to listen to bits, over and over again, to try and transcribe things that were almost gibberish. Likely, he was drunk. There was some pretty crazy stuff in there. My guess is, he has Paranoid Personality Disorder.
To think, he’s been leaving messages like this, and worse, with my mother for almost a decade. Not about me all that time, of course, but other stuff. I’m just the first person who’s in a position to do something about it.
The last thing I want to do is write an impact statement. I don’t even know if any of this will be needed. I was selective in printing out old emails between me and my family that documented some of the crazier stuff – I even have some that predated our move! – and still ended up with a stack an inch thick. Granted, that’s with lots of formatted spaces and larger fonts, but still. The package for the restraining order is much, much smaller, but when it comes to applying for a psychiatric evaluation, I’d rather have more available than less, even if they don’t end up needing it all.
This is the new panel he put in. All of this is behind the touch screen in front. At the far end is the power button, then where the knob pops on, the start/pause button, and then the controls for temperature, spin and soil. There is no load size control; the machine senses that itself and adjusts the amount of water accordingly, but at the far right of the panel, you can do things like add a soak time, and extra rinse, or even tell it to add extra water. All of these can change the time, which is where the digital display comes in.
Of course, he tested everything before he started, and it was exactly the same as before. After switching out the panel, but before putting it all together, we tested it.
Power? Yes.
Knob for wash cycles? Yes.
Start/pause? Yes.
Temperature? No. Spin? No. Soil? No!
But, of the buttons on the far right did work.
Just one!
So he opened it up again, tested them without the front panel, and everything was working.
He put it back, and it was working.
Best guess, there just wasn’t enough contact between the touch screen and the switches, the first time he put it on.
Of course, we kept testing it over and over, as he put everything back in place!
It’s all working fine now.
Hopefully, it will stay working!
I have a sudden urge to do laundry…
I’m sure if I ignore it, it’ll go away, though. ;-)
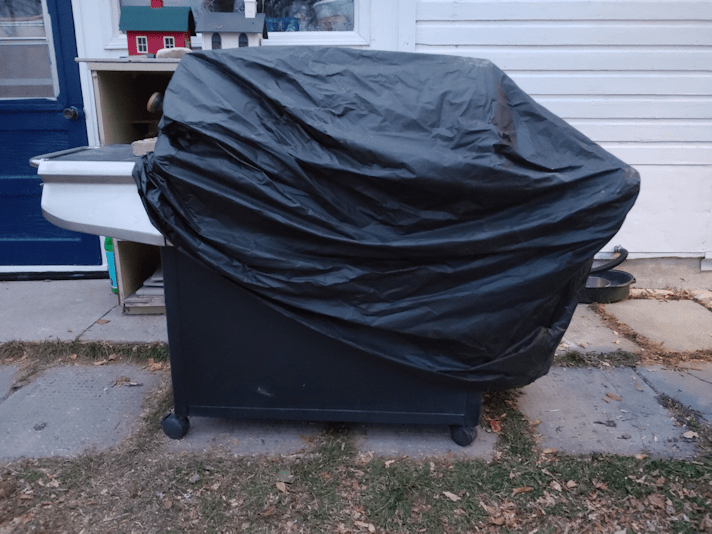
I got a call from him, early this evening. He just finished loading up their big BBQ into his truck and was ready to bring it over!
This was something he had offered to us when I told him about what we’d done with the fire pit, for outdoor cooking. They got themselves a smaller BBQ, as their older one was too big for just the 2 of them, and it was just sitting there, unused. Today, he up and decided to deliver it!
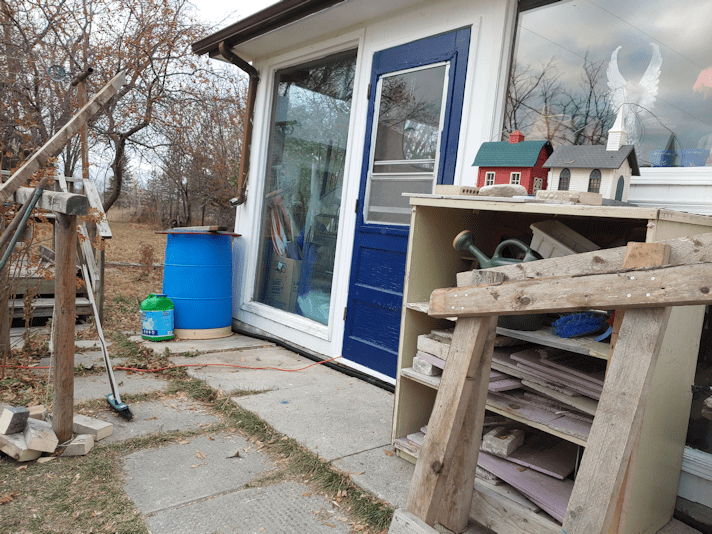
There aren’t a lot of places we can put a BBQ right now. Basically, there’s the concrete and patio blocks in front of the sun room where it can stay for the winter.
So I quickly went out and moved the shelf I was planning to moved now that the sun room door is finished. It would be much harder to move it, with a BBQ in the way!
With the shelf moved away, you can really see how much the concrete under the rain barrel has sunk! This is likely from years of the rain barrel being allowed to overflow.
Which might have something to do with why the sun room has been shifting, and why I had such troubles with the door!
Ya think?
Since it’s that time of year, anyhow, I took advantage of the situation and emptied the rain barrel into the old kitchen garden.
After breaking through ice about an inch thick!
It will be much easier to go through here to the old kitchen garden, now that the shelf is moved. We had originally intended to put the shelf in storage, with most of the other stuff that belonged to my parents, and had put it aside until we could bring the van over to take it. It was so handy, we left it. :-)
Inside the shelf are the pieces of rigid insulation that had been used for the “cat condo” we made for the cats in the sun room last winter. We will likely use some of them for the kibble house, under the food containers. We also plan to leave the two bottom shelves empty, except for some pieces of insulation on the “floor”, for the cats to be able to tuck into it for shelter. We did that last winter, and they made full use of it.
There it is! Our new Q!
We’ve never had anything bigger than 3 burners before; this one has five. It’s so big, he had to take the lid off to fit it under his truck cap! My brother even fired it up to test it out, including the extra burner for pots and pans on the side. It even starts better than any BBQ we’ve had before. :-)
Chances are, we won’t be able to use it until spring, but at least now we have the option! We don’t have any BBQ tools, but with all the summer stuff on clearance right now, this is probably the best time of year to get more. :-) I really look forward to using it!
Sadly, they were not able to stay for long. I’m glad my SIL made it out; she hadn’t been able to for a while, as she recovered from surgery. We did get a chance to walk around the yard, and show them what we’ve been doing. Technically, my brother is my “landlord”, so it’s probably a good idea for him to know what’s going on. ;-) Unlike my mother, they are actually quite happy with how things are shaping up, and are not offended by us doing things like using mulch. :-D
Somehow, they found my glee, as I demonstrated opening and closing the sun room door repeatedly, very amusing. :-D
It’s probably a good thing they didn’t stay any longer. They’ve got a long drive back, and wanted to make a quick stop to visit our mother along the way. From what I’m seeing on the live feed for the security camera, there are strong winds and snow right now!
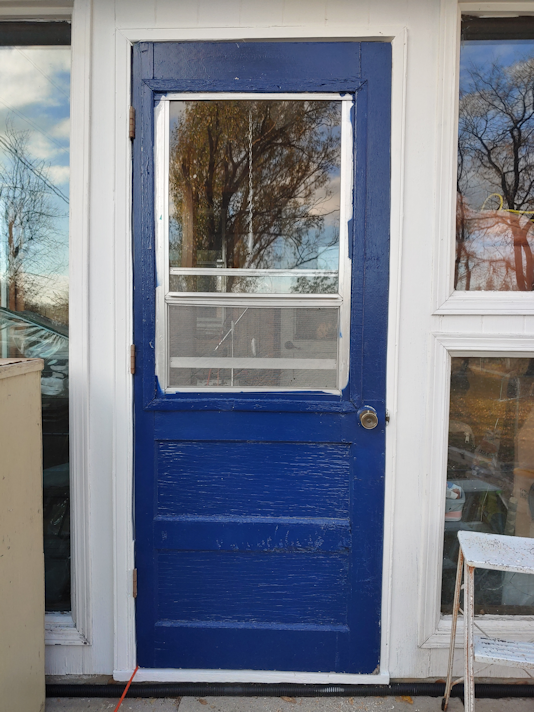
This afternoon, with the help of a daughter, we hung the replacement door back up onto the newly painted frame.
We lined the hinges up with where they were before, except further in as far as we could go. Just to be on the safe side, my daughter held the door in place while I marked the holes for the screws, then I drilled pilot holes for just the top hinge. We screwed in the top hinge, then double checked the locations for the other pilot holes and re-marked accordingly.
As you can see in one of the photos, the entire frame looks like it’s pulling away from the wall! It was like this when we moved here, and the gap doesn’t seem to be getting any bigger, so I don’t think it’ll be a problem. At least not any more than anything else is! :-D
Also, we only had the old screws available, since none of the new screws we have were the right size, and there were only 6 of the same type. So each hinge is missing 1 screw! I still drilled the pilot holes, though, for when I pick some up.
Of course, as soon as we got the top and bottom hinges secure, we tested the door, just in case.
Aaannndd…
Really???
The door was hitting the frame again! It had to be forced closed!
We decided to finish hanging the door, though. Once it was in, I tested it again, which is when I noticed this…
The door latch was now higher than it was before.
Keep in mind that we did NOT raise the door when we put it back. The hinges were lined up with where it was hung previously. The only change was mounting them further in the frame than it was before. Apparently, that was enough for the door latch to be about half an inch higher than it was before!
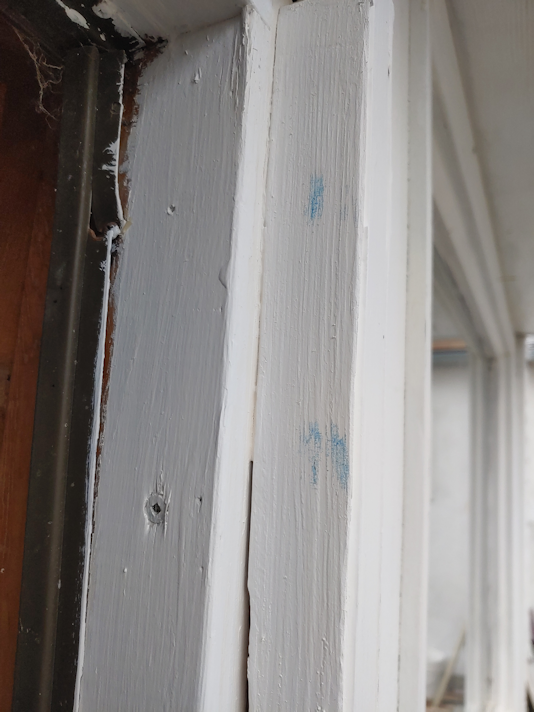
Using where the blue paint marked the frame as a guide, I went back to trying to reduce the wood in those spots. I used the shaver, a chisel, a rasp, and even some of my coarsest sandpaper. For some of the tools, it was hard to get right into the corner. Time and again, I tested the door, and it still was hitting.
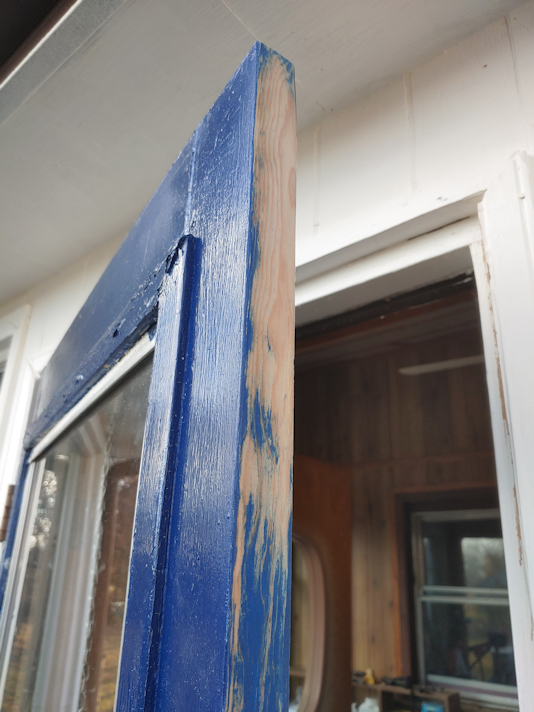
Finally, I started shaving wood off the door itself. That wood is so much softer than the frame, I could do in moments what took several minutes, and a variety of tools, to take off the same amount of material.
I took these photos when I figured I was done, but then went ahead and took off more material. Just in case!
I also gouged out more of the hole for the latch. After testing the door again and again, I finally put the latch plate back on.
That mark on the inside of the frame by the latch plate?
It turned out part of the door handle assembly – I just looked it up and now know it’s called a “rose” – hits it. So I used sandpaper to gouge out a recess there. That wood is also very soft compared to the frame pieces I’ve been fighting with!
The door now closes, easily and properly!
In fact, it’s probably the smoothest working door in the entire house right now!
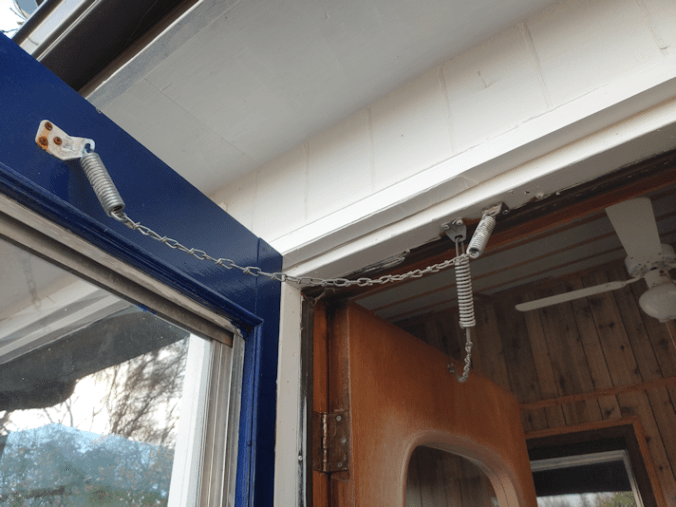
I had one last thing to attach.
The stop chain!
I started screwing it in where there were pre-existing holes, but realized the bent part of the plate was extending beyond the wood, and the door would be hitting it. While moving it over, I noticed the plate for the chain on the inner door had only one screw holding it in place, so I fixed that, too.
Now, there is no chance the door will bang open too far. It doesn’t even hit the shelf behind it anymore, which means no risk it’ll hit the window. I can now move that shelf to the other side of the door, in front of the cracked window.
Tomorrow morning, I’ll be touching up the paint that I scraped off, including the door; thankfully we still have some of that blue left.
Once I was done hanging the door, I just couldn’t help it.
I stood there, opening it and closing it again, and giggling to myself. :-D
I am easily entertained!
This door was so much more of a problem to replace than we could have imagined!
This morning, after doing my morning rounds, I gave the sun room door frame a second coat of paint. Tomorrow, we hang the door back up.
I had an audience. :-D
Also, while I was painting, I found that Nostrildamus has figured out to jump over the threshold after it’s been painted! :-D
Meanwhile…
Today was finally racking day for our first attempt at making hard apple cider, using our own crab apples. For new visitors, you can read up about that here and here. (links will open in new tabs)
Here is how the gallon carboys looked before I started. As expected, there was a LOT of sediment at the bottom. It’s not just the lees from the yeast, but the sediment from the raw, unfiltered juice.
We had some concerns with the fermentation. Activity in the airlock stopped a while ago. I think the room temperature became a problem. While they were actively bubbling, their temperatures tended towards 18C/64F, though we did also keep them wrapped in a towel and, every now and then, I’d heat up a rice-filled warming pad in the microwave and stick it between them to help keep them warm. We had used an electric heating pad, when making mead, but where these were sitting, there is nowhere to plug it in.
Racking from a 4L to a 3L carboy meant a lot of sediment heavy liquid left behind. Though I tried to hold the racking cane well above the sediment as long as I could, I could still see wisps of it being pulled up the siphon.
As I racked each jug, I made sure to get a hydrometer reading.
I just don’t know what to make of it.
For one of them, the hydrometer pretty much sank to the bottom. I had to add cider almost to the top for it to float enough to get a reading. The other was only slightly better. When they were first tested, it floated quite handily.
Unfortunately, I just can’t get it straight on how to read the specific gravity on that thing. So I write down all three readings.
The readings still don’t make any sense to me. Why would the numbers all drop so much? From what I can figure out, this is basically telling me there’s no alcohol in one, and almost no alcohol in the other.
I did taste test it, of course, and they both have a VERY sour apple taste. It also does taste alcoholic, but that is almost overwhelmed by the sour apple taste. Which is interesting, since the apples we used are actually quite sweet, and there was quite a bit of sugar added to the juice, too.
As for the hydrometer reading this time around, the only thing I can think of that might be affecting it (besides something going weird with the cider itself) is the temperature. Both carboys had a temperature reading of 16C/60F. The ambient temperature in the room is 15C/59C. From what I’ve been reading, newer hydrometers are calibrated for about 20C/68F. I’ve found a site that will calculate the adjustment for temperature, but there is virtually no change in the reading. So what gives?
I have no idea.
Considering that the traditional way of making hard apple cider is to press whole apples into a barrel, set it aside for a few months and BOOM, you’ve got booze, I didn’t expect this to be so complicated.
Anyhow. The 3L carboys are now set up with their airlocks for a second fermentation. As for the liquid left behind with the lees, I ended up straining much of it, and we now have about half a liter of filtered baby hard apple cider.
Hmmm… I wonder how it will go with the ham I will be roasting today?
The Re-Farmer
Update: When I started the hard apple cider, I did it based on this video from CS Mead and More.
There is a reason I included them among my Recommended sites!
I went ahead and contacted them about my readings, and got a very prompt response, and I am very happy!
It turns out, everything is working fine. My problem is with reading the hydrometer, then figuring out what it’s telling me! :-D
And now I know what to do with the information I’m getting off the hydrometer. I may not be using the AVB or Brix to work it out, but I’m writing them down anyway, because I can see those readings better. I can then use the printed out chart that came with the hydrometer to see where that lines up with the Specific Gravity and actually read that number on paper, instead of trying to see it in the liquid. When I take pictures and upload them to my desktop, I can usually zoom in and read it, but sometimes I find the hydrometer moved as I was taking the picture and I still can’t read it. :-/
The formula I was given to calculate the alcohol percentage is to subtract the new reading from the first reading, then multiply the answer by 135. So for one of my ciders it’s:
With the chillier temperatures, it’s really not a good time to be painting outdoors, so I made a point of starting right after doing my morning rounds. This way, it could have the whole day to cure, and I could decide on whether I wanted to do a second coat or not.
The top is cut so terribly crooked! LOL This is the piece I cut using a hand saw, after two failed attempts with the power tools we have available.
Though the house was painted the summer before we moved in, it looks like the inside of the door frame only got one coat, so I went ahead and painted that, too.
The extension cord to the cat shelter was staying, but I managed to keep it away from the paint. This corner on the left is where we’ve had to add the most material to make up for the shifting of the frame.
It’s really amazing how much a coat of paint makes even the worst patch jobs look better! :-D
Well, that didn’t take long! :-D
I had to leave the doors into the sun room open, of course, and later in the day we found white foot prints on the concrete inside! :-D
I’m rather happy with how the paint was feeling by the end of the day. We will be able to drop the cord down and actually close the door for the night. I’ve decided to go ahead and give it a second coat tomorrow morning, which means that the day after tomorrow, we can hang the door back up again.
It will be so good to finally have this job done!!!
After painting this morning, I headed to the post office to pick up our bulbs, which are now planted – but those will get their own posts! :-)
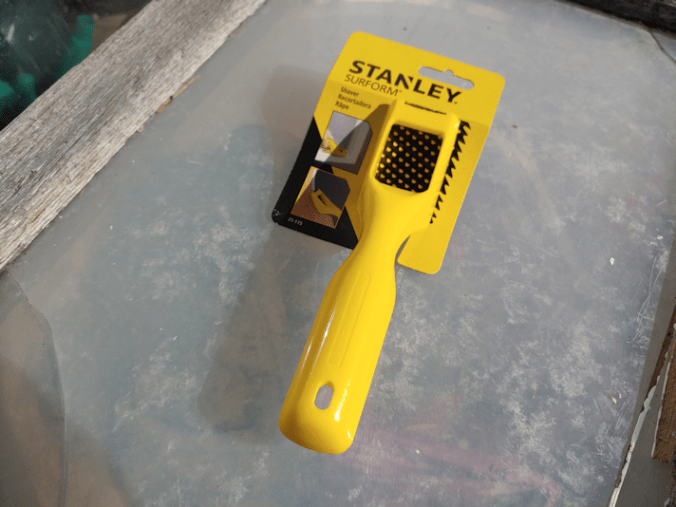
The first order of business was to test out my new tool on the sun room door frame.
I had gone into town to look at mini planers, but while perusing my options, I chose this tool, instead.
It’s a shaver. The shaving plate looks rather like a bada$$ Parmesan cheese grater. I figured the many cutting blades would make short work of the areas I needed to work on.
I was right. (For a change! LOL)
Using the blue paint marks from the door to show me exactly where I needed to shave off the wood – was well as smoothing my messy, messy cut somewhat – I did both the side of the door frame and the threshold.
What a fantastic little tool! The door can now close without catching anywhere on the frame or the threshold!
Then, because it worked so well, I did the threshold for the inner door, too. It now closes better, too.
The door is not quite done, yet. I’ve decided I need to take it off again, and move the hinges in about half an inch. Right now, when the door is closed, there is a lot of stress at the hinges, and I can actually see where parts of the door are starting to pull apart. This is a temporary fix with a salvaged door, but I’d like it to at least last the winter!
When we first set up the replacement door and attached it to the frame, we lined the hinges up on the door itself with the old door, then rehung it in the same recesses in the frame that the old door’s hinges were in.
With all the other problems that had to be dealt with, we still used the same spots, even after I filled the recesses with wood. Now that the door can actually close, I can see that the hinges are too far out, which basically forces the door to bend in order to close.
As I was thinking about this, and remembering the old door we were replacing, I am realizing what likely happened. When the sun room was built (which happened while we were living in another province), it likely had a different door. When that door was replaced with the door that was here when we moved in, the same recesses in the frame were used for the hinges. Remembering the problems we had to close that door before it finally fell apart, I am guessing that the house had already shifted and the frame was no longer straight, plus the door itself didn’t set the same way as the previous door, but whomever hung it didn’t bother doing anything to compensate for that. Over the years, my parents just put up with it. Meanwhile, the house would have continued to shift which would have made it worse, until it was in the condition it was in when we moved here.
If my guess is right, we hung this door up in the same location as the previous door, which was hung in the same location as the original door.
What I am now thinking of doing is taking the door off again, painting the frame, then hanging it back up with the hinges further in, rather than where the old door was hung.
Given the overnight temperatures, though, I will need to wait for a sunny, warmer day so the paint will have as much time to cure as possible before it starts dropping below freezing. Unfortunately, the long range forecasts are showing a steep drop in temperatures over the next few days, though it is supposed to flatten off after that.
For now, though, we have a working door!
The next job on the list was setting up the newly painted bird feeder stand.
I decided to set it like a fence post, in the same spot as before. The new metal support we have the suet cage hanging from was set aside, and self-seeded flowers and bird seed plants cleared away. Much of it was already empty, though. I don’t know what cats were fighting in there, but they flattened everything around the bases of the bird bath and feeder!
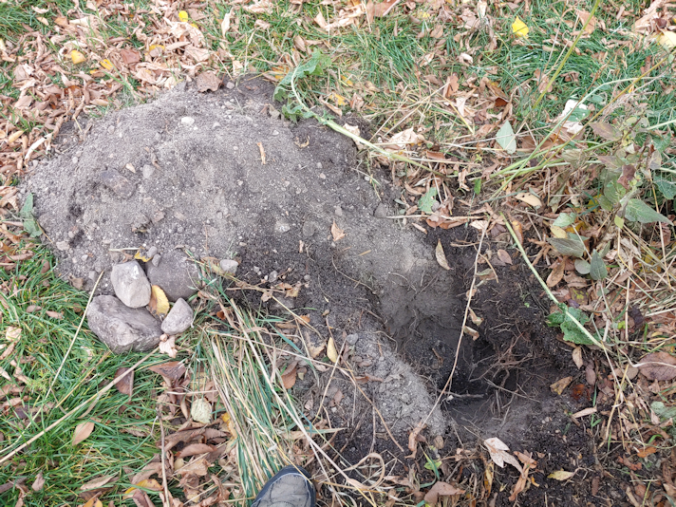
I half considered trying out one of the old post hole diggers we found, but as I dug, I immediately started hitting rocks, so I’m glad I didn’t! The soil is a lot deeper here than in other areas; I just started to hit sandy soil when I stopped. Very different from the soil further away from the house.
The larger rocks I dug out went back in, to help support the post.
Finally, the soil was returned and stamped down. It will now be left for a few days to settle before I hang anything on the hook.
If you look closely at the suet feeder in the back, you can see a chickadee on it!
Chickadees were not my only audience!
The suet feeder was returned, with the hook facing the bird bath. I deliberately placed the other hook facing away from the bird bath, to reduce the number of seeds that end up in it. That’s not as much of a concern with a suet feeder, though my daughter pointed out that it’s a lot closer to something the cats use to drink out of! So it will likely be moved further away.
The chickadees were quick to return, and are already using the support bars from under the platform feeder as perches! This might actually be a better use for them than to add another platform later.
The hook is on the north side of the post, but the post itself is leaning slightly to the south. This was not intentional, but rather than straightening it, I decided to leave it. It should compensate a bit for any pull from the weight of a full bird feeder. That would be more of an issue with those surprisingly fierce winds from the south that kept blowing the whole thing over until we stopped hanging a feeder on it.
I’m rather pleased with how it looks. Plus, it’s set deep enough in the ground that I should be able to hang a feeder on it without needing to stand on something. Previously, I could tip the whole thing over to reach but, obviously, that is no longer an option!
The real test will be how it holds up the next time we have a storm, while a feeder is hanging off of it!
Well, after getting such bad news from the plumbers, and passing on what they told me to my brother, he gave me a call, and I’m feeling much more encouraged.
There is no one alive today that knows this farm and the systems that run it better than my brother. So when I told him in more detail about what the plumbers had said, he was torn between disbelief and laughter, that they would be so unfamiliar with, and intimidated by, the system we have. It’s still used a fair bit, and he had no problems finding a replacement for the basement pump.
He does not share their concerns about the immersion pump and that we might lose our water. This pump has been replaced about 4 times in the past 50 years, by his memory, and it has always been a relatively simple switch.
He will be coming out to do it himself. He just has to find the time in his own schedule to make the trip out. It was something we both hoped to avoid, but he’s frustrated by plumbers that are so intimidated by our old system.
By the end of the call, I was feeling much more encouraged. As much as I am willing to trust the professionals, my brother knows things about our system that they don’t. If he is confident that the pump can be switched out without causing problems in the well itself, I trust his experience.
Speaking of wells, I remembered to ask him if he remembered what happened to our old well, from before this one was dug. This pump was operated with electricity, but when we had power failures, we could attach a handle and pump it manually. I remember bits and pieces of when problems started, but not why. He told me that the water had started to come out dirty. His guess is that something collapsed in the pipes. I then got the lowdown on how that well was set up, including that it has a piston at the very bottom, some 80 feet down. So when it was first being pumped, it would take a while for the water to reach the top (I remember that time it took before water started to come out). Of course, once it was no longer being used for a long enough time, that water would slowly drain down again.
Theoretically, if I pumped long enough, I should be able to get water out of them, but it is most likely the pipes need to be replaced.
That opens up possibilities for us, since one of the things we want is to have a manual pump well as a back up if we ever lose power and can no longer get water from the well by the house.
I wonder if I should move things away from that pump and give it a try?
Honestly. I would really like to just quit right now.
This morning, I tried calling a plumber about switching out our well pump in the basement. This would be the third plumber we’ve contacted in the past few weeks.
To recap: we are on a deep well for water. There is an immersion pump in the well itself, and two pipes going from the well to our basement, into another pump. The two pipes in at one end become one pipe out the other, pumping water into our pressure tank.
The well pump in the basement has been making noises. At times, the pressure is lost, as if it is losing prime, or as if we’re using the water faster than it can refill the pressure tank. When that happens, it makes a grinding noise. Once the pressure gauge on the pump is where it’s supposed to be, it goes quiet and stays quite for the rest of the time it’s running, but the noises return frequently, if not every time it turns on. Basically, it seems to be wearing out.
My older brother had bought us a new pump and was going to install it for us, but we ended up fighting with our septic, instead. So the new pump, with all the fittings, clamps and whatnot that he could think of possibly needing, has been sitting and waiting ever since. Instead of making my brother come back, we were just going to hire a plumber. Unfortunately, the “discretionary” funds had to go towards vehicle repairs, but I really wanted to get that done before winter, in case the plumber needed to go into the well, since there was also the possibility the foot valve in there was leaking.
I called the plumber and left a message, honestly not expecting to hear back until Monday. So it was a pleasant surprise to get a call back a couple of hours later.
I had said in the message what we needed done, and that we already had a pump. It just needed to be switched up.
When he called, he asked if I meant the immersion pump. No, I said. The one in the basement. He seemed confused. I brought up the possibility of the foot valve leaking in the well, but that it was the pump in the basement that was making the noise, and we wanted to switch that out.
He said they had better come out and take a look.
They came out this afternoon!
I now understand why he was confused. I’m starting to get the impression that we are the only ones that still have this old system. Once they were in the basement, checking it out, he explained that basically, no one likes to work on these systems, because they are such a problem. He asked me to turn on a tap to trigger the pump to turn on, so I went to the bathtub and did what we normally avoid doing: turned both taps on to full. This not only turned on the pump, but triggered that grinding noise and, eventually, I lost water to the tub. Which is when I shut off the taps and joined them in the basement again.
Once the pump’s pressure reached where it was supposed to be, the pump was nice and quiet again. He told me that, it’s not a matter of simply switching pumps. The front cap of the new pump would have to be removed and installed inside the well itself – and there would be just one pipe leading to the basement and the rest of the pump. There was a good chance changing it would cause further problems, which is when he asked to see the well.
They were able to get the cap off, with it’s one bent up handle. I am pretty sure this is the first time I have ever seen the inside. My only memories are of when the trench was dug from where this well was dug, towards the barn. That is where a water pipe to serve the barn and water fountains for the cows was laid, as well as the main pipe for the grey water from our septic tank. I don’t know exactly where near the barn these pipes split off in opposite directions, but I do have a general idea of where it must be.
Once the plumber used the ladder to get into the well, his assistant had to take it out so he’d have room to actually move around.
The news did not get any better.
It seems ours is a 4 inch well. Modern wells are 5 inch. That means there is a smaller immersion pump – a size that’s very hard to find these days.
Like the first plumber we talked to – the guy who has worked in our well before – he said it would be better to replace the immersion pump. This would mean one pipe into the house (the other could be used for the electrical wires to go through) and no pump in the house.
The other problem with doing that job is, the cap inside the well – what he was standing on to check out the system – would have to be removed. There’s no way to know how high the water table is right there, but given how damp and rusty things were, it’s probably quite high. Which means they’d be working in water.
However, this is a 50 year old well.
What we really need is a new well.
We could do all the other work, spending what might be as much as a couple thousand dollars but, in the end, we could lose out water entirely. He did not dare even switch out the pump in the basement, for fear of losing us our water.
As we were chatting, I asked questions and mentioned various things, ranging from the snails that showed up in our fish tank after using well water to make a change (I forgot to mention the algae blooms), and how we stopped drinking the water since them,to having to shock the hot water tank with hydrogen peroxide regularly because of the smell.
By the time I got to that, he was looking a little wild eyed. What had been, to paraphrase, as sort of “I won’t go so far as to recommend it, but if it were me, I’d drill a new well,” became a “yeah… you really need a new well!” The more he heard about it, the more he wanted to stay away from doing things like replacing the pumps, either one at a time, or both at once. We definitely have issues that are beyond what they can do for us.
In the end, after apologizing for being the bearer of bad news, I gave him my email so he could send me some names for well drillers.
Oh, and when I asked if he knew what a new well might cost? Depending on various factors, of course, it could cost as much as $10,000.
I told him that if we had that kind of money, we’d have a new roof! :-D
Normally, they would have charged for a service call like this, but by the end of it, he said he would not charge us anything. Then apologized again for all the bad news. My response was along the lines of, with this place, I’ve come to expect it!
For now, we were basically told to hang in there with what we’ve got. We have water right now, and it’s not worth jeopardizing that until we are in a position to get the job done fully.
So, not only do we need $10,000 for a new roof, now we need another $10,000 (estimated) for a new well. That’s on top of everything else that needs replacing, like flooring and walls and repairing the old basement walls, and the weeping tile under the new basement… on and on it goes.
Coming up with that kind of money is a challenge all on its own. Doing it without jeopardizing my husband’s disability insurance is another issue. If we made that much in “income,” he’d basically lose his insurance. It’s not just a matter of his disability income that we are living on, but coverage for his medications.
Needless to say, I got zero work on the sun room door today.
It would be so much easier if we could quit, somehow.
But that’s just not an option.
So, I guess we’ll just have to figure something out.
The replacement door to the sun room is back up again!
Of course, things went wonky in the process. At this point, I expect nothing else!
I don’t know if you can tell, but we ended up adding yet another piece of wood under the bottom hinge. The gap there was still massive. And yet, none was needed at the middle hinge!
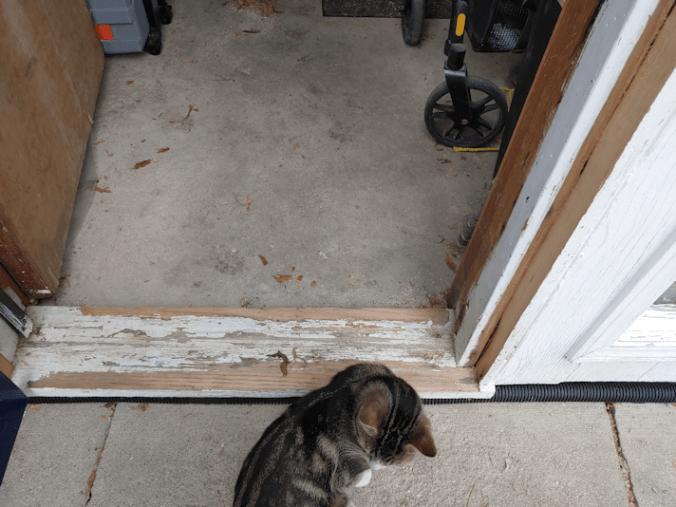
Of course, the door didn’t quite fit, even after all this. We still needed to force the door over the threshold. We’d had to do that with the old door, to a certain extent. It wasn’t as noticeable, and I think that was partly because the door was already starting to fall apart before we moved here.
Using the blue paint scraped off the door as a guide, I used whatever tools I could dig up to smooth out the side piece. I tried one of the planes we found in the basement. It was a bit big for the space, but it would have worked, except the plate was loose, which is when I discovered the frame holding it was cracked.
We didn’t find it that way. The cats had knocked it off the shelf I’d put it on.
*sigh*
I carved out a recess for the latch plate and deepened the hole for the latch itself until it could finally catch and stay caught. I also began chiselling, carving and rasping away at the outer edge of the threshold until the door could close without being forced.
Well. It still kinda needs to be forced. There is still an issue with the hinges. Understandably, there is a lot of stress on them. I’m trying to think of what I can do to fix that, and not a whole lot comes to mind that is feasible.
I suspect this door won’t last very long, but it’s the best we can do right now, and at least there’s a working door!
I still need to work on smoothing out the frame some more before we paint it. I have been eyeballing some tiny little planers at the hardware store that would be perfect for the job. I might just have to spring for one.