Replacement door: sun room door frame progress, and washer surprise

You know, when the outer door on the sun room finally broke, we thought replacing it would just be a simple matter of switching out one door for another that we salvaged from a shed.

How wrong we were!

There were a lot of things we discovered along the way that complicated things. For those who are new to this blog (welcome! Happy to see you here! :-) ), you can catch up on the saga here, here, here and here. Then life happened, and the whole thing stopped until yesterday.

Today, I am finally seeing a light at the end of the tunnel!

The first thing I did was smooth out the rough bits of the cut pieces a bit, then nail the side piece in place. I didn’t bother taking a picture at that point, because it really just looked the same as when we checked the final fit yesterday.

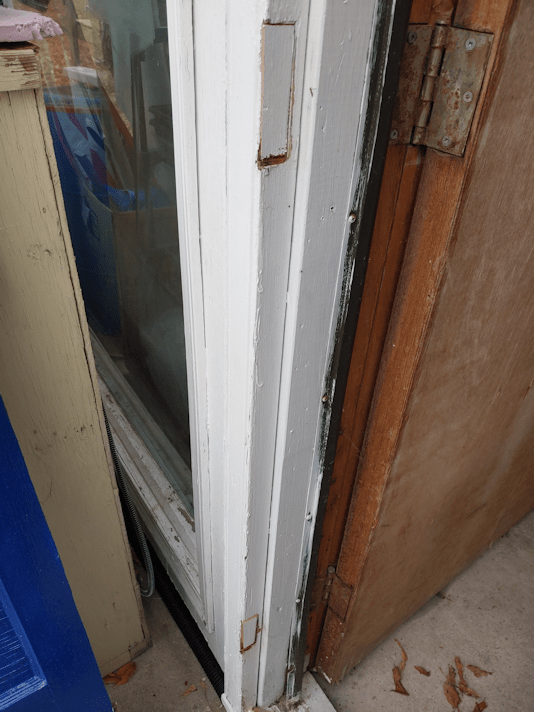
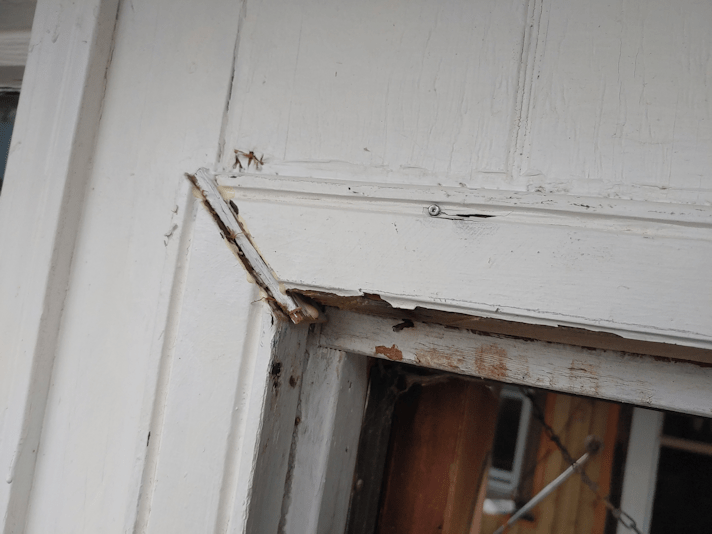
I had trimmed away some ragged bits of old caulking that were still attached to both frame and wall, but that bit of a gap that you can see was still there.

Once the side piece was nailed in, it was time to take off the door and work on the hinge side.

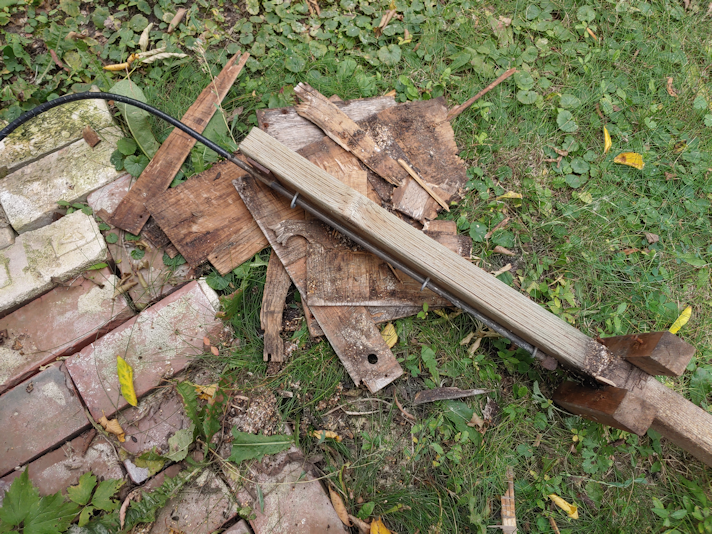
When cutting the side piece yesterday, I first cut it to the line I’d measured and marked with a chalk line, only to discover that when we put the piece in place, needed more cut off. That I was left with two long, narrow pieces came in very handy.

I used sections from the skinny end of the first piece I cut off to fill in the hinge recesses.

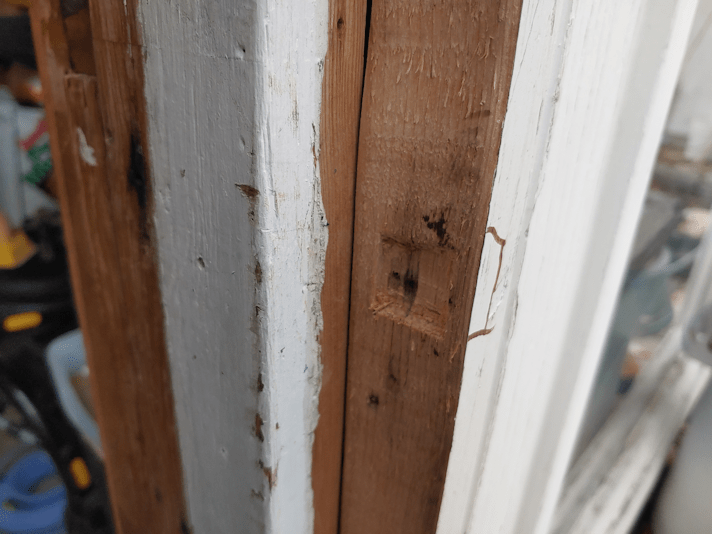
Since the weight of the door will be on this side, I used some wood glue on the second piece that was cut off…

… then nailed it in place, with extra nails on either side of where the hinges will be screwed into place.

Before taking the door off its hinges, I’d marked exactly where I would need to put the latch plate on the other side.

While giving the glue some time to set, I used a chisel to start gouging out a recess for the latch.

While I had been working on this, we got a call from the appliance repair guy about our washing machine, and he arrived while I was gouging, so I paused to be with him for that.

It was just last week that our new washing machine simply stopped working. No response when pushing the power button. Of course, pretty much every time we walked past it, we’d reach over and push the button. Nothing happened.

When the repair guy first called after being contacted by LG for the warranty work, and I described what was (and was not) happening, he ordered 2 parts that could possibly be the problem. They came in very quickly – in conversation, he mentioned that some of his customers using other brands have been waiting for 5-6 weeks, and he still doesn’t have their parts! With LG, the parts come in pretty much the next day.

He, of course, did the same thing we did; pushed the power button. LOL He tested the power to the outlet, and it was fine. As we were chatting, he mentioned that he has only recently started working with LG products; the company had been trying to get him to do warranty work for them for some time, and he finally agreed. I’m glad he did, because he’s the only person in the area that does! Still, he said he’s not as familiar with LG products as other brands.

After popping off the cover for the electronics at the back, he took the screws off one of the first part he was going to replace, for the power. The other one would have been the display panel. Then to check something out, he plugged it in.

It made noise.

I think we both had matching stunned faces.

He hit the power button.

It turned on.

I asked him what he did. He’d done nothing!

He checked the wires, to see if any where loose, but everything was fine.

He was at a complete loss as to why is suddenly started working.

He was also at a loss as to how to proceed. If he left it and sent the parts back, he’d half to re-order them if it stopped working again. The fact that it stopped working once, for no reason he could find, means that it could easily happen again. In the end, he decided to leave the parts with me, bill the warranty work, then if – when? – it happened again, we could call him directly, and he’d put in the new parts. Not knowing why it happened in the first place, as well as what happened for it to start working again, made is difficult for him to just walk away from the job. It just seems like there’s a very good chance it will happen again.

After he left, we started a small load of laundry, just to test it! So far, it’s still working fine.

What a mystery!

Ah, technology. I love my tech, but it does break down a lot more than the old school stuff! :-D

After that, I went back to working on the door.

While the door was hung, I had to lift it over the threshold to be able to close it. There was a large gap at the bottom hinge, but not the top hinge. In fact, the top corner of the door was hitting the frame. So while I did not need to add material all the way to the top of the frame, I decided to fill the hinge recess at the top, as well. With no hinge recesses, there should be enough of a gap at the top for the door to no longer be touching the frame at that corner.

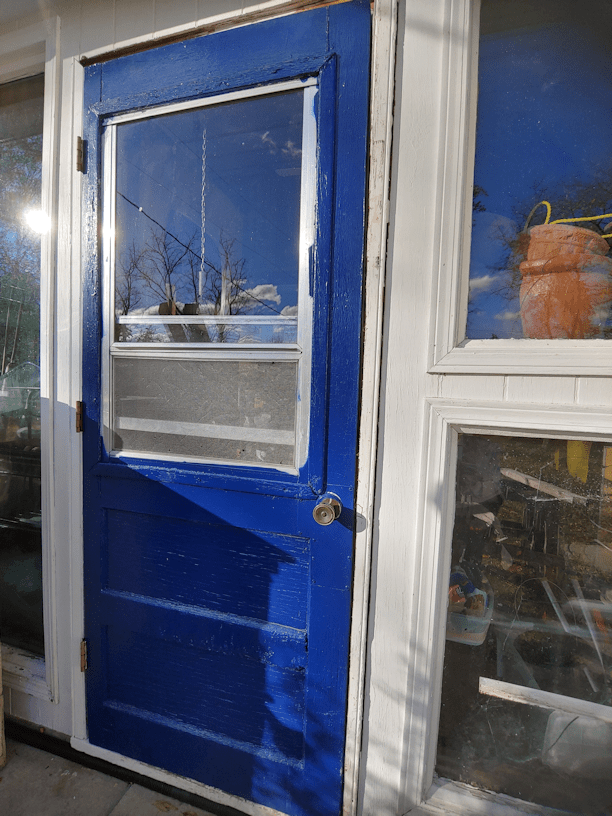
Once the hinge side was built up, I put the top piece back. I then applied caulk to the outside of the frame pieces.

It’s amazing how just adding that white caulk over the gap made the whole thing look so much better!

The top was a different issue. Particularly in the middle, where there was a substantial section of wood missing! I’m guessing there was some rot that got cleaned out, before it was painted the summer before we moved in.

Little bits and pieces from the remaining piece cut off the side frame got used to fill in the gap, then I caulked the rest.

I lined the angle cut with the other side of the frame, but the shifting meant that left a large gap on the hinge side. Another piece of wood and some wood glue got pressed into duty to fill the space.

For now, everything is being left for the glue to and caulk to dry and cure for a while. The next step will be to hang the door again, and attach the latch plate. I picked up a quart of white exterior paint, and the whole frame will be painted.

Then, once everything is back up, the chain for the door, to keep it from blowing open too far, will be attached to the top of the frame. Once that is secure, I plan to move the shelf we’ve got behind the door, to the other side. I want to wait until the door is completely done because, right now, that shelf ensures the door doesn’t get blown open and breaking a window or something. I doubt the door can even open that far, but I didn’t want to take any chances!

So I figure, I’ll snag a daughter this evening to help hang the door, then – weather willing – the painting can happen tomorrow afternoon/evening.

Unless we discover something else has gone wrong, once the door is hung back up. The way this project has been going, that wouldn’t surprise me at all! :-D

The Re-Farmer

Did it work?

This afternoon, the girls and I did a bit of winterizing around the house by laying sheets of foam insulation around the base of the house and covering the septic tank, and the pipes to the house, with straw. The only part that is left to do is around the tap at the back of the house. There is still a hose attached, and we’ll likely be using both front and back hoses for a while longer. Once those are put away and we shut the water off from the inside, we’ll cover it with more pieces of foam insulation. We’re doing this quite a bit earlier than last year. There was already snow on the ground then!

Once that was done, one of my daughters and I decided it was time to take down a branch of the tree in front of the kitchen window. This is the branch the tech from our internet provider singled out as the last possible thing that might be preventing our secondary internet account from having any signal at all to its satellite dish. I can’t say that I was hopeful. There are far fewer leaves left on the branch, yet the signal to our primary account has been worse than ever.

Still, the wasps are gone, so it was time to give it a go.

We considered our options and decided to use the extended pole pruning saw to take the branch down, rather than climb up a step ladder and use something else. We figured that, this way, we could more easily jump out of the way if the branch went in an odd direction as it fell.

We also chose to cut it further out, so that the cats will still have their perching branch. They like to sit on it and watch us through the kitchen window! :-)

It was a pretty large branch, so rather than try and manhandle the whole thing, I used the reciprocating saw to break it down to smaller pieces. The thin, leafy branches went to the chipping pile in the outer yard. The lengths of the “trunk” were big enough, we lay them out around one side of the bed the white lilacs are in. We only needed to grab one more piece from another large branch we had taken down from the tree near the gate to completely line one side, and curve around the end.

Then, because I was able to find some this summer, my daughter sprayed the cut end with pruning paint.

At some point, we are going to take this tree out completely but, until then, I’d really like to get the branch hanging over the roof removed. There’s no way for us to take it down without it falling on the roof. We just don’t have the equipment to take it down safely in pieces.

So it will wait. It seems to be quite strong and unlikely to come down in a storm, but then, so did the branches on this tree that have come down in storms!

Once we were done and everything was cleaned up, we went inside to see if we could notice a difference in our signal with the primary account.

We had no internet.

Nothing.

Zero.

Zilch!!!

After doing the usual troubleshooting, there was still nothing.

So my husband started phoning our internet provider. After several calls that went straight to a busy signal, rather than their usual recorded messages to direct calls, we figured we were not the only ones having issues! My husband tried again about an hour or two later, and this time it went straight to a recording saying they were getting an unusually high volume of calls and were not able to answer.

Eventually, though, we did get our internet back!

Once we did, one of my daughters tested it out by trying to log into a particular game where our intermittent signal was giving all sorts of problems. She was actually able to log in first try – and was even able to switch servers in the game! Now, this could just mean we are having a particularly good night. It could mean taking down the branch made a difference. Or it could mean that, in fixing whatever shut down our IPs service completely, they also fixed whatever problem was causing our intermittent service.

One thing I’ve noticed in preparing to write this post, though; WordPress seems to be loading better now! I have been having endless problems embedding images into posts, and this time, they worked just fine. I still had tabs that didn’t want to load, but even those were able to finally load, much faster than usual.

Tomorrow, my husband will call our IP to get the suspension on the secondary account removed, and we will see if we finally get a signal. If there is still no signal to that dish, there’s nothing else here that would be causing the problem. For all we tried to ration our internet usage, we still went over last month, and the overage fees per gig are so high, the final bill was higher on one account, than the cost of both accounts together!

Until then, I’m just happy to have any internet at all, again!

The Re-Farmer

Ceramic heating soaks…?

This morning, my daughter asked me if I’d read the packaging for the terrarium heater we got for the cat house.

I had not, so she read it to me, and I just have to share!

In case you can’t see or read the image for some reason, this is what is says, in “Engrish“.

Reptile Products
Heat Emitter

. The ceramic heating soaks is one kind of infrared source,has one kind of similar natural sunlight heat radiation.

. The radiator produces the long wave infrared heat radiation can effectively the warm reptilia animal.

. Has promoted in the rearing tray temperature.

. Infrared hot may penetrate the skin organization,expands the blood vessel,thepromotion blood circulation,the enhancement health and accelerates to be restored to health

. Can provide the quantity of heat for reptile,provides the heat source is nonluminous,the service is 10000 hours.

Surface temperature is too high.
do not directly touch during use

It sounds like it was put through Google translate or something! :-D I love it!

In thinking about putting this heater into the cathouse, I remembered we have something that will be useful.

We have a spare smoke detector.

I found it in the kitchen junk drawer, still in its package. We’ll test it to see if it works (it should, but I have no idea how long it’s been sitting in that drawer). We can then install it (or a new one, if it doesn’t work) in the cathouse. That will add some piece of mind for us, in the unlikely event something goes wrong with the heater.

Since we’re taking out the light source to do this, I’m thinking of getting an LED night light for in there, with a red or blue bulb that won’t affect their night vision. The light would be for us to see inside through the windows at night, and make sure it’s cats in there, and not a skunk! :-D

The Re-Farmer

Fall clean up: surprises in the junk pile

Little by little, I had been working my way towards the junk pile. With a litter of kittens living in it, it was not as high on the priority list. Still, I’d been clearing access to it, and had even gone digging into it to find scrap pieces of wood.

The junk pile is actually a wood pile, with lots of junk around it, too. The wood had been neatly stacked and covered with tarps, which have long since torn up and degraded, which means the wood at the top has a lot of rot happening, but the further down it goes, the better the shape of the wood.

Unfortunately, in sorting through the pieces to find the least rotten ones, I also discovered that many were also full of nails, screws or staples. I’d set those aside to deal with another time. With having to go through it so much more today, and having to set aside so many pieces, “another time” was today!

While trying to get at the wood to find better pieces, I ended up having to move the remains of old tarps to access it, and finally had to move the grey tarp that was draped across the end of the pile.

That was my first surprise.

It turned out to be huge!

I then had to remove the even more torn up orange tarp, though I found another, smaller orange one (it actually looks more like the remains of a larger tarp). There are also the remains of a blue tarp on the pile of wood, but it’s so disintegrated, I didn’t even try to dig it out, yet.

I also finally dug out the yellow tarp I was seeing just bits and pieces of. This one was so brittle, I could hear it cracking as I moved it.

When it came time to do something with the wood I’d set aside, I was a bit at a loss. I didn’t want to just make a pile on the ground. I also wanted to stack it in suck a way that no critters would hurt themselves on all the nails and such.

After thinking about it for a bit, I went over to the garden shed and hunted through the stuff we’d piled around it while cleaning out the maple grove.

I ended up bringing over an old metal bed frame – one of three I found in the maple grove. It has metal slats held in place with springs, so I put the longest boards I placed the first few boards in such a way that none of the weight was on the slats. After that, I layered the pieces in such a way that all the pointy bits were facing down or tucked away somehow. Critters can still get under it, without the risk of scratching themselves on rusty nails.

Once the rotted and dangerous pieces were stacked, I started to pull up the disintegrating orange tarp that was mostly on the side, tangled in the things that had been leaned against it to keep it from blowing away in the wind.

That’s when I started to see wheels.

By the time I was done, I’d pulled out all of these.

That’s a metal dump truck in there! Too bad it is so rusted out. The paint is coming off in chunks, too.

I think these might have belonged to one of my nephews.

All of my nephews are adults now.

I ended up tucking them part way under the pile of rotted wood, to partially cover them. I’ll figure out what to do with them, another time.

As I was pulling those out, I also found this…

A rather large white tail deer antler! The discolouring shows the parts that were in contact with debris that would have gotten wet, regularly.

While I was working, I was eventually able to get closer to a tree stump than before. Which is when I noticed something odd.

There were nails in the stump!

Looking closer, I could see the board on the ground. Assuming that was what the nails had been holding in the past, I’m wondering if maybe this had been a platform bird feeder at some point? It’s too high to be a seat, and too small to be much use as a table.

Once I’d done as much clearing as I was going to today, I put the partial tarp that was still useful over the wood pile, having thrown out the torn up one. Then I spread out the big grey tarp.

I’m not sure it’s actually a tarp. It might be a canopy cover of some sort. Whatever it was made for, it’s really big! It’s unfortunate it was left out the way it was, and got all torn up by the elements.

I ended up folding it up and setting it aside. It’s not much use at full size, but it’s big enough that, folded in quarters, I might actually find a use for it for one more winter, before tossing it.

At some point, I want to finish cleaning up the junk around the wood, then go through the wood itself to sort out the rotten pieces from the ones that are still useful.

Somewhere in there is a space big enough for Butterscotch to have a nest for her and her babies. I’m curious to see it!

The Re-Farmer

So many cords…

Today I did some work on my mother’s car, to help prepare it for winter.

For those less familiar with some of the things many of us Canadians need to do to our vehicles so they better survive our winters, most vehicles here have, at the very least, a block heater. That’s all our van has. This prevents the oil from freezing and cracking the engine block.

We actually had that happen to us. We were living in Victoria, BC, which is temperate rainforest. Getting snow there is a rarity, and temperatures below -20C/-4F even rarer. An unexpected windfall meant we could afford to drive out to be with family for Christmas. We had no car of our own, so we rented one. My husband called several places and, at each one, told them that where we were planning to drive and asked for a car with a block heater. The typical response was “what’s a block heater?” So we took what we could and headed out, stopping for the night along the way. That night, temperatures plummeted and wind chills reached -61C/-77F. Amazingly, the car started the next morning, but we barely got back on the highway when it started making noises, so we stopped. This was in the days before cell phones, so my husband started to walk back to town, getting a ride from someone (thank God!) along the way, to get help. Long story short, the engine block had cracked (also, a 6 pack of pop on the floor of the back seat exploded. :-D ) and by the time all was said and done, it cost the company some $5000.

A few years later, when we went back to rent a car there again, we learned our story had become legend in the company. Also, the franchise owner replaced his entire fleet, and all their cars now had block heaters.

So… yeah. These are essential.

If you ever see a vehicle with Canadian plates, and the end of a cord hanging out the hood, now you know what it’s for. :-D

My mother’s car, however, also has a battery warmer and, because it was used so little, my brother added a trickle charger, too.

All of which need to be plugged in.

The plug and cord for the block heater in newer vehicles are different. They don’t need to be on constantly to do that job so, to save power, the cord itself is designed to shut itself off about about 20 minutes, then if the temperature of the lines drop below a certain point, it turns itself on again.

When my brother set things up, he used an extension cord they could all plug into, tucked neatly away.

I needed to replace the extension cord.

He also had a wire around the battery warmer to hold it in place. However, with my mom’s car having so much work done in recent years, things got moved around. After the battery died while sitting at the garage for so long, it was taken out to be charged, but I guess the wire that had been around the warmer was forgotten. I was going to use Zip Ties to hold it, but they kept breaking, so I used a Bungee cord; the red that you can see around the battery.

This is the plug for the trickle charger, after I pulled the rest of it loose. As you can see, there’s no way to plug in the block heater or the battery warmer. My mother didn’t drive the car in the winter and, until we took over taking care of it, my brother stored it here at the farm and took the battery into the house for the winter.

Remember how I mentioned the extension cord used to be neatly tucked in, until work was done on the car?

This is why the cord needs replacing.

I had noticed an odd sound a while back (this was before we had the serpentine belt and pulleys replaced) and found a loop of it hanging down, touching the belt. Thankfully, it didn’t get caught, but there was enough contact for the friction to wear right down to the wire. In another spot, it had been caught between something tight enough to cut through two layers of plastic.

We had the same type of extension cord set up in the garage for our own van, so I was going to just switch them out. I had gotten to the point of trying to figure out how to fit the end, with all three plugs in it, in place when I realized something.

Our cord was much longer than the one I’d just taken out! There was no way I could safely tuck away any excess.

Since I couldn’t leave everything half done like that, I made a quick run into town. Of the 2 hardware stores, one was already closed, and I had less than an hour to get into the second one!

Score!!

I have never seen an extension cord for block heaters before!

I could have done with shorter, but that was the shortest they had.

It took a fair amount of fiddling to find a way to lay the plugged in cords out.

More Zip Ties were used to keep things from slipping down, while the new extension cord was set up to exit at the other end.

At this point, I’m not bothering to hook up the trickle charger. It’s not needed right now.

The battery has nothing to indicate which side is positive and which is negative! Only by stretching to see the far side of the battery can I see which connector cable is red and which is black.

I’d used the slots for holding the battery cover in place for Zip Ties to hold the cord. Thankfully, that did not prevent me from being able to fasten the cover back into place.

I then dropped the hood a couple of times to make sure I could actually close it with the end of the extension cord sticking out.

For now, though, it’ll stay tucked away. When we get colder, I’ll hook up the trickle charger and leave the plug hanging out. A lot of public parking lots have outlets available, so an extension cord will be kept in the vehicle in case we want to plug it in while out and about, too.

Aside from that, my mother’s car is all set for winter. :-)

The Re-Farmer

Fall cover, and working out a problem

It’s been rather windy for the past few days.

We certainly won’t be needing to mulch the bulbs we planted! They’re getting an excellent cover right now. :-)

We’ve got a bit of a challenge in winterizing things outside. One of the things that needs to be done is to replace the rotting skid under the cat house.

After dismantling our goat catcher earlier in the year, we left the frames together. The two 4′ x 8′ ones were prefect to use as guides for our potato beds. When I noticed how rotten the skid under the cat house was, I grabbed one of the frames to check.

It’s actually a better size than what’s already under there! Right now, only one side rests completely on the length of the skid, while the other rests on the skid at only 2 points. That’s the side that also had the little addition, where the entrance is. There is nothing supporting the weight of the entry at all, other than the floor beams.

The problem is, this thing is incredibly heavy. My brother had managed to move it onto his trailer all by himself, but he did that by putting straps around the skid. We need to take it off the skid, then put a new one underneath. The whole thing will be on bricks to keep the wood from contacting the ground, and I plan to add more under the entry to support it, as well.

We discussed taking the roof right off, since that’s where a lot of the weight it, but we are already hearing crackling of wood every time we raise it. It’s already got a lot of years on it, and we’d like to be able to use it for quite a few more! Once we have it on a new skid, set up a bit closer to the house for the extension cord to reach, it will hopefully never need to be moved again until it’s no longer usable. Another part of the problem is the lack of tools. We don’t even have a bar we could use to lever it – there was one, but it was among the things that disappeared while the place was empty.

We will have to make do with whatever we can find!

The Re-Farmer

Fall colours

It’s looking really gorgeous out there!

My mother’s “living fence” has a row of hawthorns (you can see some of their berries) on one side, and a mix of caragana and oak on the other. I got a picture of a larger oak at the far end of the row of trees, with elms above it. The crab apple tree is one of the ones in the West yard. The apples do not taste very good, but the deer and birds will enjoy them. There is also the linden tree, all yellow, while the currant leaves (which I thought were gooseberry at first) are lovely shades of red.

The Re-Farmer

Look what I found

While tending the garden beds where we have the beets and carrots, I was looking into the area behind it. It had been part of the plan for this past summer to clean up further into there, and I was thinking of what I might still be able to manage this year, while we have some co-operative weather.

Of course, with the leaves turning, I was seeing all sorts of yellow and reds and…

… reds?

Those aren’t leaves. Those are apples!

Yup. I found another crab apple tree!

It is easily the tallest of any of the crab apple trees we’ve got, including the ones that aren’t buried by other trees. I honestly can’t remember if I’d noticed anything blooming here in the spring, but if I did, I probably thought it was another cherry tree, since there are so many in this area.

It’s not like I could get closer to see. There are at least 3 dead trees that have fallen by it (the leaves in the foreground are cherry suckers, grown from the bases of dead cherry trees). Through the matting of crab grass and various other undergrowth, I can see wood from other dead trees, but not well enough to tell if they are separate trees, or pieces of the ones that I can see more easily.

There is even a big fallen dead branch, stuck in the apple tree! I suspect this one fell during our more recent high winds, though, and was not part of the fallen trees at my feet when I took this photo.

I was able to get around one side and reach a single apple to pick and taste. I notice the apples are a pretty decent size for crab apples. It was sweet, but the texture wasn’t very pleasant. That could be due to the recent frosts, though.

Well, if I do get a chance to start doing some clean up this fall, I know where I plan to work! I want to clean out up to and around this tree, and get that dead branch out. That will open things up and give it more sunlight and space to branch out.

I suspect I will be finding little surprises like this for a few more years as I continue to clean up further into the spruce grove. :-D

The Re-Farmer

Fall Clean up: finally clearing the second tire planter

When we moved here, there were two tractor tire planters in the yard. One of them had been next to a willow for so long, it was actually damaged by the willow as it grew.

You can read about what a job it was to clear that out here, and here.

Thankfully, this one was not as big, and easier to get to!

The other one was likely about 130-140 pounds, so I’d guess this one was probably around 100 pounds.

Not counting any soil inside it.

The first thing to do was pull up the spent, self-seeded flowers, which I’d already done before taking the picture. Then I needed to loosen the soil and clear out the remaining plants, weeds and grass.

There had been a concrete block in the middle of this, to support the bird bath that used to be here. I dug it out to use in the fire pit, leaving a hole behind.

You’ll notice, there is no hole.

Junk Pile’s kittens LOVED playing in the dirt, and filled it in with their rolling around in it.

They were also very fascinated by me working on this, and were even willing to stay fairly close to watch!

Though I could pull out a fair amount of roots, stems and bigger rocks with my hands, it still wasn’t good enough for the soil to go into the retaining wall blocks.

So I rigged a sieve.

This is the mesh from what had been a screen window that would be put over the window to the old basement in the summer. The wooden frame had rotted and broken, so we built fitted replacement. The old wood frame is trash, but the steel mesh worked well for sifting the soil. A slightly finer mesh probably would have been better, but it did the job well enough!

Well enough that I think I will build a new frame for it, for future sifting jobs like this!

After filling the wheelbarrow with enough soil to top up half the retaining wall blocks, I was at a point where I needed to start lifting the tire itself.

While working my way around the tire, I could hear roots tearing as I lifted it!

And yes, this has been here long enough for moss to start growing on it!

Since this tire planter wasn’t placed next to any trees to damage it, it could potentially still be used for something – in a better location! However, as I cleared the soil and roots away, I could see there is still a fair bit of damage from weathering. I was even pulling broken pieces of cable out.

Eventually, after clearing enough soil to finish topping up the retaining wall blocks, I had removed enough soil to actually lift it up.

As you can see, there’s still a lot of soil in there!

Soil that is jam packed with roots.

I tried loosening the soil with a garden tool, but the root mats were so dense, it was hard to break it loose. It ended up falling over in the process.

Which did a much better job of knocking the root filled soil loose!

In the end, the easiest way to clear it was to roll it a bit, pull it back, bounce it, roll it again, pull it back, bounce it…

I finally got it all out! You can see the pile of roots in the back, where I’d pulled out the biggest, vine-looking ones. I don’t know what they were from; they look like they’ve been dead for a long time. Certainly nothing growing in the planter since we’ve been here came from those long roots!

The tire was just been set aside for now. We might still try to find a way to use it, but not as a planter!

For anyone reading this, thinking of re-purposing tires as planters…

Don’t.

Just… don’t! :-D The tires do degrade quite a bit, they are difficult to work around, and they are a huge job to clean up!

Speaking of cleaning up…

Yay!! No more tire planter!

That thing was such a pain to mow around!

All rakes up and ready to have some grass seed added, next spring.

Another job off the list!

The Re-Farmer

Fall Clean Up: the platform bird feeder

We had a light frost last night, and have frost warnings for tonight, but today was a gorgeous day to get work done outside! We reached a high of 15C/59F, which is an ideal temperature, I find.

The first thing on the list was to work on the platform bird feeder. It has been just sitting off to the side for a couple of weeks now, so it’s about time!

The first thing to do was remove the “legs”. They’re not particularly stable, and showing rot where they touch the ground, so it was time for them to go.

There were a remarkable number of screws holding them in place!

There were 20 screws between 3 legs!!

You can see how they were starting to degrade.

Also, pieces of the platform feeder were just peeling right off!

That took a bit more effort to take off. I started to remove screws from the supports under it, but realized it is really solid, so I tightened them again and left it.

Then I had to find the screws holding the platform to the supports.

I found one I was able to remove. Another would not budge.

It was actually easier to just tear apart the platform with my hands.

I had to use pliers to loosen the remaining screws before I could take them out.

After that, I brushed and scraped away the old bird seed that had gotten jammed around the support post, the scrubbed again with water. Is was then set aside to dry in the sun.

Later, I will cut off the rotten end of the support post, and then I think we will paint it. This can definitely be salvaged. We just need to figure out how to securely set it in place. With a bird feeder hanging off the hook – or even just the cage of a suet feeder – the wind kept blowing it over. I also want to find a way to put on another platform. Maybe something not wood, to avoid the problem of rot that developed on the old one!

We’ll figure it out as we go. For now, we’ll see about getting it painted, first. :-)

The Re-Farmer