Clean up: progress on the old wood cookstove

Looking at the weather forecasts, it’s looking more and more like our planned outdoor gathering with family to celebrate multiple birthdays and anniversaries is going to be an indoor celebration!

So today, I focused on tidying up the Old Kitchen a bit more, so my mother, at least, can sit in it comfortably. Between the Old Kitchen and the sun room, we should be able to fit all of us, if a bit tightly. Of course, if my mother is up to doing the stairs between the old and new parts of the house, we can always move to the dining room.

While wiping things down, I started doing a more thorough cleaning of the old wood burning cookstove. It’ll probably just have a tablecloth thrown over it and be used to hold the food, but I wanted to get some more progress in cleaning it out. Including several decades old ashes in the fire box!

Here is how it looked after I removed the top pieces, and brushed the ashes through.

I should be able to remove the metal plates at each end, which would allow me to remove the grate at the bottom, but I couldn’t see how to do that. For now, I just tried to sweep away as much as I could.

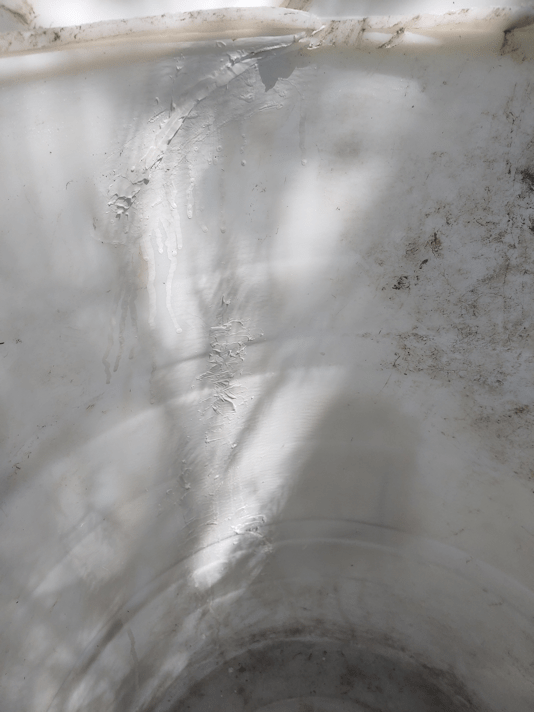
Doing so revealed something strange about the inside wall.

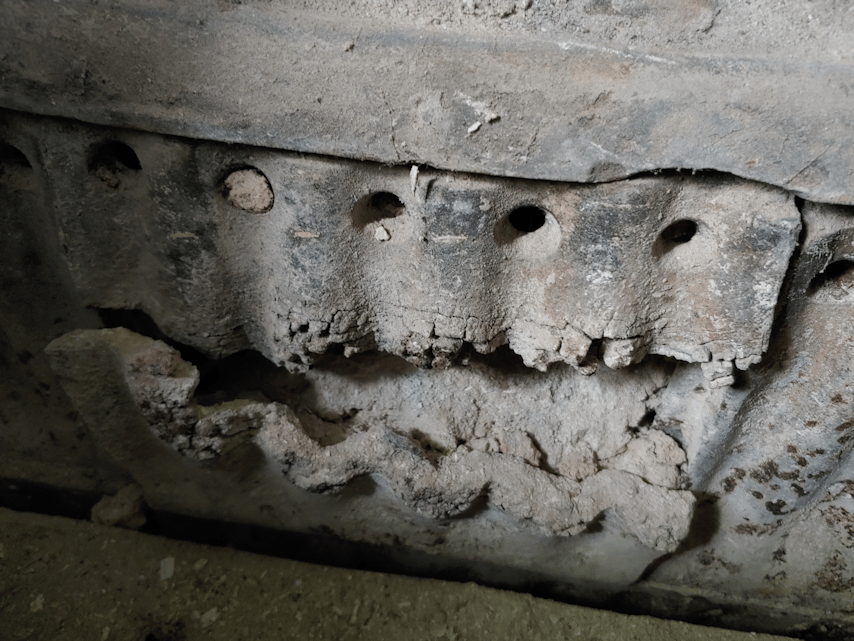
The middle plate looks absolutely destroyed!

I left that for later. First, I wanted to get rid of the ashes. Under the grate are three rollers that can be turned from the outside; a crank handle to do that seems to be missing, but I was able to turn them with my fingers. This allows the ashes to fall into the box below.

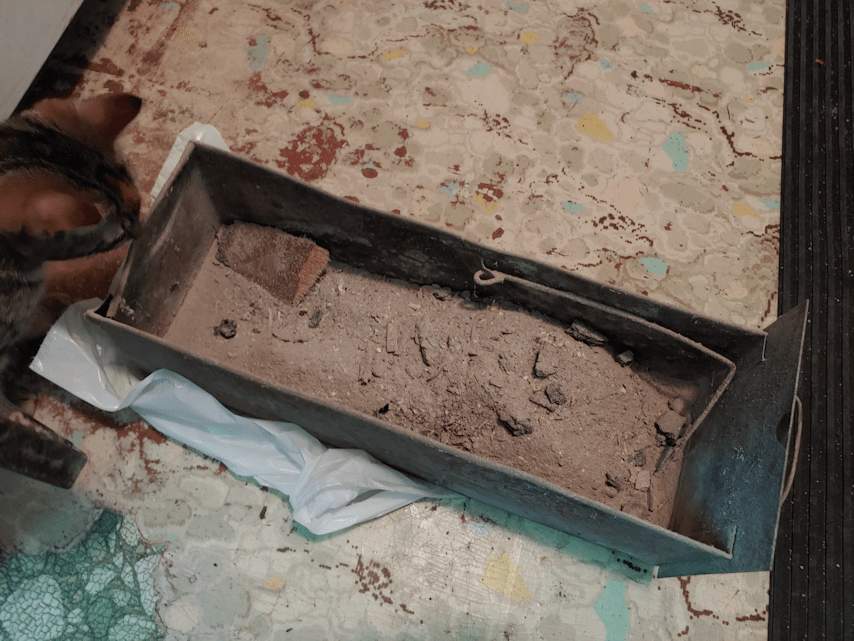
I had mostly emptied this box before, so this is all ashes from the fire box.

I’m not sure where that unburned piece of… paneling? … came from. I might have simply missed it, before.

The piece to hold one end of the handle is broken.

After taking the ashes out to the compost, I hosed it down. Then used a chisel to scrape off things stuck to the sides and bottom that were definitely not wood ashes. :-( After hosing it down again, I set it aside to dry, then went back to working on the fire box.

I ended up taking out the bottom of that destroyed panel completely.

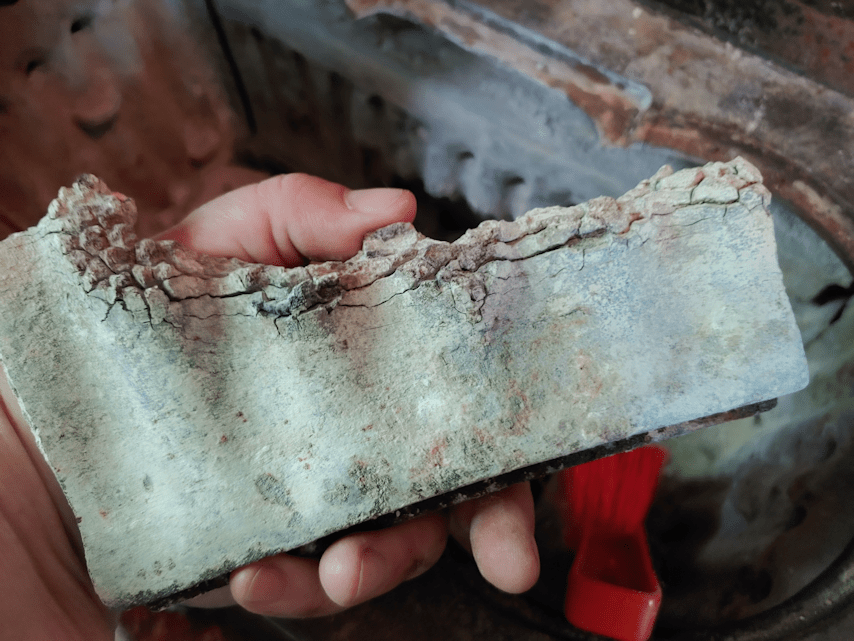
This is thick, cast iron. Just how hot did things get, for this top happen?

Once it was out, I tried to sweep away more ashes.

I ended up knocking out chunks of packed ashes, like this one. More was jammed behind the top piece of the metal panel, and I took that out to get at the rest.

Ashes are not supposed to be able to get in there!

I then started sweeping out the space the ash box fits into. In the ashes I swept out, I found some odd things, like old nails and…

What is this???

That, my friends, is the screw end of a light bulb.

Later, I found the filament in the ashes, too. No glass, thank God!

Why on earth would someone toss a light bulb into the fire? The nails, at least, I can see happening. Scrap wood would have been burned, and if they had nails in them, no one would have taken the time to pull them out, first.

But a light bulb???

Then I used the miracle of technology that is my phone camera, to see what I couldn’t see otherwise!

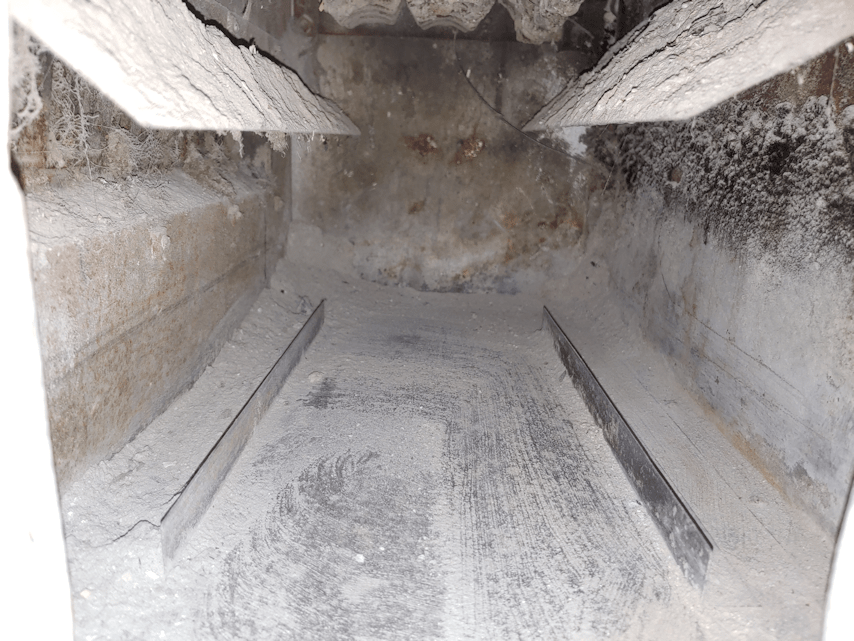
This is where the as box slides in. The flaps above divert the falling ashes towards the box.

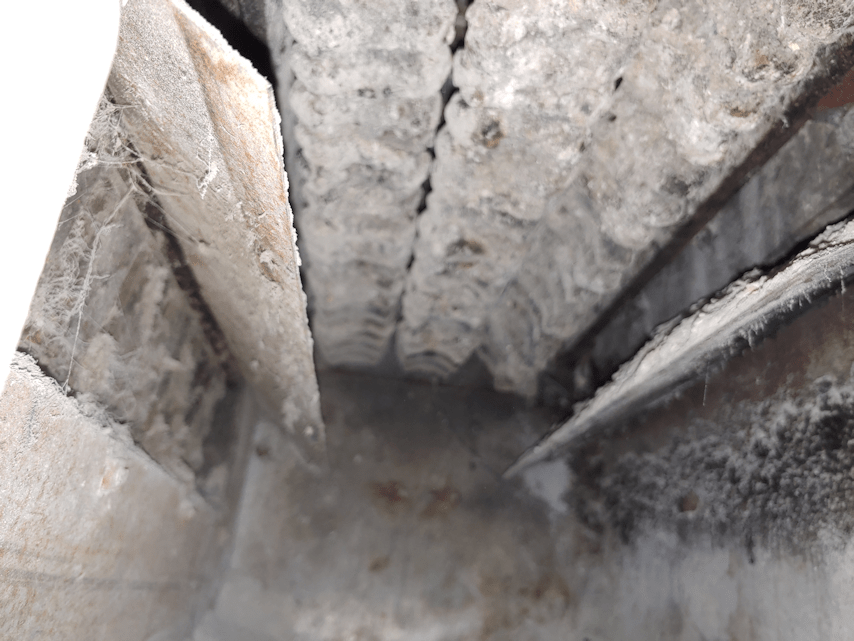
The camera focused on the flaps, but you can see the rollers above, that keep the hot coals from falling into the ash box.

I did as much as I could for now on the fire box side. Next was the cook top above the oven.

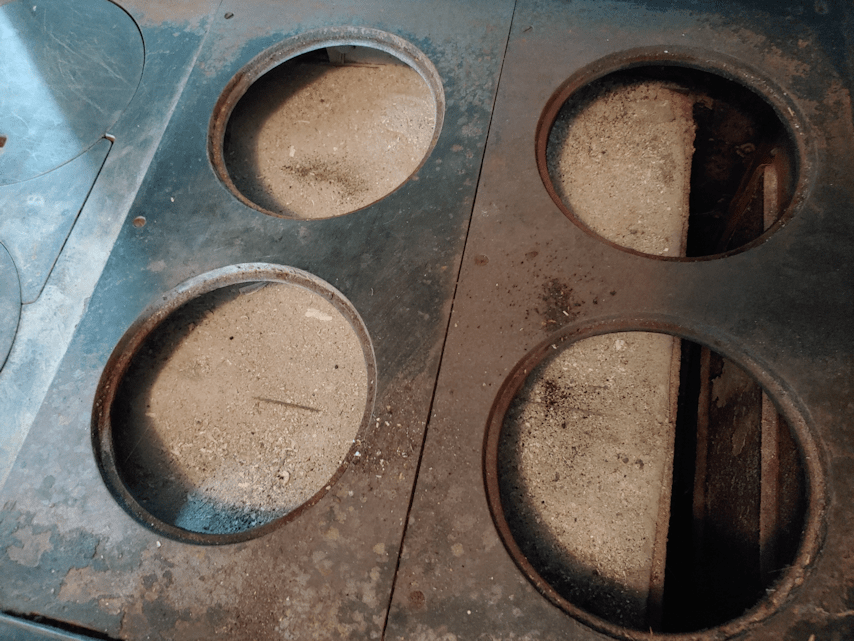
As you can see, the oven box is covered with ashes. Now that I’ve seen the broken panel piece in the fire box, I know why.

I didn’t even try to get those out. The metal pieces can be removed for easier access, but…

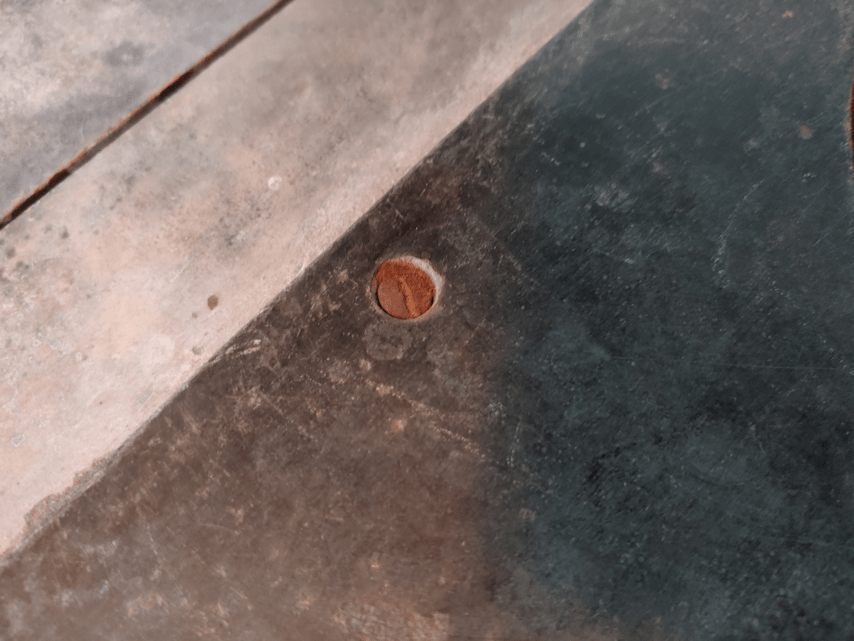
… they are held in place by screws, and there is no way I’m going to try and take those screws out now!

Though I’ve taken the ring plates out before, somehow I never looked at the bottoms of them.

!!!

It seems the fire was allowed to be built up too big and too hot to cause all that damage in the fire box, which then lead to ashes and sooty smoke getting into the space around the oven box. I was quite young when this was still being used, and don’t remember much about it, but I may well have been among those causing the damage. :-/

I really wonder, at times, how we didn’t burn the house down back then!!

I just brushed off as much as I could from the underside of the ring plates. The panels over the water reservoir didn’t need as much.

I didn’t even try to clean the inside of the water reservoir this time.

I did go into the drawer under the oven. The handle and a piece of hinge from the broken oven door is in there, along with …

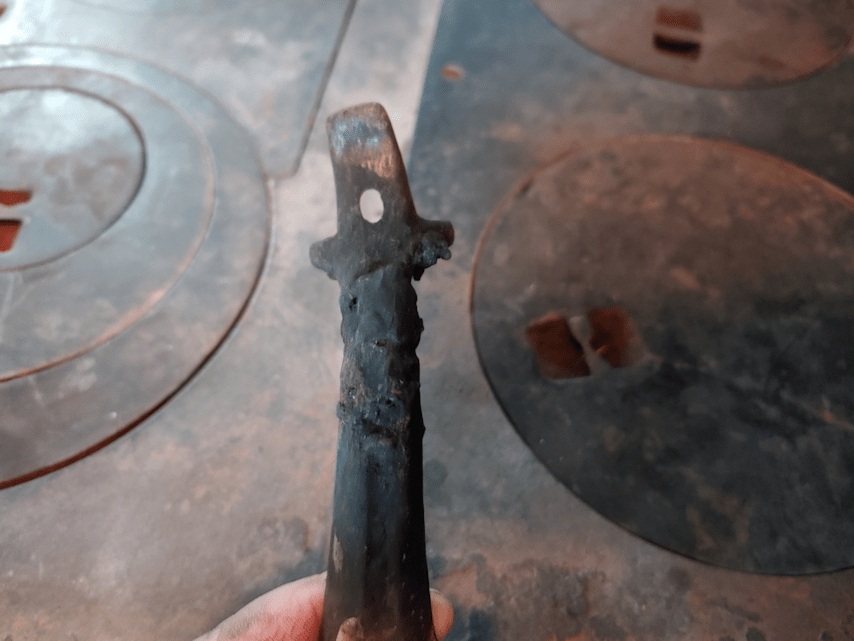
… the lifter for the ring plates.

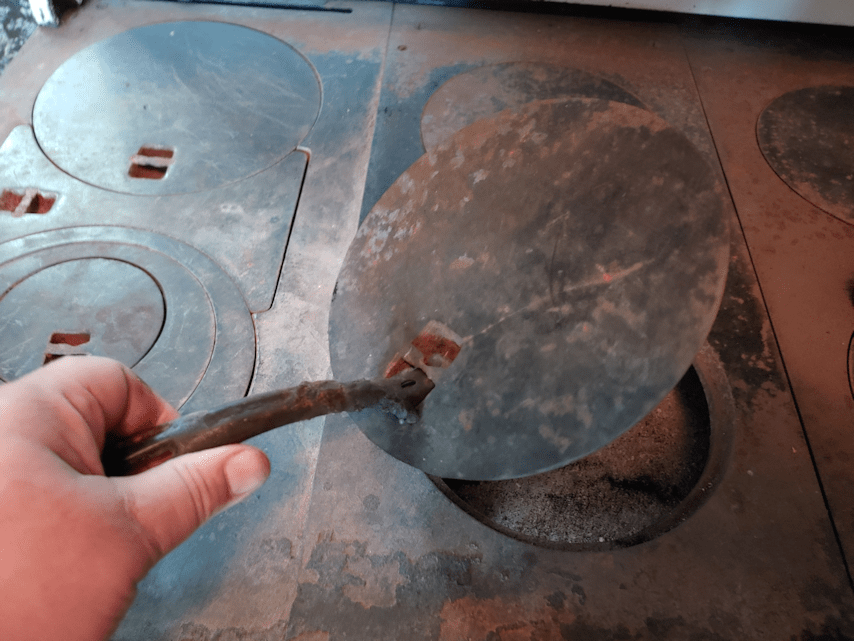
I just used my hands to lift them, but when the stove is in use, this tool is vital.

I… can’t imagine what was done to it to cause this damage. !!!

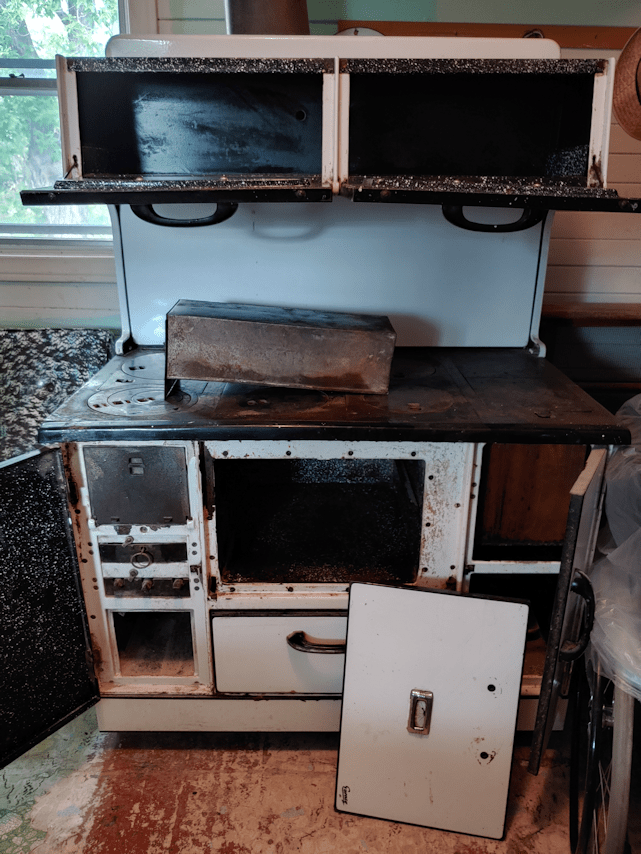
The final thing to do was give it all a wipe down, then leaving it to dry completely before closing it up and putting everything together again. The cook surface and parts like the front of the fire box, and the panels below it, are the only things that are not enameled. Eventually, I want to use stove blacking on those parts. The rest still needs a very thorough scrubbing and rust removal, but I really don’t know far I’ll bother to go with that. We can’t use it – partly because of the damage, partly because we’d lose our insurance if we did – so mostly, I just want to keep it from degrading further. It would be great if we could get it all fixed up but… I’m not sure that it’s worth it. Especially since, there is another one in the storage shed that I know my late brother used, back when that building was his workshop. As far as I know, it’s in good shape. It’s not as old as this one, but is almost exactly the same design.

Who knows. When we finally build our outdoor cooking area, maybe we can include the wood cookstove as part of it. I think I’d really like that.

The Re-Famer

Finally doing a burn, and getting cuddles for my efforts

Today turned out to be actually chilly, for a change. Also, a bit on the damp side, with the odd bit of rain here and there.

Which made it the perfect day to FINALLY get a burn done.

I set this ring up last year, so we could burn away the scrap and rotted wood and other garbage that was too big or oddly shaped for the burn barrel.

With weather conditions, neither have been used much at all, lately! There was stuff in here, waiting to be burned, for months. This thing was supposed to be a short term set up that was meant to be cleaned up by fall of last year!

It is about 2/3rds full of ashes now, so this will be the last burn in it.

I was originally thinking that the ashes would be emptied into garbage bags, then taken to the dump, but I’ve decided against that. It will be added to the material we’ve been putting behind the outhouse. At some point, we’ll be ready to get rid of it and fill in the pit, and we should be able to just shovel this stuff in.

While tending the fire, I had some loving company!

He was not only determined to get hugs and cuddles, but also to lick my nose. If he couldn’t get at my nose, he would go for my neck, chin, ears, hair… but apparently, my nose tasted best of all! LOL Which wouldn’t have been too bad, except he kept trying to lick the inside of my nose, too.

Which actually hurts. That tongue is sharp!

When I had get up to tend the fire…

… he took my butt spot! :-D

After everything was burned out, I found some pieces of metal that I fished out. Nails and old wire are one thing; they’ll be left in there. These pieces, however, were a bit too big!

The metal plate could have been on pretty much anything that was in there, and I half remember the parts and pieces of an old drawer going in, which would explain the handle, but I cannot, for the life of me, think of what went into the pile that had such a huge hinge on it!

The next step will be to shovel out the ashes until I can move the ring. The metal sheet underneath will make it easier to clean up whatever is left. Then the whole thing will be moved away. I had deliberately placed it, not only far away from anything that could catch fire, while still being close enough to reach with a hose, but also in the way of using this part of the driveway. The inconvenience of it would be incentive to get it done! :-D

Well, it worked. It was definitely inconvenient where it was. LOL It’ll be good to finally have it cleared away!

The Re-Farmer

The wonkiest

Today I found myself heading into town for a trip that included a stop at the hardware store. I took advantage of being there to look for some Dremel tips.

The didn’t have the individual tip I was looking for.

I ended up getting this, instead.

I think I’ve got enough tips for quite a few projects, now! :-)

So, of course, I had to find a reason to use it. :-)

A while back, I posted about making a maple spoon.

You see that chunk of wood beside it?

That’s what I worked with, today.

This is that same piece of wood, roughed out.

Not for a spoon, though. Today, I was determined to make a fork!

For this project, I used everything I had around to remove the excess wood. The 4 way rasp got a lot of use, but I also used several of my new Dremel tips, the big K-bar knife, and a couple of my fine saws.

Basically, I see no point in dulling the blades on my carving knives any more than I have to! :-D

I saved cutting the tines for when I was ready to start using sandpaper on the rest of it.

I used a carving knife, as well as a fine tip on the Dremel to shape the tines.

Unfortunately, while sanding them, the wood broke off the tip of one of the inside tines.

Which meant I had to shorten all the others to match.

Here it is, after sanding.

The end result is the wonkiest of forks!

But it’s still a fork. :-D

Here is it, after oiling.

Oh, gosh, it’s the funniest looking fork, ever! :-D

Here it is, next to the spoon made with the same wood.

The spoon could use another coat of oil!

Well, I at least accomplished what I set out to do. Even if it does look totally wonky!! :-D

I still have wood left from the piece I used for these. I suppose my next project should be a knife. :-)

I’m looking forward to it!

The Re-Farmer

Clean up: working towards the junk pile, and… really??

It was a little bit cooler today, so I decided to do a bit of clean up around the spruce grove perimeter. Eventually, we want to clean out the junk pile, but it’s got kittens in it, so I am just working my way towards it.

Here is where I started working.

All those thistles and crab grass are growing out of a pile of … dirt? I’d already cleared a path to the chokecherry tree behind it, and now I wanted to clear the pile itself.

Which meant pulling the thistles and crab grass up by hand.

Yes, the row marker I used in the spring was still there!

It is now leaning against the garage, where there is at least a bit of shelter from the elements.

As for the pile itself, I’m not sure what it is. Stuff was pulling out of it easily, so I thought it might be an ash pile from cleaning out the old wood furnace over the years?

It’s really quite sandy in texture, though.

I’m sure this pile was made for a purpose, but if it’s not an ash pile, I just can’t figure out what that might have been!

After clearing most of the pile from both sides, I continued working my way towards the junk pile. I had seen branches piled there early on, and had added a few myself whenever I needed to clear something but didn’t have a chance to take the wood to one of the piles outside the yard at the time. Like part of the cherry tree by the house that broke off when I tried to move it around the post with an old bird house on it. In the above photo, I’d already cleared that out – and dragged out a length of those tiny decorative wire fences for around flower beds, in the process. It was pretty bent up, so that ended up on the junk pile that will eventually be hauled away.

My first load of very old branches that I dragged out after pulling away more thistles and years of crab grass.

I never did get another full load…

The closer I got to the junk pile, the more old branches I uncovered – as well as something yellow. It looks like a large piece of very thick plastic… tarp?

It was at about this point that I got stung, and found a small, yellow and black wasp stuck in my shirt.

After brushing it away, I kept a close eye out while pulling out a few more branches.

Aaaaannnddd… yes. There were more wasps.

To the left of centre in the above photo is the remains of a log. The wasps seemed to be coming out from under it.

So I took a hose to it, then eventually used a long metal pipe we use for poking around when doing a burn, to lift it over.

Yup. It looked like the opening to a ground nest was right under it.

I hosed that for a while, too. I don’t know if it was enough to drown out the nest, but there were quite a few wasps flying around. They don’t show up in the photo, but they’re there!

At which point, I was done.

I have never seen so many wasp nests in my life, before this summer. They’re all over the place! There is the tree in front of the kitchen window, and one beside the beet and carrot beds, that are nests. Then there are 3 active paper nests in various places, plus the one above the garage door that I got rid of, and the one under the eaves of the house at the old kitchen that I got rid of. There appears to be a nest inside the branch pile near the garage, and now this ground nest by the junk pile.

And those are just the ones I know of.

There isn’t much we can do to stop them from building under the eaves, but this is just more reason to get rid of the junk piles, debris and branch piles!

And those Chinese elms.

Meanwhile…

This is the pile of thistles and quack grass, with a couple of spirea I pulled up near the end, that I cleared up and added to the new compost pile. With so many thistle seeds, I plan to give them a few days to dry, then burn them. That will help with breaking down the old tree stump in the middle, and making sure more saplings don’t start pushing their way through again.

So, I think this is going to be it for clean up in this area for a while. I’m not sure what to do about the wasps, other than hosing the area down repeatedly. With the kittens living in the junk pile, I don’t want to be using wasp poison.

I think it’s time to pick up another wasp trap. The one I got before is currently being used to catch fruit flies in the house, which suddenly became a problem.

Well, a bit of progress is better than no progress at all!

The Re-Farmer

Maple spoon; an unexpected experiment

Today was another hot one, which made it a good day to finally go into the basement and see what I could do with the various pieces of wood I’ve brought down there.

Since getting my wood carving kit, I haven’t had much chance to make things with it. I used the spoon blank it came with for my first attempt. Then I used some of the lilac wood pieces to make a hair pin for my daughter. I have since made a longer, plainer lilac hair stick for my daughter, and tried to make one out of cherry for myself.

I say “tried” because when I got a bit decorative at the thick end, it ended up breaking, twice. The inner core of the piece of cherry I was using was rotted just enough that when I tried shaping the wood, it was just too weak. This was true of the lilac wood, too, but I hadn’t tried to carve anything that would affect the integrity as much, so they were fine.

Today, I wanted to make something with some of the maple pieces from the tree I had to cut part off, earlier this year, so it would be safer for my brother to move around on the shed roof he was patching.

I had a branch of it set aside, waiting for a day like today, and I cut a short piece to work on.

I was thinking of going very simple, and making a spreader or something like that.

Thinking of the lilac and cherry wood, though, I decided to split the piece and see what it was like on the inside.

Well, crud.

I’m not going to be able to make a spreader out of that.

So I cut a piece from a larger branch I had set aside.

Dangit!

I really hope it isn’t all like this. The stuff I want to make uses the heartwood. For the larger pieces, I’m thinking of cups or bowls. Stuff I plan to actually use.

In fact, there was a particular piece of dead maple I’d found while cleaning up the maple grove, I think in our first summer here, that I was looking forward to using.

It doesn’t look like much on the outside, but when I cut it, this particular maple had red rings inside it.

I cut a piece off the end and took a look.

That does not bode well.

So I split it.

*sigh*

Yup. The middle is rotted.

However…

What about the edges? The parts with the red it in still looked solid.

So I split it again.

It did not split well, but the wood did seem pretty solid. Could I do something with this?

I wasn’t sure.

Over the next hour and a half or so, I hacked at it with a giant knife (which I’ve been using in lieu of a hatchet), decided to try the sloyd knife to carve out a spoon bowl, gave up on that and tried the Dremel (the two different tips I tried did the job, but the friction actually charred the wood!), finally broke open my new set of rasps and used a bar rasp with 4 different surfaces, and yes, even the carving knives.

Part way through, I dragged one of the chimney blocks from the old basement to use as a lower, solid surface. Especially for when I was hacking away with the big K-bar.

So that hunk of wood up there?

This is what I got out of it.

I didn’t stop to take any photos while I was working on it because, to be honest, I didn’t think it would work!

So here, I am at the stage of using my coarsest grit sand paper.

As I moved up to finer sandpaper, I would sometimes use my little vice.

You can really see the gouges left by the rasp. The vice made it much easier to just use a narrow strip of sandpaper around the handle and pulling back and forth.

Working my way through ever finer grits of sandpaper took probably another hour and a half.

Sanding the inside of the bowl was the most difficult. While I could use the curved sloyd knife a bit, the wood was really too small for the blade. What I really needed was a wood gouge, but I don’t have one. So that’s where the Dremel came in handy, to get the bulk of the wood out of the bowl, but I still had to cut out the bits that charred from the friction and shape it. I ended up using the other carving knives more than the sloyd knife, because of that.

Here it is, after final sanding.

You can see on the scrap wood, where the knife was hitting while I was chopping away the excess wood on the spoon. :-D

I also included the bar rasp, to show the different surfaces.

Of course, I just had to get a picture of it next to a piece of the wood it came from.

I still can’t believe I was able to get this out of that chunk of wood!

As I was sanding it, I noticed black showing up in the non-red parts of the wood.

Having done my research before I started with my first attempt at carving, I recognized it as spalting. There are people who go out of their way to use spalted wood. It’s basically a sign of the wood’s decomposition.

It was very faint as I sanded, but how would it look after being oiled?

And how would that red show up after being oiled?

Let’s find out!

Wow!! What a difference!

I could have cut this part out, but I kind of like it.

Unfortunately, I find the spalting makes it look like it’s dirty. :-(

On the back, you can still see some of the roughness of the would that I didn’t quite get rid of completely. They look a bit like scratches on the lower part of the spoon. The part that became the outside of the spoon bowl had some chunks missing from how the wood split. It meant less excess wood to remove in that area, at least.

So this experiment was a lot more successful than I had dared hope! Not only was I able to get something out of a partially rotted piece of wood, but I was able to start and finish a spoon in one sitting!

One of these days, I want to try making a fork. :-)

The Re-Farmer

An unexpected outing

You know those times when you suddenly think of someone, and how you should talk to them… and then the phone rings, and it’s that person you were thinking about?

Yeah. That happened to me this morning!

Just as I was thinking that I should call my mother and ask if she needed help with grocery shopping or something, the phone rang. My mother was calling, to see if I were available to help her with grocery shopping!

Perfect timing.

So we arranged that for in the afternoon.

I had another nice surprise when I did my morning rounds. When I do the outdoors part, I always start with putting kibble out for the cats. The cats usually aren’t around in the mornings anymore – likely because it’s been getting so hot, so early! The last thing I’ve been doing in my rounds is going through the garden to pick what vegetables need picking.

As I came around the corner of the house to go to the garden, I saw this.

The tiny little calico was hungry enough to come out in the heat, all by herself!

Unfortunately, she ran off as soon as she became aware of me.

Ah, well. We’ll get them used to us, eventually!

At least, I hope so!

Meanwhile…

I got to my mother’s place, just before 2pm. So I was quite surprised when she told me she hadn’t had lunch yet! She wanted to go out to eat, and was waiting until I arrived. !!! She asked if one of the local restaurants was open again, since I had to drive past it to get to her place, and that’s where we ended up going.

This place used to be half restaurant, half convenience store. They’ve had to completely change everything, and the convenience store side is pretty much empty now.

Hopefully, they will get enough business to stay open. The shut down has been decimating small businesses like this. :-(

While we were eating, my mother started talking about garden sheds.

She has got it in her head to replace the old garden shed that’s here now, even though it’s a very low priority item. It’s come up a few times since we’ve moved here. However, there are a couple of places that have garden sheds in different sizes and styles on display, and she really likes them.

So we drove across the street to a hardware store to look at the one they had on display near the parking lot. She then asked me to go in and get information and a price for her. I ended up getting the information for several different kinds, including a couple of shed kits (which were decently priced) that we would have to put together ourselves, and several more fully assembled types (which are MUCH more expensive), as well as information about delivery and set up.

She then wanted to see where there is a display of 5 or 6 sheds, in the parking lot of an empty building, not far away.

Forgetting that today is Friday.

There’s a Farmer’s Market there, every Friday.

Which was fine, since both of us have been meaning to check it out, but hadn’t gotten around to it.

It was quite busy, but I did find one last parking spot – and found myself looking at the younger of my brothers! He was there with his chainsaw carvings. :-)

I made a quick dash to one of the display sheds to pick up their pamphlet, then rejoined my mother…

At my cousin’s honey display, right next to my brother!

She bought herself some honey, and I placed an order for a 9kg bucket of liquid honey.

We’re finally going to be making mead again!

I’ll be going to their honey farm on Monday to pick it up, as he didn’t have any buckets that big at the time. I keep driving past there and thinking I need to stop by and get some honey, without being able to stop during that particular trip! So I’m extra glad we stopped for the market.

We checked out my brother’s display, of course, but he was with customers, so we didn’t stay long. He’s been making some really nice mushroom lawn ornaments lately. I love his morels, of course, but the fly’s bane he’s been making lately are just adorable, with a tall one surrounded by little ones. My mother was thrilled to see them. As a child in Poland, she remembers picking mushrooms in the forest, and they had these. They could grow to knee height, she says! Now, that might be knee high to a child, but that’s still really tall! She says her mother would cook them, then leave them on the window sill, for the flies to land on and die. I knew they were used that way, but had never heard of them being cooked, first!

Once we were done at the market, we did her grocery shopping, then I stayed for a while as we talked garden sheds.

After going over the information I got and explaining things, I did offer an alternative.

That’s a lot of money, and we don’t really need a garden shed right now. With the roof on the old one covered with strips of metal roofing, the old one no longer has a leak, and is adequate to our needs. What would be more useful for us right now would actually be a gas powered wood chipper, so we can get rid of all those piles of branches all over the place.

To think, when we first moved here, I thought we would be able to use the wood I cleaned up in the fire pit, during cookouts. Aside from not being able to actually use the fire pit more than a couple of times, due to fire bans, we cleaned up far more wood and branches than I ever imagined. Even without a fire ban, there’s just too much to burn. I told her about the estimate I got, to have a company come out with their huge wood chipper. They estimated 6 hours to do the job, at $750 (though, after all this time, I would expect it to be more now). But if we had our own chipper, we could clean out the piles, and have something we could use, year after year.

Unfortunately, when I mention that we can also use the wood chips, she gets upset, because she’s never heard of anyone doing this before, she didn’t do it, so why do I want to do it?

*sigh*

Still, a chipper would be less expensive than a shed and, for us, more needed at this time.

I left the suggestion with her to think about. She told me she would talk to my older brother for advice. Which she has actually done before, at least once, that I know of.

In the end, I honestly don’t expect it to happen. If it does – either a shed or a chipper – I’ll be happy, but the likelihood is very low.

And that’s okay.

In the end, it turned out to be a very good visit. My mother got an outing she really, really needed, she got her groceries, and we even got to enjoy the market and see other family.

I am content with that!

The Re-Farmer

New compost location

Yesterday, I moved the metal ring the compost pile was in to its new location. I ended up using the same wires to hold the seam together; they’ll just be much easier to undo in the future! That allowed me to simply roll the whole thing over.

This is where we decided to put it. I’ve trimmed around this old tree stump many times, but those little trees (several kinds of them) keep coming back.

In the background, you can see part of what was cleared to get at the chokecherry trees, including another tree stump, and the pile of spirea and thistles from clearing towards the junk pile.

Now that we’ve discovered her babies, I fear Butterscotch has already moved them somewhere else. I hope not!

After taking a pruner to the saplings and adding a pile of dried weeds and grasses I’d pulled up when clearing here earlier, it looks full already!

The tree stump does take up a lot of space.

Time to start burning!

I needed to burn out all around the stump, to hopefully kill off the root systems those saplings keep growing from.

By the time I was done, several hours had past, and it was completely dark when the girls came to help me make sure all the coals were out and put everything away.

I had the hose going so much, spraying around the fire and keeping the sparks from getting far, it was actually muddy by the ring.

On the plus side, I got rid of the pile of spirea and thistles in the process.

Of course, I needed dry wood to keep the fire going, since much of what I was burning away was pretty green. So I raided the pile of branches by the garage that’s waiting to be chipped.

I couldn’t see anything, but I am convinced there is a wasp nest somewhere in that pile. I can hear them, and the sound is NOT coming from the nearby Chinese elm.

!!

This is how it looked this morning.

Hmm. I am thinking I might need to do this again, before we start using it for compost. The stump didn’t burn much, but that’s okay. It’s the area around it that has stuff I want to kill off, so they don’t start growing into the compost when we start it.

I’m thinking this will be a good location. We’re happy enough with the nearby garden beds (even with the deer decimating our beets) that we will continue growing there, so having a compost pile nearby will be handy. It’s closer to the house – but not too close! This is near where we plan to build the cordwood shed to use as an outdoor bathroom with a composting toilet. It might be in the way during construction, but the way things have been going, I’ll be happy if we can just dig out the sod where we want to lay down gravel and level things, first.

Though we plan to have a composting toilet, the contents will NOT be used for compost in any of our garden beds. I’ve seen many sites talk about how great human waste is for compost, and it absolutely horrifies me. It’s not the waste itself I have concerns with, but what might be in it. Not many people are in my husband’s situation, having to take more than a dozen different prescriptions, but even if it’s just OTC pain killers, hormonal birth control, or other prescriptions, it will be an issue. So we will have a separate dumping site, well away from anywhere food will be grown.

So that is how things are progressing with the new compost location.

One of these days I intend to get some dual roller composting bins. They are supposed to compost a lot faster but, for me, it’s more about accessibility and mobility. We may not need it now but, at some point, it will be more of an issue.

That’s one thing I learned about living in the housing co-op we were in before moving back here. It was one of the few places that had a lot of wheelchair accessible housing, and many of my friends and neighbours had a variety of mobility issues. Now, I see everything with different eyes. It did make the transition to my husband becoming disabled much easier, to be honest. It can happen to any of us and, as we age, it’s almost inevitable. One woman I know uses the term TAB to describe people without disabilities: Temporarily Able Bodied.

Accessibility is now an almost constant thought in the back of my mind as we work on things and plan ahead.

Even with composting.

The Re-Farmer

Clean Up: spruce grove perimeter, by the Saskatoons

One of the clean up goals that got shifted back a year, due to my husband’s hospitalization and other issues last year, was to clear the spruce grove. Not all of it; parts of it will be left overgrown to shelter critters. I do want to get most of it cleared. This will be a multi-year project, but at the very least, I want to get the perimeter done.

That was supposed to include clearing around and into the junk pile, but now that we know Butterscotch’s kittens are in there, that will wait.

We never did get a chance to clear things out to reach the Saskatoon bushes near the junk pile, but I still wanted to get that done so we can reach them, and the chokecherry trees beside them.

Here is how it looked when I started.

The spruce tree in the foreground is still alive, while the tree on the left of the photo is dead, as is the one by the junk pile on the right of the photo.

(Also, I set up containers for kibble and water for the babies, and yes, they’ve already discovered them!)

There had been quite a few bushes and spirea at the base of the live spruce tree, and crowding the horseradish, that I cleared away a couple of nights ago (it was too dark for photos at the time), so a start has already been made in this area.

The first thing to do was cut away the elms that have been growing in the old wine barrel planter that used to be such a favorite place for the kittens to nap and play in. Then I began working a bit towards the junk pile. Not too far, though, as the spirea in there creates places for them to hide in.

I’d forgotten about that tire rim that was buried in there… :-D

After moving the tire rim into the old wine barrel planter, I discovered something else.

Those are concrete blocks, buried in the soil!

When we first moved here, the wine barrel on its side in the bushes was intact enough that the cats would sit on it. It was another favorite spot for them, until it rotted out enough that the staves collapsed! :-D

It looks like the tire rim was placed on top of the blocks, then the barrel on top of the tire rim until it eventually got knocked over. Unlike the planter, this was a whole barrel, not one cut in half to be a planter. I don’t know what it was set up for.

I’ve left the blocks for now, and did not clear further around the remains of the barrel. I figure this makes a nice spot for kittens to play in!

I didn’t want to go any closer to the junk pile – I don’t want Butterscotch to move her babies! – so I started working around the other side. Some of this area, I’d cleared before, but it doesn’t take long for spirea to spread out again!

Here is how it looked when I stopped for the day.

I would have liked to continue, but even working in the shade, it was just getting too hot.

The Saskatoon bushes are still loaded with – now dried – berries. I’m sure the birds will enjoy what we could not harvest. The chokecherry trees in there should be ready for picking fairly soon. It is likely too late in the season to make a difference this year, but clearing up around them will likely result in better growing and fruiting conditions, too.

Here is another view.

For this photo, I’m standing near the horseradish and facing right into the Saskatoon bushes, with a few chokecherry branches hanging over from the side.

This is how it looks from further in.

All those skinny little trunks you see on the right half of the photo are chokecherries and Saskatoon bushes.

When I worked in here previously, I’d cleared away the spirea up to a spruce tree with an extension cord hanging down from it. So most of this area had already been done. I only worked closest to the Saskatoon bushes and chokecherry trees for now. Eventually, I want to clear all the spirea out of here. There are wild roses growing not far from here, and I would like to encourage those to spread, instead.

As for this area near the edge of the spruce grove, I want to keep it clear of undergrowth. It’s one of the areas I want to eventually set up a bench and create a little haven, near the stone cross my late brother set up at the very edge of the grove. If possible, this would be an area I’d like to encourage moss to grow as a ground cover.

It was a fairly small area that got cleared, but there was a lot in it! I was able to pull most of the spirea out by the roots. With some of them, there was a LOT of root coming up with them! The topsoil here is decades of decomposed spruce needles, so it’s quite loose, making it much easier to get those roots out.

Eventually, we will have the tree company that cleared our roof and power lines come back and take out the two dead spruce trees here. We were supposed to get that done this spring, or at least get the chipping done, but we ended up spending all our money fixing vehicles and replacing appliances. We probably won’t be able to get it done this year at all.

Which gives me more time to clean up the area, which will make it easier for them to get at the dead trees.

Little by little, it’ll get done!

The Re-Farmer

Garden rain barrel; redux

With yesterday’s rain, it wasn’t until today that the rain barrel set up by the squash beds was dry enough to try patching again.

The silicon sealant is white, and so is the Plasti Dip spray, so it’s hard to see! Especially after I spread the sealant into the cracks.

Hopefully, this will do the trick and there will be no more leaking. Though, to be honest, the amount that was leaking was so minor, I’m not too worried about it. It’ll just water the spruce tree it’s sitting next to! :-D

I’ll leave it to cure for at least 24 hours before refilling the barrel. Then we will see how well this worked. :-)

The Re-Farmer

Fungus fire

Yesterday afternoon, we had a constant, light rain.

The perfect time to light a sketchy fire!

Of the several fungus infected tree stumps we need to burn out, I started with the only one that isn’t cut flush to the ground. I figured I should get the bigger one done first; the rest will get done very quickly, in comparison!

The metal ring I rolled over from where I found it by the storage shed was just the right size.

You can see some of the fungus from last year, dried up on the side of the stump facing me. On the other side is the remains of an ants nest. When we cut what was left of the tree down and left the short length of trunk next to the pile of diseased branches we’d pruned earlier this summer, the ants moved with it!

So no killing of ants involved. :-)

Of course, I made sure to have a hose handy, even with the rain. The wood used as fuel is from the stack of diseased branches, which all need to be burned.

I set myself up with a chair and an umbrella, too. :-D

It took a while to build the fire around all of the stump, partly because I needed to keep the fire small. It wasn’t directly under another apple tree, but close enough to potentially damage some of the branches.

I’m not too worried about that particular tree. Of all the apple trees, that one has the smallest, least edible apples on it.

The birds and deer like them, though, so that’s good.

This tree is one of the ones I want most to protect.

It’s at the far end of the row of trees, and next to one of the stumps cut flat to the ground that we found fungal growth on, too. This tree already has tasty apples! It has the wonderful combination of sweetness and tartness that I love. There is one other tree, at the very end, that also has really good apples, though they take quite a bit longer to ripen. The main grafted part of that tree died, and it’s the suckers from the base that are producing such nice apples. Usually, it’s the other way around.

So I’m rather motivated to keep this fungal infection from spreading! We really should have done this in the spring, but the weather was not at all co-operative. Spores for these emerge in the fall, so we have a bit of time, yet.

When I stopped for the day, I scrounged for something to cover the stump with. The fire was out, but might still smolder, so I wanted to make sure it couldn’t flare up or spread.

That top of an oil drum is something I fished out of the edge of the nearby spruce grove when I cleared the north side of it. The metal sheet was just one of those things among the garbage we dug up near the old garden shed.

The fire got quite a bit of it cleared. I don’t know how far into the wood the fungal infection gets, but even if the fire killed that off, I still need to get the stump down to ground level.

For now, I’ve taken an ax to it to break it apart a bit. We’ll start another fire on it later and repeat the process as often as necessary.

We’ll see what the weather is like.

The Re-Farmer