This morning, I was a bit late doing the outside part of my morning rounds, having taken the time to finish the second hoop to cover the rain barrel by the sun room.
On checking the rain barrel by the garden, it seemed to be okay, but I did find a very minor leak from one of the larger cracks.
Then I noticed this, beside it.
It’s a bubble of water! The Plasti Dip on the outside it still holding it, but it won’t take long for it to give out.
So I need to empty the barrel, then add more sealant after cleaning and drying it.
I’m out of Plasti Dip, but I did finally find the silicone sealant we’d used to fill the holes in the wall from when the satellite dishes were moved from the side of the house to the roof of the sun room. It’s designed for exterior use, and is what I’d wanted to use at first. So that is what I will use on the inside of the barrel.
For now, though, I think I’m going to shut down the computer as we hunker down. Storms are coming through, and look like they’ll actually hit us this time. So I am expecting to lose our internet completely at some point, and probably at least some power flickers.
The rain is going to be wonderful. It’s been a long time since we’ve had a solid rain.
This morning, I emptied the can of Plasit Dip on the cracks in the rain barrel.
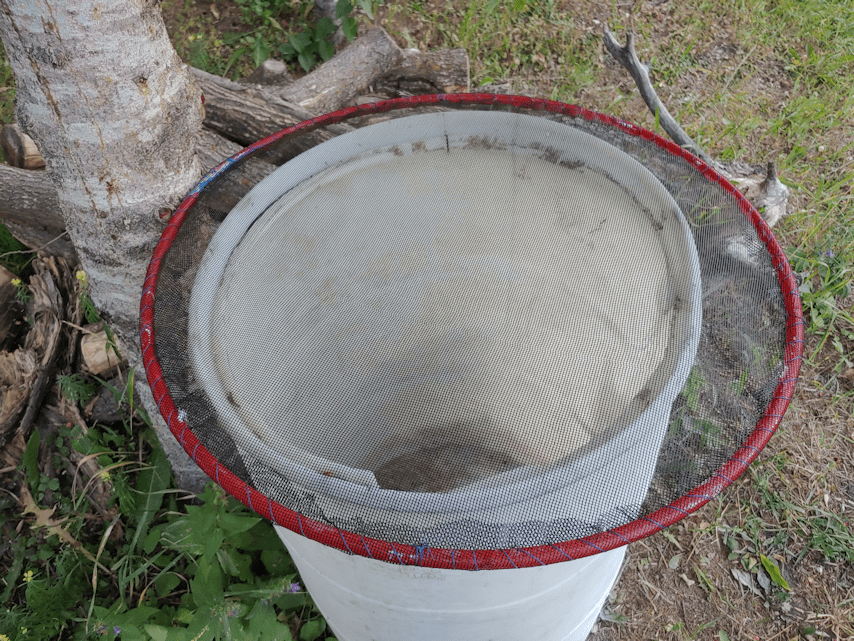
Yesterday, I found a couple of hoola hoops at a dollar store in town, and this afternoon, I dug out the role of window screen mesh we found while cleaning out the basement. I hadn’t quite figured out how I was going to attach the mesh to the hoops, and decided to just sew it on. The only problem with that was holding the mesh in place, so I ended up applying the WeldBond glue I’ve got to the hoop, then laying the mesh I’d cut to size on top of it.
Made a real mess on my hands, pressing it into place, but thankfully, the glue washes off easily.
After it had set long enough, I then just sewed the mesh on with a needle and thread.
It’s a bit on the light side and I want to figure out how to add weight to it. With the screen directly on the top of the barrel, any weight on the hoop could potentially tear the screen. I’ll probably just put a board across the top.
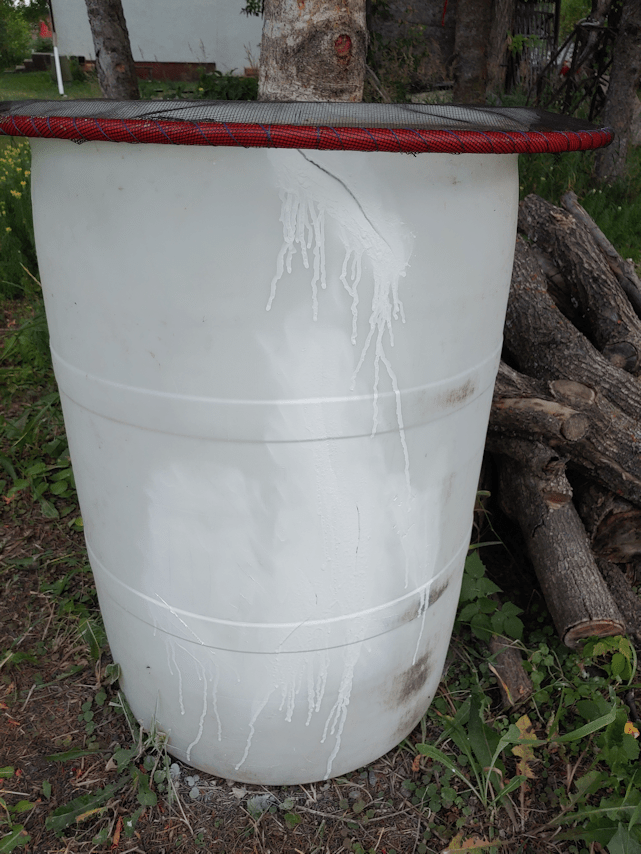
Here are the areas I sprayed with the Plasti Dip, both inside and out. I even sprayed areas that I wasn’t sure was cracked, or just a deep scratch, just in case.
That big crack at the top? It’s actually sealed. I didn’t think it would work, but with enough layers, it filled the gap! Most of the seal on that one is on the inside layers.
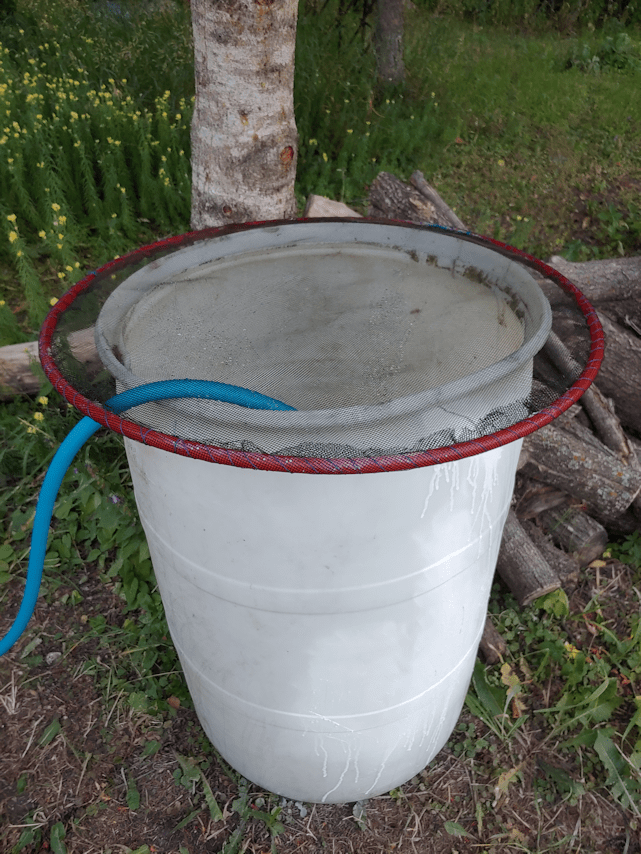
After giving the inside of the barrel a quick rinse, it was time to fill it and test out the seal.
As of tonight, it is completely waterproof. When I do my rounds in the morning, I’ll see if it held up through the night.
I’ll also be able to water the garden using water that has had a chance to warm up, instead of ice cold well water. :-D
The second hoop is currently sitting in the basement with the mesh and some glue. Tomorrow, I’ll use needle and thread to attach the screen securely, then put it over the rain barrel by the sun room. It’ll be nice to use the water from there, and not have my watering can’s head get clogged up with leaves and other debris. :-)
It took a while to get the garden rain barrel to the point it could be filled, but I think it was worth it to keep adding more layers to the cracks, with lots of time in between to cure.
It may not be pretty, but it’ll do the job! And that’s all that matters. :-)
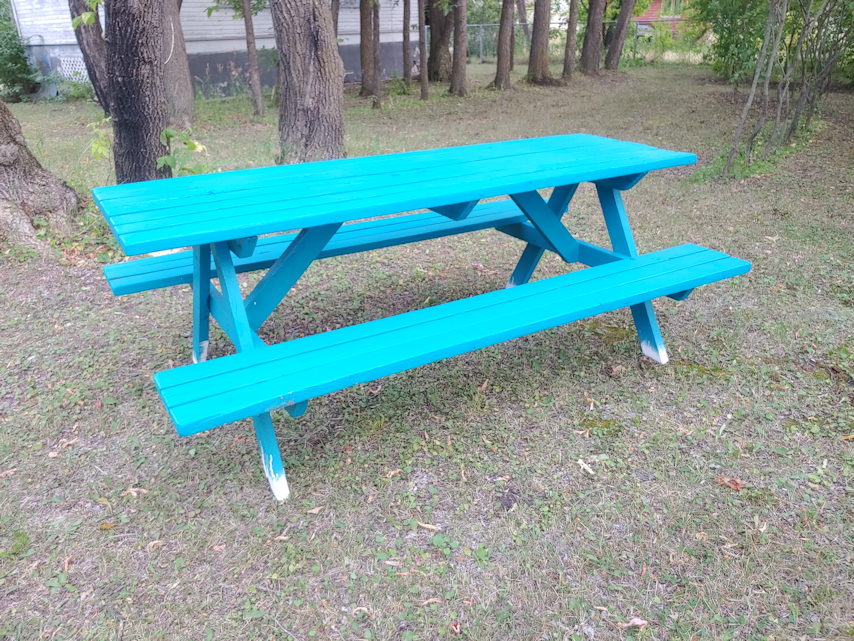
This morning, I touched up the scratches we found after we flipped the picnic table upright again. This evening, we moved it over by the fire pit.
It will probably be moved again, the next time we do a cookout and figure out where is the most useful place to position it in relation to the fire pit.
It practically glows! :-D I’m really happy with how it turned out, and look forward to using it at our next cook out!
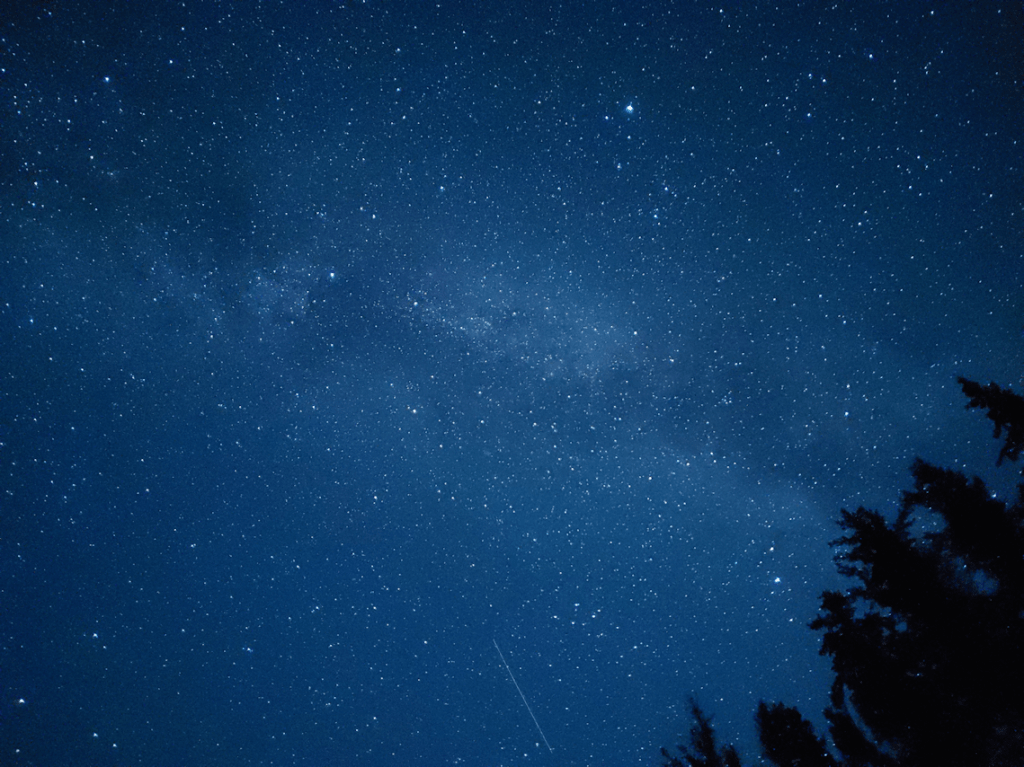
Last night was supposed to be the height of this year’s Perseids meteor shower, so I headed out again to try and get some photos.
This time, I actually played around with the manual settings on my phone’s camera a bit, so I will include that information the photos in the captions, for those who are interested. I resized the following photos by 50%, but the images are otherwise untouched.
f/1.5 Exposure time: 13 seconds ISO 1600
This time, I headed straight to the old garden area, which is the darkest areas that is close to the house. As before, I had my phone on a GorillaPod and used voice commands to take the photos after positioning it.
In the above photo, you can see I caught a meteor on the bottom left. I did not actually catch many meteors in photos, and while I did see (but missed getting a photo of) one really bright meteor, followed by a flash when it hit the atmosphere, I didn’t actually see most of the meteors I managed to catch during the long exposures!
I think I may have simply gone out too early in the night, and it may have still been a bit too bright.
f/1.5 Exposure time: 20 seconds ISO 1600
In the above photo, you can see some clouds, looking like a smudge on the bottom right. They were so thin and sparse, we could not actually see them ourselves.
f/1.5 Exposure time: 20 seconds ISO 1600
After taking a few shots with the phone on the ground (and being tackled by a Potato Beetle, desperate for attention!), I ended up using the top of the straw bale as a surface.
This was good enough for Potato Beetle, too. After sniffing the phone, he laid down nearby and kept me company.
Much nicer than him jumping half way up me, and hanging on with his claws… :-o
f/1.5 Exposure time: 30 seconds ISO 3200
While I was taking photos with my phone’s camera, my daughters came out with the DSLR on the tripod to give it a try.
I haven’t uploaded the card yet, but my daughter was very frustrated. Even at 30 seconds exposure time, the camera preview showed nothing but black. While it may not have been as light as the above 30 second exposure shot, it still shouldn’t have been black!
f/1.5 Exposure time: 30 seconds ISO 1600
I just love how the Milky Way shows up. Especially in contrast with the trees.
f/1.5 Exposure time: 30 seconds ISO 1600
One of the frustrating things about trying to take the photos is how many of them ended up being out of focus. The camera was on auto focus, so I finally switched that to manual. There is a sliding bar between a flower (macro) and mountain (landscape) icons. I set it as far as it would go towards landscape, but for some reason, the bar would adjust itself just short of that, on its own. I’d take a good picture, then the next one would be out of focus and, invariably, I would find the manual focus had changed on its own.
f/1.5 Exposure time: 30 seconds ISO 1600
It took me many tries, but I finally got one where the Big Dipper could be clearly seen!
f/1.5 Exposure time: 30 seconds ISO 1600
Before heading into the house, I couldn’t resist taking a few more photos from the East yard – and caught another meteor! :-)
Hmm. Interesting. I selected what I thought were among the best photos from the many I took last night, and they all ended up having almost exactly the same properties. I know I adjusted the F stop, as well as trying out different ISO and exposure times. I guess f/1.5 and ISO 1600 for 30 seconds simply gave the best results!
It’s a pain in the butt using manual settings on a smart phone. Especially with how I have the GorillaPod set up so it lies almost parallel to the ground, resulting in a Pod leg blocking the part of the screen the adjustments are made. It is, however, worth it. I am so happy with how these photos turned out!
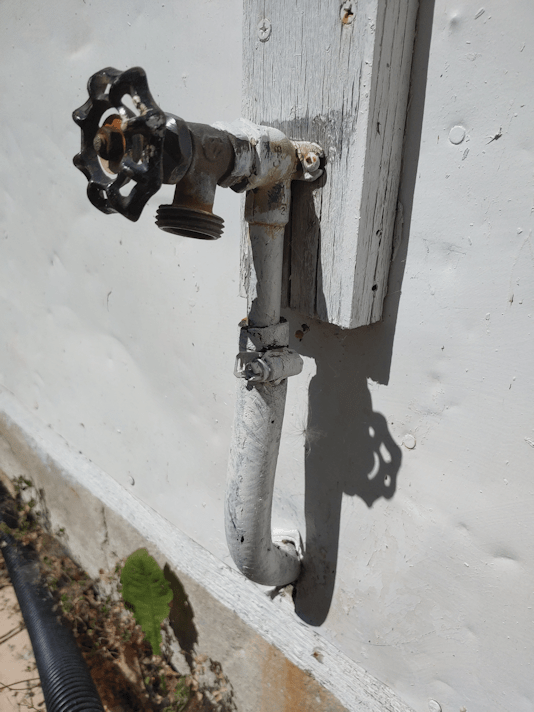
For the past while, whenever I’ve had the chance, I’ve been looking for what I might need to fix the front outside tap.
At first, it would spray water when we shut the water off, so we just left it on. It made it more convenient when using the hose, anyhow. Then, after the end of the hose broke off and I tried putting on another one, I found it had started spraying water all the time. So we’ve had to use the tap at the back of the house – and almost 300 ft of hose – leaving the front one shut off in the basement.
I figured I just needed to replace the O ring (or whatever this type of seal is properly called) inside the tap, but do you think I could find one? I was also looking for replacement taps, since I thought that might be easier (and I figured it was due to be replaced, anyhow), but I couldn’t find those, either. I wasn’t even sure what section of various stores to look in. The closest I could find to what we had were laundry taps, and any ring seals I saw were not for inside the tap itself, but for the couplings.
I needed to go to town today, so I remembered to take a photo of the tap before I left. Once at the hardware store, I just showed it to an employee, explained the problem, and asked him where I might find what I needed.
Of course, he needed to know where it was leaking from, which was right at where it turns on and off.
Well, it turns out there’s a reason I couldn’t find what I was looking for.
They don’t carry that type of seal.
In the end, it was easier to just replace it!
Also, the new taps were, indeed, in the plumbing section (not the gardening or laundry sections, where I had also looked), but not where I had been looking. According to the label, the tap is designed for boilers. :-D
Once back at home, I dug up some thread tape and headed out to replace the old tap. The old tap was painted over a bit, but nothing a wrench couldn’t get loose.
On screwing in the new tap, however, I found an unexpected problem.
This is the new tap, with the hose connector facing down. Notice how much of the threads are exposed? In the old tap, there was nothing like this!
It wasn’t actually screwed in tight in the above photo. I got a daughter to turn the water on in the basement to test it out, and I was happy to see it did not leak at all, but as I turned the tap on and off, the whole thing would turn and wiggle even looser.
For the tap to be on good and tight, we get this.
All it took was a quarter turn to tighten it, but it would go no further.
It’s a flexible hose coming through the wall, so we could move that board the tap is affixed to, if we wanted, and reposition it to the side. I don’t really want to put new holes in the wall, then have to seal the old holes, get paint to touch up the wall (the house was painted the summer before we moved in, but we don’t have any leftover paint from that), and end up with a tap that’s lower and harder to reach to screw the hose into.
So we’ll just leave it like this, with the hose sticking out sideways. :-)
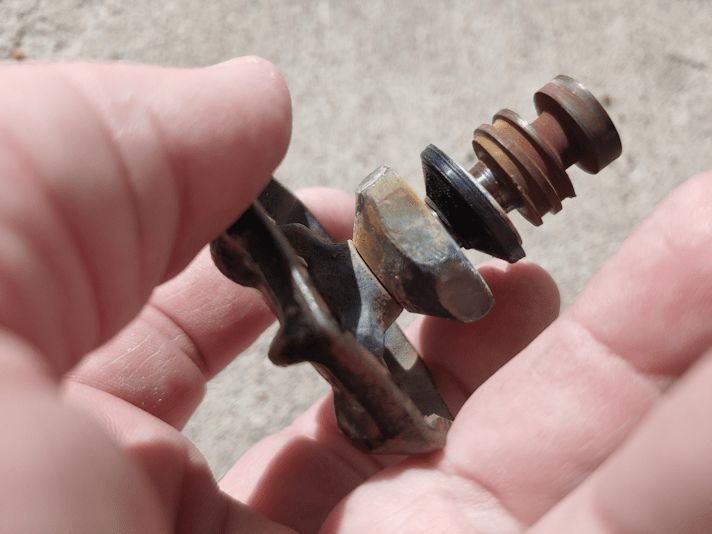
Of course, I had to open up the old tap to see how bad the seal was inside.
It…
…looks perfectly fine!
The seal is still flexible, and nothing is cracked or broken.
I have no idea why this tap started spraying water like it did, where it did!
So I’ve kept it.
In the end, I’m happy with the new tap. I like the triangular design over the round one, as it can be gripped more easily and securely. Especially with wet hands.
So now we have front and back hoses again!
We might need to get another hose for the front, though. I looked for something to fix the hose that broke, but everything I could see would require me to cut off the metal reinforced end. I might just wait for the fall sales and pick up another one, instead.
Over the past while, I’ve been adding another coat of Plasi Dip to the ends of the picnic table legs. I stopped adding more coats yesterday, but have continued to spray the cracks in the rain barrel. Basically, I plan to empty that can on those. :-D
This is about 5 or 6 coats. I lost track of how many, exactly. When I took the picture, it had at least 24 hours to cure since the final coat. It looks like it will do the job just fine, and help extend the life of the picnic table.
Earlier today, a daughter and I flipped the picnic table right side up, then checked the surface. Sure enough, there was a bit of damage. Some paint had come off when the bird feeder had been put on top of it – both surfaces hadn’t quite cured yet, and the feeder stuck to the table.
While upside down, the table was on the chimney inserts I’d used to raise it off the ground while painting. There were a few scratches from those, as well as dirt. My daughter hosed it off and scrubbed where needed.
Tomorrow, the bits of damage will get touched up before we move it to somewhere near the fire pit.
For something that is too far gone to repair, this should last quite a bit longer now. As long and nothing actually breaks. :-D
I headed out last night to brush spider webs away from the garage security camera. The infrared flash was reflecting off a single strand of web, but it was enough to completely mess with what could be seen!
That and seeing a spider go by on it is a bit alarming. :-D
Which is why I happened to be out to notice the incredible number of stars that were visible.
Time to break out the Gorilla pod and see what I could capture with the camera on my phone!
Now, I will admit off the top that I have only the vaguest understanding of the manual settings on cameras. I’ve had them explained to me often enough. The problem is that when I try to adjust things, what I get is often the opposite of what I’m supposed to get.
Very frustrating.
So what I ended up doing with my phone’s camera is just adjusting settings and trying them out until I find something that works.
Then I don’t touch them again.
To get these pictures, I set up the Gorilla pod’s legs to hold the camera almost parallel to the ground, and a couple of inches above. I can then step back and use voice commands to take the actual photo.
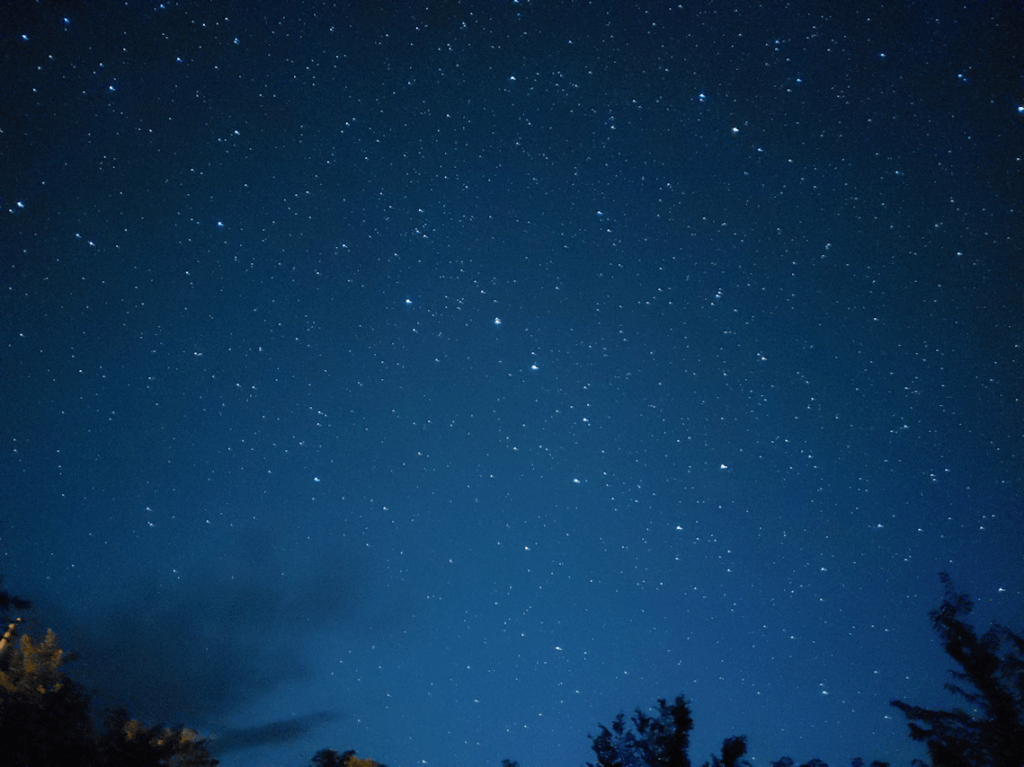
The first pictures that worked were taken in the inner yard.
Aside from resizing the images to 50%, these photos are straight out of the camera.
The above is the first picture I took that worked.
Can you see the shooting star? Quite a few pictures had them. Most of which I missed seeing while the photo was being taken.
Though I made sure to set up in the shadows of trees, the yard light does actually affect the outcome, as you can really see in this next one.
The camera may have been in shadow, but the tops of these trees were partially lit up by the yard light, so they look SO much brighter!
I’m so happy with how the Milky Way shows!
For the next couple of photos, I’d moved into the outer yard to the mowed area in front of the storage building. This put the pump shack between me and the yard light.
No adjustments made to the settings, and the images are much, much darker, just from the yard light being blocked by a building.
So many more stars are visible with the long exposure, that it’s actually harder to make out constellations. In the above photo, you can just make out the handle of the Big Dipper, near the bottom.
In some of these photos, there were blades of grass visible in the frame. This one just has some seed heads waving around on one side.
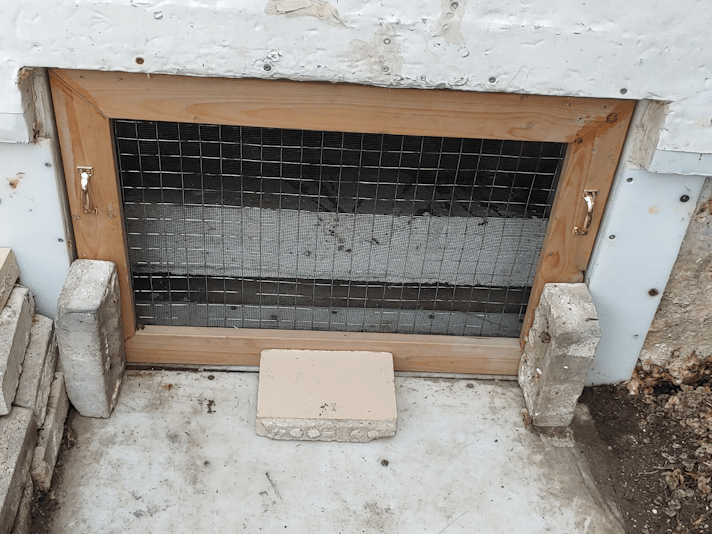
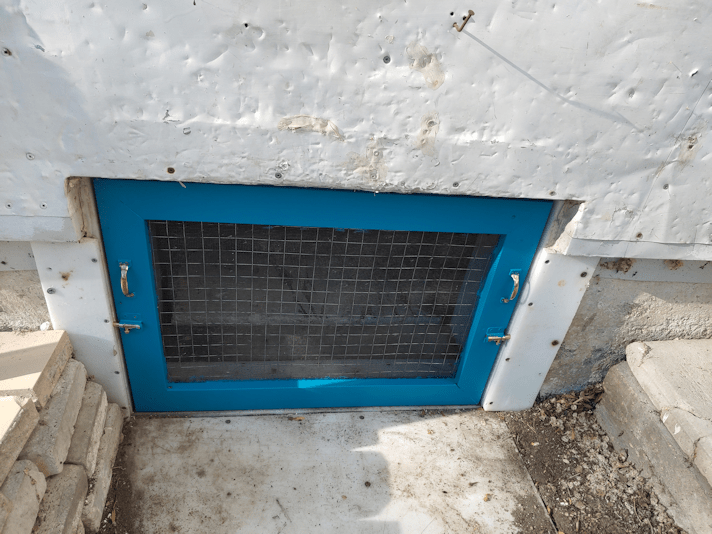
After several coats on of paint on the outside, and one on the inside, the screened window for the old basement is now fully cured and back where it belongs!
It’s one thing to have that bright blue on something that is in the yard. Quite another to have it on something that is part of the house! Even the blue replacement door is a dark blue, so not quite as jarring.
I think it looks rather nice against the white. :-)
Normally, I would not have done clean up on a Sunday, but the chokecherries needed to be picked, and we couldn’t get at the two trees with the ripest berries.
Which turned out to be 4 trees… :-D
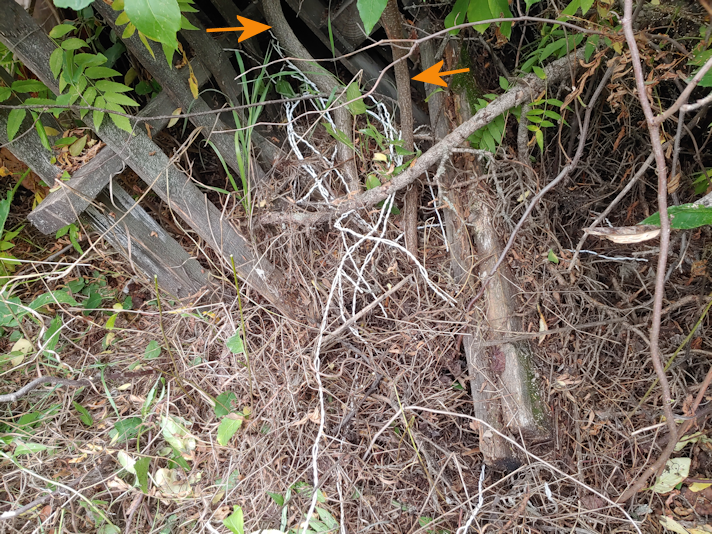
Here are the ones behind the garden beds where the old wood pile used to be.
The arrows are pointing to the two chokecherry trees. They are close enough together that I had thought they were just one tree at first. All around them are dead cherry trees with live cherry saplings coming up the bottoms, along with other odds and sots that have come up since I cleared things away last year.
I started on this side because I figured taking out the dead cherry trees would be the more difficult job. Especially since we were getting spotty rain, so I wasn’t going to string out extension cords to use the electric reciprocating saw!
This is how it looked when I stopped.
The fallen spruce tree and poplars behind them kinda make it look like they’re not cleared, but there is plenty of space to walk around them now.
While the girls started picking berries, I moved on to the other side. This is how it looked before I started.
In the spring, I had cleared a path to the junk pile to access the wood stacked in it, and I’ve been trying to keep things clear around the Saskatoons. You can see those on either side of what’s left of the path, and the arrow is pointing to the chokecherry tree. Which is actually two trees next to each other.
Most of what’s here is spirea and thistles, with a bit of burdock, plus a few other things hidden by the spirea. I figured this side would be much easier to clear, since I could basically just yank them out of the ground.
I really should know better by now.
The spirea and thistles were, indeed, easy to pull up.
First, I’d forgotten about the fallen spruce tree in there, and how close it was to where I needed to go.
It’s been there for a long time, so I was pulling out bits and pieces that had broken off as it fell, as well as breaking off or pulling out rotten branches that were jutting out all over.
I’d uncovered the one stump that I already knew about, then found another, smaller one, beyond it.
As I worked my way closer, I found something else.
There’s a reason we call what started out as a pile of neatly stacked boards that used to be covered with a tarp, a “junk pile”.
So… that’s… wire? It looks like the wire from those little decorative fences you can get to put around garden beds.
Also, there’s an old pallet there.
Because, of course there is.
Don’t mind me. After clearing out the old wood pile and dragging away a couple dozen rotten pallets, I’m not much of a fan of those anymore! :-D I remember having to work my way around it, while searching for boards in the pile that weren’t too badly rotted.
As I worked my way closer, I found the chokecherry trees grew through the partially rolled up wire. Which gives an idea of how long it’s been hidden there!
That wire really does look like it’s from one of those little fences, undone. It even has cross pieces still wound into the twists.
At this point, I stopped!
It was clear enough to reach the trees, and most of the berries. So I started picking those, while the girls harvested carrots and little squashes. :-)
The piles of debris will wait until tomorrow to be hauled away!
This pile is almost all spirea and thistles, with a few smaller branches from the fallen spruce tree tossed in. I had to pull up some of the wildflowers, too. They’ve shown up all over the place this year, so there are plenty more around the yard.
This pile is mostly the cherry I cleared away from around the first chokecherry trees, plus the larger pieces of the dead spruce tree I was working around.
These are pieces I set aside to keep for future crafting or carving purposes.
As for the chokecherries, we picked about a gallon pail of them. The girls had picked from the tree by the squash beds, and the ones among the lilac hedge, too. Lots were left behind for the birds. We are finding more chokecherry trees deeper in the spruce grove, that are not ripe yet, so we will have more to pick, later on.
This morning, I applied the first coat of spray-on rubber to the legs of the picnic table, and the cracks on the rain barrel.
This is the product I am using.
I have never used this stuff, or this brand, before. It was the only one on the shelf, so it’s not like I had a choice of brands or product versions. I think it will work just fine.
The first time we used a product like this, it was a can of liquid rubber deep enough to dip things directly onto. Like the handles of tools. Which is what we did at the time. Or it could be brushed onto a surface. The first time we tried a spray, it was basically the same product as an aerosol. My husband used it to coat the handle of one of his canes (made with aircraft grade aluminum, that could also be used for self defense), and to a cord wrapping he added to parts of his walker for extra support to hold the weight of the backpack he has hung on it. For the can, a dip version would have done a better job, but as a spray, it worked very well on the uneven surface created by the rope work. It’s still holding out, and it’s been about 5 years.
So that was basically what I was expecting. Black, spray on rubber.
Nope.
It’s white.
At least it looks white against the blue paint.
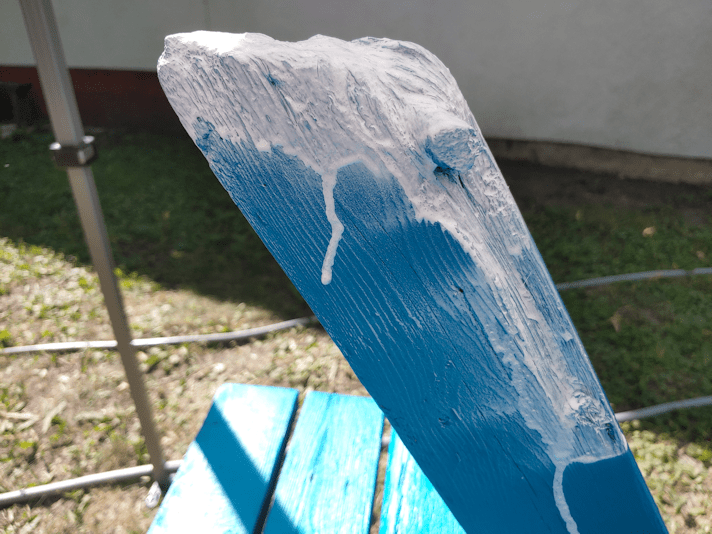
It’s also a lot lighter and thinner than I expected. Which I suppose is exactly what I need to fill in all those crevices. I added extra along the part where the most rotted wood had come off on the one leg.
I probably could have applied it more carefully to avoid drips, but there is no aesthetic requirement on this.
On the rain barrel, it looks a bit different. The barrel got sprayed both inside and out.
Here, you can see it has an almost blue tint to it. Depending on the angle, it looked a bit more purple than blue.
It should be interesting to see how it looks when it’s done.
How many layers we put on will depend on how well it coats. It requires at least 2 hours between coats. Depending on how often someone can get outside to add another coat, this may take a day or two! It then needs at least 4 hours of curing time after the final coat for the coated object can be used. Thankfully, these are not things we need to use, quickly.