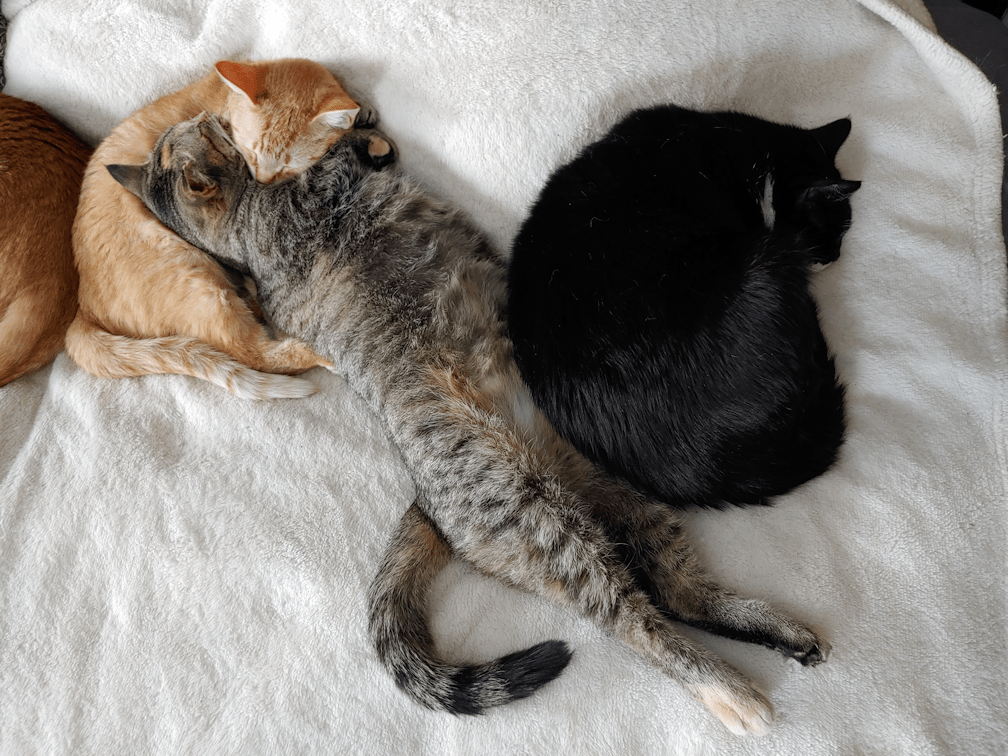
I love how Beep Beep is all stretched out, yet still managing to cuddle with her baby girl! Which is funny, because when they’re not cuddling, they’re usually fighting.
Also, her belly fur is all grown in.
The girls have been calling Beep Beep “dry grandma”. Next to her is “greasy grandma”. :-D
She really is greasy. She has the most oddly oily fur I’ve ever seen on a cat!
They’re so cute when they’re not terrorizing each other or trying to destroy things. ;-)
It’s getting to the point where I can start doing my evening rounds again, if in a limited way, since most of the places I check are still inaccessible. Last night I heard a noise when I came out and spotted a deer, in the outer yard, out by the collapsing log cabin, getting up from where it was lying down. After watching me for a bit, it ran off.
Later, I also heard the sounds of what I at first through was a cat fight. Nope. It was one of the ‘iccuses, busily getting pregnant.
Which is probably why Sad Face cat is back and hanging around.
*sigh*
I saw these two out my bedroom window this morning. While checking out the one deer that was just standing there, chewing, I realized I was seeing the ears of a second deer, lying down!
They clearly feel pretty safe over here.
Which is probably not a good thing, but… ah, well.
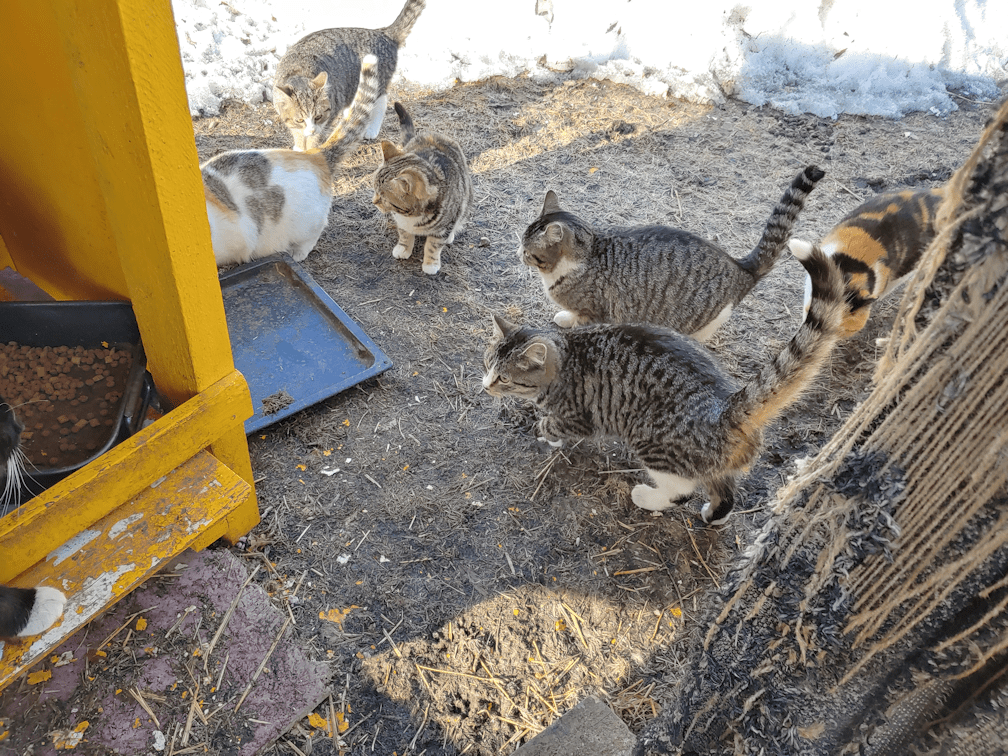
This morning, Sad Face was around, but would not come closer while I refilled the kibble trays. The boys in the above photo were getting along this morning. Nutmeg and The Distinguished Guest actually booped foreheads affectionately. He even let me pet him.
I suppose the Distinguished Guest isn’t a Guest anymore!
The ladies seem to prefer to wait until I’m away before they’ll go into the kibble house, and would rather all crowd around the tray on the ground, instead.
In the above photo, we know that Ghost Baby and Caramel (next to each other in the middle left, and Broccoli (on the right) are female. Bradiccus, with the white tail tip, in the front, is male. The ‘iccus next to him, and the one in the back left, I’m not too sure of, but one of them is female.
Altogether, I think I spotted 13 or 14 cats this morning.
After feeding the cats, including the kibble tray out by the shrine, I realized I had what was either a cut or a sliver, so I went in for a while to get my husband to take a closer look. It turned out to be a sliver. In the time it took to get it out and bandage it up (it was rather large!), then grab the last of the deer feed from the bin, I came out to find two deer at the shrine, with one of them eating the kibble! There were about 6 cats surrounding them, watching the deer stealing their food!
What cheek!
So I chased them off, then poured the seed at the feeding station (still feeling a little miffed that we can’t use the new bird feeder because the deer just pull it down). The ran off across the road as I walked that way to get to the path to the sign cam.
Sometimes, when checking the files, something dark will trigger the motion sensor, but is too close to know what it is. Usually, it’s a bird or a squirrel on the fence post it’s attached to.
This morning, I confirmed the most recent of such files was a squirrel.
It enjoyed a nice spruce cone on the post, triggering the camera with its tail! LOL
One my way back, I could see the deer watching me from the spruces across the road. As I continued on to the driveway cam, I could see them running over to the feeding station, looking so excited!
When my morning rounds were done, I made a quick trip to the post office/general store to pick up more deer feed. I had expected to be switching to the black oil seed by now, but decided to stick to deer feed for at least one more bag.
The frustrating thing is that, over the next couple of days, we’re supposed to get more snow. Not a lot, but it should be rain by now. At least, that’s how it feels. If I look at the historical weather data, though, we’re actually supposed to be warmer than the 30 year average, and getting snow is not that unusual. Just as it’s not unusual to get one last blizzard in April. We’re supposed to warm up for the next week, then drop down to just above, or just below, freezing, depending on which weather app I’m checking. I feel like I’m gnawing at the bit, because we need to be starting more seeds indoors, but it’s still too cold to move seedlings into the sun room to free up cat-proof space. Even just yesterday, the sun room only reached 10C/50F. Pleasant enough, but too cold for seedlings that have only known the warmth of their cat-proof set ups.
Though I was happy to finally see some new eggplant seedlings in the large aquarium greenhouse beginning to emerge this morning. Still no new peppers, though. At least we do still have some survivors of both n the mini-greenhouse, but I don’t want to chance killing them by moving them to the sun room too soon.
I love the cats. Really, I do. But having to keep them from destroying our plants and seedlings got real old, real fast!
It always amazing me just how fast some seedlings grow!
It’s like they’re bigger, every time I look in the tank. Just look at those Crespo squash!
These two pots each have 3 seeds in them. Two that were scarified, and one that was not. I think the scarification made the difference!
To the left is the Ozark Nest Egg gourd, and…
… you can see a Tennessee Dancing Gourd emerging, too. In the background, the luffa are starting to develop their true leaves.
What is interesting is that, while these squash and gourds are germinating, there is no sign of germination in the pots with eggplant and peppers seeded into them.
Last year, it took forever for the squash and gourds to germinate, and many pots never did. This is a huge improvement. I think there is a combination of reasons. One being the scarification of the seeds – except the dancing gourds, which were too small – and the other being the use of a heat mat.
I know we’re supposed to thin the seedlings down, but I’m thinking we’ll thin them by transplanting the extras. When it’s time to transplant outside, I want to have extra, just in case some don’t survive transplanting, or in case critters get to them. The more we plant, the better the chances of having at least one survive!
It looks like we have a new addition to our outside cats.
Sad Face has been hanging around. This morning, I saw him milling about with the other cats without any trouble. He was even in the kibble house, though he ran off when I came by. The photo above is the closest he was willing to get, while I was out and about, and I had to zoom in with my phone.
Rolando Moon followed me when I went to switch memory cards on the sign cam.
Of course, we had deer visiting, including this one.
Green grass is actually starting to show in places, though I haven’t noticed any along the sidewalk. She found something to chew on, though.
Then I spotted the piebald heading for the kibble house, and one of my daughters was kind enough to send it away!
The girls started a load of laundry before we sat down for lunch, and it’s a good thing we were lingering at the table afterward. As the washing machine was draining, we suddenly heard water gurgling in the kitchen sink – then splashing!
The drain for the washing machine was overflowing again.
Crud.
I’d hoped, after getting the septic tank emptied and that backed up pipes in the basement cleared, it would have solved that problem, too. I made sure to dash into the basement to check, and all was fine down there.
It doesn’t happen every time we do laundry. In fact, it only happened once before, and that was the day we discovered the septic was backing into the basement.
From what I could hear in the pipes, things were draining. It just seems that it wasn’t draining fast enough for a larger load. With our new machine, we don’t choose a load size. It’s a “smart” machine, and adjusts the water levels itself, based on how much is in the drum.
The last time it happened, and we pulled the machines out to clean up the mess, we used drain cleaner in the pipe. Clearly, that wasn’t enough.
When the new part of the house was built, my dad included a sink in the entryway. That was taken out, long ago, which is why there was plumbing in place for my brother and daughter to install the washing machine (all those years my parents used the basement when, as their mobility decreased, they could have used the entry). It joins the drain pipe from the kitchen, which then joins with the tub’s drain, then the toilet, and finally the main pipe to the septic.
My guess is that we’ve got decades of kitchen grease and detritus, as well as whatever was washed down the sink that used to be in the entry, every time someone cleaned up after being in the barn, garage, garden, etc. I don’t think anyone really paid attention to what went down the drain. Out of sight, out of mind.
I followed the pipe as best I could, but the section that is under the entryway is actually hidden behind a floor joist in the ceiling of the root cellar. The root cellar is under the entry and built around a corner of the old basement. The pipe runs along the top of the old concrete wall, until it bends and joins the drain from the tub. It’s pretty inaccessible.
When we tried to use a plumbing snake in that drain, it didn’t really accomplish anything.
So, how do we clear the pipe?
Slowly, it appears.
I headed into town (I never made it yesterday, so I had to go to refill our water bottles, anyhow) and made a stop at a hardware store. I’d found something there before that we’d tried but, when we ran out, we never remembered to get more. It’s an enzyme based product that is designed to maintain both the pipes and the septic tank. It’s meant to be used once a month. I found a version of it made by CLR, so I got both. I also got a funnel with a flexible hose on it, so we can pour it into the drain without having to pull the dryer out, then the washing machine, to reach the opening.
Then I got a new bottle of heavy duty drain cleaner, since we emptied the last one was had.
With the monthly treatment products, it can be poured into any drain, so we might start from the kitchen sink. It’s the one that’s furthest out from the septic, but still close to the washing machine drain.
We already use a bacterial product to help maintain the septic tank, but this is something that gets flushed down the toilet regularly, and does nothing for the pipes. As the products I picked up today are to maintain both the pipes and the tank, I think we’ll stop using the flush additive for now. It’s probably not a good idea to have TOO much bacteria or enzymes in the system.
While I was out, getting the stuff for the pipes, my daughter monitored the washing machine so that, if it started to overflow again, she could quickly shut the machine off, wait until it drained, then turn it back on again.
I hope this stuff works, because I don’t see any other way we can get those pipes clear. At least not without calling in a plumber.
At least this happened early enough in the day that the hardware store was still open. :-D
Remarkably, my quick fix using cord held, while the metal crimp at the other end gave out.
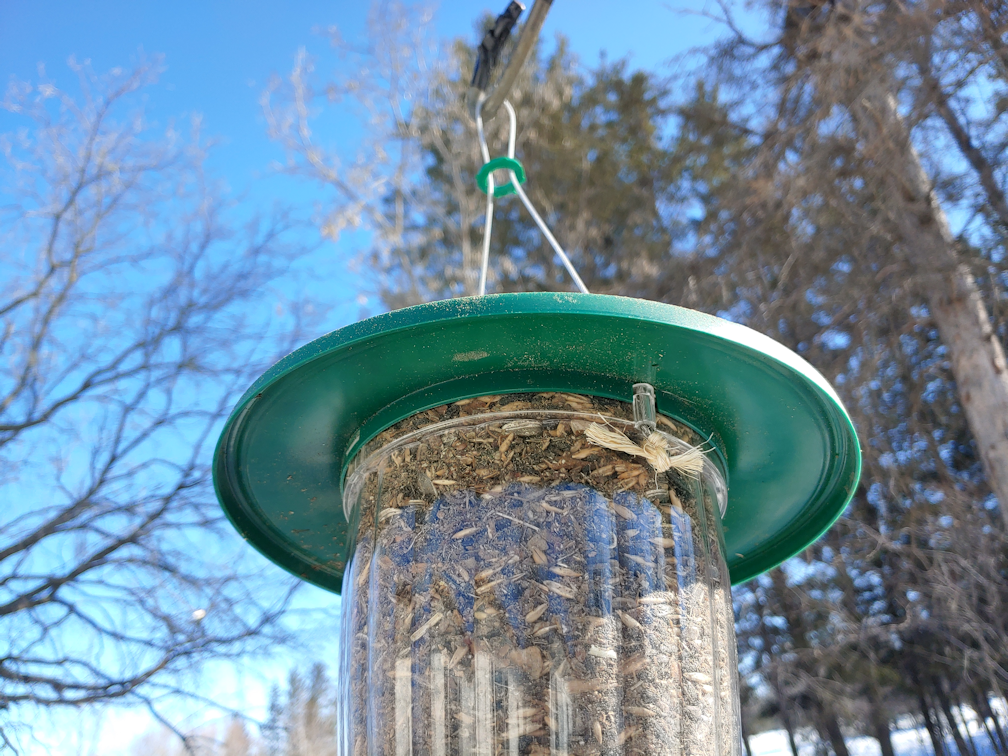
We have no way to keep it from the deer right now, so we’re giving up for now. Once the snow is gone and there is food available elsewhere, the deer stop coming to the feeding station, so we will wait before putting the feeder back up.
Which is too bad, because the birds were really happy to have it back!
We certainly expect to have issues with squirrels and raccoons getting at the hanging feeder. I never expected to have issues with deer going after it! We’ve had hanging feeders there since we brought the stand from where we found it in the maple grove to this area, and the deer had never gone for it until this year. Mind you, with the wind constantly knocking the stand down, they didn’t have to. Now the main post is buried in the ground, so that might be making the difference. That and it’s March, and there’s still lots of snow on the ground, so they’re probably getting pretty hungry.
Which reminds me.
Since we had to dig out the septic tank, we now have access to that corner of the house. The roof faces north, and is the only place we still have snow. It builds up in a corner where the old kitchen roof joins the main part of the house, where a huge ice dam forms. Most snow remains on the north facing roof of the old kitchen.
This morning, I brought over the extended pole roof shovel to see if I could break through the crust that has formed on top of all the snow, and get some of it down. It actually worked, more or less. I got a lot more down than I thought I would, though even with the pole extended as long as it could, I still couldn’t reach parts of the snow. In some places, it was because the septic tank lid itself was in the way.
Still, I got quite a lot of it down. The ice dam in the corner now has several feet of built up snow cleared away from it, so it should actually start melting faster, as it’s no longer in the shadow of the snow pile. I must say, though, walking around on that insulated tarp was its own challenge. That thing is so slippery! However, the snow I got down mostly landed on it, so when it melts, it will flow away from the house. I guess that makes one benefit for the insulated tarp that straw doesn’t have. I still think we’ll go back to covering the tank with straw, though. Much easier to access the tank with a lot of snow on the ground!
Ugh. I really should be heading into town right now, but I just don’t want to go.
I’ve had no end of internet troubles this morning, so it has taken me quite a while to finally settle down and write. The troubles were only with my desktop and, oddly, my phone. Sometimes, I’d still be able to connect to the local wi-fi, but couldn’t access the internet. No one else in the household had issues. It took a few restarts and troubleshoots, but I finally have internet again.
I was in contact with the Cat Lady today. She sent me another precious photo of Cabbages.
Now that she’s all healthy again, Cabbages still has no time for anyone in their household other than their daughter. She’d gone for a sleepover, and Cabbages cried at her bedroom door all night!
We confirmed the surgery date for Turmeric this Wednesday, and she will come back to us for recovery. She has some rescues that will soon be going to their forever homes, including a pair of rescues that will be going to some newlyweds! :-) Which means they’ll soon be able to take another of ours, soon. The next one will be going to her place, and will be spayed with her personal vet, who is able to give them a steep discount.
Which is a good time to put up a reminder that we still have the fundraiser going to help cover her out-of-pocket costs towards saving Cabbages’ life. While her new cat rescue is getting donations, much of it is still being funded by her husband, so every little bit will help. Click here if you would like to contribute to the fundraiser.
She will also be helping us adopt Nosencrantz out.
As Nosencrantz is now spayed and indoors, she is not as high on the priority list for adoption just now. I think, after Turmeric is done, Tissue will be next.
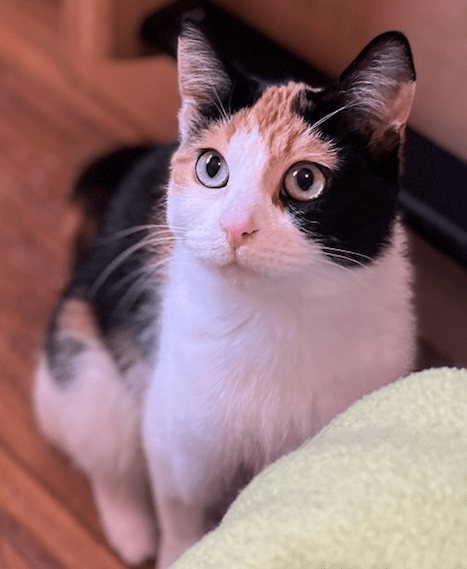
Eventually, we’ll get to the outside cats, including this lady.
This is Ghost Baby!!! She must have been incredibly hungry, because this is the closest she’s come to anyone before. Usually, she just disappears as soon as she sees us, or if we move even vaguely in her direction.
We’re just going to go on the assumption that she’s pregnant right now. Which might explain why she is hungry enough to chance coming within a couple of feet of me, to eat!
It would be pretty awesome if we could socialize her at least a little bit.
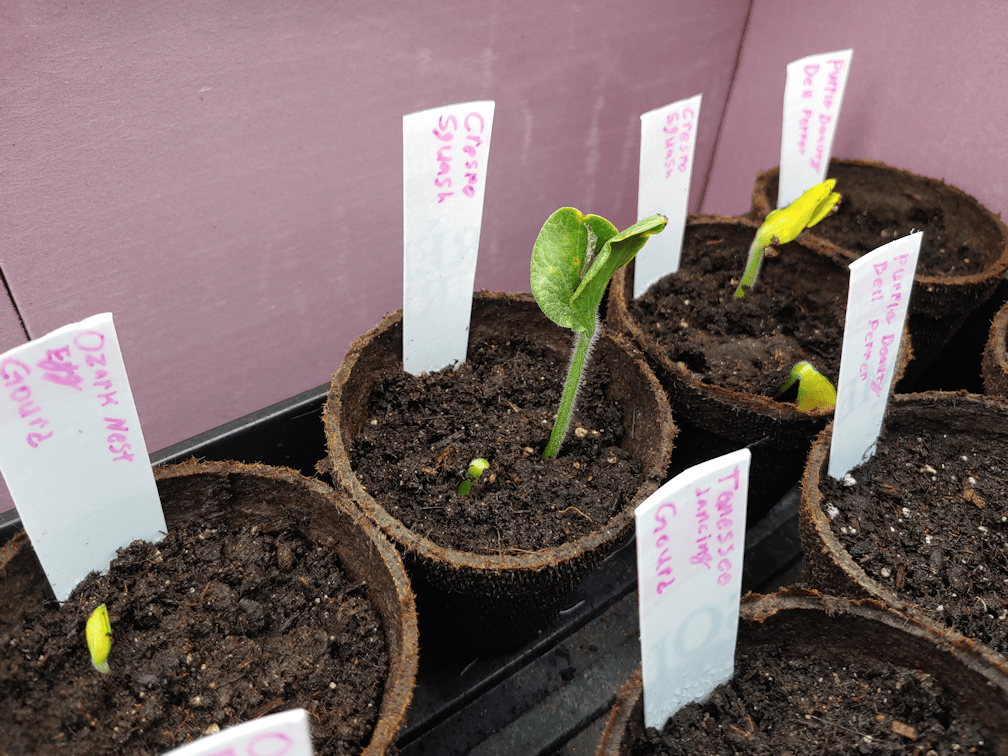
This morning, while tending our seedlings, I spotted a newcomer!
That is a Crespo squash seedling!
This tray, on the heat pad, needs to be watered about twice as often as the tray next to it.
Where the Cup of Moldova tomatoes are doing quite well! The big aquarium greenhouse has been working out the best among our three set ups.
The Sophie’s Choice tomatoes got moved from the small aquarium greenhouse to the mini-greenhouse, in hopes that they will start doing better. I’m not sure why things are not doing as well in that little greenhouse. I suspect it has to do with lack of air circulation. The mini-fan we had on the aquarium greenhouses, moving it back and forth between the two, is now set up in the mini-greenhouse. We can’t open up the cover because of the cats, so the fan is needed more in there, than with the aquariums. I hope we can figure it out, though, because that’s little tank is currently wasted space that could be growing things! We do have a pedestal fan, but it’s not tall enough to provide air circulation in through the screen covers on the tanks. We’ve looked at different ways to set it up, but so far, we haven’t been able to come up with anything suitably cat proof.
It’s become such an issue, that we’re coming up with plans to build a “door” between the living and dining rooms, so that we can turn the living room into a safe zone for plants – all our plants – and not have to have all these barricades and shields around them. My older daughter has diagrammed a plan for a removeable frame to fit into the opening between the two sets of shelves between the living room and dining room, which would support a “door”. It would be made using hardware cloth, for maximum light and air to pass through. One of the shelves has an opening through it that we’ll have to frame a screen on, as well. We’ve really got to come up with something, because all the stuff we’re doing to try and protect the plants from the cats isn’t all that good for the plants! Especially since we are starting so many seeds indoors and, next year, will likely be starting even more. That will be a summer project, if we can get the materials we need to build it.
Last night was the first night we had the outside doors to the sunroom closed, so no cats – or skunks – could come in. It had reached temperatures of 20C/68F in there yesterday, yet this morning, it was just barely above 0C/32F, which means it was even colder, overnight. There is no way we can move any of our seedlings into there, without having to bring them back into the house overnight, which we won’t be able to do. Our overnight temperatures are going to be warming up, though, so we’ll have to keep monitoring the room. I might set the ceramic heater bulb up overnight, just to see what a difference it makes.
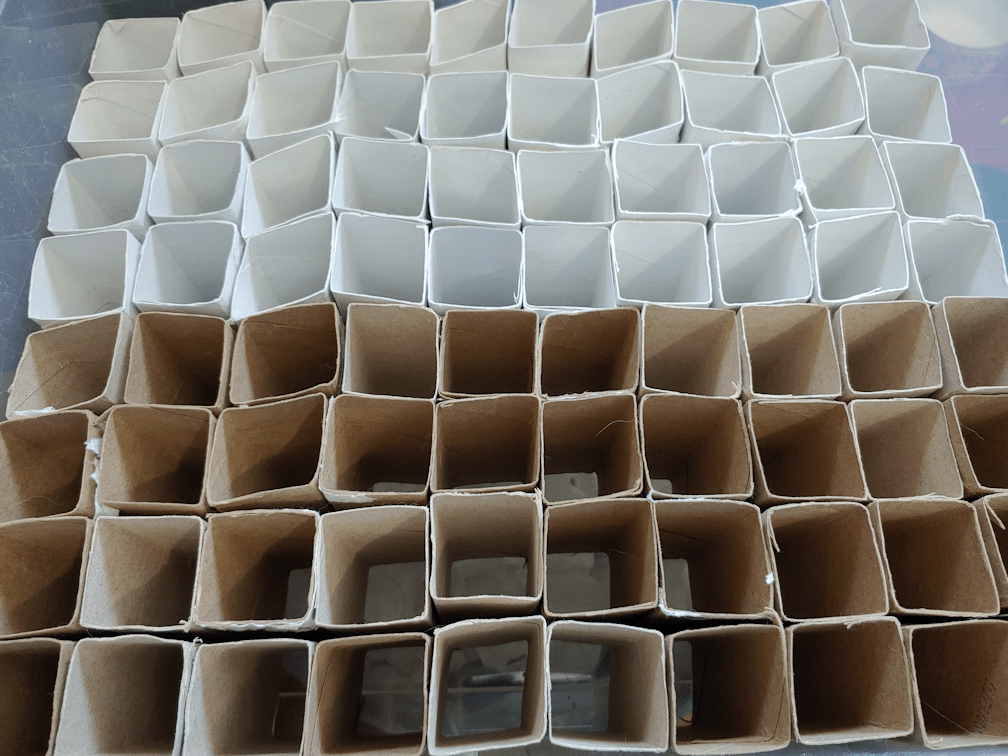
Some things will be started right in the sun room, but not for a while, yet. We’re still preparing, though, including getting the toilet paper tube “pots” set up in a bin.
This will be for the black Kulli corn. I’m not going to bother folding bottoms onto the tubes, so as to give the roots more depth. We have a total of 100 Kulli seeds (unless there are extras in the packets, which sometimes happens), and I thought I’d be able to put 100 tubes in this bin. If it had been square, it would have worked but, alas, it is a rectangle. Instead of the 10 rows of 10 I thought would fit, we could only fit 8 rows of 10. We do have more of the smaller bins we used to start the tulip tree and paw paw seeds in (still no signs of anything in those, but I’m not expecting it, yet). They can fit 4 rows of 8, so we’ll be able to work it out. The corn won’t be started until early May, though. The sun room’s overnight temperatures should be just fine by then.
I picked up more bins in this size; there was only 2 left in the store I found them in, so I now have 3 “spares”. I also got more of the smaller bins, and we now have 4 available to use for new starts. With their transparent lids, they can be used as little greenhouses, and they will make things much easier to move around when it’s time to harden off the seedlings. The toilet tube pots fit really well in these, so we’re going to continue collecting the tubes to use to start seeds in the bins.
You know, for someone who is a hermit by nature, I’ve been out and about an awful lot lately!
Today I was out again, after an unexpected change in plans. With the roads clearing up and the days warming up, my mother was wanting to finally visit her sister in the nursing home, to see for herself how she is doing. Every time I suggested a day, though, she would defer on making a decision, and then say that she’d go any time I had the time to take her. She just wanted me to give her at least a day’s advance notice. So a few days ago, after looking at the forecast and seeing that Friday (today) was supposed to be warmer, I called to suggest Friday.
Oh, I was thinking Sunday, she tells me.
Hmm. Apparently, I was supposed to know this somehow? :-D
So we arranged for a trip on Sunday.
Then last night, while I was on my way home from visiting my friend in town, she called. It was pretty late when I got home, but I got through to her before she’d gone to bed.
She had been talking to someone in her building. They told her Friday was supposed to be a nice warm day, so she thought that might be a better day to visit her sister, instead of Sunday, and was I okay with that?
Oh, Mom.
I still had the day open, since that was the day I’d suggested to begin with, so of course, I was okay with the switch, but my goodness, that was funny.
We timed it so that she could visit in between when they would be doing lunch and supper. I used her car, of course, and left early enough to put some gas in the tank.
*sigh*
I filled the tank in our van last night. Gas was at 174.9/L It cost me almost $50 for a quarter tank. This morning, gas was up to 177.9/L My mother’s car was closer to 1/2 than 3/4 full, and she has a smaller tank than I do. It still cost almost almost $40 to fill her tank, and I didn’t even fill it all the way. The nozzle kept shutting itself off, so I kept restarting it until the pump got to what I knew would be close, and it turned out to be just a hair under full when I stopped.
Of course, with gas prices going up, the price of everything else is going to keep going up, too. :-(
We made the trip to where my aunt is, and since they still require masks and I can’t wear one (my mother shouldn’t be wearing any, either), I dropped her off with her walker and helper her in to the doors, where they had someone set up at a table. While my mom was being tended to before being allowed in, I found a place to park. We’d talked about where we were going to eat after the visit, and I’d suggested a fish and chips place instead of her usual fried chicken restaurant. She’s not doing meat on Fridays, so she agreed. I’m pretty sure the chicken place has fish and chips, too, but she would have just ordered fries if we’d gone there. It’s a tiny place and has only street parking, so after I parked my mom’s car, I quickly walked over to see how busy they were and what the parking situation was like, before heading back to the nursing home and waiting for my mom outside.
Her visit with my aunt was much shorter than expected, so I wasn’t waiting for long. We headed over to the restaurant so she could fill me in on how it went. Unfortunately my aunt, who’s 98, did not recognize my mother. She doesn’t talk anymore, and she fell asleep while my mother was there. At least my mother got to talk to the nursing staff about her sister, and left small gifts for her for later.
These visits are very hard on my mother. Still, she was glad to have finally seen her, and talk to the staff directly about how she’s doing. My mother can’t navigate their automated phone system, so I’ve been the one calling the nursing home to get updates for her which, thankfully, they are allowing. I’m not on the list of contacts for my aunt, but my mother is, and I’m someone they recognize as speaking on behalf of my mother, so they can give me information. Still, it’s not the same as my mother being able to actually see and try to talk to her sister, in person.
I told my mother that, now that the roads are clearing up and the temperatures are getting nice, she can visit her sister more often, and that I would be happy to drive her. She started saying, what’s the point? Her sister doesn’t even recognize her. I reminded her it’s been a long time since my aunt has seen her. If she visits more often, she might start recognizing my mother. Plus, at least she’s be able to see for herself how her sister was doing. My mother said she would think about it, but later on the the drive home, she brought it up again as if it was something she’s just thought of herself, and said it would be good to visit more often, now that the roads and weather are better… :-D
The place we ate at is very generous with their portions, and neither of us could finish even half of the fries, so we boxed those up. My mother didn’t want the fries, so she suggested I could give it to the cats. She’d covered hers with salt and vinegar, and I didn’t think that would work, but I took them anyway. My mother took advantage of having access to a car and we went to a couple of places before I took her home. While we were doing errands, I got a message from one of my daughters with a photo.
They’d got a fire going in the fire pit and were having a wiener roast for supper! We’ve used the fire pit so rarely since we’ve moved here, due to fire bans and drought conditions, so I was really happy that they did that.
By the time I was driving my mother home, I was so very tired. Being around people too much just sucks the energy out of me, and with all the other errands we’ve been running in just the past week, I was pretty wiped out. I think I was even more tired than my 90 yr old mother! :-D So I didn’t stay long after putting her groceries away. It’s a good thing I left when I did, because it was starting to rain! It was mostly done by the time I got home, but I wouldn’t have wanted to be driving on those roads any later in the day.
My daughters were still doing their cookout when I got home! They had the hardest time keeping the fire going, even with having access to dry wood.
The rain starting certainly didn’t help, but it didn’t rain enough to have to end their cookout, and it stopped shortly after I got back. I joined them for a while. It felt so good to be sitting at a fire like that, even with the mud all around the fire pit.
Then, since I had all those fries, the girls brought out cast iron pan to reheat them on the fire grill. I’m told they were quite delicious done that way! :-D
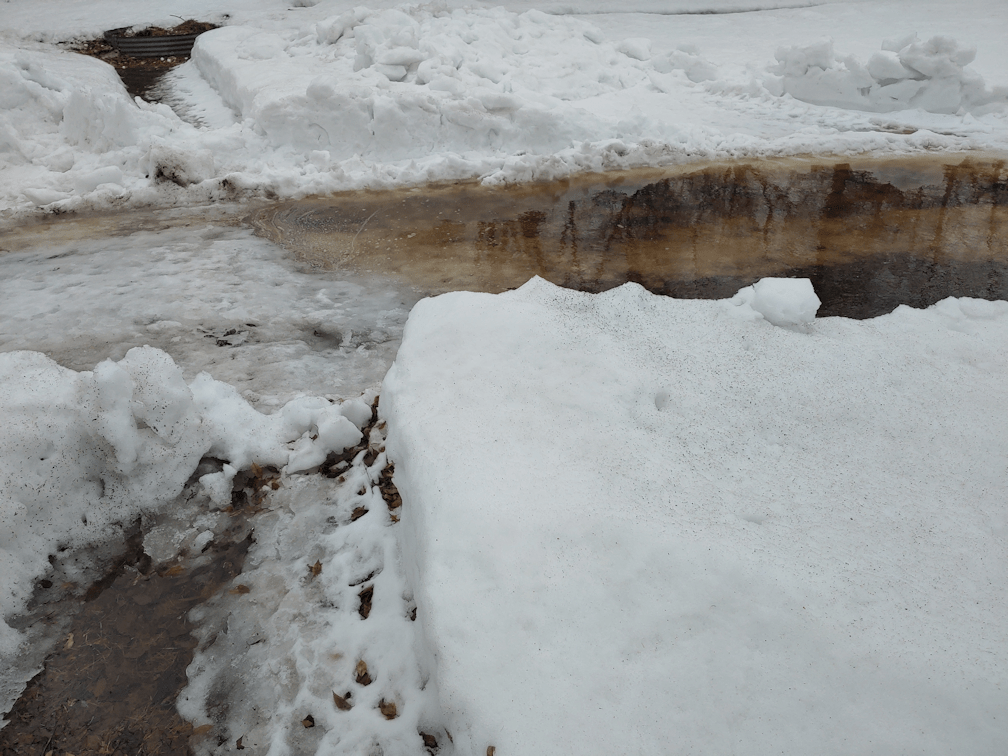
I didn’t stay out for too long, though, and left them to their cookout. I did pause to check out one of the little “lakes” that are forming in our yard!
Getting to the compost pile is going to be a bit of a challange!
We’ve got snowmelt forming a “lakes” forming all over the yard and in the paths we’ve dug right now! All that water, in between all that still-deep snow, is quite the sight!
We’re still supposed to get a bit more rain, then temperatures are supposed to dip below freezing overnight. I was going to say, I’m glad I won’t have to go anywhere for a few days, but I just remembered that we will at least need to go into town again to refill our empty water jugs. I really should have done it today, but it’s not something I could do while running errands with my mother. After that, we should have a few days “off”. I hope! At least until the middle of next week, when we’ll be dropping Turmeric off for her appointment at the vet that the Cat Lady arranged. Then, that same evening, we are now scheduled to pick up the freezer pack of beef I ordered last night. I chose their large “rancher” variety pack. The only item in the pack I know for sure will be in it is ground beef. I’m quite content with “surprise” packs, because we sometimes end up with cuts we normally wouldn’t think to get, usually due to the price/pound. Because it’s in a bulk pack, the price is by the pound for the whole thing, not for individual cuts, so we end up with a better price – and higher end cuts!
It’ll definitely be worth the extra running around.
Still, it all leaves me feeling so very tired. At least it’s a good tired, though!
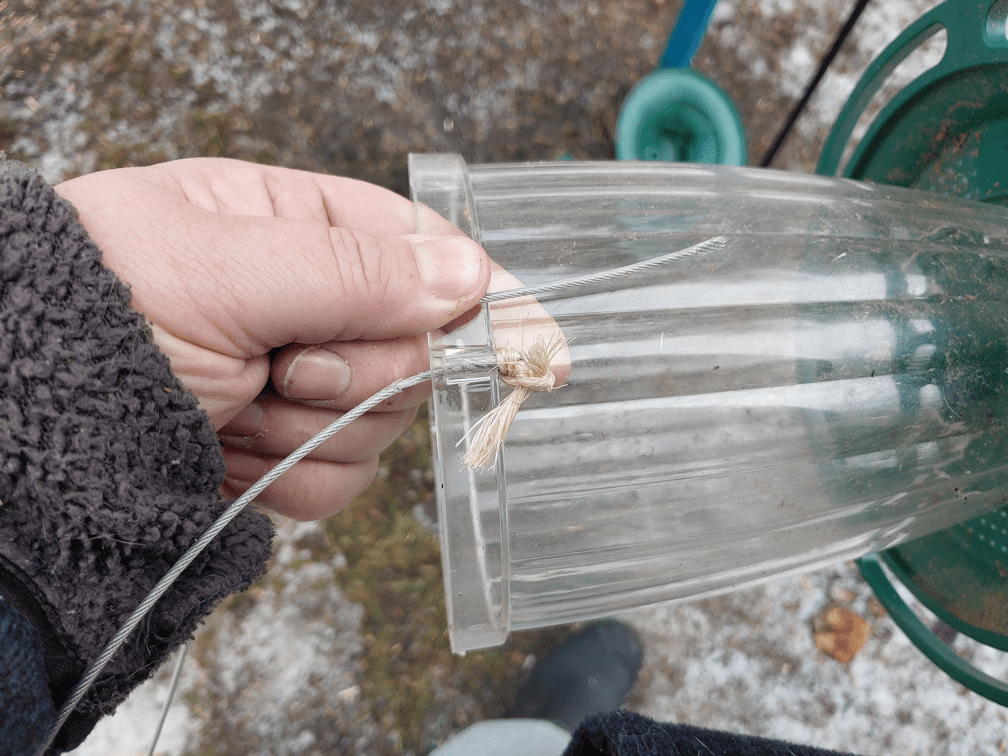
Guess where I found the new bird feeder, this morning?
*sigh*
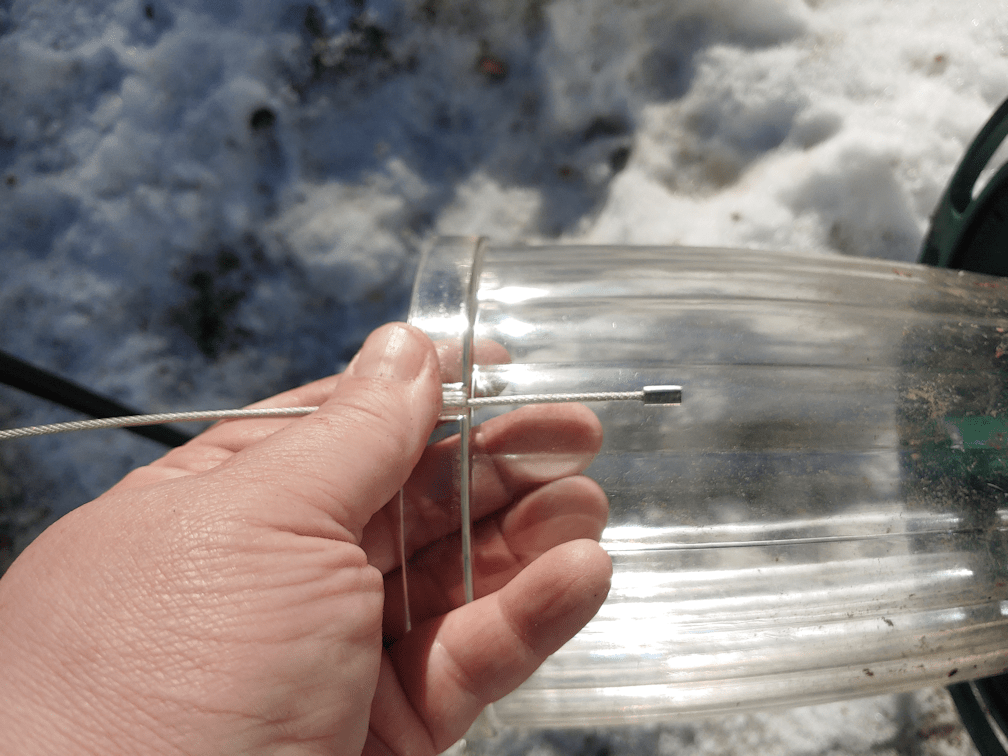
On the plus side, for the most part, it wasn’t broken. There was only this…
One cable end was torn right off.
This is what it is supposed to look like.
This suggests to me that it was the deer, trying to get at the feed and pulling it down. Critters like the Racoons would knock it off the hook, not actually break the cable. They don’t have the mass or strength for it.
I did keep that in mind when I fixed it as best I could for now.
I slipped a spare hose washer over the loop. That will make it much harder to fall off the hook, whether from the wind, or because a critter is swinging off of it. This also solves the problem of the cable sliding down as I’m stretching to hang it.
You can also see what I did to the broken end of the cable. After threading it back through the various holes it needed to go through, I folded the end and tied it off with some cord. If this works, I’ll replace the cord with wire, or maybe pick up some double crimps.
The cable is noticeably shorter now but, thanks to the rubber washer, the loop no longer slides down, so it’s actually easier for short little me to reach than before. It should keep the loop on the hook, but it won’t do anything about the deer. That is a whole different problem!
I meant to post this earlier, but my friend is still in town and I was able to meet up with her at the last minute. We had a grand time!
It was getting dark by the time I was heading home, which meant being extremely cautious about deer! At one point, I passed at least 5 standing on the edge of the highway but, thankfully, they did not try to cross.
I put together some of the better videos from the gate cam, showing our morning visitors. I hope you like it! :-)