Gathering Data: future cheese cave?

Among the many things we are interested in doing in the future is making cheese.

We already make yogurt cheese (see here and here) whenever we make yogurt, which can be used right away, but we’re interested in making cheeses that need to be aged.

Which requires a place to age them. Like a cheese cave.

Well, we do sort of have a “cave” in the basement. The old root cellar.

In the research I’ve been doing (watch out for a future “Recommended” post for a home cheese making resource!), the aging cheeses need temperatures and humidity to stay within a certain range.

I don’t know that our root cellar has that range. For starters, I think it might actually be too cold, but that can be helped with appropriate insulation. I think our greater challenge will be the humidity.

Since this is not something we’ll be able to do for quite some time, that means we have time to gather data.

Which begins today.

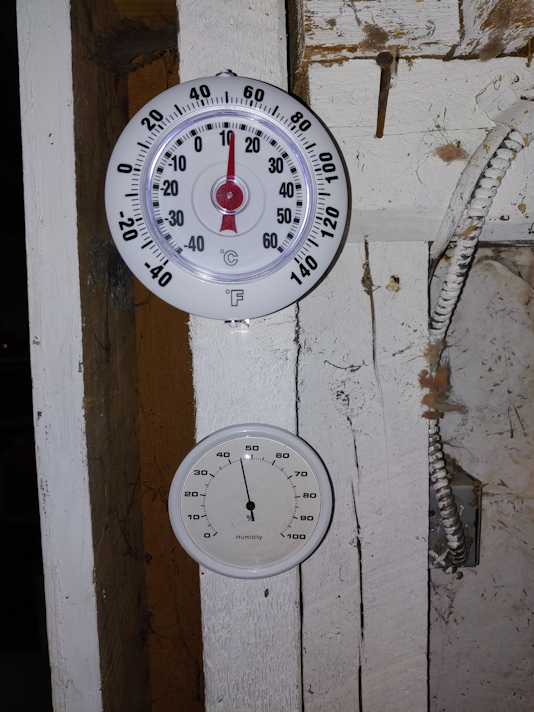
I went to pick up a cheap thermometer at the dollar store and found a hydrometer right next to it, which was great, because I didn’t even think of such a device existing. At least not in household form. These are not mounted just inside the door of the root cellar. This is probably the warmest part of the room, but the best location for hanging them. Ah, well.

As you can see, the temperature gauge had already dropped quite a bit.* The humidity is about the same as it was upstairs, so I don’t know if that was the actual reading, or if it still needed time to adjust for the new location.

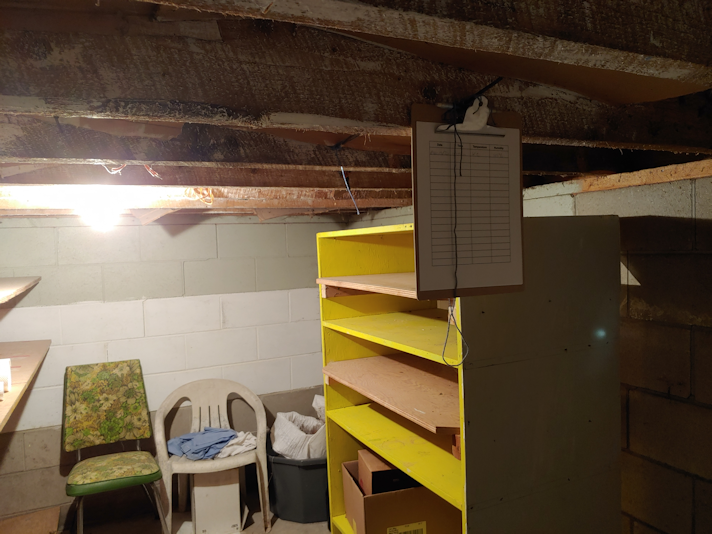
There were already huge nails hammered into the floor joists of the entry above (I’m finding nails like this all over the basements, garage, sheds, barn – anywhere there is wood, there are nails hammered in for hanging things), so I used one that was accessible, but still out of the way enough to not bash my head, for the clip board. I printed out some chart sheets to record date, time, temperature and humidity. The plan is to come down here once a week, at different times of the day, and record the gauge readings.

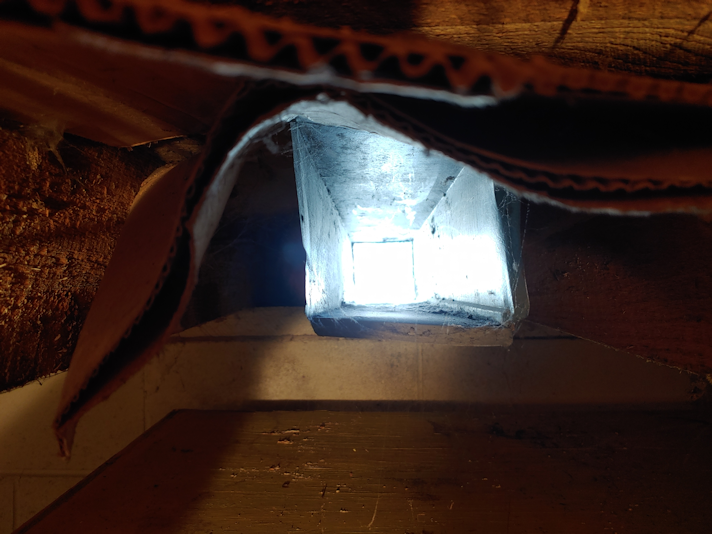
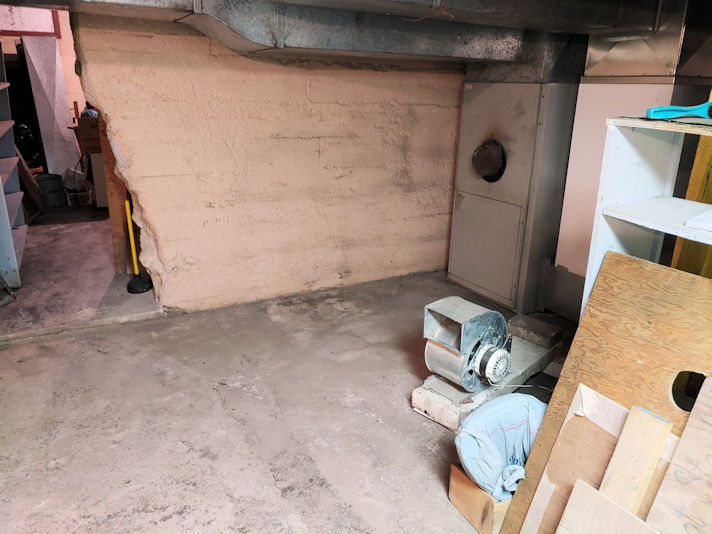
This would be why it’s so cold in here. This vent duct goes directly outside. The only thing at the end is a screen to keep the critters out. While I was down there, I felt an actual wind coming through this duct.

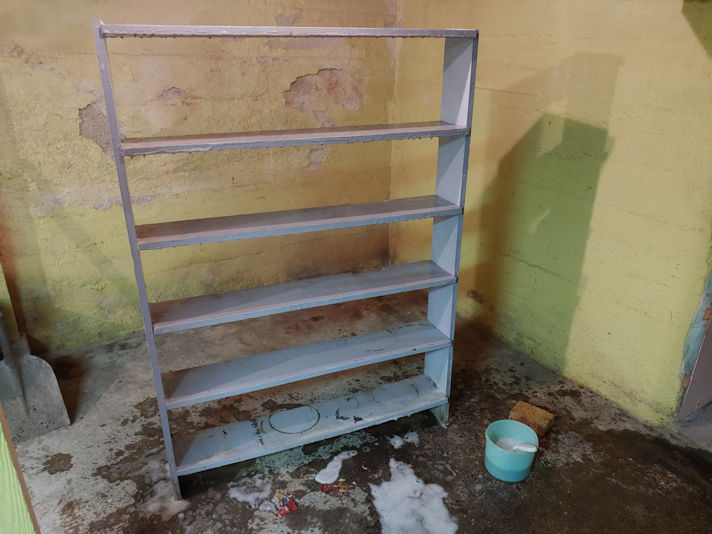
Over the next year, we will get the weekly readings and slowly empty the room out and give it a good cleaning. I figure, in a year we’ll be able to chart the data and use that to determine how much would need to be done to make it functional as a cheese cave, or if we have to go with something else. Like a modified refrigerator.

If the room turns out to not be appropriate as a cheese cave, I already know it works well as a root cellar. :-) So either way, it will be used in the future!

The Re-Farmer

*edit: for some reason, my brain just assumed that, like every other thermometer I’ve seen, the 0C was at the top, so when I looked at it, I saw 2C instead of 12C!! Which is a bit of a relief, because while the temperature did continue to drop, it was not as severe as I originally thought.

Bread Baking Day – all done!

Sometimes, I think we really need to do bread baking more often.

Then I remember how much clean up is involved. :-D

No matter! We now have two kinds of freshly baked bread done.

Here’s how the seedy bread turned out.

This is how it looked after only 1 hour of rising time. The bowl it’s in is pretty huge – too big to fit in our kitchen sink (which makes washing it a bit of a challenge! :-D ) – with plenty of room for this 4 loaf recipe.

The timing of things works out really well. I use half the dough to make buns first, leaving them to rise while I shape a couple of loaves. Once those are done, I star to preheat the oven. By the time it’s heated up, the buns have risen enough to go straight in. Once they’re out, the loaves have had enough time for their second rising. When those are done, the overnight sourdough loaves are ready to go into the oven. No wasted time in between, making for more efficient use of a hot oven.

They came out quite beautifully, too! Such a tasty bread, with a really nice texture. I love the bit of crunch the seeds add to it.

The second rising for the sourdough loaves was probably about 4 – 4 1/2 hours. The first rising was probably about 11 or 12 hours.

This is how they looked, just before I put them in the oven. They definitely rose more than the first time I tried this recipe, so the modifications made quite a difference, but still not rising as high as variations that use added yeast.

Is it worth it?

I think so.

The actual working time to make this bread is low. It’s mixed at night, then kneaded for 10 minutes the next day. It really doesn’t need a lot of attention.

The loaves came out so smooth and gorgeous. None of the cracking you can get when using an added yeast bread, since there’s no sudden rise in height in the oven.

The bread itself has a slightly thicker, sturdier crust, while the crumb is incredibly soft, tender and fine in texture.

Reducing the amount of sugar was definitely a good move. The sourdough flavour was more dominant this time, whereas the last time I tried this recipe, the sweetness was more dominant. I think adding that little bit of baking soda helped with the rising, too.

I’d still prefer a more “sour” sourdough flavour, but that has more to do with our starter than with the recipe. We’ll be making more of this one, that’s for sure. I think I’m satisfied with it enough that, next time I bake it, I’ll post with the tweaked recipe.

Tomorrow is going to be another baking day, though this time for my daughters. I look forward to seeing what they’re planning to make. :-)

The Re-Farmer

Bread Baking Day

Yesterday was actually intended to be my bread baking day, but we just didn’t have the energy for it. It was a pretty bad fatigue and pain day for all of us. :-(

I did start a batch of overnight sourdough before bed, though. The last time we tried this recipe, it didn’t really rise at all by morning, so I tweaked the ingredients this time. I reduced the sugar to something adequate to feed the sourdough yeast, and not make the bread itself a sweeter bread. I also added just a touch of baking soda along with the flour. Last time, I left the dough to rise in a bowl on our dining room table, but the house it just too cold, so this time it went into a warm oven with the light left on to keep it warmer throughout the night.

I checked the dough before I headed out to do my rounds, and was quite pleased by what I saw.

It rose quite nicely! I’m very pleased.

After finishing my rounds, I kneaded the dough for 10 minutes, then set it up in loaf pans for a second rising.

With no yeast other than the sourdough in the recipe, it will still take a long time to rise. So I waited an hour before starting some non-sourdough bread.

My favourite additives to my basic bread recipe is thick cut oats, chia seeds, ground flax, sunflower seeds and pumpkin seeds. The sunflower and pumpkin seeds are roasted and salted, and this time I took more time to grind them in a mortar and pestle to break them up. The whole seeds and bigger pieces tend to fall out while the dough it being kneaded. I let it all soften in boiling water first, which makes a much nicer texture in the bread. I doubled the basic 2 loaf recipe again, too.

By the time I got this batch set aside to rise, it was about an hour and a half since setting the sourdough loaves to rise. A quick check showed very little change, so I expect to have the second batch baked before the sourdough is ready to put in the oven! :-D

Oh, and my timer has just gone off. Time to get back to it! :-)

The Re-Farmer

Colder temps and signs of furry visitors

It was a bit perplexing, looking at the weather forecasts over the past few days. We’d have these lovely temperatures, hovering just a bit below freezing, while the app was saying it was cold.

A few days ago, I could at least blame the wind chill…

Continue reading

Recommended: Cordwood Construction

Welcome to my “Recommended” series of posts. These will be weekly – for now – posts about resources I have found over the past while that I found so excellent, I want to share them with you, my dear readers. :-) Whether or not I continue to post these, and how often they are posted, will depend on feedback. Please feel free to comment below, and if you have a favorite resource of your own, do share, and I will review them for possible future posts.

I hope you find these recommendations as useful and enjoyable as I have!

Since we decided to try our hand with some cordwood practice buildings, starting this summer with what will be an outdoor bathroom, I’ve been doing a fair bit of research. I’m learning that this building technique has had some modern changes to it that have greatly improved the final result.

One thing I found, as I did online searches, what that time and again, I kept finding myself back at one site. Cordwood Construction: The Essence of Cordwood Construction. There are many, many sites, blog posts, videos and books about the technique out there, but I’m not finding anything else more informative and practical. There is so much information at the site – even house plans! – one could easily spend many hours there. (I’m loving their post about cordwood flooring, too!) Their blog seems to be kept up quite often, too. They also have a Facebook group, bookstore and newsletter.

They do have a YouTube channel as well. There are not many of their own videos there, but if you check their playlist tab, you’ll find lots more videos.

The information they have is very hands on. I find myself wishing I could attend one of their workshops but, alas, they are too far away.

They also get right into the basic, essential details in a way that is so very helpful.

My previous experiences with cordwood (aka stackwood) construction are historical buildings, and this resource is where I first heard of using an inner layer of insulating material between outer layers of mortar. It’s also where I first encountered the notion of bottle bricks, outside of Pinterest images that led to nowhere useful.

They provide so much basic information that I really feel that someone like me, who has never built anything major before, can do it. I’ve already downloaded their shed plans ebook, and it is so very thorough! I plan to rely on it heavily, and I’m downright excited about building some practice buildings over the next couple of years. Who knows. A few years from now, we might be using the technique when it’s time to build a barrier free house for myself and my husband!

Obviously, this is a resource useful for someone who is – or hopes to be – in a position to construct their own cordwood building, but I think the technique itself is a sort of “lost art”. Given some of its many advantages, which include lower costs, being fire retardant, and more “eco-friendly”, I think this is a building method that deserves a resurgence. Resources like Cordwood Construction are a fantastic place to learn more about it, and be inspired. Of all the other sites I’ve looked at, this one is, hands down, the best of the lot!

I’m really looking forward to putting what I learn from this resource into practice, and definitely recommend this resource for anyone to check out, even if it’s just to learn more about this fascinating building method.

The Re-Farmer

Wow!

What a constant stream of deer caught on the trail cam last night! Especially between 4 and 5 in the morning.

Nothing compared to this one clip, however.

A full dozen are seen here, but there may well have been more after the camera stopped recording.

There were about 35 clips of deer recorded by this camera last night, and there are other locations the deer use to cross into the property. Most were in groups of 2 or 3, with a few lone deer. The family of 4 that like to use the road came by again. At one point, there was even 2 way traffic of deer, coming and going!

Wow!

The Re-Farmer

You can herdly tell

I had quite a surprise last night!

As I got up from my computer to do the cat stuff a bit earlier than usual – the only reason I happened to see this while there was still enough light – I caught movement out the north facing window.

Three deer had been startled and were bolting away from the feeding station, which is around the corner of the house from where I was looking, running through the old garden area and maple grove.

Did I say three? Oh! There’s number four…

Continue reading

Clean Up: old basement progress, and finding things

I was able to get a bit more progress in the old part basement yesterday, and it’s the sort of progress that actually feels like things are finally moving forward!

Stuff got put back for a change!

Okay, so it’s really all temporary, but still…

The first thing I wanted to work on was getting the now dry shelves back against the wall. My plan was to put both on one side of the centre pillar, instead of one on each side, like it was before.

It didn’t quite work out that way.

Continue reading

Clean Up: old part basement. Mopping and scrubbing

Today, I was finally able to continue working on cleaning up the old part basement.

For those who are new to visiting this blog (Welcome! Thanks for popping by!), click here to read about what happened, and you can see the clean up progress here, here, here and here. (All links will open new tabs, so you won’t lose your place! :-) )

I’ve really been kinda dreading what I need to work on next, which is to start putting back some of the things I had to move out during cleanup, and try and figure out what to keep, what to store elsewhere, and what needs to be disposed of. Hopefully, I won’t be finding any more hidden “poison for tree” containers hidden somewhere!

The first thing I did today was move the blower fan to a different area, so I could do a bit more clean up in the last section I had worked on.

The photo on the left is how it looked when I last worked in this section. There was still a lot of dust and dirt in the area, but trying to sweep it did more to kick the dust into the air than get rid of it.

In the process, I discovered a light fixture hidden between two furnace ducts! I had to have seen it before, but simply forgot it existed. It’s very well hidden! (As an aside, I had my phone on one of the ducts near where I was working, held in place by the magnetic case, playing music. I later found out the girls could hear my music on the second floor, through the vents!)

There are so many odd little lights around this old basement. This half of the basement alone has one of two lights that turn on with the switch at the top of the stairs, one that has its own switch at the side closer to the new part basement, and one above the septic pump that has no switch. It is screwed in and out to turn it on and off. Now I find the light with the pull chain between the ducts, so that’s 4 lights on this side of the stairs. On the other side of the stairs is the other light that’s turned on by the switch at the top of the stairs, a light with a pull chain above the sump and well pumps, and another with its own light switch closer to the furnaces.

That’s a total of 7 lights in one little basement!

Anyhow. Where was I? Oh, yes. Cleaning.

I was even able to wash this section of wall a bit. The other walls were too crumbly, and the best I could do was sweep them gently, but this wall is solid. Since this wall is part of the original basement, but became an internal wall after the new part was added, it tells me that the crumbing of the exterior basement walls is probably due to all sorts of moisture from the soil around it.

Waterproof sealants probably didn’t exist when this basement was built.

As for the clean up today, this time I didn’t even try to use the mop bucket, and just set up in the laundry sink. That water got so black! Even after changing the water several time and rinsing the floor several times, it was still really filthy.

We’re not going to be able to use this mop anywhere else in the house anymore. :-D No amount of washing and rinsing of the mop will get it clean enough!

Once the floor was washed and rinsed as best I could, I set up the blower, then turned my attention to the two shelves we will be able to reuse.

I started by washing and scrubbing the shorter one.

I gave it a good scrubbing – after first removing the nails that were used to attach it to the pillar it was next to, originally – then flipped it upside down to do the bottoms of the shelves. You can see the water damage on the “legs” of the shelf, even though it was raised off the floor by bricks.

When this shelf was scrubbed and rinsed (and I took advantage of all that soapy water to mop that section of floor again), I dragged out the taller shelf.

It needed some nails removed before I could start cleaning it, too.

This one has less water damage on its bottom, but was a lot dirtier. The section of wall it was next to is crumbling a lot more than where the shorter shelf was set up. At least this shelf is a lot sturdier, which made it easier to scrub.

Once they were done, I set them up where the blower is aimed, on bricks to keep the air circulating.

Though we will be using these shelves, because we need to, it will be temporary. When we are able to, we’ll pick up some plastic utility shelves to use instead. No wood. No metal. Not for this area!

Once we figure out what goes where of the stuff that got moved out of the shelves, we plan to use them to store bottles. We’ve got a stack of bottles from hard apple cider that we’ve been accumulating over the past two years that will be used as bottle bricks when we do our cordwood practise building. There are also lots of other bottles and jars all over the place, and as we clean those up, we will set aside the one we want to use at bottle bricks as well, so we’ll have other colours as well as ones with no colour at all. The outdoor bathroom we’re planning to make as our first practice building is not going to have any windows in it. Bottle bricks will be used, instead, so all light while maintaining privacy. Whichever wall ends up facing south the most, will have the most bottle bricks with no colour in them for maximum sunlight.

Storing these in the old basement will also mean we’ll have access to water, and the old laundry sink that has turned out to be so very handy. The bottles and jars will need to be cleaned and sterilized before they can be made into bricks.

Little by little, it’s getting organized!

All of this took only about an hour, and it feels like I should have done more, but everything needs to dry before I can continue. Hopefully, I’ll get a bit more progress in tomorrow.

Now, before I forget again, I’m going to go back into the basement and get the dehumidifier that’s down there running.

The Re-Farmer