I just had to share this excellent piece from the Maritime Gardening Newsletter, Failure is the Best Guru.
This is the video included with the newsletter.
I highly recommend signing up for his newsletter and subscribing to his Substack.
In regards to failures, I heartily concur. We’ve had a couple of really bad years in our garden, and learned the most from both of them! We now know how our garden spaces respond to heat waves and drought, flooding, and that we’ve got a major problem with slugs to figure out!
Yesterday, I headed out to fix the water pipe to the garden tap. It was hot and muggy, and I had sweat pouring off my face, so if you hear me sounding out of breath in the video below, that is why!
The couplings did work. I had to use both of them.
But then… well… here’s the video.
So… that’s a write off.
In theory, I could just dig out the section between where the couplings are, and my unexpected find, figure out where the third leak is and repair that. However, the pipe is so old, and clearly splitting apart easily, it’s not worth it. It needs to be replaced completely.
So now my plan is to take advantage of end of season sales to pick up a heavy duty garden hose long enough to reach from the house to the garden tap, with slack. I am also thinking of picking up some pipe wide enough to run the hose through it. This way, the hose would be protected by the pipe after it’s buried, but if it does need repair, it can be easily pulled out, then put back in again, without having to dig another trench. It would be even easier to attach a line to one end before pulling it out the other way, do any repaires, then use the line to pull it back through the pipe.
I won’t dig up the water pipe until we have what we need to install a replacement, but I am now very curious as to just why there is that wider diameter section of pipe, and how far it extends. I’m also curious as to just how far the hose section coming out of the ground to attach to the house extends, and how it’s joined to the pipe.
Whatever was done obviously made sense at the time, and it did work for about 50 years, which is pretty darn good!
Okay, it’s that time! I’ll be working on a serious of posts, going over how our 2022 garden went, what worked, what didn’t, and what didn’t even happen at all. This is help give us an idea of what we want to do in the future, what we don’t want to do in the future, and what changes need to be made.
Okay, so now let’s look at the things that never happened – or the things that kinda, sorta happened.
I’ll start with a kinda-sorta happened, and didn’t happen, at the same time!
The bread seed poppies.
Last year, we’d planted some bread seed poppies in the old kitchen garden, which didn’t thrive, but we were still able to harvest dried pods and keep seed for. For 2022, we also bought two other varieties. The plan was to plant them well away from each other, to prevent cross pollination. Poppies self seed very easily, so wherever we planted them, they would be treated as a perennial.
In the spring, we scattered our collected seed over the same bed we’d grown them in before. They really were too densely sown, but at the same time, it was just such a terrible growing year. Lots of them germinated, but there were weeds growing among them that had leaves very similar to the poppy leaves. I had to wait until the got larger before I could tell for sure, what was a weed, and what was a poppy. They still didn’t do all that well, and I didn’t bother trying to collect any of the few dried pods that formed to collect seed. Instead, that bed was completely torn up, and there is now a low raised bed framed with small logs. Whatever we end up planting there should do a lot better.
As for the new varieties, we never found a place we felt was suitable to sow them. The flooding certainly didn’t help. Some of the places I was thinking of ended up under water, so I guess it’s a good thing we never tried planting there.
So bread seed poppies are something we will try again, once we figure out permanent locations to grow them that are in very different parts of the yard.
Then there were the wildflowers.
We got two types of wildflower seed mixes, specific for our region. Both were sown in the fall, when overnight temperatures were consistently below 6C/43F. One was an alternative lawn mix, so we sowed those between two rows of trees behind the storage house, where it’s very difficult to mow or tend. The other was sown outside the fence near the main garden area, where we later put the new sign to identify the property, after the old one disappeared. There is a broad and open strip of grass between the fence and the road, that I would eventually like to fill with wildflowers. To start, our first sowing was done near the corner, where we hoped they would attract pollinators that would also benefit our garden.
We got nothing.
The photo on the right doesn’t show the space between the trees the seeds were broadcast onto, but it was filled with water. The storage house didn’t just have a moat around it, like the garage. The space under it, where the yard cats often go for shelter, was completely full of water.
The photo on the right shows where the Western wildflower seed mix were broadcast and, while there was some standing water in places, it also got covered with sand and gravel from the road, as the ridges left behind by the blows melted away.
Yes, the snow got flung that far from the road!
Not a single wildflower germinated, in either location.
I suppose it’s possible that some seeds were hardy enough to survive the conditions and will germinate next spring. Who knows.
I’d intended to get more seed packets, which would have been sown in the fall, but completely forgot to even look for them. I might still get them and try broadcasting the seeds in the spring. We do still want to turn several areas that are difficult to maintain, over to wildflowers and groundcovers. Once we get them established, they should be virtually maintenance free. It’s getting them established that might take some time!
During our previous two years of gardening, we grew sunflowers. The first year, we grew some giant varieties. For 2021, we grew Mongolian giants and Hope Black Dye. These were to do double duty as privacy screens.
They did not thrive during the drought conditions we had last year, and deer were an issue, but we were able to harvest and cure some mature seed heads and intended to plant them in 2022.
That didn’t happen.
Basically, with the flooding, the spaces we would have planted them in were just not available. Plus, the bags with the seeds heads were moved into the sun room, after spending the winter in the old kitchen, with the intention of planting the seeds, they ended up in there all year. With how hot it can get in there, I don’t think the seeds are viable anymore.
Still, it might be worth trying them!
The reason we wanted to grow the varieties included using them as both privacy screens and wind breaks. We also want to grow them as food for ourselves and birds and, at some point, we’ll be getting an oil press, and will be able to press our own sunflower oil. So sunflowers are still part of our future plans.
We did have sunflowers growing in 2022, none of which we planted ourselves. They were all planted by birds, and were most likely black oil seed; the type of bird seed available at the general store. Only a couple of seed heads were able to mature enough to harvest, and we just gave them to the birds.
I do want to plant sunflowers again, but at this point, I’m not sure we will do them for 2023.
Several other things we got seeds for, some we intended to plant in 2022, but others for future use.
Of those we had intended to plant, one of them was Strawberry Spinach.
These are something we’ve grown before on our balcony, while still living in the city. The leaves can be eaten like a spinach, while also producing berries on their stems. We’d ordered and planted some in a new bed, where we could let them self-seed and treat them as a perennial, in 2020.
They were a complete fail. We don’t know why.
I ordered more seeds and we were thinking of a different location to plant them, but then the flooding hit, and we got busy with transplanting and direct seeding, and basically forgot about them.
I still want to grow them, but we still need to figure out a good, hopefully permanent, location for them.
We also found ourselves with a packet of free dill seeds (, plus we were given dill that we were able to harvest seeds from. Since cleaning up the old kitchen garden area, we did start to get dill growing – dill is notorious for spreading its see and coming back year after year! – but they never got very large. We have bulbs planted where they’ve been coming up, so we’re not exactly encouraging them in that location.
In the end, with the way things went, we never decided on a location to plant them, and with all the other issues we had with the garden this year, it just wasn’t a priority.
For 2023, however, we’re actively starting to order herb seeds and will be building up an herb garden, so hopefully we’ll be able to include dill in those plans, too.
One thing we ordered that we did not intend to plant right away was wheat.
These are a heritage variety of bread wheat, and we only got 100 seeds. Even if we had a good year, I doubt that would give us enough yield for even a loaf or two of bread. We do, however, plan to invest in a grinding mill in the future.
Meanwhile, when we do plant these, it will be for more seeds, not for use. In the longer term, we’d need to have a much larger area to grow enough wheat for our own use.
We’ll be starting slow!
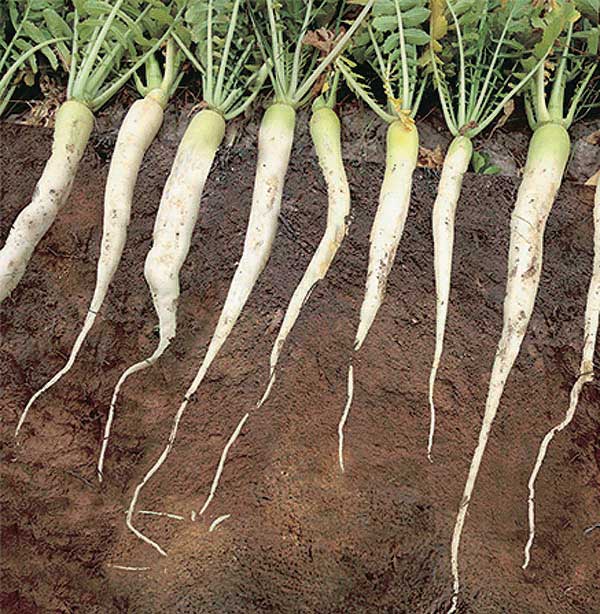
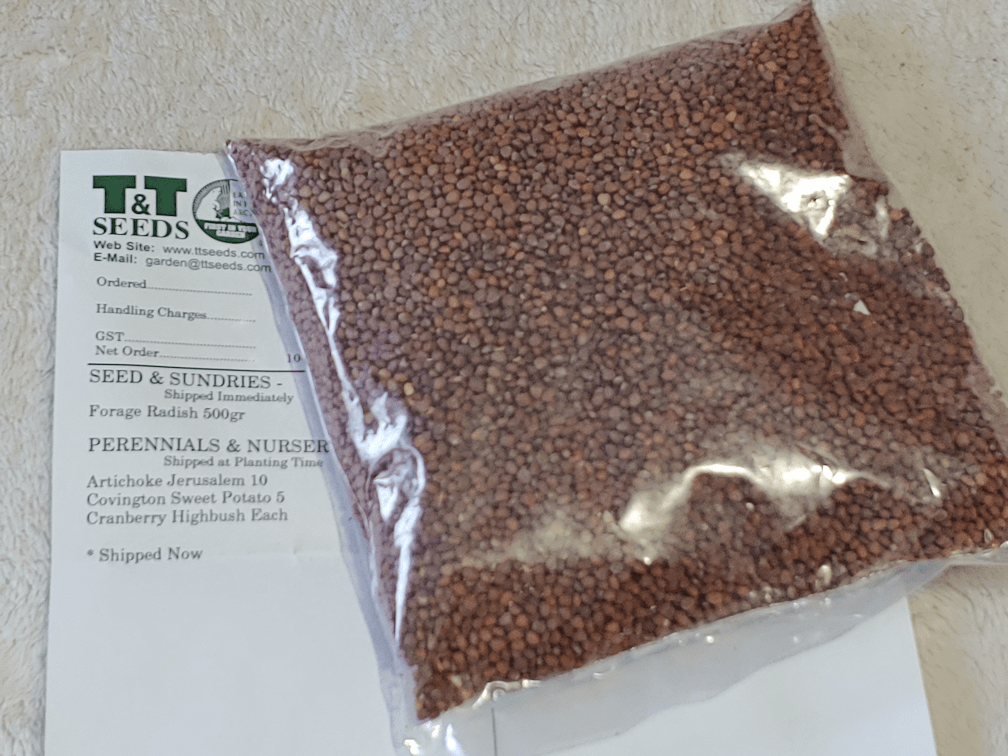
Then there were the forage radishes.
Also called tillage radish. We got these to help amend our soil, and loosen it for future planting. These would be something we would use to break new ground in preparation for future garden plots. There are a whole lot of seeds – and that was the smallest size package! – so we’ll probably have a few years to use these to prepare new beds.
I think that’s it!
I’m sure I’m forgetting something. 😄😄
Next, I’ll post my final thoughts on how everything went. With everything that went on this year, that’s going to need its own post!
The Re-Farmer
Update: I knew I was forgetting something! Two somethings.
The first is our winter sowing experiment. You can read about how that turned out, here. Basically, we got nothing, and I think it was due to our extended, cold winter. I know this is something that has worked for others in our climate zone. It just didn’t work for us this year. In the future, I will probably experiment with it more, but not for the 2023 growing season.
The other is our cucamelons. In 2021, the cucamelon vines grew well in a much more ideal spot, but we had almost no fruit. The previous year, we grew them in a spot that was too shady for them, but still managed to get more fruit. I believe it was a pollination problem.
While we do want to grow them again in the future, we decided not to get more seeds. However, in cleaning up and redoing the spot they were growing in, putting in chimney blocks to plant in and keep the soil from eroding under the chain link fence, we found lots of tubers. In theory, we could over winter the tubers and plant them again in the spring. So we buried them in a pot and set the pot into the sun room, where it doesn’t get as cold. The first year we tried that, there was pretty much no sign of the tubers by spring. I found only the desiccated skin of one. When I brought the pot out for 2022, I didn’t even bother digging for the tubers. I knew they wouldn’t have survived the extended cold, even in the sun room. We should have taken it into the house and maybe into the old basement, where the cats couldn’t get at it, but those stairs are difficult for to navigate, and we go down there as rarely as possible.
So winter sowing and cucamelon tubers were both things that just didn’t work for 2023.
Okay, it’s that time! I’ll be working on a serious of posts, going over how our 2022 garden went, what worked, what didn’t, and what didn’t even happen at all. This is help give us an idea of what we want to do in the future, what we don’t want to do in the future, and what changes need to be made.
Our 2022 garden had a lot of challenges, and a lot of failures. Some of challenges and failures started well before we planted a single thing outdoors.
With our short growing season, we need to start a lot of things indoors. That, in itself, is expected and not a big deal. Our circumstances, however, have thrown in some major difficulties.
Fourteen of them, in fact.
Well. Sixteen, when we were trying to get them going this year.
Our indoor cats.
The other challenge is a combination of space and light. This house is oriented to the East. Our largest windows face the sunrise – with a grove of 60’+ spruces not far away. Our south facing windows are smaller and inaccessible for the purpose. The exception to that is the sun room, however the sun room is not warm enough to start seeds in when we need to. Plus, during colder weather, we allow the outside cats to use it for shelter.
Which means we need to figure out how to start seeds indoors, provide adequate artificial light, and protect the seedlings from cats that are determined to either roll on them, or eat them!
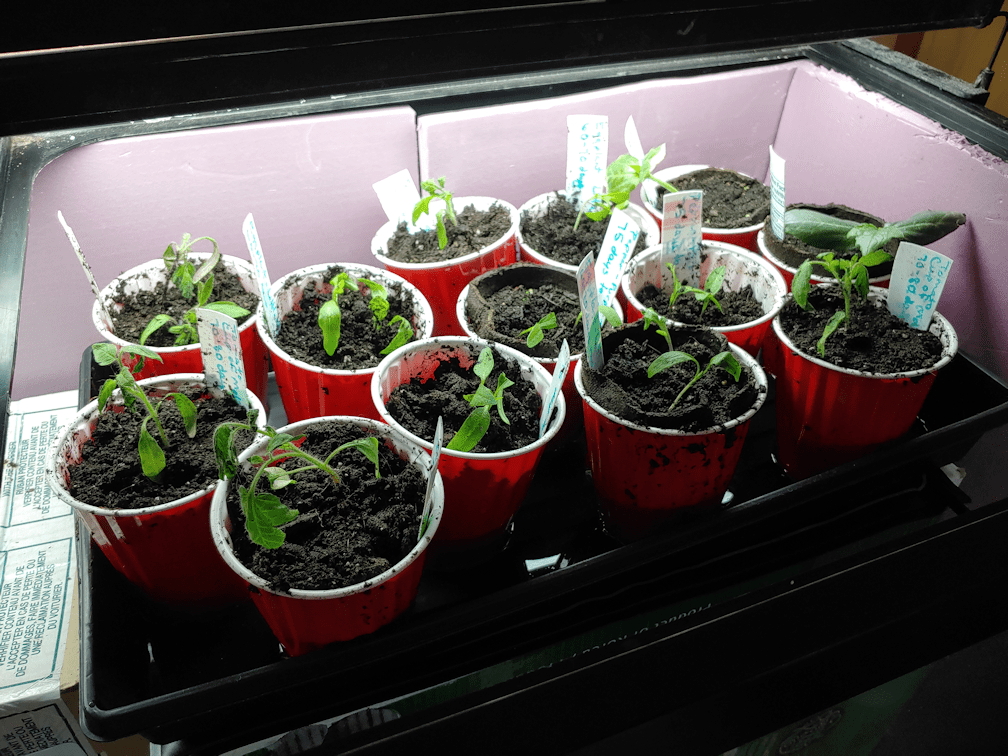
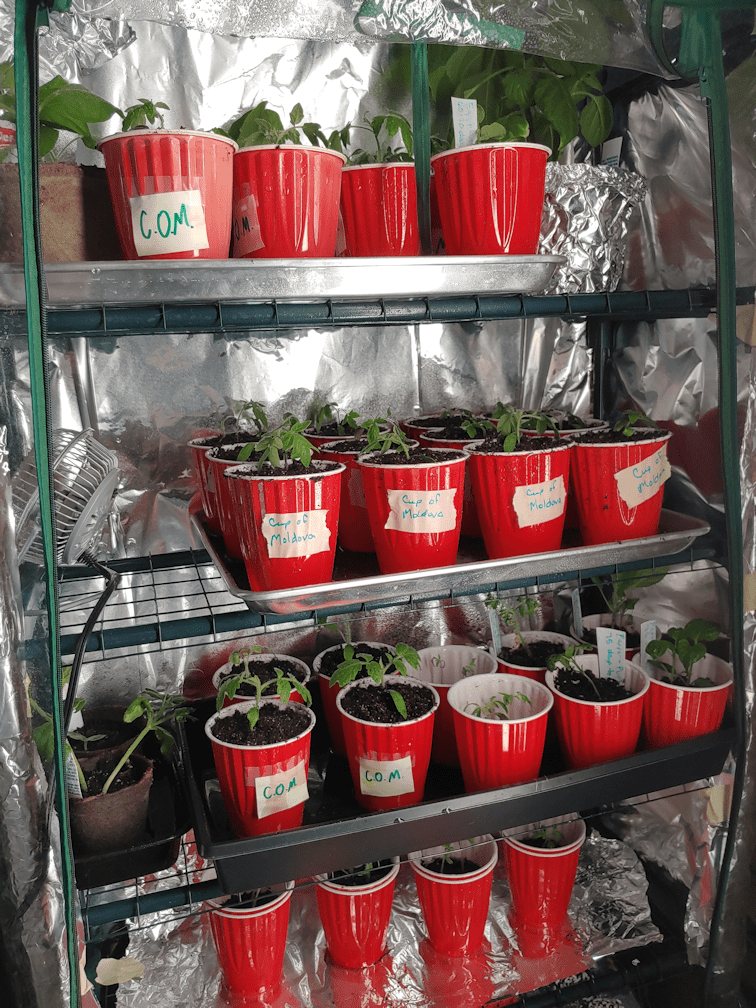
The first solution was one that we started doing last year. We have two aquariums that we have been able to convert into greenhouses, of a sort. When we moved out here, we brought our big tank, with a second light fixture to replace the kit light. Both work just fine, and provide adequate light for starting seeds.
The corner of the living room the tank sits in gets cold, so we added rigid insulation against two walls for extra protection. We were also able to get a warming mat to place under seed trays of things that needed extra heat. Since the lights can’t be raised or lowered, we used cardboard boxes under the seed trays to adjust the height, with new plantings closer to the lights, and larger ones lower down, rotating and adjusting as needed. We built frames with hardware cloth to cover the top of the tank, which both protected the seedlings from the cats, but also allowed more air flow.
This above picture was taken with the hardware cloth covers removed for access. As you can see from the bedraggled seedlings, we didn’t quite manage to protect them from the cats. More on that later.
The other tank is much smaller; just a 20 gallon tank. It, too, tended to get chilly, plus the light it came with was not as bright as having two lights, as with the large tank. It has insulation on three sides to protect from the chill walls, which also got covered in aluminum foil to reflect the light.
When we first started using this tank the previous year, we used the original lid it came with. The cats were incredibly determined to get at the trays below, and were able to reach through the opening for the filter, no matter what we used to block it, completely destroying the trays below. This year, we found some window screens in a shed, and used one of those as a lid, weighted down with hand weights. We removed the light from the bottom of the original lid and attached it to a foil lined piece of rigid insulation, and simply set it on top of the window screen. The cats still sometimes managed to knock the weights around and displace the screen but, over all, it did keep them out.
The problem with both tanks, but especially the little one, was air circulation. For that, we used a tiny fan we found in one of the basements while doing clean up. We could put it right into the big tank, or on top of the hardware cloth covers, aimed downwards. For the small tank, we could just set it on the screen, also aimed downwards. Ultimately, though, we used the small tank as little as possible.
We had an awful lot of seeds to start indoors, however. Way too many to fit in the tanks. Since the seeds needed to be started at different times, we could start the earliest ones in the tanks, then rotate them out when the next seeds needed to be started.
The question was, rotate them out where?
One of my daughters had bought a mini greenhouse for me the year before, so we brought that into the living room. We also bought a long, narrow, LED shop light to illuminate it better. That worked out well enough that we later bought a second one.
We set it up as close to the window as we could, on a chair to catch more light. The only way we could use the light, however, was to hang it from a plant hook in the ceiling above, so that it rested on the chair as well, oriented vertically.
The cats were absolutely determined to get into it!
They managed to squeeze in from under the chair, so we tried taping the plastic cover to the chair.
That wasn’t enough.
We added pieces of cardboard to block the spaces they were squeezing through.
It… mostly worked.
In the end, it was a combination of taping the bottom, the cardboard, and covering the back and sides of the frame with aluminum foil – which also helped reflect light onto the seedling better.
They still managed to get in.
I came out one morning and found cats had somehow squeezed through one of the zippers, pushing it open more, and rolled all over a couple of the trays.
It was such a disaster!
We did managed to save some of the seedlings, but not all. Thankfully, we had seeds left for some of them and were able to start over.
We were eventually able to keep the mini greenhouse sealed up well enough to keep the cats out, but it meant keeping the plastic cover on and closed up at a time when the seedlings didn’t need a cover. This meant no air circulation in there at all. Even so, there were times when a cat or two managed to get in, and try to eat some of the seedlings!
I was able to rig the little fan up inside the mini greenhouse, aimed at the walls in such a way that the air flow would be pushed upwards and around the whole space.
That little fan got one heck of a work out!
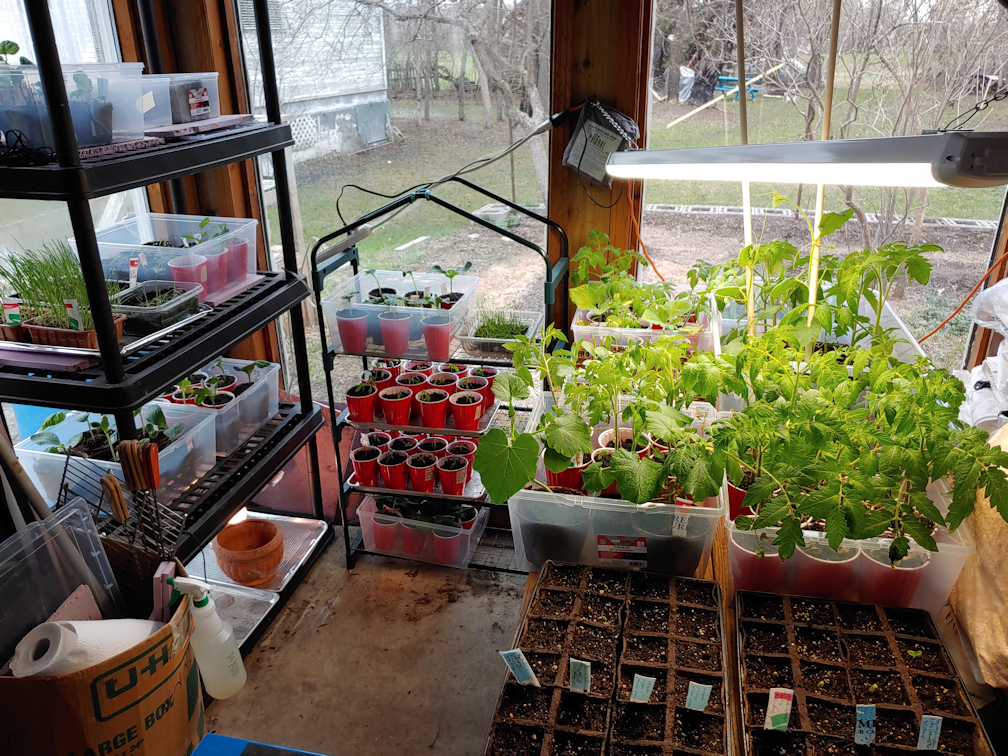
So we finally got that working, but there’s not a lot of space in between the shelves. Before long, some of the seedlings began to outgrow the mini greenhouse. They needed to be moved out, and the only place we could move them to was the sun room – but we had to wait until it was warm enough!
Eventually, we were able to move the largest seedlings onto shelves in the sun room, while other seedlings got rotated into the mini greenhouse, and newly sown trays were set up in the aquarium greenhouses. We had our seeds organized by when they needed to be started, with the earliest started 10 weeks before our average last frost date, then 8 weeks, 6 weeks and finally 4 weeks.
We still ran out of space.
In the end, we set up a surface to hold seedlings over the swing bench, and eventually we could move the mini greenhouse to the sun room – and finally take the cover off! The second shop light was hung above the plants over the swing bench, and we eventually hung the one from the living room on the inside of the shelf.
For a sun room, the sunlight doesn’t actually reach far into the room.
There were so many things that needed to be started indoors! In fact, most of what we were growing needed to be started indoors, with only a few things that needed to be direct sown.
That’s not really going to be changing, so we need to figure something better out. How do we provide the seed trays and seedlings with the light, air flow and space they need, while also protecting them from the cats?
Well, the girls and I have been talking about it, and the only real solution we have is to find a way to keep the cats out of the living room completely, and turn the living room into a plant room.
The question is, how?
There are floor to ceiling cabinets between the living room and dining room. On one set, the living room side is completely covered. On the other, there is a “window” at one shelf that allows access from both sides. It’s a favourite lounging place for David! Between the cabinets is an open space somewhat wider than a standard sized door for access between the two rooms.
The only way to prevent the cats from getting into the living room is to build a barrier in that space, with a door in it, plus another barrier to cover the “window” in one of the cabinets.
Barriers which need to be strong enough to withstand cats trying to get through, yet still be easily removeable.
One of my daughters has drawn up plans for a barrier with a doorway, while the “window” will just need a simple rectangular frame to fit the space. It’s basically going to be all wooden frames and hardware cloth.
Unfortunately, we’ll need to actually buy the lumber for this, and lumber is extremely expensive right now. There is nothing in the piles of salvaged lumber in the sheds and barn suitable for what we have in mind.
It’s something we’ll have to figure out soon. Some things, like onion seeds, could be started as early as January. February at the latest. Honestly, I just don’t see how we can get the materials and build the barriers that quickly. We could start off using the large aquarium, which might give us until March to get it done, but… I’m not very hopeful.
It would be a lot easier, if the cats weren’t so absolutely determined to destroy the seed trays!
Ah, I was afraid of this. I managed to kill the dough ball.
My mother describes how her mother would bake only once a week. So after working using the old dough after letting it sit in the flour few a few days, this time, I left it longer. Last night, I took it out and prepped it to soak overnight, as usual. Unfortunately, I did not have my camera with me.
The dough ball didn’t look any different on the outside from before. The extra time did mean the inside was drier, which I did expect. It was basically a hollow ball. Being drier, it was easier to break up into small pieces. I added 2 cups of water that had been boiled and allowed to cool to the right temperature (because of concerns with our well water), and it was set in a warm oven with the light on, overnight.
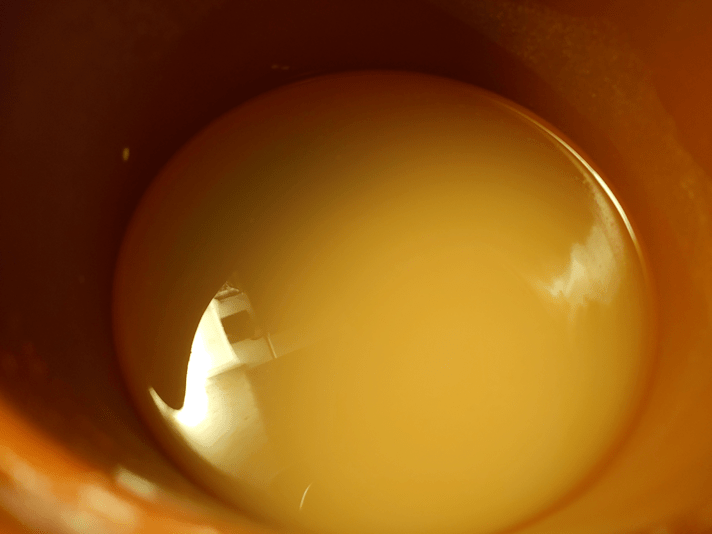
This is what it looked like this morning.
Yeah. That yeast is dead.
In stirring it up, the dough was completely dissolved, but no hint of yeast activity.
I can say with confidence that the extra time buried in flour did not kill the yeast. I could have dehydrated it completely, and it should have reconstituted and kept right on going.
One of the things I mention in there was that I “cheated” by using baking soda. If you’ve worked with sourdough recipes that called for baking soda before, you know what happens! There is a lovely chemical reaction that results in a light, fluffy dough or batter.
My mistake was, I didn’t take the dough ball out before I added the soda. That chemical reaction would have continued after I buried the dough ball in the flour, which is why it still developed a hollow center. However, as I thought might happen, the yeast was spent in the process. I didn’t remember to take the dough ball out until too late in the process, but I hoped that maybe it would still work. Alas, it did not.
Well, this IS and experiment!
So I am restarting the process. I don’t have the “instant sourdough yeast” I used before, so I am using regular yeast to make a sponge, which is currently in a warm oven to get all spongy. I’ll post the details later, but it is also a very old technique. It will slow down my bread baking plans for the day by quite a bit. Ah, well. That’s okay. It’s a learning process, and that’s the whole fun of it!
One of the things we planted this spring was a couple of rows of kohl rabi (or is it kohlrabi? I have seen it both ways…).
They have not done well.
Of all that we planted, there were about 4 surviving plants that sprouted.
Of those, a couple got et by deer.
The last two, however, were getting quite big and leafy and looking to have some potential, though there was as yet no sign of a bulb forming.
Then, something got at them.
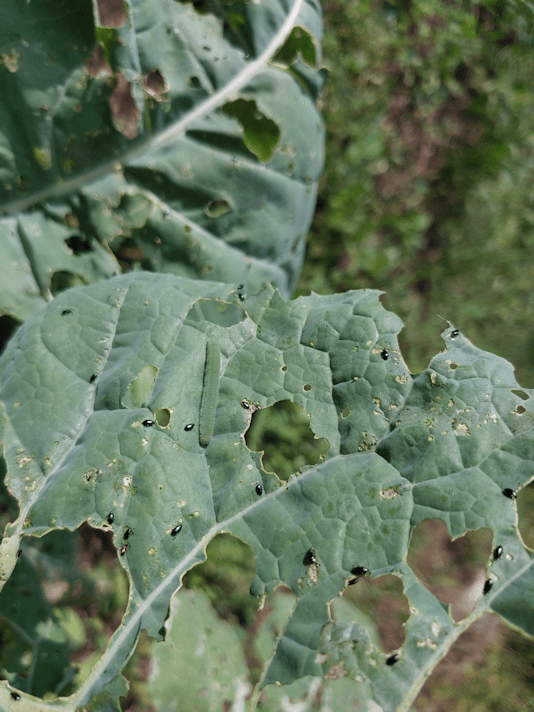
At first, it looked like the caterpillars from cabbage moths. I found a whole bunch on the underside of the leaves, wreaking havoc, and got rid of them.
Soon after, however, the leaves were looking even worse.
I took this picture yesterday. These are the culprits.
The leaves are absolutely infested with these teeny, tiny black beetles.
I hosed them off after taking the picture, but when I checked them today, they were back, and there’s hardly anything left of the leaves, but the veins and stems.
So… kohl rabi is a bust for our garden!
Darn. I was looking forward to having our own. It’s one of those “treat” vegetables that we buy only once in a while.
At least whatever those beetles are, they are completely uninterested in anything else we’re growing.
The jars of sauerkraut and cider are in locations that I can easily check on them. With the lack of fermentation in the mead, I’ve found myself eyeballing the jars harder.
I was feeling suspicious.
So this evening, I took down a jar of plain sauerkraut and took the filter off. It seemed okay, but I went to check the other two, anyhow.