There have not been a lot of cats around lately, when I first come out!
I did see others as I went out and about, but nowhere near as many as usual. I think they are enjoying the lack of snow and drying ground, and heading out further afield.
There is a tabby that hangs out with Junk Pile and her kittens, snuggling so close together, I’ve found myself trying to see if there’s a second litter in there, and they’re sharing the parenting. It’s really hard to see in there; the windows are dirty on the inside, and we’re not going to lift the roof to clean them right now, or Junk Pile will move her kittens somewhere else.
I saw The Distinguished Guest walking around. I noticed him limping a while back, but now he’s not putting any weight on that leg at all, but hopping around three-legged. We won’t let me near him, so I can’t check it. Usually, if he starts eating in the kibble house, I can at least pet him, but he didn’t go for the food at all.
The snow is pretty much completely clear in front of the sign cam, other than what’s in the ditches. This spot here is where I spread the wildflower seeds. I am a bit concerned that the gravel and clay from the road that ended up over here will prevent them from germinating. That puddle is there because road dust pushed over with the snow had enough clay in it to form a poll that isn’t draining as it would if it were on just soil.
I broadcast the seeds quite widely, though, so I hope at least some of them will make it!
I did NOT do the walking to check on the flooded out areas. The water continues to recede, and we’re just waiting for the repair crews to get to them. I’ve been walking 3-4 miles total, every morning, for about a week now, and as much as I love the walking, my broken old body is telling me I need to take a break.
I might even listen to it.
Or I might do the walking later in the day. ;-)
We’ll see!
The snow cleared around the yard enough that I could start picking up some of the larger branches. The smaller ones will wait until things dry up more, and we can go around with the wagon or wheel barrow.
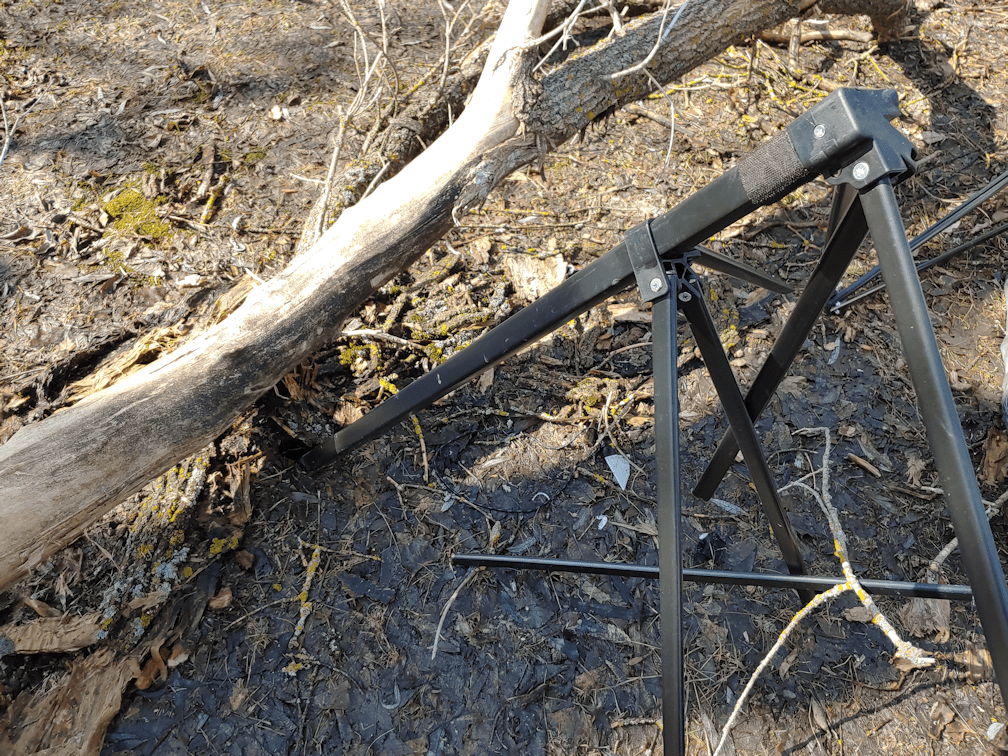
I was also able to finally clear the broken canopy tent frame away from the BBQ and picnic table. I was able to collect the tent pegs, too, and the new BBQ cover is now properly pegged to the ground.
I still had to deal with this, though.
I was able to pull the leg part way out of the ground.
If you look at where the leg goes from dry to wet, that’s how much of the leg the fallen piece of tree pushed into the ground.
There’s still the base of the leg, which has a flat plate where tent pegs can be used to secure it. It was difficult to work with, because the rest of the canopy frame is still attached to it. I noticed the screws were standard Phillip’s head, so I got a screwdriver and was able to separate it from the rest of the frame. Unfortunately, while trying to wrestle it out of the ground, the leg started to bend. !! I didn’t want to break it off completely, and then have to fight with a much shorter piece, so I left it for now.
Once I realized how easily the frame can be taken apart, without the need for proprietary tools, I got pretty excited. We can take the whole thing apart and salvage the unbroken pieces. I’ve been needing stronger materials to use as supports in the garden. The unbroken pieces will work perfectly. And you can never have enough screws and bolts!
So that’s going to be a task for later today. Dismantling the frame, and seeing how much of it can be salvages. :-)
It’s going to be a good day for working outside. We’re already at 16C/61F, and are expected to reach 20C/68F this afternoon.
There is a lot of work outside that we can finally get started on! I’m almost giddy with looking forward to it!
Okay, yeah, it’s still mucky out there, but I can still get things done! :-D
I’ve just spent the last several hours fighting with a single load of laundry. The laundry I tried to do last night that ended up flooding the entryway.
Today, the first thing I did was remove the clothing that was still in the water, wringing it out as best I could, and putting it back in the laundry basket. While I was doing that, I realized…
I was seeing… daylight?
Check out how low that is. The top of the basin is usually just under the top of the washer. It was about 3 inches lower. There is a window in the wall behind the washer, with sunlight shining through some openings in the back of the machine, and I was seeing it only because it was so low.
Once the clothes were out, I used the new syphon pump to drain the water into a bucket. The breaking main door was opened and left open, to put as little stress on the hinges as possible.
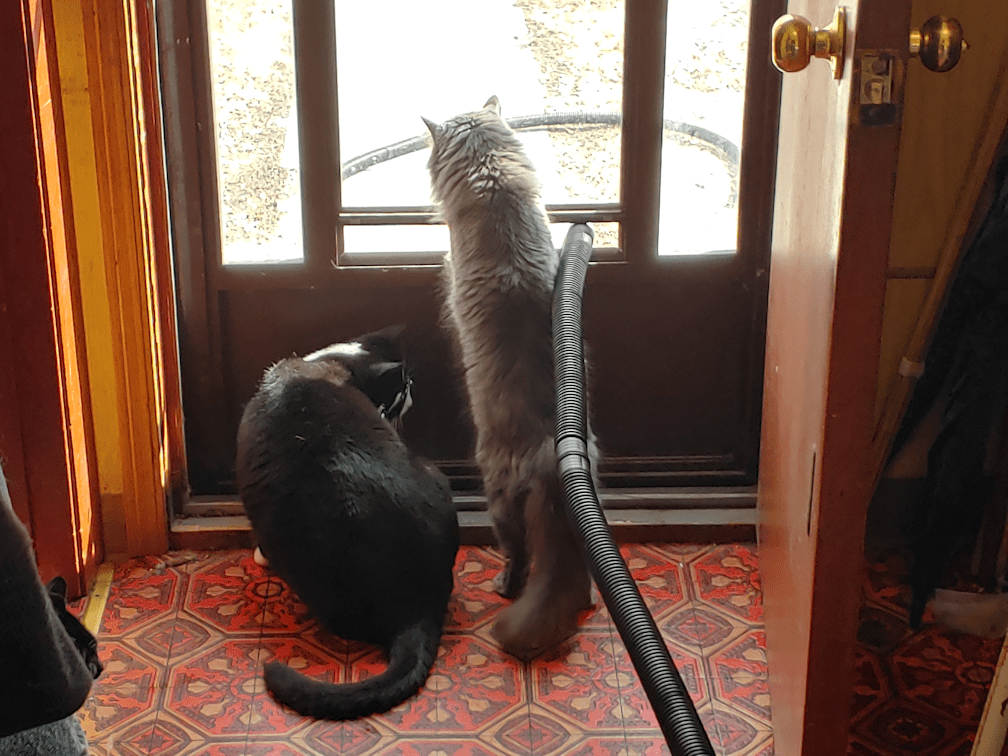
I had to fight off cats, every time I came in and out. They were so excited to be able to see through the storm door, and sniff at the slightly open window!
Once as much water was removed from the basin as the pump could get, I left it be, hoping that without the weight of the water and clothes, it would lift itself up again.
While giving it time to do that, I dumped the basket of laundry into the tub. It had already been washed and needed to be rinsed, so I added water and stomped on it with my feet, like I was stomping grapes, to rinse it out. When the old washing machine broke, that was how we did our laundry until we could replace it.
The down side of doing laundry that way is, it’s hard to squeeze out the water. Which makes it much more work for the dryer. I did use one of the arm bars to twist as much water out as I could, but decided to take advantage of the sunny and warmer day, and hang them on the clothes line.
Before I did, though, I checked on the washing machine.
That was encouraging. The basin was almost at the top again.
I left it be to head outside and wipe down the clothes line – it hasn’t been used in a long time – while a daughter lugged the laundry basket out for me. While hanging the clothes, I made extra sure to pin them on well because, if they fell off, they’d fall right into mud, snow, water or even deer droppings, depending on where they were.
I did notice that we need to replace the clothes line. It’s a plastic coated wire line, and it’s so old, the plastic was cracking all over. I don’t want to get rust on the clothes.
One of the handy things we got were a couple of S clips. Our clothes line is on pulleys, so we can just stand on the laundry platform and move the clothes on the line, rather than having to drag a basket across the yard. With the weight of the clothes, it starts to sag, but S clips placed strategically between the clothes, holds the top and bottom together and reduces the sag. I had just put on the second S clip and was getting hear the bottom of the basket when…
… the clothesline snapped.
Almost all my laundry, now lying in the mud.
*sigh*
Well, we had to test the washing machine out at some point.
After a daughter and I picked up the laundry and brought it in, I decided to do a test run with half a load. I made sure the sump pump hose was set up out the window before even plugging the machine back in.
The cats were wild with curiosity.
Finally, it was time to plug it in and…
Nothing happened.
So far, so good.
I put in the half load of clothing, added the detergent, and finally hit the power button.
It turned on, and did nothing else.
Still, so far so good!
I started setting the machine for a normal load. All the buttons worked, and the timer showed 63 minutes, just as it should. I started the load, and it was soon filling with water.
I wasn’t sure it was so far so good, though. Didn’t it usually take longer before it started filling? The machine does a bit of a jig with the basin as part of its automated load size system. We don’t normally do small loads of laundry, so I’m not sure. Plus, there had still been some water at the bottom. Maybe that threw it off.
Being paranoid, I set up the household step ladder across from the machine and sat there on my phone, supervising it.
As the machine filled, the timer counted down.
It kept filling.
And filling.
And filling.
That was a small load. It should have stopped earlier.
Then I realized the countdown on the timer was at 55 minutes – and it wasn’t changing.
I do appreciate that the washing machine has a window in its lid. I kept watching the water level slowly rising. The basin did start to agitate a bit, but kept stopping, while the water kept going.
Finally I paused it, checked the load and restarted it.
It kept filling.
The timer stayed at 55 minutes.
About this time, my other daughter came down to see how my cursed load of laundry was doing, and I told her what was happening. When the machine still wouldn’t stop filling, and the level was just way too high, I finally shut it off. Clearly, there was something wrong with the machine.
I got my daughter to bring me the syphon pump while I removed the machine’s drain hose from the sump pump hose that was running out the window. The hose from the syphon pump fit into the sump pump hose, nice and snug – I could pump straight outside, instead of hauling buckets!
The cats REALLY wanted to check things out!
I started to pump, but there wasn’t enough of a seal and water started to leak from the join, so I went to get some electric tape to seal it.
I had just gotten the tape from another room, when I started to hear splashing sounds.
I came running to find water shooting out of the washing machine’s drainage hose. The machine had turned itself on and was draining!
This time, I had the presence of mind to shove the end into the washing machine. The little step ladder was still there, so I was able to climb up and reach the plug while staying dry.
Now that I think about it, the machine turning itself on to drain the basin may be a failsafe system, to make sure the basin wasn’t left with heavy water in it for too long. Which would be a good thing, if we actually had somewhere for it to drain, but with the pipe clogged, we don’t, and the only way to stop it is to unplug it!
My younger daughter, sweetheart that she is, went running for the mop and bucket as soon as she heard the splashing. We got the water cleaned up as best we could, then she dried off the hose connections so they could be taped together. Meanwhile, I started taking the clothes out – again! – squeezing as much water out them as I could, and putting them back in the basket, while my daughter started pumping water out.
We got that done, and then I took the laundry into the bath tub again, then headed outside, while my daughter used the syphon hose to empty out most of the mop bucket, so it would be easier to dump outside.
That pump and hose system through the door works really well.
While outside, I gathered up the broken clothes line. That took a while. It’s a long line! My daughter came to join me, and when we went into the sun room to put the line away until we had time to grab some tools and remove the line tightener, which is still good, we talked about how I want to set things up in the sun room to make a surface for plants above the swing bench.
Not something we’re going to do today.
Then we headed in, and I was talking about having to still do my laundry with my feet when my daughter started taking off her shoes by the tub.
She said I was having a bad enough day, so she would do it for me.
What a sweetheart!
So that’s done and, since no amount of manual squeezing matched the spin cycle of a machine, the load is being dried in two batches, so as not the overwork the dryer.
We went from not being able to do laundry because of a clogged drain, to now having a broken washing machine.
I hope it’s still under warranty. I’m not sure something like this would be covered, though.
As for the drain…
When I had the chance, I got my daughter to stand near the laundry and listen, while I ran both taps in the kitchen on full. She heard no gurgling and no sounds of water backing up the pipe.
Could we have finally cleared the clog?
I sure hope so. I’d really like something to go right!
Actually, something did go right. Wanting to cheer myself up, my daughter and I went to check on the seedlings in the big aquarium greenhouse. There are more sprooots! More Lady Godive and Kakai hulless pumpkins have sprouted, and I spotted a Styrian seedling just breaking ground. We also have more of the cantaloupe type melons! We have an almost 100% germination rate on those! There is only one out of 8 pots of Halona melons that hasn’t germinated – and those are seeds from last year’s garden, so they’re more than a year old. One of the grocery store melons, which has 4 pots, had only one seed germinated, but now the rest of them are up, too.
That did a great job in cheering us both up. :-)
Tomorrow, I want to call the plumber and, now that the washing machine is doing crazy things, call the appliance guy that came out to do warranty work on it before. I want to describe to him what happened, before trying to find the info for the company about possible warranty work.
What a day.
My other daughter commented on how all this was somehow to “make up” for our not being flooded outside, like so many others are!
Check out this screencap from my phone’s weather app.
Yeah. They’re predicting another 5-10cm/2-4in of snow in a couple of days. If I tap to check the “snowfall probability”, though, is says 1-2 cm, which is less than an inch.
My desktop weather app says Wednesday will be 3C/37F, with 2-4cm of snow, which is less than 2 inches.
Meanwhile, I’ve read that there is a possibility of another Colorado Low developing later in the month.
Seriously????
I’m trying to stay positive here. Appreciating the moisture and all, but could it please start coming as rain now, instead of sow? I mean, we’re still supposed to have highs above freezing, so you’d think we’d be getting rain, but apparently not. :-/
Anyhow.
While I was heating up water for the outside cats, I spotted some activity out the kitchen window.
Cheeky buggers! :-D
Actually, they’re using the paths we’ve dug out, since all the other ones have been left snowed in.
I think I spotted 11 cats outside this morning. I’m not sure how many are at the kibble tray on the ground.
Things got weird with Ghost Baby, though. As I was pouring out the kibble, she actually ran right up to me, then backed off an hissed… then ran up, then hissed, then ran up, then hissed… Very odd. Especially having her run up close enough to rub against my leg! As I went around to put kibble on the tray on the ground, she came up and went for the tray, then hissed at me, then went for the tray again.
While I was putting seeds out in the feeding station, I could hear the yowling of cats. I came around to see what was going on, and pretty much all the cats had run off – except Ghost Baby. As I came closer, she went around the side of the kibble house, so I checked on her. I held my hand out to her and she actually touched my finger with her nose – which had a spot of blood on it! – and hissed again.
We were almost out of deer feed and low on kibble, so I decided to make a quick run into town. After popping inside for a bit, I came back out to discover 2 skunks in the kibble house – and Ghost Baby in the space between the kibble house and the cat house, screaming at them! The skunks saw me and tried to run away, but Ghost Baby was in the way, and even batted at them. The poor skunks where in a pickle!
No surprise when Ghost Baby got sprayed. The skunks got by here, but I could see she had a big, yellow splash right across her chest.
It doesn’t seem to be bothering her. She wanted that kibble!
The outside cats typically have their kittens around the end of April or beginning of May. It is very possible that Ghost Baby is due to have hers within a couple of weeks, which may explain her behaviour.
Rosencrantz, Broccoli and at least one other cat – possibly Junk Pile – are looking very, very round, too.
There are going to be way too many kittens this year – though there is always the question of how many will survive long enough for us to ever see them. Beep Beep and Butterscotch always stuck close to home, even when we didn’t manage to catch them to have their kittens in either the sun room or our basement. The other cats won’t have their kittens in the cat shelter – it’s far to busy in there and used by too many cats. We’ll just have to see how many there are, probably around June.
I think Butterscotch will be very happy to NOT be pregnant this year!
Meanwhile, Potato Beetle is still being kept in the sun room, though he did make his escape while my daughter tried to get the loaded wagon through the sun room door while I carried the feed sack. We left him be while things got brought inside, then the girls put things away while I refilled the bins of kibble and feed. By the time I got outside again, though, I couldn’t see Potato Beetle. It took me a while, but I finally spotted him, rolling luxuriously in the snow, then going around marking his territory on some trees. :-D He finally came over for cuddles, and I was able to get him back in the sun room.
He still wants out.
Though he is still favouring his front left leg, he does seem to be better, and able to put more weight on it. Hopefully, it’s just a minor injury. We’ll find out when we get him to the vet on Wednesday evening (unless we get a call due to a cancellation).
Potato Beetle may be wanting out, but he’s also REALLY loving it when we visit him in the sun room. This cat loves his cuddles!
Now, if he could just learn how to use that litter box. This morning, I discovered he somehow managed to use a tall bucket to leave a “present” for me, without knocking it over. It’s going to be pretty unpleasant when it’s time to clean out the sun room, and we pull the swing bench out, because I’m pretty sure it’s behind there that he’s been making a mess. Until it’s warm and dry enough outside that we can empty the sun room and clean it out, however, we’re just going to have to put up with the smells.
*sigh*
At least it’s warm enough that we can open up the inner door to outside. The outer door lets in more sunlight, so it still stays pretty warm, but the window is open a few inches, so there’s at least a bit of air circulation.
Whether or not we’re getting another Colorado Low or now, we’re going to have to start using that sun room as a greenhouse for more seedlings, and today was the day for that.
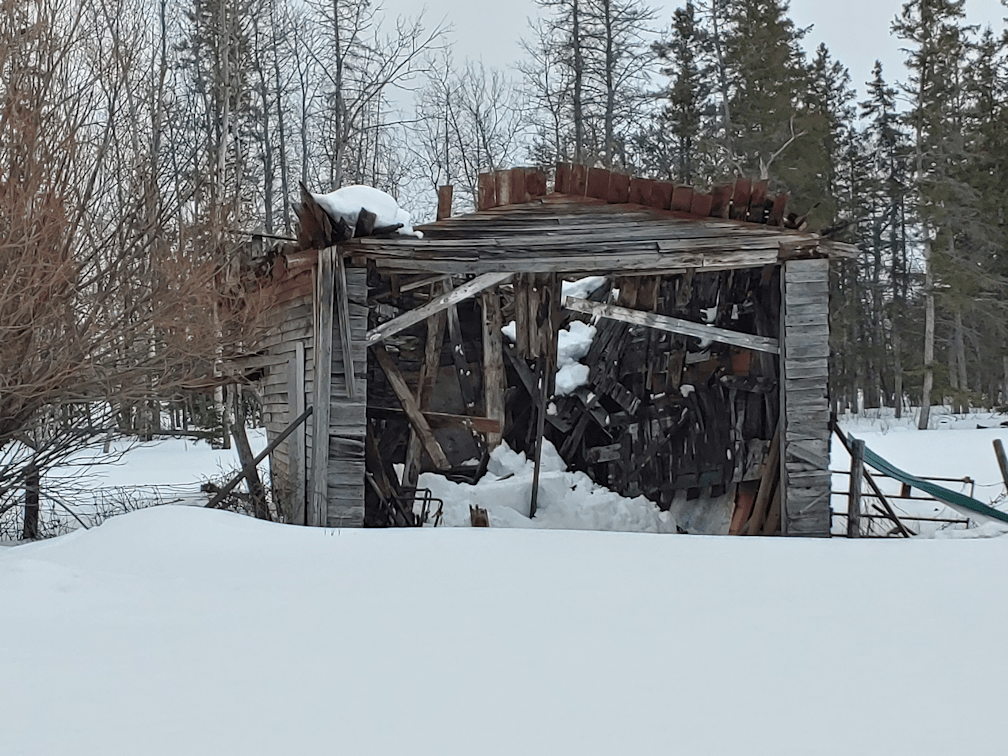
I hoped it would hold out a bit longer, but it finally happened.
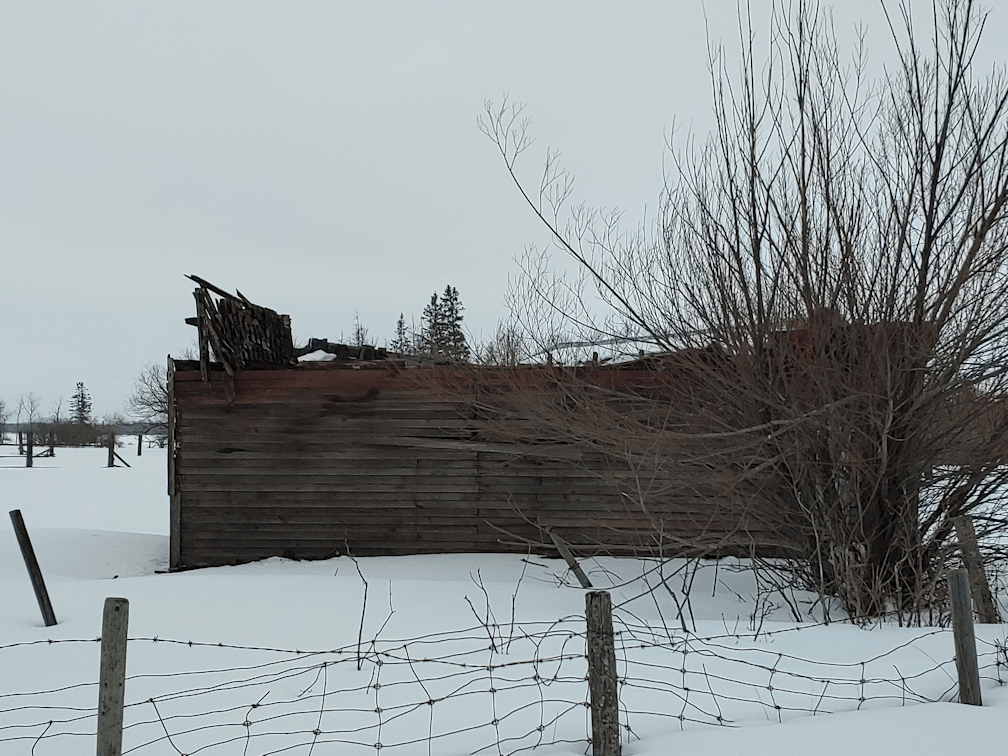
An old shed roof collapsed.
I spotted it when I headed outside to meet the pharmacy delivery driver.
Just look at all that snow!
The shed was mostly empty, with a few odds and ends in it. There were a couple of things I’d hoped to tuck away somewhere else before the roof came down. There’s a package of shingles that are useable, for example, and an antique plow I’d hoped to save. It might actually still be okay, as it was tucked pretty far into a corner.
When I showed the pictures to one of my daughters, her reaction was, “so that’s what that crunching noise was!” She’d thought it was from a vehicle and had gone outside to see if there had been an accident or something, but didn’t think to look at the shed.
This shed was among the things we wanted to actually get rid of, but I was thinking along the lines of after a new fence was built, from the barn to the road, so we could get rid of the fencing towards the driveway. The renter was talking about putting in new fences (part of the agreement in renting the property from my family is that he would be responsible for the fences) and I’d suggested the new fence line. If he does build new fences this year, and cuts through the old hay yard, that’s where we would eventually be planting more shelterbelt trees.
This past summer, I’d made a point of examining the shed from the inside, to see if it was worth trying to save. It wasn’t. The roof structure really didn’t have a lot of support, and there were already holes in it.
Now that the roof has finally collapsed, I want to dismantle the shed and salvage as much material as we can. The 2×4’s in the joists should still be useable, and I think a lot of the boards forming the walls should still be pretty sound. In fact, there might be enough material to salvage out of this that we can build a chicken coop. I’d hoped to be set up for chickens this spring, but we just don’t have the materials to build shelters for them. I can’t even figure out where we could put a cat proof brooder for any chicks we get.
I want to have a chicken tractor for use in the summer, so we can integrate chickens into our garden plans, but we would also need a permanent structure sturdy and warm enough for them to survive our winters. The old log summer kitchen my parents used as a chicken coop is not useable. I do want to replace the corrugated tin pieces that have come off, due to a tree being allowed to grow against it, and its branches tearing away at the roof. It’s the only log building that is still structurally sound, but it won’t be for long if we don’t patch up the roof. I would love to be able to clean out and repair it, but that’s a huge job we won’t be able to start for quite a while.
I think I can reasonably expect to salvage enough material from this shed to build a small coop – large enough for the dozen or so chickens that would be suitable for our egg laying needs – but not enough to also build a chicken tractor. However, one of the things I want to do is build mini-coops for our high raised beds that will allow us to set up a few chickens on a raised bed after it’s been harvested, to do their magic and leave their fertilizer for the next season. We’ll be making all our raised beds the same size, so that any covers we make will fit on any of them, whether a bed needs to have a plastic cover to act as a cold frame or protect from frost, a screen to keep the insects out, mesh to keep the critters out, or a mini-portable coop to keep chickens in!
So the roof collapsing on this shed will actually made it easier and safer to take it down, and we’ll be able to salvage materials out of it sooner than expected.
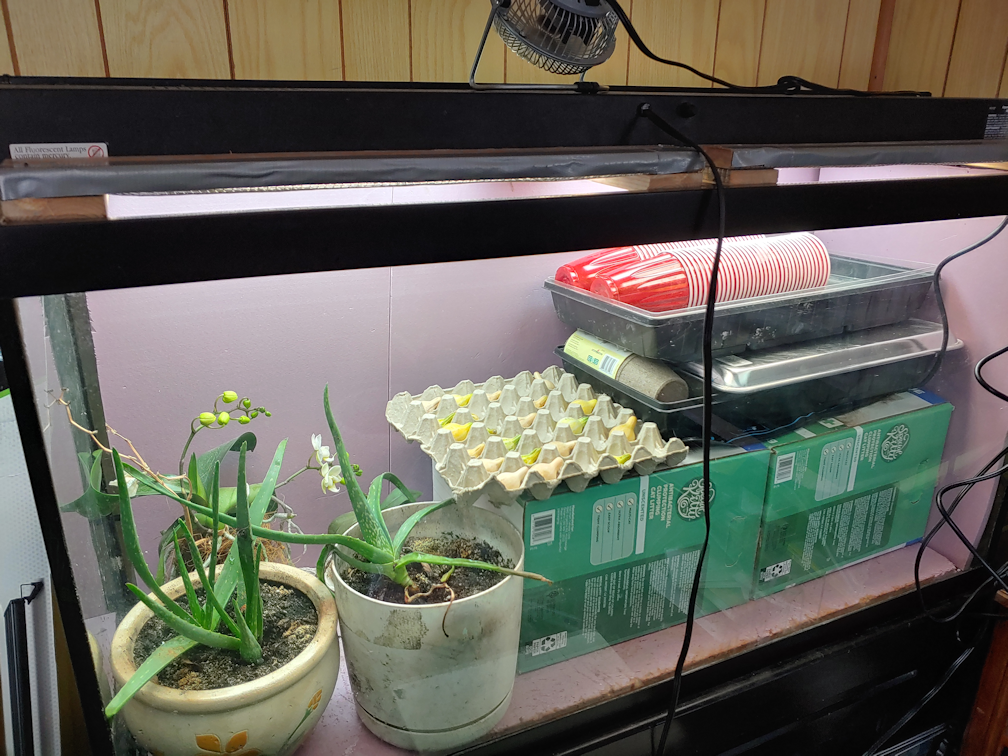
Last year, we converted two unused aquariums into greenhouses, where we hoped to protect our seed starts from the cats.
It mostly succeeded.
Today, I prepped the tanks for this year’s seeds.
The small tank – a 20 gallon tank – was a real problem with the cats last year.
Even when we pur the original hard cover back on at the end of the season, using the space inside to store the light, etc., the cats still got into it!
The foil around the back and sides were to provide reflective light for the seedlings. As you can see, the cats have torn up the foil, and even left scratches in the rigid insulation at the back!
Last year, we had tried using the lid that came with the tank at first, but the cats would reach through the opening for the water filter in the back, even if it meant fighting past whatever we put to block the opening. They managed to reach in and pull up the seed trays, anyhow. Having to block everything meant no air circulation, so what the cats didn’t destroy, mold did it’s damage. I finally rigged a window screen and that worked, though it was far too late to save the onions we’d tried to start in there at the time.
This tank will be for onions again. After seeing that onion seeds can be planted very close together, and they don’t really get transplant shock, I’m hoping to be able to get all 5 varieties of onions we have in hear.
The problem is the size and shape of the tank is too small to fit any of the commercial seed starting trays we’ve been using. I want to be able to water the planting trays from below, which meant having to find something to use as a tray for the water.
I decided to try aluminum oven lines. They are pliable enough to bend to size, and strong enough that I could fold corners without it tearing. It’s not deep, but it doesn’t need to be.
There’s still quite a bit of space left. If needed, I can fold up another tray and overlap them. I’ll just have to make sure they are attached to each other with a water tight seal. Or we can just use the doubled Red Solo cups again, and not need to have a tray under them at all.
Then the screen window was brought back into action as a cover. A pair of 5 pound hand weights get added to the back, in case a cat walks onto the overhang in front. The metal screen is strong enough to hold their weights. The heavier cats don’t try to go up there, just the tiny ones, so that has worked out. If necessary, we have more weight we can put on it. At some point, I want to build a screened cover to fit, but that’s not an urgent thing.
Since we can’t change the height of the light fixture, the egg cartons are being used to bring the seedling trays closer to the light, and can be taken out to lower the base as needed.
One thing we found last year is that this room is pretty cold, which is why we added the insulation around the back and sides. It was still difficult to keep it warm enough for the squash and gourds we had in there. Onions are a cool weather crop, so they should be fine in here, as far as the temperature goes.
Then there was the big tank to do.
I had to take out the biggest pot with an aloe vera in it to make space for the boxes that are being used to raise the seedling tray closer to the light. Previously, the boxes were under that sheet of insulation at the base to create a raised floor, but with the plants still in there, we can’t do that this time.
This is where we will be starting the luffa, and probably a few other gourds, at the same time as the onions. They will need the heat mat we got for under the seed trays, which is why they have to go in this tank. The mat won’t fit in the small tank. Right now, the mat is under all the trays and pots, so the weight can flatten it out a bit. There’s just enough room left to hold the curing Tennessee Dancing gourds.
At some point, we’re going to have to take the other aloe vera and my daughter’s orchids out. We’ll need the space for the tomatoes, eggplant and peppers, which are the next earliest seeds we need to start. After that, we will need space for the winter and summer squash. Hopefully, by the time they need to be started, we can start moving the onions into the sun room. The orchids (you can see one has started to bloom again!) are here because it was too cold for them to hang at the window in winter. The aloe is there to keep the cats from digging in the pots.
Which happened with the one pot I did take out, while I was setting things up in here! I caught Nicco, inside the barriers I put around the aloe vera. She’s so long and skinny, she snaked her way through the gaps! The little beast!
We had another, larger pot with an aloe vera in it in. It had been okay for months but, a few days ago, we came out to find the pot all dug up, and the only remains of the plant in it were a couple of leaf tips. We never found the rest of the aloe, and have no idea what happened to it! I’m sure we’ll find it, desiccated, under the couch or in a corner somewhere, months from now. :-D
As you can imagine, I’m not too keen on taking the plants out of the tank. They’re doing very well in there! But we won’t have a choice.
We have many things we need to start indoors, but a lot of them will have only a few seeds per packet used. Particularly with the squash and gourds. For the tomatoes, the paste tomatoes are the only ones we will be planting a lot of, since those are determinates being grown specifically for canning. The others are indeterminates and will be more for fresh eating, so we won’t need more than a few plants of each. We have enough varieties that, in the end, there should still be quite a few to transplant in the spring.
The other major thing we will need to start indoors will be the kulli corn, but those won’t need to be started until about the middle of May, at which point the sun room will be warm enough to use.
We are expanding the garden a lot this year, and will be expanding it more again, next year. I expect to be expanding it every year for quite some time. Which means that we will be needing lots of room to start seeds indoors every year. Until we are at a point when we can get a greenhouse or polytunnel, a goal of mine is to set up a corner in the sun room for starting seeds. We’d need grow lights, so that we wouldn’t have to constantly turn the trays for even sunlight, and we would need a heater sufficient to keep the room – or at least that corner – warm enough for germination. Or use more heat mats, but there is no outlet in that room. We are using an outlet in the old kitchen, with an extension cord running through a window to a power bar, right now. So warming the room would be more practical than using heat mats.
It’s funny. As we work on what we are doing this year, my mind is already on what will need to be done next year.
And the year after.
And the year after that…
As we work on things, we get a better idea of what plans we have will work, what needs to be modified, what needs to be re-priorities, or dropped entirely.
I don’t think we’ll ever reach the end of that process. Which is good, because figuring it all out is a bit part of the fun!
Yesterday, I decided to try making meat pies with an oil based crust again. The goal was to make mini pies, in muffin tins, perhaps, or just little turnover hand pies.
After my first attempt was a tasty fail, and my many searches for recipes did not turn up anything I found useful, I decided to try a hot water dough I’ve made many, many times before.
It’s from this cookbook.
Sort of.
I have this as a set of 11 English language books. Which is funny, because on the back there’s a sort of an index telling what categories of recipes are in which numbered book – and there are 12 of them. Some of them are split between two books. The reason is that this was originally published in French. As a set, it would have been 12 books. Which means that everything in the English language books are shifted over from how the contents are described on their back covers.
My late MIL had the original cookbook. Back in the day, in Quebec, they had a sort of recipe card subscription, where recipes were sent every month or whatever. However, this subscription sent chapters, and people could keep just the ones they wanted. The pages were sewn together. When all the chapters were sent out, the subscribers could then take all their chapters and have them professionally bound. That’s what my MIL had. It was a thick, hardcover book, with many decades of wear and tear on it. This was the book that had the base recipe for tourtierre, a traditional meat pie, that she used (except hers was modified for her own secret recipe, which was passed on to me). It was also where the base hot water dough recipe was from. Every Christmas, my MIL would special order her secret mixture of ground meat from the butcher, complete with “top secret” and “eyes only” warnings (my late MIL was a hoot!) from the local butcher. Anywhere from 20 – 30 pounds of it, depending on how many pies she planned to give away that Christmas. In the years we were living in the same province, we would spend a couple of days with them, making tourtierre, assembly line style. The first day was to make the filling, which then sat outside overnight to cool. The next day was to make triple-recipe batches of hot water dough, over and over. Each triple-recipe batch was set outside in the snow to chill, which did not take long at all, while the next batches were being made. I usually had blender duty to mix the hot water and shortening, then helped with mixer duty to combine the dough. My husband had the job of rolling the dough balls out between two sheets of heavy duty vinyl, and other family members lined the pie tins, filled and topped them. When baking started, she could only fit 3 pies into her oven at once. After coming out of the oven, they were given some time to cool, scattered around their condo, before being set outside to freeze.
So I became very, very familiar with that hot water dough recipe, even though I couldn’t read it very well in French.
I’ve been a fan of Mdm Benoit for many years, so when I found this set of cookbooks at a charity book sale, I snapped them up. I had them for a few years before I happened to look closely through the pie dough recipes and saw one that was very, very familiar. On a hunch, I found another section and, sure enough, there was the base tourtierre recipe from my MIL’s French cookbook. I had unknowingly found an English copy of it!
Now, this hot water dough recipe uses shortening, but it gets melted into the boiling water, so I figured to give it a try using oil.
So I dug out the appropriate volume, made the dough and…
Had another tasty fail.
The dough just crumbled apart.
I was able to roll the dough out inside pans, using parchment paper to be able to move the top, and still had to push it together because it was breaking apart so much.
While this second tasty failure was in the oven, I sat and flipped through the cookbook.
I found this on the very next page after the hot water dough recipe.
I should have known. I really should have. Instead of going through dozens and dozens of internet recipes, I should have just gone to Mdm Benoit in the first place.
I would never have thought to use milk instead of water. I also find it interesting that is specifies to NOT stir after combining the water and oil.
We don’t use waxed paper, but do have parchment paper, including non-disposable versions. Either would work to roll the dough out.
If I can get a working dough recipe, I plan on making a large batch of filling, then make lots of small pies that we can stick in the freezer for quick eats.
The next time we have something thawed out that will make a good filling, I will try this recipe and see how it works!
Meanwhile, the next time I want to try something to conserve ingredients, I need to remember that the internet is not my friend. I have dozens of cookbooks, even after purging so many of our books for the move *sniffle*. Many of them are very old. Those are my fravourites, because they have really basic ingredients, and don’t assume you have access to pretty much anything, at any time.
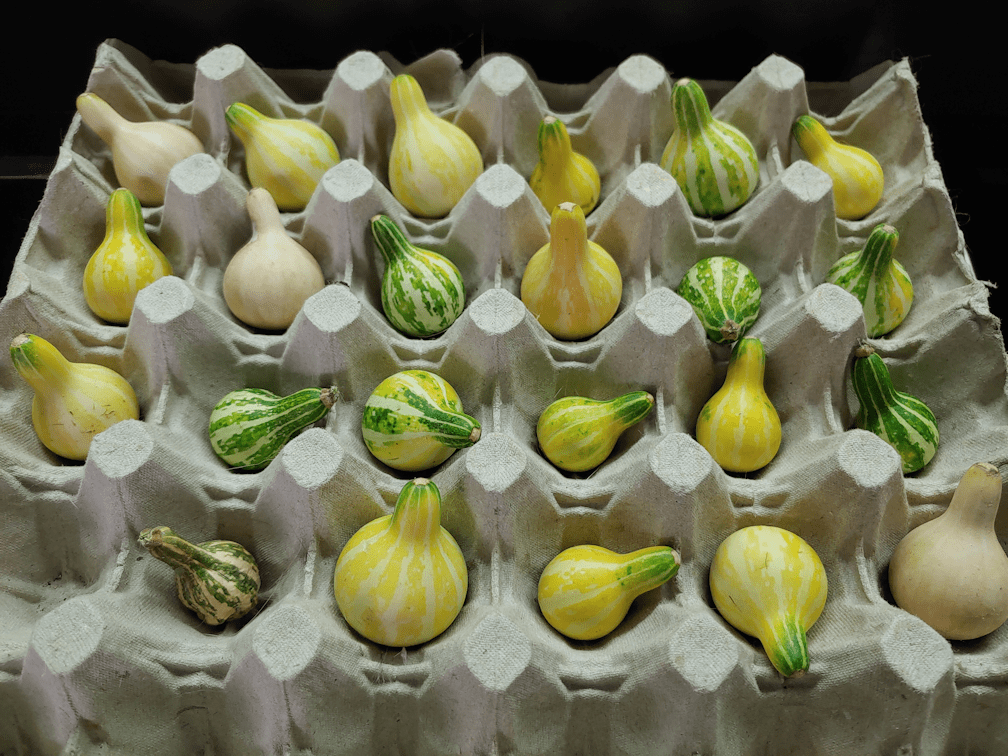
While watering plants today, I thought it would be a good time to post some pictures of how our Tennessee Dancing Gourds are drying out.
We have been using the big aquarium tank to protect some of our plants from the cats, and the gourds have been drying in there, too. Also to protect them from the cats, who love to play with them!
It’s awkward to water in there, and I didn’t want to accidentally spill water on the gourds, so I took them out and put them in the stack of egg trays I’ve got stored next to the tank. I don’t know why I’m keeping these, as we will NOT be using them to start seeds again. That did not work out at all. However…
… an egg tray turned out to be perfect for holding the gourds!
Here are all the Dancing gourds we were able to harvest for drying. There were many, many more on the vines that were too under developed to harvest.
Like this one was. This immature gourd withered as it dried.
This fully mature gourd shows how they change colour as they dry. It’s almost as dry as my finger tips!
Eventually, all of them are supposed to dry to this tan colour. It’s a bit of a shame, because their green stripes look so pretty!
This one looks like a bit of mold had started as it was drying. From everything I’ve read about drying gourds, this is normal and not a problem. When fully dry, they can be scrubbed and sanded.
Which is going to be a bit more difficult with gourds this tiny!
I moved things around inside the tank to fit the tray. Before, they had been just lying on the bottom, so they took up less space. We’ve got a tiny fan we found in the basement to maintain air circulation in the tank.
You can see one of my daughter’s orchids is going to be blooming again, soon! The one flower that is visible is actually completely dried out from the last time it bloomed.
I need to figure out what to do with all these plants, so we can use the tank to start seeds. Since there is no way to lower the lights, we put boxes under that sheet of insulation on the bottom, to bring the seed starting trays close to the lights. This tank has two light fixtures; the one that originally came with it, which lies flat on the top, and one that has stands on the ends to keep it several inches above the top. That one gets warm, and is one of Saffron’s favourite places to sit (along with the heat vents). :-D She’s so tiny, it’s not an issue, but we’ve caught her brother, Layendecker, on there, too, and he’s about double her size and triple her weight. It’s weird how Saffron has stayed so tiny – even Turmeric is finally starting to fill out a bit – while Big Rig quickly became larger than their mother, and Layendecker, who was probably the smallest of the litter, is now as big as Cheddar!
But I digress…
One of the reasons my daughter’s orchids are in here is because it’s warmer. In the spring, it’ll be warm enough to hang them in front of a window again, but we’ll be needing the tank to start seeds long before then. One of them is small enough that we could probably keep it in the tank after raising the floor higher, but I am not so sure about the bigger one.
The aloe vera, however, will need to come out. We have all sorts of places we can put them, but Cabbages in particular is absolutely dedicated to digging into the plant pots. We’ve been able to create barriers to protect other plants. With one pot, we had to build a cage around it out of hardware cloth, and sometimes I can hear a cat trying to tear through. Which cat it is, I have never been able to find out, since they run off when I come out to check, but the girls and I have caught Cabbages sitting on top of the cage! I’ve seen Tissue trying to climb the cage, too. That Jade tree would have been destroyed long ago, if we hadn’t put that cage around it! Another Jade tree is so big, it covers its pot and protects itself, but we’ve not been able to create a barrier around these pots that the cat’s haven’t been able to get past, and they’re too big and heavy to hang.
Frustrating.
Anyhow.
When I put the gourds back in the tank to dry, I kept the wizened one to see what’s inside.
The answer is, nothing! It was so immature, I don’t see any sign of developing seeds.
Cutting it open felt a bit like trying to cut a dry, crispy sponge on the inside. Even the outer shell around the widest part felt like cutting through a brittle, rigid foam. It was practically weightless, too.
I haven’t decided what to do with the dried gourds, but I am thinking of cutting open at least the largest one to harvest the seeds. We do still have seeds from last year, so it would be interesting to compare germination rates.
They are so adorable! I look forward to growing more of them. :-)
For at least a decade, there has been an increase in people who have decided to move out of the cities, get themselves an acreage, and live as self-sufficiently as possible.
Which is basically, how I grew up.
Things have really changed, though, and modern homesteaders have a lot more resources, options and choices than was available when I was a kid, 50 years ago, never mind what our pioneers had. I found this very encouraging to see.
A couple of decades ago, while part of an online homeschooling support group – pre-social media, when everything was by email (and dinosaurs roamed the earth) – I often saw people waxing poetic about how we all need to go “back to the land”, and live these organic, subsistence lives, and all our food would be free and we would barter for everything else, and so on. It had a lot more to do with ideology than anything else. Going back to the farm was a dream of mine since I moved away in my late teens, so I could appreciate many of the sentiments they expressed. Unfortunately, this romanticized view was wildly unrealistic, and I found myself trying to remind people that there are reasons people, including farmers, moved away from that life.
Most of them didn’t get it.
Once we moved to the farm, 4 years ago, in a caretaker role, how things were done when I was a kid just wasn’t an option, and I’m quite okay with that. Most of the land is rented out, so we just have our corner to work on. My mother had a massive garden that had been slowly neglected for many years, as my parents retired from farming and age reduced their mobility, no matter how much my siblings tried to help. We can finally work on our dream to be as self-sufficient as possible, but we have to do a lot of things differently than how we did it when I was a kid.
It was in researching this that I found this dynamic and growing homesteading community. These were people who may have gone in starry eyed, but were also realistic and determined, and they were making it work. The aging hippies I couldn’t get through to all those years ago, with their ideological blinders, could never have done what these awesome people were doing. It was very exciting!
Then, the last couple of years happened.
As people saw their jobs disappearing, their livelihoods destroyed, prices skyrocketing, and government restrictions stifling people’s ability to do some of the most basic things, a lot of people are suddenly having real concerns about being able to feed themselves and their families.
During WWII, governments actively encouraged families to grow Victory Gardens, and even gave out information and resources to help people do it. That sort of thing isn’t happening now. Instead, we are having to rely on each other to figure out how to grow what, for too many people, are literally survival gardens.
Whatever your reasons for wanting to start growing as much food for yourself as you can, I heartily encourage you! You won’t get any sermons or lectures from me. I do hope that I can, at the very least, provide some information and inspiration.
Start where you’re at
Your circumstances are going to be unique to you. If you’re already on an acreage, great. If all you’ve got to work with is a hall closet and some makeshift grow lights, great. You can start where you’re at, even if it’s just poking some holes in a bag of potting soil to grow some greens in a sunny window. Little by little, it’ll get done!
What I will be sharing here is going to be geared mostly to people living in colder climates – and by that, I meant Zone 2 or 3 (depending on what Canadian zone maps are being used, we live in either 3a or 2b).
I will add one thing I’ve heard quite a number of very experienced, prolific gardeners say. If they had to depend on their gardens for survival, they’d starve! It takes a lot to grow enough food to actually provide enough for even one person to last from preservation to the next year’s harvest, and it will still need to be supplemented with other things. I’m still somewhat amused and perplexed by my mother trying to lure us out here by saying we could grow a garden and not have to buy groceries anymore. Even as big as her garden was, plus having chickens and cows, sometimes pigs, turkeys and geese, a root cellar and lots of canning and freezing, we still had to buy groceries.
So you’re still going to need to buy stuff. Hopefully, just a lot less!
With that in mind, as you plan what to grow in your own personal survival garden, here are some things to consider when making decisions.
Grow what you will eat.
I’ve looked at so many lists out there, for things like what to grow to feed a family for a year, or what to grow in your climate, and so on, and frankly, a lot of stuff on those lists are foods I just don’t like. Others, I can’t eat. There are four of us in our household, and we have very different tastes. Which means that our focus will be more on growing things all of us enjoy eating, then including smaller amounts of things only one or two of us like to eat. As wonderful and appetizing as I find tomatoes and bell peppers, they both make gag, but two people in our household enjoy eating them, and all of us can eat processed tomatoes. Now, those two people REALLY like their tomatoes, so growing more of those than peppers for fresh eating makes sense, as well as growing a lot of tomatoes that are good for making tomato paste to last us for months. It’s a sort of juggling game.
Try new things
What we find in the grocery stores is there because those varieties can handle large scale growing and transportation. When you’re growing your own, you can have a lot more choices. This is a time to grow new varieties of things you know you like, and if you have the space and resources for it, grow something you’ve always wanted to try, but couldn’t for one reason or another. Which kinda ties in with my next point to consider.
Grow at least one thing for fun
Yes, growing food to ensure your family has something to eat when times are tough is serious business. The whole point of the list I’ll be presenting to you is to be able to get as much bang for your buck as you can. At the same time, growing something just for fun is a great morale booster. As you go through what various seed companies and nurseries have to offer, you’re bound to find something that just puts a smile on your face. If you have the space and resources for it, go for it!
Keep in mind your region, climate and particular circumstances.
While the zone maps are very handy, that doesn’t mean there aren’t exceptions. There are things my mother successfully grew in our Zone 3 that were rated at Zone 5. She didn’t even doing anything different for them, either! This is a good time to find and get involved with a community of people in your region and zone, online or off, to learn from. If you are growing outdoors, look at what is rated for your zone, but also consider whether you can create microclimates. If you have only a balcony or patio, there are lots of places where you can learn about container gardening or vertical gardening. If you are growing indoors, there are resources geared specifically for that.
Storage and preservation
If you’re growing food to feed your family, and trying to grow as much as possible in your space, it’s not going to be much good if you grow more than you can eat, but can’t preserve it! There are many options available; freezing, dehydrating, water bath canning, pressure canning and even freeze drying, if you can afford the machine! You might even be able to create a root cellar in some corner of your home. Refrigerator pickling and fermenting are options, if you don’t have canning equipment.
If you’re going to store and preserve food, you’ll need somewhere to put it. What methods you have available to save your food will help you decide what makes the most sense for you to grow.
Things will go wrong. Do it anyway
One thing that is going to happen is, there will be failures at some point. It’s inevitable. Sometimes, you’ll make a mistake. Sometimes, there will be circumstances completely out of your control. It happens. The beauty is, you can still fail “up”. Honestly, you’ll probably learn more from the failures than the successes! Of course, it’s always a good idea to learn from others as much as you can to avoid failures, but it’s still going to happen. Since being here at the farm for 4 years, and only gardening for 2, we knew we were trying to grow in far from ideal conditions, and had some setbacks, yet we still managed to have food from our own garden that we could enjoy.
When it came to making a list of things that might work well in a survival garden, I looked for things that could be grown in colder climates, had high yields, and could be stored or preserved, while also keeping time in mind. So let’s start with the fastest growing things, first!
There are quite a few things that can go from seed to plate in less than a month. Some in less than 10 days! Micro-greens and sprouts can be grown very quickly, can be grown indoors in trays or jars, continually throughout the year. Many seed companies now has sections for sprouts, and quite a variety of things can be grown for their sprouts. Many sprouts can be grown in jars – alfalfa, mung beans, lentils, radishes, and more. Gelatinous seeds, such as flax, chia, cress, arugula and psyllium, can be sprouted in trays. For microgreens, you can try beets, swiss chard, broccoli, cress, peas, radishes and sunflowers.
If you want to give things a bit more time, leafy greens such as pretty much any type of leaf lettuce, spinach, chard, kale, bok choi and radishes can be grown and harvested very quickly. Many of these don’t like heat much, so they can be planted outdoors early in the spring and sowed successively until the heat of summer, then sowed again for a fall crop.
These quick growing plants are nutritional power houses, but they don’t have a lot of calories. They’re not going to keep anyone going for long, so it’s good to think of these as a supplement, and something that can provide nutrition until other foods can be harvested.
Short term
By “short term”, I am talking about the things we typically think of in our annual vegetable gardens. These are things that can take a few months before you can start harvesting anything, and can potentially keep feeding you and your family throughout the winter, with proper storage and preservation.
Root vegetables: carrots, parsnips, beets, radish bulbs, turnips, rutabagas… there are many to choose from, and many varieties of each! Stored properly, they can last for months on their own, but they can also be pickled, pressure canned, frozen, and dehydrated. With these, they are one seed, one plant (except beets; their seeds are actually clusters of seeds), but they produce so many seeds, most packets will provide more than needed for a typical household.
Bulbs and tubers: potatoes, sunchokes/Jerusalem artichokes, sweet potatoes – yes, there is a cold hardy variety of sweet potatoes out there! – bulb fennel, celeriac and more.
There are many varieties of potatoes, some more prolific than others, and some better for storage than others. A good source of seed potatoes will give that information. Potatoes also come in determinate and indeterminate varieties. Indeterminates are good for potato bags and towers, while determinate are good for hilling or Ruth Stout growing methods. Sunchokes will grow in just about any type of soil, and can be so prolific, they are sometimes considered invasive.
Special mention: the alliums are excellent bulbs to grow, but tend to require a lot more time, unless you are starting onions and shallots from sets, or spring garlic. Hard neck garlic needs to be planted in the fall, while onions and shallots from seed – which gives a lot more choice in varieties – need to be started indoors very early. In my garden groups, I’ve found Zone 3 gardeners that start their onions from seed as early as January! Onions also come in long day and short day varieties. If you are in a northern Zone, look for long day varieties. Of course, some varieties store longer than others but, properly cured and stored, they can last a very long time! Onion greens can be eaten as the bulbs mature, and hard neck garlic produces scapes that need to be removed to produce bigger bulbs, and they are delicious, making them dual crops to grow.
Summer squash and zucchini: There are many varieties of summer squash, and they all tend to be quite prolific. Just a couple of plants can provide plenty of baby squash that mature fairly quickly, and if they are left to grow larger, some varieties can be stuffed and baked. Most summer squash start to get tough as they get larger, and are not a storage vegetable, but they can be pickled, canned, frozen and dehydrated. Zucchini is a bit of an exception, in that it can be used as both a summer squash while small, or a winter squash if allowed to grow to full size.
Winter squash and pumpkins: These are squash that can grow to sometimes colossal sizes, but there are also varieties that are small, fast maturing and very prolific. Once they reach maturity, the fruits are cured and can be stored for the winter months. Some varieties reach their best flavour after weeks or months in storage. They can also be frozen, canned, shredded and dehydrated.
Legumes: there are few vegetables out there that provide more bang for your buck than legumes! Especially beans. Bush beans can be grown for their pods, and when they’re done producing is about when pole beans are ready for harvesting, and of course there are shelling beans, which are grown for their fully mature and dry seeds. Peas, chick peas and lentils can also provide a lot of food from just a few plants. Dried legumes, stored properly, can last for years, making them one of the most efficient foods to grow.
We could fit about a hundred of these tiny Spoon tomatoes into a single Red Solo cup.
Tomatoes: tomatoes are a fruit that deserve their own category. The varieties available is staggering! However, if you are looking to get the most pounds per plant, look at growing a mid sized variety. Aside from fresh eating, they can be frozen, canned or dehydrated on their own, or be used as an ingredient for sauces and salsas, and so much more.
Cucumbers: As with tomatoes, there are a really amazing number of cucumber varieties available, but most fall into one of two categories; slicers, for fresh eating, and picklers, for preserving. They all tend to be fast growing and very prolific, too.
Peppers: I wasn’t sure about including peppers on this list. They are excellent producers, but growing them in our colder climate seems to be touch and go. I’ve heard from people who have had great success with them, while others have tried for many years, but have never had a harvest. Peppers can be canned, preserved in oil, frozen, dehydrated, pickled and made into relishes.
While being able to grow food quickly is important, it is also useful to consider the long haul. If you have the space for it, there are things that may take several years before they begin producing, but once they do, the harvests will be bounteous!
Asparagus: asparagus can be grown from seed or you can buy crowns to transplant into trenches. It can take three years before they can be harvested, and even then, for the first year or two, harvests should be minimal. Once they are established, however, asparagus will keep producing for up to 20 years!
Raspberries, currants, gooseberries and haskaps: Haskaps are the new berries on the block, and are exceptionally cold hardy. They require male and female plants to produce, and can potentially begin producing berries in their first year. Raspberries are available as regular cane (new canes produce berries in their second year, then die back) or primal cane (new canes produce berries in their first year). Choosing varieties that mature at different times can give you fresh berries for months. Currants and gooseberries, once established, can produce fruit for many years. Berry bushes can provide a great deal of fruit per plant. Along with being used fresh, frozen or dehydrated, as well as made into jams and jellies, they can be used to make vinegars, syrups and wines.
Grapes: yes, there are Zone 3 grape varieties. I’ve even seen a Zone 2 variety. Grape vines are very long lived, and have the potential to provide fresh and frozen fruit, jelly, and wines for many years.
Hedge bushes and trees: There are a number of larger berry bushes that can double as shelter belts and natural boarders. Some, like sea buckthorn and bison berry, do well in poor soils, and while they may be considered invasive in warmer climates, they tend not to be, in our Zone 3. The Rugosa rose produces large edible hips, and their flower petals are edible, too. Saskatoons are a more of a tree than a bush, and absolutely delicious. Chokecherries produce many berries, but are better used in syrups, vinegars, etc. than eaten fresh. Many of these will provide enough berries not only for your own use, but for birds as well!
Now we’re really going for the long haul! Here, we are looking at things that can take five or ten years before they start producing food – but once they do, they will continue for decades to come.
Fruit trees: there are a remarkable number of fruit trees that can grow in colder zones. Apples, pears, apricots, cherries and plums can all be grown here. While a single mature tree can provide enough fruit for the entire family, many need to be planted with a pollinator, which can be a different variety.
Nut trees: there are not a lot of nut trees that can grow in Zone 3, but some, like the Korean Pine, are hardy to Zone 2! Hazelberts and beaked hazelnuts are also very hardy. Others, such as the black walnut, can grow in Zone 3, but the nuts may not have enough for a growing season to fully mature.
Okay, so all this is a lot more than just a “survival” garden, but we all start somewhere, right? :-) Little by little, it’ll get done!
I hope you find these useful in working out what are the best things for you to start growing in your own particular situation.
For those who have already been doing this for a while, please feel free to leave a comment, sharing your own experiences. What worked best for you? What didn’t work? Is there anything you would tell someone who is just starting out now? Let us know!
My husband was able to bring food and water to the cats this morning. He found the heated water bowl had been knocked over again, even with the improved set up. Which means, of course, it is unplugged again. It’s just too close to the entrance of the cats’ house.
When I headed out later and went to put bird seed out, I found this handsome bird watching me!
Tuxedo Mask has such owl eyes, too! :-D
It’s rare, but he does sometimes let us touch him. More often, if I hold my hand out for him to sniff, he tentatively bats at it, instead. :-D This morning, however, I had a lovely surprise. Chadicous (I think) kept flopping onto the snow in front of my feet while I was trying to move around, pausing to pet Agnoos and Nutmeg. I’d reach out to Chadicous and he’d move away a few inches, before flopping on the ground again.
Then I got him!
Before he had a chance to move, I was able to start skritching his ears. Not only did he stay and let me keep skritching for a while, but he was actually purring!!!
Yes, progress!
As I continued my rounds, I went into the garage and did some digging. I found the extension cords we use to plug in our van, and the old one that used to be inside my mother’s car, to plug in the block heater, battery warmer and trickle charger, set up under the hood. Her old one got replaced because it was damaged, but I half remembered having an extra.
I was right. Not only did we have an extra cord that was only 8 ft long (still longer than I need, but better than the next size up we have, which is 30 feet!), but I could see no damage to it at all. I brought it to the house and asked my husband to check it for me while I finished my rounds, and he tested it out, too. It’s one of those that has a light in the female end to show if there is power on or not. It is in perfect working order, and has no damage.
Which means we have a suitable, safe extension cord we can set up inside the cats’ house, long enough that I can run it along the frame, away from the straw bedding and any gnawing teeth, up to the entry. We will then be able to reach the plug through the opening, instead of having to lift the roof every time. When my daughter and I opened the cat house to plug in the water bowl yesterday, I discovered it moving away from the wall near the hinge on one side. That roof is very heavy, and the shelter is pretty old. One of the pieces of wood in the frame had split, right near the corner. After we were done, I added a couple of screws from the outside to stabilize it. When we open it again today, I’ll give it another look and see if I should add more.
Once that’s done, we will no longer have to keep the heated water bowl so close to the entry, and can have it directly the ground.
There’s always a little something, when I do my morning rounds! :-D
My husband had been able to take care of the cats earlier, so when I got out, I just have to put out feed for the birds (and deer). By the time I came out, however, I found the new heated water bowl had been knocked over. There had to have been some sort of altercation at the entry of the cats’ house, because even the brick supports around it had gone flying, and the power cord to the bowl had been pulled out.
Not only was the new bowl empty, but the water in the other bowls was frozen solid!
Something better had to be found.
I quickly went to feed the birds, thinking about it, and noticed the chimney liners along the side of the house. Since cleaning up the pile behind the house, we’ve been using these to hold the insulation that gets put around the house every winter.
They were just the right size and shape. Was there one we could spare?
Not on that side of the house, so I came back around and looked at the ones along the back of the house. We have other things set up against the house to help keep the insulation from being blown away, so I was able to find one that looked like we could spare.
It’s the perfect size and shape!
The bowl is so big, I added bricks as spacers between it and the shelter. The cats immediately were all over it, until I refilled the other water bowls, too. They were very thirsty!
We will have to plug the bowl back in later, once there are two people available. With the snow accumulation, the counterweight doesn’t quite reach the ground, so one person has to hold up the roof while the other does what needs to be done, inside. When we do our monthly shop, we’ll pick up a short, appropriate extension cord that can be safely used, so we can at least not have to worry about the cord being unplugged. Not too short, though. I want to run it along the frame of the shelter, just under the roof, so there will be no issue with the cats knocking it about, and no critters chewing on it.
Thanks to my daughter digging out more paths, I was able to get at the back of the garage and the outhouse. To clear access to the outhouse, my daughter had to break up that fallen piece of tree. It was warm enough to no longer be quite frozen to the ground, but that’s as far as it’s going to be moved until, most likely, spring.
When switching out the memory card in the trail cam by the new sign, I noticed these tracks. Something had walked towards the corner, stopped, then turned around. At first, I thought they were foot prints, they were so big. That didn’t seem likely, given the piles of snow from the plow. Not even our vandal is that dedicated to causing problems! The question was, did whatever made it go far enough to trigger the motion sensor on the trail cam?
The answer is, yes!
Would you look at that majestic beauty!!
While doing my rounds and seeing deer tracks, I had been noticing some hoof prints much larger than the others. I’d say, we’ve captured the beast that made them! And what a handsome fella he is!
I’m pretty sure we’ve been seeing this same buck visiting our place since we moved here. If it is, this would be the fifth winter of visits from him. :-)