Bitter cold, and it’s the little things that are going to do us in!

I am SO glad I was able to get the big shop done yesterday!

The temperatures were expected to go down over the next while, but still be just below average. Of course, the forecasts change constantly it still wasn’t by much.

Yeah, well… this is what we were at this morning.

Just in case the image isn’t loading for you, just after 8 this morning, we were at -31C/-24F, with a wind chill of -41C/-42F Our high of the day is still supposed to be -20C/-4F, which is actually our 30 year average low for the day, but the record low is -36C/-33F, so it’s still well within the norm. Will we actually warm up that much by this afternoon? I sure hope so, because we need to go into town! As it is, I cut my morning rounds down as much as I could, basically just making sure the outside cats had food and warm water, and that was pretty much is. I only counted 19 this morning. Most were in the sun room, but the ones outside were actually dancing around with their paws from the cold!

I’m really not looking forward to tomorrow morning. We have a vet appointment at 8:30 am, and it’s supposed to be about -28C/-18F at that time. Any wind chill on top of that will be brutal. We’ll be using the van for this trip because, for all the problems it has, it still handles the cold better than my mother’s car.

Speaking of handling problems, I finally got tired of one annoyance last night and did something about it.

I added string lights near my door.

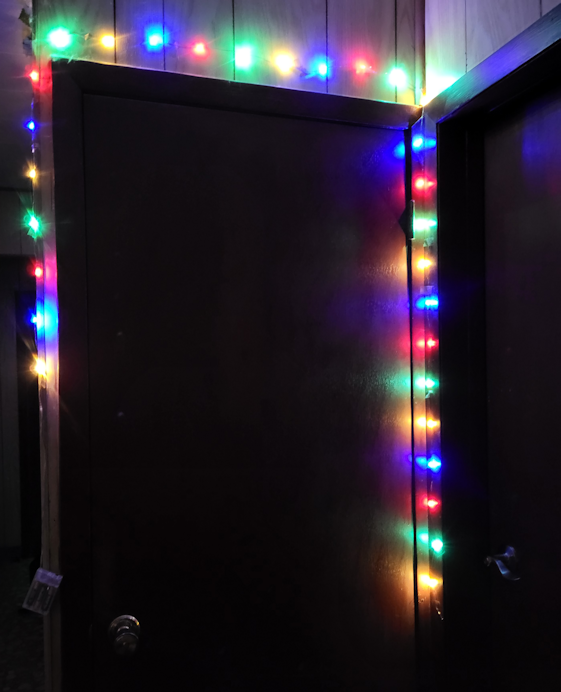
This corner has the door to the old basement, and the door to my office/bedroom, and it is always really dark. It’s not too bad during the day but at night, even with string lights around the mirror hanging opposite my bedroom door, it is ridiculously dark. Usually, that results in tripping over or stepping on a cat at my door when I try to go in. Yesterday, it was an annoyance when I kept having to go into the old basement to check on things.

Also, those stairs really, really suck. And not just because my knees are shot.

The set of string lights I had on our Advent wreath got missed when the Christmas decorations were put away, so I added batteries and taped it around the basement door. It’s bright enough that I can now see the door handles, and even grey or black cats on the grey mat under my door (to protect the floor from their scratching).

As for why I kept having to go into the basement: noises.

Too many out of place noises.

Our well pump, every now and then, makes a vibrating noise when it starts. Of course, it stops by the time I get down to check it, and everything looks fine, but it really bothers me. At least it doesn’t make the grinding noise it used to. We have figured out that it would do that when too much water was being used at once, such as if the water for the shower was turned on too full. The pressure tank was being emptied faster than the pump could refill it, so it would start grinding. It means less water pressure while we are taking a shower, but that’s a small thing compared to burning out our pump and losing water completely. The vibrating noise is something else, though, and I can’t tell if it’s coming from the pump or the pipes to the tanks. Nothing has changed down there, though, so there is no obvious reason for it to start making that noise. It also seems to be a winter/cold weather thing, but I have no way to tell.

The pump has been going off more often, too. Even when no one is using the water, I would hear it start up. Some nights, I’ll be awakened because it’s turning on again. I’m the only one who can hear it, since my husband sleeps with a CPAP, which makes just enough noise to drown most things out, and the girls are on the second floor.

The problem is usually the toilet.

Ultimately, though, the source of the problem is our water. It is so full of iron and minerals, it’s messing things up. We’ll need to get a plumber in to fix the bathtub taps because the build up is getting so bad, the hot water tap leaks, even if only the cold water it turned on! When the plumber was here to clear the drain to the septic tank for us, he did take a quick look to give us an estimate, and he thinks he can fix it, rather than have to replace it, but we’d have to take off and replace the tub surround, since that’s the only way to access the taps.

It’s the toilet that is having more problems now. There must be quite a buildup inside the refill hose, as hardly any water flows through it, and it’s taking longer and longer for the tank to refill. The entire inside, which is lined with Styrofoam insulation, is coated with iron, which is also interfering with the flap. Sometimes, after flushing, the flap doesn’t seal right, so the tank keeps draining about as fast as the water is flowing to refill it, so the tank simply doesn’t fill. Unless someone happens to use the bathroom soon after and notices it – because there isn’t enough water to flush! – it’ll keep going for hours. Which is how I end up being awakened by the well pump going off repeatedly during the night! All that needs to be done is to give the lever a wiggle; the flap will settle in place and the tank will finally start filling. Looking at the parts and pieces, though, what I’d really like to do is simply replace all the innards. It’s all so coated with iron and minerals, that would probably be the best way to not just solve a couple of small problems, but keep them from happening again for a long time.

Which leads me to another little problem we’ve been having, thanks to our water quality.

The bathroom sink.

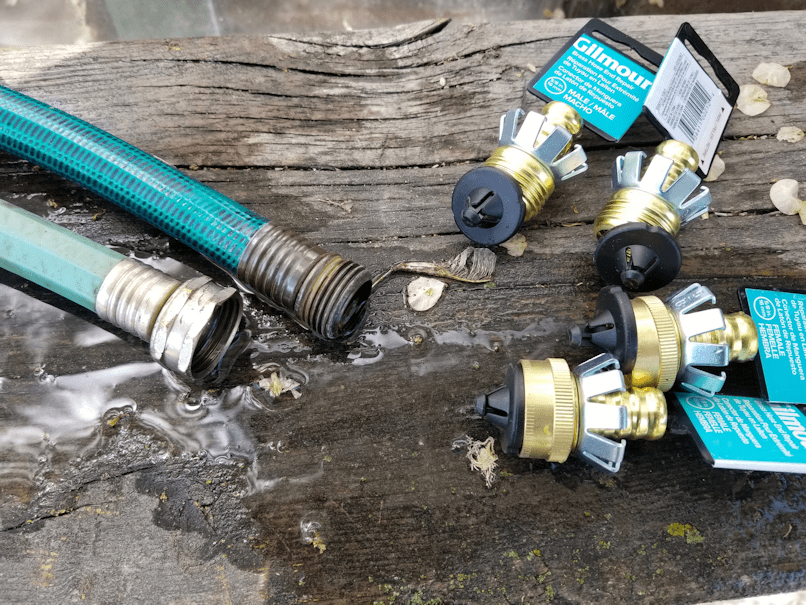
This still has the original tap and faucet set, from the mid 70’s or so. When the water flow starts to get bad, we usually just unscrew a piece from the faucet, give the parts a scrub, then put it back. If it’s really bad, we’ll soak the pieces in CLR for a while. The problem just kept coming back faster in between cleanings, though, and getting worse.

Last night, I had the pieces soaking in CLR again, but when I put them back, the flow was even worse than before the soak and scrub. I gave it some extra scrubbing, but that made things worse again, not better. I tried clearing the openings more directly but, again, it just got worse. When I put it back in place and almost no water could go through anymore, I had to do something more drastic! I took the part in question (I don’t know what it’s called) over to my craft table and tried to clear the holes with a pin. Which worked on one side, but not the other.

After much fighting with it, I managed to separate the pieces.

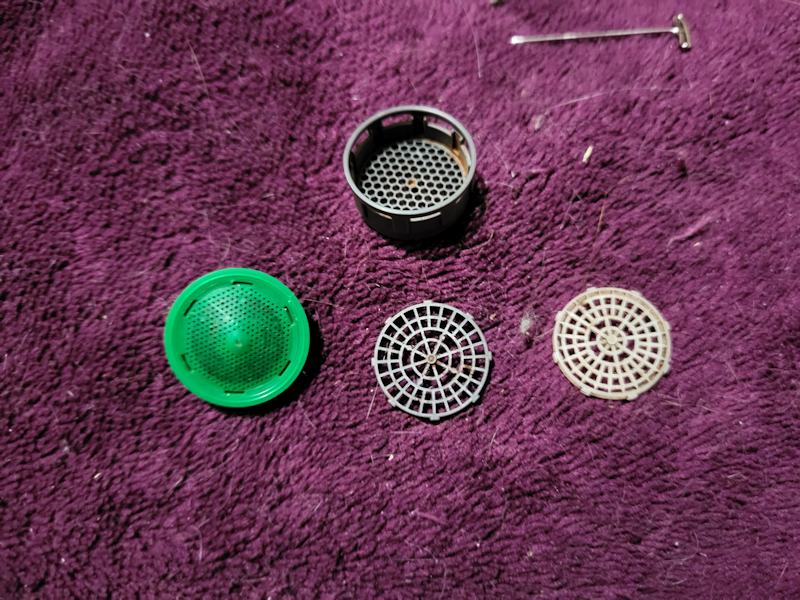
The grey piece at the top of the picture wasn’t too hard to clean. Especially when I was eventually able to get out the two other pieces inside. It was all so full of rust and gunk, each layer needed to be cleaned before I could get the next one out. The openings are large enough, the T pin I was using had no problem clearing them of scale and rust.

The real problem was the green piece.

The conical part you can see, with the fine mesh of holes, was still clogged. The holes on the bottom are even smaller, much fewer, and barely visible. I cleared them with a pin as best I could, but it was just not working well.

Eventually, I did get it to the point that the conical part started spinning around. Only then could I figure out where the pieces came apart. After much fussing – and the use of a tiny screwdriver – I was finally able to pop the conical part off.

Well, no wonder we were having problems!

Note that this is AFTER multiple soaks in CLR.

After wiping them down, I set the conical part aside to soak in CLR again, while I used the pin to clear the holes in the other part – holes that are much larger on the inside than the outside! Eventually, I got it to the point that I could see through all the holes when I held it up to the light. Not all the holes you see in the photo go all the way through. There’s just the circle of holes around the outer edge, plus another circle of holes half way to the centre.

Then I took the pin and cleared every last hole in the conical part.

By the time I was done and everything was put back together, it was 2am.

One of my daughters happened to be using the bathroom, so she put the newly cleaned part back together with the other parts and screwed it all back into the faucet for me.

Then we stood there and watched in awe over how much water was flowing through, as we let it run to make sure there was no CLR residue left. It hasn’t flowed this well in decades!

Now, if we could just get the toilet tank parts to flow as well!

At least this was a small thing we could take care of ourselves. There’s another new thing that is stressing me out.

The furnace has started making noises.

Of course, with this cold, the furnace is turning on more often, and staying on longer. This house is not very efficient, either, so we lose heat quickly. For all the time the furnace is on, the upstairs is still very cold. There’s only one heat vent for the entire second floor, and the girls have not noticed any real difference since the roof was done. Ah, well. It would have been nice!

Last night, I kept hearing the furnace turn on and start making a strange vibrating noise which – like the well pump – would stop by the time I hobbled my way down the basement stairs to check it.

I ended up turning the thermostat down, so at least the furnace would turn on less frequently, and not stay running as along. Oddly, after I did that, the vibrating noise seems to have stopped completely! Which doesn’t make any sense at all.

What we need to do is get someone to come in and give it a check, and do any maintenance stuff it needs. The problem is, we need to set aside funds for a replacement vehicle. Funds that would normally cover the cost of such irregular expenses. It becomes a battle of priorities over the dwindling “unallocated funds” part of our budget, since rising costs for everything else keeps chipping away at that, too.

It’s all these little things that are going to do us in. The well pump. The septic. The furnace. The taps. The toilet. The lights. The outlets. etc. All these accumulative things. Yes, it’s an old house. This sort of thing must be expected. Especially since there’s very little of this that we can do ourselves, and our resources are so limited.

So we try to focus on the stuff we do have control over, and juggle the budget to find ways to pay people to come in for the stuff we don’t.

The crazy thing is, a significant portion of these problems are caused by our water. It’s simply to loaded with iron and minerals. What I’d like to do is add a filter to the line going into the well pump. A simple filter would extend the life of all sorts of things! There are types that can be cleared without having to open it up to change filters, which would require re-priming the pump. Adding a filter is not going to be done until the pump is replaced, and we’ve already had three plumbers not want to do that (my brother already bought a new pump and all the fittings) due to the risk of the foot valve, at the bottom of the well, disintegrating and losing our water completely. That would turn a job of a few hundred dollars into a job of several thousand dollars, because of the set up we have, and the lack of availability of parts we would need. The valve itself is cheap. It’s all the other stuff that would have to be done to get to it that gets expensive!

Yup. It’s all those little things. They sure do add up!

The Re-Farmer

Fixed

Last night, my younger daughter was able to crawl under the kitchen sink and get it fixed. Yay!

This the old stuff she removed.

What a mess! Just disintegrated!

The sink the pieces are in was much like this when she fixed it our first spring here.

The new drain kit is very different. The cup is deeper, and it has a completely different stopper, both in how it fits in the drain, and aesthetic appearances. I didn’t see it until later, or I would have included it in the picture. It’s not standard at all, and I don’t recall seeing replacements of it anywhere. I’m thinking, if I ever do see a replacement stopper in that style, I’d better pick up some extras, just in case. I suspect they will be harder to find compared to the usual design. Still, I’m happy with the design. I think it actually works better than the standard ones.

I really appreciate that my younger daughter is up to being our plumber for jobs like this. She’s the most able bodied in our household! I might be able to get under the sink if I really had to, but I’d probably need someone to help me get back up again. I’m much better suited to doing the outdoor stuff! :-D

The Re-Farmer

It works!

Here’s hoping it stays working.

Today, we finally had a chance to test out the washing machine as the appliance guy described.

And by “we”, I mean mostly my younger daughter, who pulled out the dryer so she could get to the back of the washing machine, pausing first to remove the broken flexible drier hose and getting the new one ready. With me as the person to pass her tools, she popped the back panel off the washing machine to find the air hose he described.

Which is when we discovered that when he said “back panel”, he meant the small back panel of the electronics at the top, not the large back panel of the machine.

The small panel took a lot more effort to get off. We ended up having to pry it off with a butter knife. !!

His instructions were to blow into the air hose (which turned out to be MUCH smaller than I expected) to make sure it wasn’t clogged. My daughter figured out where the end of the hose was, how to get it off, and tested it.

While we manually pumped water out of the tub, we couldn’t quite get all of it, so when she blew on the hose, we could hear air bubbles in the tub.

Which was good. It meant the hose wasn’t clogged.

That meant the next step was to do an empty wash cycle. After everything was put back together, we plugged the washer in and started the empty test load.

After we taped the spare sump pump hose to the end of the washer’s drain hose, running it out the window of the storm door. We still weren’t sure about the drain pipe in the wall being unclogged enough to not spray water all over the place again.

One of our other concerns was the washer’s tub. It was still lower than it should have been, and I was concerned something got broken under it. My daughter pointed out that it did still have water in it, so that was likely why it was lower.

With nothing in the tub, the timer set itself for only 35 minutes. She and I both stayed and watched through the window in the lid, her behind the machine and me in front of it, for the whole time.

I gotta tell ya, we were just thrilled when the washing machine actually stopped adding water when it was a few inches deep, just as the appliance guy said it should, and again when it finally reached the rinse cycle and actually drained properly, with no leaks in the cobbled together hoses leading outside.

Part way through, my older daughter came by to see if she could help. I got her to fill a container of water so we could test the drain pipe. It seemed fine, but with the washing machine going, we couldn’t be sure things weren’t gurgling further down the pipe.

Once the washer was done, with everything working fine and even the tub lifting itself up as high as it normally does, we tested the drain pipe again. This time, while my daughter poured the water down the drain as fast as the funnel would let her, I had my head in the kitchen sink, listening to the pipes.

Normally, we’d be hearing all sorts of gurgles. We always have. This time, I heard nothing.

Just to be on the safe side, though, we used the last of the Max Gel drain de-clogger, both in the kitchen sink and the drain pipe. While that was left to sit for half an hour, my daughter and I pushed the washer back into place, then she started working on the dryer hose.

She was able to get it on the fitting in the wall easily enough, but the one coming out the dryer is slightly larger. The hose is held in place with an iron spring clamp. I was expecting a screw clamp. The spring clam is such a pain! It took her almost an hour to get it on. It simply did not want to fit around the pipe from the drier, and the hose, at the same time.

While she fought with that, I waited on the drain cleaner, (and kept an eye on a roast in the oven) and boiled up a kettle of water to flush them both with. Usually we just run hot water, but the kitchen sink is far from the hot water tank and takes forever to get hot. Once the drains got their boiling water treatment, I ran the hot water in one sink, listening to the drain in the other.

Not a gurgle to be heard.

I honestly think we got finally got the pipes clear.

After all the troubles we’ve been having, though, we aren’t confident.

My daughters had to do some laundry, so as soon as the dryer hose was finally attached, they decided to give it a go. While the washing machine tub seems to be behaving properly, they’re still going to do a couple of small loads, instead of one big one – and the washing machine’s drain hose is still set up to drain outside!

The problem with the drain hose is that the only way we can be sure if it’s clear enough is to actually let the washing machine drain through it. There’s nothing else we have that can push that much water, under that much pressure, though the drain pipe. If it does start backing up again, we’ll end up with the same mess all over again.

For now, we’re going to baby the darn thing, with small loads, until we’re sure the tub can handle the weight before increasing it.

Then we’ll test out the pipes.

The Re-Farmer

Progress: sun room door and cat kibble shelter

There was quite a crowd of kitties this morning!

There are 12 cats in this picture. Happily, Rolando Moon is still hanging around, busily hissing at any cat that comes near. We haven’t seen Creamsicle in a while, though. I hope he is all right.

The cat butt sticking out of the entry is a hoot. That is Rosencrantz’s baby, and she seems to be the shiest of the bunch.

As you can see by the frozen blocks of ice, artistically embedded with leaves, it’s been getting a bit cold out at night! It did warm up a few degrees above freezing. Not good for paint, but it had to be done.

I can now officially say that replacing the door on the sun room is DONE!! I just came in from outside a little while ago, and the paint was dry enough I could close the door. What’s supposed to be blue is now blue, what’s supposed to be white is now white, and nary the twain shall have contact with each other!

Yaaah!!

No, I didn’t take pictures. I’m am tired of taking pictures of that door! :-D

The next project is the shelter for the cat food. It will be placed about where the kibble containers currently are. I want to position it so that it will also provide extra shelter for the entrance to the cat house. The heated water bowl can be plugged in, inside, but the bowl has to be outside, since there’s no way I’m going to be lifting that roof every morning to refill their water. ;-) The shelter for the food containers will help keep the snow off the water bowl, too.

It took a couple of hours, but I got the end pieces of the frame done.

Working with this wood we salvaged from the barn has been a challenge. Nothing is even, so about the only thing I can measure is length. After that, I basically just made sure all the pieces matched and lined up. Not being able to just take measurements meant I had to get creative in lining up the pilot holes. Just making the pilot holes was an issue! My drill bits that were the right diameter for the pilot holes are just barely long enough to drill through the wood. I went hunting in the basement and the garage and, while I did find longer drill bits, they were all too large.

Thankfully, the bits I did have were long enough that, after drilling the pilot holes in one piece, I could position them on the other piece, “drill” though the pilot holes again, and make a mark on the other piece.

It worked most of the time. With the uneven wood, there were a couple of spots where the bit just wasn’t long enough to leave a mark.

Once I’d marked the pieces, I could drill more pilot holes, then screw them together.

When we used this wood to make the goat catcher, I had 3 inch screws, and only used two per corner. This was meant to be temporary, but I still didn’t expect it to be so wonky, it would end up bending and breaking the screws! So this time, I got 3 1/3 inch screws, and there’s 4 in each corner.

That thing is solid!

I started by attaching the 2 ft cross piece on the bottoms. The first corner was screwed together manually. Even with the pilot holes, it was not easy – and with arthritis in my wrists and fingers, rather painful. Our new drill isn’t a quick release type, and I didn’t want to be switching from drill bit to screwdriver tip, over and over, so I decided to use an old drill that we “inherited” to put in the screws.

That worked much faster!

Once the cross pieces were in, I got out a tape measure and figured out how much of an overhang I wanted on the roof supports. I decided to make the roof supports 3 1/2 feet long.

Lining those up at an angle was a pain in the butt! Once again, it was more about making sure the pieces matched, because there was no way I was going to be able to take usable measurements. I managed to get them lined up and the pilot holes done. By the time I was putting in the last set of screws, though, the drill was starting to complain, so I set them as far as I could before the drill started having a hard time, planning to screw them the rest of the way by hand.

When I took the screw driver tip off the drill, I realized I was seeing smoke coming out of the drill!! I remember that happening when we used it before. This old thing overheats very quickly!

By then, it was getting too cold to keep working outside, so I will continue the rest tomorrow. Once I have the 6 foot horizontal supports in place, we can take some measurements for the floor and wall boards.

The good thing is, we’ll be using the scrap wood in the junk pile. They are a lot thinner. That means I can finally use the table saw, and do all the cutting at once. :-) Those will be nailed into place; in cleaning up the basement, we found an old ice cream bucket full of nails that are just the right size for this job.

We can also go hunting in the barn or sheds for something to use as a roof. The roof supports are 3 1/2 feet long, but I hope to be able to have a sheet that’s 4 ft. The roof will be the last thing put in place.

After that, it’ll be done for this year. It’ll need to be painted, but we’ll be using it right away, so that will wait until spring. The one exception might be the roof, depending on what we find to use for that.

I hope to get a lot more done tomorrow, but that will really depend on the weather! At least they’re no longer predicting snow flurries, but who knows what the day will actually bring!

That reminds me. We need to bring the sheets of rigid insulation stored in the garage, back to the house. We’ll have to find a better way to get the sheets for the sun room windows to stay in place, though. At least this winter, we won’t be keeping the doors to outside propped open for the cats to go in and out, now that they have their own heated house! :-)

Lots to do before winter sets in, that’s for sure! :-)

The Re-Farmer

Hanging rig, finished

So… I’m a suck. Especially when it comes to the cats.

But if you have been following this blog for a while, you knew that already. ;-)

While our basement maternity ward is certainly warmer than outside, when I checked on the mamas and babies earlier today, I noticed that the babies felt a bit chilly.

Therefore, on the principle of “put on a sweater, Mom is cold”, I decided to borrow and set up the upstairs heater at the end of the basement where the newborns are. Then, I had to stay in the basement, since it’s not supposed to be left on unattended.

Which gave me the opportunity to finish the hanging rig I’d whipped together when making cheese.

I had already done some basic sanding, as well as a bit of damage repair, a couple of days ago. Having picked up some more sandpaper yesterday, I could now finish the job.

The piece with the crack I’d glued was rough enough that I actually used a rasp we found while cleaning the basement, to get the roughest parts a bit smoother. I then spent the next couple of hours working my way through sandpaper grades until all the pieces were silky smooth.

The basement got nice and warm while I was doing that. The mamas and kitties seemed to be quite content with this. :-)

Then, because I had some, I rubbed the wood with mineral oil.

If I hadn’t had any, I would have eventually picked up some type of varnish, or maybe paint, to finish it with later.

In my rush to make the rig, I’d drilled a pilot hole in the cross piece a bit off. I was going to drill a new hole, lined up with the other side, but when I measured it, the new hole would have been just too close to the existing one. So I left it. I’ll just have one leg a bit off from the other.

The final step was to reassemble it, using wood glue at the ends of the side pieces to stabilize it.

Here are the before and after pictures.

It really doesn’t look a lot different, but trust me. It is! No possibility of getting splinters anymore, for starters. :-D I’m glad I happened to have the mineral oil to treat the wood. Once the glue has cured, it will be nice and solid, too.

We’re now all set for any future preserving we do that requires hanging a bag to drain. Plus, if we had to, we could even add a couple more cup hooks to hang up to three jelly bags or something, if needed.

I’m rather pleased with how it turned out.

It doesn’t take much to make me happy. :-)

The Re-Farmer

It’s finally done!

I am thrilled to say, the problem with our septic has been dealt with AND the pump itself still works! We’re still not sure why it stopped pumping completely. More on that later.

The whole job was much, much bigger than we expected.

Also, my brother is a saint. God bless him! I don’t know how we would have managed without his help!

Let’s back up a bit.

This is what we had to work with.

Continue reading

Fixing garden hoses

Today, I made a quick trip into town to pick up a new litter box for the sun room. Small as they are, 10 kittens and 1 little litter box isn’t working anymore! :-D

Since I was in town anyways, I stopped to pick up replacement hose connectors.

Garden hoses are among the things we’re finding lots of, all over the place, and they all suck! Last year we threw out a couple because they had so many holes in them. Why they were kept at all was a mystery! I’ve even found some in the barn, but they’ve been there so long, they’re actually brittle.

For the past while, we’ve been using 4 hoses that we’ve found. They all leak, but were still usable, for the most part. When I washed the gates in the garage in preparation for painting, I had to hook all 4 of them together to be able reach into the garage. One of the connections had started to spray so much, my daughter thought it was a sprinkler, at first!

We do need new hoses, but replacing them is low on the budget priority list. Especially since I want to replace them with heavy duty 50′ and 100′ hoses. Replacing the connectors, on the other hand, is much more affordable.

I picked up some inexpensive brass connectors. After testing the first pair of hoses, these are the ends that need replacing.

This was very much a “use the tools I got” project. I used pruning sheers to cut the old ends off.

I could really tell the difference between the quality of hoses while inserting the connectors! Yes, I did get the one on the right pushed in further. This involved slamming the end into the bench I was using as a work surface. LOL

Then I used the concrete step as a surface to hammer the grips into the hose.

When I tested it later, I discovered I accidentally hammered the female coupling into an oval, and had to hammer it back into shape. LOL

After finding these two no longer leaked, I tested the other pair of hoses.

This one was spraying so much, it reduced the water pressure when using it. Which was a problem when we had it hooked up to the back tap and were using it with a sprinkler to water the raspberries I’d transplanted. :-D

Fixing this turned out to have an unexpected problem. This is a heavier duty hose than any of the others, and the inner circumference was much smaller. I wasn’t able to stretch it enough to insert the connector. I could stretch it quite a bit with the tools I had, so I knew I could get the connector in, but it didn’t stay stretched. Which is good for a hose, but not good for what I was trying to do! :-D

Through a combination of careful snips with the pruning sheers and some spray lubricant, I was able to get it in. Not far enough for the grips to catch all of the hose, though. I eventually thought of using a small box cutter to make a couple more surgical incisions in the outer layer of the hose, which allowed it to stretch enough that I could push (well… slam, repeatedly…) the connector in further. I had my doubts whether it would work or not, so I tested it right away.

Yes!!! It worked! No more spraying. Not even a little leak.

The other hose it’s attached to was not leaking… yet.

It had several cracks like this at one end, so I cut off about two feet of hose, then attached the connector.

While not as heavy duty as the one I’d just finished, this one also had an inner lining that made it too a bit small for the connector. This time, however, I had my skinny little box cutter handy, and I was able to shave some of the inner liner off at the end. Between that and the spray lubricant, I was able to get the connector in and finish the job.

I wish I’d thought of that with the previous hose. It would have been a lot easier to do, if I had!

We do still need to replace the hoses, but for less than $15, I’ve added years to their usability.

It also means that I can leave the water tap on, and not be wasting water from all the drips and spraying.

Once done, I was glad to get inside again. While I did the work in the shade, the testing was done in full sun. We’ve hit 28C today, and it’s supposed to stay hot like this for the next couple of weeks.

At times like this, I quite appreciate how cool the main floor of the house stays.

The Re-Farmer

New range hood – part 2

Yes!! It’s done!

My darling brother happened to need to come out here for other things, so he was able to take a look at the wiring, and we got it done.

No more exposed wires, and now the entire stove top is lit up. The light even has 3 brightness settings, so we’ll have to pick up a dimmable bulb, so there won’t be any flicker.

The fan also has a variable speed adjusting knob; the previous one had a switch for fast or slow.

Also, here is the mystery wire that perplexed us.

I had a hard time even describing this extra piece of wires. It’s just… a piece. Of wire.

Why was it there?

My brother, once he saw it, was able to tell me.

It’s an extension.

I don’t know when work was done on the old fan, but at some point, the wires from the fan no longer reached the wires from the wall, and this piece was added. It’s about 6 inches longer than was needed, too.

Meanwhile, we tested the wires to ensure hot was hot, neutral was neutral, and we had the right voltage. Going through all the safety checks and precautions took longer then hooking the wires together. We don’t cut corners with that. Then it was just a matter of attaching the ground to where it belongs, applying a bit of anti-oxidant cream (also, it was confirmed that the new range hood wires were tinned copper – thanks, 53old!) and using marrettes to twist the ends together.

It just blows me away that there was that big nest of exposed wires before, when it should have just been two connections and a ground, covered.

So glad this is done!

And we can even keep this one clean.

Ah, the things I’ve come to appreciate since moving here… :-D

The Re-Farmer

Fixing the garage door

With the snow starting to show up, I had no excuses.

Time to fix the garage door.

Back in April, the old handle on the door simply fell off.

20180427handle

It wasn’t the original handle to begin with.  I have no idea what was holding it in place, really, since there were no screws.  Just the bar running through.  There had to be something inside the handle, but I never found the pieces.

We were in no hurry to fix it, since leaving the door open was so handy, though we didn’t expect to have to deal with cows getting in. :-D

I got a new handle, but on taking things apart on the inside, found the old cable ends to be quite frayed, and I wouldn’t be able to thread the end through the inner handle again.  So I got new cables, too.

Then the parts and pieces just stayed in the garage, managing to not get lost after being tossed about, including when a cow knocked into the bin they were on.  Thankfully, things fell INTO the bin, and not onto the dirt floor. :-D

So here is the fix I did today.

20180924.garage.door.fix.1

Here is the latch end, with the old cable still attached.  This end wasn’t as frayed as the others.

And… I just realized, that’s a dead spider in the old web above it.

Ew.

20180924.garage.door.fix.2

This is the underside of the inside mechanism that the handle attaches to and opens the door.  I have threaded a new cable through it.  The new cables came with loops on one end, as you can see in the photo.

The non-loop end of this cable was later affixed to the door on the side opposite of the latch.

20180924.garage.door.fix.3

Here is the assembled door handle mechanism, which took some doing to get right – including reversing things from the first time I put it together, because I couldn’t remember which way that washer was supposed to go.

The door handle came with wood screws, so I had also picked up nuts and bolts to use instead.

That special washer is essential to how this works.  Without it, the squared post of the handle would just spin in place.  That washer ensures the entire plate turns, pulling the cable, which in turn pulls the latch on the side of the door.  You wouldn’t believe how many times that thing almost got lost!  And I have no idea where we would have found another, if it had disappeared.

20180924.garage.door.fix.4

Here is the latched door, with the new cable.

(The dead spider is gone…)

When the door closes, the latch catches on the plate, but as you can see, there’s not a lot catching!  This was an issue before the door handle broke.  When closing the door, we often had to slam it several times before the vibration moved the latch far enough out to catch on the plate.

At one point, after assembling it all, but not tying off the new cables completely yet, I tested the door by closing it from the outside.

Then I couldn’t open it.

The cables had loosened when I shut it, resulting to so much slack, turning the handle did nothing but wiggle them!

It’s a good thing there are other ways into the garage!

There needed to be at least some slack on the cable, though.  Without it, the cable prevented the latch from springing back far enough to catch on the plate at all.

20180924.garage.door.fix.5

The old cables were kept in place with knots.  The new cables came with S hooks, so I used both of them, facing opposite directions, to attach the two cables together.  I figure that, this way, even if one fell of, the other wouldn’t.  And it would still be easy to remove the cables if needed at some point.

The door now opens from the inside with a quick twist of the plate.

20180924.garage.door.fix.6

The new handle came with a lock and two keys.  I can’t imagine bothering to lock it, since there are two other ways to get in that have no locks (or even door knobs), so it’s not like it would solve any security issues.  But I guess it’s good to have.  So long as we don’t loose track of the keys!

Another thing off the list of stuff to get done before winter. :-)

20180924.garage.door.fix.7

That was a much dirtier job than I expected it to be! :-D

The Re-Farmer

Building the new back gate

Today we picked up some fence wire to make a new gate for our second driveway.

The wire we got was 1 inch mesh, in a roll of 36″ x 25′  I was pleased to see the hardware store had 1 inch mesh in stock. When I price checked it a while back, the largest they had was 3/4 inch mesh.  I would have preferred something like a 2 inch mesh, but this will do just fine.

My younger daughter and I then went out to the back gate to replace the old barbed wire gate.

20180801.old.gate

When we moved out here, the gate was open and we had no idea that it was in such bad condition.  When the girls went over to close the gate, they had to replace the post at the end (the lock and chain around it is the only thing keeping it closed) and salvage the wire as much as they could with what was there.

We salvaged the posts for the new gate, cutting down the round one at the end so that it was the same length as the middle ones.

In the process of working on it, I made sure to gather up and set aside the old barbed wire from the gate.

20180801.old.gate.wire

It’s amazing how much rusty barbed wire just disappears in the grass.  There were a couple of times when, even though I knew the wire was there, I still managed to catch it with a shoe, or almost step on it.

Keep that particular detail in mind for later…

On to the new gate!

20180801.new.gate.1

The first thing we did was lay out the wire and position the posts more or less where they needed to be, while using other posts I’d brought, just in case we couldn’t salvage the old ones, as weights to keep the wire from rolling itself back up again. :-D

20180801.new.gate.2

For the end post, we first affixed the end of the mesh to the post with U nails, then wrapped the wire around the post and affixed it again, opposite the first U nails.  Since this post will see the most movement, the wire needs to be secured the strongest here.

20180801.new.gate.3

Once the first post was secured, we slid the next two posts under the wire, making sure their bottoms lined up with the bottom of the first post.  Then, after making sure the wire mesh was pulled taut again, the wire was affixed with more U nails.

20180801.new.gate.4

Next, the gate was put in position and the mesh affixed to the gate post.

The main gate post on the right has a barbed wire loop at the bottom that the first post tucks into.  A second barbed wire loop at the top was then tucked over the top of the post to hold it in place.  You can’t see it, but the chain is hanging down from that wire loop, as it had been threaded through one of the links when the chain was added.

You can see my daughter at the other end, securing the wire mesh to the opposite gate post with more U nails.  The posts in the gate itself each has 3 U nails securing them, but at the end, the mesh is secured with 5 U nails.

20180801.new.gate.5

The space between gate posts is about 22 feet.  Once the mesh was secured, wire cutters were used to remove the last 3 feet or so of mesh.

20180801.new.gate.6

The chain fits through the mesh, which worked out perfectly.

The barbed wire loop at the top was replaced with the wire that was wrapped around the mesh roll, to keep it from unraveling.  It is the same type of wire the mesh itself is made of, but was long enough that we could fold it in half, twist it around itself, fold it in half again, then twist it around itself again (something I do with string or yarn to make cord when crafting).  The loop itself is secured to the gate post with a U nail as well.

Yay!  The gate is finished, and it looks SO much better than barbed wire!

That done, my daughter headed back to the house to put away the tools and supplies, except for the hand saw and anvil shears I’d brought to clean up some of the self sown saplings that were starting to encroach.

Remember what I said about barbed wire, disappearing in the grass?

Well, this was next to the gate.

20180801.barbed.wire.trap.1

The old gate had been on top of this pile of posts and barbed wire (and an ant hill).  My daughters referred to this as the barbed wire trap!  We’ve already had the renter’s cows end up on this side of the fence once (and as bad as the old gate was, it was enough to keep them from ending up on the road, so it still did the job. :-) ), and it’s always possible it will happen again.  I don’t want any cows getting hurt in barbed wired, so I figured I’d take some of the loose wire and pull it out to add to the pile of junk we plan to get hauled away later in the year.

I grabbed some of the wire and pulled…

… and pulled…

… and pulled…

Before I knew it, I was pulling up the wire from an old fence line, long since collapsed.  Since I had already started pulling the wire up, I couldn’t even stop, since lifting it made it that much more of a hazard.

Every now and then, I’d reach a fence post and try to lift it up, only to have the wood disintegrate in my hands.  On some of them, the bared wire was attached to the post with nothing but bail twine. ???

Now, the thing about barbed wire fences is, they never have just one line.  There’s usually three.  Which meant there were at least two more barbed wire lines, hidden in the grass.

About half way down the row of trees, I found myself pulling up two wires at once, because they were stuck to each other in places.  Then one of them ended abruptly, while the first one continued…

… and continued.

When I finally reached the end of the row of trees, at a large willow, I saw the remains of what turned out to be the last post of the fence line (I hope!).  I pulled it up, but the wires attached to were basically all broken off a couple of feet away.  I tucked the post itself against the willow.  I did find some ends and started pulling them up.  Once they were clear of the tall grass and old thatch (that area needs a controlled burn, big time!), I started working my way back, rolling up the wire as I went along, eventually adding in the second line as I found it again.

When I got back to the area of posts in the picture above, it was all pretty tangled together, so I tried lifting the post that looked like it was the furthest out in the line and began pulling on it.

As near as I can make out, the pile of posts were the remains of another barbed wire gate.  But why would there be two of them?  I’m thinking maybe an old gate was replaced with a newer gate, and rather than getting rid of the old one, it was just tossed aside at the fence line.  Then when the fence line collapsed, the old gate came down with it.

But that’s just a guess on my part.

I did, however, find the third wire of the fence!

So back I went down the row of trees, pulling up the third wire until it ended.  Which was about 2/3rds of the way down the row of trees.  Which means there’s probably more of it under the grass somewhere along the way.

Once I found the end, I worked my way back to the gate again, rolling it up as I went along.

This is where the fence line was.

20180801.barbed.wire.trap.2

The tip of the arrow at the back is pointing to the willow the fence line stopped at.

My guess is that, when the row of trees was planted along the fence that’s still there, this fence line was added to protect the plantings from cattle.  Since then, the current fence line was kept up, since the land is being rented out for grazing on the other side, but the inner fence was allowed to just rot away and collapse. [Update: I have since learned that I got this backwards.  It turns out that the collapsed fence is the original one, and it has been there for an estimated 40 years!]

Leaving barbed wire hidden in the grass for anyone, or any cow or deer, to step on, trip over or otherwise hurt themselves on.

Which just blows me away.

20180801.barbed.wire.trap.3

In the end, I couldn’t even get rid of the wire, because it’s all still attached to the main fence line.  I just didn’t have the tools for it.  So I moved the posts and the wire I rolled up into one, more obvious pile that I think even a cow will not bother getting into.

I hope!

After this, I cut away the spreading saplings on both sides of the area I’ve been mowing to the gate we just replaced, including clearing them away from the gate into the garden.

20180801.garden.gate

Notice that this gate has 5 lengths of barbed wire on it.

In the future, as I work my way around, clearing the yard’s fence line, I will eventually cut back that lilac to uncover the gate post it’s growing over.  I checked the area over as I cut away the saplings and it’s clear, so the next time I mow down this way, I will probably mow a path to this gate, too.  (I haven’t done that to the gate by the fire pit yet, as it seems to need some clearing, first; I’m not entirely sure what’s buried under the thatch and tall grass, but it’s very uneven.)

20180801.garden.gate.area

This is the corner created by the garden/yard fence line leading to the roadside fence line.  Though I will be clearing the fence lines themselves, I have not yet decided if I will also clear away these self-sown saplings.  It might be nice to just leave them be.  They’re not blocking anything.  I’ll leave them for now and decide what to do with them later, when we get to the point of working in the outer yard area.

It wasn’t until I was at the computer, uploading these photos, that I noticed this…

20180801.oops

I honestly don’t know what that happened!  I’ve got so many scratches from doing yard work, I don’t even notice them anymore.  :-D

The back gate is finally done.  One more thing to check off the list! :-D

The Re-Farmer