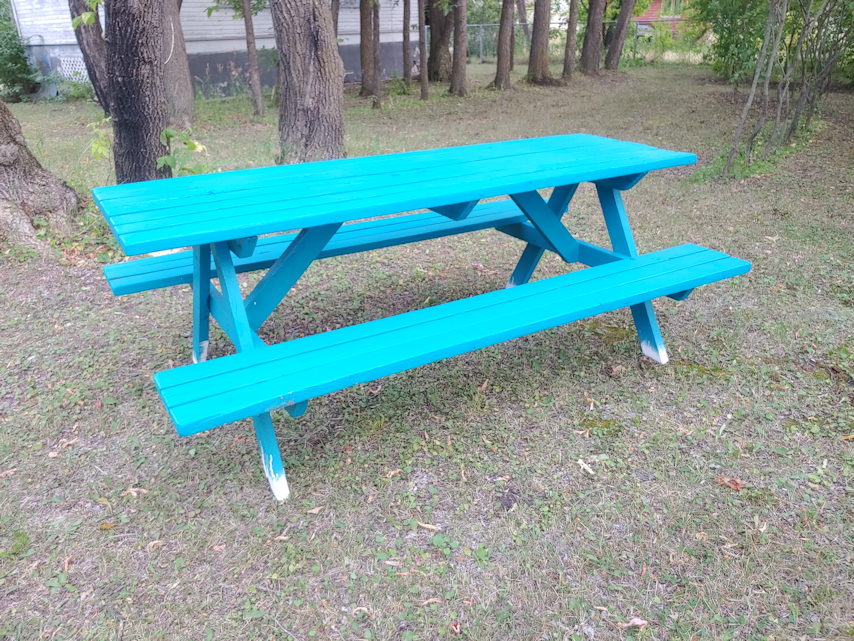
This morning, I touched up the scratches we found after we flipped the picnic table upright again. This evening, we moved it over by the fire pit.
It will probably be moved again, the next time we do a cookout and figure out where is the most useful place to position it in relation to the fire pit.
It practically glows! :-D I’m really happy with how it turned out, and look forward to using it at our next cook out!
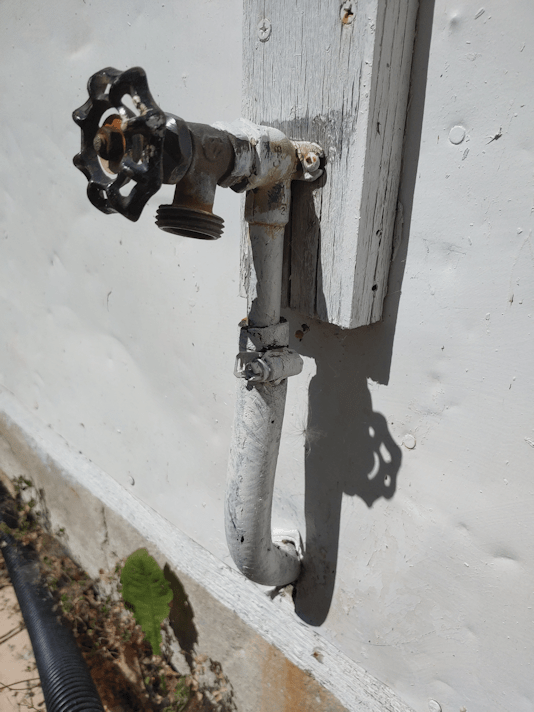
For the past while, whenever I’ve had the chance, I’ve been looking for what I might need to fix the front outside tap.
At first, it would spray water when we shut the water off, so we just left it on. It made it more convenient when using the hose, anyhow. Then, after the end of the hose broke off and I tried putting on another one, I found it had started spraying water all the time. So we’ve had to use the tap at the back of the house – and almost 300 ft of hose – leaving the front one shut off in the basement.
I figured I just needed to replace the O ring (or whatever this type of seal is properly called) inside the tap, but do you think I could find one? I was also looking for replacement taps, since I thought that might be easier (and I figured it was due to be replaced, anyhow), but I couldn’t find those, either. I wasn’t even sure what section of various stores to look in. The closest I could find to what we had were laundry taps, and any ring seals I saw were not for inside the tap itself, but for the couplings.
I needed to go to town today, so I remembered to take a photo of the tap before I left. Once at the hardware store, I just showed it to an employee, explained the problem, and asked him where I might find what I needed.
Of course, he needed to know where it was leaking from, which was right at where it turns on and off.
Well, it turns out there’s a reason I couldn’t find what I was looking for.
They don’t carry that type of seal.
In the end, it was easier to just replace it!
Also, the new taps were, indeed, in the plumbing section (not the gardening or laundry sections, where I had also looked), but not where I had been looking. According to the label, the tap is designed for boilers. :-D
Once back at home, I dug up some thread tape and headed out to replace the old tap. The old tap was painted over a bit, but nothing a wrench couldn’t get loose.
On screwing in the new tap, however, I found an unexpected problem.
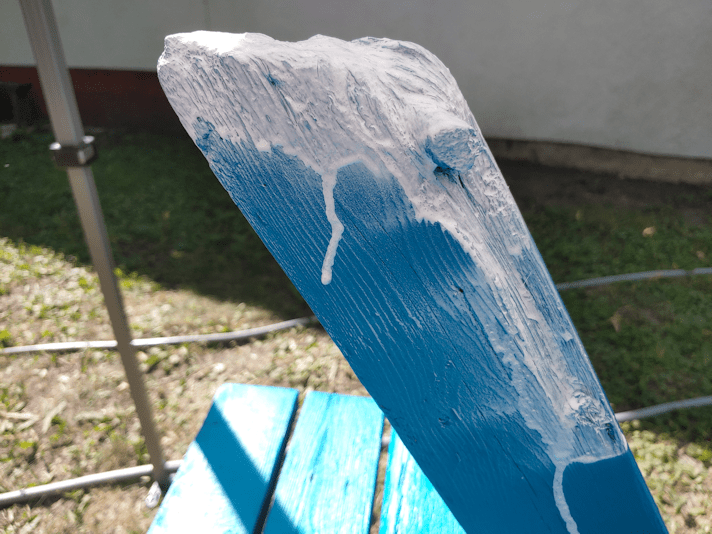
This is the new tap, with the hose connector facing down. Notice how much of the threads are exposed? In the old tap, there was nothing like this!
It wasn’t actually screwed in tight in the above photo. I got a daughter to turn the water on in the basement to test it out, and I was happy to see it did not leak at all, but as I turned the tap on and off, the whole thing would turn and wiggle even looser.
For the tap to be on good and tight, we get this.
All it took was a quarter turn to tighten it, but it would go no further.
It’s a flexible hose coming through the wall, so we could move that board the tap is affixed to, if we wanted, and reposition it to the side. I don’t really want to put new holes in the wall, then have to seal the old holes, get paint to touch up the wall (the house was painted the summer before we moved in, but we don’t have any leftover paint from that), and end up with a tap that’s lower and harder to reach to screw the hose into.
So we’ll just leave it like this, with the hose sticking out sideways. :-)
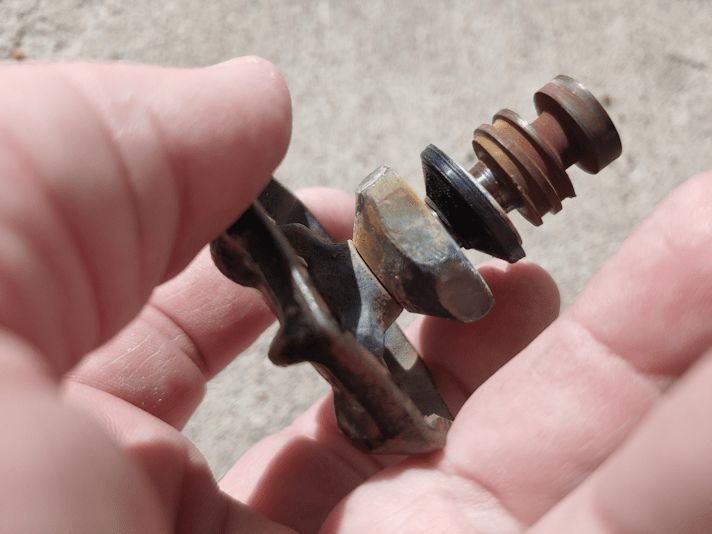
Of course, I had to open up the old tap to see how bad the seal was inside.
It…
…looks perfectly fine!
The seal is still flexible, and nothing is cracked or broken.
I have no idea why this tap started spraying water like it did, where it did!
So I’ve kept it.
In the end, I’m happy with the new tap. I like the triangular design over the round one, as it can be gripped more easily and securely. Especially with wet hands.
So now we have front and back hoses again!
We might need to get another hose for the front, though. I looked for something to fix the hose that broke, but everything I could see would require me to cut off the metal reinforced end. I might just wait for the fall sales and pick up another one, instead.
Over the past while, I’ve been adding another coat of Plasi Dip to the ends of the picnic table legs. I stopped adding more coats yesterday, but have continued to spray the cracks in the rain barrel. Basically, I plan to empty that can on those. :-D
This is about 5 or 6 coats. I lost track of how many, exactly. When I took the picture, it had at least 24 hours to cure since the final coat. It looks like it will do the job just fine, and help extend the life of the picnic table.
Earlier today, a daughter and I flipped the picnic table right side up, then checked the surface. Sure enough, there was a bit of damage. Some paint had come off when the bird feeder had been put on top of it – both surfaces hadn’t quite cured yet, and the feeder stuck to the table.
While upside down, the table was on the chimney inserts I’d used to raise it off the ground while painting. There were a few scratches from those, as well as dirt. My daughter hosed it off and scrubbed where needed.
Tomorrow, the bits of damage will get touched up before we move it to somewhere near the fire pit.
For something that is too far gone to repair, this should last quite a bit longer now. As long and nothing actually breaks. :-D
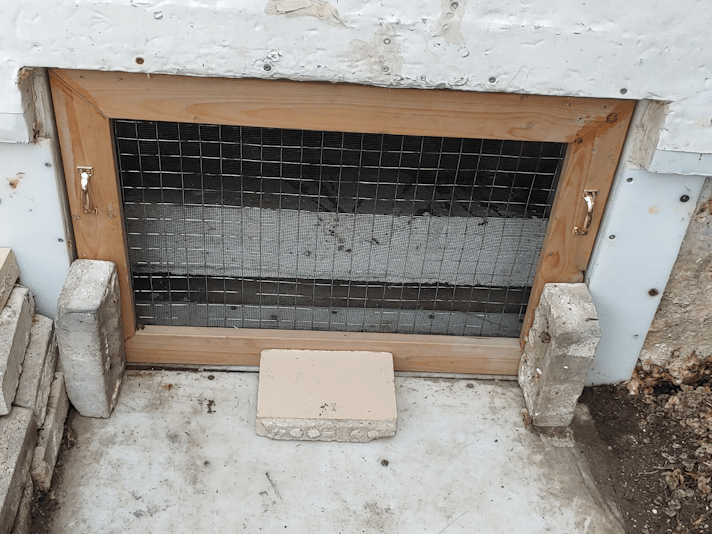
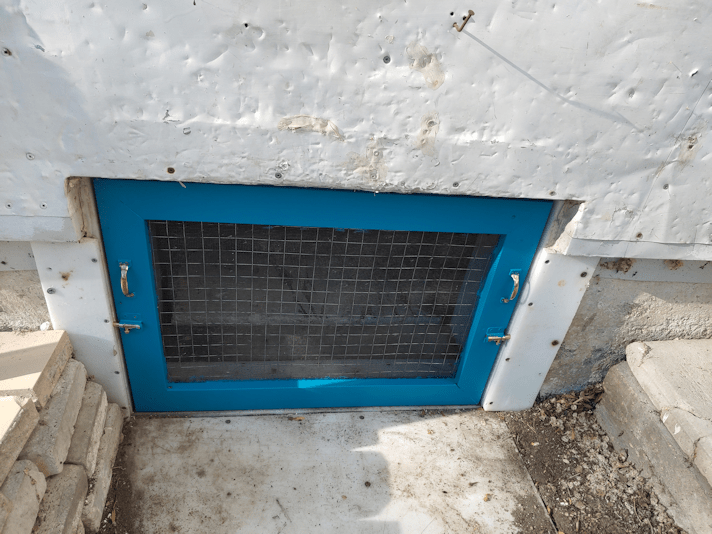
After several coats on of paint on the outside, and one on the inside, the screened window for the old basement is now fully cured and back where it belongs!
It’s one thing to have that bright blue on something that is in the yard. Quite another to have it on something that is part of the house! Even the blue replacement door is a dark blue, so not quite as jarring.
I think it looks rather nice against the white. :-)
This morning, I applied the first coat of spray-on rubber to the legs of the picnic table, and the cracks on the rain barrel.
This is the product I am using.
I have never used this stuff, or this brand, before. It was the only one on the shelf, so it’s not like I had a choice of brands or product versions. I think it will work just fine.
The first time we used a product like this, it was a can of liquid rubber deep enough to dip things directly onto. Like the handles of tools. Which is what we did at the time. Or it could be brushed onto a surface. The first time we tried a spray, it was basically the same product as an aerosol. My husband used it to coat the handle of one of his canes (made with aircraft grade aluminum, that could also be used for self defense), and to a cord wrapping he added to parts of his walker for extra support to hold the weight of the backpack he has hung on it. For the can, a dip version would have done a better job, but as a spray, it worked very well on the uneven surface created by the rope work. It’s still holding out, and it’s been about 5 years.
So that was basically what I was expecting. Black, spray on rubber.
Nope.
It’s white.
At least it looks white against the blue paint.
It’s also a lot lighter and thinner than I expected. Which I suppose is exactly what I need to fill in all those crevices. I added extra along the part where the most rotted wood had come off on the one leg.
I probably could have applied it more carefully to avoid drips, but there is no aesthetic requirement on this.
On the rain barrel, it looks a bit different. The barrel got sprayed both inside and out.
Here, you can see it has an almost blue tint to it. Depending on the angle, it looked a bit more purple than blue.
It should be interesting to see how it looks when it’s done.
How many layers we put on will depend on how well it coats. It requires at least 2 hours between coats. Depending on how often someone can get outside to add another coat, this may take a day or two! It then needs at least 4 hours of curing time after the final coat for the coated object can be used. Thankfully, these are not things we need to use, quickly.
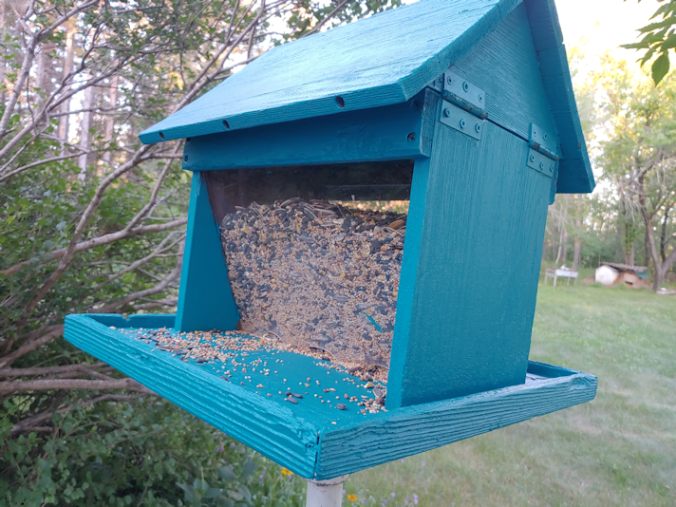
This evening, I remembered to grab a box of screws so I could get the newly painted bird feeder back up.
I did have an unexpected problem, though!
The feeder had been moved to the top of the picnic table, so that wire frame it was on could be used to hold the screen window from the basement for painting.
Either the feeder or the picnic table were not quite cured yet. The feeder was stuck!
In the photo below, you can actually see where some of the paint came off.
It’s the underside, though, so it doesn’t matter.
Meanwhile, the post mount now has 6 of the same type of screw holding it in place, instead of the two very different screws next to each other, like it was before! :-D
It’s up!
The post is actually narrower than the opening in the mount by a fair bit. Plus, I noticed the post, which is basically a steel pipe, is slightly squished. Which means the feeder wobbles. I’ll have to find something I can put around the top of the post to make up for that.
I did have to move one of the lilac branches and tuck it behind another one, to get it out of the feeder, as well as angle it to keep the one side clear. It holds a surprising amount of seed; I’m going to have to pick up more, if I want to keep adding bird seed to the other end of this flower bed, where the platform feeder and bird bath are.
I look forward to seeing how quickly the birds find it. :-)
When we first moved here, three winters ago, there was a bird feeder mounted on a metal post at the opposite end of the flower garden where we currently have the platform feeder.
One of the first things I noticed about it was that there was a rock sitting on one corner of the base. I quickly discovered why it was there, when I lifted the top to add birdseed.
The whole thing tipped over to one side.
The rock was a counterweight, so it wouldn’t tip when birds landed on it, or in the wind.
Eventually, I took a look and discovered that the feeder had a metal mounting that fit over the post, so it could easily be lifted off.
Also, there were only 2 screws on one side, holding it in place, and that’s why the feeder kept tipping. Rather than add more screws. someone just put on the rock.
I’d set it aside for cleaning and painting, and for the past two years, it’s been sitting upside down on the bench near the main entry. I just kept forgetting about it.
This evening, my daughter wanted to add a second coat of paint to the bottoms of the picnic table legs, so I went out with her. We’d made a dump run, and I needed to hose out the plastic bin we put the cat litter bags into until we do. As I was putting the cleaned bin back next to the bench, I saw the feeder and realized this was the perfect time to prep it for painting. I just needed to take the two screws out and remove the post mount, first.
Of course, they were two completely different types of screws, that needed different screwdrivers.
One of them was actually bent.
That would be from the bird feeder tipping! I’m surprised they weren’t both bent.
Here is the feeder, after hosing it down to get rid of debris.
And spider webs.
I don’t know how much the birds would have used it, considering it was basically surrounded by the lilac, plus the maple tree that was growing through the middle of the lilac at the time. I’ve since removed the maple and pruned the lilac, so the post is now clear enough that I think the birds will use it, once we put it back again.
I suspect being engulfed in greenery had a lot to do with the feeder being so covered in lichen.
I scrubbed it as best I could, though there are still some crevices the brush I was using couldn’t fit into.
Which is fine. We’ll just paint over it.
I noticed there were holes drilled into the base to allow water to drain off. Considering much much water collected from the hose while I scrubbed, I don’t think they’re enough. I might drill a few more before we paint it.
If I remember… ;-)
I then flipped it upside down to scrub the bottom, then let it dry.
I see absolutely no sign that this was ever painted.
Yeah, the wood is definitely showing signs of rot.
It’s still pretty solid, though. Once it’s painted and the mount is properly secured, it will probably last for many more years.
The plan for tomorrow will be to head into the city for the rest of our monthly shop. Only one of my daughters will be coming along. I believe my other daughter is planning to do the first coat on the top of the picnic table while we are gone, when she takes a break from work. There should be plenty of paint to do the bird feeder, too.
I am also planning on painting the frame of the screened window I made for the old basement.
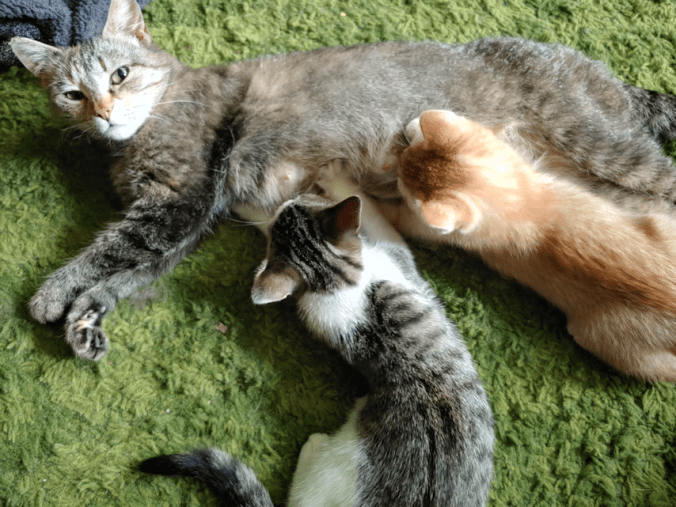
The kittens have taken to napping under the couch regularly. Beep Beep can just barely squeeze under there, herself. A little while ago, my daughter saw her squeeze part way there, then start wiggling oddly. Moments later, some sleepy kitties came out. She then flopped on the floor for them to nurse. She actually woke them up for lunch! :-D They’re more than old enough to be weaned, but it’s still great bonding time. :-)
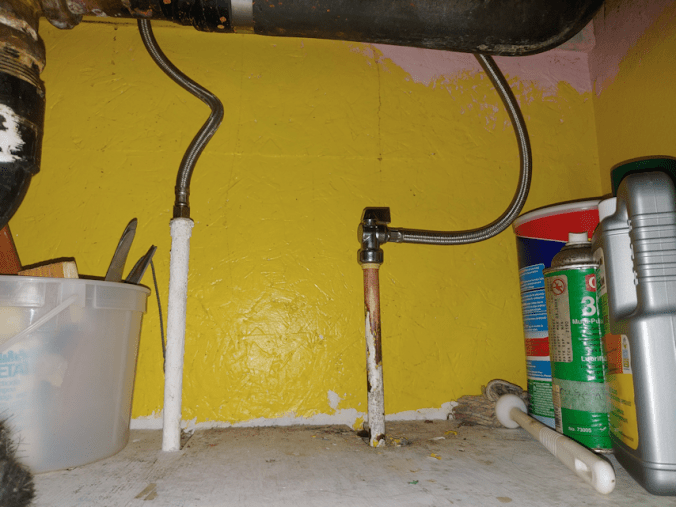
My daughter got the broken flexible pipe replaced. She did just the one for now.
The other has been left for now, partly to make sure the cold water is working fine and there are no leaks. With the hot water, there is at least a shut off valve at the hot water tank. When we replaced the tank shortly after moving here, the plumber added one on for us. When it’s time to replace the other piece, only the hot water to the house will need to be shut off, and not all the water.
For some reason, the copper pipes are painted, including the end of the flexible hose. My daughter tells me the pipes to the old sink in the entry way, which now supply water to the washing machine, were also painted.
Why paint copper??
As for me, I headed outside for a last bit of mowing.
That’s 4 days of mowing, now, and I’m skipping some places!
I did do an extra bit, though.
I mowed a path to and around the old Farm Hand tractor. Next, we’ll be going in there with the weed trimmer. Once we can access the tractor, we need to cut away the trees that are growing through it. We aren’t able to maintain the tractor itself, but we can at least prevent some types of damage to it!
For the last couple of summers, I’d been able to keep an area to the back gate mowed, large enough to drive through. This year, between the rain and the heat, I just never made it that far.
Today, after mowing the area in front of the storage shed, I decided to mow a path to the back gate. It’s our “emergency exit”, so I don’t want to leave it entirely.
A path, however, is all I was up to!
I cranked the mower up as high as it can go – which is higher than the riding mower can go – and only managed a path twice the width of the mower itself. I actually took 8 passes, just to get it as good as this! The first pass, I had the front wheels up almost the whole way, just to get the height down enough to not choke out the mower.
My daughter suggested it would probably be easier to use the old scythe in the garden shed, instead of a mower, for this stuff! She’s probably right. This is hay that’s being cut! Heck, if we had the equipment (well… working equipment), we could probably get a couple of large round bales just in this section! :-D
I’m hoping to at least keep up a path to the back gate. I don’t expect to make the wide “driveway” I’d kept clear last year. I’d hoped to do more, since the area becomes quite the fire hazard, but we just can’t keep up with it all. More time is being spent on the lawn than anything else right now. As much as I love mowing the lawn, there are other things that need to get done! Ultimately, the goal is to have less lawn, with trees in some areas, and raised garden beds in others. Maybe even a greenhouse or two. Other areas, I hope to replace the grass with moss.
Until then, though, there’s an awful lot of grass to cut!
One of the things that is quite visible when the grass is tall, is a path through the grass, worn down by cats, leading from the yard to under the storage shed. While I was working on the path to the back gate, and was turning to make another pass, I noticed Junk Pile cat, sitting in the newly mowed grass in the shade of the shed, watching me. I think her kittens might be under there. When I told my daughter about it, she said she saw them this morning! Junk Pile cat had brought them to the house for food. :-)
I look forward to seeing them more often and, hopefully, being able to socialize them at least a bit. And their mom, too!
Of course, I looked around at anything I could see to try and figure out why it stopped. The only thing I couldn’t do is look under it, because we can’t see under there without lifting it or removing things, and it’s too heavy to lift more than a corner. It’s not something we can just pick up at one end/side and tilt, either, due to the design.
So I pushed it into the garage and left it. The plan for mowing still involves using the push mower to get into areas the riding mower can’t, so I saw no issue with letting it wait until the end of the month, when we were already planning to take it in for some general TLC.
Then I got an email from my brother. He had needed to pick up a ball hitch, so he’d bought an extra one for out riding mower. This way, we can use it to pull the trailer, when that’s all fixed up.
In my response, I mentioned what happened with the riding mower.
Well, my brother – being the awesome person that he is – decided to pop over today. They were already on the way when my SIL phoned us to let us know they’d be going straight to the garage, and not going to the house (practicing physical distancing for my husband’s health), to install the ball hitch and check out the riding mower.
By the time I realized they were here and joined my brother at the garage, he was already done installing the ball hitch. He had also given the mower a once over, and couldn’t see anything wrong. Since I was there, he asked me to give it a try, while he watched. So I pushed it out of the garage, first, then tried starting it.
It wouldn’t start.
Then my brother noticed I forgot to turn the shut off valve on the fuel line. :-D He turned it for me.
Which is when he saw it.
The wheel was almost off the axle!!!
The back wheels are held in place by a bolt that runs through the axle, like a pin. We had to look at the other side to even remember what it was supposed to look like.
We propped the corner of the mower up on whatever we could find to support the weight, and my brother managed to hammer the wheel back on. Then he tried to make sure that the holes were still lined up.
They were, but the narrow screw he was using to check, couldn’t go through.
This was the culprit.
This was still stuck inside.
So, somewhere in our lawn, is the head of a bolt, and a nut, still on the other end of the bolt.
After much scrounging in the garage by all of us, my brother found another nut and bolt the right size, and got it on.
Once that was all fixed, he got me to test it out again.
The mower runs fine now.
Basically, once the wheel got loose, the mower acted as if it were in neutral, regardless of what gear it was in. When I stopped the mower to talk to my daughter, my getting on and off of it must have loosened the wheel just enough to trigger this.
Which is awesome, because if it didn’t have that fail safe, I would have kept on going right up until the wheel fell off, never realizing there was a problem. Just pushing it to the garage is probably why it was as far off the axle as it was. If my brother hadn’t picked up a hitch and decided to come over to install it, we likely would not have discovered it, until it fell off as we moved it around to load it into the van at the end of the month.
Neither of us had even thought to check the wheels as a reason the mower stopped moving. The only reason my brother spotted it at all, was because I’d forgotten about the shut off valve on the fuel line, and he turned it for me. That’s when he could see the bright, shiny, silver part of the axle that no longer had wheel over it. It I had turned it from my seated position, I wouldn’t have seen it. If it had been the other wheel, neither of us would have seen it.
Sometimes, it amazes me when so many tiny things line up like that.
The awesome thing is, my brother has once again saved the day! :-D The riding mower moves again.
I also got to see my SIL for the first time in way too long. She is allergic to cats, so we were planning to visit their place for a change, when the pandemic lockdowns started and all such plans went poof. So it was really, really great to be able to see them both. I just wish it could have been for longer!
And for just a visit, and not to fix yet another thing. :-D
Well, today ended up a bit going off plan, but we still got a couple of things off the to-do list for outside.
The main one being, the broken flexible hose for the sump pump has been replaced!
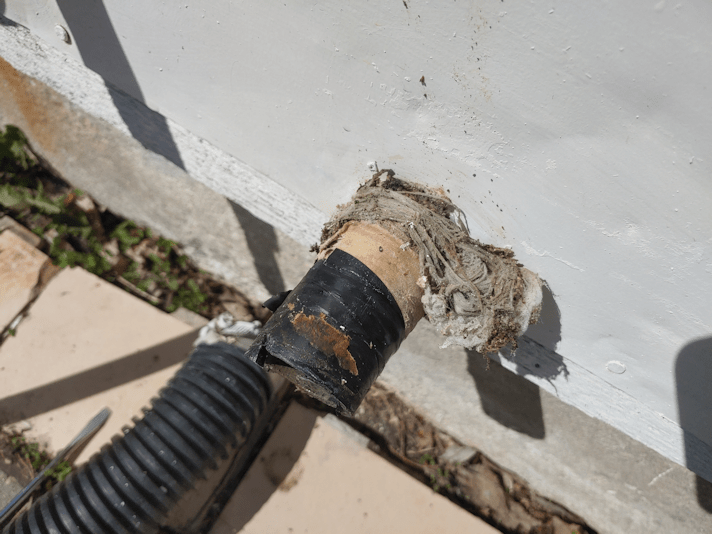
This is what the connection looked like, before I started.
After talking to my brother, I was confident there wouldn’t be any weird surprises when I took off the flexible hose.
The first order of business was to make sure the pump wouldn’t go off while I was working on it. The reservoir was pretty full, so I lifted the float to trigger the pump and let it drain before unplugging the pump.
My brother had suggested I might want to push the pipe from the inside, through the opening to maybe add a bit of length on the outside. The pipe is so snug in there, though, that it wouldn’t budge. Which told me I wouldn’t need to have one of my daughters in the basement to brace it while I was attaching things on the outside, at least!
Once I took the flexible hose off, I could see that the batting or whatever that is, and the rest of the hose, was wrapped in a thick later of electric tape.
I started taking that off and found…
… something that looked… almost like fabric? Canvas??
It turned out to be hockey tape. Several layers of it.
I got all the old tape and the batting-looking-stuff off and discovered…
… the end of the pipe had a big ole crack.
I guess that’s why it was taped so thoroughly, and why a larger hose was added over it.
I wonder. If the previous hose had indeed been wrecked by someone running over it with a lawn mower, it’s possible the hose was yanked hard enough to crack the pipe at this end, too.
I cut off the cracked part, which didn’t leave a whole lot of pipe sticking out the wall. I did try and push more through from the basement, but didn’t seem to accomplish anything.
The next thing to do was clean up the inside of the pipe, then use the connector piece the guy at the hardware store picked out for me, in case I needed to attach the two hose kits to each other.
Pushing the connector into the pipe did finally start moving the pipe through the opening – making it shorter, of course, but not enough that I couldn’t get it done. I brought out a hair drier to soften the plastic of the pipe, which made pushing the connector the rest of the way in much easier.
That didn’t quite work with the flexible hose part. I could get it through the flat part easily enough, but once the end started to go into the flexible rings, it just wouldn’t go any further.
So I tightened the clamps as it was. It really should be closer together, but I know the important parts of the connector are through to the flexible rings of the hose and, together with the clamp, that should be enough. We’ll just have to keep an eye on it, to see if it leaks. If it does, I should just need to tighten the clamps a bit more. I put a container under the connections, so if it does leak, I’ll be able to see water in the container.
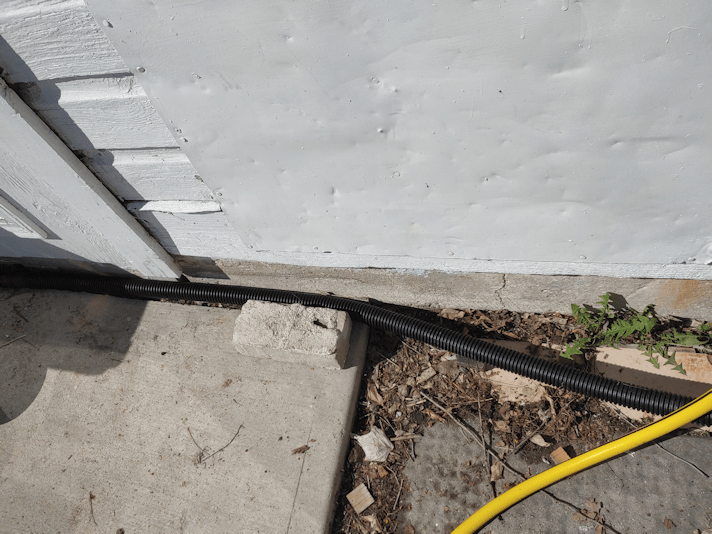
Next, I ran the hose down the side of the house.
There is adequate space along the house to tuck it under, so it won’t be in the way at all. It’s also being held in place by a shelf, garbage can and rain barrel along it’s length. The brick was just a little extra to hold it in place, closer to the pipe.
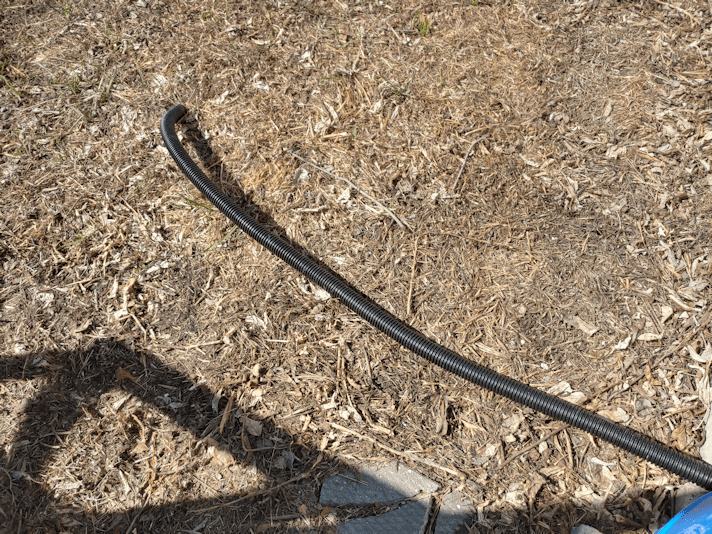
The hose reaches several feet into the old kitchen garden. I would have preferred an extra foot or two, but this should be fine. If we find it needs to be further from the sun room’s foundation, we can always get another connector and attach the hose from the spare kit onto it.
Once it was all done, the sump pump was plugged back in, but so far it hasn’t had to go off, yet. I’ll be sure to check on it, later today.
While I was working on this, the girls dragged the table saw out of the old shed we’d found the door in and brought it by the house. They plugged it in and turned it on and YES!!! It works!
It is currently sitting in the sun room. We won’t be able to work on the replacement door for the sun room today, as I’d planned. It likely won’t be worked on tomorrow, either.
Oh, I don’t think I’ve mentioned it here, yet. My husband got a call from the cardiac clinic in the city a couple of weeks ago. When they cancelled all appointments, they were looking to June for rescheduling. It seems they were no where near as busy with the Wuhan virus as they expected, and could start re-booking earlier. The appointment is early tomorrow afternoon, but he and I will be leaving in the late morning.
I have to figure out what to do after I drop him off, though, as I will not be allowed to go in with him, as normal. Which is frustrating, but whatever. Unfortunately, it’s not like I can find a coffee shop or something and hang out for more than an hour. My FIL actually lives nearby but, like where my mother lives, the building is locked down to visitors, since so many people living there are very high risk, including my FIL.
If I can find someplace free to park, maybe I’ll get some Pokemon Go in or something. :-/
Meanwhile, I have had to take it a bit easier today than I intended. It’s been a slightly worse pain day, and I don’t want to overdo it when I have what will likely be a long day, tomorrow.
For now, I think I’ll painkiller up and find something more sedentary to work on. :-/ Normally, I’d work on some crochet, but the pain is mostly in my arms and finger joints today, so that might not be possible.